1
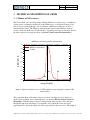
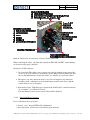
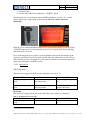
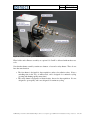
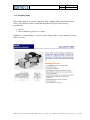
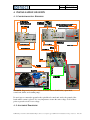
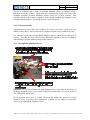
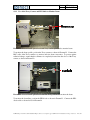
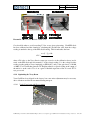
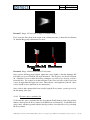
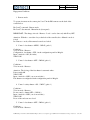
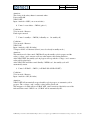
Version 005
Date
July 5, 2007
Remove the collimator tube from the GeniX head, and mount the X-ray camera at the output
of the collimator tube mount, as shown in FIGURE 22. With a BNC cable, connect the X-ray
camera to a monitor (not supplied by Xenocs). Also ensure that the X-ray camera is receiving
power. Loosen the lock screws that fix the alignment screws (see FIGURE 21).
FIGURE 26 : View of Bragg and tilt adjustment screws on GeniX optical head.
Place a radiation monitor near the junction of the X-ray camera and the GeniX, then ensure
that all radiation protection elements are in place (e.g. doors to X-ray hutch), then power up
the GeniX as described in § 3.2.2.6 or 3.2.2.7 (see page 21 ). Open the X-ray shutters (both
the safety and the fast shutters) and verify visually and audibly that the radiation monitor does
not detect an excessive dose of radiation. If so, verify that the end of the GeniX collimator
mount is completely inserted into the sleeve of the X-ray camera, as shown in FIGURE 22.
Consult you local radiation safety authorities if you have any questions about radiation safety.
If the radiation detector does not detect excessive radiation, you can defeat the appropriate
interlock using the expert mode key on the back of the GeniX (see § 3.2.1.4 on page 16), so
that you can access the GeniX in order to tune the optic. The first thing to do is to sweep the
radiation detector around the entire GeniX optical head, especially around the junction
between the GeniX collimator mount and the X-ray camera. Once you have verified that
there is no radiation leakage, you may begin tuning the optics, as described below.
A typical image of the X-ray beam is shown below in FIGURE 27. If you do not see an X-ray
beam, or see a much smaller beam than is shown below, turn the Bragg adjustments screws
(see FIGURE 26, above) to maximize the brightness of the beam in the image. Note that there
are two adjustment screws (push-pull system), so that one screw should be loosened and the
other tightened. Be meticulous in this step so that you can return to the original position if
need be (i.e. count revolutions of each screw). Sweep the Bragg angle around the original
position, and you should find the beam without difficulty. If not, contact Xenocs for help.
Z:\Marketing & Commercial\Produits\GeniX\procédures et description appareil\DDV-071107-installation and operation.doc 30 /38