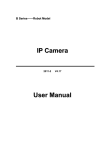
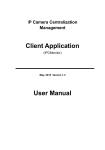
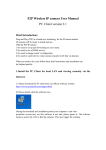
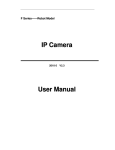
1
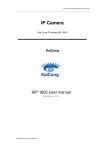
IP Camera Management
Client Application
(IPCMonitor)
User Manual
April, 2013
Version 1.01
http://www.avacomtech.com
INDEX
1
Introduction ...................................................................................................................... 3
2
Computer Requirements................................................................................................ 3
3
Installation........................................................................................................................ 4
4
Devices list....................................................................................................................... 5
4.1
Searching and Adding Cameras on the LAN............................................... 6
4.2
Adding Cameras .............................................................................................. 7
4.3
Modifying Camera information ....................................................................... 8
4.4
Deleting a Camera from the Device list........................................................ 8
4.5
Starting and Stopping the Camera Video Stream....................................... 8
5
Device setting.................................................................................................................. 9
6
PTZ Control ................................................................................................................... 10
7
Group Management ..................................................................................................... 11
7.1
Set group......................................................................................................... 11
7.2
View Video Stream by group........................................................................ 11
8
Schedule Record .......................................................................................................... 12
9
Alarm setting.................................................................................................................. 14
10
System Settings ............................................................................................. 16
11
Recorded Video Playback ............................................................................ 17
12
Manage NVR .................................................................................................. 18
13
Other Operations............................................................................................ 19
13.1
Basic Video Operation .................................................................................. 19
13.2
Device List Operations .................................................................................. 19
13.3
Recording Modes........................................................................................... 20
14
Notifications .................................................................................................... 21
Avacomtech Inc.
Page 2
http://www.avacomtech.com
1 Introduction
IPC Monitor provides the central control of monitoring, video capture, recording and,
alarm detection for multiple IP cameras on a LAN or WAN.
Before using this software, please ensure the devices to be monitored can be accessed
by web browsers from the LAN or WAN. Please consult the user manual of your IP
Camera to know which series the camera belongs to. The IPC Monitor supports M10, B,
H, B1, and Q series products. This article provides instructions on viewing the IP
Camera's video by using this dedicated client application.
2 Computer Requirements
To use IPC Monitor, your computer should meet the following minimum requirements:
z CPU: Dual-core CPU
z RAM: 1GB or above
z Hard disk: 160GB or above
z OS: Windows XP or higher
z Resolution of display: ≧1024x768
Avacomtech Inc.
Page 3
http://www.avacomtech.com
3 Installation
Figure 1: IPC Monitor User Interface
Insert the Software bundle CD in to the CD drive, and then double click
“IPCMonitor_en1_v1.0.1.7.exe”. An installation window will appear. Please follow the
prompts on the window to complete the software installation. After successful installation,
run the application and the user interface will be shown as in Figure 1.
Avacomtech Inc.
Page 4
http://www.avacomtech.com
4 Devices list
Complete the following steps before using this application:
1) Install the IP Camera(s) which you intend to monitor.
2) Login to the IP Camera(s) by web browser and set the IP address, port, username &
password, alarm setting, system time, etc.
3) You need to complete DDNS settings and port forwarding configurations in the router
if you intend to monitor the devices via the WAN.
Devices list is blank for the 1st time running IPCMonitor.
Figure 2: Devices list
Avacomtech Inc.
Page 5
http://www.avacomtech.com
4.1 Searching and Adding Cameras on the LAN
Click the
button to search for cameras on the LAN. In the ‘search and add devices’
window perform the following steps:
z Select the product series and click “Search”, the found devices will be listed.
z Click the checkbox on the device which you want to be added, assign a name
and set the viewing username and password.
z Click “OK” and the camera is added to the device list.
Figure 3: Search and add devices
Avacomtech Inc.
Page 6
http://www.avacomtech.com
4.2 Adding Cameras
Click
button in Figure 2, it will open a dialog box where you can enter the cameras
information as shown in Figure 3. Click the 'save' button to finish adding the camera. The
camera will now appear in the devices list.
Figure 4: Adding a Device
z
z
z
The camera name must be unique in the devices list.
Choose the correct product series(Required).
'Domain/IP', 'Port', 'Viewing account', and ‘Viewing Password' fields must be
filled out correctly.
Avacomtech Inc.
Page 7
http://www.avacomtech.com
4.3 Modifying Camera information
¾
Select a camera and then click the
button to modify the information of the
¾
camera. See example in Figure 3.
Select a device and right click on it and a menu will open and you can select to modify
the cameras information or to change the cameras name.
Figure 5: Modify device name
4.4 Deleting a Camera from the Device list
Highlight a camera on the device list and then click
button to delete the device. If
need to delete several cameras simultaneously, you can use the Ctrl or Shift key and then
click to select the cameras from devices list and delete them.
4.5 Starting and Stopping the Camera Video Stream
¾
Highlight a camera and double click it or click the
¾
Highlight a started device and click the
¾
Press the to start the video stream.
button to stop the video stream.
button in the left bottom to start all camera video streams
simultaneously.
¾
Press the button in left bottom to stop all camera video streams
simultaneously.
Avacomtech Inc.
Page 8
http://www.avacomtech.com
5 Device setting
Click the ‘Device setting’ button and a dialog box will open where you can set up basic
parameters in a selected viewing window.
Select a video viewing window and click the ’get’ button. You will then retrieve the
cameras video parameters and then you can adjust these parameters and save them.
Figure 6 Device setting
Note: The device setting is different for different product series, and it is recommend you
don’t adjust the parameters frequently.
Avacomtech Inc.
Page 9
http://www.avacomtech.com
6 PTZ Control
Click the “PTZ control” button to display the PTZ control interface.
Figure 7
PTZ control
1) The Pan/Tilt head can be moved up, down, left, right by clicking on the corresponding
arrows in the “PTZ Control” area. You also use the keyboard to control Pan/Tilt head
by using the arrow keys: ← → ↑ ↓;
2) For H Series IP Camera, like High Speed Dome,click
Zoom;
to control
3) For High Speed Dome and H Series IP Camera with external PTZ, click the following
buttons:
You will Set/Call the preset point; and clicking on auto the Pan/Tilt head will cruise
to the preset point. Clicking stop will halt the Pan/Tilt cruise.
Avacomtech Inc.
Page 10
http://www.avacomtech.com
7 Group Management
Clicking ‘Group management’ will open up the group management list where you can add
and edit groups. You can also view video streams by group and cycle through multiple
groups.
7.1 Set group
¾
Click the
¾
¾
Enter the group name and click the ‘add’ button. The name appears in the group list.
Select the group name in the group list and then click the cameras you want to add to
the group.
Set the cycle time interval for each group.
¾
button to add a group.
If need to edit a group click the
button and choose the group from the list.
Figure 8
Set Group
7.2 View Video Stream by group
¾
Select a group from the group list and double click on it to view the video stream from
all the cameras in that group.
¾
Click the
¾
Click the
Avacomtech Inc.
button to play the video stream from each group for the cycle time
button to stop viewing the video streams.
Page 11
http://www.avacomtech.com
8 Schedule Record
Click ‘Schedule record’ to manage the recording schedule for the cameras.
1) Click the
button to open a plan dialog box.
Figure 9 Set plan dialog
2) Click ‘add plan’ to open up ‘a add plan’ dialog box enter a plan name and click the
button to add the duration of recording time and then click the ‘save‘ button.
Figure 10 Add plan
Avacomtech Inc.
Page 12
http://www.avacomtech.com
3) Selected the plan name and click on the camera name in device list to add it to the
recording plan. The camera will then record according to the plan.
Figure 11 Set plan dialog
4) Select a plan name and click the
button to change the recording plan
parameters;
5) Select a plan name and click the
Avacomtech Inc.
button to delete the recording plan.
Page 13
http://www.avacomtech.com
9 Alarm setting
Click ‘Alarm settings’ to manage the alarms of the camera.
1) Click the
button to open up a set alarm dialog box.
Figure 12 Alarm plan Setting
2) Click ’add plan’, to open up a dialog box to edit the plan.
Figure 13 Add plan Avacomtech Inc.
Page 14
http://www.avacomtech.com
3) Selected plan name, and then click on the devices you want to add to the plan.
Figure 14
4) Select a plan in the set alarm list and click the
button to edit the plan and reset
the alarm mode.
5) Select a plan in the set alarm list and click the
button canto delete the plan.
Note: Before setting alarms, please make sure the IP camera’s configuration is
correct and it can detect the alarm. (refer to the IP camera user manual)
Avacomtech Inc.
Page 15
http://www.avacomtech.com
10 System Settings
Click the
button to set the global parameters for the monitor.
Figure 15 System Settings
1) Alarm action settings:
z
The user can select an alternate sound file (.wav) as siren the sound. The default
sound will be used if this field is blank.
z
Users can also configure the parameters for Siren Duration, Snapshot Number,
and Record Duration.
2) Picture and video file storage location:
The user can set the snapshot and video files storage location. The default location is
located in the installation directory. Snap and videos will be stored in /snap,
and ./record subdirectory.
3) Clicking “Disk space is not enough, delete the file of the earliest day” will
automatically delete the day's earliest data and then begin cyclical recording when
the disk space is less than 1GB. If not clicked, it will stop recording when the disk
space is less than 500MB. For setting the storage location, click the
button and a
dialog box will open asking you to set the snapshot and video storage locations.
4) The other options can be set if you clicked:
z
Play all the cameras video streams when the software is running.
z
Show video from all the channels in full screen.
z
Prompt before shutting down monitor.
Avacomtech Inc.
Page 16
http://www.avacomtech.com
11 Recorded Video Playback
Click the
button to open the recorded video player. You can click to enter the video
storage file folder. Or you can view a list of video files sorted by device name.
Figure 16 Recorded video playback
Avacomtech Inc.
Page 17
http://www.avacomtech.com
12 Manage NVR
Click the
button to launch any network connected NVR players, for detailed
information on how to connect to the NVRs please see the manufacturer’s NVR user
manual.
Avacomtech Inc.
Page 18
http://www.avacomtech.com
13 Other Operations
13.1 Basic Video Operation
¾
¾
¾
¾
Double click on a video channel to open the video to full screen. Double click it again
to shrink the video back to its original size.
Click and hold a channel to drag it to another channel. If the target channel is utilized,
the two video channels will be swapped.
Right click your mouse on a channel to perform some operations like start and stop
video recording, take a snapshot, expand the video, or modify or delete the camera.
Click the icons in the status bar for each channel, you can take a snapshot or record
manually. Due to different functions, every series product has its own icon content. It
will display an alarm icon when the device detects an alarm. The icon at right will
become red when recording.
Figure 17 Channel Status Bar
Note: A user can only to talk and monitor the sound from the device on the current channel.
The talk icon is disabled if another user is talking.
13.2 Device List Operations
¾
The camera name will become green when it is playing.
¾ An alarm icon
will display in the device list when the device is alarming.
Figure 18 Device list
Avacomtech Inc.
Page 19
¾
http://www.avacomtech.com
Double click on the alarm icon and an alarm log of the device will display.
Figure 19 Alarm log
13.3 Recording Modes
¾
¾
¾
The software supports three recording modes: alarm recording, scheduled recording
and manual recording;
z The status button becomes red to indicate that the device is recording .
z The User can click recording status button to record manually when the button is
green. The button will become red while the device is recording. Click it again to
stop recording; The device will stop manual recording after 1 hour .The device
will continue scheduled recording if scheduled recording and alarm recording are
triggered at same time.
The file name of alarm recording, manual recording and scheduled recording will be
prefixed with A, M, or S respectively. The start time stamp will make up the rest of the
filename and end with an .avi suffix. (H series product’s suffix is .asf);
A new file is created automatically each hour of scheduled recording.
Avacomtech Inc.
Page 20
http://www.avacomtech.com
14 Notifications
1) To ensure proper functioning of the monitor check that the settings of the camera are
correct and it can be accessed by web browsers.
2) You will need an administrator level account to install the software in Vista and
Windows 7 or above.
3) If the video running speed is slow or the software is unstable while performing
monitoring please open Windows Task Manager and check the percentage of CPU
usage. If process is using more than 80% of the CPU cycles CPU speed may not be
sufficient. Try decreasing camera resolution or reducing the number of monitored
devices.
4) Try closing anti-virus software if video playback interface or NVR management
connections won’t open.
Avacomtech Inc.
Page 21