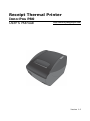
1
Receipt Thermal Printer
Inno-Pos P80
User’s Manual
http://www.noyabilgisayar.com/
Version 1.0
Federal Communications Commission (FCC)
This equipment has been tested and found to comply with the limits for a Class A
digital device, pursuant to part 15 of the FCC Rules. These limits are designed to
provide reasonable protection against harmful interference in a residential
installation. This equipment generates, uses and can radiate radio frequency energy
and, if not installed and used in accordance with the instructions, may cause
harmful interference to radio communications. However, there is no guarantee that
interference will not occur in a particular installation. If this equipment does cause
harmful interference to radio or television reception, which can be determined by
turning the equipment off and on, the user is encouraged to try to correct the
interference by one or more of the following measures:
•
Reorient or relocate the receiving antenna.
•
Increase the separation between the equipment and receiver.
•
Connect the equipment into an outlet on a circuit different from that to
which the receiver is connected.
•
Consult the dealer or an experienced radio/TV technician for help.
Declaration of Conformity
These devices comply with part 15 of the FCC Rules. Operation is subject to the
following two conditions:
1. These devices may not cause harmful interference.
These devices must accept any interference received, including interference
that may cause undesired operation.
Industry Canada (IC)
This Class A digital apparatus meets all requirements of the Canadian InterferenceCausing Equipment Regulations.
Cet appareil numérique de la classe A respecte toutes les exigences du Règlement
sur le matériel brouilleur du Canada.
WEEE (Waste from Electrical and Electronic Equipment)
The WEEE wheeled bin symbol on the product or on its packaging indicates that the
product must not be disposed of with other waste. It should be the user’s
responsibility to dispose of their waste equipment by handing it over to an approved
location for the recycling of waste electrical and electronic equipment. For more
information about where to send your waste equipment for recycling, please
contact your local city office, your household waste disposal service or where you
purchased the product.
ii
Inno-Pos P80 Receipt Thermal Printer
Disclaimer
The material in this document is for information purpose and is subject to change
without prior notice. Noya has made every effort to ensure that this user’s manual
is accurate and complete. However, no liability is assumed for any errors and
omissions that may have occurred. Nor are any liability assumed for any damages
resulting from the use of this product and the information contained in this
document. Noya reserves the right to make improvements to this publication from
time to time in the contents hereof without obligation of the manufacturer to notify
any person of such revision or changes.
Trademark Recognition
Noya and the Noya logo are trademarks.
All marks are trademarks or registered trademarks of their respective owners.
Copyright
This work is copyrighted. Reproduction or retransmission of this documentation, in
whole or in part, without prior written permission from the manufacturer is a
violation of copyright law.
© 2011 Noya Bilgisayar Sistemleri Ltd Sti. All rights reserved.
Inno-Pos P80 Receipt Thermal Printer
iii
Safety Instructions
Failure to observe these safety instructions may cause body injury, or damage to
the product. Read these instructions carefully and keep this user manual in an
accessible location for future reference.
The product may cause fire or electric shock when used improperly.
Observe the following safety measures all the time.
If the product is damaged, immediately turn off the power and
disconnect the power cord. Contact your dealer for assistance.
1. Do not plug in or unplug the power cord with wet hands.
2. Do not plug the product into an AC outlet with the incorrect voltage
(The correct voltage should be between AC 100V~240V.)
3. Do not plug several products in one multi-outlet.
4. Do not apply pressure to the power cord or place heavy objects on it.
5. Immediately stop using the product if it emits strange noise, odor, or smoke.
6. Do not use aerosol sprayers containing flammable gas inside or around the
product.
7. Do not allow foreign objects or liquids to enter the product, serious damage
may result.
8. Do not try to disassemble or repair the product yourself.
9. Do not place the product on an unstable surface. The product may cause a
fire if it is dropped, damaged, or broken.
The following instructions will help you make better use of this product.
1. Keep the product from locations subject to high humidity, dust, and
temperatures out of specification.
2. Clean the product using a dry cloth or a cloth soaked with detergent. Never
use thinner or other volatile solvent for cleaning.
3. At the end of the day, clean and inspect the exterior of the product after
turning OFF the product.
4. Use only approved accessories.
5. Do not place heavy objects on top of the product /or lean against the product,
these items may fall and cause injury.
6. Do not block the air vent of the product, this can cause heat to build up
inside the boxed product and may lead to fire.
iv
Inno-Pos P80 Receipt Thermal Printer
Table of Contents
Chapter 1 Product Overview ....................................................................... 8
1.1
Introduction .................................................................................................. 8
1.2
Features........................................................................................................ 8
1.3
Package Contents .......................................................................................... 9
Standard Package ..................................................................................................... 9
Optional Accessories .................................................................................................. 9
1.4
Printer Parts ................................................................................................ 10
Front View and Compartment ................................................................................... 10
Status Indicators ..................................................................................................... 11
Rear View ............................................................................................................... 12
Chapter 2: Getting Started ........................................................................ 14
2.1
Choosing a Location ..................................................................................... 14
Mounting the Printer ................................................................................................ 14
Location Considerations ........................................................................................... 15
By Serial Interface Connection .................................................................................. 16
By USB Interface Connection .................................................................................... 16
2.3
Connecting the Cash Drawer ......................................................................... 17
Single Cash Drawer ................................................................................................. 17
Two Cash Drawers .................................................................................................. 17
2.4
Connecting the Power Supply ........................................................................ 18
2.5
Turning the Printer On .................................................................................. 18
2.6
Loading the Paper Roll .................................................................................. 19
2.7
Printing a Test Label ..................................................................................... 20
Chapter 3: Using the Printer...................................................................... 21
3.1
Basic Controls .............................................................................................. 21
Inno-Pos P80 Receipt Thermal Printer
v
Power Button .......................................................................................................... 21
Open Button ........................................................................................................... 21
Feed Button ............................................................................................................ 21
3.2
Replacing the Paper Roll ............................................................................... 21
3.3
Adjusting the Paper Sensor ........................................................................... 22
3.4
Removing Jammed Paper ............................................................................. 23
Jammed Paper in the Cutter Blade ............................................................................ 23
Paper Jam Considerations ........................................................................................ 24
3.5
Advanced Settings ....................................................................................... 25
Adjusting the Settings.............................................................................................. 25
DIP Switch Tables.................................................................................................... 25
TABLE 1 :
DIP Switch Set 1 ............................................................................ 25
Table 1-1 : Transmission Speed................................................................................ 26
TABLE 2 :
DIP Switch Set 2 ............................................................................ 26
Table 2-1 : Print Density .......................................................................................... 26
3.6
Printer Status Report .................................................................................... 27
Printing the Status Report ........................................................................................ 27
Chapter 4: EPSON ESC/POS Commands ................................................... 27
Chapter 5: Code Page Tables..................................................................... 30
Chapter 6: Cleaning the Printer ................................................................. 41
6.1
Cleaning the Print Head ................................................................................ 41
6.2
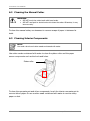
Cleaning the Manual Cutter ........................................................................... 42
6.3
Cleaning Interior Components ....................................................................... 42
6.4
Cleaning the Housing ................................................................................... 43
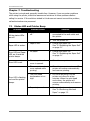
Chapter 7: Troubleshooting ....................................................................... 44
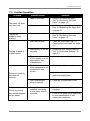
7.1
Status LED and Printer Beep ......................................................................... 44
7.2
Printer Operation ......................................................................................... 45
Chapter 8: Specifications........................................................................... 47
vi
Inno-Pos P80 Receipt Thermal Printer
8.1
Printer Specifications .................................................................................... 47
8.2
Paper Specifications ..................................................................................... 49
Appendix I. : User Guide for Ethernet Interface ....................................... 50
Description: ............................................................................................... 50
Installation ................................................................................................ 50
Hardware .............................................................................................................. 50
Software ............................................................................................................... 50
Configure INNO-POS P80 ......................................................................................... 50
Printing via TCP/IP................................................................................................... 51
Use Standard TCP/IP Port ........................................................................................ 51
Use Virtual-COM Tool............................................................................................... 53
Appendix II : RS232C Connector Pins Assignment ................................... 55
Inno-Pos P80 Receipt Thermal Printer
vii
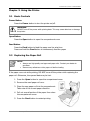
PRODUCT OVERVIEW
Chapter 1 Product Overview
This section describes the features and the package contents and provides an
overview of the printer parts.
1.1 Introduction
Thank you for choosing INNO-POS P80 Thermal Receipt Printer, a high quality and
high speed printer ideal for use with Electronic Cash Registers (ECR), Point-of-Sale
(POS) terminals, banking equipments and other demanding applications.
Read this manual for information on how to operate and maintain your printer. The
content of this manual is as accurate as possible. However, due to continuous product
improvements, the content is subject to change without prior notice. Visit our
website http://www.noyabilgisayar.com/ for further information.
1.2 Features
8
•
Aerodynamic, compact and stylish
•
High resolution printing up to 203 dpi
•
High speed printing up to 220 mm/s
•
Low noise thermal printing method
•
Quick and easy drop-in paper loading
•
Auto-cutter and tear bar
Inno-Pos P80 Receipt Thermal Printer
PRODUCT OVERVIEW
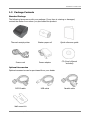
1.3 Package Contents
Standard Package
The following items come with your package. If any item is missing or damaged,
contact the dealer from whom you purchased the product.
Thermal receipt printer
Starter paper roll
Quick reference guide
Power cord
Power adapter
CD (User’s Manual
included)
Optional Accessories
Optional accessories can be purchased from your dealer.
RS232 cable
USB cable
Parallel cable
Wall mount kit
Inno-Pos P80 Receipt Thermal Printer
9
PRODUCT OVERVIEW
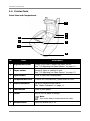
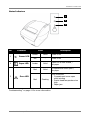
1.4 Printer Parts
Front View and Compartment
4
5
6
1
2
7
3
8
No.
Item
Description
1
Adjustment screw
Loosen the screw to adjust the paper sensor.
See “3.3 Adjusting the Paper Sensor” on page 22.
2
Paper sensor
Senses if paper is nearing its end.
See “3.3 Adjusting the Paper Sensor” on page 22.
3
Open button
Press to open the compartment.
4
Compartment cover
Protects the compartment; press down to close.
5
Status indicators
Lights to indicate printer status.
See “Status Indicators” on page 11.
6
Feed button
Press to feed paper.
7
Cutter
Use to cut the paper manually.
Note:
Auto-cutter blade is located below this cutter.
8
10
Power button
Turns the printer on or off.
Inno-Pos P80 Receipt Thermal Printer
PRODUCT OVERVIEW
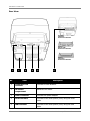
Status Indicators
1
2
3
No.
Indicator
1
Power LED
2
Paper LED
3
Color
Description
Green
Solid
Power is on
Off
-
Power is off
Amber
Solid
Paper roll is near its end /
No paper
Red
Solid
Compartment cover open /
No paper
Error LED
Red
Flashing
Error occurred:
• Compartment cover open
while printing
• Printer head temperature too
high
• Paper jam
Troubleshooting” on page 44 for more information.
Inno-Pos P80 Receipt Thermal Printer
11
PRODUCT OVERVIEW
Rear View
Version 1
USB+RS232
Interface board detachable
Version 2
Ethernet + USB
Interface board detachable
Version 3
Parallel (LPT)
Interface board detachable
1
No.
2
3
4
6
5
Item
Description
1
Drawer kick-out
connector
Connects to cash drawers.
2
DIP switch
compartment
Holds the DIP switch.
3
Power connector
Connects the power adapter.
4
Serial connector
Connects to the host system (POS) using the serial
cable.
5
USB connector
Connects to the host system (POS) using the USB
cable.
12
Inno-Pos P80 Receipt Thermal Printer
PRODUCT OVERVIEW
6
Other interface version
Beside the standard version ( USB + RS232, interface board
non- detachable), the INNO-POS P80 is available in other 3
versions which interface board is detachable as shown in the
table .
The interface board is separately available.
NOTE: Please refer to INNO-POS P80 User’s Manual CH. 2 Getting Started for the complete
instructions.
Inno-Pos P80 Receipt Thermal Printer
13
GETTING STARTED
Chapter 2: Getting Started
This section describes how to set up the printer for the first time and provides
instructions on basic operations, such as turning on the printer, loading the paper roll
and others.
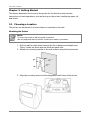
2.1 Choosing a Location
The printer can be placed on a level surface or mounted on the wall.
Mounting the Printer
NOTE:
To mount the printer, a wall mount kit is required.
Use only approved wall mount kits. Contact your dealer to purchase.
1. Drill the wall to make three holes at Ф 6.5mm distance and depth over
35mm. Insert the three anchors inside the each hole.
2. Attach the mounting bracket to the wall surface using the three screws.
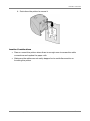
3. Align the mounting screws to the designated hook holes of the printer.
14
Inno-Pos P80 Receipt Thermal Printer
GETTING STARTED
4. Push down the printer to secure it.
Location Considerations
•
Place or mount the printer where there is enough room to access the cable
connections and replace the paper rolls.
•
Make sure the cables are not easily stepped on to avoid disconnection or
knocking the printer.
Inno-Pos P80 Receipt Thermal Printer
15
GETTING STARTED
2.2 Connecting the Computer
You can connect the host computer using one of the following connections:
•
Serial interface
•
USB interface
WARNING:
Before making any connections, ensure that the printer, the computer, and the cash
drawers are turned off.
By Serial Interface Connection
1. Plug the male end to the serial port of the
computer.
2. Plug the female end of the serial cable into the
serial connector of your printer.
By USB Interface Connection
1. Plug the USB type B end of the cable to the USB
port of your printer.
2. Plug the standard end to the USB port of the
computer.
16
Inno-Pos P80 Receipt Thermal Printer
GETTING STARTED
2.3 Connecting the Cash Drawer
You can connect up to two cash drawers to one printer.
Single Cash Drawer
1. Plug one end of an RJ-11 cable to the drawer kick-out connector of your
printer.
2. Plug the other end to the connector of the cash drawer.
Two Cash Drawers
NOTE:
An RJ-11 Y-cable is needed to connect two cash drawers to your printer. Contact
your dealer to purchase.
1. Plug the single end of the Y-cable to the drawer kick-out connector of your
printer.
2. Plug the other ends to the connectors of the cash drawers.
WARNING:
DO NOT connect a telephone line to your printer. This may damage the printer or
the telephone.
Inno-Pos P80 Receipt Thermal Printer
17
GETTING STARTED
2.4 Connecting the Power Supply
WARNING:
Before connecting the power, ensure that the Power button is off.
1. Plug the power adapter to the power connector of your printer.
2. Connect the power adapter to the power cord.
3. Plug the power cord to a wall outlet.
WARNING:
May cause electric shock!
• When the power cord is plugged to a wall outlet, DO NOT unplug the power
adapter from the printer or the power cord.
• To disconnect the power cord, grasp and pull by the plug head, DO NOT tug
on the cord.
2.5 Turning the Printer On
Press the Power button to turn the printer on/off.
O Off
─ On
WARNING:
DO NOT turn off the power while printing data. This may cause data loss or damage
the printer.
18
Inno-Pos P80 Receipt Thermal Printer
GETTING STARTED
2.6 Loading the Paper Roll
1. Press the Open button to open the
compartment cover.
2. Place the paper roll into the compartment. Take note of the correct paper
direction.
3. Pull out a small portion of the paper then
push down the compartment cover to
close it.
Inno-Pos P80 Receipt Thermal Printer
19
GETTING STARTED
4. Tear off the excess paper if necessary.
2.7 Printing a Test Label
Print a test label to check if your printer is working properly.
NOTE:
Before printing a test label, make sure all connections are properly connected and
there is enough paper roll in the compartment.
1. Press and hold the Feed button and then turn on the power.
The printer prints out the current status, firmware version, and DIP switch
settings. After which, the printer pauses and the Paper LED flashes.
2. Press the Feed button to continue printing the test label.
The printer prints out the built-in character set.
3. After printing, the printer automatically cuts the paper. Pull out the paper.
20
Inno-Pos P80 Receipt Thermal Printer
EPSON ESC/POS COMMANDS
Chapter 3: Using the Printer
3.1 Basic Controls
Power Button
Press the Power button to turn the printer on/off.
WARNING:
DO NOT turn off the power while printing data. This may cause data loss or damage
the printer.
Open Button
Press the Open button to open the compartment cover.
Feed Button
Press the Feed button to feed the paper one line at a time.
Press and hold the Feed button to continuously feed the paper.
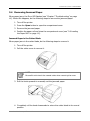
3.2 Replacing the Paper Roll
NOTE:
• Always use high quality and approved paper rolls. Contact your dealer to
purchase.
• Remove any adhesives on the paper roll before loading.
If the paper runs out while printing, DO NOT turns off the printer while replacing the
paper roll. Otherwise, the queued data may be lost.
1. Press the Open button to open the compartment cover.
2. Remove the used paper roll core.
3. Place the new paper roll into the compartment.
Take note of the correct paper direction.
4. Pull out a small portion of the paper then close
the compartment cover.
5. Press the Feed button to restart printing.
Inno-Pos P80 Receipt Thermal Printer
21
EPSON ESC/POS COMMANDS
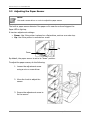
3.3 Adjusting the Paper Sensor
NOTE:
You need a screw driver or a coin to adjust the paper sensor.
The built-in paper sensor detects if the paper roll is near its end and triggers the
Paper LED to light up.
It has two adjustment settings:
•
Down: Use if the printer is placed on a flat surface, such as a counter-top.
•
Up: Use if the printer is mounted on a wall.
Up
Down
By default, the paper sensor is set to its “down” position.
To adjust the paper sensor, do the following:
1. Loosen the adjustment screw
using a coin or screw driver.
2. Move the knob to adjust the
sensor.
3. Secure the adjustment screw to
fix the sensor.
22
Inno-Pos P80 Receipt Thermal Printer
EPSON ESC/POS COMMANDS
3.4 Removing Jammed Paper
When paper jams, the Error LED flashes (see “Chapter 7 Troubleshooting” on page
44). When this happens, do the following steps to remove the jammed paper:
1. Turn off the printer.
2. Press the Open button to open the compartment cover.
3. Remove the jammed paper.
4. Position the paper roll and close the compartment cover (see “2.6 Loading
the Paper Roll” on page 19).
Jammed Paper in the Cutter Blade
When paper jams in the cutter blade, do the following steps to remove it:
1. Turn off the printer.
2. Pull the cutter cover to remove it.
NOTE:
Be careful not to touch the manual cutter when removing the cover.
3. Roll the knob upwards to manually cut the jammed paper.
4. Completely roll the knob downwards to return the cutter blade to its normal
position.
Inno-Pos P80 Receipt Thermal Printer
23
EPSON ESC/POS COMMANDS
5. Press the Open button to open the compartment cover.
NOTE:
If the compartment cover does not open after pressing the Open
button, the cutter blade is not in its normal position. Roll the knob
downwards to position the cutter blade back.
DO NOT forcibly open the compartment cover.
6. Remove the jammed paper.
7. Position the paper roll and close the compartment cover (see “2.6 Loading
the Paper Roll on page 19).
8. Align and slide the cutter cover back.
Paper Jam Considerations
When using any printer, paper jams are inevitable. However, if this happens
frequently, follow the precautions below to prevent paper jams from occurring.
•
Use only approved paper rolls by the manufacturer.
•
Load the paper roll according to the instructions in this manual.
•
If using a paper roll with adhesives on the back, make sure that no portion of
the paper is peeled off. Otherwise, the adhesive may stick on the printer.
•
Check for torn papers previously stuck in the printer or any foreign object
inside the printer.
24
Inno-Pos P80 Receipt Thermal Printer
EPSON ESC/POS COMMANDS
3.5 Advanced Settings
The printer is shipped with default factory settings suitable for most users. However, it
also offers advanced settings for users with special requirements.
Use the DIP switches to adjust settings such as transmission speed, handshaking,
parity check, printer density, and others.
Adjusting the Settings
WARNING:
Turn off the power and unplug the power cord from the wall outlet before adjusting
the DIP switches.
Changes made with the power on have no effect until the printer is restarted.
1. Lay the printer upside down on a flat even surface.
2. Unscrew the DIP switch cover.
3. Adjust the DIP switches according your
preference. Refer to the table below
for DIP switch configurations.
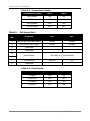
DIP Switch Tables
TABLE 1 :
DIP Switch Set 1
SW
(Switch No.)
Function
ON
OFF
1
Handshaking
XON/XOFF
DTR/DSR
2
Data Bits
7-bit
8-bit
3
Parity Check
Yes
No
4
Parity Selection
Even
Odd
5
6
Transmission Speed Selection
7
Reserved
8
Reserved
Inno-Pos P80 Receipt Thermal Printer
See Table 1-1: Transmission Speed
25
EPSON ESC/POS COMMANDS
Table 1-1 : Transmission Speed
TABLE 2 :
Transmission Speed
SW 5
SW 6
4800 Baud
ON
ON
9600 Baud
ON
OFF
19200 Baud
OFF
ON
115200 Baud
OFF
OFF
DIP Switch Set 2
Switch
No.
Function
ON
OFF
1
Kitchen bell with cash drawer
Enable
Disable
2
Kitchen bell with cutter
Enable
Disable
3
Reserved
4
Reserved
5
6
Print Density
7
Chinese font
8
Reserved
See Table 2-1: Print Density
Not use
Use
Table 2-1 : Print Density
26
Print Density
SW 5
SW 6
1 (Light)
ON
ON
2 (Normal)
OFF
OFF
3 (Middle)
ON
OFF
4 (Dark)
OFF
ON
Inno-Pos P80 Receipt Thermal Printer
EPSON ESC/POS COMMANDS
3.6 Printer Status Report
The printer can generate a status report to show the current system configuration.
The report includes the following:
•
Supported paper width
•
Printing speed
•
RS-232 configuration such as Baud rate, parity check, data bits, and flow
control scheme
•
Supported emulation language
•
Print density
•
Receive error handling method
Printing the Status Report
Before printing the status report, make sure that the printer is turned off and the
cover is closed.
To print the status report, press and hold the FEED button and turn on the printer.
The printer prints the current status. After printing, the printer goes to standby mode.
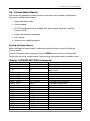
Chapter 4 EPSON ESC/POS Commands
Command
Hexadecimal
<HT>
<LF>
09
0A
<FF>
0C
<CR>
<CAN>
<DLE> <EOT> n
<DLE> <ENQ> n
<DLE> <DC4> …
<ESC> <FF>
<ESC> <SP> n
<ESC> ! n
<ESC> $ nL nH
<ESC> % n
<ESC> & y c1 c2 …
<ESC> * m nL nH …
<ESC> - n
<ESC> 2
<ESC> 3 n
<ESC> = n
<ESC> ? n
<ESC> @
0D
18
10 04 n
10 05 n
10 14 01 m t
1B 0C
1B 20 n
1B 21 n
1B 24 nL nH
1B 25 n
1B 26 y c1 c2 …
1B 2A m nL nH …
1B 2D n
1B 32
1B 33 n
1B 3D n
1B 3F n
1B 40
Inno-Pos P80 Receipt Thermal Printer
Function
Horizontal tab
Print and line feed
Print and return to standard mode (In
page mode)
Print and carriage return
Cancel print data in page mode
Real-time status transmission
Real-time request to printer
Generate pulse in real-time
Print data in page mode
Set right-side character spacing
Select print mode(s)
Set absolute print position
Select / cancel user-defined character set
Define user-defined characters
Select bit-image mode
Turn underline mode on/off
Select default line spacing
Set line spacing
Select peripheral device
Cancel user-defined characters
Initialize printer
27
EPSON ESC/POS COMMANDS
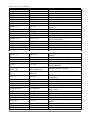
<ESC> D n1…nK 00
<ESC> E n
<ESC> G n
<ESC> J n
<ESC> L
<ESC> M n
<ESC> R n
<ESC> S
1B 44 n1…nk 00
1B 45 n
1B 47 n
1B 4A n
1B 4C
1B 4D n
1B 52 n
1B 53
<ESC> T n
1B 54 n
<ESC> V n
<ESC> W xL …
<ESC> \ nL nH
<ESC> a n
1B 56 n
1B 57 xL …
1B 5C nL nH
1B 61 n
<ESC> c 3 n
1B 63 33 n
<ESC> c 4 n
<ESC> c 5 n
<ESC> d n
<ESC> p m t1 t2
<ESC> t n
1B 63 34 n
1B 63 35 n
1B 64 n
1B 70 m t1 t2
1B 74 n
<ESC> { n
1B 7B n
FS ! n
FS &
FS S n1 n2
1C 21 n
1C 26
1C 53 n1 n2
FS W n
1C 57 n
FS g 1 m a1 a2 a3 a4 nL
nH d1...dk
FS g 2 m a1 a2 a3 a4 nL
nH
1C 67 31 m a1 a2 a3
Write to NV user memory
a4 nL nH d1...dk
1C 67 32 m a1 a2 a3 Read from NV user memory (P83)
a4 nL nH
Turn underline mode on/off for Kanji
1C 2D n
characters
1C 2E
Cancel Kanji character mode
1C 70 n m
Print NV bit image
1C 71 n …
Define NV bit image
1D 21 n
Select character size
Set absolute vertical print position in
1D 24 nL nH
page mode
1D 28 41 …
Execute test print
1D 2A x y …
Define downloaded bit image
1D 2F m
Print downloaded bit image
1D 3A
Start/end macro definition
Turn white/black reverse printing mode
1D 42 n
on/off
1D 48 n
Select printing position of HRI characters
1D 4C nL nH
Set left margin
1D 50 x y
Set horizontal and vertical motion units
FS – n
FS .
<FS> p n m
<FS> q n …
<GS> ! n
<GS> $ nL nH
<GS> ( A …
<GS> * x y …
<GS> / m
<GS> :
<GS> B n
<GS> H n
<GS> L nL nH
<GS> P x y
28
Set horizontal tab positions
Turn emphasized mode on/off
Turn double-strike mode on/off
Print and feed paper
Select page mode
Select character font
Select an international character Set
Select standard mode
Select print direction in page
mode
Turn 90°clockwise rotation mode on/off
Set printing area in page mode
Set relative print position
Select justification
Select paper sensor(s) to output
paper-end signals
Select paper sensor(s) to stop printing
Enable/disable panel buttons
Print and feed n lines
General pulse
Select character code table
Turn upside-down printing mode
on/off
Set print mode(s) for Kanji characters
Select Kanji character mode
Set Kanji character spacing
Turn quadruple-size mode on/off for
Kanji characters
Inno-Pos P80 Receipt Thermal Printer
EPSON ESC/POS COMMANDS
<GS> V m
<GS> V m n
<GS> W nL nH
1D 56 m
1D 56 m n
1D 57 nL nH
<GS> \ nL nH
1D 5C nL nH
<GS> ^ r t m
1D 5E r t m
<GS> a n
1D 61 n
<GS> f n
<GS> h n
<GS> k m ….NUL
<GS> k m n …
<GS> r n
<GS> v 0 m …
<GS> w n
1D 66 n
1D 68 n
1D 6B m… NUL
1D 6B m n …
1D 72 n
1D 76 30 m…
1D 77 n
Inno-Pos P80 Receipt Thermal Printer
Select cut mode and cut paper
Set printing area width
Set relative vertical print position in page
mode
Execute macro
Enable/disable Automatic Status
Back (ASB)
Select font for HRI characters
Set bar code height
Print bar code
Transmit status
Print raster bit image
Set bar code width
29
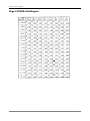
CODE PAGE TABLES
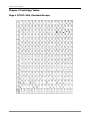
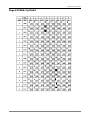
Chapter 5 Code Page Tables
Page 1 PC437: USA, Standard Europe
30
Inno-Pos P80 Receipt Thermal Printer
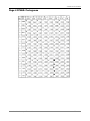
CODE PAGE TABLES
Page 2 Katakana for Japanese
Inno-Pos P80 Receipt Thermal Printer
31
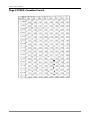
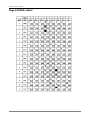
CODE PAGE TABLES
Page 3 PC850: Multilingual
32
Inno-Pos P80 Receipt Thermal Printer
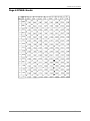
CODE PAGE TABLES
Page 4 PC860: Portuguese
Inno-Pos P80 Receipt Thermal Printer
33
CODE PAGE TABLES
Page 5 PC863: Canadian-French
34
Inno-Pos P80 Receipt Thermal Printer
CODE PAGE TABLES
Page 6 PC865: Nordic
Inno-Pos P80 Receipt Thermal Printer
35
CODE PAGE TABLES
Page 7 WPC1252: West European Latin
36
Inno-Pos P80 Receipt Thermal Printer
CODE PAGE TABLES
Page 8 PC866: Cyrillic#2
Inno-Pos P80 Receipt Thermal Printer
37
CODE PAGE TABLES
Page 9 PC852: Latin2
38
Inno-Pos P80 Receipt Thermal Printer
CODE PAGE TABLES
Page 10 PC858: Multilingual + Euro Symbol
Inno-Pos P80 Receipt Thermal Printer
39
CODE PAGE TABLES
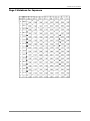
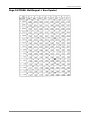
Page 11 International Character Set
Country
U.S.A
France
Germany
U.K.
Denmark I
Sweden
Italy
Spain I
Japan
Norway
Denmark II
Spain II
Latin America
Korea
40
23
#
#
#
£
#
#
#
Pt
#
#
#
#
#
#
24
$
$
$
$
$
¤
$
$
$
¤
$
$
$
$
40
@
à
§
@
@
É
@
@
@
É
É
á
á
@
5B
[
°
Ä
[
Æ
Ä
°
¡
[
Æ
Æ
¡
¡
[
ASCII code (Hex)
5C 5D 5E 60
\
]
^
`
ç
§
^
`
Ö
Ü
^
`
\
]
^
`
Ø
Å
^
`
Ö
Å
Ü
é
\
é
^
ù
Ñ
¿
^
`
¥
]
^
`
Ø
Å
Ü
é
Ø
Å
Ü
é
Ñ
¿
é
`
Ñ
¿
é
ü
W
]
^
`
7B
{
é
ä
{
æ
ä
à
¨
{
æ
æ
í
í
{
7C
|
ù
ö
|
ø
ö
ò
ñ
|
ø
ø
ñ
ñ
|
7D
}
è
ü
}
å
å
è
}
}
å
å
ó
ó
}
Inno-Pos P80 Receipt Thermal Printer
7E
~
¨
ß
~
~
ü
ì
~
~
ü
ü
ú
ú
~
CLEANING THE PRINTER
Chapter 6: Cleaning the Printer
WARNING:
Be sure to turn off the power and unplug the printer from the wall outlet before
cleaning the printer. Failure to do so may cause electric shock.
6.1 Cleaning the Print Head
NOTE:
You need a cotton swab and alcohol solvent such as ethanol, methanol, or isopropyl.
WARNING:
• After printing, the print head can be very hot. DO NOT touch it.
Let the print head cool before you clean it.
• DO NOT touch the print head with your fingers or any hard object. This may
damage the print head.
To clean the print head, do the following:
1. Turn off the printer.
2. Press the Open button to open the compartment cover.
3. Clean the print head with a cotton swab moistened with alcohol.
Inno-Pos P80 Receipt Thermal Printer
41
CLEANING THE PRINTER
6.2 Cleaning the Manual Cutter
WARNING:
• DO NOT touch the cutter teeth with bare hands.
• DO NOT use liquid or alcohol solvent to clean the cutter. Otherwise, it may
become rusty.
To clean the manual cutter, use tweezers to remove scraps of paper in between its
teeth.
6.3 Cleaning Interior Components
NOTE:
You need a brush and cotton swabs moistened with water.
Use cotton swabs moistened with water to clean the platen roller and the paper
sensor components such as the knob and holes.
Platen roller
To clean the compartment and other components, brush the interior compartment to
remove bits of paper. Or use a cotton swab moistened with water to remove sticky
paper or dust.
42
Inno-Pos P80 Receipt Thermal Printer
CLEANING THE PRINTER
6.4 Cleaning the Housing
NOTE:
You need a damped cloth with water.
WARNING:
DO NOT apply alcohol solvent or strong cleaning liquid on the printer housing.
To clean the printer housing, use a damped cloth with water.
Inno-Pos P80 Receipt Thermal Printer
43
TROUBLESHOOTING
Chapter 7: Troubleshooting
The printer is simple and generally trouble-free. However, if you encounter problems
while using the printer, check the reasons and solutions to these problems before
calling for service. If the solutions stated in this document cannot correct the problem,
call authorized service personnel.
7.1 Status LED and Printer Beep
Problem
All the status LEDs
are off.
Possible Cause
• The printer is turned
off.
Solution
• Check if the power cord is
connected to the wall outlet and
the printer.
• Turn the printer on.
• Paper is low.
• Load a new paper roll.
See “3.2 Replacing the Paper Roll”
on page 21.
• No paper.
• Load a new paper roll.
See “3.2 Replacing the Paper Roll”
on page 21.
• The compartment
cover is opened.
• Close the compartment cover.
• The compartment
cover opened while
printing.
• Close the compartment cover. The
printer will recover automatically
and resume printing.
• The print head
temperature is too
high.
• Do not do anything. Let the
printer cool down for a few
minutes. When the print head
cools down, the printer will
recover automatically and resume
printing.
• Paper is jammed.
• Remove the jammed paper.
See “3.4 Removing Jammed
Paper” on page 23.
Paper LED is amber.
Error LED and Paper
LED are lit and the
printer beeps.
Error LED is red.
Error LED is flashing
red and the printer
beeps.
44
Inno-Pos P80 Receipt Thermal Printer
TROUBLESHOOTING
7.2 Printer Operation
Problem
The paper roll does
not come out.
The printer
suddenly stops
printing.
Printing is faded or
of poor quality.
Possible Cause
Solution
• Paper is jammed.
• Remove the jammed paper.
See “3.4 Removing Jammed
Paper” on page 23.
• No paper.
• Load a new paper roll.
See “3.2 Replacing the Paper Roll”
on page 21.
• Paper is jammed
• Remove the jammed paper.
See “3.4 Removing Jammed
Paper” on page 23.
• Print head is dirty.
• Clean the print head. See “4.1
Cleaning the Print Head” on page
41.
• Print density is not set • Adjust the print density settings.
correctly.
See “3.5 Advanced Settings” on
page 25.
• The paper roll used is • Use only approved paper rolls.
of low quality or is not
approved by the
manufacturer.
Printer is turned on,
but does not
function.
Printer is printing
but nothing appears
on the paper.
• The host computer or • Check the cable connection.
other peripheral is not
connected to the
printer.
• Check that the host computer is
getting enough power.
• The compartment
cover is opened.
• Close the compartment cover.
• Paper roll may be
installed incorrectly,
or the paper used is
incorrect.
• Check if the paper roll is installed
correctly.
Inno-Pos P80 Receipt Thermal Printer
• Check if the paper roll is approved
by the manufacturer. If not,
replace the paper roll.
45
TROUBLESHOOTING
Problem
A portion of the
paper is not printed.
Compartment cover
does not open after
the Open button is
pressed.
46
Possible Cause
Solution
• There might be a
problem with the
printer mechanism.
• Contact authorized service
personnel for service.
• The cutter blade is
not positioned
correctly.
• Move the cutter blade back to its
normal position.
See “3.4 Jammed Paper in the
Cutter Blade” on page 23.
Inno-Pos P80 Receipt Thermal Printer
SPECIFICATIONS
Chapter 8: Specifications
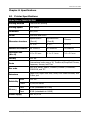
8.1 Printer Specifications
Model Name: INNO-POS P80
Printing method
Thermal line printing
Printing speed
220 mm/s
Command
ESC/POS
Driver
Windows and OPOS
Alphanumeric
(Font A)
Alphanumeric
(Font B)
Chinese
12 x 24
9 x 17
24 x 24
Number of columns
48 columns
64 columns
24 columns
Character size
(W x H)
1.5 x 3.0 mm
1.1 x 2.1 mm
3.0 x 3.0 mm
Density
203 dpi
Fonts
International code page x 26, Traditional/Simplified Chinese,
Japanese, Korean, and Thai
Bar code
UPC-A/E, EAN8, EAN13, CODE39, CODE93, CODABAR,
CODE128, and ITF
Detectors
Paper end, Paper near end, Cover, Print head overheat, and
Cutter jam
Character structure
Reliability
Memory
Head
100 km
Cutter
1,500,000 times
Flash
2 MB (extendable to 4 MB)
Flash
8 MB (extendable to 16MB)
Power supply
24V DC/2.5A
Inno-Pos P80 Receipt Thermal Printer
47
SPECIFICATIONS
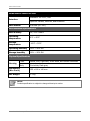
Model Name: INNO-POS P80
Standard: RS-232C, USB
Interface
Optional: Parallel, Ethernet, and Bluetooth
Cash drawer
2 drivers (DC 24V)
Environmental Specifications
EMC & Safety
CE / FCC Class A
Operating
temperature
0°C ~ 45°C
Storage
temperature
-10°C ~ 50°C
Operating humidity
10% ~ 90% RH
Storage humidity
10% ~ 90% RH
Physical Specifications
Housing
Cover
Yellow, Pink, Light blue, Silver black, and Golden chocolate
Body
Cool white, Dark gray
Dimensions
(W x D x H)
155 x 190 x 140 mm
Net Weight
1.3 kg
NOTE:
Product specification is subject to change without prior notice.
Inno-Pos P80 Receipt Thermal Printer
48
SPECIFICATIONS
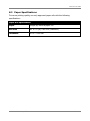
8.2 Paper Specifications
To ensure printing quality, use only approved paper rolls with the following
specifications:
Paper Roll Specification
Paper
Single-ply thermal paper roll
Roll Size
80 ± 0.5 (W) x 83 mm (Diameter)
Thickness
0.05 ~ 0.06 mm
Inno-Pos P80 Receipt Thermal Printer
49
APPENDIX
Appendix I. : User Guide for Ethernet Interface
Description:
INNO-POS P80 Receipt Thermal Printer is Ethernet+USB. Since the usage of Ethernet
interface is quite different from other interfaces, the methods how to configure and
utilize the Ethernet board are documented in the paper. Please read it before use.
With Ethernet interface, the INNO-POS P80 is a network printer and can serve more
than one PC while on duty. Over the Ethernet, we implement the TCP/IP protocol to
transfer data and manage printer from PC which has the ability to browse the
internet with various browser such as IE from Microsoft, chrome from Google , Firefox
and so forth.
Installation
Before the INNO-POS P80 is able to work with network interface, both the hardware
and software are needed to be set up properly. The section details the installation on
both hardware and software.
Hardware
Please connect INNO-POS P80 with a RJ-45 Ethernet cable. While connecting, the
LED on the RJ-45 connector will blink. There is no other setting needed on the printer.
Software
Since the data transfer is via TCP/IP protocol, each INNO-POS P80 must possess an
IP address before working on the network. The default IP address is programmed as
following:
Default IP address: 192. 168. 1. 200
Default ID: admin
Default Password: 1234
Note that you can change the IP address as you wish. If you forget the IP address
assigned to an INNO-POS P80, you can retrieve its default status with the VCOM tool
mentioned in later section.
Configure INNO-POS P80
Connect your INNO-POS P80 with RJ-45 Ethernet cable and power on the machine.
Open the IE or other internet browser you are familiar with.
Inno-Pos P80 Receipt Thermal Printer
50
APPENDIX
Type the IP address of your INNO-POS P80 in the URL field. If you did not ever
change the IP address, it should be the default value as following:
Use default ID and password to login. Please enter the exact ID and Password if you
have changed the ID and Password. The Administrator Setting screen will show up
after login. With the Administrator Setting screen, you can change the TCP/IP related
attributes such as IP address, subnet mask and Gateway to fit your network
configuration. If you don’t know how to set these data, please consult your IT
technician for help.
Printing via TCP/IP
There are two methods of sending data to INNO-POS P80 for printing. The first one is
to use standard TCP/IP port as connection port of printer driver. The second one is to
use VCOM tool to create a virtual COM port as the connection port of printer driver.
Use Standard TCP/IP Port
Install the printer driver that comes with the companion Disc.
Open the Printers and Faxes from Windows Start menu
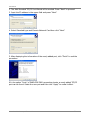
Select INNO-POS P80 and right click it to enter “Properties” of INNO-POS P80. Select
“Ports”.
1. Click “Add Port …” Select Standard TCP/IP Port and then click ”New Port…” to add a
standard TCP/IP port.
Inno-Pos P80 Receipt Thermal Printer
51
APPENDIX
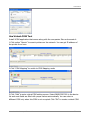
2. The Add Standard TCP/IP Port Wizard will be evoked. Press “Next” to proceed.
3. Input the IP address in the upper field and press “Next”.
4. Select Standard type and Generic Network Card then click “Next”.
5. After displaying the information of the newly added port, click “Finish” to end the
procedure.
6.In the option “Ports” of INNO-POS P80’s properties sheets, a newly added TCP/IP
port can be found. Select the new port and then click “Apply” to make it effect.
Inno-Pos P80 Receipt Thermal Printer
52
APPENDIX
Use Virtual-COM Tool
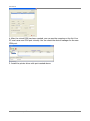
Install VCOM application that comes along with the companion Disc and execute it.
1.Click option “Search” to search printers on the network. You can get IP address of
the printer from here.
Inno-PosP80
2.Click “COM Mapping” to switch to COM Mapping mode
3.Click ”Add” to enter virtual COM setting screen. Select INNO-POS P80 in the device
list and most fields are filled with proper values automatically. You can select a
different COM only when this COM is not occupied. Click “OK” to create a virtual COM.
Inno-Pos P80 Receipt Thermal Printer
53
APPENDIX
4. After the virtual COM has been created, you can see the mapping on the list. Your
PC now has a new COM port virtually. You can check the device manager for the new
COM port.
5. Install the printer driver with port created above.
Inno-Pos P80 Receipt Thermal Printer
54
APPENDIX
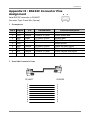
Appendix II : RS232C Connector Pins
6
Assignment
9
Serial RS232C connector to PC/HOST
Connector Type: D-sub 9Pin (Female)
1
5
1. Pins assignment
Pin #
Signal
I/O
Transmission
Function Description
1
2
TXD
Output
Printer PC/Host
Printer status data
3
RXD
Input
PC/Host Printer
Receive data
4
DTR
Input
PC/Host Printer
PC/HOST set ready signal
5
GND
6
DSR
Output
PC/Host Printer
Printer set ready signal
7
CTS
Input
PC/Host Printer
PC/Host ACK to RTS signal
8
RTS
Output
Printer PC/Host
Printer request send signal
Power ground
9
2. Series Cable Connection for Printer
PC/HOST
1
2
3
4
5
6
7
8
9
Inno-Pos P80 Receipt Thermal Printer
PRINTER
1
2
3
4
5
6
7
8
9
55