1
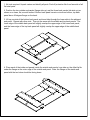
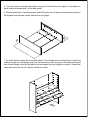
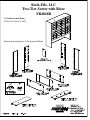
Kwik-File, LLC
Two-Tier Sorter with Riser
SR4846R
2- Tier Sorter with Riser,
48"W x 46 1/4"H x 13 1/4"D
Parts list and drawings for 2-Tier Sorter with Riser.
1. No tools required: Unpack carton and identify all parts. Peel off protective film from face side of all
flat steel parts.
2. Position the two outside end panels (flange side up) and the three back panels (tab side up) as
shown on a clean, flat, smooth surface. Bottom back panel has wire cutouts on bottom; top back
panel has a 45-degree flange on the back.
3. Lift up one side of the bottom back panel and insert tabs through the lower slots in the adjacent
end panel. Repeat with other side. Then do the same with the middle and top back panels. The
lower edge of the middle back panel will slightly overlap the upper edge of the lower back panel;
and the lower edge of the top back panel will slightly overlap the upper edge of the middle back
panel.
4. Place each of the inside end panels inside the outside end panels, loop side up; the offset lip fits
under the flange on the outer edge of the outside end panel. Note: the flange on the inside end
panel with the two holes should be facing down.
5. Take the 6 pieces of double-faced tape and peel off the backing; then apply 2 to the bottom of
each outside end panel and 2 to the back panel.
6. With the assistance of another person, each lifting from an end panel, swing the end panels up
90 degrees from the back panels, and set the unit upright.
7. To install shelves, begin with the bottom shelf (1" front flange and no divider slots). Position the
shelf so its tabs (on side flanges only) lock into the bottom rows of loops on the inside end panels,
and its back flange is held by the tabs on the back panel, and set it gently into place. Repeat this
same procedure with the four shelves with slots in them.
8. To install dividers, insert a divider through each slot. Dividers slide down through slots in all
shelves until they rest on the bottom shelf. Note: the end of each divider with the two holes should
be facing up.
9. When all the dividers are in place, pull each one forward to lock into position. Insert the plastic
buttons into the holes behind the dividers on the top and bottom shelves with divider slots.
10. Repeat steps #7, #8 and #9 to create the second tier of pockets in the sorter. (Start by installing
the top shelf of the first tier, which has no divider slots and a 1" front flange; this also acts as the
bottom shelf for the second tier.)
11. Position the top shelf (1" front flange and
no divider slots) over the top row of tabs on
the back panel and with its tabs through the
loops on the inside end panel, and set it
carefully in place.
12. Remove backing from double-faced tape
previously attached to bottom of sorter and
set in place. Tape will prevent sorter from
moving on table.