1
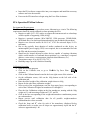
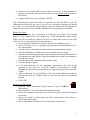
Force Plate Actimeter®
User’s Manual
Version 1.0
www.bioanalytical.com
1
Introduction
Purpose
The Force Plate Actimeter (FPA) is designed to be used in a wide range of applications
where the goal is objective quantification of a laboratory animal’s behavior. This device
can be used to quantify locomotor activity, startle, ataxia, focused stereotypies (head
bobbing, grooming, rearing, scratching, etc.), as well as tremor and seizure. The FPA can
also measure all of these behaviors in both rats and mice weighing between 15g and
500g. The FPA can replace several pieces of equipment in your laboratory by performing
all of their functions simultaneously!
Background
The Force Plate Actimeter is the invention of Professor Stephen C. Fowler and Troy
Zarcone, University of Kansas (Lawrence, KS). The concept and applications are
described by issued USA and pending international patents, USA Patent No. 6,601,010.
Professor Fowler and BASi jointly continued the development of the device under an
STTR technology transfer grant from the National Institutes of Health (Bethesda, MD).
FPA Features
•
•
•
•
•
•
•
•
Ventilated sound attenuating chamber for sensitive experiments looking at fine
motor activity
Force plate design allows much finer spatial and temporal resolution than
previous devices
Easy-to-clean plate and animal enclosure to facilitate higher throughput
Independent height adjustment of transducers and animal enclosure for easy setup
Specially indexed calibration weights included for more accurate and repeatable
calibration
USB connection between interface and personal computer (PC not provided)
Easy-to-use software for data collection and analysis (Windows 2000/XP)
Raw data exportable as a comma-delimited text file for custom post-hoc analysis
2
FPA Description
Animal
Enclosure
Force Plate
Cage
Adjuster
Transducer
Adjuster
Actimeter
Base
Figure 1: Construction of the Force Plate Actimeter
Actimeter
Interface
Sound
Attenuating
Chamber
Figure 2: Exterior view of the Force Plate Actimeter
3
Setting up the FPA
The Force Plate Actimeter is very easy to set up and install in your laboratory and is
designed such that one person can complete the installation and initial calibration process
in less than one hour.
Upon unpacking your FPA, you should have the following components:
• One (1) ventilated sound attenuating chamber
• One (1) black steel base
• One (1) carbon fiber force plate
• One (1) polycarbonate animal enclosure
• Four (4) adjustable transducer assemblies
• Four (4) numbered cable flags
• Four (4) adjustable animal enclosure supports
• One (1) FPA interface box
• One (1) set of specially-indexed calibration weights
• One (1) compact disc containing FPA software and tutorials
• One (1) interface power cord
• One (1) USB 2.0 cable
• Sixteen (16) small hex-head screws
• One (1) hex-head wrench
If you are missing any of these components, please contact BASi customer support at
1-800-845-4246 and ask for the In-Vivo Product Manager.
Component Installation:
• Place the black steel base on the working surface (table, etc.) with the sixteen (16)
screw holes facing upward oriented such that there are two holes on the ends of
each of the horizontal bars
• Attach each of the four (4) adjustable transducer assemblies with two (2) screws
to the base on the inner sets of holes such that the transducer points toward the
center of the steel base at a 45°.
• Attach the four (4) adjustable animal enclosure supports to the base perpendicular
to the adjustable transducer assemblies using the outer sets of holes.
• Place the base, with all attachments, in the sound attenuating chamber
• Label each of the cables coming from the four (4) transducers with the provided
cable flags according to the quadrants of the Cartesian coordinate system (#1 is
located in the top-right corner, and numbering continues counter-clockwise to #4).
• The transducer cables are then routed out the back of the box and to the
corresponding numbered outlet on the back of the FPA interface box.
• The cord coming from the fan is also routed to the corresponding outlet on the
FPA interface.
• Insert the USB 2.0 cable into the FPA interface, as well as the computer on which
you intend to install the FPA software.
• Attach the power cord to the FPA interface, but DO NOT POWER IT ON.
4
•
Insert the FPA software compact disc into your computer and install the necessary
software and view the tutorials.
• Power on the FPA interface to begin using the Force Plate Actimeter.
FPA Operation/FPARun Software
Environmental Requirements
The FPA was designed for use in procedure rooms, laboratories or vivaria. The following
requirements should be strictly adhered to when operating the FPA:
• Requires a stable (24" x 24") surface to support the instrument such as a benchtop
or table capable of supporting 150lb (68 kg).
• Requires a personal computer (Win 2000/XP, 1GHz processor, 250MB RAM,
40GB hard drive) for data acquisition and analysis (not included with purchase).
• Requires two electrical outlets 90-264 VAC, 47-63 Hz universal input, 50 VA
maximum.
• Due to the typically short duration of studies conducted on this device, an
uninterruptible power supply (UPS) is not required, but is recommended for both
the FPA and the associated computer.
• Should not be located adjacent to other devices capable of creating vibrations
which would interfere or confound data acquisition (e.g. centrifuges, reciprocal
shakers, vortex mixers, vacuum pumps, ultrasonic dismembrators, etc.)
• Temperature range: 60 to 160°F (15 to 72°C)
• Humidity range: up to 80% Relative Humidity
Calibration Procedure
• Open the FPARun program.
• Click on the Calibrate icon, or go to FileÎSet Up Force Plate
Actimeter
• Click on the Calibrate button located in the lower right corner of the window
• On the calibration screen, click on the 100g button on the left wide of the
calibration grid
• Enter the actual weight of the calibration weight closest to 100g
• Repeat for the other three calibration weights
• Next to each of the weight buttons, note the four empty boxes, corresponding to
each of the Calibration Weights for transducers F1 through F4
• Place the four Calibration weights on the four transducers, starting with the 100g
weight on F1, and increasing weights on F2, F3, and F4
• Click in the box corresponding to the weight and transducer combination present
on each transducer
• Repeat process until calibration data for all possible weight-transducer
combinations have been recorded
• Check the slope and R2 value for each of the transducers (displayed below
calibration boxes) to make sure all slopes are approximately equal and the R2
values are approximately 1.00
5
•
•
If there is a case where either of these values is off for one or more transducers,
attempt to recalibrate, and if still unsuccessful, see the Product Support section of
this manual
If slopes and R2 values are acceptable, click OK
This calibration process does not need to be repeated every time the FPA is used. The
calibration can be good for up to one (1) year if care is taken not to traumatically disturb
the system. It is recommended, though, that the system be calibrated at the beginning of
each new experiment to ensure that the calibration for each experiment is consistent.
Balance Procedure
The first step to setting up an experiment is “balancing” the system. This essential
process is very similar to the “tare” function on a scale, and therefore must be done
before each time an animal is placed in the FPA to ensure total accuracy of the data
collected. This is achieved by the following procedure:
• Upon exiting the Calibration screen, you should be at the Balance screen
• On the left of the screen is a graphical representation of the distribution of force
on each transducer
• Close the doors to the animal enclosure and the sound attenuating chamber
• Note the distribution of weight on the system while the doors is closed
• Open the sound attenuating chamber door and adjust the black knobs on each of
the transducers to equal out the weight distribution noted on the four transducers
with the door closed
• Close the door to the sound attenuating chamber again
• Click the “Balance” button
• If all four transducers are not supporting approximately the same weight
(signified by the green bar across the graphical representation of weight
distribution), repeat the process until they are supporting approximately the same
weight
• After it is balanced, if you would like to, place one of the calibration weights on
the plate and click the “Weigh” button to verify that the system is functioning
properly
• Click “OK”
Setting up an Experiment
• Click the “New Measurement Setup” button or go to FileÎNew
Measurement
• Enter the project I.D. and operator name/initials (optional)
• Choose the sampling rate at which you would like to collect data (10-200 points
per second)
• Choose the number of data points per frame (1024=shorter frame times or
2048=longer frame times)
• Choose the number of frames in the run (determines total run time)
6
•
•
•
•
•
If your experiment is looking for activities during low mobility, adjust the radius
and duration required to register one Bout of Low Mobility (BLM, see
definitions)
Enter the animal I.D., sex, and date of birth
Enter any pre-run notes that are pertinent (optional)
Click the “Save to” button and choose the file name and location that you would
like the data saved to
Click “OK”
Default Settings
Most experiments will not require adjusting the default settings, but experiments
examining gait or those requiring lower sensitivity levels may warrant adjustments. The
two parameters that are adjustable are the Moving Average Kernel and Threshold. The
Moving Average Kernel is used primarily to eliminate the effects of gait on locomotor
activity. This parameter has a default value of 5, which was shown by Fowler, et al. to
eliminate the effects of gait on distance traveled and the plot of movement. The
Threshold is a value in grams that determines the minimum weight used to register
locomotor activity, and has a default setting of 0g. This is used primarily to create a
cleaner trace of locomotor activity and obtain more accurate numbers for distance
traveled. Adjusting the Threshold value will not affect the Force Plate Actimeter’s ability
to measure fine motor activity such as tremor or focused stereotypy. Both of these
parameters can be changed in the analysis software following data collection (without
altering the raw data collected), so it is not critical to have these settings fine-tuned before
an experiment begins.
Running an Experiment
After setting all of the parameters for the experiment, and before you begin data
collection, place an animal in the FPA. Make sure the cage door and sound attenuating
chamber door are properly closed and latched (sound chamber is not necessary if only
looking for gross locomotor activity, but is HIGHLY recommended for all experiments.
If you are looking at behavioral changes due to an induced stimulus, injury, drug effect,
etc. it is necessary to run the animal in the FPA with a vehicle that does not alter the
animal’s behavior (i.e. saline) to ascertain the animal’s baseline behavior. This method
will provide directly comparable data regarding the animal’s behavior before and after
dose/stimulus.
Recording Behaviors
There are three pre-defined and three user-defined behavior “flags” to mark behaviors
during a run that can also be used to mark behaviors during data analysis using the FPA
Analysis software. Clicking on one of these markers will place a labeled, time stamped
mark on the force plot that can be retrieved in the “Event-Force View” screen in the FPA
Analysis program. There is also a “Run Note” option that will leave a labeled, time
stamped mark on the force plot, but can be used to record observations that require
further explanation than a simple letter. These are retrieved in the Analysis program on
the “Report” screen and also in the “Event-Force View” screen with the other behavior
markers.
7
FPA Help File
There are two ways to access the Help file for both the FPA Run and Analysis
software. Clicking the Help icon will access a quick-help option in which you
can click any part of the screen and get either a description of the function of the item you
click on, or a definition for a term if a term is clicked. A full help file can also be
accessed by going to HelpÎHelp Index. Navigating to HelpÎAbout FPARun will bring
up a dialog box containing information about the software version and copyright
information. For additional help, see the “Frequently Asked Questions” section at the end
of this manual.
Cleaning the FPA
Cleaning the FPA after an experiment is quick and easy. Start by removing the animal
enclosure and force plate. These parts can be easily cleaned with an antimicrobial cleaner
either by spraying the parts and wiping them down or by submerging them in a sink. The
sound attenuating chamber and transducer base can be cleaned by spraying with
antimicrobial cleanser and wiping down. Do not submerge these components as there are
electrical wires that could pose an electrocution hazard.
Data Analysis
Data analysis can be done via the FPAAnalysis program provided with the purchase of
each FPA, or the data can be exported as a tab-delimited text file for analysis using your
preferred software package. The following is a brief description of the contents and
functions of each of the screens in the FPA Analysis software:
Report
The report is a log of general information about the experiment. The report
contains the information entered during the Setup phase of the experiment (file
name, animal information, project information, etc.), as well as all run notes and
calibration information.
Movement Trajectories
This screen contains graphical representations of the animal’s position on the
force plate during each frame of the experiment.
Frame Graphics
This screen contains the movement trajectories, force plot, and distance traveled
for each frame of the experiment.
Tabular Frame Summaries
This screen contains all of the information that was listed in the table that was at
the bottom of the window in the FPA Run program. This table contains a large
amount of valuable information that can be used for statistical analysis.
Traveled Distance
This screen contains a plot of distance traveled for the entire experiment.
8
Frequency Response and Tremor
This screen contains information relevant to analyzing rhythmic behaviors such
as tremor. On the left side of the screen are the parameters used for the Fourier
analysis and the population of the table in the window in the upper-right portion of the
screen. The first parameter allows you to choose between using all of the data, or only the
data in a frame where there is at least one bout of low mobility (BLM). This can be useful
if the behavior that you are looking for only occurs while the animal is sitting still. The
next parameters are used to define the spectral analysis. Averaging can be done across
any number of consecutive frames by changing the number in the first box (“Average
Spectra Over XX frames”). The units of power can also be changed from standard units
to log10 units, the starting frequency can be changed (0 to 2 Hz). The power spectra
scales can also be changed from being independently scaled by unselecting the check-box
on the left. It is also possible to obtain the average power in each frame over three
specific frequency bands. This is useful if the behavior you are interested in is frequencyspecific, and is also used to calculate the tremor indices, which quantify the difference in
power between two bands (high power band vs. low power band). The option of whether
or not to calculate the focused stereotypy score is also available.
In the top-right window is located a table with information from the Fourier analysis.
This table contains the information for which parameters were set in the using the
window to the left, as well as a few other numbers from the main data table. Below the
table is the frequency response curve with the movement trajectory for each frame (or
block of averaged frames).
Event-Force View
The Event-force View contains the force plot for the whole session. You can use
the cursor to zoom in on specific portions of the plot (by clicking and dragging to
make a box). Also, all of the run notes and behavior markers are logged in the window on
the left. These are sortable by type and time by clicking on the header for the appropriate
column. Double-clicking on one of the markers will cause the plot to zoom in on the
selected marker. Clicking on the magnifying glass in the toolbar with the negative sign in
it will expand the window out to the original zoom level.
Replay
The replay screen can be used to show the animal’s movements, force plot,
distance traveled, rotation, etc. in “real-time” as if the experiment were being rerun. This is a useful tool for characterizing behaviors based on movement, or lack thereof.
All of the above features can be found in both the toolbar and the menu bar. In addition, it
is also possible to alter the default settings (in the event that they were not set correctly in
the FPA Run program) by going to FileÎModify Default Settings. This will bring up a
dialogue box identical to the one in the FPA Run program, and changing any of the
parameters will automatically update all of the tables and plots in the FPA Analysis
9
software. Data can also be exported from the analysis program by using the right-click
options (when available) or by using FileÎExport in the menu bar.
Frequently Asked Questions
Q: How long can I run an experiment in the FPA?
A: The FPA is designed to conduct experiments for up to four (4) hours at a time. This
restriction is due to the lack of food, water, and bedding in the animal enclosure of the
FPA. If you wish to run longer experiments, the cage may be modified to accommodate
food and water dispensers, but it is not recommended given that excessive amounts of
food and water on the force plate could affect data accuracy.
Q: What species are best suited for use in the FPA?
A: Mice and rats between the weight of 15g and 500g are best suited for use in the FPA.
If you need the capability to run experiments outside of this weight range, please contact
the BASi In-Vivo Product Manager at 1-800-845-4246, as we would like to assist you
with this need.
Q: What do I do if I did not receive one or more components of my FPA?
A: Please contact BASi customer support at 1-800-845-4246 and ask for the In-Vivo
Product Manager.
Q: Who do I contact to purchase additional parts for my FPA?
A: If you would like to purchase additional components such as an extra force plate or
replacement transducers, please contact BASi at 1-800-845-4246 and ask for the In-Vivo
Product Manager.
Q: How do I know when my FPA needs recalibrated?
A: There are several ways to tell when your FPA requires recalibration. One way to tell
that your FPA needs recalibrated is the inability of your FPA to accurately ascertain the
weight of objects placed on it. Another way to tell is that the motion-tracker located in
the FPARun program is not accurately representing where the animal is located on the
plate. The best advice that can be given with respect to this question is that it is
recommended that you follow the calibration routine suggested earlier in this manual.
Q: Do I have to use the sound attenuating chamber?
A: If you are only looking for general locomotor activity, and not any fine motor
activities, then it is not necessary to use the sound attenuating chamber during an
experiment. It is advised that you try this before beginning an experiment in order to
determine whether the sound levels in your laboratory will affect the results of your
experiment.
Q: Can I use the FPA to measure operant behavior?
A: Yes, but it requires modifications by the end-user. Any number of devices can be
suspended from the walls of the animal enclosure to measure operant behavior as long as
they do not touch the force plate. The cage can be modified to accept devices such as a
10
cylinder to mimic a rotometer, mazes, dark-light preference inserts, or lever presses and
similar devices. The top of the animal enclosure is removable to help facilitate these
modifications.
Q: Can I place items in the FPA with an animal?
A: Yes, as long as the combined weight of the item and the animal does not exceed 500g,
and the item is fixed to the force plate to prevent it from shifting. In order for this to
work, the item must be placed in the FPA before the animal and the “balance” procedure
must be followed with the item on the plate. Items such as loose bedding should not be
used.
Q: How many FPAs can I use with one computer?
A: One computer can operate from one (1) to four (4) FPAs at one time. Additional
computers will be needed to operate more than four (4) FPAs.
Q: How many animals can I place in the FPA at one time?
A: Only one animal can be monitored in the FPA at one time. The premise of the FPA
technology is the tracking of the center of mass on the force plate with unprecedented
precision and accuracy; therefore it is impossible to accurately portray more than one
moving object on the force plate at the same time.
Q: Can BASi help in developing methods for running experiments using the FPA?
A: Yes. Since BASi uses the FPA in its own vivarium for contract services, we would be
happy to work with you to develop methods for running experiments in your FPA. Please
contact BASi at 1-800-845-4246 for more information on this contract service.
Q: What other contract services does BASi offer using the FPA?
A: BASi offers contract services for both complete FPA experiments including data
analysis, as well as experiments in which we only acquire data using the FPA and send
the data files to your laboratory for analysis. The latter service is great if your laboratory
is experiencing a temporary lack of personnel (sick leave, vacation, etc.).
Product Support
BASi proudly stands behind all of its products and services. Because of this, we offer
expert technical product support on the Force Plate Actimeter. If you have a question
regarding technical problems with the FPA, please call 1-800-845-4246 and specify that
you have an FPA technical question and we will be happy to help you resolve your
technical problems. We also offer service contracts that will entitle you to on-site service
of your FPA as well as free software upgrades as new versions are released. On-site
service and software upgrades will also be available to users without a service contract
for a fee.
11
If you experience technical problems that require the purchase of additional FPA
components (broken force plate, transducer, etc.) please call the number above and ask
for the In-Vivo Product Manager.
If you would like BASi to come to your facility and conduct a product orientation
workshop, the In-Vivo Product Manager can arrange this service for a fee.
12