1
Smart Mover
User Manual
Version 4.2.0 October 4, 2006
Smart Mover
Á link to Index
Warning
Smart Mover can improve workflow and streamline
tasks by automating many processes that are usually
done manually. But setting these tasks up incorrectly,
system, or programming errors can result in the lose of
critical data.
It is very important that you back-up all important data
and system files and maintain those backups in a safe
place. You should also keep access to this program secure from unauthorized users.
Please read the enclosed license agreement carefully
for more information.
Smart Mover
Smart Mover
Á Link to Index
Smart Mover is owned by Varsity Systems, LLC and is distributed under special agreement with
WoodWing Software, The Netherlands and its distributors worldwide.
Software License Agreement
This is a legal agreement between you and Varsity Systems, LLC covering your use of Smart
Mover (the “Software”). Be sure to read the following agreement before using the Software. BY
USING THE SOFTWARE (REGARDLESS IF YOU HAVE REGISTERED THE SOFTWARE
OR NOT), YOU ARE AGREEING TO BE BOUND BY THE TERMS OF THIS AGREEMENT.
IF YOU DO NOT AGREE TO THE TERMS OF THIS AGREEMENT, DO NOT USE THE
SOFTWARE AND DESTROY ALL COPIES IN YOUR POSSESSION.
The Software is owned by Varsity Systems, LLC and is protected by United States copyright
laws and international treaty provisions. Therefore, you must treat the Software like any other
copyrighted material (e.g., a book or musical recording). Paying the license fee allows you the
right to use one copy of the Software on a single computer. You may not use it on more than one
computer at the same time. You may not rent or lease the Software, nor may you modify, adapt,
translate, reverse engineer, decompile, or disassemble the Software. If you violate any part of this
agreement, your right to use this Software terminates automatically and you must then destroy all
copies of the Software in your possession.
The Software and its related documentation are provided “AS IS” and without warranty of any
kind and Varsity Systems, LLC expressly disclaims all other warranties, expressed or implied,
including, but not limited to, the implied warranties of merchantability and fitness for a particular
purpose. Under no circumstances shall Varsity Systems, LLC be liable for any incidental, special,
or consequential damages that result from the use or inability to use the Software or related documentation, even if Varsity Systems, LLC has been advised of the possibility of such damages. In
no event shall Varsity Systems, LLC liability exceed the license fee paid, if any. Because some
states do not allow the exclusion or limitation of liability for consequential or incidental damages, the above limitations may not apply to you.
This Agreement shall be governed by the laws of the State of Michigan, USA. If for any reason
a court of competent jurisdiction finds any provision of the Agreement, or portion thereof, to be
unenforceable, that provision of the Agreement shall be enforced to the maximum extent permissible so as to effect the intent of the parties, and the remainder of this Agreement shall continue
in full force and effect.
Smart Mover
Smart Mover
Á link to Index
Smart Mover Manual - Index
Section 1-
I.
II.
III.
IV.
V.
VI.
VII.
VIII
Introduction to Smart Mover
Overview............................................................................................ A1
Purpose............................................................................................... A1
Operating System Requirements........................................................ A2
Support Contacts and Information..................................................... A2
Mover Installation.............................................................................. A2
Mover Registration............................................................................ A2
Backing up your Mover settings........................................................ A3
Major Changes in Version 4.2............................................................ A3
Section 2-
I.
II.
III.
Description of Smart Mover’s Main Windows
Mover Status Window........................................................................ A4
Description of Available user created processes window.................. A4
Description of process log window.................................................... A5
Section 3-
I.
II.
III.
IV.
Smart Mover Preferences
Suffix Conversions............................................................................. A6
Log Purging........................................................................................ A7
Miscellaneous..................................................................................... A7
Saving................................................................................................. A7
Section 4-
I.
II.
III.
Creating and editing processes
Create a new Process.......................................................................... A8
Edit an existing Process..................................................................... A8
Working with a Process...................................................................... A8
Section 5-
I. II.
III.
IV.
V.
VI.
VII.
VIII.
IX.
X.
XI.
XII.
XIII.
Description of Tasks available
Copy Files.......................................................................................... A10
Delete Files........................................................................................ A11
Move Files.......................................................................................... A12
Translate Tables.................................................................................. A13
FTP Put Files...................................................................................... A16
FTP Get Files..................................................................................... A17
Get Email........................................................................................... A18
Stuff Files (Mac Only)....................................................................... A19
Expand Files....................................................................................... A20
Zip Files............................................................................................. A21
UnZip Files........................................................................................ A22
Run Application................................................................................. A23
InDesign Server.................................................................................. A24
Smart Mover
Á Link to Index
Smart Mover
Section 6-
I
II III
IV V. VI
VII Smart Mover and Smart Connection Enterprise
SCE Login.......................................................................................... A27
SCE UpLoad...................................................................................... A28
SCE Folder Upload............................................................................ A29
SCE DownLoad................................................................................. A30
SCE Delete......................................................................................... A31
SCE Download-Upload (Version)...................................................... A32
SCE Logout........................................................................................ A34
Section 7- Backing up your Settings
I. Using the Backup Settings Menu....................................................... A35
Appendix A
I. Using Regular Expressions in Table Translations.............................. B1
Appendix B
I. InDesign Server Scripts..................................................................... B7
Smart Mover
Á Link to Index
Smart Mover
Section 1 - Introduction
I. Overview
Most businesses use computers to power the processes that make the businesses profitable.
However much of the power of the computer lies dormant in that many of the processes that
are completed day to day require interaction between the computer and the user. The reality
is that many of these manual tasks can be automated, freeing up the user to perform other
tasks and functions that the business can use to become more profitable.
II. Purpose
Smart Mover was created to help make the process of working with computer files and
information more automated.
Smart Mover allows the user to create an unlimited number of “Processes”. In turn, each of
those Processes is composed of a series of individual “Tasks”. The Processes can then run
unattended on a scheduled basis.
Smart Mover has the ability to perform the following Tasks:
1. Move files/folders
2. Copy files/folders
3. Delete files/folders
4. FTP Get and FTP Put files
5. Get E-mail from servers
6. Perform complicated Regular Expression search and replace functions on the contents
of a text file.
7. Compress and decompress files - Support for compression and decompression is
provided via the .zip format or the StuffIt format. Support of StuffIt files is Macintosh
only feature and requires appropriate licensing from Allume (www.stuffit.com).
8. Run Application - This task allows the user to write an AppleScript or other applications that do nor require user input.
9. SCE (Smart Connection Enterprise) functions. These include Uploading, Downloading
and Deleting files from the Enterprise system.
10. Process jobs using InDesign Server
Smart Mover
Smart Mover
Á link to Index
For example a Process could be set up to:
A. Move a file from Folder A to Folder B.
B. While the file is being moved all occurrences of the word “Stocks” could be replaced
with the words “Bonds” and all line feeds could be removed.
C. The resulting file could then be compressed (“Stuffed”) and sent via FTP to a remote
server.
III. Operating System requirements
Smart Mover requires Apple Macintosh Mac OS X 10.2 and above running on a PowerPC
machine with at least 20 MG of available RAM and 20 MG of disk space.
If Smart Mover is being deployed on the Windows platform, it requires Windows 98 or
higher running on a Pentium 2 or equivalent processor with at least 20 MG of available
RAM and 20 MG of available disk space.
Smart Mover requires IP Network access to perform the Internet related tasks such as FTP
Get or Put and to Get E-mail.
QuickTime needs to be installed on the machine to include previews and thumbnails on
most SCE Upload Tasks.
IV. Support contacts and information
Support for Smart Mover is available from your WoodWing distributor.
V. Mover Installation
Simply copy the Smart Mover application file into the desired folder on your hard disk.
VI. Mover Registration
The first time you run Smart Mover on a given machine, you will be asked to enter your
serial number. You can run the application in an unregistered mode by leaving the serial
number blank.
A unregistered version of Smart Mover will run through 5 Process cycles and then stop. To
use the application for another 5 cycles restart the application.
Once Smart Mover has been registered this limitation is removed.
If you ever need to transfer Mover to another machine, you can click the UnAuthorize button found on the About Smart Mover window.
Smart Mover
Smart Mover
Á Link to Index
VII. Backing Up Your Mover Settings
As you will see, setting up Smart Mover Processes and Tasks is quite simple, but nevertheless, in case of an equipment failure, you would not want to have to do it all again. For
this reason, you can “backup” all of the current settings using the “Backup Settings” menu
located under the “File” menu.
Simply select the “Backup Settings” menu item (only available when the Process Timer is
off) and select a backup destination folder from the presented dialog. This will copy the
folder “Smart Mover” from your system preferences folder to the location you specified.
All of your Process and Task settings are stored in this folder. Should you have an equipment failure requiring you to use another machine, just copy that backup folder to that new
machine’s Preferences folder, remove “Backup” from the folder name, install the Mover
application itself and you should be running.
A few additional considerations:
When you backup the settings make sure that the backup files are stored on another machine
or removable media. If the normal Smart Mover machine fails, having a backup on the
machine that has failed will not do you much good.
If you do need to use the backup, and any of your Tasks were dependent on a local folder
(i.e. on the failed machine’s own disk) then there is a good chance you will need to reset
such Tasks.
In addition you will need to re-enter your serial number for the application so be sure to
keep that information in a safe place.
VIII. Major Changes in Version 4.2
InDesign Server support has been added. This Task will allow you to send jobs to InDesign
Server where they are processed according to a user definable Script.
Support for SCEnterprise server version 4.2 has been added.
Smart Mover
Smart Mover
Á link to Index
Section 2 - Description of Mover’s main window
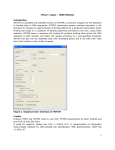
I. Smart Mover Status Window
After you have successfully installed Mover, started the application and run through the
registration process, Smart Mover will present to the user the Process window. See example
below.
This window is broken down into two areas: “Available User Created Process” and “Process
Logs”.
II. Description - Available User Created Process...
Smart Mover main screen
Any previously created Process will be displayed in this list along with its Status. The Status
names are assigned by Mover and include the following:
1. Not Active - indicates that this Process has not been made active in the Process Setup
window and will not run when Mover’s Process Timer is running.
2. Active every (x min) - indicates that this Process will run every X minutes when
Mover’s Process Timer is running (only displays when the Process Timer is not running).
3. Next Run at hh:mm:ss - indicates the time this Process will run next. (Only displays
when the Process Timer is running) The time displayed is a combination of the last
time the Process ran and the time interval assigned by user for the Process.
4. Queued - indicates that the Process is scheduled to run but the maximum number of
running Processes has already been met. See Preferences Misc for more information.
Below the “Available...” window are five buttons:
1. Start Time/Stop Timer - Used to Start and Stop the Process Timer and thus run any
Smart Mover
Á Link to Index
Smart Mover
Processes that are currently active.
2. Run a Process Immediately - Selecting a Process from the window and then pressing
“Run” will cause that Process to run once immediately. This is a good way to test an
individual Process.
3. New Process - Use this button to create a new Process.
4. Edit Process - Select a process in the window and press this button to change the
Process settings.
5. Delete Process - Select a Process from the window and pressing Delete will delete the
selected Process. Warning: Once a Process is deleted it can not be retrieved. Smart
Mover does require user confirmation before deleting a Process.
6. Copy Process - Copy the selected process. The copied process will appear in the window with the word copy appended to the end of the name.
III. Description - Process Logs...
The Process Log window displays the results of all previously run Processes. The results in
this window include the Date - Time the process ran and Name of the Process.
Logs are kept for two reasons:
1. Diagnostics: if a Process failed the Log text will help you determine why.
2. Audit Trail: when did a file arrive and how did it move through your system?
View Log button
Each Process Log contains more information about what happened when the Process ran.
If the Process Log item is RED then an error occurred during the Process.
To find out about the error or to just see what happened when a Process ran, selected the
log in the Log list and press the View Log button. Doing so will bring up another window with the detailed results of each step in the Process. Press “Close” to close the Log
window.
Purge & Purge Selected....
The Purge button will purge the logs based on the settings in your Mover Preferences.
The Process Timer must be turned off for this option to be available See Section 3
- Preferences for more information. The Purge Selected button will only purge the logs
you have selected in the list.
Select Process
To help you find when a particular process has run, select it in the Available Process List
and click the Select Process button. This will select and thus highlight all the log entiries
for that Process.
Smart Mover
Smart Mover
Á link to Index
Section 3 - Smart Mover Preferences
Before you start using Smart Mover there are several Preferences that you may want to set.
The location of the Preferences menu is based on the
operating system you are
using but regardless select it
to open the window. You will
see 3 tabs.
They are:
1. Extension Conversions
2. Log Purging
3. Misc.
I. Suffix Conversions
Extension conversions allow
you to set the Creator and
Smart Mover Preferences Screen - Extensions
Type of incoming FTP and Email enclosed files based on
the file name extension. So, for example, if you would like to make sure that PDF files are
going to open in Acrobat:
1. Press the “Add” button to add a listing in the window.
2. Navigate to an example file, for instance any good PDF file on your machine, and
select the example file.
You are done. Now when Mover receives file with a “.PDF” extension it will assign the
proper Creator and Type.
If you would like to delete a listed combination choose the combination from the list and
press the “Delete” button.
II. Log Purging
Logs can be set to purge themselves on a scheduled basis instead of you, the user, pressing
the “Purge Logs” button.
Just set the time that you would like to have Mover purge the logs. You probably want
Mover to do this when it is not usually busy, maybe 1:00 am. Also set how many days logs
are to be kept on the system.
We suggest less than 7 days. Keep in mind the purpose of the logs discussed in Section III
“Log Window” to help you determine the proper setting for your application.
Chances are that some Process will run but that it will not do anything. For example, the
Process may check an E-mail account but there is no new mail. If you do not want such a
Smart Mover
Á Link to Index
Smart Mover
“did nothing” Process logged then check the “Log Process that do nothing” check box.
If you are creating Process that include
Smart Connection Enterprise Tasks and you
need to record the messages send to and
from the server, you can check the “Log
SCE Server....” option. Doing this will create a sub-folder in the same folder as this
application called “Mover SCELogs”. As
each message is sent its text will be placed
in a file in this folder. This can provide
invaluable debugging help.
Do not leave this option turned on since it
will negatively impact performance.
Smart Mover Preferences Screen - Logs
III. Miscellaneous
The Miscellaneous section of the Preferences allows you to set the location of Stuffit Expander and DropStuff. This information is required if you want to use Mover to automate
the stuffing or unstuffing of files. In addition, this tab allows you to set whether or not
Mover will start its Process Timer automatically upon start up or require an operator to do
that.
You can also set the “Maximum number
of Running Process” Mover is allowed
to run at the same time. If a Process is
scheduled and this number would be
exceeded then it will be “queued” and
will not run until another Process is
completed. Queued Process are noted
in the Process List Status column and
a colored orange. But queued Process
do not run according the the oldest first.
Instead the topmost Process in the list
will be run first. This allows you to set
Smart Mover Preferences Screen - Misc.
a crude form of priority by naming more
important Process lower alphabetically.
Windows Note: in this window only the
You may also preceed the Process name with numbers to ‘Application Options’ selection is available.
more easily set the priority.
IV. Saving
If you do not wish to save any changes you have made to any of your Preferences click the
“Cancel” button. Otherwise click “Save”.
Notes:
The Preference menu will not be enabled if the Process Timer is running.
Smart Mover
Smart Mover
Á link to Index
Section 4 - Creating and Editing Processes
Every Process is made up of one or more Tasks and each Task has appropriate settings that
need to be designated for it to operate. Following is a description of how that is done.
I. Create a new Process
To create a new Process,
click the “New Process” button on the Status Window.
You will immediately be
presented with the dialog to
the right asking you to enter
a name for this new Process.
Enter something meaningful
like “Get support mail” or
“Delete old files”. Then click OK to proceed
with the creation of the Process. Click Cancel
should you decide not to create a new Process
at this time.
New Process dialog
Processes can have a max of 25 characters for Process
names. Names can also not contain “:”, “\”, or “/”.
Now skip to part III below.
II. Edit an Existing Process
Select the Process you wish to edit from the “Available User Created Process” list on
Mover’s Status Window and click the “Edit Process” button.
III. Working with a Process
If you are editing an existing Process or creating a new Process, you will see a dialog similar
to the one on the next page. This is where you will set up all the Tasks and other settings for
the current Process.
The “This Process is Active” check box controls if the Process is to run automatically when
the Process Timer is running. And if it is “active” (check box checked) then “This Process
runs every X minutes” controls how often it will run.
The list of “Available Tasks” on the left portion of the screen includes all the Tasks that are
available regardless if they are used in this Process or not. To include one or more of the
Tasks in this Process, select it in the list and click the “Add” button located to the right of
the list. You will see that Task added to the “Tasks in this Process” list just to the right.
If you would like to remove a Task from the “Tasks in this Process” list then select it in that
list and click the “Remove” button to the left of the list.
Smart Mover
Á Link to Index
Smart Mover
Changing the order of Task Execution
Since each Task is executed in the order it appears (top to bottom) in the “Tasks in this Process” list, you might need to change the order of execution. To do this, select the Task you
need to change and click either the “Up” or “Down” button to change the order.
Task Settings
Every Task requires some
settings. For example: “Delete Files” needs to know
which folder to delete the
files from. So to create or
modify these settings, select
the Task in the “Tasks in
this Process” list and click
the “Edit” button. You will
be presented with a dialog
requesting all the appropriate settings for that Task.
See Section 5 for detailed
information for each availEdit Process screen
able Task.
Selecting a Task in the “Tasks
this Process” list will display that Task’s settings under the “Task settings summary”.
To rename a Process click in the ‘Edit Name’ field, highlight the text and type the new name
for the Process.
Finally click “Save” or “Cancel” as appropriate to exit this dialog.
Notes:
If you are editing a Process it will not run even if it is scheduled.
If using the Macintosh version “Expand Files” and “Stuff Files” are displayed in italics.
Before you can use these Tasks you must use the Preference menu to setup those Tasks See
Section 5, Stuffing and Expanding Files. This is not an option under Windows.
Smart Mover
10
Smart Mover
Á link to Index
Section 5 - Description of Tasks
I. Copy Files
“Copy Files” is used to duplicate
files in a “watched” or source folder
into a destination folder. After
completion of the process each file
will exist in both folders. Should
you want the files to be copied to
the destination and not remain in
the source folder use the “Move
Files” task or follow this task with a
“Delete Files” task.
To choose the folder from which the
files will be copied press the “Select Source Folder” button. A Find
Folder dialog will appear. Navigate
to the appropriate folder, or if you
need to, create a new folder at the
Copy Files Task
location you wish. Select the folder
and press the “Choose” button. The
application will return you to the “Copy Files” screen and text describing the path to the
folder you just selected will be displayed just below the button.
Repeat this process using the “Select Destination Folder” button and choosing the appropriate folder.
Optionally you may also choose to “Include Sub-Folders”. If this check box is not checked,
then this task will ignore any folders that appear inside the “Source” folder. If the check box
is checked then “Copy Files” will copy all folders located inside the “Source” folder along
with their contents to the “Destination” folder.
After you have made the required choices, click the “OK” button to save the settings you
have made or click the “Cancel” button to ignore any changes.
Notes:
If a file of the same name already exists in the destination folder then it will be replaced.
If a file is “busy” at the time this task runs then it will not be copied.
If you do not move or delete a given file from the “Source” folder that file will be recopied
every time this task runs.
Smart Mover
Á Link to Index
Smart Mover
II. Delete Files
Like some other tasks, “Delete Files” requires selection of a “watched” or source folder.
Once the folder is selected, and based on some additional options, the Task will delete any
file or folder that appears in that
folder.
To choose the folder from
which the files/folders will
be deleted press the “Select
Folder” button. Choose the
folder that will contain the file
that will be deleted.
Mover will not allow you to select an entire disk drive or some
folders critical to your systems
operation but you must be careful to select the correct folder to
avoid unwanted loss of data.
The “Delete Files” task provides additional options to allow it to be a little more selective in the files that it deletes.
Delete Files Task
If “Delete Immediately” is selected, all the files found in the
folder when the Task runs will be deleted. Or you can choose to “Delete if Creation Date
is older than X hours”. With this option the Task will wait for the files Creation Date to be
older than the number of hours you specify in “X”. Once the file is older than the entered
time the file(s) will be deleted.
“Delete files in Sub Folders” allows the Task to look inside folders that appear in the selected folder and delete the files inside that folder. And if there are empty sub-folders and
“Delete Empty Sub-Folders” is selected then they too will be deleted.
You can also choose to “Never delete files types or extensions of:”. Any file with either of
the listed file types or extensions will not be deleted. You can add to either exclusion list
by clicking the appropriate “Add” button and then choosing a sample file from the resulting
“Select file” dialog. To delete from either list just select the item to be deleted and click the
appropriate “Delete” button.
After you have made the required choices, click the “OK” button to save any settings you
have made. Or click the “Cancel” button to ignore any changes.
Notes:
The importance of setting this Task correctly can not be overstated. Make sure you do not
accidentally delete the wrong files.
Smart Mover
11
12
Smart Mover
Á link to Index
III. Move Files
“Move Files” as the name implies, is used to move files located in a “watched” or source
folder into a destination folder removing them from the source folder. Additionally, during
the “Move” text data
within the files can be
translated based on a
powerful regular expression table.
To choose the folder
from which the files will
be moved from press the
“Select Source Folder”
button. A Find Folder
dialog will appear.
Navigate to the appropriate folder, or if you
need to, create a new
folder at the location you
wish. Select the folder
and press the “Choose”
button. The application
will return you to the
Move Files Task
“Move Files” screen and
text describing the path
to the folder you just selected will be displayed just below the button.
Repeat this process using the “Select Destination Folder” button and choosing the appropriate folder.
See Section 5, Part IV of this section for instruction on the use of Translate Tables.
After you have made the required choices, click the “OK” button to save any settings you
have made. Or click the “Cancel” button to ignore any changes.
Notes:
If a file of the same name already exists in the destination folder then it will be replaced.
If a file is “busy” at the time this task runs then it will not be moved.
“Move Files” will always also move sub-folders and their contents.
Smart Mover
Á Link to Index
Smart Mover
IV. Translate Tables
Even though Translate Tables are not a Task per se, they are a major feature of Mover.
Translate Tables only work as part of a “Move Files” Task.
To create or modify a Translate Table, edit the setups for
the associated “Move Files”
Task and click on the “Translate Table” button (See Task
III “Move Files”). You will
see the following dialog:
At the top of the window
there is a field labeled “Insert
at top of file” This field corresponds with the “Insert at
bottom of field...”area midway through the window.
These text fields are here to
allow you to add text to the
top or bottom of a text file.
Translate Tables
For instance you may be adding some type of tagging to the
file so that it can be recognized by another application. Note that the addition of the Inserts
occurs after the translations are completed.
The “List of Translations” contains a text reference to all of the translations that will execute
during the associated “Move Files” Task. You may Add New, Change or Delete any of the
Translations to and from this list using the buttons to the left. Additionally, since Translations are executed in order (top to bottom) and that one Translation may directly effect
another one, you can change the order by selecting it from the list and using the “Move up”
or “Move Down” buttons accordingly.
Since you may have multiple types of files in the same folder which may need to be Moved
and that some of those files need Translation while others do not, you will need to specify
which do. That specification can be done by setting either file types or file name extensions and by using the “Add Type/Ext” and “Delete Type/Ext” buttons. To add a type or
extension simply click the appropriate “Add” button and find an example file. To remove a
type or extension from either list, just select it in the list and click the appropriate “Delete”
button.
The process for Adding or Changing a Translation to the table are very similar. If you want
to “Change” one, simply select it in the list and click “Change”. Too add a new Translation
just click “Add”.
Smart Mover
13
14
Smart Mover
Á link to Index
Either way, the dialog following will display.
In the case of
a Change, the
“from” and “to”
fields will be
filled in with the
current values for
that Translation.
In the case of an
“Add” they will
be empty.
Translate tables
can be very simple or extremely
complex.
Simply, you can
just enter the
text you want to
translate from
Edit Translation screen
into the “From”
box and the text
you want that translated into in the “To” box. This is how you would translate all occurrences of “Stocks” to “Bonds”. If you were to check the “Case sensitive” box then this
translation would only occur for instances of the text “Stocks” but not “stocks”.
But simple translations like this are not often found in the real world. You are much more
likely to require something more complex. Additionally, some translations may not be part
of what we might call visible text. For example, I might want to remove all tabs that follow
an alphabetic character and replace them with a space, or remove all line feeds. These and
much more specific complex translations are achievable. Please refer to Appendix A for
complete documentation.
After you have made the required choices, click the “OK” button to save any settings you
have made. Or click the “Cancel” button to ignore any changes.
Smart Mover
Á Link to Index
Smart Mover
Import and Export Translation Table settings
Since there is usually quite a bit of work put into creating Translation Tables, Mover is
equipped with a way to Export and Import the Translation Table settings.
To Export a Translation Table press the Export
button. A Save File dialog will appear. Name
the file that is about to be created and then
select a location for the file to be saved to. Press
OK.
Export Translation settings
To Import a Translation Table press the Import
button. A Find File dialog will appear. Navigate to the Exported Translation Table settings,
select the file and press OK. Your settings will appear on the Translation window.
Notes:
During setup and testing, it is very advisable to precede any “Move Files with Translation”
Task with a “Copy Files” Task, so you will have a copy of the file before translation.
Smart Mover
15
16
Smart Mover
Á link to Index
V. FTP Put Files
The “FTP Put Files” Task allows you to send all files from a designated “watched” folder to
an FTP Server.
The Task setup screen looks
like the screen to the right.
You will need to fill in all the
“FTP Server Information”
fields since they are required
to communicate with any
FTP server.
If you do not know some of
the settings then contact the
Administrator of the FTP
server for that information.
Additionally some FTP
servers are configured to
require PASV (“Passive”)
mode. Again check with the
Administrator to determine
what setting you should use.
FTP Put Files dialog
To choose the folder from
which the files will be sent press the “Put Files from” button. A Find Folder dialog will appear. Navigate to the appropriate folder, or if you need to or create a new folder at the location you wish. Select the folder and press the “Choose” button. The application will return
you to the “FTP Put Files” screen and text describing the path to the folder you just selected
will be displayed just below the button.
Checking the “Delete original file after FTP Put” will permanently remove that file from
your system. If you do not choose this option, you should remove those files using another
Task (either Move or Delete) or the files will be FTP’ed over and over.
After you have made the required choices, click the “OK” button to save any settings you
have made. Or click the “Cancel” button to ignore any changes.
Notes:
Only Files will be sent via FTP, folders are ignored by this Task.
To send folders they must be Stuffed or Zipped and then sent via the FTP Put task.
Some FTP servers require a trailing “/” in the Directory while others do not. Some do not
allow spaces in the directory name.
Smart Mover
Á Link to Index
Smart Mover
VI. FTP Get Files
The “FTP Get Files” Task allows you to receive files from a FTP server and place them into
a designated folder.
You will need to fill in all
the “FTP Server Information” fields since they are
required to communicate
with any FTP server.
If you do not know some of
the settings contact the Administrator of the FTP server
for that information.
Additionally some FTP
servers are configured to
require PASV mode. Again,
check with the Administrator to determine what setting
you should use.
To choose the folder into
which the received files will
FTP Get Files dialog
be sent press the “Save Files
to” button. A Find Folder dialog will appear. Navigate to the appropriate folder, or if you need to, create a new folder at
the location you wish. Select the folder and press the “Choose” button. The application will
return you to the “FTP Get Files” screen and text describing the path to the folder you just
selected will be displayed just below the button.
Checking the “Delete File(s) from server after FTP Get” will permanently remove those
files from that server. If you do not choose this option, you may “Get” those same files
every time this Task runs. Normally you will probably check this option but for testing you
may not.
After you have made the required choices, click the “OK” button to save any settings you
have made. Or click the “Cancel” button to ignore any changes.
Notes:
Some FTP servers require a trailing “/” in the Directory while others do not. Some do not
allow spaces in the directory name.
Smart Mover
17
18
Smart Mover
Á link to Index
VII. Get E-mail
The “Get E-mail” Task allows you to retrieve E-mail into a designated folder. The contents
of the mail will be saved in a file and placed in a designated folder you specify. The file will
be named roughly the same as the
E-mail’s subject line.
The Task setup screen looks like the
picture to the right.
You will need to fill in all the “Email Account Information” fields
since they are required to communicate with any E-mail server. If you
do not know some of them contact
your E-mail Administrator for that
information.
Some E-mails are sent marked up
in HTML. If you check the “Save
HTML versions of mail” then the
Task will save both the plain text
and HTML version of the content. If
unchecked only the plain text version
will be saved.
Get Email dialog
To choose the folder into which the E-mail files will be saved press the “Save Files to” button. A Find Folder dialog will appear. Navigate to the appropriate folder, or if you need to,
create a new folder at the location you wish. Select the folder and press the “Choose” button. The application will return you to the “Get Mail” screen and text describing the path to
the folder you just selected will be displayed just below the button.
You will also probably want to check the “Delete Received Mail from Server” check box. If
you do not then you will probably receive the same E-mail every time this Task runs Although for testing leaving this unchecked can be helpful.
Use the “Creator/Type/Ext” button to find a sample file that has the three file attributes you
wish to have applied to the file containing the text of the E-mail message.
If multiple E-mails have the same subject, the file name will include a sequential number to
keep them separate. Also, if the E-mail includes one or more enclosures, they along with
the contents will be stored in a created sub folder of the designated folder. The sub-folders
names will be roughly the same as the E-mail subject line.
After you have made the required choices, click the “OK” button to save any settings you
have made. Or click the “Cancel” button to ignore any changes.
Smart Mover
Á Link to Index
Smart Mover
VIII. Stuff Files (StuffIt)
NOTE:
This section only applies to the Macintosh version of Smart Mover.
The “Stuff Files” Task lets
you compress a single or multiple files into one physical
file. This is useful for keeping related files together, for
reducing transmission time or
saving disk space.
Mover uses Aladdin’s
DropStuff program to actually
do the file manipulations
In order to take advantage
of this feature you will need
to purchase a license to use
DropStuff from Allume (See
www.stuffit.com for more
information.)
Stuff files
The Task individually “Stuffs” each the file located in the “Source” folder and puts the resulting compressed file in the folder designated by the “Destination” folder.
The Task setup screen looks like figure above.
To individually choose the “Source” and “Destination” folders by clicking the appropriate
button. A Find Folder dialog will appear. Navigate to the appropriate folder, or if you need
to, create a new folder at the location you wish. Select the folder and press the “Choose”
button. The application will return you to the “Stuff Files” screen and text describing the
path to the folder you just selected will be displayed just below the button.
Check the “Delete original” check box should you want to delete the files from the Source
folder after the “stuffed” file has been created. You should probably either check this option
or use another Task to delete or move the files from the source folder. If you do not this
Task will “restuff” the same files each time it is run.
After you have made the required choices, click the “OK” button to save any settings you
have made. Or click the “Cancel” button to ignore any changes.
Notes:
Before you can use this Task you must set the path to the Stuffit Deluxe program from the
Preferences menu (see Section 4 for more information).
Smart Mover
19
20
Smart Mover
Á link to Index
IX. Expand Files (Stuffit)
NOTE:
This section only applies to the Macintosh version of Smart Mover.
The “Expand Files” Task lets you
decompress many types files including Stuffit and Zip. Mover uses
Aladdin’s Stuffit Expander program
to actually do the file decompression so you will need to obtain
license to use that program from
Aladdin. (See www.stuffit.com for
more information.)
The Task “Expands” all the files
located in the “Source” folder and
puts the results in the folder designated by the “Destination” folder.
Expand files
The Task setup screen looks like the
following:
To individually choose the “Source” and “Destination” folders by clicking the appropriate
button. A Find Folder dialog will appear. Navigate to the appropriate folder, or if you need
to, create a new folder at the location you wish. Select the folder and press the “Choose”
button. The application will return you to the “Expand Files” screen and text describing the
path to the folder you just selected will be displayed just below the button.
Check the “Delete original file” check box should you want to delete the files from the
Source folder after they have been expanded. You should probably either check this option
or use another task to delete or move the files from the source folder. If you do not this Task
will “re-expand” the same files each time it is run.
After you have made the required choices, click the “OK” button to save any settings you
have made. Or click the “Cancel” button to ignore any changes.
Notes:
Before you can use this Task you must set the path to the Stuffit Expander program from the
Preferences menu (see Section 4 for more information).
Smart Mover
Á Link to Index
Smart Mover
X. Zip Files
The “Zip Files” Task lets you compress a single or multiple files into one physical file. This
is useful for keeping related files together, for reducing transmission time or saving disk
space.
This task differs from the “Stuff
Files” task in that this task uses a
standard called “Zip” to complete the
compression of the files.
The Task “Zips” all the files located
in the “Source” folder and puts the
resulting single compressed file in
the folder designated by the “Destination” folder.
The Task setup screen looks like the
following:
Zip files
To individually choose the “Source” and
“Destination” folders by clicking the appropriate button. A Find Folder dialog will appear. Navigate to the appropriate folder, or
if you need to, create a new folder at the location you wish. Select the folder and press the
“Choose” button. The application will return you to the “Zip Files” screen and text describing the path to the folder you just selected will be displayed just below the button.
Check the “Delete original” check box should you want to delete the files from the Source
folder after the “zipped” file has been created. You should probably either check this option
or use another Task to delete or move the files from the source folder. If you do not this
Task will re-Zip the same files each time it runs.
After you have made the required choices, click the “OK” button to save any settings you
have made or click the “Cancel” button to ignore any changes.
Notes:
If you going to be sending files from a Mac running OS9 to another Mac using OS9 then
you should probably use the Stuffit Tasks instead. Using the Stuffit tasks ensures that you
will maintain the Creator and File Type information.
Smart Mover
21
22
Smart Mover
Á link to Index
XI. UnZip Files
The “UnZip Files” Task lets you decompress files that have been compressed using the Zip
compression format that is the de facto standard of the Windows platform and as of Mac OS
X 10.3 a standard on the Mac platform as well.
The Task “Expands” all the files located in the “Source” folder and puts the
results in the folder designated by the
“Destination” folder.
The Task setup screen looks like the
window to the right.
To setup the task choose the “Source”
and “Destination” folders by clicking the appropriate button. A Find
Folder dialog will appear. Navigate to
the appropriate folder, or if you need
UnZip files
to, create a new folder at the location
you wish. Select the folder and press
the “Choose” button. The application will return you to the “UnZip Files” screen and text
describing the path to the folder you just selected will be displayed just below the button.
Check the “Delete original file” check box should you want to delete the files from the
Source folder after they have been expanded. You should probably either check this option
or use another task to delete or move the files from the source folder. If you do not this Task
will UnZip the same files each time it is run.
After you have made the required choices, click the “OK” button to save any settings you
have made. Or click the “Cancel” button to ignore any changes.
Smart Mover
Á Link to Index
Smart Mover
XII. Run Application
The “Run Application” Task is designed to execute an unattended application (ie one that
has no user interface). It could be written in AppleScript (Mac OS X) or possibly Visual
Basic (Windows).
The basic idea being that you want to
do something outside of what Smart
Mover’s tasks are designed to do but
have Smart Mover start the process.
Notes:
Run Application
Keep in mind that the scripts that are
asked to run via the ‘Run Application’
task are independent of Smart Mover as far as the results they achieve.
This means that if you are using the ‘Run Application’ task and have something that you
want Smart Mover to do to the file that results comes from the script that is started by
‘Run Application’ you should break the Processes into two parts:
A. Processes (and Tasks) that come before and include ‘Run Application’
B. Processes (and Tasks) that come after ‘Run Application’
These tasks should be part of their own Processes.
Sample Script
The easiest script to write to try ‘Run Application’ is to open Apple’s Script Editor application and enter the following:
tell application “Finder”
beep 1
End tell
Save the Script as a ‘Script Application’. Create a Process and add the ‘Run Application’
task to the process. Select the Script Application you just saved and then manually run the
Process.
You should hear the Finder beep once.
Smart Mover
23
24
Smart Mover
Á link to Index
XIII. InDesign Server
The “InDesign Server” Task is designed to automate repetitive chores speeding up workflows and freeing users time. Almost anything that a user can do with InDesign can now be
processed by the Server while the user moves on to other jobs.
More specifically, this task
monitors a “source” or hot
folder and when it encounters a file, it processes that
file using the instructions
found in the selected Script
file. Once completed, provided there are no errors,
the finished file is moved
into a user designated
destination folder where it
could be processed further
by another task.
To setup this task, enter the Address and Port
number for the InDesign Server (example:
127.0.0.1:18383)
Choose both the “Source”
and “Destination” folders
by clicking the appropriate
button. A Find Folder dialog will appear. Navigate to the appropriate folder, or if you need
to, create a new folder at the location you wish. Select the folder and press the “Choose”
button. The application will return you to the “InDesign Server” screen and text describing
the path to the folder you just selected will be displayed just below the button.
Select the Processing Script by clicking the appropriate button and locating that file. Also
select what language the Script is written in from the three radio buttons provided. See Appendix B for more information about creating Script files.
After you have made the required choices, click the “OK” button to save any settings you
have made. Or click the “Cancel” button to ignore any changes.
Notes:
Before you can use this task, you must install and launch InDesign Server on a machine
which is accessible to Mover. Additionally, you must configure the Server to listen on a
specific port. (Please refer to the installation and operation instructions provided with that
software.)
Subfolders of the Source folder are not searched by this Task.
Smart Mover
Á Link to Index
Smart Mover
If a file of the same name exists in the Destination folder, it will be overwritten by the newly
processed file.
If an error is detected during the processing of a file, it will remain in the Source folder and
could be repeatedly reprocessed resulting in the same error. You should monitor Mover or
the InDesign Server console window for such a situation.
This Task will attempt to process all files found in the Source folder regardless of file type.
If a file is “busy” at the time this task runs then it will not be processed but will remain in
the source folder until the next time the task runs.
Your InDesign Server can reside on the same machine as Smart Mover or they can be on
different machines. If you do use two machines there are several considerations:
1. Both machines should be running the same operating system (ie both Mac OSX or
both Windows). This avoids problems with the different file path naming conventions
used by each.
2. Only the Mover machine needs access to the Script file. Yes, this does sound incorrect
but it is true. The entire contents of the Script file are sent to the InDesign Server in the
“run” message initiated by Mover.
3. Mover passes the full path name of the file to be processed to the Script. So that path
name must be valid from the InDesign Server machine perspective for the task to operate
correctly. If this is not possible, then the path string could be manipulated as required in
the Script code before the “open” command.
4. If the Script creates a new file (ex: a PDF) then the path for that file will need to be
located from the InDesign Server machine’s perspective.
5. Any required remote folders will need to be mounted before the Task is run. If they
are not, Mover will generate an appropriate error.
Smart Mover
25
26
Smart Mover
Á link to Index
Section 6 - Smart Mover and
Smart Connection Enterprise
Smart Mover can be a stand alone application or it can work
with WoodWing’s Smart Connection line of products, in
particular the Smart Connection Enterprise system.
When the integration with Smart Connection Enterprise is
purchased, the Process editing panel will include 7 more
tasks.
These tasks are:
SCE Login
SCE Upload
SCE Folder Upload
SCE DownLoad
SCE Delete
SCE Dn-Up (Version)
SCE Logout
Each of the tasks can work on their own or they can be
combined with the other tasks.
For instance, Smart Mover can be used to download articles
from the Enterprise system where they can then be stored in
an archive.
Task List
The Smart Connection Enterprise tasks are described in detail in the following pages.
A Smart Mover setup note - Create a SCE User
Smart Mover can login to a Enterprise Database using any of the existing users in the system.
However, we suggest that you create a user specifically for Smart Mover and assign that
user to the appropriate groups.
Several of the SCE Tasks use queries to find the data that needs to be acted upon. These
queries can be either named queries or user created queries. Having a single user for Mover
makes customizing these queries easier.
In addition, when files are uploaded to Enterprise, information is logged about the activities
and the logs will reflect Smart Mover’s activities.
For any SCE Tasks that runs a query, you must make sure that the following fields are
returned in the results: ID, Name, LockedBy, Type, State, PublicationID, FormatID. Not
including any of these fields will result in a log error and can cause erratic behavior.
Smart Mover
Á Link to Index
Smart Mover
I. SCE Login
SCE Login does exactly what the name implies: it logs Smart Mover into a Enterprise system.
SCE Login does an explicit login. This
allows a process to login to the server
and perform multiple tasks and then
logout (see page 29).
If SCE Login is used, then the other
tasks such as SCE DownLoad use the
login and do not have to log themselves
in.
If SCE Login is not used then the other
tasks will automatically log themselves in
and then out as they are completed.
Smart Mover
SCE Login Screen
27
28
Smart Mover
Á link to Index
II. SCE UpLoad
This task is used to upload files to the Smart Connection Enterprise system.
Types of files that can be
uploaded include InDesign
layouts, InCopy articles,
Word documents and Image
files.
After loading the SCE UpLoad Task, double click on
the Task and the window to
the right will appear.
Select a Source Folder.
This is the “watched” folder
from which the files will be
uploaded.
Select the “Delete original
files” option to do the obvious. If you leave this option
off remember to add a Move
or Delete task so that the
files in the source folder are
not continually uploaded.
The “Include Top SubFolder” option allows Mover to
also upload any file found
in a sub-folder of the Source.
This can be helpful when
uploading e-mail enclosures.
SCE Upload Screen
Choose a server, a user name and a password (see the introduction to this section for more
information about setting up a user for Smart Mover).
Press the Login button to log Smart Mover into the system. Logging in will make the Publication, Issue, Section, Status and Route To pop ups available. And now just choose Publication, Issue, Section, Status and Route To. Note that Pub, Issue, Section and Status MUST
be selected for the OK button to become active. If the chosen Publication includes Editions
(SCE Server 4.2 or newer) you may also select one or more from the displayed list.
When choosing the Status, you may select “First”. In this case Mover will assign the object
the lowest order number Status available for that Publication-Issue-Section and File Type.
This allows you to have one Task that will Upload multiple file types.
Press the ‘OK’ button to save your work or Cancel to ignore any new settings.
Smart Mover
Á Link to Index
Smart Mover
III. SCE Folder Upload
Folder Upload is very similar to Upload except that you do not need to specify the Publication, Issue, Section, Status
or Route To. Instead,
inside the Source folder
you create a series of
nested sub-folders where
the top folder must be
named the same as one
of your Publications. In
that folder must be a subfolder named the same as
a valid Issue. And in that
folder another sub-folder
named the same as a valid
Section. Finally, any file
found in the Section subfolder will be uploaded
using the names of the
parent folder structure to
assign those properties.
So the same Task can
Upload to different PubSCE Folder Upload Screen
lications, Issues and Sections
by merely creating folders and
placing the object file into the appropriate folder.
Additionally, the uploaded file will be assigned the system’s first Status (lowest order number) for that Publication-Issue-Section combination. The Route To is left unassigned.
After loading the SCE UpLoad Task, double click on the Task and the window to the right
will appear.
Select a Source Folder.
This is the “watched” folder where you place the Publication-Issue-Section sub-folders.
Select the “Delete original files” option to do the obvious. If you leave this option off
remember to add a Move or Delete task so that the files in the source folder are not continually uploaded.
Choose a server, a user name and a password (see the introduction to this section for more
information about setting up a user for Smart Mover).
Press the Login button to log Smart Mover into the system confirming your settings.
Press the ‘OK’ button to save your work or Cancel to ignore any new settings.
Smart Mover
29
30
Smart Mover
Á link to Index
IV. SCE DownLoad
This task is used to download files from the Smart Connection Enterprise system.
The SCE Download task uses Queries that have been created and saved by a user in the
Enterprise system.
The first thing that must be done to use SCE Download is to login to the Enterprise system
via either InDesign, InCopy, or Smart Browser and create a query that finds exactly what
needs to be downloaded and then save the query. Once you are done you must logout of
Enterprise to save the query to the server and thus make it available to Mover.
Select a Destination Folder which is where you want the save the query resulting files to be
saved.
Select the desired server, enter name and password and click the Login button. Mover will
log into Enterprise and populate the query popup with your available options. Choose the
query you wish to run with this task.
Choosing the “Include Child Elements”
option will also download any elements
contained within any downloaded InDesign layouts. These include images,
articles and any other such items.
Choosing the “Set Status to Next” will
change the status of the downloaded
items to the “Next” status (based on
your Enterprise workflow settings). You
will typically want to choose this option to prevent the same files from being
selected by the query and downloaded
repeatedly.
Next you may also choose which Renditions of the Enterprise objects you which
SCE DownLoad Screen
to download by selecting the appropriate check boxes. Choosing the “Include
MetaData File” will also save an XML file that contains all the meta data associated with the
downloaded object. The data in this file could then be used to update an archive or other
system. The “native” rendition will be named the same as the object. Other rendition file
names will include the rendition type. Version files names will include a “-vX” where X is
the version number.
Notes:
If you modify the selected query using InDesign, InCopy or Smart Browser you must
do two things before those changes will take effect in Mover. One: you must log out
from the application you modified the query with. Two: you must re-enter this Mover
window, login, reselect that query and then OK the dialog.
Smart Mover
Á Link to Index
Smart Mover31
V. SCE Delete
This task is used to delete files from the Smart Connection Enterprise system.
The same concept that was discussed regarding SCE DownLoad applies here but in this
case, the results of the query will be deleted
from Enterprise.
NOTE: Once you turn a process containing
this task on Smart Mover is going to be DELETING objects from the database.
KNOW WHAT YOU ARE DOING!
Select the desired server, enter name and
password and click the Login button. Mover
will log into Enterprise and populate the query
popup with your available options. Choose the
query you wish to run with this task.
Normally “layout child” objects will be deleted but if the child is also used on another
layout it will not be deleted unless you choose
this options. Normally leave it unchecked.
SCE Delete Screen
Notes:
If you modify the selected query using InDesign, InCopy or Smart Browser you must
do two things before those changes will take effect in Mover. One: you must log out
from the application you modified the query with. Two: you must re-enter this Mover
window, login, reselect that query and then OK the dialog.
Smart Mover
32
Smart Mover
Á link to Index
VI. SCE Dn-Up(Version)
Sometimes you need to download an Enterprise object file, process it in some fashion and
then uploaded back to
Enterprise as a new
version of that same
original object. That
is exactly what this
task is designed to do.
As with the a normal
download, you must
create and save a
query that will result
in the retrieval of
the files you wish to
process. So select the
server, enter name,
password and Log In
to the server. Then
select the appropriate
query.
Typically, you will
also want to check
the “Set Status to
Next” option so that
the object will not be
processed a second
time and that its current status reflects the
actual situation.
SCE Download-Upload (Version)
You will also probably
want have the object “Checked Out”
and thus locked while it is being processed. And optionally, you can also save the assoicated meta data into a XML file (see IV SCE Download).
Next, select the destination folder where you want the downloaded object files to be placed.
This should be the same folder where your external process will be looking for such files.
Then select the “watched” source folder where the now processed files will be placed for
upload back to Enterprise. Select “Delete Original File” to remove it from that folder after
the upload.
Notes:
During the external processing the file name of the object CANNOT be changed. If it
Smart Mover
Á Link to Index
Smart Mover33
is then the version upload will fail.
If you modify the selected query using InDesign, InCopy or Smart Browser you must
do two things before those changes will take effect in Mover. One: you must log out
from the application you modified the query with. Two: you must re-enter this Mover
window, login, reselect that query and then OK the dialog.
Smart Mover
34
Smart Mover
Á link to Index
VII. SCE Logout
SCE Logout does exactly what the name implies: it logs Smart Mover out of a Enterprise
system.
The same things that were said for SCE Login
apply here. SCE Logout, when used in conjunction with SCE Login allows the other task
such as SCE DownLoad to perform their task
without having to login and logout.
SCE Logout
Smart Mover
Á Link to Index
Smart Mover35
Section 7 - Backing up your settings
I. Using the Backup Settings Menu
Mover provides a simple method to backup the Processes that you have
created.
To backup your processes do the following:
1. Go to the File Menu and choose ‘Backup Settings’
2. A dialog will come up asking you to select a location to place the folder containing
the Mover settings. Choose an appropriate location and press OK.
A backup of the current settings now exists in the location you selected and is in a folder
named “Smart Mover Backup”.
Smart Mover
Smart Mover
Á Link to Index
Appendix A - Using Regular Expressions in Translate Tables
The basic idea of regular expressions is that it enables you to search and replace text that
matches the set of conditions you specify. It extends normal Search and Replace with pattern
searching. More information about using Regular Expression is available at http://www.
pcre.org/
This section describes the syntax of regular expressions
Pattern
Description
[a-z0-9]
Matches any single character of set.
.
[^a-z0-9]
\d
\D
\w
\W
\s
\S
\n
\r
\t
\f
\b
\0
\000
\nnn
\xnn
\cX
\metachar
(abc)
\1, \2,…
x?
x*
x+
x{m,n}
abc
a|b|c
\b
\B
^
$
Matches any character except new line.
Matches any single character not in set.
Matches a digit. Same as [0-9].
Matches a non-digit. Same as [^0-9].
Matches an alphanumeric (word) character — [a-zA-Z0-9_].
Matches a non-word character [^a-zA-Z0-9_].
Matches a whitespace character (space, tab, newline, etc.).
Matches a non-whitespace character.
Matches a newline (line feed).
Matches a return.
Matches a tab.
Matches a formfeed.
Matches a backspace.
Matches a null character.
Also matches a null character because of the following:
Matches an ASCII character of that octal value.
Matches an ASCII character of that hexadecimal value.
Matches an ASCII control character.
Matches the meta-character (e.g., \, ., |).
Used to create subexpressions. Remembers the match for later backreferences.
Referenced by replacement patterns that use \1, \2, etc.
Matches whatever first (second, and so on) of parens matched.
Matches 0 or 1 x’s, where x is any of above.
Matches 0 or more x’s.
Matches 1 or more x’s.
Matches at least m x’s, but no more than n.
Matches all of a, b, and c in order.
Matches one of a, b, or c.
Matches a word boundary (outside [] only).
Matches a non-word boundary.
Anchors match to the beginning of a line or string.
Anchors match to the end of a line or string.
Smart Mover
Smart Mover
Á link to Index
Replacement Patterns
The following expressions can only apply to the replacement pattern:
Pattern
Description
$&
The entire matched area; this is identical to \0 and $0.
$`
Replaced with the entire target string before match.
$’
Replaced with the entire target string following the matched text.
$0$50
\0-\50
$0-$50 evaluate to nothing if the the subexpression corresponding to the
number doesn’t exist.
\xnn
Replaced with the character represented by nn in Hex, e.g., \xAA is ™.
\cX
Replaced with the character that is the control version of X, e.g., \cP is DLE,
data line escape.
\nnn
Replaced with the character represented by nn in Octal.
Regular Expression Examples
The basic idea of regular expressions is that it enables you to find and replace text that
matches the set of conditions you specify. It extends normal Search and Replace with pattern searching.
Wildcards
Some special characters are used to match a class of characters:
Wildcard
.
Matches
Any single character except a line break, including a space.
If you use the “.” as the search pattern, you will select the first character in the target string
and, if you repeat the search, you will find each successive character, except for Return
characters
The following wildcards match by position in a line:
Wildcard
Matches
Example
^
Beginning of a line (unless
used in a character class;
see below)
^Phone: Finds lines that
begin with “Phone”:
$
End of a line (unless used in
a character class)
Smart Mover
$: Finds the last character in
the current line.
Á Link to Index
Smart Mover
Character Classes
A character class allows you to specify a set or range of characters. You can choose to either
match or ignore the character class. The set of characters is enclosed in brackets. If you want
to ignore the character class instead of match it, precede it by a caret (^).
Here are some examples:
Character Class
Matches
[^aeiou]
Any character except a, e, i, o, u.
[aeiou]
Any one of the characters a, e, i, o, u.
[a-e]
Any character in the range a-e, inclusive
[a-zAZ0-9]
Any alphanumeric character. Note: Case-sensitivity is controlled by
the CaseSensitive property of the RegExOptions class.
[[]
Finds a [.
[]]
Finds a ]. To find a a closing bracket, place it immediately after the
opening bracket.
[a-e^]
Finds a character in the range a-e or the caret character. To find the
caret character, place it anywhere except as the first character after
the opening bracket.
[a-c-]
Finds a character in the range a-c or the - sign. To match a -, place it
at the beginning or end of the set.
Non-printing Characters
You can use the following notation to find non-printing characters:
Special Character
Matches
\n
Newline (line feed)
\r
Line break (return)
\t
Tab
\f
Formfeed (page break)
\xNN
Hex code NN.
Other Special Characters
The following patterns are wildcards for the following special characters:
Special
Character
Matches
\s
Any whitespace character (space, tab, return, linefeed, form feed)
\w
Any “word” character (a-z, A-Z, 0-9, and _)
\S
\W
\d
\D
Any non-whitespace character.
Any “non-word” character (All characters not included by \w).
Any digit [0-9].
Any non-digit character.
Repetition Characters
Smart Mover
Smart Mover
Á link to Index
Repetition characters are modifiers that allow you to repeat a specified pattern.
Repetition Character
Matches
Examples
*
Zero or more characters.
d* finds no characters, or one or more
consecutive “d”s.
.* finds an entire line of text, up to but not
+
One or more characters.
including the return character.
d+ finds one or more consecutive “d”s.
[0-9]+ finds a string of one or more
consecutive numbers, such as “90404”,
?
Zero or one characters.
“1938”, the “32” in “Win32”, etc.
d? finds no characters or one “d”.
Please note that, since * and ? match zero instances of the pattern, they always succeed but may
not select any text. You can use them to specify an optional character, as in the examples in the
following section.
“Greediness”
Mover supports the “?” as a “greediness” modifier for a subpattern in a regular expression. By
default, greediness is false, but can be overridden using the “?”. You can place a “?” directly after
a * or + to reverse the “greediness” setting. That is, if Greedy is True, using the ? after a * or +
causes it to match the minimum number of times possible: For example, consider the following.
Target String
Greedy
Regular Expression
Result
aaaa
False
(a+?) (a+)
$1=aaa, $2=a
aaaa
True
(a+?) (a+)
$1=a, $2=aaa
Extension Mechanism
We also support the regular expression extension mechanism used in Perl. For instance:
(?#text)
Comment
(?=pattern)
A zero-width positive look-ahead assertion. For example, \w+(?=\t) matches a
(?:pattern)
(?!pattern)
(?<=pattern)
(?<!pattern)
For grouping without creating backreferences
word followed by a tab, without including the tab in $&.
A zero-width negative look-ahead assertion. For example foo(?!bar)/matches
any occurrence of “foo” that isn’t followed by “bar”.
A zero-width positive look-behind assertion. For example, (?<=\t)\w+
matches a word that follows a tab, without including the tab in $&. Works
only for fixed-width look-behind.
A zero-width negative look-behind assertion. For example (?<!bar)foo
matches any occurrence of “foo” that does not follow “bar”. Works only for
fixed-width look-behind.
Smart Mover
Á Link to Index
Smart Mover
Subexpressions
You can use parentheses within your search patterns to isolate portions of the matched string. You
do this when you need to refer to subsections of the matched in your replacement string. For example you would do this if you need to replace only a portion of the matched string or insert other
text into the matched string.
Here is an example. If you want to match any date followed by the letters “B.C.” you can use the
pattern “\d+\sB\.C\.” (Any number of digits followed by a space character, followed by the letters “B.C.”) This will match dates such as 33 B.C., 1742 B.C., etc. However, if you wanted your
replacement pattern to leave the year alone but replace the letters with something else, you would
use parens. The search pattern “(\d+)\s(B\.C\.)” does this.
When you write your replacement pattern, you can refer to the year only with the variable \1 and
the letters with \2.
If you write “(\d+)\s(B.C.|A.D.|BC|AD)”, then \2 would contain the matched letters.
Combining Patterns
Much of the power of regular expressions comes from combining these elementary patterns to
make up complex searches. Here are some examples:
Pattern
Matches
\d+\sB\.C\.
one or more digits followed by a space, followed by “B.C.”
\$?[0-9,]+\.?\d*
Matches dollar amounts with an optional dollar sign.
The Alternation Operator
The alternation operator (|) allows you to match any of a number of patterns using the logical “or”
operator. Place it between two existing patterns to match either pattern. You can use more than
one alternation operator in a pattern:
Pattern
Matches
cat|dog|possum
“cat”, “dog”, or “possum”
\she\s | \sshe\s
([0-9,]+\sB\.C\.)|([0-9,]+\sA\.
D\.) or
[0-9,]+\s((B\.C\.)|(A\.D\.))
“ he ” or “ she ”
Years of the form “yearNum B.C. or A.D.” e.g., “2,175 B.C.”
or “215 A.D.”
Search and Replace
You use special patterns to represent the matched pattern. Using replacement patterns, you can
append or prepend the matched pattern with other text.
Pattern
$&
Description
Contains the entire matched pattern.
If “\d\d\d\d\sB\.C\.” finds “1541 B.C.”, then the replacement pattern “the year $&”
results in “the year 1541 B.C.”, as the $& contains the string “1541 B.C”.
Smart Mover
Smart Mover
Á link to Index
\1, \2,
etc.
Contains the matched subpatterns, defined by use of parentheses in the search string.
The search pattern “(\d+)\s(B\.C\.|A\.D\.|BC|AD)” looks for any number of digits
followed by a space character, followed by either “B.C.”, “BC”, “A.D.”, or “AD”. The
\1 variable contains the match to the “\d+” portion of the expression and \2 contains the
match to the “B\.C\.|A\.D\.|BC|AD” portion.
Smart Mover
Á Link to Index
Smart Mover
Appendix B - InDesign Server Scripts
Each copy of InDesign Server includes documentation and numerous example Scripts.
Please use that information as your guide to writing and maintaining your Scripts. But there
are some special considerations that you need to be aware of when working with Mover.
(All examples shown here are written in JavaScript.)
Mover passes the full path name of the file to be processed in a argument called “infile”. So
your Script will most likely start with something like:
infile = app.scriptArgs.get(“infile”); // variable infile now contains the file path
myDoc = app.open(File(infile)); // opens the file now referenced as myDoc
You can use the “app.consoleout()” to direct debugging or other messages to the InDesign
Server console. For example:
app.consoleout(“Processing File “+infile);
Any errors that are not trapped using “Try/Catch” statements will be passed back and reported by Mover in its normal Log system. If you do not want the error reported and want
to programmatically deal such situations you can use a Try/Catch statements. You could
use this method to move the offending file into an error folder so that Mover does not try to
reprocess it.
Examples:
This Script that adds a text box containing ‘Hello World’ to the document:
// open doc
infile = app.scriptArgs.get(“infile”);
myDoc = app.open(File(infile));
// message to console
app.consoleout(“Adding ‘Hello World’ to “ + infile);
//Get a reference to the first page.
var myPage = myDoc.pages.item(0);
//Create a text frame.
var myTextFrame = myPage.textFrames.add();
//Specify the size and shape of the text frame.
myTextFrame.geometricBounds = [“6p0”, “6p0”, “18p0”, “18p0”];
//Enter text in the text frame.
myTextFrame.contents = “Hello World!”;
//Save the document
myDoc.save(infile);
//Close the document.
myDoc.close();
// message to console
app.consoleout( “finished\n” );
Smart Mover
Smart Mover
Á link to Index
Keep in mind that some Scripts may not modify the Source file. Instead, they might just
open it, make another file (PDF or JPG for example) and then close it.
The following makes a PDF of the passed document:
// open doc
infile = app.scriptArgs.get(“infile”);
myDoc = app.open(File(infile));
// make output name replacing “/Workfolder/” with your desired path
outname = myDoc.name;
outname = outname.replace(“.indd”, “.pdf”);
outpath = File(“/Workfolder/”+outname);
// message to console
app.consoleout(“Processing “ + infile + “ into “ + outname);
// export and close
myDoc.exportFile(ExportFormat.pdfType, outpath);
myDoc.close( SaveOptions.no );
app.consoleout( “finished\n” );
Depending on the available Plugins, InDesign can open other types of documents and
convert them to its own format. For example, the following Script could be used to convert
Quark documents. (Assumes that the passed path is in Mac “:” delimited format.)
// open doc
infile = app.scriptArgs.get(“infile”);
myDoc = app.open(File(infile));
// get name of Quark doc remove any extension and add .indd
outname = infile.substr(infile.lastIndexOf(“:”)+1);
if (outname.indexOf(“.”) > 1)
{
outname = outname.substr(0,outname.indexOf(“.”));
}
outname = outname + “.indd”;
// replace “/Workfolder/” with your desired path
outpath = “/Workfolder/”+outname;
// message to console
app.consoleout( “Converting “+infile+” to “+outpath );
// save & close indd doc
newdoc = myDoc.save(File(outpath));
newdoc.close();
app.consoleout( “finished\n” );
Smart Mover