1
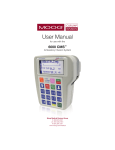
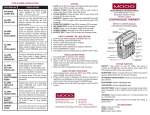
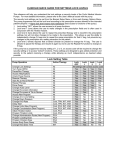
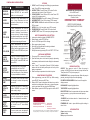
PUMP ALARMS & RESOLUTIONS
LCD DISPLAY
RESOLUTION
INFUSION
COMPLETE
Press PAUSE, add another IV bag,
select REPEAT Rx and confirm
fields, or turn the pump off.
ALARM
AIR-IN-LINE
Remove air from administration set
and IV bag. (Disconnect set from
patient’s access site prior to using
prime function.)
ALARM
DOWN
OCCLUSION
Check administration set from the
pump to patient’s access site for
cause of occlusion. Correct obstruction per protocol. Consider changing
the pressure setting from Low to High.
When occlusion is resolved, the alarm
will stop and pumping will resume.
ALARM
UP
OCCLUSION
Check administration set from IV
bag to pump for cause of occlusion.
When ready to begin infusion, press
PAUSE, select RESUME, and press
RUN.
ALARM
HIGH UP
PRESSURE
Check for excessive pressure on IV
bag. When ready to begin infusion,
press PAUSE, select RESUME, and
press RUN.
ALARM
SET NOT
INSTALLED
Install appropriate Curlin Medical
administration set. Use ONLY
Curlin Medical administration sets.
See User’s Manual or IV set directions
for proper installation instructions.
ALARM
UNATTENDED
PUMP
To resolve, press RUN and resume
the therapy or continue with operating
procedure.
ALARM
REPLACE
SET 3
Replace set, prime set if necessary,
select RESUME and press RUN
when ready to begin.
ALARM
DOOR OPEN
Check placement of administration
set and close pump door properly.
See User’s Manual for instructions.
ALARM
EMPTY
BATTERY
Press the pause key and turn pump
off. Install 2 new “C” size alkaline
batteries.
ERROR
CODE
If an error code occurs, turn pump off
and consult provider or manufacturer.
1
2
3
4
5
6
7
8
9
OPTIONS
LOCK: Press NO to change Lock Setting (may need access
code). Press YES to accept new setting.
HOURLY TOTAL: Press NO then YES to view. Scroll to
review each hour’s totals. Press NO to exit.
CLEAR HOURLY: Press NO then YES to view. Press YES
to clear, NO to retain and exit.
DOWN OCCLUSION: Press NO to change, YES to accept.
AIR SENSITIVITY: Press NO to change, YES to accept.
NEXT DOSE: HH:MM until next dose. When correct, press
YES to accept.
AUDIO: Press 1-9 to hear level, press YES to accept.
POWER CHECK: Press NO then YES to check level.
ACCEPT OPT? Press YES to accept any changes made.
1
2
3
4
5
6
7
HOW TO CHANGE THE LOCK SETTING
Lock may be initially selected in BIOMED SETUP.
When infusing, press OPTIONS key.
Scroll to LOCK and press NO to change.
Enter access code at prompt.
Select NO until the desired lock setting is obtained.
Press YES/ENTER to select.
Exit Options menu by pressing YES at “ACCEPT OPT?” field.
1
2
3
4
INSTALLING BATTERIES
Turn pump OFF or connect to AC adapter.
Open the battery door on the back of pump by depressing
the release pin with a small coin and sliding it in a downward
motion.
Insert 2 new “C” size alkaline (Duracell ProCell) batteries
bottom side first with both positive poles at the top of the
battery compartment.
Slide the battery compartment door back into place.
1
2
3
USING THE HELP FUNCTIONS
When programming, press the HELP key. While running,
press PAUSE, then press HELP key.
When a HELP screen is displayed and there is more text to
read that is not displayed on the screen, or icons will appear,
scroll up and down the text using the ARROW keys.
When finished, press the HELP key again to exit the HELP
screen.
Moog Medical Devices Group tf
4314 Zevex Park Lane
ph
Salt Lake City, Utah 84123 USA
fx
MOOG MEDICAL DEVICES GROUP
Curlin 4000 Series™
Ambulatory Infusion Pumps
Clinician’s Guide
INTERMITTENT THERAPY
REFER TO USER’S MANUAL
FOR DETAILED INSTRUCTIONS
KEYPAD FUNCTION
ON/OFF: Turns pump on and off. When the pump is
running, the PAUSE key must be used to stop infusion first.
Then press the OFF key to turn pump off.
RUN/PAUSE: Starts or pauses the pump. When the pump is
paused, pressing this key will resume pumping.
UP ARROW/ DOWN ARROW: Used to scroll through the
display screens.
NO/CHANGE: Rejects highlighted data.
YES/ ENTER: Accepts highlighted data.
HELP/OPTIONS: Used to request and exit help screen when
pump is paused, or go to options screen when pump is
running.
./SILENCE: Used to silence alarm for 1 minute intervals, and
as a decimal point.
800.970.2337
801.264.1001
801.264.1051
www.moog.com/medical
Moog is a registered trademark of Moog, Inc. and its subsidiaries. All trademarks indicated herein are
the property of Moog, Inc. and its subsidiaries. © 2011 Moog, Inc. All rights reserved. 46254 Rev. A
PRIME/BOLUS: Used to prime fluid through the tubing to
clear it of air.
LED INDICATORS
Green- pump is running
Yellow- standby
Red- pump in alarm status
1
2
3
4
5
SETTING UP THE PUMP
Install 2 new “C” size alkaline batteries (Duracell ProCell)
or connect Battery Pack, or AC adapter to port at bottom
of pump.
Prepare IV bag and attach a new administration set.
Eliminate all air from the bag and the administration set
(see PRIMING THE SET).
Install set and close pump door.
Attach set to venous access device using agency protocol.
8 Make selection from the Run/Options menu: Press NO
to review prescription, OPTIONS to view options menu,
PRIME to prime set, or press RUN key to start infusion.
PRIMING THE SET
Note: If a Check Valve Adapter is provided with your administration set, remove it from the package and connect it to the
distal end of the set.
CAUTION: Disconnect set from patient’s access site before
priming. Sets with in-line ASV must be primed on the pump.
By Gravity:
1 Twist and remove breakaway tab from “Flow- Stop”.
2 Squeeze “Flow-Stop” between thumb and forefinger to
allow fluid to flow through tubing.
INSTALLING THE ADMINISTRATION SET
Important Notification
A lack of compliance with proper positioning of the
tubing could result in infusion inaccuracies.
Please center the tubing in the pumping area when
installing the administration set.
1
2
3
4
5
6
7
8
9
Fully open the door of the pump.
Close the slide-clamp on the administration set.
Activate the Integral “Flow-Stop” by twisting and removing
the breakaway tab.
Insert the blue tubing guide into the receptacle on right
side of pump in the direction of the blue arrow, positioning
the tubing in front of the door hinge.
Center the tubing in the middle of the pumping fingers,
covering the yellow dot.
Holding the yellow Integral “Flow-Stop” by the handle,
insert it on an angle into the receptacle on the left side of
the pump in the direction of the yellow arrow.
CAUTION: Do not press down on the top of the
Integral “Flow-Stop” when inserting it into the
receptacle. This action could inadvertently open the
Integral “Flow-Stop” and allow fluid to flow through
the tubing.
Open the slide-clamp on the administration set.
Push the tubing slightly into the black Air Detector slot.
Fully close the door of the pump and latch it securely.
1
2
3
4
5
6
PROGRAMMING FOR INTERMITTENT THERAPY
Turn the pump on.
Observe the self-test, the LED lights, and the power
source screen.
Select PROGRAM from the first selection menu.
Select NEW PROGRAM to program a new therapy
manually.
If multiple therapies are available, select INTERMITTENT
from the therapy selection menu.
Complete the pre-prescription menu:
By Pump:
Note: Set must be installed into the pump.
1 Release any clamps on the administration set.
2 Press and release PRIME key from “Run Options” menu
3 Press and hold the PRIME key until set is free of air;
release key to stop (each prime cycle allows up to 6 mL
of fluid).
4 When prime is complete, press YES/ENTER to exit the
prime screen.
Once pump is running
While INTERMITTENT infusion is running, the display will
alternate between various information screens.
To interrupt or pause an infusion, press RUN/PAUSE key.
Select from the pause menu: Press YES to RESUME to
continue therapy without interruption. Highlight and press
YES to REPEAT Rx when hanging a new bag.
Note: Hang a new bag prior to the administration of a dose.
Interrupting a dose when hanging a new bag will lead to the
dose dropping when REPEAT Rx is selected.
When the infusion is complete, the following screen displays:
7 Then complete the prescription menu:
9 To stop a therapy, press PAUSE then turn pump off.