1
TABLE OF CONTENTS
TABLE OF CONTENTS
Page
Page
LIST OF FIGURES ...........................................................................................................
ii
LIST OF FIGURES ...........................................................................................................
ii
LIST OF WARNINGS and CAUTIONS ............................................................................ iii
LIST OF WARNINGS and CAUTIONS ............................................................................ iii
CHAPTER 1 - GENERAL INFORMATION .......................................................................
1
CHAPTER 1 - GENERAL INFORMATION .......................................................................
1
CHAPTER 2 - DIRECTIONS FOR USE ...........................................................................
2
CHAPTER 2 - DIRECTIONS FOR USE ...........................................................................
2
Pump Features ...............................................................................................
The Keypad ....................................................................................................
The Display .....................................................................................................
Preparing the Disposable Set ........................................................................
Loading the Disposable Set ..........................................................................
A Single Feeding Example ............................................................................
An Interval Feeding Example ........................................................................
Charging the Battery .....................................................................................
Running on Battery Power ............................................................................
2
4
6
7
8
10
11
14
15
CHAPTER 3 - LABELS ................................................................................................... 17
CHAPTER 3 - LABELS ................................................................................................... 17
CHAPTER 4 - ALARMS and INDICATIONS ................................................................... 18
CHAPTER 4 - ALARMS and INDICATIONS ................................................................... 18
CHAPTER 5 - CLEANING ............................................................................................... 21
CHAPTER 5 - CLEANING ............................................................................................... 21
CHAPTER 6 - MAINTENANCE and CALIBRATION ....................................................... 22
CHAPTER 6 - MAINTENANCE and CALIBRATION ....................................................... 22
CHAPTER 7 - DISPOSABLE SETS and ACCESSORIES .............................................. 23
CHAPTER 7 - DISPOSABLE SETS and ACCESSORIES .............................................. 23
CHAPTER 8 - IMPORTANT PEDIATRIC CONSIDERATIONS ........................................ 27
CHAPTER 8 - IMPORTANT PEDIATRIC CONSIDERATIONS ........................................ 27
CHAPTER 9 - TECHNICAL INFORMATION ................................................................... 29
CHAPTER 9 - TECHNICAL INFORMATION ................................................................... 29
CHAPTER 10 - WARRANTY ........................................................................................... 32
CHAPTER 10 - WARRANTY ........................................................................................... 32
CHAPTER 11 - WHO TO CALL ....................................................................................... 33
CHAPTER 11 - WHO TO CALL ....................................................................................... 33
i
i
LIST OF FIGURES
Figure
LIST OF FIGURES
Description
Page
Figure
Description
Page
2-1
Pump Features - Front ...........................................................................
2
2-1
Pump Features - Front ...........................................................................
2
2-2
Pump Features - Rear ............................................................................
3
2-2
Pump Features - Rear ............................................................................
3
2-3
Keypad Layout .......................................................................................
4
2-3
Keypad Layout .......................................................................................
4
2-4
Display Segments ..................................................................................
6
2-4
Display Segments ..................................................................................
6
2-5
Alphanumeric Characters and Units ....................................................
6
2-5
Alphanumeric Characters and Units ....................................................
6
2-6
Setting Indicators ..................................................................................
6
2-6
Setting Indicators ..................................................................................
6
2-7
Run Indicator ..........................................................................................
6
2-7
Run Indicator ..........................................................................................
6
2-8
Power Indicators ....................................................................................
6
2-8
Power Indicators ....................................................................................
6
2-9
Load Tubing in Air Sensor .....................................................................
8
2-9
Load Tubing in Air Sensor .....................................................................
8
2-10
Load Tubing in Upstream Pressure Sensor .........................................
8
2-10
Load Tubing in Upstream Pressure Sensor .........................................
8
2-11
Load Tubing around Pump Wheel ........................................................
9
2-11
Load Tubing around Pump Wheel ........................................................
9
2-12
Load Tubing in Downstream Pressure Sensor
and Load Pinch Clip Occluder ..............................................................
2-12
9
Load Tubing in Downstream Pressure Sensor
and Load Pinch Clip Occluder ..............................................................
9
2-13
Time Displayed Between Interval Feedings ........................................ 13
2-13
Time Displayed Between Interval Feedings ........................................ 13
2-14
"Fuel Gauge" Displays Ascending Low to High
Pattern While Charging ......................................................................... 14
2-14
"Fuel Gauge" Displays Ascending Low to High
Pattern While Charging ......................................................................... 14
2-15
Battery Power Indicator ........................................................................ 15
2-15
Battery Power Indicator ........................................................................ 15
3-1
Pump Label - Warning ........................................................................... 17
3-1
Pump Label - Warning ........................................................................... 17
3-2
Pump Label - Feeding Bag Connection ............................................... 17
3-2
Pump Label - Feeding Bag Connection ............................................... 17
3-3
Pump Label - Patient Connection ......................................................... 17
3-3
Pump Label - Patient Connection ......................................................... 17
3-4
Pump Label - Shock Hazard .................................................................. 17
3-4
Pump Label - Shock Hazard .................................................................. 17
7-1
Disposable Sets ..................................................................................... 24
7-1
Disposable Sets ..................................................................................... 24
8-1
Flow Rate Accuracy ............................................................................... 28
8-1
Flow Rate Accuracy ............................................................................... 28
ii
ii
LIST OF WARNINGS and CAUTIONS
LIST OF WARNINGS and CAUTIONS
WARNING:
Use ONLY feeding solutions prescribed by the responsible physician, registered dietitian, registered nurse, or other licensed practitioner.
WARNING:
Use ONLY feeding solutions prescribed by the responsible physician, registered dietitian, registered nurse, or other licensed practitioner.
WARNING:
Use ONLY EnteraLite® Disposable Sets to ensure proper fluid delivery.
Others won't deliver the correct dose, may allow dangerous free-flow conditions, and may generate hazardous fluid pressures which may activate
occlusion alarms at unpredictable pressures.
WARNING:
Use ONLY EnteraLite® Disposable Sets to ensure proper fluid delivery.
Others won't deliver the correct dose, may allow dangerous free-flow conditions, and may generate hazardous fluid pressures which may activate
occlusion alarms at unpredictable pressures.
WARNING:
Replace the disposable set every 24 hours to maintain delivery accuracy
and prevent the growth of harmful bacteria.
WARNING:
Replace the disposable set every 24 hours to maintain delivery accuracy
and prevent the growth of harmful bacteria.
WARNING:
Low flow rates, combined with high dose settings may exceed the life of the
disposable set. The disposable set must be replaced every 24 hours to
maintain delivery accuracy and prevent the growth of bacteria. DO NOT
PROGRAM RATE AND DOSE COMBINATIONS WHICH EXCEED A 24
HOUR FEED REGIMEN.
WARNING:
Low flow rates, combined with high dose settings may exceed the life of the
disposable set. The disposable set must be replaced every 24 hours to
maintain delivery accuracy and prevent the growth of bacteria. DO NOT
PROGRAM RATE AND DOSE COMBINATIONS WHICH EXCEED A 24
HOUR FEED REGIMEN.
WARNING:
The battery capacity is an approximation. If you're unsure that enough
capacity remains for your intended use, recharge it!
WARNING:
The battery capacity is an approximation. If you're unsure that enough
capacity remains for your intended use, recharge it!
WARNING:
To avoid electrical shock, never clean the pump or the EnteraLite® AC
Adapter/Charger with the charger plugged in or the pump on.
WARNING:
To avoid electrical shock, never clean the pump or the EnteraLite® AC
Adapter/Charger with the charger plugged in or the pump on.
WARNING:
Never immerse the pump or the EnteraLite® AC Adapter/Charger in liquids.
Electrical shock or pump damage can result.
WARNING:
Never immerse the pump or the EnteraLite® AC Adapter/Charger in liquids.
Electrical shock or pump damage can result.
WARNING:
The EnteraLite® must be periodically calibrated to ensure proper fluid delivery.
WARNING:
The EnteraLite® must be periodically calibrated to ensure proper fluid delivery.
WARNING:
Do not use the EnteraLite® Enteral Feeding Pump for the delivery of nonenteral solutions. Serious injury may result. For enteral feeding only. Not for
IV use.
WARNING:
Do not use the EnteraLite® Enteral Feeding Pump for the delivery of nonenteral solutions. Serious injury may result. For enteral feeding only. Not for
IV use.
WARNING:
The Total Volume may be incorrect due to an interruption of battery power if
the overcurrent or temperature protection circuits are triggered. In such a
case one of the following conditions occurs:
WARNING:
The Total Volume may be incorrect due to an interruption of battery power if
the overcurrent or temperature protection circuits are triggered. In such a
case one of the following conditions occurs:
During Single Feeding
The pump enters pause mode, but does not display "DOSE DONE" or turns
off (but not due to a low battery).
During Single Feeding
The pump enters pause mode, but does not display "DOSE DONE" or turns
off (but not due to a low battery).
During Interval Feeding
The pump enters pause mode or turns off (but not due to a low battery).
During Interval Feeding
The pump enters pause mode or turns off (but not due to a low battery).
iii
iii
LIST OF WARNINGS and CAUTIONS
LIST OF WARNINGS and CAUTIONS
WARNING:
WARNING:
When simultaneously charging and operating the pump, position the pump
to avoid contact with the patient’s skin.
When simultaneously charging and operating the pump, position the pump
to avoid contact with the patient’s skin.
(Place the pump on a table top, in an EnteraLite® pack, or secure the pump
to an appropriate fixture using a pole clamp).
(Place the pump on a table top, in an EnteraLite® pack, or secure the pump
to an appropriate fixture using a pole clamp).
WARNING:
Make sure the EnteraLite® AC Adapter/Charger is completely dry before
plugging into an electrical outlet.
WARNING:
Make sure the EnteraLite® AC Adapter/Charger is completely dry before
plugging into an electrical outlet.
WARNING:
Do not use an extension cord with the AC Adapter/Charger.
WARNING:
Do not use an extension cord with the AC Adapter/Charger.
WARNING:
The AC Adapter/Charger is intended for indoor, dry area use only. Do not
allow adapter to be exposed to liquids.
WARNING:
The AC Adapter/Charger is intended for indoor, dry area use only. Do not
allow adapter to be exposed to liquids.
WARNING:
Possible explosion hazard if used in the presence of flammable anesthetics!
WARNING:
Possible explosion hazard if used in the presence of flammable anesthetics!
WARNING:
U.S. law restricts this device to sale by or on the order of a physician, registered dietitian, registered nurse, or other licensed practitioner.
WARNING:
U.S. law restricts this device to sale by or on the order of a physician, registered dietitian, registered nurse, or other licensed practitioner.
WARNING:
Dispose of the packaging properly. The plastic bag and band could be a hazard to children.
WARNING:
Dispose of the packaging properly. The plastic bag and band could be a hazard to children.
CAUTION:
Dispose of EnteraLite® Disposable Sets properly, as required by local law.
CAUTION:
Dispose of EnteraLite® Disposable Sets properly, as required by local law.
CAUTION:
Gently clean the pressure sensors. Excessive pressure due to aggressive
cleaning can damage them.
CAUTION:
Gently clean the pressure sensors. Excessive pressure due to aggressive
cleaning can damage them.
CAUTION:
Never press fingers or other objects into the cavities over the pressure sensors. Load only the silicone tubing of the disposable set into these sensors.
CAUTION:
Never press fingers or other objects into the cavities over the pressure sensors. Load only the silicone tubing of the disposable set into these sensors.
CAUTION:
When feeding human milk, fat separation may occur. The feeding solution
should be periodically checked during the feed regimen.
CAUTION:
When feeding human milk, fat separation may occur. The feeding solution
should be periodically checked during the feed regimen.
CAUTION:
If the pump is dropped or falls onto a hard surface from a height of 3 feet or
more, it is recommended that it be returned for service.
CAUTION:
If the pump is dropped or falls onto a hard surface from a height of 3 feet or
more, it is recommended that it be returned for service.
iv
iv
CHAPTER 1 - GENERAL INFORMATION
CHAPTER 1 - GENERAL INFORMATION
WARNING: U.S. law restricts this device to sale by or on the order of a
physician, registered dietitian, registered nurse, or other licensed practitioner.
WARNING: U.S. law restricts this device to sale by or on the order of a
physician, registered dietitian, registered nurse, or other licensed practitioner.
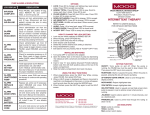
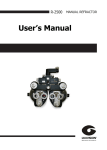
The EnteraLite® is a rotary peristaltic enteral feeding pump (order number Z-11583-1)
designed to deliver programmed doses of enteral nutrition solutions at selectable rates.
This small, lightweight pump operates in any orientation, making it ideal for ambulatory use.
The EnteraLite® is a rotary peristaltic enteral feeding pump (order number Z-11583-1)
designed to deliver programmed doses of enteral nutrition solutions at selectable rates.
This small, lightweight pump operates in any orientation, making it ideal for ambulatory use.
SIZE
SIZE
Pump Dimensions:
Pump Weight:
PRIME (approximately 600 ml/hr)
Pump Dimensions:
4.97" H x 4.47" W x 2.00" D
13cm H x 11cm W x 5cm D
1.30 lb. (590g)
ALARMS
Chek
Load Set
Low Batt
No Flow In
No Flow Out
BATTERY
Type:
Life:
NiMH
(Nickel Metal Hydride)
24 hours @ 125 ml/hr
Charge Time:
approximately 5 hours
(see * note in Chapter 2, Running on Battery
Power)
Charge Level Indicator
Compact Charger
105 to 129 VAC, 60 Hz, 0.22A
No Food
Pump Won't Run
Push Run To Feed
ERRA - ERRZ
DISPLAY
Backlit LCD
DISPOSABLE SET FEATURES
OPERATING ORIENTATION
Any
FLOW RATE
Range:
Increment:
Accuracy:
Programming error
Set not loaded properly
Battery Low
Upstream occlusion
Downstream occlusion,
Select 8 psi (55 kPa)
or 12 psi (83 kPa)
Tolerance = ± 2psi (14 kPa)
psi (pounds per square inch)
kPa (kilopascals)
Bag or set is empty
Motor slow or jammed
Pump unused for 2 minutes
Self-test error
1 - 600 ml/hr
1 ml/hr over full range
± 5%,
including high
viscosity solutions
Pump Weight:
PRIME (approximately 600 ml/hr)
4.97" H x 4.47" W x 2.00" D
13cm H x 11cm W x 5cm D
1.30 lb. (590g)
ALARMS
Chek
Load Set
Low Batt
No Flow In
No Flow Out
BATTERY
Type:
Life:
NiMH
(Nickel Metal Hydride)
24 hours @ 125 ml/hr
Charge Time:
approximately 5 hours
(see * note in Chapter 2, Running on Battery
Power)
Charge Level Indicator
Compact Charger
105 to 129 VAC, 60 Hz, 0.22A
No Food
Pump Won't Run
Push Run To Feed
ERRA - ERRZ
DISPLAY
Backlit LCD
DISPOSABLE SET FEATURES
Automatic Anti-free-flow
Drip Chamber Eliminated
OPERATING ORIENTATION
ACCESSORIES
FLOW RATE
Multi-purpose EnteraLite® packs
Multi-position Pole Clamp (rotatable 360°)
EnteraLite® AC Adapter/Charger
Range:
Increment:
Accuracy:
Automatic Anti-free-flow
Drip Chamber Eliminated
Any
WARRANTY
ACCESSORIES
Multi-purpose EnteraLite® packs
Multi-position Pole Clamp (rotatable 360°)
EnteraLite® AC Adapter/Charger
1 - 600 ml/hr
1 ml/hr over full range
± 5%,
including high
viscosity solutions
WARRANTY
2 years
2 years
DOSE
DOSE
Maximum:
Increment:
OPERATING ENVIRONMENT
3000 ml
10 ml
(specified per IEC 60601-1)
Temperature:
VOLUME DISPLAY
Current Dose Status
Accumulated (Pump on or off)
Humidity:
INTERVAL FEED
Temperature:
50 °F to 104 °F
(10 °C to 40 °C)
30% to 75%
STORAGE ENVIRONMENT
Interval Feed Indication
Time To Next Feed Indication
Humidity:
-4 °F to 149 °F
(-20 °C to 65 °C)
10% to 95% noncondensing
PROGRAM MEMORY RETAINED
When Pump is on or off
Atmospheric
pressure:
700 hPa to 1060 hPa
LIFE EXPECTANCY
IEC 60601-1 CLASSIFICATIONS
Class I and Internally Powered
BF Applied Part
The pump will survive a minimum of 5,000 loadings.
At a typical use of 1-3 loads per day, this is equivalent to 5 - 10 years.
1
Programming error
Set not loaded properly
Battery Low
Upstream occlusion
Downstream occlusion,
Select 8 psi (55 kPa)
or 12 psi (83 kPa)
Tolerance = ± 2psi (14 kPa)
psi (pounds per square inch)
kPa (kilopascals)
Bag or set is empty
Motor slow or jammed
Pump unused for 2 minutes
Self-test error
Maximum:
Increment:
OPERATING ENVIRONMENT
3000 ml
10 ml
(specified per IEC 60601-1)
Temperature:
VOLUME DISPLAY
50 °F to 104 °F
(10 °C to 40 °C)
30% to 75%
Current Dose Status
Accumulated (Pump on or off)
Humidity:
INTERVAL FEED
Temperature:
Interval Feed Indication
Time To Next Feed Indication
Humidity:
-4 °F to 149 °F
(-20 °C to 65 °C)
10% to 95% noncondensing
PROGRAM MEMORY RETAINED
When Pump is on or off
Atmospheric
pressure:
700 hPa to 1060 hPa
LIFE EXPECTANCY
IEC 60601-1 CLASSIFICATIONS
STORAGE ENVIRONMENT
Class I and Internally Powered
BF Applied Part
The pump will survive a minimum of 5,000 loadings.
At a typical use of 1-3 loads per day, this is equivalent to 5 - 10 years.
1
CHAPTER 2 - DIRECTIONS FOR USE
CHAPTER 2 - DIRECTIONS FOR USE
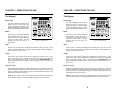
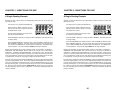
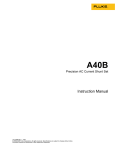
Pump Features
Pump Features
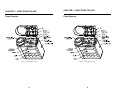
Figure 2-1: Pump Features - Front
Figure 2-1: Pump Features - Front
2
2
CHAPTER 2 - DIRECTIONS FOR USE
CHAPTER 2 - DIRECTIONS FOR USE
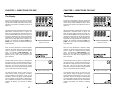
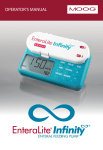
Pump Features
Pump Features
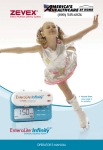
Flow Dire ction La be ls
P ump Ins tructions
La be l
Cha rge r /
P owe r Conne ctor
Re ce pta cle for
P ole Cla mp
Flow Dire ction La be ls
P ump Ins tructions
La be l
Cha rge r /
P owe r Conne ctor
Re ce pta cle for
P ole Cla mp
P ole (re fe re nce )
P ole Cla mp
Z-11981
P ole (re fe re nce )
P ole Cla mp
Z-11981
AC Ada pte r/Cha rge r
23159-001
AC Ada pte r/Cha rge r
23159-001
Figure 2-2: Pump Features - Rear
Figure 2-2: Pump Features - Rear
3
3
CHAPTER 2 - DIRECTIONS FOR USE
CHAPTER 2 - DIRECTIONS FOR USE
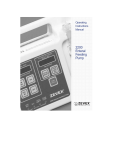
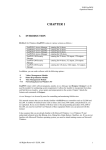
The Keypad
The Keypad
ON / OFF
ON / OFF
Press this key for 2 seconds to either
turn the EnteraLite® on or off. When the
charger is plugged in, the pump is not
completely off, instead it displays the
battery charge status.
Press this key for 2 seconds to either
turn the EnteraLite® on or off. When the
charger is plugged in, the pump is not
completely off, instead it displays the
battery charge status.
RUN / PAUSE
RUN / PAUSE
Press this key to either start the pump or
place it in pause mode. When you press
the key to run, the pump resumes operation with the current rate, dose, feed
interval, and volume delivered (the rate,
dose or feed interval can be changed
while in pause mode, in which case the
volume is cleared and the pump begins
a new feed cycle).
Figure 2-3: Keypad Layout
PRIME
PRIME
Press this key to fill or prime the disposable set once it is loaded into the pump (approximately 13 ml). Press and hold the PRIME key to rapidly fill the disposable set with
fluid. Release the key to stop. The PRIME key operates only while the pump is in
pause mode. Use this key to fill the tubing set when air has been introduced into the
tubing (indicated by the NO FOOD alarm).
VOL / TOTAL
VOL / TOTAL
Press this key once to display the current volume delivered for this feed cycle. Press
this key again to display the total cumulative volume delivered in all feed cycles since
the total volume was last cleared (in this mode the display flashes TOTL, then the total
cumulative volume).
Press this key once to display the current volume delivered for this feed cycle. Press
this key again to display the total cumulative volume delivered in all feed cycles since
the total volume was last cleared (in this mode the display flashes TOTL, then the total
cumulative volume).
FEED INT
FEED INT
Press this key to display the feed interval. FEED INTERVAL flashes and the display
indicates the number of hours in which the pump will repeat the programmed dose at
the selected rate.
4
Press this key to display the feed interval. FEED INTERVAL flashes and the display
indicates the number of hours in which the pump will repeat the programmed dose at
the selected rate.
4
CHAPTER 2 - DIRECTIONS FOR USE
CHAPTER 2 - DIRECTIONS FOR USE
The Keypad
The Keypad
RATE / DOSE
RATE / DOSE
If the rate is displayed, press this key to
display the dose, or, if the dose is displayed, press this key to display the rate.
If neither is displayed, press once to display the rate and again to display the dose.
If the rate is displayed, press this key to
display the dose, or, if the dose is displayed, press this key to display the rate.
If neither is displayed, press once to display the rate and again to display the dose.
MORE
MORE
Press this key to increase the displayed
feed parameter; either rate, dose, or
feed interval. Press and hold this key to
increase the value rapidly. This key
operates only when the pump is in
pause mode.
Figure 2-3: Keypad Layout
Press this key to increase the displayed
feed parameter; either rate, dose, or
feed interval. Press and hold this key to
increase the value rapidly. This key
operates only when the pump is in
pause mode.
Figure 2-3: Keypad Layout
LESS
LESS
Press this key to decrease the displayed feed parameter; either rate, dose, or feed
interval. Press and hold this key to decrease the value rapidly. This key operates only
when the pump is in pause mode.
Press this key to decrease the displayed feed parameter; either rate, dose, or feed
interval. Press and hold this key to decrease the value rapidly. This key operates only
when the pump is in pause mode.
CLEAR
CLEAR
Press this key when volume or total volume is displayed to set either to zero. Press
this key when rate or dose is displayed to set either to its minimum value (Minimum
Rate: 1 ml/hr, Minimum Dose: 10 ml). Press this key when FEED INTERVAL is displayed to disable interval feed operation. This key operates only when the pump is in
pause mode.
EnteraLite® (Light)
EnteraLite® (Light)
Press the key labeled EnteraLite® to light the display to view in a dark room. The pump
will automatically turn the display light off 10 seconds after the last key is pressed. The
light is on constantly when the battery charger is connected between the pump and a
wall outlet and the pump is turned on.
NOTE: On early versions of the pump, the display light turns off after 10 seconds even
when the battery charger is connected between the pump and a live wall outlet.
NOTE: On early versions of the pump, the display light turns off after 10 seconds even
when the battery charger is connected between the pump and a live wall outlet.
5
5
CHAPTER 2 - DIRECTIONS FOR USE
CHAPTER 2 - DIRECTIONS FOR USE
The Display
The Display
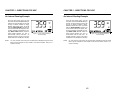
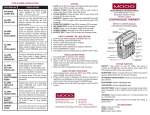
The pump communicates to the user through the
display, which includes large alphanumeric characters, as well as smaller symbols and words. All the
segments and symbols in the display are shown in
Figure 2-4.
The pump communicates to the user through the
display, which includes large alphanumeric characters, as well as smaller symbols and words. All the
segments and symbols in the display are shown in
Figure 2-4.
Important information is displayed through the large
alphanumeric characters shown in Figure 2-5.
When the pump displays the rate with these characters it indicates ml/hr to the right of the value, for
the dose it indicates ml, and for the feed interval it
indicates hr. The pump also communicates messages with the large alphanumeric characters. For
example, the characters will display DOSE, then
DONE, when the pump has finished delivering a
single feed dose.
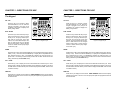
Figure 2-4: Display Segments
Figure 2-5: Alphanumeric
Characters and Units
When the large alphanumeric characters display
numbers, the smaller words below the characters,
shown in Figure 2-6, describe what the numbers
mean. For example, if FEED INTERVAL is displayed, then the number of hours between the
beginning of each dose will be displayed by the
large characters.
Important information is displayed through the large
alphanumeric characters shown in Figure 2-5.
When the pump displays the rate with these characters it indicates ml/hr to the right of the value, for
the dose it indicates ml, and for the feed interval it
indicates hr. The pump also communicates messages with the large alphanumeric characters. For
example, the characters will display DOSE, then
DONE, when the pump has finished delivering a
single feed dose.
The run symbol, shown in Figure 2-7, indicates that
the pump is running. The arcs around the run symbol rotate when the pump is in the process of delivering fluid. The arcs are off but the run symbol
blinks when the pump is between feeding intervals
(only if a feed interval has been selected).
Figure 2-6: Setting Indicators
The run symbol, shown in Figure 2-7, indicates that
the pump is running. The arcs around the run symbol rotate when the pump is in the process of delivering fluid. The arcs are off but the run symbol
blinks when the pump is between feeding intervals
(only if a feed interval has been selected).
Figure 2-7: Run Indicator
6
Figure 2-5: Alphanumeric
Characters and Units
When the large alphanumeric characters display
numbers, the smaller words below the characters,
shown in Figure 2-6, describe what the numbers
mean. For example, if FEED INTERVAL is displayed, then the number of hours between the
beginning of each dose will be displayed by the
large characters.
Figure 2-6: Setting Indicators
The wall plug symbol, shown in Figure 2-8, indicates that the charger is plugged in, the battery
symbol indicates that the pump is running on only
the battery, and the "fuel gauge" symbol indicates
how much battery charge remains. More information is available in the sections of this chapter titled:
Charging the Battery, and Running on Battery
Power.
Figure 2-4: Display Segments
Figure 2-8: Power Indicators
Figure 2-7: Run Indicator
The wall plug symbol, shown in Figure 2-8, indicates that the charger is plugged in, the battery
symbol indicates that the pump is running on only
the battery, and the "fuel gauge" symbol indicates
how much battery charge remains. More information is available in the sections of this chapter titled:
Charging the Battery, and Running on Battery
Power.
6
Figure 2-8: Power Indicators
CHAPTER 2 - DIRECTIONS FOR USE
CHAPTER 2 - DIRECTIONS FOR USE
Preparing the Disposable Set
Preparing the Disposable Set
WARNING: Use ONLY EnteraLite® Disposable Sets to ensure proper fluid
delivery. Others won't deliver the correct dose, may allow dangerous freeflow conditions, and may generate hazardous fluid pressures which may
activate occlusion alarms at unpredictable pressures.
WARNING: Use ONLY EnteraLite® Disposable Sets to ensure proper fluid
delivery. Others won't deliver the correct dose, may allow dangerous freeflow conditions, and may generate hazardous fluid pressures which may
activate occlusion alarms at unpredictable pressures.
WARNING: Use ONLY feeding solutions prescribed by the responsible physician, registered dietitian, registered nurse, or other licensed practitioner.
WARNING: Use ONLY feeding solutions prescribed by the responsible physician, registered dietitian, registered nurse, or other licensed practitioner.
Follow your health care provider’s instructions regarding cleanliness in preparing the feeding solution and the disposable set.
Follow your health care provider’s instructions regarding cleanliness in preparing the feeding solution and the disposable set.
Remove the disposable set from the package. Remove any plastic band around the tubing.
Remove the disposable set from the package. Remove any plastic band around the tubing.
WARNING: Dispose of the packaging properly. The plastic bag and band
could be a hazard to children.
WARNING: Dispose of the packaging properly. The plastic bag and band
could be a hazard to children.
Remove the Stepped Enteral Adapter cover from the pinch clip occluder to prevent solution
free-flow. Leave the cover on the Stepped Enteral Adapter until ready to connect to the
patient’s enteral feeding tube.
Remove the Stepped Enteral Adapter cover from the pinch clip occluder to prevent solution
free-flow. Leave the cover on the Stepped Enteral Adapter until ready to connect to the
patient’s enteral feeding tube.
If you are using the spike set with a vented bottle or a pre-filled bag:
If you are using the spike set with a vented bottle or a pre-filled bag:
Insert the spike into the spike adapter of the vented bottle or the pre-filled bag.
If you are using the 500 ml or 1200 ml disposable set:
Hold the bag upright and pour the feeding solution into it.
NOTE: Allow blenderized solutions to sit for 10 to 15 minutes before pouring them into
the bag.
Firmly seal the bag closure.
Invert the bag so that the outlet is at the top.
Squeeze the buttons on the Pinch Clip Occluder to allow flow.
Squeeze the bag until all of the air has passed out of the bag and feeding solution extends beyond the Pinch Clip Occluder. If you wish, continue to squeeze the
bag to prime the tubing set.
Release the Pinch Clip Occluder.
7
Insert the spike into the spike adapter of the vented bottle or the pre-filled bag.
If you are using the 500 ml or 1200 ml disposable set:
Hold the bag upright and pour the feeding solution into it.
NOTE: Allow blenderized solutions to sit for 10 to 15 minutes before pouring them into
the bag.
If you are using the mini backpack, waistpack, or sports pack, remove excess air from the
bag. To remove excess air from the bag:
Firmly seal the bag closure.
If you are using the mini backpack, waistpack, or sports pack, remove excess air from the
bag. To remove excess air from the bag:
Invert the bag so that the outlet is at the top.
Squeeze the buttons on the Pinch Clip Occluder to allow flow.
Squeeze the bag until all of the air has passed out of the bag and feeding solution extends beyond the Pinch Clip Occluder. If you wish, continue to squeeze the
bag to prime the tubing set.
Release the Pinch Clip Occluder.
7
CHAPTER 2 - DIRECTIONS FOR USE
CHAPTER 2 - DIRECTIONS FOR USE
Loading the Disposable Set
Loading the Disposable Set
CAUTION: Never press fingers or other objects into the cavities over the
pressure sensors. Load only the silicone tubing of the disposable set into
these sensors.
CAUTION: Never press fingers or other objects into the cavities over the
pressure sensors. Load only the silicone tubing of the disposable set into
these sensors.
CAUTION: Dispose of EnteraLite® Sets Properly, as required by local law.
CAUTION: Dispose of EnteraLite® Sets Properly, as required by local law.
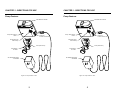
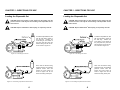
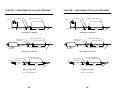
To load the disposable set, start
with the tube fitting closest to
the feed bag. Position the
round fitting on the outside of
the pump and then press the
silicone tubing into the air sensor as shown in Figure 2-9.
Figure 2-9: Load Tubing in Air Sensor
To load the disposable set, start
with the tube fitting closest to
the feed bag. Position the
round fitting on the outside of
the pump and then press the
silicone tubing into the air sensor as shown in Figure 2-9.
Figure 2-9: Load Tubing in Air Sensor
Next, route the silicone tubing
segment through the upstream
pressure sensor area and
toward the pump wheel as
shown in Figure 2-10. Do not
stretch the tubing at this point.
Figure 2-10: Load Tubing in Upstream Pressure Sensor
8
Next, route the silicone tubing
segment through the upstream
pressure sensor area and
toward the pump wheel as
shown in Figure 2-10. Do not
stretch the tubing at this point.
Figure 2-10: Load Tubing in Upstream Pressure Sensor
8
CHAPTER 2 - DIRECTIONS FOR USE
CHAPTER 2 - DIRECTIONS FOR USE
Loading the Disposable Set
Loading the Disposable Set
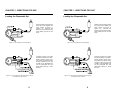
Wrap the silicone tubing around
the pump wheel (against the
pump rollers) as shown in
Figure 2-11.
Minimize the
stretching of the silicone tubing
when loading the set into the
pump.
Figure 2-11: Load Tubing around Pump Wheel
Wrap the silicone tubing around
the pump wheel (against the
pump rollers) as shown in
Figure 2-11.
Minimize the
stretching of the silicone tubing
when loading the set into the
pump.
Figure 2-11: Load Tubing around Pump Wheel
As shown in Figure 2-12, guide
the silicone tubing in the downstream pressure sensor area.
Only stretch the silicone tubing
enough to place the pinch clip
occluder of the disposable set
into the rectangular slot, with
either button facing up. Close
the door.
Figure 2-12: Load Tubing in Downstream Pressure Sensor
and Load Pinch Clip Occluder
9
CHAPTER 2 - DIRECTIONS FOR USE
CHAPTER 2 - DIRECTIONS FOR USE
A Single Feeding Example
A Single Feeding Example
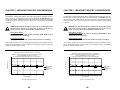
Suppose you want to deliver 500 ml of enteral feeding solution at a rate of 120 ml/hr and
then stop the pump:
Suppose you want to deliver 500 ml of enteral feeding solution at a rate of 120 ml/hr and
then stop the pump:
Turn the pump on by pressing the ON/OFF key.
Turn the pump on by pressing the ON/OFF key.
Verify that all the display segments and symbols are active as shown in Figure 2-4 and that
the audible alarm sounds.
Verify that all the display segments and symbols are active as shown in Figure 2-4 and that
the audible alarm sounds.
The rate will be displayed by the large characters after the pump's self-test.
Figure 2-4: Display Segments
The rate will be displayed by the large characters after the pump's self-test.
Figure 2-4: Display Segments
Press the MORE or LESS key to change the rate to 120 ml/hr. Hold down either key
to change rapidly.
Press the MORE or LESS key to change the rate to 120 ml/hr. Hold down either key
to change rapidly.
Press the RATE/DOSE key to display the dose. Press the MORE or LESS key until a
dose of 500 ml is displayed. The pump should stop when the dose has been delivered, so press the FEED INT key and then press the CLEAR key. This disables interval feed operation. The pump will display NONE with the large characters.
Prepare the disposable set and enteral feeding solution as described in CHAPTER 2 PREPARING THE DISPOSABLE SET and load the set into the pump as described in
CHAPTER 2 - LOADING THE DISPOSABLE SET. Close the pump's door. Hang the feeding bag or container so that the bottom of the bag is at or above the level of the pump door.
If any of the EnteraLite® packs are to be used, load the pump and feeding bag into the proper compartments, securing the pump, bag and tubing with the pack's straps.
Prime the set by pressing and holding the PRIME key until the set is filled with enteral feeding solution (approximately 13 ml). Connect the stepped enteral adapter at the patient end
of the set to the patient's enteral feeding tube. Press the RUN/PAUSE key and the pump
will begin delivering fluid. If you want to stop the pump at any time, press the RUN/PAUSE
key. When the dose has been delivered, DOSE DONE will appear and the pump will beep
(or mute, depending upon the pump's configuration - contact your healthcare provider if a
change is desired).
10
10
CHAPTER 2 - DIRECTIONS FOR USE
CHAPTER 2 - DIRECTIONS FOR USE
An Interval Feeding Example
An Interval Feeding Example
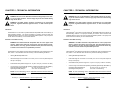
Suppose you want to deliver 300 ml of enteral feeding solution at a rate of 80 ml/hr, and
repeat this feeding every 6 hours:
Suppose you want to deliver 300 ml of enteral feeding solution at a rate of 80 ml/hr, and
repeat this feeding every 6 hours:
Turn the pump on by pressing the ON/OFF
key. Verify that all display segments and
symbols are active as shown in Figure 2-4,
and that the audible alarm sounds. Once the
pump finishes its self-test the rate will be displayed by the large characters.
Turn the pump on by pressing the ON/OFF
key. Verify that all display segments and symbols are active as shown in Figure 2-4, and
that the audible alarm sounds. Once the
pump finishes its self-test the rate will be displayed by the large characters.
Press the MORE key or the LESS key to
increase or decrease the rate to 80 ml/hr.
Figure 2-4: Display Segments
Press the MORE key or the LESS key to
increase or decrease the rate to 80 ml/hr.
Figure 2-4: Display Segments
Press the RATE/DOSE key to display the dose. Press the MORE or LESS key until a
dose of 300 ml is displayed.
Press the RATE/DOSE key to display the dose. Press the MORE or LESS key until a
dose of 300 ml is displayed.
Now press the FEED INT key. Press the MORE or LESS key until the feed interval is
set to 6 hr.
Now press the FEED INT key. Press the MORE or LESS key until the feed interval is
set to 6 hr.
WARNING: Replace the disposable set every 24 hours to maintain delivery
accuracy and prevent growth of harmful bacteria.
WARNING: Replace the disposable set every 24 hours to maintain delivery
accuracy and prevent growth of harmful bacteria.
WARNING: Low flow rates, combined with high dose settings may exceed
the life of the disposable set. The disposable set must be replaced every 24
hours to maintain delivery accuracy and prevent the growth of bacteria. DO
NOT PROGRAM RATE AND DOSE COMBINATIONS WHICH EXCEED A 24
HOUR FEED REGIMEN.
WARNING: Low flow rates, combined with high dose settings may exceed
the life of the disposable set. The disposable set must be replaced every 24
hours to maintain delivery accuracy and prevent the growth of bacteria. DO
NOT PROGRAM RATE AND DOSE COMBINATIONS WHICH EXCEED A 24
HOUR FEED REGIMEN.
11
11
CHAPTER 2 - DIRECTIONS FOR USE
CHAPTER 2 - DIRECTIONS FOR USE
An Interval Feeding Example
An Interval Feeding Example
Prepare the disposable set and enteral feeding solution as described in CHAPTER 2 PREPARING THE DISPOSABLE SET. If a feeding bag is to be used, pour the total
amount of enteral food to be delivered into the feeding bag.
Prepare the disposable set and enteral feeding solution as described in CHAPTER 2 PREPARING THE DISPOSABLE SET. If a feeding bag is to be used, pour the total
amount of enteral food to be delivered into the feeding bag.
Next, load the EnteraLite® Disposable Set into the pump as described in CHAPTER 2
- LOADING THE DISPOSABLE SET and close the door. Hang the feeding bag or container so that the bottom of the bag is at or above the level of the pump door. If any of
the EnteraLite® packs are to be used, load the pump and feeding bag into the proper
compartments, securing the pump, bag and tubing with the pack's straps.
Prime the set by pressing and holding the PRIME key until the set is filled with enteral feeding solution (approximately 13 ml).
Prime the set by pressing and holding the PRIME key until the set is filled with enteral feeding solution (approximately 13 ml).
Connect the stepped enteral adapter at the patient end of the set to the patient's enteral feeding tube.
Connect the stepped enteral adapter at the patient end of the set to the patient's enteral feeding tube.
Press the RUN/PAUSE key to begin feeding. The pump will deliver 300 ml every 6
hours at a rate of 80 ml/hr, until the bag is empty.
Press the RUN/PAUSE key to begin feeding. The pump will deliver 300 ml every 6
hours at a rate of 80 ml/hr, until the bag is empty.
If you want to stop the pump at any time, press the RUN/PAUSE key. You may resume
the feed interval by pressing the RUN/PAUSE key as long as the rate, the dose, and
the feed interval remain unchanged (clearing the volume will cause the pump to restart
the feed cycle).
If you want to stop the pump at any time, press the RUN/PAUSE key. You may resume
the feed interval by pressing the RUN/PAUSE key as long as the rate, the dose, and
the feed interval remain unchanged (clearing the volume will cause the pump to restart
the feed cycle).
Additional notes regarding interval feeding:
Additional notes regarding interval feeding:
Once the pump is running, the volume display, which can be accessed by pressing the
VOL/TOTAL key once, shows the volume being delivered for the current feed cycle. In
6 hours the next feed cycle will begin. If you would like to display the total cumulative
volume, press the VOL/TOTAL key once more. Now the display indicates the total volume delivered since last cleared, alternating with TOTL.
You cannot set the feed interval shorter than the current rate and dose settings will
allow. To set a shorter feed interval, first change the rate and dose settings, then set
the feed interval.
You cannot set the feed interval shorter than the current rate and dose settings will
allow. To set a shorter feed interval, first change the rate and dose settings, then set
the feed interval.
If you want to start with the total volume from zero, then the volume must be cleared.
This can be done any time that the pump is in the pause mode. Press the VOL/TOTAL
key twice so the total volume is displayed. Press the CLEAR key. The total volume is
reset to zero.
If you want to start with the total volume from zero, then the volume must be cleared.
This can be done any time that the pump is in the pause mode. Press the VOL/TOTAL
key twice so the total volume is displayed. Press the CLEAR key. The total volume is
reset to zero.
There is a limit to the total volume that the pump can count. It will display up to 9998
ml. If the maximum value of 9998 ml is exceeded, OVER FLOW will be displayed by
the large characters instead of the total volume. Clear it to start over.
There is a limit to the total volume that the pump can count. It will display up to 9998
ml. If the maximum value of 9998 ml is exceeded, OVER FLOW will be displayed by
the large characters instead of the total volume. Clear it to start over.
12
12
CHAPTER 2 - DIRECTIONS FOR USE
CHAPTER 2 - DIRECTIONS FOR USE
An Interval Feeding Example
An Interval Feeding Example
Once the feed interval, dose, and rate
have been set and the RUN/PAUSE key is
pressed, the pump will keep running until
the bag or solution container is empty.
Between interval feed cycles, the words
run and FEED INTERVAL will blink, but
the arcs around run will not appear. Also,
the large characters will display the message NEXT DOSE ##.## hr, where the
format ##.## indicates the time in
hours.minutes until the next dose. An
example is shown in Figure 2-13 (3.59 hr
equals three hours and fifty-nine minutes).
NOTE:
Figure 2-13: Time Displayed Between
Interval Feedings
On early versions of the pump, the next dose timer is displayed using the format
##.# hr (As an example 3.9 hours equals 3 hours and 54 minutes. Every 0.1 hr
equals 6 minutes).
13
CHAPTER 2 - DIRECTIONS FOR USE
CHAPTER 2 - DIRECTIONS FOR USE
Charging the Battery
Charging the Battery
To charge the battery, insert the plug from the
EnteraLite® AC Adapter/Charger into the matching jack on the pump marked "CHARGER".
Plug the charger into a wall outlet rated at:
To charge the battery, insert the plug from the
EnteraLite® AC Adapter/Charger into the matching jack on the pump marked "CHARGER".
Plug the charger into a wall outlet rated at:
105 to 129 VAC, 60 Hz, 0.22A
105 to 129 VAC, 60 Hz, 0.22A
When using the international charger, plug the
power cord into a wall outlet rated at:
When using the international charger, plug the
power cord into a wall outlet rated at:
100 to 250 VAC, 50-60 Hz, 0.39A
100 to 250 VAC, 50-60 Hz, 0.39A
The pump can continue to operate while charging the battery or charge when the pump is
turned off.
The pump can continue to operate while charging the battery or charge when the pump is
turned off.
The EnteraLite® AC Adapter/Charger may be left
continuously connected to the wall outlet. The
battery charging circuit stops automatically
when the battery is fully charged.
The EnteraLite® AC Adapter/Charger may be left
continuously connected to the wall outlet. The
battery charging circuit stops automatically
when the battery is fully charged.
When the charger is plugged in and charging,
the plug symbol will appear in the display as
shown in Figure 2-14a. The "fuel gauge" then
indicates that the battery is charging by displaying the segments in an ascending low to high
pattern starting with the leftmost segment. This
pattern continuously repeats while the pump is
charging. Refer to Figures 2-14a through 2-14e.
To check the status of the battery, disconnect
the charger from the pump and then turn the
pump on.
To check the status of the battery, disconnect
the charger from the pump and then turn the
pump on.
See Chapter 2 - Running on Battery Power for
information on battery life and charge times.
See Chapter 2 - Running on Battery Power for
information on battery life and charge times.
WARNING: When simultaneously
charging and operating the pump,
position the pump to avoid direct
contact with the patient's skin.
Figure 2-14: “Fuel Gauge” Displays
Ascending Low to High Pattern
While Charging
WARNING: When simultaneously
charging and operating the pump,
position the pump to avoid direct
contact with the patient's skin.
(Place the pump on a table top, in
an EnteraLite® pack, or secure the
pump to an appropriate fixture
using a pole clamp).
(Place the pump on a table top, in
an EnteraLite® pack, or secure the
pump to an appropriate fixture
using a pole clamp).
14
14
Figure 2-14: “Fuel Gauge” Displays
Ascending Low to High Pattern
While Charging
CHAPTER 2 - DIRECTIONS FOR USE
CHAPTER 2 - DIRECTIONS FOR USE
Running on Battery Power
Running on Battery Power
WARNING: The battery capacity is an approximation. If you're unsure that
enough capacity remains for your intended use, recharge it!
WARNING: The battery capacity is an approximation. If you're unsure that
enough capacity remains for your intended use, recharge it!
When the pump is running on battery power
the battery symbol will appear in the display
as shown in Figure 2-15.
When the pump is running on battery power
the battery symbol will appear in the display
as shown in Figure 2-15.
The segments or bars between E and F represent the “fuel gauge” of the battery. Each
block is approximately 1/4 of a 24-hour
charge. If two blocks appear, then the battery
is half full and the battery operation time
remaining is roughly 12 hours. As the battery
Figure 2-15: Battery Power Indicator
charge decreases, the blocks will blink before
they disappear. When the last block is gone,
the battery symbol will blink to indicate that there is approximately 1 hour of charge left,
based on a flow rate of 125 ml/hr. At higher flow rates, this time will be reduced, while at
lower flow rates, this time will increase.
When the battery symbol blinks, the display will flash LOW BATT every 7 seconds, alternating with the active display and the pump will beep every 3 minutes to remind the user of
the low battery charge condition. Plug in the charger to continue to run and recharge the
batteries. When the battery is fully depleted the pump will turn off automatically.
NOTE: As battery charge level decreases the pump may not be able to deliver enteral fluid
at rates greater than 300 ml/hr, even though some battery capacity remains. The pump will
alarm and indicate PUMP WONT RUN or RATE TOO FAST FOR BATT. If this happens,
either recharge the battery or select a lower rate to complete the feed cycle.
NOTE: Some pumps contain an updated battery that can store a larger charge when
charged for more than 5 hours. When charged for 5 hours, the first two bars will last for
approximately 4 hours while the remaining two bars will last approximately 10 hours each.
NOTE: Some pumps contain an updated battery that can store a larger charge when
charged for more than 5 hours. When charged for 5 hours, the first two bars will last for
approximately 4 hours while the remaining two bars will last approximately 10 hours each.
*NOTE: Battery life approximation is based on a battery with full charge range (charged for
approximately 5 hours) and a flow rate of 125 ml/hr. Higher flow rates will reduce battery
life, while lower flow rates and interval feeding will increase the battery life. Also, longer
charging will increase battery life.
NOTE: The battery may take longer to charge if the temperature is below 50°F (10°C) or
above 85°F (30°C).
NOTE: The battery may take longer to charge if the temperature is below 50°F (10°C) or
above 85°F (30°C).
15
15
CHAPTER 2 - DIRECTIONS FOR USE
WARNING:
The Total Volume may be incorrect due to an interruption of
battery power if the overcurrent or temperature protection
circuits are triggered. In such a case one of the following
conditions occurs:
CHAPTER 2 - DIRECTIONS FOR USE
WARNING:
The Total Volume may be incorrect due to an interruption of
battery power if the overcurrent or temperature protection
circuits are triggered. In such a case one of the following
conditions occurs:
During Single Feeding
The pump enters pause mode, but does not display "DOSE
DONE" or turns off (but not due to a low battery).
During Single Feeding
The pump enters pause mode, but does not display "DOSE
DONE" or turns off (but not due to a low battery).
During Interval Feeding
The pump enters pause mode or turns off (but not due to a
low battery).
During Interval Feeding
The pump enters pause mode or turns off (but not due to a
low battery).
If one of these conditions occurs, check the disposable set feed bag to estimate how much
volume was actually delivered. If these conditions occur frequently, contact your healthcare
provider or refer the pump for service.
If one of these conditions occurs, check the disposable set feed bag to estimate how much
volume was actually delivered. If these conditions occur frequently, contact your healthcare
provider or refer the pump for service.
16
16
CHAPTER 3 - LABELS
CHAPTER 3 - LABELS
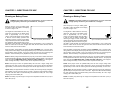
Brief instructions for the operation of the
pump as well as a brief explanation of
each alarm message which the pump may
communicate are printed on labels
attached to the pump. These are not
intended to be used in place of the
Operator's Manual. They are simply a
quick reference guide. Please read the
Operator's Manual before operating the
EnteraLite®!
Read operator's manual
before using!
Figure 3-1: Pump Label - Warning
The bag symbol, shown in Figure 3-2, is
printed on the side label under the port
where the loaded set leads directly to the
feeding bag.
The bag symbol, shown in Figure 3-2, is
printed on the side label under the port
where the loaded set leads directly to the
feeding bag.
Figure 3-2: Pump Label - Feeding Bag Connection
The patient symbol, shown in Figure 3-3,
is printed on the side label under the port
where the loaded set leads directly to the
stepped enteral adapter. The stepped
enteral adapter attaches to the patient's
enteral feeding tube.
Figure 3-3: Pump Label - Patient Connection
There are no user serviceable or replaceable components inside the EnteraLite® or
the EnteraLite® AC Adapter/Charger. Do
not open the pump or the EnteraLite® AC
Adapter/Charger because there is risk of
electrical shock.
Shock hazard inside
Figure 3-4: Pump Label - Shock Hazard
17
CHAPTER 4 - ALARMS and INDICATIONS
CHAPTER 4 - ALARMS and INDICATIONS
The audible alarm will sound to call attention to situations which must be corrected. The following messages may be displayed by the large display characters.
The audible alarm will sound to call attention to situations which must be corrected. The following messages may be displayed by the large display characters.
CHEK
The three smaller indicators: RATE, DOSE, and FEED INTERVAL are displayed with
this message. One of the three was programmed so that the pump cannot execute the
combination of commands. The pump divides the dose by the rate and if the result is
greater than the feed interval, this message is displayed.
For example, if rate is 100 ml/hr, and dose is 200 ml, then the pump will take 2 hours
to deliver the dose. However, if the feed interval is 1 hour, the pump cannot complete
the first interval feed before the next is due to start.
For example, if rate is 100 ml/hr, and dose is 200 ml, then the pump will take 2 hours
to deliver the dose. However, if the feed interval is 1 hour, the pump cannot complete
the first interval feed before the next is due to start.
Press the RUN/PAUSE key, and reprogram the settings. The pump will not run until
the rate, dose, and feed interval are compatible.
Press the RUN/PAUSE key, and reprogram the settings. The pump will not run until
the rate, dose, and feed interval are compatible.
DOSE DONE
This message indicates that a single feed dose has been delivered.
DOSE DONE
This message indicates that a single feed dose has been delivered.
ERRA - ERRZ
The pump displays ERR followed by a letter to indicate that a self-test has failed. Turn
the pump off and then back on. If the problem persists, contact your healthcare
provider or refer the pump for service (see CHAPTER 11 - WHO TO CALL).
ERRA - ERRZ
The pump displays ERR followed by a letter to indicate that a self-test has failed. Turn
the pump off and then back on. If the problem persists, contact your healthcare
provider or refer the pump for service (see CHAPTER 11 - WHO TO CALL).
LOAD SET
The pump attempted to run with the set improperly installed or missing.
Check the following:
Make sure an EnteraLite® Disposable Set is installed properly and the
door is closed.
Check for spillage, especially around the pressure sensors. If cleaning is
necessary, refer to CHAPTER 5 - CLEANING.
LOW BATT
The battery is low and the pump will soon stop running. Plug in the EnteraLite® AC
Adapter/Charger to recharge the battery. The pump can continue to operate while the
battery is charging.
LOW BATT
The battery is low and the pump will soon stop running. Plug in the EnteraLite® AC
Adapter/Charger to recharge the battery. The pump can continue to operate while the
battery is charging.
NEXT DOSE
The next dose will be delivered in ##.## hr, where the format ##.##, indicates the time
in hours and minutes until the next dose.
NEXT DOSE
The next dose will be delivered in ##.## hr, where the format ##.##, indicates the time
in hours and minutes until the next dose.
NO FLOW IN
The pump has detected an occlusion upstream in the set, between the pump and the
bag. Check the tubing set for blockage and correct the blockage. Also check for
spillage where the set is routed under the door. If there is spillage, refer to CHAPTER
5 - CLEANING.
NO FLOW IN
The pump has detected an occlusion upstream in the set, between the pump and the
bag. Check the tubing set for blockage and correct the blockage. Also check for
spillage where the set is routed under the door. If there is spillage, refer to CHAPTER
5 - CLEANING.
18
18
CHAPTER 4 - ALARMS and INDICATIONS
CHAPTER 4 - ALARMS and INDICATIONS
NO FLOW OUT
The pump has detected an occlusion downstream in the set, between the pump and
the patient. Check the tubing set for blockage and correct the blockage. Also check
for spillage where the set is routed under the door. If there is spillage, refer to CHAPTER 5 - CLEANING.
NO FLOW OUT
The pump has detected an occlusion downstream in the set, between the pump and
the patient. Check the tubing set for blockage and correct the blockage. Also check
for spillage where the set is routed under the door. If there is spillage, refer to CHAPTER 5 - CLEANING.
NO FOOD
The air sensor detects an empty tubing set. Check for the following problems.
NO FOOD
The air sensor detects an empty tubing set. Check for the following problems.
If the feeding bag is empty, refill the bag and continue feeding. If necessary,
prime the set.
If the feeding bag is empty, refill the bag and continue feeding. If necessary,
prime the set.
Make sure the air sensor is clean.
Make sure the air sensor is clean.
Make sure an EnteraLite® Disposable Set is installed properly, seated in the air
sensor, with the door closed.
Make sure an EnteraLite® Disposable Set is installed properly, seated in the air
sensor, with the door closed.
Replace worn tubing with a new tubing set.
Replace worn tubing with a new tubing set.
NOTE: The air sensor can be sensitive to foamy and/or blenderized solutions. Allow
blenderized solutions to sit for 10 to 15 minutes prior to pouring into the bag and priming the disposable set. Small air bubbles from the foam may get trapped in the air sensor region and must be cleared in order to avoid a NO FOOD alarm.
WARNING: Replace the disposable set every 24 hours to maintain delivery
accuracy and prevent the growth of harmful bacteria.
WARNING: Replace the disposable set every 24 hours to maintain delivery
accuracy and prevent the growth of harmful bacteria.
PUMP WONT RUN or RATE TOO FAST FOR BATT
The pump is inhibited from operating at the selected rate.
Check for the following problems.
PUMP WONT RUN or RATE TOO FAST FOR BATT
The pump is inhibited from operating at the selected rate.
Check for the following problems.
Make sure an EnteraLite® Disposable Set is installed properly and the
door is closed.
Make sure an EnteraLite® Disposable Set is installed properly and the
door is closed.
Check that the battery is fully charged or that the EnteraLite® AC Adapter/Charger
is plugged in.
Check that the battery is fully charged or that the EnteraLite® AC Adapter/Charger
is plugged in.
Try reducing the rate below 300 ml/hr. The pump may not be able to deliver
highly viscous (thick) fluids at high rates with the present charge level of
the battery.
Try reducing the rate below 300 ml/hr. The pump may not be able to deliver
highly viscous (thick) fluids at high rates with the present charge level of
the battery.
Check for contamination around the pump wheel and clean according
to CHAPTER 5 - CLEANING.
Check for contamination around the pump wheel and clean according
to CHAPTER 5 - CLEANING.
19
19
CHAPTER 4 - ALARMS and INDICATIONS
CHAPTER 4 - ALARMS and INDICATIONS
PUSH RUN TO FEED
This battery-saving feature indicates that the pump has been inactive in the pause
mode for 2 minutes. Program and use the pump or turn it off.
PUSH RUN TO FEED
This battery-saving feature indicates that the pump has been inactive in the pause
mode for 2 minutes. Program and use the pump or turn it off.
TO STOP LET GO
The pump displays this message when priming the set. To stop priming, release the
PRIME key.
TO STOP LET GO
The pump displays this message when priming the set. To stop priming, release the
PRIME key.
WONT PRIM IN RUN
The PRIME key was pressed while the pump was running. If you wish to prime the
pump, press the RUN/PAUSE key; then press and hold the PRIME key.
WONT PRIM IN RUN
The PRIME key was pressed while the pump was running. If you wish to prime the
pump, press the RUN/PAUSE key; then press and hold the PRIME key.
Battery Doesn't Hold Its Charge
The battery will lose its charge if stored for a long period of time or if stored at high temperatures (such as in an automobile during the summer). Recharge the battery.
Battery Doesn't Hold Its Charge
The battery will lose its charge if stored for a long period of time or if stored at high temperatures (such as in an automobile during the summer). Recharge the battery.
If you've charged the battery and the battery life is still less than expected, contact your
healthcare provider or refer the pump for service. The battery is not user-replaceable
(see CHAPTER 11 - WHO TO CALL).
If you've charged the battery and the battery life is still less than expected, contact your
healthcare provider or refer the pump for service. The battery is not user-replaceable
(see CHAPTER 11 - WHO TO CALL).
Charger Installed but No Plug Symbol Visible
Charger Installed but No Plug Symbol Visible
If the plug symbol remains off after the AC EnteraLite® Adapter/Charger is plugged into
the pump, the charger isn't charging the battery. Verify that the wall outlet works by
plugging in another appliance, such as a lamp. If the charger is connected properly
and the outlet works, then the pump or charger may be damaged. Contact your healthcare provider or refer the pump for service (see CHAPTER 11 - WHO TO CALL).
NOTE: There are no user serviceable or replaceable components inside the
EnteraLite® pump or EnteraLite® AC Adapter/Charger.
NOTE: There are no user serviceable or replaceable components inside the
EnteraLite® pump or EnteraLite® AC Adapter/Charger.
20
20
CHAPTER 5 - CLEANING
CHAPTER 5 - CLEANING
WARNING: To avoid electrical shock, never clean the pump or the
EnteraLite® AC Adapter/Charger with the charger plugged in or the pump on.
WARNING: To avoid electrical shock, never clean the pump or the
EnteraLite® AC Adapter/Charger with the charger plugged in or the pump on.
WARNING: Never immerse the pump or the EnteraLite® AC Adapter/Charger
in liquids. Electrical shock or pump damage can result.
WARNING: Never immerse the pump or the EnteraLite® AC Adapter/Charger
in liquids. Electrical shock or pump damage can result.
WARNING: Make sure the EnteraLite® AC Adapter/Charger is completely dry
before plugging into an electrical outlet.
WARNING: Make sure the EnteraLite® AC Adapter/Charger is completely dry
before plugging into an electrical outlet.
CAUTION: Gently clean the pressure sensors. Excessive pressure due to
aggressive cleaning can damage them.
CAUTION: Gently clean the pressure sensors. Excessive pressure due to
aggressive cleaning can damage them.
Don't use abrasive materials to clean the EnteraLite®.
Don't use abrasive materials to clean the EnteraLite®.
Clean the pump only with warm soapy water, a 5% bleach solution in water, or a multipurpose disinfectant cleaner. When using the cleaner or bleach solution, apply for
approximately 10 minutes and then wipe the pump clean with water.
Clean the pump only with warm soapy water, a 5% bleach solution in water, or a multipurpose disinfectant cleaner. When using the cleaner or bleach solution, apply for
approximately 10 minutes and then wipe the pump clean with water.
Carefully clean debris from each of the 3 rollers on the roller assembly on a regular
basis. This will help ensure accurate volumetric delivery.
Carefully clean debris from each of the 3 rollers on the roller assembly on a regular
basis. This will help ensure accurate volumetric delivery.
Use a soft cloth or sponge to clean the pump surfaces, including the keypad.
Use a soft cloth or sponge to clean the pump surfaces, including the keypad.
Use a cotton swab to gently clean the pathways under the door and the air and pressure sensors.
Use a cotton swab to gently clean the pathways under the door and the air and pressure sensors.
The compartments of the EnteraLite® packs can be cleaned with a damp sponge.
The compartments of the EnteraLite® packs can be cleaned with a damp sponge.
The EnteraLite® packs are machine-washable. Use warm water and the gentle cycle,
whenever possible.
The EnteraLite® packs are machine-washable. Use warm water and the gentle cycle,
whenever possible.
The EnteraLite® AC Adapter/Charger normally does not require cleaning. When
desired, a dry or slightly damp cloth may be used to clean the outside surface of the
EnteraLite® AC Adapter/Charger while it is disconnected from the wall outlet. Do not
allow liquid to enter the EnteraLite® AC Adapter/Charger through the vents.
21
21
CHAPTER 6 - MAINTENANCE and CALIBRATION
CHAPTER 6 - MAINTENANCE and CALIBRATION
WARNING: The EnteraLite® must be periodically calibrated to ensure proper fluid delivery.
WARNING: The EnteraLite® must be periodically calibrated to ensure proper fluid delivery.
CAUTION: If the pump is dropped or falls onto a hard surface from a height
of 3 feet or more, it is recommended that it be returned for service.
CAUTION: If the pump is dropped or falls onto a hard surface from a height
of 3 feet or more, it is recommended that it be returned for service.
ZEVEX recommends that the EnteraLite® be calibrated by authorized personnel at least
every 12 months. Please contact your health care provider to arrange for this service (see
CHAPTER 11 - WHO TO CALL).
ZEVEX recommends that the EnteraLite® be calibrated by authorized personnel at least
every 12 months. Please contact your health care provider to arrange for this service (see
CHAPTER 11 - WHO TO CALL).
22
22
CHAPTER 7 - DISPOSABLE SETS and ACCESSORIES
CHAPTER 7 - DISPOSABLE SETS and ACCESSORIES
WARNING: Replace the disposable set every 24 hours to maintain delivery
accuracy and prevent the growth of harmful bacteria.
WARNING: Replace the disposable set every 24 hours to maintain delivery
accuracy and prevent the growth of harmful bacteria.
WARNING: Use only EnteraLite® Disposable Sets to ensure proper fluid
delivery. Others won't deliver the correct dose, may allow dangerous freeflow conditions, and may generate hazardous fluid pressures which may
activate occlusions alarms at unpredictable pressures.
WARNING: Use only EnteraLite® Disposable Sets to ensure proper fluid
delivery. Others won't deliver the correct dose, may allow dangerous freeflow conditions, and may generate hazardous fluid pressures which may
activate occlusions alarms at unpredictable pressures.
CAUTION: Dispose of EnteraLite® Disposable Sets properly, as required by
local law.
CAUTION: Dispose of EnteraLite® Disposable Sets properly, as required by
local law.
The disposable set consists of several parts, as illustrated in Figure 7-1.
The disposable set consists of several parts, as illustrated in Figure 7-1.
The bag is filled with the enteral solution. The spike is used to pierce pre-filled containers.
The bag is filled with the enteral solution. The spike is used to pierce pre-filled containers.
The pump fitting holds the silicone tubing in place in the pump.
The pump fitting holds the silicone tubing in place in the pump.
The silicone tubing passes through the air sensor and around the pump wheel, passing over pressure sensors on either side of the pump wheel.
The silicone tubing passes through the air sensor and around the pump wheel, passing over pressure sensors on either side of the pump wheel.
The pinch clip occluder blocks solution flow when the set is out of the pump or when
the pump door is open.
The pinch clip occluder blocks solution flow when the set is out of the pump or when
the pump door is open.
The stepped enteral adapter connects to most common patient feeding tubes, but is
not I.V. compatible.
The stepped enteral adapter connects to most common patient feeding tubes, but is
not I.V. compatible.
The Enteral Adapter Protective Cover contains a feature which is used to hold the
Pinch Clip Occluder open while the set remains packaged, to avoid kinking of the silicone tubing.
The Enteral Adapter Protective Cover contains a feature which is used to hold the
Pinch Clip Occluder open while the set remains packaged, to avoid kinking of the silicone tubing.
The only disposable sets approved for use with this pump are:
The only disposable sets approved for use with this pump are:
EnteraLite® 500 ml Bag Set, Order Number EL0500
EnteraLite® 500 ml Bag Set, Order Number EL0500
EnteraLite® 1200 ml Bag Set, Order Number EL1200
EnteraLite® 1200 ml Bag Set, Order Number EL1200
EnteraLite® Spike Set, Order Number EL0010
EnteraLite® Spike Set, Order Number EL0010
23
23
CHAPTER 7 - DISPOSABLE SETS and ACCESSORIES
CHAPTER 7 - DISPOSABLE SETS and ACCESSORIES
S ilicone Tubing
S ilicone Tubing
Fill Ca p
S te ppe d Ente ra l Ada pte r
P ump Fitting
Fill Ca p
S te ppe d Ente ra l Ada pte r
P ump Fitting
P inch Clip Occlude r
P inch Clip Occlude r
11.5"
Ba g
5.8"
66.0"
Ente ra l Ada pte r P rote ctive Cove r
11.5"
Ba g
S te ppe d Ente ra l Ada pte r
5.8"
11.5"
66.0"
Ente ra l Ada pte r P rote ctive Cove r
S pike
11.5"
66.0"
Enteral Adapter Protective Cover
66.0"
Ente ra l Ada pte r P rote ctive Cove r
1200 ml Ba g S e t, P /N EL1200
S ilicone Tubing
S pike
5.8"
5.8"
11.5"
S te ppe d Ente ra l Ada pte r
P inch Clip Occlude r
P ump Fitting
P inch Clip Occlude r
Ba g
Fill Ca p
1200 ml Ba g S e t, P /N EL1200
S ilicone Tubing
S te ppe d Ente ra l Ada pte r
S ilicone Tubing
P ump Fitting
P inch Clip Occlude r
Ba g
Fill Ca p
66.0"
Ente ra l Ada pte r P rote ctive Cove r
500 ml Ba g S e t, P /N EL0500
500 ml Ba g S e t, P /N EL0500
S ilicone Tubing
P ump Fitting
5.8"
S te ppe d Ente ra l Ada pte r
P inch Clip Occlude r
P ump Fitting
11.5"
66.0"
5.8"
Enteral Adapter Protective Cover
S pike S e t, P /N EL0010
S pike S e t, P /N EL0010
Figure 7-1: Disposable Sets
Figure 7-1: Disposable Sets
24
24
CHAPTER 7 - DISPOSABLE SETS and ACCESSORIES
CHAPTER 7 - DISPOSABLE SETS and ACCESSORIES
Additional accessories are available for use with the EnteraLite®:
Additional accessories are available for use with the EnteraLite®:
EnteraLite® Pole Clamp, Order Number Z-11981
Tighten the black wheel to mount the clamp on a pole. Thread the bolt into the
receptacle on the back of the pump and tighten the gray wheel to mount the pump
on the clamp. If the gray wheel is slightly loosened, the pump can be rotated to
snap into different positions. Retighten the gray wheel when the pump is in the
desired position.
EnteraLite® Waistpack, Order Number 11939-001
This pack provides two ways to carry the EnteraLite®:
This pack provides two ways to carry the EnteraLite®:
Waistpack with 500 ml bag.
An elastic strap secures the neck of the 500 ml bag with a clip in the compartment on
the right side. The pump fits in the left side. The tubing is loaded into the pump and
any excess length of tubing can be secured with a Velcro® strap inside the right-hand
compartment. The patient end of the tubing then feeds through a gap in the zipper
and through a button hole in the right-hand waist strap of the pack.
Waistpack expanded to become a backpack with 1200 ml bag.
An elastic strap secures the neck of the 1200 ml bag with a clip in the backpack
portion of the pack. An elastic strap can be used to secure the body of the bag
with a clip. The pump is placed in the Waistpack portion. The tubing is fed
through a button hole from the backpack into the Waistpack and loaded into the
pump. Any excess length of tubing can be secured with a Velcro® strap inside the
right-hand compartment of the Waistpack. The patient end of the tubing then
feeds through a gap in the zipper and through a button hole in the waist strap of
the pack. A hook is also available in the expanded backpack to secure pre-filled
containers of formula.
EnteraLite® Mini-backpack, Order Number 12501-001 (black), 12501-002 (teal),
12501-003 (red), 12501-004 (purple), 12501-005 (pink)
EnteraLite® Mini-backpack, Order Number 12501-001 (black), 12501-002 (teal),
12501-003 (red), 12501-004 (purple), 12501-005 (pink)
This pack holds the EnteraLite® with a 500 ml bag. The pump is secured within a
clear pouch by a Velcro® strap. An elastic strap secures the neck of the 500 ml
bag with a clip above the pump. The tubing is loaded into the pump and any
excess length of tubing can be secured with a Velcro strap behind the bag. The
patient end of the tubing then feeds through a button hole at the bottom of the
pack (either side).
25
25
CHAPTER 7 - DISPOSABLE SETS and ACCESSORIES
EnteraLite® Sportpack, Order Number EL3000
This pack holds the EnteraLite® with a 500 ml bag. The tubing is loaded in the
pump, then the pump is placed in the pack with the display facing the clear window and with the charger port facing the hole at the bottom of the bag. The 500
ml bag is placed inside the pack with the neck of the bag secured by an elastic
strap with a clip above the pump. Any excess length of tubing can be secured with
a Velcro® strap inside the bag. The patient end of the tubing then feeds through a
gap in the zipper, or through a special hole at the bottom of the bag. The
EnteraLite® AC Adapter/Charger may also be plugged into the pump through this
hole in the pack. The sportpack is designed to be worn on a belt. It is barely
noticeable when worn under a jacket.
EnteraLite® Wheelchair pack, Order Number Z-12634
An elastic strap secures the neck of the 500ml or 1200ml bag with a clip at the
top right side of the bag. A hook is also available to secure pre-filled containers of
formula. The pump is secured within a clear pouch at the bottom left side of the
bag by a Velcro® strap. The tubing is loaded in the pump and any excess length
of tubing can be secured by a Velcro® strap. The patient end of the tubing then
feeds through a gap in the zipper. The EnteraLite® AC Adapter/Charger may be
stored in a pouch on the left side of the bag. There is also room in the bag to store
an extra container of formula or other personal items.
EnteraLite® AC Adapter/Charger, Order Number 23159-001
CHAPTER 7 - DISPOSABLE SETS and ACCESSORIES
EnteraLite® Sportpack, Order Number EL3000
This pack holds the EnteraLite® with a 500 ml bag. The tubing is loaded in the
pump, then the pump is placed in the pack with the display facing the clear window and with the charger port facing the hole at the bottom of the bag. The 500
ml bag is placed inside the pack with the neck of the bag secured by an elastic
strap with a clip above the pump. Any excess length of tubing can be secured with
a Velcro® strap inside the bag. The patient end of the tubing then feeds through a
gap in the zipper, or through a special hole at the bottom of the bag. The
EnteraLite® AC Adapter/Charger may also be plugged into the pump through this
hole in the pack. The sportpack is designed to be worn on a belt. It is barely
noticeable when worn under a jacket.
EnteraLite® Wheelchair pack, Order Number Z-12634
An elastic strap secures the neck of the 500ml or 1200ml bag with a clip at the
top right side of the bag. A hook is also available to secure pre-filled containers of
formula. The pump is secured within a clear pouch at the bottom left side of the
bag by a Velcro® strap. The tubing is loaded in the pump and any excess length
of tubing can be secured by a Velcro® strap. The patient end of the tubing then
feeds through a gap in the zipper. The EnteraLite® AC Adapter/Charger may be
stored in a pouch on the left side of the bag. There is also room in the bag to store
an extra container of formula or other personal items.
EnteraLite® AC Adapter/Charger, Order Number 11938-001
Use only the EnteraLite® AC Adapter/Charger with this pump. Plug the EnteraLite®
AC Adapter/Charger into a wall outlet and plug the connector of the EnteraLite®
AC Adapter/Charger into the pump to operate on AC power and/or recharge the
battery.
Use only the EnteraLite® AC Adapter/Charger with this pump. Plug the EnteraLite®
AC Adapter/Charger into a wall outlet and plug the connector of the EnteraLite®
AC Adapter/Charger into the pump to operate on AC power and/or recharge the
battery.
Note 1: The button on the connector must be pressed in to remove the charger
from the pump.
Note 1: The button on the connector must be pressed in to remove the charger
from the pump.
Note 2: Several optional EnteraLite® AC Adapter/Chargers and power cords are
available for use in various countries.
Note 2: Several optional EnteraLite® AC Adapter/Chargers and power cords are
available for use in various countries.
WARNING: Do not use an extension cord with the AC
Adapter/Charger.
WARNING: Do not use an extension cord with the AC
Adapter/Charger.
WARNING: The AC Adapter/Charger is intended for indoor, dry area
use only. Do not allow adapter to be exposed to liquids.
WARNING: The AC Adapter/Charger is intended for indoor, dry
area use only. Do not allow adapter to be exposed to liquids.
Please contact your health care provider to obtain additional disposable sets and accessories (see CHAPTER 11 - WHO TO CALL).
Please contact your health care provider to obtain additional disposable sets and accessories (see CHAPTER 11 - WHO TO CALL).
26
26
CHAPTER 8 - IMPORTANT PEDIATRIC CONSIDERATIONS
CHAPTER 8 - IMPORTANT PEDIATRIC CONSIDERATIONS
WARNING: Low flow rates, combined with high dose settings may exceed
the life of the disposable set. The disposable set must be replaced every 24
hours to maintain delivery accuracy and prevent the growth of bacteria. DO
NOT PROGRAM RATE AND DOSE COMBINATIONS WHICH EXCEED A 24
HOUR FEED REGIMEN.
WARNING: Low flow rates, combined with high dose settings may exceed
the life of the disposable set. The disposable set must be replaced every 24
hours to maintain delivery accuracy and prevent the growth of bacteria. DO
NOT PROGRAM RATE AND DOSE COMBINATIONS WHICH EXCEED A 24
HOUR FEED REGIMEN.
CAUTION: When feeding human milk, fat separation may occur. The feeding solution should be periodically checked during the feed regimen.
CAUTION: When feeding human milk, fat separation may occur. The feeding solution should be periodically checked during the feed regimen.
The EnteraLite® can be used on pediatric patients provided that the specifications of the
pump meet the delivery requirements of these patients. Those specifications of primary
importance are:
The EnteraLite® can be used on pediatric patients provided that the specifications of the
pump meet the delivery requirements of these patients. Those specifications of primary
importance are:
The flow rate range of the EnteraLite® is 1 ml/hr to 600 ml/hr in 1 ml/hr increments.
The flow rate range of the EnteraLite® is 1 ml/hr to 600 ml/hr in 1 ml/hr increments.
The EnteraLite® pump delivers the dose at the specified rate, both programmed by the
user, within +/- 5% volumetric flow-rate accuracy under the following conditions:
The EnteraLite® pump delivers the dose at the specified rate, both programmed by the
user, within +/- 5% volumetric flow-rate accuracy under the following conditions:
NOTE: For test methodology refer to ANSI/AAMI ID26-1992 American National
Standard for Infusion Devices. The reported accuracy is based upon a generic volume
accuracy calculation:
NOTE: For test methodology refer to ANSI/AAMI ID26-1992 American National
Standard for Infusion Devices. The reported accuracy is based upon a generic volume
accuracy calculation:
Accuracy % = (Volume Delivered - Volume Programmed) x 100
Volume Programmed
Accuracy % = (Volume Delivered - Volume Programmed) x 100
Volume Programmed
•
utilizing ZEVEX disposable sets
•
utilizing ZEVEX disposable sets
•
fluid head height at +6.0 inches ± 0.3 inches (+15 cm ± 0.75 cm) with respect to
the top of the pump.
•
fluid head height at +6.0 inches ± 0.3 inches (+15 cm ± 0.75 cm) with respect to
the top of the pump.
•
downstream back pressure range from -1.9 psi to +5.8 psi (-13 kPa to +40 kPa)
•
downstream back pressure range from -1.9 psi to +5.8 psi (-13 kPa to +40 kPa)
•
over the range of environmental operating conditions (Specified per IEC 60601-1)
Operating Temperature Range:
50 °F to 104 °F (10 °C to 40 °C)
Operating Humidity Range:
30 to 75% noncondensing
•
over the range of environmental operating conditions (Specified per IEC 60601-1)
Operating Temperature Range:
50 °F to 104 °F (10 °C to 40 °C)
Operating Humidity Range:
30 to 75% noncondensing
Accuracy for the range of 1 to 250 ml/hr is illustrated in Figure 8-1.
Accuracy for the range of 1 to 250 ml/hr is illustrated in Figure 8-1.
The occlusion alarm pressure of the EnteraLite® is 8 psi (55 kPa) or 12 psi (83 kPa),
as set by authorized service personnel.
The occlusion alarm pressure of the EnteraLite® is 8 psi (55 kPa) or 12 psi (83 kPa),
as set by authorized service personnel.
If these specifications are consistent with the required feed regimen, the EnteraLite® can be
used to deliver enteral formulas to pediatric patients. ALWAYS VERIFY THE RATE, DOSE
AND FEED INTERVAL BEFORE PROCEEDING TO FEED.
If these specifications are consistent with the required feed regimen, the EnteraLite® can be
used to deliver enteral formulas to pediatric patients. ALWAYS VERIFY THE RATE, DOSE
AND FEED INTERVAL BEFORE PROCEEDING TO FEED.
27
27
CHAPTER 8 - IMPORTANT PEDIATRIC CONSIDERATIONS
CHAPTER 8 - IMPORTANT PEDIATRIC CONSIDERATIONS
The EnteraLite® contains safety features which reduce the incidence of free-flow and overinfusion. When the set is improperly loaded, the pump will display a LOAD SET alarm, and
the pump will not start. Additionally, the pinch clip mechanism on the set will automatically
occlude the tubing when the set is removed from the pump, thus preventing the possibility
of free-flow.
WARNING: The Total Volume may be incorrect due to an interruption of battery power if the overcurrent or temperature protection circuits are triggered. In such a case one of the following conditions occurs:
WARNING: The Total Volume may be incorrect due to an interruption of battery power if the overcurrent or temperature protection circuits are triggered. In such a case one of the following conditions occurs:
During Single Feeding
The pump enters pause mode, but does not display "DOSE DONE" or turns
off (but not due to a low battery).
During Single Feeding
The pump enters pause mode, but does not display "DOSE DONE" or turns
off (but not due to a low battery).
During Interval Feeding
The pump enters pause mode or turns off (but not due to a low battery).
During Interval Feeding
The pump enters pause mode or turns off (but not due to a low battery).
If one of these conditions occurs, check the disposable set feed bag to estimate how much
volume was actually delivered. If these conditions occur frequently, contact your healthcare
provider or refer the pump for service.
If one of these conditions occurs, check the disposable set feed bag to estimate how much
volume was actually delivered. If these conditions occur frequently, contact your healthcare
provider or refer the pump for service.
EnteraLite ®Volumetric Flow Testing Percent Error vs. Flow Rate for:
EnteraLite ®Volumetric Flow Testing Percent Error vs. Flow Rate for:
0
0
Nominal 6 inch Head Height, 0 psi Back Pressure, Room Temperature (23 C)
(Tested per AAMI ID26-1992, section 5.1.1.2m(1))
Generic Accuracy Reported: Volume Delivered vs. Volume Expected
10.0
10.0
7.5
7.5
5.0
5.0
2.5
0.0
Measured Error
TM
(NutriLan )
-2.5
Measured Error
(Water)
-5.0
Flow Rate Error (%)
Flow Rate Error (%)
Nominal 6 inch Head Height, 0 psi Back Pressure, Room Temperature (23 C)
(Tested per AAMI ID26-1992, section 5.1.1.2m(1))
Generic Accuracy Reported: Volume Delivered vs. Volume Expected
2.5
0.0
-7.5
-7.5
-10.0
5
10
50
125
Flow Rate (ml/hr)
250
Measured Error
(Water)
-5.0
-10.0
1
Measured Error
TM
(NutriLan )
-2.5
1
5
10
50
125
Flow Rate (ml/hr)
Figure 8-1: Flow Rate Accuracy
Figure 8-1: Flow Rate Accuracy
28
28
250
CHAPTER 9 - TECHNICAL INFORMATION
CHAPTER 9 - TECHNICAL INFORMATION
WARNING: Do not use the EnteraLite® Enteral Feeding Pump for the delivery of non-enteral solutions. Serious injury may result. For enteral feeding
only. Not for IV use.
WARNING: Do not use the EnteraLite® Enteral Feeding Pump for the delivery of non-enteral solutions. Serious injury may result. For enteral feeding
only. Not for IV use.
WARNING: Use ONLY feeding solutions prescribed by the responsible
physician, registered dietitian, registered nurse, or other licensed practitioner.
WARNING: Use ONLY feeding solutions prescribed by the responsible
physician, registered dietitian, registered nurse, or other licensed practitioner.
Indications
Indications
The EnteraLite® is to be used only with EnteraLite® Disposable Sets for the delivery of
enteral feeding solutions. The pump's sensitivity to occlusion and its low flow rate
capability allow the pump to be used on adult and pediatric patients. This pump must
not be used for the delivery of non-enteral solutions.
Volumetric Flow Rate Accuracy
Volumetric Flow Rate Accuracy
WARNING: Use ONLY EnteraLite® Disposable Sets to ensure proper fluid
delivery. Others won't deliver the correct dose, may allow dangerous freeflow conditions, and may generate hazardous fluid pressures which may
activate occlusion alarms at unpredictable pressures.
WARNING: Use ONLY EnteraLite® Disposable Sets to ensure proper fluid
delivery. Others won't deliver the correct dose, may allow dangerous freeflow conditions, and may generate hazardous fluid pressures which may
activate occlusion alarms at unpredictable pressures.
The EnteraLite® pump delivers the dose at the specified rate, both programmed by the
user, within +/- 5% volumetric flow-rate accuracy under the following conditions:
The EnteraLite® pump delivers the dose at the specified rate, both programmed by the
user, within +/- 5% volumetric flow-rate accuracy under the following conditions:
•
utilizing ZEVEX disposable sets
•
utilizing ZEVEX disposable sets
•
fluid head height at +6.0 inches ± 0.3 inches (+15 cm ± 0.75 cm) with respect to
the top of the pump.
•
fluid head height at +6.0 inches ± 0.3 inches (+15 cm ± 0.75 cm) with respect to
the top of the pump.
•
downstream back pressure range from -1.9 psi to +5.8 psi (-13 kPa to +40 kPa)
•
downstream back pressure range from -1.9 psi to +5.8 psi (-13 kPa to +40 kPa)
•
over the range of environmental operating conditions (Specified per IEC 60601-1)
Operating Temperature Range:
50 °F to 104 °F (10 °C to 40 °C)
Operating Humidity Range:
30 to 75% noncondensing
•
over the range of environmental operating conditions (Specified per IEC 60601-1)
Operating Temperature Range:
50 °F to 104 °F (10 °C to 40 °C)
Operating Humidity Range:
30 to 75% noncondensing
NOTE: For test methodology refer to ANSI/AAMI ID26-1992 American National
Standard for Infusion Devices. The reported accuracy is based upon a generic
volume accuracy calculation:
NOTE: For test methodology refer to ANSI/AAMI ID26-1992 American National
Standard for Infusion Devices. The reported accuracy is based upon a generic
volume accuracy calculation:
Accuracy % = (Volume Delivered - Volume Programmed) x 100
Volume Programmed
Accuracy % = (Volume Delivered - Volume Programmed) x 100
Volume Programmed
29
29
CHAPTER 9 - TECHNICAL INFORMATION
CHAPTER 9 - TECHNICAL INFORMATION
Occlusion Pressure
Occlusion Pressure
WARNING: Use ONLY EnteraLite® Disposable Sets to ensure proper fluid
delivery. Others won't deliver the correct dose, may allow dangerous freeflow conditions, and may generate hazardous fluid pressures which may
activate occlusion alarms at unpredictable pressures.
WARNING: Use ONLY EnteraLite® Disposable Sets to ensure proper fluid
delivery. Others won't deliver the correct dose, may allow dangerous freeflow conditions, and may generate hazardous fluid pressures which may
activate occlusion alarms at unpredictable pressures.
The occlusion alarm pressure of the EnteraLite® is 8 psi (55 kPa) or 12 psi (83 kPa) as set
by authorized service personnel. The pump produces both audible and visual alarms when
the downstream fluid pressure reaches the preset limit, within a 2 psi (14 kPa) tolerance.
The occlusion alarm pressure of the EnteraLite® is 8 psi (55 kPa) or 12 psi (83 kPa) as set
by authorized service personnel. The pump produces both audible and visual alarms when
the downstream fluid pressure reaches the preset limit, within a 2 psi (14 kPa) tolerance.
Battery Operation Time
Battery Operation Time
The EnteraLite® will deliver fluid at 125 ml/hr for more than 24 hours, when running on
a fully charged battery. Adequate charge of a depleted battery is accomplished in
approximately 5 hours of uninterrupted battery charge time.
The EnteraLite® will deliver fluid at 125 ml/hr for more than 24 hours, when running on
a fully charged battery. Adequate charge of a depleted battery is accomplished in
approximately 5 hours of uninterrupted battery charge time.
Fluid Delivery Characteristics
Fluid Delivery Characteristics
The EnteraLite® delivers a bolus of solution at a nominal flow rate of 600 ml/hr while
plugged into the charger. The flow rate will decrease to approximately 440 ml/hr when
the battery is low. The minimum delivery volume is approximately 0.08 ml each fractional turn of the pump wheel.
The EnteraLite® delivers a bolus of solution at a nominal flow rate of 600 ml/hr while
plugged into the charger. The flow rate will decrease to approximately 440 ml/hr when
the battery is low. The minimum delivery volume is approximately 0.08 ml each fractional turn of the pump wheel.
When the flow rate is set to 300 ml/hr or less, increments of volume are delivered once
every 20 seconds. At higher flow rates, increments of volume are delivered once each
minute. Note that at very low flow rates the pump won't deliver fluid every 20 seconds
because of the minimum volume increment (1 ml/hr at the minimum delivery volume of
0.08 ml means that the pump wheel must rotate only thirteen times during the hour, or
once every 4 to 5 minutes).
Amount of Air Before the Bag Is Considered Empty
Generally, the amount of air which must pass the air sensor before the bag is considered empty is 1 ml, but this figure varies with battery condition (it is approximately 0.5
ml when the battery is low). The range of 0.5 to 1 ml relates to a bubble which is
approximately 2.5 to 5 inches (6 to 13 cm) in continuous length within the silicone tubing segment of an EnteraLite® Disposable Set.
30
CHAPTER 9 - TECHNICAL INFORMATION
CHAPTER 9 - TECHNICAL INFORMATION
Power Requirements
Power Requirements
The EnteraLite® AC Adapter/Charger, 11938-001, requires 105 to 129 VAC, 60 Hz, and
a minimum current capacity of 0.22 Amp. Output is 12 VDC and 1.5 Amp.
The EnteraLite® AC Adapter/Charger, 11938-001, requires 105 to 129 VAC, 60 Hz, and
a minimum current capacity of 0.22 Amp. Output is 12 VDC and 1.5 Amp.
Where the integrity of the external protective conducter in the installation or its arrangement is in doubt, equipment shall be operated from its internal electrical power source.
Where the integrity of the external protective conducter in the installation or its arrangement is in doubt, equipment shall be operated from its internal electrical power source.
The Universal AC Adapter/Charger, 19162-002, 19162-003, 19162-010 requires 100 to
240 VAC, 50-60 Hz, and a minimum current capacity of 0.75 Amp (for 100 VAC) or 0.35
Amp (for 240 VAC).
The Universal AC Adapter/Charger, 19162-002, 19162-003, 19162-010 requires 100 to
240 VAC, 50-60 Hz, and a minimum current capacity of 0.75 Amp (for 100 VAC) or 0.35
Amp (for 240 VAC).
Operational Conditions
Operational Conditions
The EnteraLite® is designed in accordance with IEC 60601-1 to operate in a temperature range of 50 °F to 104 °F (10 °C to 40 °C) and in a relative humidity range of 30%
to 75%.
EnteraLite® Disposable Set Displacement
The EnteraLite® Disposable Set displaces approximately 13 ml of fluid when primed.
Approximately 3 ml of air is drawn into the tubing before the enteral pump detects that
the bag is empty. Therefore, approximately 10 ml of fluid remains in the disposable set
when the pump stops feeding. (These values vary by approximately 0.5 ml, depending on whether the batteries are low or fully charged).
31
CHAPTER 10 - WARRANTY
CHAPTER 10 - WARRANTY
Solely for the benefit of the original buyer, ZEVEX® INCORPORATED ("ZEVEX®"), warrants
all new EnteraLite® products of its manufacture to be free from defects in material and workmanship, and will replace or repair, F.O.B., at its factory in Salt Lake City, Utah, USA or other
location designated by ZEVEX®, any EnteraLite® products returned to it within twenty-four
(24) months of original purchase by the buyer. Such repair or replacement shall be free of
charge.
ZEVEX® warrants to the original buyer, all repaired or replaced products to be free from
defects in material and workmanship and will replace or repair such products F.O.B., at its
factory in Salt Lake City, Utah, USA or other location designated by ZEVEX®. Such repair
or replacement shall carry a warranty of ninety (90) days from the date of repair or replacement or the balance of the new product warranty as described above, whichever is greater.
This Warranty applies to all EnteraLite® products manufactured by ZEVEX® and is the ONLY
WARRANTY GIVEN FOR THE SALE OF PRODUCTS OR SERVICES. NO WARRANTIES
IMPLIED IN LAW, INCLUDING, BUT NOT LIMITED TO THE IMPLIED WARRANTIES OF
MERCHANTABILITY AND FITNESS FOR PARTICULAR PURPOSE, SHALL APPLY.
ZEVEX® WILL BE LIABLE, IN ANY EVENT, ONLY FOR THE PURCHASE PRICE OF THE
DEFECTIVE PRODUCT, BUT NOT FOR ANY CONSEQUENTIAL DAMAGES.
This Warranty may not be modified, amended or otherwise changed, except by a written
document properly executed by a corporate officer of ZEVEX®.
This Warranty may not be modified, amended or otherwise changed, except by a written
document properly executed by a corporate officer of ZEVEX®.
ZEVEX®, Inc. voids the warranty if the EnteraLite® pump is opened or tampered with in any
way without prior authorization from ZEVEX®, Inc.
ZEVEX®, Inc. voids the warranty if the EnteraLite® pump is opened or tampered with in any
way without prior authorization from ZEVEX®, Inc.
32
32
CHAPTER 11 - WHO TO CALL
CHAPTER 11 - WHO TO CALL
This manual is intended to answer the most common questions which may arise during ordinary use of the EnteraLite® Enteral Feeding Pump. If further assistance is needed, contact
your health care provider.
This manual is intended to answer the most common questions which may arise during ordinary use of the EnteraLite® Enteral Feeding Pump. If further assistance is needed, contact
your health care provider.
ADDITIONAL INFORMATION:
ADDITIONAL INFORMATION:
YOUR HEALTHCARE PROVIDER:
YOUR PHYSICIAN:
_________________________________________
YOUR HEALTHCARE PROVIDER:
_________________________________________
_________________________________________
_________________________________________
_________________________________________
_________________________________________
_________________________________________
_________________________________________
_________________________________________
_________________________________________
_________________________________________
YOUR PHYSICIAN:
_________________________________________
_________________________________________
_________________________________________
_________________________________________
_________________________________________
_________________________________________
_________________________________________
33
33
NOTES
NOTES
34
34
OPERATOR’S MANUAL
OPERATOR’S MANUAL
Also available in other languages
Also available in other languages
4314 ZEVEX PARK LANE
SALT LAKE CITY, UT 84123, USA
www.zevex.com
4314 ZEVEX PARK LANE
SALT LAKE CITY, UT 84123, USA
www.zevex.com
TEL: 801-264-1001
TOLL FREE IN USA: 1-800-970-2337
FAX: 801-264-1051
TEL: 801-264-1001
TOLL FREE IN USA: 1-800-970-2337
FAX: 801-264-1051
© 2003 ZEVEX INCORPORATED
U.S. PATENT NO’S: 5514102, 5531680, 5704584, 5720721,
5733061, 5810323, 6142979 AND D389228.
© 2003 ZEVEX INCORPORATED
U.S. PATENT NO’S: 5514102, 5531680, 5704584, 5720721,
5733061, 5810323, 6142979 AND D389228.
INTERNATIONAL PATENT NO’S: 0959920, 0900106, and
69619282.9-08.
INTERNATIONAL PATENT NO’S: 0959920, 0900106, and
69619282.9-08.
OTHER U.S. AND FOREIGN PATENTS PENDING
OTHER U.S. AND FOREIGN PATENTS PENDING
MADE IN USA
PART NO. DI-0278-1/G
MADE IN USA
PART NO. DI-0278-1/G
ildren's Ho
Ch
s
CEPTED
ildren's Ho
Ch
s
AC
ls, Inc.
pita
ls, Inc.
pita
AC
EnteraLite® is the first
enteral feeding pump to be
awarded the Seal of
Acceptance for Superior
Pediatric Product Quality
from the Alliance of
Children’s Hospitals.
Alliance o
f
Ambulatory Enteral Feeding Pump
Alliance o
f
Ambulatory Enteral Feeding Pump
CEPTED
EnteraLite® is the first
enteral feeding pump to be
awarded the Seal of
Acceptance for Superior
Pediatric Product Quality
from the Alliance of
Children’s Hospitals.