1
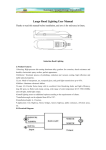
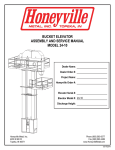
Nancy’s Knit Knacks LLC Motor Add-on Kit for HDSS Swifts/Skein-winders Assembly Instructions and User Manual Thank you for purchasing our Motor Add-on Kit for the HDSS Swift and Skein-winder. This product motorizes the operation of these units and also integrates the functionality of both the Electronic Rotation Counter (ERC) and the Electronic Yarn Meter (EYM). This allows either of our metering systems to work with the motorized Swift and Skein-winder systems. As a result, your new motorized Swift/Skein-winder is the most advanced motorized winder on the market. This installation and user guide will walk you through the installation of the motor unit and provide basic user operating instructions. SAFETY WARNING!! The Motorized Swift/Skein-winder is a potentially dangerous tool if not set up and/or used correctly. The motor will turn the aluminum arms at rates of 130 RPM or greater1. At any speed, however, the rotating arms can harm individuals and damage property if the unit is not properly secured to a table or floor stand. Therefore, it is imperative that you follow the safety guidelines listed below at all times when operating this equipment. Table Top Version of the HDSS 1. Make sure the 8” square wooden base is securely attached to the table with two of the large L Bolts that we provide with each Swift and Skein-winder. 2. Tighten both knobs that secure the rotator plate on the base. 3. Tighten the knob that secures the I-Beam to the base. 4. Ensure that the aluminum arms are secured to the main shaft with: a 3/8” flat washer, a 3/8” lock washer and a 3/8” hex nut. The nut must be tight. 5. Makes sure that the set screw in the 5/8” aluminum collar (on the opposite end of the shaft) is tight and that the collar cannot move. Floor Stand version of the HDSS 1. Make sure the floor stand legs are tightly secured to the center column with 4 carriage bolts, flats washers, lock washers, and hex nuts. 1 Motor Add-on Kit for the Heavy Duty Swift/Skein-winder Rev. 01 Nancy’s Knit Knacks LLC 800-731-5648 www.nancysknitknacks.com [email protected] 2. Also, make sure the 2 front to back legs on the floor stand are securely fastened to the 2 left to right legs. 3. Be sure to review the cabling information in the general instructions that follow. Assembly Instructions of the Motor Add-on Kit The optional Motor Add-on Kit is attached to either the table top or floor stand version of the HDSS. Thankfully, it is very easy to install. Although it is a relatively heavy item, it attaches with a single bolt and knob. Our innovative design of the I Beam on the HDSS already has the hole where you will attach the motor drive. If for any reason your unit does not have this hole, please contact us. Please follow these assembly steps to ensure a properly installed motor drive Familiarize yourself with the various components of the Motor Add-on Kit: Dovetailed wooden motor housing with metal electronic control box Nut Plate with shaft and knob/washer Pulley for the HDSS shaft Allen Wrench for pulley 3 Belts Control Panel Ethernet Cable (either 3’ for table top, or 10’ for floor stand) 24 volt DC Power Supply and power cord 24” Data Cable for use with the ERC 2 Motor Add-on Kit for the Heavy Duty Swift/Skein-winder Rev. 01 Nancy’s Knit Knacks LLC 800-731-5648 www.nancysknitknacks.com [email protected] The 24 VDC power supply is rated for 100 to 240 VAC 50/60 Hz use so it can be safely used worldwide. Power On Status – the green LED on the Control Panel will be lit if the power switch is on. That is your primary warning that the power is on and the unit is “live” and can operate by simply tapping the Run or Jog buttons. We recommend powering down the system by means of the main power switch at the end of each session or work day or whenever the unit will be unattended for awhile. We do not recommend turning it off and on for each skein during a single session or work day, however. Installation You will pre-position the HDSS upside down on its side on the floor so that you can easily install the motor housing while the HDSS is laying face down. While in this position, it is easier to install the heavy motor housing onto the I-beam. The next task is to insert the Nut Plate (shown above right) into the motor housing such that the bolt portion extends through the slot in the motor housing. Once you get the Nut Plate inserted, keep your hand in that area to prevent the plate from falling back out. MAKE SURE THE WIDEST PART OF THE NUT PLATE IS GOING LEFT TO RIGHT AND NOT UP AND DOWN AS YOU INSERT IT INTO THE MOTOR HOUSING 3 Motor Add-on Kit for the Heavy Duty Swift/Skein-winder Rev. 01 Nancy’s Knit Knacks LLC 800-731-5648 www.nancysknitknacks.com [email protected] You will then lift the motor housing and insert it onto the HDSS that is lying on the floor so that the bolt of the Nut Plate extends through the hole in the I-beam and faces downward. Attach the knob and both white washers to the end of the bolt while they are in this position. Tighten the knob. Now you can stand the unit up in its normal vertical position. Then lift the entire assembly onto the table (if you have a floor stand instead, then simply plug it into the floor stand at this point). Now, you have the motor housing mounted onto the HDSS I-Beam and it is standing up in its normal position. The next step is to attach the pulley on the HDSS shaft and then install the belts. Attach the metal pulley to the end of the HDSS shaft as pictured above. It is important that the groove in this pulley is directly above the pulley in the motor housing. If you must reverse this pulley in order to get the grooves to align properly, then do that. Tighten the set screw with the Allen wrench. Make sure the pulley is positioned such that the set screw makes contact with the FLAT portion of the shaft. Slightly loosen the knob that holds the motor housing onto the I-beam that you just installed. Allow the housing to move up and down. Then “fish” (maneuver) the belt around the pulley in the motor housing and insert it into the pulley above on the HDSS shaft. Note: The motor housing can be pushed upward to create slack for the belt so you can get it onto the upper pulley (loosen the adjustment knob in the front of the I-Beam and then press upward with your hand under the motor housing). Note: This is the belt tensioner feature, an exclusive NKK feature for motorized skein-winders! Once you get the belt around the upper pulley, then press downward on the top cover of the motor housing until the belt is snug. Then while holding the motor housing down with your hand on the top cover, re-tighten the tensioner knob. You just experienced how to install and tighten a belt. Congratulations! 4 Motor Add-on Kit for the Heavy Duty Swift/Skein-winder Rev. 01 Nancy’s Knit Knacks LLC 800-731-5648 www.nancysknitknacks.com [email protected] Over the life of the unit, you will make minor adjustments in belt tension and occasionally replace a stretched belt. But the beauty of this system is that as the belt stretches through normal use, you can simply apply more tension to the belt by adjusting the belt tension. ALWAYS check the tightness of the tension adjustment knob before running the machine. Belt tension, what is the correct tension level? Not too loose and not too tight. There is no need to make it super tight and you want to avoid a condition where it is too loose. Watch the belt bulge out sideways upon power up. It should not bulge out too much (a little is OK and normal). If you make the belt too tight, however, it is harder on the motor and the belts themselves. _____________________________________ Now, let’s discuss the electronic controls. The unit has 2 switches which are on the right side of the housing (as viewed from the front). The switch closest to the front (toward the I-Beam) is the On/Off switch (it has the International symbols for on (a vertical line) and off (a circle)). This switch must be on in order for the unit to run. Note: these pictures are of a prototype unit and do not match the final production version so the final switches are not shown. The switch immediately in back of the main power switch (which has a red portion but no other symbols) is the Reverse direction switch. When using this switch to reverse motor direction, you must first turn off the power switch and then change the direction by throwing the toggle on this reverse switch. You cannot simply throw the reverse switch without first turning off the power. If you don’t turn off the power first, the system will not recognize the new switch position. So, turn power off, throw the reverse switch, then turn power back on and away you go. IT IS MANDATORY TO SHUT THE POWER OFF BEFORE USING THE REVERSE SWITCH! Ethernet Cable connection – in order to operate the motor drive, you need to plug in the control panel. The Ethernet cable plugs into the back of the control panel on one end and into the front of the Electronic Control Box (the metal box under the motor control housing). Once connected, the cable can be easily directed to one side or the other of the I-beam and base. If you like, you can also affix a twistee tie cable holder toward either (or both) side(s) to secure the cable. Make sure the rotating arms cannot make contact with this cord. See the last page for images of locations. 5 Motor Add-on Kit for the Heavy Duty Swift/Skein-winder Rev. 01 Nancy’s Knit Knacks LLC 800-731-5648 www.nancysknitknacks.com [email protected] PLEASE NOTE: you need to be aware at all times of the cable position relative to the rotating arms. If the rotating arms catch the cable, serious product damage or personal injury could occur. We have provided a 3 ft. long cable for table top use or a 10’ cable for floor stand use. You can purchase any length cable you want and use it. Cat 5 Ethernet cable is adequate. We do not recommend exceeding 10 feet due to the signal loss potential over such a long distance. On the other side of the Electronic Control Box, we have the following (in order): An integrated twistee cable tie to hold your ERC data cable and Power Supply cable back from arms Power jack for the 24 DC Volt Power Supply (do not mix up the 12 Volt DC ERC or EYM power supply with this one for the motor) A 3.5 mm jack for the ERC data signal (first jack after the Power jack) A 3.5 mm jack for the EYM data signal (2nd jack past the power jack) The Ethernet cable runs from the Electronic Control Box to the Control Panel. The Control Panel is your interface with the system. It is a wooden housing with a membrane switch panel that electrically connects to the Electronic Control Box. With the Control Panel you control the following functions: Stop – stops all motion. Press this to stop the unit. Run – this is the primary button to use to make the unit operate. It has 10 speeds which are activated by the Speed buttons (up and down to the right). When you have reached the maximum (or minimum) speed, the Power LED will flash twice. Speed Up and Speed Down Arrows – press either button once for each 10% change in speed. When the speed range has been reached, the LED will flash twice. Jog – This is a slower speed setting than Run. It has 5 speeds and has limited use. One thing it does have, however, is a slow reverse which is handy for reversing direction quickly to clear a jam or remove yarn from the unit by pulling it off manually as you are in reverse. The first time you press Jog it will go in the 6 Motor Add-on Kit for the Heavy Duty Swift/Skein-winder Rev. 01 Nancy’s Knit Knacks LLC 800-731-5648 www.nancysknitknacks.com [email protected] same direction as Run does but slower, but on the second press, it will go into reverse until you push it again. The speed of the reverse direction while in Jog is slow. You can use the Speed up and Speed down arrows to change the speed. If you need to change direction of the unit and run it at a normal high speed, then use the Reverse Speed button on the Electronic Control Box instead. Save – This button will save your current speed setting which is running at the time you press the Save button. This is good to prevent you from having to tap, tap, tap the speed up button when you want to run repeat jobs. The Saved speed will be in effect until you power down (turn unit off) or simultaneously press the Run and Stop buttons. The Save button is a time saver when doing repetitive tasks. Note about the Membrane panel – do not press it too hard or you will crush the metal domes inside the membrane panel. It will last for up to 1 million depressions if treated with respect! Note: The green LED on the control panel will be lit whenever power is switched on for the unit. That is your warning that power is on and the machine is live. Safety Note: You have four different ways to shut the power down in an emergency. These 4 methods are located in all four directions from the unit (front (control panel), Left Side (power cord into the unit), Right Side (Power Switch), and Rear (power cord in the wall socket). No matter where you are located, you can immediately kill the power in the event of a problem or accident by doing one of the following: 1. 2. 3. 4. Press the Stop button Pull the power cord out of the Left side of the Electronic Control Box Press the On/Off Switch on the right side of the Electronic Control box Pull the power cord out of the wall socket We have provided a High Visibility Yellow Ethernet Cable to help you keep track of it. Use of the Motor Add-on with optional floor stand When using the motor drive on the table top, it is an easy matter to simply place the control panel on the table. However, when used with the optional floor stand or with the 4YO (4 yard skein-winder option which is always mounted on a floor stand), the user needs to do one of two things: Use the optional Control Panel Stand Set the Control panel on an adjacent table top or other surface Route the cable in such a way as to prevent the arms from hitting the cable 7 Motor Add-on Kit for the Heavy Duty Swift/Skein-winder Rev. 01 Nancy’s Knit Knacks LLC 800-731-5648 www.nancysknitknacks.com [email protected] It is critical that the user does not simply lay the Control panel on the floor. First of all, it is not safe because the user needs to constantly bend over to get the control panel. Plus the unit could be stepped on. Finally, the unit will not be easily accessible in order to stop all motion, etc. We strongly encourage you buy the dedicated Control Panel stand. It was designed to hold the control panel safely and securely and be easily moved about the floor area to whatever position you require. It is also able to be used for other applications related to swift/skein-winder/warping wheel use. It is a multi-use stand. Use of the Motor Add-on Kit Now that you have added this great new tool to your swift or skein-winder, you will quickly become addicted to it. Once you go motorized on these machines or on our ball winder line, you will never want to go back to a manual machine. So enjoy your new found freedom and think of ways to become more productive while you are no longer winding yarn. If you add the Electronic Rotation Counter, then the machine becomes truly automatic since the ERC will shut the unit off when it has measured the qty of yarn that needs to be measured. You may remove the handle now that the unit is motorized and that will increase the load carrying capacity of the unit slightly and make it run more smoothly (because it will have better balance). Just avoid over-handling the yarn guides as “handles.” We do offer an optional yarn attachment to hold the yarn when the handle has been removed. Make sure to SAVE your speed setting that you like and that will save you time and effort on each subsequent skein. Don’t be too rough on the control panel membrane switch panel. Treat it properly and it can last for up to 1 million presses. Treat it poorly and it will not last. Do not crush the metal domes inside the panel by pressing to hard. If the unit is not responding to your switch depressions, it could be some other problem. Never mix up the 24 volt motor power supply with the 12 volt ERC power Supply or you will damage the ERC or EYM. Plus the motor will run at half speed when used with a 12 v power supply. The motor has a life of approx. 2,000 hrs and then it needs to be replaced. We sell replacement motors. 8 Motor Add-on Kit for the Heavy Duty Swift/Skein-winder Rev. 01 Nancy’s Knit Knacks LLC 800-731-5648 www.nancysknitknacks.com [email protected] If belts stretch or break, then use the backup and then order more from NKK. Check our Forum out at our website for other tips and do’s and don’ts. Please remember with this type of powerful tool, safety must be a priority for you and your visitors/customers, etc. If you see anything that appears to be wrong or something is not working properly, please call us immediately at 800-731-5648 so we can help you diagnose the problem. Thanks for purchasing our Motor Add-on kit. It will provide you with many years of World class performance and will also be a lot of fun to use. Support We provide telephone and email support for all of our products. Please email us first unless you have an emergency, but even then, email may get through to us faster rather than the phone during off-hours. We also have a forum which lists information about our products. Newer products have less content online but as we generate such content, we will add it to the User Forum. Phone: eMail: Website: Forum: 800-731-5648 [email protected] www.nancysknitknacks.com www.nancysknitknacks.com/forums Warranty – this unit is warranted against defects in materials and workmanship for a period of one (1) year from the date of first purchase. This warranty is non-transferrable to subsequent purchasers. Nancy’s Knit Knacks LLC (“NKK”) will repair or replace any portion of this unit in the event of failure. Damage caused by the user shall not be covered under this warranty which includes electrical damage and/or physical abuse. Liability – the end user assumes all responsibility for operating this unit is a safe manner and in safe area at all times. Pets and small children should not be in the immediate vicinity of the machine while in operation nor should unauthorized (i.e. untrained) persons ever be allowed to operate the equipment. In the event of an equipment failure, the user should immediately stop using the equipment and notify NKK of the problem. The user must ensure that both this Motorized Add-on unit and the HDSS Swift or Skein-winder have been properly assembled in accordance with NKK’s written instructions. For a copy of such instructions, please request them by email or fax or download a copy from the NKK Website. ______________________________________________________________ 1 The Speed of the standard High Torque motor (#R-19) is 130 RPM with a 2” pulley on both the motor and the HDSS shaft. The speed of this same motor with a 1-1/2” pulley on the HDSS shaft is 175 RPM but with reduced torque. The 1-1/2” pulley is non-standard and is not for the 4 Yard unit. 9 Motor Add-on Kit for the Heavy Duty Swift/Skein-winder Rev. 01 Nancy’s Knit Knacks LLC 800-731-5648 www.nancysknitknacks.com [email protected] Options & other Images for the HDSS – Check our website for newer offerings as well We STRONGLY recommend the Control Panel Stand when using a floor stand unit. Electronic Rotation Counter Electronic Yarn Meter Control Panel Stand (30" high) Triple Yarn Guide System Retractable Table mount guide for Triple Yarn Guide System 4 Yard Option Cable Routing for Control Panel 10 Cable Routing for ERC Data & Power Motor Add-on Kit for the Heavy Duty Swift/Skein-winder Rev. 01 Nancy’s Knit Knacks LLC 800-731-5648 www.nancysknitknacks.com [email protected]