1
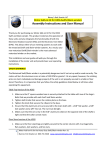
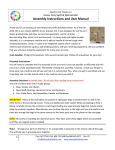
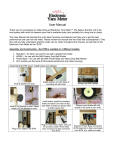
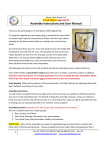
User Manual
Thank you for purchasing our state-of-the-art Electronic Rotation Counter TM (ERC). This is the only system
available to the commercial and consumer markets for measuring yarn on a skein-winder in yards, meters, and
rotations. But even if we did have competition, our ERC would still be the best solution!
This User Manual will describe the unit’s basic functions and features and help you to get the best performance
and use from the ERC. Please review this manual completely so that you can fully appreciate and understand
what the ERC can do.
Configuration
The ERC can be procured in two ways: first, it may be bundled with our Skein-winder, and secondly, it can be
purchased separately.
When it is included with the Skein-winder, it is intended to be mounted on the metal bracket on the top of the
Skein-winder. When you assemble your Skein-winder, the ERC will be packaged in a separate padded
envelope and will not be mounted on the bracket as the unit comes from the factory.
Simply remove the ERC from its packaging and attach it to the metal bracket on the top of the Skein-winder.
Insert the threaded studs on the back of the ERC housing through the two metal bracket holes on the top of the
skein-winder. Then attach the washers and lock nuts to securely hold the ERC on the bracket.
You will insert the silver plug on the short cable that protrudes from the top of the skein-winder into the jack
marked “ERC” on the ERC housing (right side of housing). Make sure you fully press the plug into the ERC,
Sometimes, it seems to go in only halfway, so press the plug firmly into the jack.
You may loosen the knob and adjust the vertical angle of the bracket for the best visibility.
Once you have the ERC mounted to the Skein-winder, you can then install the power supply. Plug the power
supply cable into the lower jack on the LEFT side of the ERC (the upper jack is a data line for connecting the
ERC to the HDSS Motor Drive, if equipped.
Route the power supply cable through the white twisty tie on the left side of the metal bracket and then twist
the 2 legs together. This secures the cable from getting hung up in the rotating arms.
Install any extra plastic cable catches at the lowest point on the I-Beam of the Skein-winder just prior to the
Socket on the base. That way, if you remove the upper portion to mount it on the Floor Stand, you can do so.
ERC for existing NKK Swifts or 3rd party equipment
When the ERC is purchased separately, it can be mounted on an existing NKK Swift and then the Swift can be
converted to a Skein-winder. An additional bracket is necessary to mount the ERC on the swift and can be
purchased from NKK. You will also need to install the White magnetic switch assembly on the top of the Swift
Column. You will need to remove the Wood Top Cap from the top of the Skein-winder column and install the
magnetic sensor. See separate instructions for this process.
The ERC can also be retrofitted to other brands of swifts. These are somewhat custom from the standpoint that
a special length magnetic sensor cable assembly will be needed and possibly a bracket as well. NKK can
assist the buyer in designing and adapting the ERC to their swift/skein-winder.
Page 1
Button Overview
Reset – this is the primary button that you will use most often. Press the Reset button once to clear the actual
data in the top row of the display. Press this button twice to clear the Preset number that you entered in the
bottom row.
Mode – this button changes the 3 modes in a rotating pattern (starts in Rotations (ROTS)) mode, then press
Mode once and it shifts to Yards mode, and press it again and it is in Meters mode. One more press and it
returns to Rotations mode.
Save – You will press the Save button after entering the number of inches or centimeters when asked in the
Yards and Meters modes. You will also press the Save button after entering a preset quantity in any of the
three modes (Rotations, Yards, and Meters). Saving this data tells the computer how to calculate the size of
each rotation and what to count up to (preset).
Decade Switches (0000, 000, 00, 0) – these buttons are used to enter the number of inches, number of
centimeters and also to enter a preset number in any of the 3 modes. In the inch mode, the decade switches
are redefined temporarily so that 0000 = hundreds, 000 = tens, 00 = ones, and 0 = tenths of an inch.
Otherwise, in all other cases, they mean 0000 = thousands, 000 = hundreds, 00 = tens, and 0 = ones.
Jacks
The ERC has 3 jacks. The top jack on the LEFT side is a data line and connects the ERC to the HDSS Motor
Drive. When the ERC is connected to the HDSS Motor Drive, the ERC will turn the motor drive off when the
preset number is reached. The bottom jack is for the 12 volt power supply. Do not plug the Motor Drive’s 24
volt power supply into the ERC or it can damage the ERC! The jack on the right side is for connecting to the
skein-winder’s magnetic switch (this is what the cable coming out of the top of the skein-winder is connected
to).
Plug in AC adaptor into the bottom jack of the
ERC.
The top jack is for use with the cable
that connects to the HDSS Motor Drive.
Aluminum housing, grounded
12v power supply, commercial
grade electronics package, user
friendly control panel logic,
works with our HDSS Motor
Drive option.
Tilt-able bracket for easy
viewing at any height. White
plastic cable stay to keep cables
away from the skein-winder
arms
Page 2
Operational Overview and Instructions
Mode &
Preset
Depress
Button
Task
LEDs
Lit
ROTS
1
Measure Rotations (ROTS) (count) – this
is the default mode. Just load your yarn,
press the RESET once prior to running job
to zero out number and start measuring
your yarn in ROTATIONS of the skeinwinder.
None
2
Measure Yards (length) – Press the Mode
button once to get to Yards. The system will
ask you to enter the number of inches
around the wheel (circumference). Refer to
the measurement labels on the arms and
then convert to inches, or run the fiberglas
tape around the arms and then enter the
number of inches into the system. NOTE: in
Yards/Inches mode, the Decade buttons
have a unique meaning as follows:
Mode
once
Yards
Mode
twice
Meters
None
ROTS
-Use 000 button to enter tens data
-Use 00 button to enter units data
-Use 0 button to enter tenths data
3
1
Preset
After entering the tens, units and possibly
tenths of an inch numbers, press the SAVE
button once. Then load your yarn. Assuming
that you just want to measure yards and not
enter a target qty., then just start measuring
and the display will show the number of
YARDS that have been wound.
Important! If you want to measure a
specific qty of yarn, then review the
following instructions for Presets.
Measure Meters (length) – Switch Mode to
Me. Menu will ask you to enter the number
of centimeters around the wheel. Refer to
the measurement labels on the arms and
then convert to centimeters, or run the
fiberglas tape around the arms and then
enter the number of centimeters into the
system. After entering the number, press
the SAVE button once. Then start to
measure.
Measure Rotations up to a Preset Qty
(count) – This starts with the default mode
(Rotations or Rt). After switching to RT
Mode, simply enter a Preset number that
you want to measure by pressing the
decade buttons (0000, 000, 00, 0) and then
press the SAVE button. You will not be
Page 3
LCD Display
presented with any menu asking for this
data, simply enter the number of rotations
that you want to measure as a Preset. This
will display the Preset (or target number) on
the bottom row and the actual count will be
in the top row). Press the RESET button
once to ensure that your actual count is
zero. When your Preset qty is reached, a
tone will sound and the HDSS Motor Drive
will stop (if connected).
2
Preset
Measure Yards up to a Preset Qty
(length) – Switch the Mode to Yd. You will
be presented with a menu asking you to
enter the number of inches in the rotation
(circumference of your skein). Enter the
number of INCHES per rotation. Then press
the SAVE button. Then, just enter the
Preset Qty. in YARDS that you want to
measure (NOTE: you will not be prompted
for YARDS, etc. when entering the Preset
qty like you were when entering the
circumference data). Just use the decade
buttons (0000, 000, 00, 0) to enter the qty.
of Yards and then press the SAVE button.
Press the RESET button once to ensure
that your actual count is zeroed out. The top
row should now be Zero and the bottom
Row should display your Preset qty in
YARDS to be measured. Start winding (or
unwinding) yarn onto the Skein-winder and
when your Preset qty is reached, a tone will
sound and the HDSS Motor Drive will stop
(if connected).
Mode
once
Yards
3
Preset
Measure Meters up to a Preset Qty
(length) – Switch the Mode to Me. You will
be presented with a menu asking you to
enter the number of centimeters in the
rotation (circumference of your skein). Enter
the number of centimeters per rotation.
Immediately after that, just enter the Preset
Qty in METERS (you will not be prompted
for centimeters when entering the Preset qty
like you were when entering the
circumference data). When entering the
Preset Qty. of Meters, pressing the decade
buttons (0000, 000, 00, 0) and then the
SAVE button. Press the RESET button once
to ensure that your actual count is zero.
Start winding (or unwinding) yarn onto the
Skein-winder and when your Preset qty is
reached, a tone will sound and the HDSS
Motor Drive will stop (if connected).
Mode
twice
Meters
Page 4
Please remember, when entering the qty of inches or centimeters in your Rotation (the
circumference of your skein), you will be prompted to enter the number of inches or
centimeters upon entering the Yds or Me modes.
When entering the PRESET Qty of yards or meters that you want to measure (AFTER you
entered the circumference data), you will not be prompted and the qty that you enter will
be in yards or meters (not in inches or centimeters).
Important Information
1. To clear actual data, press RESET once
2. To clear a Preset qty in any mode, press the RESET button twice.
3. SLEEP Mode – the unit goes into SLEEP mode after 5 minutes of inactivity. Just press the RESET
button ONCE to bring it out of SLEEP mode. Your last data will still be displayed unless you press the
RESET button a second time. When in SLEEP mode, the display, and the LEDs are turned off but your
data is maintained.
4. Master Reset – press the Save and Reset buttons simultaneously to reset all data (or you may remove
the power plug and then re-insert it).
5. Mode Switch – when changing modes, all data is lost from the current mode. There are 3 Modes:
Rotations, Yards, and Meters. All modes can have a Preset mode also.
6. Power – you may leave the unit on all of the time (there is no on/off button) and it will go into SLEEP
mode when not being used. For periods longer than a few days, disconnect power cord or install a
power strip with an on/off switch and switch the power strip off rather than unplug the ERC each time.
Which can cause wear and tear on the jack.
7. Starting point – if the handle on the swift is connected to the unit, the weight of the handle will cause the
wheel to “settle” with the handle hanging downward. This will put the magnet on the back of the same
arm in the upper position near the magnetic pickup unit on the top of the I-Beam column. Depending on
the direction that you are pulling yarn from, be sure to have the magnet clear the sensor before you
start counting/winding or you will register a count before any yarn has actually been wound.
8. If the unit ever performs erratically, do a Master Reset or pull the power cord to “reboot” the ERC.
Warranty – The ERC is covered by an International 1 year commercial use limited warranty – NKK will repair
or replace any part of the unit that fails during the one year period. Buyer must return the unit freight prepaid to
NKK and NKK will return the repaired or replaced unit freight prepaid to Buyer. Buyer must secure a return
authorization from NKK before returning unit.
Nancy’s Knit Knacks LLC 800-731-5648 [email protected] www.nancysknitknacks.com Copyright 2011-13 021715
Page 5