1
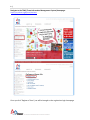
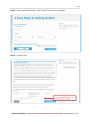
Instructions Team Registration 2 | Navigate to the TIMS (Team Information Management System) homepage: https://my.usfirst.org/fll/tims/site.lasso Once you click “Register a Team” you will be brought to the registration login homepage. | 3 FLL TIMS Homepage 1. If you have already created an account, enter your email and password and click “Login”. If you do not remember your password you have the ability to click on “Forgot Your Password?” 2. New users will need to create an account. 4 | Creating an Account If you do not already have an account, click “Create User Account” on the registration login page. You will be directed to the 2014 FIRST LEGO League Terms & Conditions page. You will need to make sure that you have read the FLL Terms and Conditions as well as the FIRST Privacy Policy. Click on “I Agree” to continue. | 5 You will now be directed to the Youth Protection Program video. You must watch this video to continue the process of creating an account. Once the video ends you will continue to the next page automatically. 6 | You will be asked to complete all required fields indicated with a red dot to move forward with completing your user account. | 7 Please indicate which programs and seasons you have participated in (if any). If you did not participate in a particular program, make sure you check off the box “No Participation”. 8 | Once you have filled out all required fields including that you have read and agree with the FIRST Youth Protection Policy, click “Finished”. | 9 The below screen will appear indicating that you will receive an e-‐mail to activate your account. Access your e-‐mail and follow the instructions. The e-‐mail will be sent to you by [email protected] Clicking on the link sent to your e-‐mail will activate your account and you will receive a second e-‐mail confirming the account has been activated. After clicking on the link from the first e-‐mail, you will be re-‐routed back to the TIMS welcome page (see page 3 for screen shot). Enter your e-‐ mail and password you just created and click “Login”. This will bring you to your FLL Dashboard. 10 | FLL Dashboard 1 2 3 4 . 1 2 1. 3 2. 4 3. . If you are the Purchaser of a team and are not going to be the Main or Alternate contact, you will not require screening per the Youth Protection Policy. If you will be taking on the role of the Main or Alternate Contact, you will go through the screening process once that role has been administered and can see if you have passed by viewing your status in section 1 indicated above. If you have not yet completed the 2014 FIRST Consent and Release Form electronically, your status will show as “Incomplete”. In order to complete your form electronically, you will need to click on the “Respond” button and accept for this season. Once you have done so, you will be re-‐ directed back to your FLL Dashboard with a new status of “Accepted”. This section allows you to accept invitations sent by a Main or Alternate contact of a team. If you are not the Main or Alternate contact and you are part of an existing team and do not see the team number listed, you will need to reach out to the Main or Alternate contact of that team to send you an invitation. This section allows you to manage current team(s) or to create a new team. Click on the “Create Team” button to move forward with the process of creating a brand new FLL team. | 11 Creating a team Once you click “Create Team” on your FLL Dashboard, you will be asked to identify which role you will serve for that team. Each role is defined and lists the capabilities you will have in the system. For the purpose of this guide, I will indicate myself as a Main Contact (this will give me full rights in administering the team and will take me through the YPP screening process.) Once you have indicated your role, click “Create New Team”. This will trigger you to be given a temporary team number. Please note that this number is only temporary and will change once the registration is paid in full. If you indicated yourself as the Purchaser, you will NOT need to go through the Youth Protection Screening process shown below. 12 | Screening Process Once you click “Continue” for the required Youth Protection Screening, you will be prompted to the page indicated below. Clicking on “Begin Step 2” will trigger you to be re-‐routed to the website of the company who completes your screening process. You will be brought to the verification site where you will begin the screening process. | 13 Once you have created your user account and have clicked “Continue” you will be asked to get verified. 14 | You will now go through a 4 step process to become verified. Steps 1 -‐ Select your package. One has already been pre-‐selected by US FIRST for you. | 15 Step 2 – Enter required information. Click “Save & Continue” once complete. Step 3 – Consent Form 16 | Step 4 – Confirm the personal information you provided is correct. | 17 Once you log back into your TIMS account, you will now be able to see your screening status in the Youth Protection section of your FLL Dashboard. This section is shown on page 2 of this guide. 18 | Team Summary Page When you log back into your TIMS account: https://my.usfirst.org/fll/tims/site.lasso, you will be brought to your FLL Dashboard. You will now see under “Teams I Can Administer” your Temporary Team Number. Click on “Team Summary” to continue the registration process. The next page is where you will enter the Team name, School information, and additional contact information. In order to pay for your team registration, you must first complete all required fields in the “Team Profile” section. Once you have completed a section you will be brought back to your Team Summary page where you can continue completing the next steps. Once a step is complete, you will see a green checkmark in the status section of that particular field. | 19 1. Team Information You will first need to complete the “Team Information” section. Click on the “Edit/view” button in that action field to continue. 20 | Enter all team specific information into these fields, and make sure that each required field is filled out. If you click “Finished” and missed a required field, the page will indicate in red text, the data you are missing. Once you click “Finished” you will be re-‐routed back to your Team Summary page. | 21 2. Organizations The second step is entering your team organizations. Click on the “Edit/View” button in that field to continue. You must enter your School/youth organization before you can register. Here y ou can also enter other sponsors of your team. The categories are: Public/Private School Home School Youth Organization Family/friends Neighborhood 22 | If you Choose “Public/Private School” as your organization information, you will be prompted to choose a school within 50 miles radius of your zip code. If you do not see the school in the drop down list, you have the option to click on “Our school is not in this list”. | 23 3. Team Contacts Click on the “Edit/View” button in the Team Contacts section of the Team Summary page to continue. The team contacts section is where you will be able to invite required team contacts which include an Alternate Contact and a Purchaser. You will also be able to invite additional team contacts from this page throughout the season. 24 | As I have indicated myself as the “Main Contact” I will just need to invite an Alternate Contact of the team. Note that the Main and Alternate contact can also be invited as the Purchaser of a team. It is required that you have both a Main and Alternate contact assigned to your team to order product and register your team to events. | 25 Clicking on “Invite Alternate (Lead Coach 2)” will prompt you to enter the first and last name of the person you would like to invite along with their e-‐mail address. Click “Invite” once these fields have been completed. You will see that the invitation has been sent as well as receive a system generated e-‐mail to your e-‐mail account. Click “Thanks” to bring you back to the “Team Contacts” page. It is important that you communicate with the alternate contact, and advise them that they will be receiving an e-‐mail to accept their invitation and they will need to register in TIMS with their own user ID and password prior to signing in. 26 | Once the Alternate Contact accepts their invitation, you will see a green check mark indicating they have accepted their role. As both the Main and Alternate contact have the ability to register/pay for team registration, order product and apply the team to events, it is not necessary to invite a Purchaser. However, you have the ability to do so at any time. (Purchaser’s cannot apply a team to an event) | 27 Now that you have invited the required contacts, click “Finished” to return to the Team Summary page. 28 | Team Registration Payment Once all fields in the Team Profile section have green checks in the status fields, you will be able to move forward with the payment process for team registration. If you do not see the “Pay” button and both the Main and Alternate contact have accepted their invitation, this means that they have not yet passed the screening process. You will need to reach out to them directly in regards to screening u pdates. Click on the “Pay” button in the Payment section to go through the process of paying the team registration. | 29 You will need to review and accept payment terms for the 2014 season. The five types of payment will be indicated with how you will need to proceed if you choose that option. Scroll down and click “I agree” at the bottom of the page to proceed. The next page will ask you to indicate the form of payment for team registration. For the purposes of this document, I will be choosing to pay with check. 30 | Depending on which payment option you chose will vary the instructions page you are sent to. You will need to review the instructions for your payment option and click “Continue” If you chose to pay via credit card, you will see an instructions screen with a 3 step billing information process. Once you have PAID for your team: paid equates to: • a credit card payment • a PO has been received by FIRST Finance and has applied the PO to your team(secured) • your check has been received by FIRST Finance has applied the payment to your team • A grant\coupon code has been applied Once any of these above occurs your team number will change form a temporary to a permanent team number. This permanent team number is yours for each year unless you abandon the team number for 1 year at which time it will be reassigned. Your team will now have either a registered\paid status or a registered\secured status. | 31 Once BOTH coaches have passed the Youth Protection screening process, and the FLL registration is paid, either coach or the purchaser can order materials from LEGO. Clicking the order button (above) in FLL TIMS will bring you to LEGO Education Ordering site depicted below: Ordering products at the LEGO website: • Enter FLL as the program. • Enter your email in the team email field. • Enter any of your team numbers. • Click green enter button 32 | Choose the SHOP button | 33 Choose your products you wish to purchase: • To compete in an FLL event you must have a 2014 Field Setup Kit. The FSK can be shared across teams. • You must also have a LEGO® Mindstorms robot. LEGO offers the EV3 and the NXT version robots; the EV3 is suggested as it is the newest version. Robots from previous years are acceptable. Additional accessories are optional, but useful. 34 | Notice each product has a detailed description. As products are chosen they are placed in your shopping cart. Once the checkout box is selected you will see the screen below where you will choose your State and shipping options. If you have a coupon\grant code you can enter it here. | 35 36 | At this point you will be presented with 3 checkout options showing what is in your shopping cart. • returning customer – login & checkout (also, previous order history is available here) • create an account – sign up & checkout • Checkout as a guest • Creating an account is recommended as it will capture your billing and shipping information thus alleviating re-‐entry of that data next time you visit. | 37 Enter your Billing & Shipping Information: (even if you have a coupon\coupon\grant\coupon\grant code you must enter this info) • If you are going to pay with a PO, are tax exempt, or have a coupon\grant code, you will see a field during the LEGO ordering process labeled "customer type". Assure you choose organization (not the private customer choice). If your organization is tax exempt, tax exemption certificates\forms will need to be provided to LEGO Education, faxed to 888-‐534-‐6784, or emailed to [email protected] • If you just wish to pay with a credit card, choose “private customer” in the customer type field. • The Ship-‐to information will default to the same as your Bill-‐to. There is a check box if your Ship-‐ to information different than your Bill-‐to. 38 | Making Payment • choose your payment type (you can enter a coupon\grant code on this page as well) • Tax exemption defaults to NO. If you choose yes and you do not have a Tax exemption certificate on file with LEGO Education, your order will suspend until one is received. • Enter any special delivery instructions, • Click the confirm button in middle of page, then choose a green “Next” button in bottom right corner of the screen (not shown here) | 39 Review, Submit, & receive an Order Confirmation (not shown) • Note your Order Confirmation. You can print the screen if you wish • You will also receive a system generated email. • If questions or difficulties while ordering please call 1-‐800-‐362-‐4308 • END 40 | Event Registration: There are several criteria that impact FLL event registration in TIMS: • The affiliate partner of the region that you are in must utilize FIRST’s system for event management, many do not. If this is the case, events in your region can be found by going to this website: http://www.usfirst.org/whats-‐going-‐on • If the affiliate partner for your region does not utilize TIMS for event registration the event section will: Ticket 638 – For teams where AP does not use PP/TIMS for event management, direct the team to the www link for events. change the messaging: Go to this link to apply for events in your region: http://www.usfirst.org/whats-‐going-‐on . and remove the “add” button • • If TIMS is utilized by the affiliate partner then the criteria below must be met before a team can register for an event in TIMS: o Both coaches must be screened. o The FLL team registration must be paid. o The event must be open for registration. o The event must still have capacity. If any of these criteria are not met then no events will display with various messages displayed. Once the above criteria are met you can apply for an event in your region which you designated in your team profile: see next screen shot | 41 • If you have already applied for an event it will be listed with the event name and your status relative to the event. You can also apply to other events by choosing the edit\view button which will bring you to a summary screen for maintenance of existing events or choosing new events 42 | This screen will show events or event groups that contain events that the team can apply for. Choosing the event will bring you to the event detail screen where you can apply for the event. | 43 Once you apply for the event your team will be listed as pending. The affiliate partner and\or event coordinators of the event will assign a status of registered, waitlisted, or declined. ALL PAYMENTS FOR FLL EVENTS ARE TO BE PAID OUTSIDE OF TIMS AND PAID TO THE EVENT COORDINATOR (not FIRST or FLL). EVENT GROUPS – The Affiliate Partner may choose to manage events within a group. For example, if the partner holds 3 regional qualifying events all on the same weekend throughout their region, the partner could create a group and add 3 events to it. They would then ask all teams to apply to all 3 events and prioritize/rank their choices 1-‐2-‐3. These choices could be made due to location or other logistical parameters. 44 | Choose the event group Choose each event within the vent group: | 45 Apply to the events: 46 | Prioritize\rank your choices: | 47 Wait for the regional partner to review your application and assign you to one of the events: You will receive a system generated email when you are registered to the event: The event application for your FLL® team : WVA has been Registered for West Virginia 1 group. You can view the status for all your FLL event applications here: https://my.usfirst.org/fll/tims/test/site.lasso For any questions regarding this event or application to this event, please contact your Event Contact. Thank you. Sincerely, FIRST® LEGO® League FLL Team Support FIRST® is recognized by the IRS as a 501(c)(3) Public Charity V: 800-871-8326 ext.0 F: 603-666-3907 E: [email protected] W: www.usfirst.org 48 | Inviting Parents and building a roster (UNDER CONSTRUCTION)