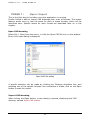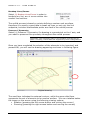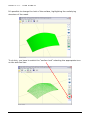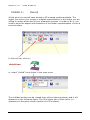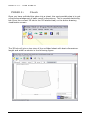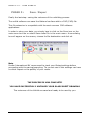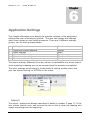
1
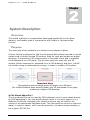
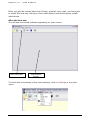
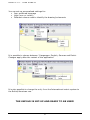
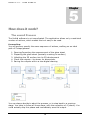
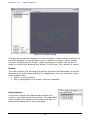
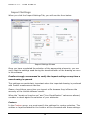
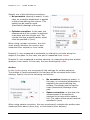
USER MANUAL A guide through the functionalities of Prodim ´s bent glass solution UNFOLD SOFTWARE Your solution for the production of bent glass Version 2.0 PROFESSIONEL SOLUTION FOR 3D MEASURING AND EDITING A user guide through installation and use of Prodim Unfold Software (ver. 2.0) PRODIM INTERNATIONAL BV Lagedijk 26 • 5705 BZ Helmond – Eindhoven Tel. +31 492 579050 • Fax +31 492 579059 Copyright © All rights reserved. Apart from the legally laid down exceptions, no part of this publication may be reproduced, stored in an automated databank, or made public in any shape or form, be it electronically, mechanically, by photocopying, filming, or in any other manner, without prior written permission from Prodim International BV in Helmond (NL). Disclaimer The quality of the results of the unfolding process is critically dependent on the awareness and experience of the user. The software outcomes’ quality level is, obviously, directly dependent to the quality of the sources / input. Helmond-Eindhoven (The Netherlands), August 2007. U N F O L D 2 . 0 - U S E R M A N U A L Contents Read this First Chapter 2 : System Description 2 3 Chapter 1 : Overview 3 Purpose 3 Technical Information Chapter 3 : 4 System Requirements 5 Notes 5 Hardware Requirements 5 Software Requirements Chapter 4 : 5 Get Started Now 6 Check your System Error! Bookmark not defined. Install it 6 Starting-up Chapter 5 : Chapter 6 : 7 How does it work? 10 The overall Process 10 PHASE 1 : 11 Open / Import Import Settings 13 PHASE 2 : Prepare: Meshing 16 PHASE 3 : Unfold 18 PHASE 4 : Check 21 PHASE 5 : Save / Export Application Settings Import 23 Mesh 24 Unfold 25 Output (check + save) 28 Generics Chapter 7 : Support 29 30 Frequently Asked Questions Commercial Support Technical Support Chapter 8 : 22 23 Icon-gramma 30 Error! Bookmark not defined. 33 34 U N F O L D 2 . 0 - U S E R M A N U A L 1 Chapter Read this First About this Manual This manual include all the information you need to know for installing, running and using correctly the application. How to Use this Manual First of all you have to check that the system is suitable to run the software (at least decently) (see chapter 3). Only once you have ensured those minimum requirements, you can proceed. Read and follow the Get Started Now! chapter which follows. This chapter will instruct you to install the software and hardware, and then run the program. Structure Chapter 2 describes in high level the application, adding a short technical insight of its relation with the Prodim Proliner device. Chapter 3 clearly points out the system requirements: everything you need to have in order to use the application. Chapter 4 will guide you through all the needed steps from the moment you received the installation file till the first run on your computer. Chapter 5 describes the way the application has to be used, providing also a 2 sample cases. Chapter 6 described more in details the complete set of functionalities and options. Chapter 7 addresses eventual doubts, problems and concerns, providing a list of answers to frequently asked questions (F.A.Q.) but also the contacts for receiving live support (both commercial and technical). THIS MANUAL REFERS TO VERSION 2.0 If you wish to get a different User Manual version, please contact Prodim International BV at:[email protected] or call +31 (0) 492 579050 2 U N F O L D 2 . 0 - U S E R M A N U A L 2 Chapter System Description Overview The Unfold software is an application developed specifically for the glass industry, and ideally used in combination with Prodim’s devices series: Proliner. Purpose The main goal of the software is to unfold curved sheets of glass. Proliner Unfold is designed to find the theoretical flat surface required to mould certain kind of doubly-curved 3D surface. Both its input and output are digital drawings. It imports the 3D measurement of the glass’ sheet and it produces its development on a 2D plane. The process used is to start with the 3D surface (either measured or extracted from a CAD drawing) and then “unfold” the surface using a mathematical process, in order to create a 2D surface. Important Note The application does not simply project 3D shapes into a 2D plane ! The Unfold software does actually flatten the 3D sharpened curve glass, producing a digital CAD drawing. A Flat Sheet: What For? The so produced file can be read by CAD software’s and in some cases directly by CAM packaging’s. You can decide double-check it or simply export it in a different file format. Ultimately the Unfold outcomes can be used for the cutting of an appropriate flat glass sheet. This last could be curved in a second stage, in order to obtain, with a certain precision, the same shape standing in the original 3D CAD file. 3 U N F O L D 2 . 0 - U S E R M A N U A L Technical Information The Unfold software is a simple but efficient tool. There are, never less, few technical aspects to be considered before even installing it. FILE FORMAT The Unfold can import the following types of CAD files: PRL This is a special format file created by Prodim International BV and used to store the results of measurement performed with the Proliner 5.7 series. DXF DXF stands for Drawing Interchange Format, or Drawing Exchange Format) is a CAD data file format, developed by Autodesk as their solution for enabling data interoperability between CAD programs. The DXF import process has being perfected accordingly to the DXF files produces by the Prodim’s devices: the Proliner 6 and 8 series. Never less, the application will read most of the generic DXF files too. IGES This is another CAD file format widely used in the automotive industry. The Unfold can import most of the IGES version 43 and 44. Other IGES files could not be supported. PRODIM MEASURING DEVICES It is then recommended to use it in combination with Prodim International BV 3D measuring devices, and in particular: Proliner® 6 and 8-serie. Proliner 8 Proliner 5.7 For information about Prodim measuring devices, please visit the website: www.prodim.nl or contact us at [email protected] and +31 492 579050 LANGUAGES (Software and Documentation) DEFAULT: English AVAILABLE: English, German, Dutch, Italian, French, Spanish Prodim is able to provide additional language packs. Please contact Prodim for additional information and pricing. 4 U N F O L D 2 . 0 - U S E R M A N U A L 3 Chapter System Requirements Notes The optimum software and hardware resources are recommended for efficiency, although users can operate with the minimum required resources. Hardware Requirements Recommended Hardware Resources Processor: Pentium IV RAM: 512 MB Video card: 64Mb RAM (full support to OpenGL) Availability on local drive: 500 Mb Installed file size: 10MB Minimum Hardware Resources Processor: Pentium II or above RAM: 256 MB or above Video card: 16Mb RAM (full support to OpenGL) Availability on local drive: 100 Mb Installed file size: 10MB Software Requirements Recommended Software Resources OS: MS Windows XP or Vista Drivers: Latest video card drivers Minimum Software Resources OS: MS Windows 2000 Drivers: Functioning video card drivers *Copyright© Netscape Communications Corporation. #Copyright© Microsoft Internet Explorer Corporation. %Copyright© 2000 Adobe Systems Incorporated. 5 U N F O L D 2 . 0 - U S E R M A N U A L 4 Chapter Get Started Now Once you have obtained a copy of the Unfold, there are a few simple steps you have to take in order to be able to use it. Install it If you determined that your system is eligible for running the Unfold software, you can now proceed at its installation. The Unfold is distributed as a single installation file. The Installation Process Proliner Unfold comes with an easy installer file. Just double-click the executable file (called InstallUnfold.exe) and the Prodim Unfold will be installed on your system. Follow the wizard to install Proliner Unfold: 4 simple steps. You will have to: 1. agree the terms (A), 2. choose the destination folder (B) 3. choose the address for the shortcut on the start menu (C) 4. confirm the choices and trim the installation (D) Sample screenshot of installer wizard The installation will create a shortcut in your Start Menu as well as on your desktop. Uninstall Process You can always uninstall later through the standard method. (Start -> Settings -> Control Panel -> Add/Remove Software) Screenshot of installer wizard 6 U N F O L D 2 . 0 - U S E R M A N U A L Starting-up To start up the application you simply have to click on either the Start Menu shortcut, created during the installation process, Start -> Programs -> Prodim -> Proliner Unfold -> Proliner Unfold or on the shortcut on your desktop. First Start-Up At the first start-up, the application will ask whether you intend to register your copy or to run it in demo mode. In this last case the application will stop working after 15 days from the moment it was installed. In order to work further with the application, you have to register it, obtaining a license key from Prodim International BV. You can do this at the first start-up or clicking on “License” under Help in the menu. And then copy the Machine ID as give by the pop-up window. Send this ID to [email protected], indicating that your are requiring a license for the Unfold software. 7 U N F O L D 2 . 0 - U S E R M A N U A L Once you got the license back from Prodim, possibly via e-mail, you have just to install the new key clicking on the Install button and following the simple instructions. After the first use You will see the Unfold software appearing on your screen. Main Menu Bar Visualization Screen To check the correctness of the local settings, click on Settings in the main menu 8 U N F O L D 2 . 0 - U S E R M A N U A L You can set-up personalized settings for: Your preferred language Units (mm or inches) Different colours used to identify the drawing’s elements It is possible to choose between 3 languages: English, German and Dutch. Changes apply after the restart of the application. It is also possible to change the unit, from the International metric system to the British/American one. THE UNFOLD IS SET-UP AND READY TO BE USED! 9 U N F O L D 2 . 0 - U S E R M A N U A L 5 Chapter How does it work? The overall Process The Unfold software is not complicated. The application allows only a restricted number of actions, which makes this tool easy to be used. Process flow You will perform usually the same sequence of actions, walking on an ideal path of 5 steps/phases: 1. 2. 3. 4. 5. Opening/Importing the measurement of the glass sheet Preparing the glass sheet (basically meshing its surface) Unfolding the 3D surface into its 2D development Check the outputs : its stress, its dimensions Saving the outputs within a new digital drawing You can always decide to abort the process, or to step back to a previous stage. You have to follow all those steps, with the exception of 4 (check). You could actually skip this phase and immediately save the output. 10 U N F O L D 2 . 0 - U S E R M A N U A L PHASE 1 : Open / Import This is the first step to be taken once the application is running. Prodim Unfold is able to import CAD drawings from a set of formats. The import feature works more or less the same for each of these formats, which will be described here. Specific issues for each format are described later on in the chapter. Open CAD drawing Select File > Open from the menu, or click the Open CAD file icon on the taskbar. Next, a file-open dialog is displayed. Open CAD file dialog A specific selection can be made by clicking the Filetypes dropdown box, and selecting one of the specific formats. fter a selection is made, click on the Open button to start the import. Import CAD drawing After clicking the Open button, a new dialog is opened, displaying the CAD drawing, named Select CAD entities. 11 U N F O L D 2 . 0 - U S E R M A N U A L Select CAD entities dialog The title bar shows the filename, and the window’s Viewer shows a preview of the CAD drawing. In the left pane, a list of entities is shown, under 3 tabs: Contour, Surface and Arc Center. After a selection is made, click on the OK button to import the drawing into Unfold, or click the Cancel button to cancel. Viewer The view support you showing the entities previews and indicating you which element is currently being selected, or highlighted. You can make use of the colour based code: Green: to be imported Red : highlighted in the menu; currently selected Entity Selection You have to identify the appropriate element for contour, as surface and as arc-center. You can select them checking the relative box on their left side, or pushing the space bar of your keyboard. 12 U N F O L D 2 . 0 - U S E R M A N U A L Import Settings When you click the Import Settings Tab, you will see the form below: Import Settings Screen Once you have completed the selection of the appropriate elements, you can verify that the settings used during the transformation of the drawing as occur in the software. Prodim strongly recommend to verify the import settings every time a new drawing is opened. This settings are particularly important when the imported drawing is produced with Prodim measurement devices. Please, check them every time you import a file because they influence the accuracy of the Unfold software results. When the “break-up lines/curves” and “Line Simplification” values are altered, consider to check again the selection of your elements. Contour In the Contour group, one must specify the settings for contour selection. The entities or layers selected for the contour will be corrected with these settings. 13 U N F O L D 2 . 0 - U S E R M A N U A L Specify one of the following corrections: No correction (drawing is exact): In this case, no correction whatsoever is applied to the points defining the contour. This setting can be used for exact (theoretical) drawings of the part. Cylinder correction: In this case, the measurement of the contour is assumed to be done with the cylinder tool. The cylinder tool has a specific radius, which must be specified in [mm]. When using cylinder correction, the user must specify whether the contour was measured from outside or from inside. Example 1: user measured a windshield, by sliding the cylinder along the edges of the glass. In this case, the part is measured from outside. Example 2: user measured a window opening, by measuring along the window aperture, from inside. In this case, the user must specify inside. Surface In the Surface group, one must specify the settings for surface selection. The entities or layers selected for the surface will be corrected with these settings. Specify one of the following corrections: No correction (drawing is exact): in this case, no correction whatsoever is applied to the points defining the surface. This setting can be used for exact (theoretical) drawings of the part. Sphere correction: in this case, the measurement of the surface is assumed to be done with a sphere tool. The radius of the sphere must be specified in [mm]. When using sphere correction, the user must specify whether the surface was measured from above (from top), or from below (from bottom). 14 U N F O L D 2 . 0 - U S E R M A N U A L Breakup Lines/Curves Select [x] Breakup Lines/Curves in order to breakup any line, arc or curve entities into smaller line sections. The unfold process is based on points defining a contour and a surface, therefore it is usually a good idea to break up lines, so not only the line endpoints, but also intermediate points are used in the unfold process. Preserve Y Symmetry Select [x] Preserve Y Symmetry if a drawing is symmetrical on the Y axis, and you want to preserve this symmetry throughout the unfold process. Important: The symmetry plane in the drawing must be the XZ plane. Currently, Unfold does not support any other configurations Once you have completed the selection of the elements to be imported, and pressed OK, you will see the drawing appearing as shown in following figure. Original drawing The read lines indicates the external contour, while the green dots/lines represents the set of elements to be used as surface. You can visualize better the image on the screen using the following viewing options: Rotation (pressing the left mouse button and moving the mouse) Zooming (pressing the right mouse button and moving the mouse) 15 U N F O L D 2 . 0 - U S E R PHASE 2 : M A N U A L Prepare: Meshing Once you check that everything looks fine, you can proceed to the next step: creating a 3D mesh. To create a 3D mesh is extremely easy with the Unfold. What you have to do is simply clicking on the: 3D mesh icon or selecting “Create a 3D mesh” under Actions in the main menu. Once you have done it, you will see a green surface appearing and covering the imported object along and within its contour. 16 U N F O L D 2 . 0 - U S E R M A N U A L It’s possible to change the look of the surface, highlighting the underlying structure of the mesh. To do this, you have to switch the “surface look” selecting the appropriate icon on the side tool bar. 17 U N F O L D 2 . 0 - U S E R PHASE 3 : M A N U A L Unfold At this point you should have already a 3D meshed surface available. The object you see on your screen is a digital representation of the object you are willing to realize at the end of your production process. In order to do it, you need to know the aspect and dimension of the flatten representation of such a curved surface. In the tool bar, click on: Unfold icon or select “Unfold” from Action in the main menu The unfolded surface can be viewed then without showing stress, and it will appear as in the following figure. The 2D surface has a violet colour (in opposition to the green colour used for the 3D surface). 18 U N F O L D 2 . 0 - U S E R M A N U A L The unfolded (2D) surface can be showed in the form of a grid (made by small triangles). This is again the underlying mesh structure, used here also for rebuilding the surface once unfolded. The figure can be rotated and zoomed in and out in the same way as explained for the 3D view. Once the Unfold surface is created, you can also choose to visualize both the 3D and 2D surfaces and/ contours at the same time. 19 U N F O L D 2 . 0 - U S E R M A N U A L To enable or disable the visibility of the 2D or 3D objects or to visualize only the contours or only the surfaces, you can click on the appropriate icons on the Side Tool bar. 20 U N F O L D 2 . 0 - U S E R PHASE 4 : M A N U A L Check Once you have unfolded the glass into a sheet, the next possible step is to get a first acknowledgment of basic result’s dimensions. This is possible switching tab (from the current 3D tab to the 2D labelled tab) on the active drawing visualization screen The 2D tab will give a top-view of the unfolded sheet with basic dimensions: length and width as shown in the following figure. 21 U N F O L D 2 . 0 - U S E R PHASE 5 : M A N U A L Save / Export Finally the last step: saving the outcomes of the unfolding process. The unfold software can save the flattened surface within a DXF (CAD) file. This file extension is compatible with the most common CAD software applications. In order to store your data, you simply have to click on the Save icon on the main menu tool bar or select Save under File in the main menu. A save dialog box will appear on the screen; choose the file destination and click ok. Note Prodim International BV recommend to check your Output settings before proceeding with the saving/exporting. The correct use of this settings can have a critical impact on the quality of your results. THE PROCESS IS NOW COMPLETE! YOU HAVE SUCCESSFULLY UNFOLDED YOUR GLASS SHEET DRAWING. The outcomes of the Unfold are saved and ready to be used by you. 22 U N F O L D 2 . 0 - U S E R M A N U A L 6 Chapter Application Settings This chapter discusses more deeply the possible changes in the application settings the user is allowed to operate. The user can change few settings which have impact on the Unfold outcomes. There are 5 different settings groups, one for each process phase: 1 2 3 4 5 Settings Group Phase importing process settings mesh settings Unfold / FEM settings Output Generics and Local Options Import Mesh Unfold Check and Save Check The import settings, differently from any others, are accessible only during import, since importing a drawing can not be reversed once the process is completed. The other settings are grouped in 4 tabs within a setting window which the user can access clicking on ACTION on the menu. Import The import settings are already described in details in chapter 5 page 17. If the user notices that an error had occurred he has in fact to close the drawing and repeat everything form the beginning. 23 U N F O L D 2 . 0 - U S E R M A N U A L Mesh Nurbs Grid Size The nurbs approximation grid is used to generate the nurbs for meshing the 3D surface. It is possible to define the size of the nurb grid, choosing between 3 default options or indicating an alternative size. This grid shall be changed when the meshing of the surface is obviously incorrect. Decreasing the size of the grid, the user will increase the accuracy of the meshing process; neverthe- less, an excessively small grid will highlight possible imprecision of the measurement. Mesh Grid This options are to be used to increase/decrease the size of the triangles which the meshed surface is split into it. Smaller mesh size will decrease the size of the triangles and it will increase the accuracy of the meshing. Never less, decreasing the size of the mesh can have a serious impact on the performances of the meshing and even more of the unfolding processes. You can choose among 3 predefined sizes (small, medium and large) or indicate a custom size. The medium size grid is default. 24 U N F O L D 2 . 0 - U S E R M A N U A L Unfold You can also change settings related to the unfolding process, giving more information on the material type and characteristics. The maximum allowed stress and the material thickness are independent from the material selection. MATERIAL PROPERTIES You can select a certain material from the list of predefined proposals : glass, metal, etc. or you can add a custom material yourself. When a new material is added to the list, you need simply to define a new name and its elasticity. 25 U N F O L D 2 . 0 - U S E R M A N U A L STRESS What you will see on your screen is visualized in the following figure. The unfolded surface is shown making use a different colours. Those are used to highlight the different stresses as they will occur on the glass sheet once it will be curved. The colours are used to indicate 3 main level of stress: none, acceptable and overstress. It is possible to disable the view of stresses clicking on the stress button on the main menu tool bar or navigating on the main menu. Stress 26 U N F O L D 2 . 0 - U S E R M A N U A L Stress options can be changed selecting the item UNFOLD/FEM under the group Settings on the menu. Within this screen, stress visualization can also be disabled by selecting NONE from the drop-box “Color Coding”. Settings > Unfold (tab) > Color coding > None 27 U N F O L D 2 . 0 - U S E R M A N U A L The stress values are dependent on the base of the material composition, type, and on the technique that will be used for curving the glass sheet. You can modify the stresses’ levels indicating a maximum allowed stress level. Any change will update immediately the look of the surface on the screen. Output (check + save) Deformation Grid The deformation grid is the set of snapshots points which can be placed automatically on the external contour of the unfolded sheet within the 2D tab on the active drawing’s visualization screen. With this option is possible to change the size of this grid and therefore the number of snapshots. This option can found in the Mesh tab. Corners Optimization This function allows the smoothing of corners. Increasing the value of the degree, the Unfold software will automatically smooth straight-line corner made, generating approximated arcs. 28 U N F O L D 2 . 0 - U S E R M A N U A L The corner of an output file generated with a smoothing limit value of 10 degrees. The same corner generated with a smoothing limit value of 100 degrees. Lines Optimization Lines as measured in 3D by the Proliner measurement devices are not always 100% perfect. In order to ensure the optimal quality of the output, the user can set different lines optimization values. Increasing the tolerance level will imply an output file with a smaller number of elements, and smoothing given by the approximation of lines along a certain direction. This option is currently available only in the Import Settings Screen. Generics In this tab you can vary the colours which identify different elements on the visualization screen. 29 U N F O L D 2 . 0 - U S E R M A N U A L 7 Chapter Support Frequently Asked Questions Top Questions I can not see any element in the preview of my Import Screen. How can I resolve this problem? Please, check again the file opening it with your CAD program. If you still are sure that the file is integer and correct, please contact our customer support via phone or sending an email with the file in attachment. I can import my drawing but I get a strange, unrealistic, graphical representation. How can I resolve this problem? See previous answer. I can import my drawing but I can see only red dots, and then the mesh fails. How can I resolve this problem? You have probably made a mistake in the selection of the elements during the import process. Please, close this file and open it again, paying attention to choose the right elements respectively for the external contour and the surface. If every thing was done correctly, you should see on the main visualization screen an image having red dots as contour and green dots as surface. I can import my drawing but I get a strange mesh. How can I resolve this problem? You can change the size of the nurbs approximation grid, to best fit the specific shape of your drawing’s curve. In order to do this: select SETTINGS onto the menu, and then MESH. Modify the Nurbs Approximation Grid size. 30 U N F O L D 2 . 0 - U S E R M A N U A L Using Unfold How do I enter my Unfold license number? Once received a license. from Prodim, select HELP menu drop and then LICENSE; then follow the given instructions, inserting the code in the indicated box. Confirm and your Unfold copy will be registered. How do I customize my Unfold? Select SETTINGS menu drop and then OPTIONS to localize your application, and GENERICS to customize its appearances. See page 14 of this manual for more detailed information.. How can I change the language of my Unfold? How to change it? Then select it under Settings > Options > Language, and restart the service to apply the changes. How to add a new pack? The language pack must be installed into the folder where also Unfold.exe is located. Just add the language file (tr_<language>.xt) to the folder. Why is Unfold slow when meshing some files? The speed of the mesh transformation depends on the specified size of its generative grid. Please consider increasing the Mesh Grid ‘s size. In order to do this: select SETTINGS onto the menu, and then MESH. Take note that extremely large mesh grid size could possibly have small implications on the accuracy of the final output. Why is Unfold slow when unfolding some files? The speed of the unfold transformation depends on a great deal of computational power from your PC’s CPU, as well as from the specified size of its related mesh grid. Please, next time, consider to generate the 3D mesh with an increased grid size. In order to do this: select SETTINGS onto the menu, and then MESH, modify the Mesh Grid size. Take not that extremely large mesh grid size could possibly have small implications on the accuracy of the final output. 31 U N F O L D 2 . 0 - U S E R M A N U A L How do I change the stress value for a unfolded development? Visit SETTINGS on the menu, then Unfold/FEM. The user can here disable the stress or change its type. Stress values depend also on the material elasticity, thickness and obviously on the maximum stress value allowed. The user shall set properly all those values too. How can I check the dimension of the Unfold output? Once the drawing is successfully flattened, the user can select the tab named 2D on the main visualization screen. Basic measurements will be given. For detailed review of the drawing, the user has to rely on its own CAD software, after the output is exported into DXF. Can I export the unfolded file in another format different from DXF? At the moment it is not possible to export the output in different formats than DXF. Never the less, we plan to implement different exportable extension in the near future. Downloading and Licensing • Every time I start up the application I get a notice asking me to renew the license? Your application is still running in Trial mode. Get your activation code and register it before the demo expiration date. After this time, the application will not run anymore. • If I start-up the application, nothing happens. What to do? Contact our customer support centre at +31 (0)492579050 • What is the easiest way to order Unfold? You can order the Unfold via phone calling our customer support centre at +31 (0)492 579050 • I have lost my registration number. How do I get it? You can obtain it selecting Help on the menu and then License. For help, call our customer support centre at +31 (0)492 579050 32 U N F O L D • 2 . 0 - U S E R M A N U A L How do I upgrade to the latest version? Our customer support centre will send you a notification as soon as there is a new update. If you are entitled and interested, you can confirm it and it will be sent to you via email (or onto a CD via post) in form of an installer file. • I have problem installing/downloading it. What can be done? Call our customer support centre at +31 (0)492 579050 Note For further information you can contact one of the software development engineers : Luca O. Gasparini via phone at +31 (0)492 579056 via email at: [email protected] Technical and Commercial Support If you have need of discuss technical problems, or commercial and legal issues; please contact us at: [email protected] or calling the +31 (0)492579050 33 U N F O L D 2 . 0 - U S E R M A N U A L 8 Chapter Icons: legenda TOOL BAR Open Open a new drawing to be flattened Save Save the output of the unfold process Mesh 3D Create a mesh 3D over the original measurement Unfold Flatten the meshed 3D surface Stress Add / Remove the visualization of the stress values as calculated to be during the bending process. About Gives information about Unfold, and its producer: Prodim International BV Previous Recover the last position on the visualization screen of the glass sheet as it is oriented in space Zoom Out Decrease the size of unfolded result the 2D view. Zoom In Increase the size of unfolded result the 2D view. 34 U N F O L D 2 . 0 - U S E R M A N U A L 2D VIEW TAB Deformation Grid SIDE BAR Add the deformation grid onto the unfolded glass of sheet in the 2D tab of the visualization screen. (if active) 2D Contour visualize the external contour of the 2D flattened glass. 2D grid surface visualize the grid surface of the 2D flattened glass. 2D full surface visualize the full surface of the 2D flattened glass. Original measurement visualize the points generated by the Unfold software based on the original measurement / drawing. 3D contour visualize the external contour of the bent 3D glass sheet. 3D grid surface visualize the grid surface of the bent 3D glass sheet. 3D full surface visualize the full surface of the bent 3D glass sheet. Nurb visualize the nurb (points cloud) used to generate the meshed surface. 35 U N F O L D 2 . 0 - U S E R M A N U A L IMPORT SETTINGS Contour Indicates a contour Contour IN Indicated that the glass sheet’s external contour was measured with Proliner’s measuring pen inside (example: in case of a frame) Contour OUT Indicated that the glass sheet’s external contour was measured with Proliner’s measuring pen outside (example: a sample bent glass sheet) Surface Indicated a surface Surface IN Indicated that the glass sheet’s surface was measured with Proliner’s measuring pen inside (example: a sample bent glass sheet) Surface OUT Indicated that the glass sheet’s surface was measured with Proliner’s measuring pen outside (example: in case of a frame) Surface TOP Indicated that the glass sheet’s surface was measured with Proliner’s measuring pen on the top of the curve Surface BOTTOM Indicated that the glass sheet’s surface was measured with Proliner’s measuring pen on the bottom of the curve 36