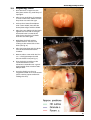
1
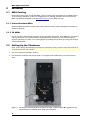
MEA Preparation Note:
Acute Hippocampus Slices
from Rattus norvegicus
Information in this document is subject to change without notice.
No part of this document may be reproduced or transmitted without the express written
permission of Multi Channel Systems MCS GmbH.
While every precaution has been taken in the preparation of this document, the publisher and
the author assume no responsibility for errors or omissions, or for damages resulting from the
use of information contained in this document or from the use of programs and source code
that may accompany it. In no event shall the publisher and the author be liable for any loss of
profit or any other commercial damage caused or alleged to have been caused directly or
indirectly by this document.
© 2005 Multi Channel Systems MCS GmbH. All rights reserved.
Printed: 2005-10-20
Multi Channel Systems
MCS GmbH
Aspenhaustraße 21
72770 Reutlingen
Germany
Fon
+49-71 21-90 92 5 - 0
Fax
+49-71 21-90 92 5 -11
[email protected]
www.multichannelsystems.com
Products that are referred to in this document may be either trademarks and/or registered
trademarks of their respective holders and should be noted as such. The publisher and the
author make no claim to these trademarks.
Table of Contents
1
1.1
1.2
Introduction
About this Application Note
Acknowledgement
2
2.1
2.2
2.3
2.4
Material
Biological Materials
Technical Equipment
Chemicals
Media
2.4.1 ACSF Buffer
3
3.1
Methods
MEA Coating
3.1.1 Planar Standard MEAs
3.1.2 3D-MEAs
Setting Up the Vibratome
Decapitation and Brain Removal
Dissection
Preparing Slices
Mounting the Slice onto the MEA
Preparations for Recording
3.2
3.3
3.4
3.5
3.6
3.7
5
5
5
6
6
6
6
7
7
8
8
8
8
8
9
10
11
12
13
4
4.1
4.2
4.3
Suggested MEA Systems
System Configurations
Microelectrode Arrays
Amplifier Specifications
14
14
14
15
5
Anatomical Details
16
6
References
17
Acute Hippocampus Slice
1
Introduction
1.1
About this Application Note
The intention of the MEA Application Notes is to show users how to set up real experiments
with the MEA System on the basis of typical applications that are used worldwide.
The documents have been written by or with the support of experienced MEA users who like
to share their experience with new users.
This application note includes a complete protocol for the dissection of rat brain, the
preparation of brain hippocampal slices for acute and long term experiments, suggestions for
long-term cultures, suggestions for MEA System configurations, and references.
1.2
Acknowledgement
Multi Channel Systems would like to thank all MEA users who shared their experience and
knowledge with us. A major part of this document is based on the instructions provided by the
laboratory of Dr.Ulrich Egert, Freiburg University, Germany.
Dr. Ulrich Egert
Institut für Biologie III
Albert-Ludwigs-Universität
Schänzlestrasse 1
79104 Freiburg i. Br.
Tel: +49 (761) 203-2862
Fax: +49 (761) 203-2860
URL www.brainworks.uni-freiburg.de
5
MEA Application Note
2
Material
2.1
Biological Materials
•
2.2
1 adult rat (for example Wistar Kyoto, Sprague Dawley, or Long Evans, P16–P24)
Technical Equipment
•
MEA System (with amplifier and data acquisition, see Suggested MEA System)
•
Stimulus generator
•
MEAs (microelectrode arrays)
•
Peristaltic pump
•
Ice
•
Stereo microscope
•
Inverted microscope (Necessary for aligning the electrode positions to the slice. If you prefer to
use an upright microscope, you need, for example, a camera and a stereo microscope for
documenting the electrode position. A picture of the slice on the electrode field can then be
loaded into the MC_Rack program for aligning the data traces to the electrodes.)
•
Oscillating microtome (for example, Integraslice, Campden, Dosalia) and blades
•
Adjustable pipettes and pipette tips (20 µL and 1000 µL)
•
Transfer pipettes (cut Pasteur pipettes with wide opening (approximately 0.5 cm)
•
Large sharp scissors or guillotine
•
Surgical instruments, for example a bone rongeur or scissors
•
Narrow flat spatula
•
Sharp forceps
•
Curved forceps
•
Small scissors
•
Razor blade
•
Filter paper tips (folded or thick filter paper cut in triangular shape)
2.3
Chemicals
•
Carbogen gas (95 % O2, 5 % CO2)
•
NaCl
•
KCl
•
CaCl2
•
KH2PO4
•
NaHCO3
•
D-Glucose
•
MgSO4
•
Super glue (cyanoacrylate)
•
100 % alcohol or acetone (for cleaning the MEA contact pads)
6
Acute Hippocampus Slice
2.4
Media
2.4.1 ACSF Buffer
NaCl
124 mM
KCl
3 mM
CaCl2
2 mM
KH2PO4
1.25 mM
NaHCO3
36 mM
D-Glucose
10 mM
MgSO4
1 mM
1. Prepare the ACSF buffer as listed above.
2. Aerate the medium with carbogen gas for 15 min.
3. Refrigerate 300 mL ACSF buffer until it is partially frozen.
4. Crush the frozen ACSF buffer thoroughly and oxygenate on ice until use.
Tip: To speed up the freezing and crushing of ACSF, you might consider to prepare ACSF ice
cubes in advance, and store the ice cubes at –80 °C until use.
7
MEA Application Note
3
Methods
3.1
MEA Coating
Depending on the type of selected MEA, various coatings may be applied to the MEA surface
to promote the adhesion of the slice. Suggestions for coating methods can be found in the
MEA User Manual available in the Download section of the MCS web site.
3.1.1 Planar Standard MEAs
Standard MEAs should be coated either with cellulose nitrate, with polyethylenimine (PEI), or
with poly-D-lysine.
3.1.2 3D-MEAs
Due to the three dimensional structure of the recording electrodes, these MEAs do not require
coating. However it is recommended to hydrophilize the surface by a two-minute plasma
cleaner treatment. As there is no coating applied, cleaning can be done by rinsing off the slice
with distilled water.
3.2
Setting Up the Vibratome
Note: As the design and handling of different vibratomes varies, please consult the manual of
your vibratome for more details.
1. Fill outer vibratome chamber with ice.
2. Fill vibratome chamber with frozen ACSF. You might need to add some room temperature
ACSF.
Figure 1
8
Vibratome overview: A Brain mounted on agar, and base plate B Oxygenation for
ACSF filled inner chamber C Ice filled outer chamber
Acute Hippocampus Slice
3.3
Decapitation and Brain Removal
The steps after step 2 should be completed within a minute or
less to avoid damage of the brain. Avoid mechanical stress on
the brain.
1. Anesthetize the rat, for example with 1 mL Isofluoran soaked
tissues in a 500 mL beaker covered with aluminum foil.
2. Decapitate the animal with large sharp scissors or a guillotine.
3. Cut the scalp with a scalpel along the midline from caudal to
rostral (see fig. A, B).
4. Pull down the skin along the sides of the head by grasping and
pulling it between thumb and index finger from below (see
fig. B).
5. Skull the cranium carefully with a scissor on ice as follows. This
method is simple and fast. It has the disadvantage that the
neocortex may get damaged during the procedure. This is
generally not a problem as the hippocampus is located inside
the temporal lobe and should be safe.
a. Midline all the way from foramen magnum to the front
end of the brain
b. Perpendicular to cut between forebrain and cerebellum
c.
Perpendicular to (a) along the front end of toward the
base of the brain
— OR — As an alternative method that allows obtaining an
almost undamaged brain:
Open the skull with a bone rongeur and carefully remove the
skull in pieces (see fig. C).
6. Proceeding from 5c: Fold the two skull segments toward the
sides.
7. Quickly remove the brain with the blade of a narrow spatula
(see fig. D, E).
8. Briefly wash the brain in a 100 mL beaker filled with ice-cold
ACSF buffer.
9. Place the brain in 200 mL ice-cold oxygenated ACSF for 10 min
to quickly cool it down (see fig. F).
9
MEA Application Note
3.4
Dissection
1. Place the brain with the dorsal side up
onto a filter paper in a Petri dish filled
with frozen ACSF.
2. Remove the cerebellum (cut A, see
fig. 1).
3. Cut the brain in sagittal plane and
separate the hemispheres (cut B, see
fig. 1).
4. Remove one hemisphere and store it in
cold ACSF until use.
5. Turn the other hemisphere onto the
sagittal surface.
6. Cut horizontally a small planar layer
from the dorsal side (fig. 2, cut C), in
parallel to the bisecting line of the
angle formed by the ventral and dorsal
area of the brain (see dotted lines,
fig. 2). Remove the dorsal piece, which
should be less than 2 mm thick, and
keep the ventral part for preparing the
slices.
7. Remove one third from the rostral end
from the forebrain to make the slices
smaller (cut D, see fig. 3 and 4).
10
Acute Hippocampus Slice
3.5
Preparing Slices
1. Glue the block of agar onto the
base plate with a very small drop of
superglue.
2. Place a very small drop of superglue
in front of the block. Make sure the
drop does not touch the agar.
3. Pick up the trimmed hemisphere
with a razor blade, thus that the
dorsal plane aligns with the blade.
4. Place the razor blade with the brain
against the front side of the agar
block and lower it towards the
plate (onto the glue). The blade
must not touch the glue.
5. Withdraw the blade with an
upward motion. You are now
looking at the ventral side of the
brain (see fig. 6).
6. Place the base plate with the brain
into the ACSF filled vibratome
chamber.
7. Remove about 3 mm with the first
cut — the hippocampus should
become visible now (see fig. 7).
8. Slice the brain according to the
recommendations of the
vibratome’s manufacturer. Typical
hippocampal slices are about 350–
450 µm thick.
9. Store the freshly cut slices in
oxygenated ACSF for at least 50 min
(use a transfer pipette and avoid
folding the slice).
11
MEA Application Note
3.6
Mounting the Slice onto the MEA
The recommended procedure described in the following instructions fixes the slice onto the
coated MEA by adhesion.
An alternative method uses small weights (of a few hundred milligrams) to hold down the
slice. This method is especially recommended if (uncoated) 3D-MEAs are used. However, this
method might stress the slice and result in an altered potential distribution and propagation.
You can use either self-made wire grids or a shim with a nylon mesh in the middle to apply the
weight. Some steel carriers with nylon meshes as slice hold-downs are also commercially
available (for example from Warner Instruments, www.warneronline.com).
Commonly used custom made weights are U-shaped flattened pieces of platinum wire (80–
120 mg) glued onto a mesh, a sort of nylon stocking or wedding veil, for example. You can also
glue another platinum wire from the other side of the mesh, symmetrically to the first piece of
platinum. This kind of grid is less damaging because you can vary the pressure on the slice by
changing the thickness of the second wire. The thickness of the wire that is placed onto the
slice should match approximately the thickness of the slice. If you use 350 µm slices, the wire
should be around 300 µm and not more than 350 µm; otherwise the grid will not hold the slice.
Important: Do not touch the slice directly. The slice should not be folded to avoid damage to
the tissue. Be careful not to touch the MEA surface with the transfer pipette to avoid damage
to the electrodes.
1. Place the slice and a drop of ACSF with the transfer pipette
onto the MEA; center it roughly on the recording area.
2. Position the slice by gently pushing it with a pipette tip from
the sides into place (see fig. A). The CA1 region should cover
the recording area.
3. Remove the ACSF solution to fix the slice onto the MEA: Hold
the slice in position with a small pipette tip along the side and
remove excess buffer with a 1 mL pipette.
4. Place a filter paper tip next to the slice — without touching it
— and remove all remaining buffer (see fig. B and C). This step
is critical and should be performed both quickly and carefully.
The slice should be almost dry after this step. Repeat this step
if necessary, until the slice is attached to the MEA surface.
5. Cover the slice with a few drops of ACSF immediately (see
fig. D)— the buffer should be pipetted onto the slice carefully
right from the top, rather than from the side, to avoid that the
slice is floating up. Avoid falling drops that can damage the
tissue.
— OR — If you prefer the alternative method of applying
weights:
→ Position the slice in the desired position with approximately
200 µL ACSF left, then apply the weight and add oxygenated
ACSF. Some MEA users prefer to nearly dry the hippocampal
slice on the array with filter paper wedges; others find it not
necessary when using weights and prefer to change the
position of the slice if the MEA culture chamber is filled with
ACSF.
12
Acute Hippocampus Slice
3.7
Preparations for Recording
Note: We recommend the perfusion cannula with temperature control (PH01) for optimal
environmental conditions. A two-channel temperature controller (TC02) allows to control both
the MEA temperature (via the heating integrated into the amplifier) and the buffer
temperature.
See the MC_Rack manual or online help for detailed application examples (for example, LTP
experiments). For connecting and programming the stimulus generator (STG), please see the
respective user manual. Please see the MEA User Manual for details on stimulation amplitudes
and times that are supported by the MEA electrodes. Though TiN electrodes are very stable, an
unsuitable stimulation pulse will irreversibly damage the electrodes.
We highly recommend the following preparations and tests before you start the experiment.
1. Test all connections.
2. Define your virtual rack specific to your application with the MC_Rack program and test it
before use.
3. Define your stimulation file with the MC_Stimulus program and test it with the test model
probe and with an MEA filled with recording buffer before use. It is recommended to test a
range of stimulus amplitudes and locations prior to starting your actual experiment. If you are
using an external stimulating electrode, the position of this electrode should be optimized in
this step as well.
4. Set up the perfusion system, and test the perfusion with an old MEA. Adjust the grounding and
shielding to avoid noise pickup and 50 Hz hum.
5. Set the temperature controller to 37 °C for heating the MEA culture chamber and to 32 °C for
the buffer temperature.
6. Start carbogen aeration 15 min before mounting the slice.
7. Start the perfusion 15 min before mounting the slice at a low flow rate (0.5 exchanges/min) to
maintain a stable oxygenation and pH.
8. Clean the MEA contacts with a soft tissue and pure alcohol or acetone.
9. Mount the MEA with the slice onto the amplifier as described in the MEA amplifier user
manual.
10. Superfuse the slice with oxygenated ACSF solution prewarmed at 32 °C. The buffer volume
should be exchanged 3–4 times per minute. The slice is mechanically stressed by activating the
perfusion and should be perfused for about half an hour before recording. You can also
control the parameter that you want to record, and start the recording as soon as you get a
stable baseline, for example, as soon as the spike rate has stabilized.
You are now ready for recording.
13
MEA Application Note
4
Suggested MEA Systems
4.1
System Configurations
Depending on the throughput and the analysis requirements desired in your laboratory,
different system configurations are recommended for the recording from acute hippocampus
slice preparations.
•
MEA60-Inv-System-E: 60-channel MEA recording system for inverted microscopes. The
temperature controller TC01/ TC02 regulates the temperature of the MEA and of the
perfusion fluid via the perfusion cannula PH01. One MEA amplifier allows recording up to
60 channels from one MEA. The three additional analog inputs can be used for feeding in data
generated by other systems recording in parallel, for example, for patch clamp data. The
additional digital inputs can be used for synchronizing the recording with the stimulation, or
with external systems. This is the standard configuration for low-throughput academic research
and high flexibility for a wide range of applications.
•
MEA60-Inv2-System-E: This system operates 2 MEA amplifiers with a 64-channel data
acquisition card. It allows the recording of software-selectable 30 channels per MEA, on two
MEAs in parallel.
•
MEA120-Inv2-System-E / MEA60-Inv4-System-E: These systems are based on a 128 channel
data acquisition card and allow the simultaneous operation of two / four amplifiers. These
systems provide a throughput suitable for both basic research and industrial applications.
4.2
Microelectrode Arrays
Available MEAs differ in electrode material, diameter, and spacing. For an overview on
available MEA types please see the Multi Channel Systems web site
(www.multichannelsystems.com) or contact your local retailer.
The microfold structures formed by titanium nitride (TiN) result in a large surface area that
allows the design of small electrodes with a low impedance and an excellent signal to noise
ratio.
For recordings from the CA1 region, a medium spatial resolution with an electrode diameter of
30 µm and a spacing of 200 µm is generally sufficient. For slice preparations from juvenile rat
or adult mouse, a spacing of 100 µm can be useful for increasing the spatial resolution. The
following MEAs are recommended for the recording of local field potentials and/or spikes from
acute hippocampus slices.
•
MEA 200/30 i. r.: Standard 8 x 8 layout, TiN electrodes for recording and stimulation, with
substrate-integrated reference electrode.
•
ThinMEA 200/30 i. r. for high-resolution imaging and combination with intracellular calcium
measurements. ThinMEAs are only 180 µm “thick” and mounted on a robust ceramic carrier.
Tracks and contact pads are made of transparent ITO.
•
3D MEAs with tip shaped electrodes generally do not need a precoating. 3-D MEA sensors
were specifically designed for acute slices, because the three-dimensionally shaped electrodes
penetrate dead cell layers. The platinum electrodes have a diameter of about 40 µm at the
base, ending in a fine small tip, with a total height of approx. 50 µm. The interelectrode
spacing is 200 µm.
14
Acute Hippocampus Slice
4.3
Amplifier Specifications
Though amplifiers with custom gain and bandwidth are available, Multi Channel Systems
recommends the following settings for this application.
•
Lower cutoff frequency: 10 Hz
With an even lower value, slow signal drifts will disturb the recordings and spike detection.
With 10 Hz, field potentials and spikes can be recorded in parallel. For pure spike recording, a
lower cutoff of at 300 Hz would be suitable. However, you can remove local field potentials by
digital filtering with the MC_Rack program later.
•
Upper cutoff frequency: 3 kHz
Sufficient even for rapid depolarization waveforms. If only field potentials are of interest, a
reduction of the upper cutoff frequency might be considered to reduce high frequency noise.
•
Gain: 1200 (MEA1060) or 1100 (MEA1060-BC)
A note on gain: Traditional amplifiers for extracellular recordings often have 5000x or
even 10000x gain switch options. A high gain, however, increases the high frequency noise
level or requires a narrower filter band. Considering a 20 µV extracellular signal, we would
receive 24 mV after a 1200x amplification. An AD converter with an input range set from –
400mV to 400 mV will resolve the signal in increments of 0.36 µV, which will definitely
provide enough information, given the noise level of such systems in general. Therefore,
there is no need for higher amplifications.
15
MEA Application Note
5
Anatomical Details
The following figures illustrate the position of the hippocampus, slicing levels and the location
of the most important functional regions.
Figure 2
A View on a mouse hippocampus from the top. The right hemisphere of the
neocortex is removed. B Close up view from the right.
Figure 3
Hippocampus slice mounted on a standard 200/30 MEA
16
Acute Hippocampus Slice
6
References
Egert, U., D. Heck, et al. (2002). "Two-dimensional monitoring of spiking networks in acute brain
slices." Exp Brain Res 142(2): 268-74.
Egert, U., T. Knott, et al. (2002). "MEA-Tools: an open source toolbox for the analysis of multi-electrode
data with MATLAB." J Neurosci Methods 117(1): 33-42.
Heuschkel, M. O., M. Fejtl, et al. (2002). "A three-dimensional multi-electrode array for multi-site
stimulation and recording in acute brain slices." J Neurosci Methods 114(2): 135-48.
Stett, A., U. Egert, et al. (2003). "Biological application of microelectrode arrays in drug discovery and
basic research." Anal Bioanal Chem 377(3): 486-95.
Wirth, C. and H. R. Luscher (2004). "Spatiotemporal evolution of excitation and inhibition in the rat
barrel cortex investigated with multielectrode arrays." J Neurophysiol 91(4): 1635-47.
17