1
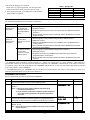
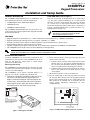
Table 1 - Wiring Table
5. Reattach the keypad to its case back.
Attach the top of the keypad first, and then press the
bottom section down until it snaps into place securely.
Keypad
▲ G (Data Out)
+
▼ Y (Data In)
6. Peel off protective film on the LED panel and install the
keypad labels as required.
Control Panel
Data In
-Aux Pwr (GND)
+Aux Pwr
Data Out
Wire Color
Green
Black
Red
Yellow
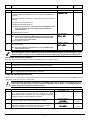
APPLICATION GUIDELINES FOR THE 6160RFPL2
Use the following guidelines when planning an installation:
If…
This is the only
transceiver on
the system,
There is another
receiver or
transceiver on
the system,
And…
You want to use both
the receiver and
transmitter function
on a single-partition
system,
• Set the keypad to a device address assigned to the desired partition.*
• Enable the receiver.
• Program a system House ID in the control panel (this will enable the transmitter
Then…
You want to use only
the transmitter
function on a second
partition,
• Set the keypad to a device address assigned to the desired partition.*
• Disable the receiver.
• Program a DIFFERENT House ID in the 6160RFPL2 than is programmed in the
•
•
You want to use only
the transmitter
function on a singlepartition system,
function).**
Set the wireless devices that will communicate with this 6160RFPL2 to the same
system House ID.
control panel.*/ **
Set the wireless devices that will communicate with this 6160RFPL2 to the same
House ID as the 6160RFPL2.
• Set the keypad to a device address assigned to the Partition 1.
• Disable the receiver.
• Program a House ID in the 6160RFPL2 that matches the system House ID
•
programmed in the control panel.*
Set the wireless devices that will communicate with this 6160RFPL2 to the same
House ID.
Notes:
* On VISTA-40 panels and above, wireless keypads (e.g., 5828V) can only be used on a single partition. This partition is
programmed in field 1*48, and must match the partition assigned to the 6160RFPL2. Wireless keys can be used on more than
one partition, using a House ID programmed in the 6160RFPL2 and the devices. In this case, the wireless keys must be assigned
to the same partition as the 6160RFPL2.
** On VISTA-20P panels, the 6160RFPL2 will use the House ID programmed in the panel for the partition to which it is
assigned. Wireless keypads can only be used on Partition 1.
PROGRAMMING THE 6160RFPL2
Refer to the following procedure to program the 6160RFPL2:
STEP
1.
2.
DESCRIPTION
Enter the program mode by pressing the [1] and [3] keys simultaneously
for a few seconds within 60 seconds after applying power.
(Keypad Address) Enter the two-digit keypad address. Press the [✱] key to
continue.
DISPLAY
CHOICES
CON ADDRESS = XX
00-31
Notes: (1) Refer to the control panel’s installation instructions for the
acceptable keypad addresses.
(2) On the VISTA-40 and above the 6160RFPL2’s partition assignment
must match the RF keypad partition assignment programmed in
field (1*48).
3.
(Receiver Enable) Enter [1] to enable, or [0] to disable Receiver. Enable the
receiver if RF transmitters or wireless keypads are programmed into the
control and no other receivers are enabled. Press the [✱] key to continue.
RECEIVER
ON [0= OFF]
1= ON
0 = OFF
4.
(Receiver Address) If receiver is enabled, enter the two-digit receiver
address. (01-30).
REC ADDRESS= XX
00-30
Note:
Refer to the control panel’s installation instructions for the acceptable
receiver addresses.
-2-