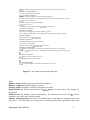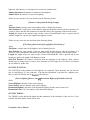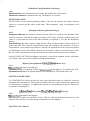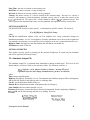
1
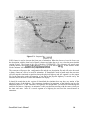
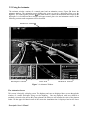
This paper has been mechanically scanned. Some
errors may have been inadvertently introduced.
INSTITUTE OF TRANSPORTATION STUDIES
UNIVERSITY OF CALIFORNIA, BERKELEY
SmartPath User's Manual
Farokh Eskafi
Delnaz Khorramabadi
California PATH
University of California, Berkeley
June 1994
~~-
..................
H
PATH TECHNICAL NOTE 94-2
This work was performed as part of the California PATH Program of
the University of California, in cooperation with the State of California Business, Transportation, and Housing Agency, Department of
Transportation; and the United States Department of Transportation,
Federal Highway Administration.
The contents of this report reflect the views of the authors who are
responsible for the facts and the accuracy of the data presented herein.
The contents do no necessarily reflect the official views or policies of
the State of California. This report does not constitute a standard,
specification, or regulation.
SrnartPath User’s Manual
Farokh Eskafi
[email protected]
Delnaz Khorramabadi
195M Cory Hall
Berkeley, CA, 94720
(5 10) 643-5 190
[email protected])
Department of Electrical Engineering
and
Computer Sciences
University of California, Berkeley
April 1994
(version2.0)
Index
1- Getting Started
1.1- Compiling SmartPath
1.2- Running SmartPath
1
1
2
2- SmartPath Simulator
2.1- Simulator Input File
2.2- Simulator Output File
2.3- Simulator Error File
3- Smartpath Animator
3.1- Using the Converter
3.2- Using the Animator
3.3- Using the Animator in Interactive Mode
11
11
15
23
References
Acknowledgements
25
26
Smartpath User’s Guide
SmartPatlz is a simulator for an Automated Highway System (AHS) [ I ] [2]. A technical description
of the system can be obtained from the authors. SmartPath can be used in two modes: batch or
interactive. In batch mode the user specifies all simulation parameters in a file and runs the simulator
to generate vehicle data. The data could then be converted to animation format and visualized with the
animator or used for other analyses. In the interactive mode the simulator, converter and animator run
simultaneously allowing users to control vehicle maneuvers in real time. This document contains
instructions on how to compile, run and use all modules of SmartPath in both modes.
1- Getting Started
The SmartParlz software package includes source code and libraries? required for compilation,
sample configuration files and demo scripts. When you install SmartPath the following directories
and files will be created for you:
bin: contains all executables
damcontains sample configuration files for SmartPath
demos: contains script files for running SmartPath
doc: contains Postcript format of this manual
includes: contains include files for external libraries required for compilation
libraries: contains all libraries required for compilation and other files used by SmartPath
src: contains source files for three modules of SmartPath
Makefiksgi: makes executables for the SGI platform
Makefile,surz: makes executables for the Sun platform
The simulator module of SmartPath could be compiled and run on Sun Sparc stations and Silicon
Graphics (SGI) Indigo workstations. The animator uses the SGI GL library and runs only on the SGI
platform. The source code is the same for all platforms and both modes (batch and interactive).
Customized makefiles are provided to simplify compilations for different platforms and modes.
1.1- Compiling SmartPath
To compile the SmartPath modules you can either use the makefiles in each module’s source code
directory or use the two makefiles (Makefile.sgi and Makefilesun) that reside in the top directory of
SmartPath. Makefile.sun will compile the simulator and converter modules for the Sun platform and
Makefle.sgi will compile all modules for the SGI platform. For example, to compile all modules for
f One of the libraries required for compilation of the SmartPath simulator is the CSIM libray. CSIM
can be aquired from Herb Shwetman ([email protected]) or from MCC ([email protected]). We
made a few changes to this library which is documented in the README file of libraries directory.
Smartpath User’s Manual
1
the SGI platform use the command:
make -f Makefilesgi
or make -f Makefilesgi batch
The default compilation is for batch mode. The above command will create the executables sm-sim,
sm-convert and sm-anim and will place them in Smartpath’s bin directory. If you want to compile
SmartPath to run in interactive mode use the command
make -f Makefile. sgi interactive
The above command will create the executables sm-sim-i, sm-convert and sm-anim-i and will place
them in Smartpath’s bin directory. Note that the converter is the same for both modes.
1.2- Running SmartPath
The simplest way to run SmartPath is to use the demo scripts that reside in the demos directory. The
scripts that run SmartPath in batch mode have a .b extension and the scripts that run in interactive
mode have a .i extension. Each script uses a different configuration file. The configuration files reside
in the data directory and have a .config extension.
To run SmartPath it is necessary to set the environment variable SMARTPATH to the directory
where SmartPath has been installed. SmartPath requires various files to run properly and will use this
variable to locate the files. For example if you have installed SmartPath in /usr/people/joe use the
command:
setenv SMARTPATH /usr/people/joe/smartpath2.0
The second step to run SmartPath is to prepare a file containing simulation parameters. Several
sample files are provided in directory $SMARTPATH/data. They all have a .config extension.
The remaining steps depend on the the mode in which you want to run SmartPath. In batch mode the
simulator should be run first to generate simulation data. Next the converter is used to convert this
data along with the highway configuration data to animation format. Finally the animator can be run
with the converted data.
In the interactive mode, the simulator and the animator execute in parallel and the conversion of
simulation data to animation format is carried out by the simulator as the data is being generated.
However, you still need to use the converter to convert the highway configuration data to animation
format. Step by step instructions on how to run both modes will follow.
To run SmartPath in batch mode:
Run sm-sim, the simulator, with the simulation file to generate the simulation data. The name of the
input file should be provided as the first argument and the name of the output file should follow. For
example to generate the output file anim.doc from the simulation file sim.confg:
Smartpath User’s Manual
2
sm-sim
sim. config
anim.doc
Run sm-convert, the converter, to translate the simulation output data and the highway configuration
into a format suitable for the animator. The converter requires the simulation parameter file
(simconfig), the output of the simulator (anim.doc) and a third optional file. The optional file is
called car.ug and contains the geometry of a car to be used in the animation. The converter will look
for this file in the current directory and the directory $(SMARTPATH)Aibruries/models.If this file is
not found then the animator will use a simple description to draw the cars. The converter will create
one file for animation in binary format. The output file name used here is called unim.datu. To run the
converter use a command such as:
sm-convert -c sim.config
-0
anim.data anim.doc
Run sm-anim, the animator, to see the animation. The animator uses the animation file generated by
sm-converr. It has two optional arguments. The - 1 option will cause all data to be loaded in memory.
This option should be left out if the size of the animation data exceeds the available memory. In this
case data for each time interval will be read from the disk and displayed. The -i option lets you
specify an index file that has information about interesting points in the animation. Sm-unim requires
three other files to run properly. The first file is times.rb, a 3D font file. The second file is
sm-colortable, a color table file for the cars. And the third file is dashboard.bw, a gray scale image
of a car’s dashboard which will be texture mapped to a car if the viewer chooses to go inside the car.
Sm-anim will look for these files in the current directory or will use the environment variable
$SMARTPATH to locate them. To run the animator use a command such as:
9
sm-anim -1 anim.data
To run SmartPath in interactive mode:
Run sm-converr, the converter, to convert the highway configuration data into a format suitable for
animation. As explained in the instructions for batch mode the converter requires a car description
file in addition to the highway configuration file. The converter will process the files and create one
file for animation in binary format. To run the converter with the input file sirn.config and generate
the output file animdata use a command such as:
snz-convert -c sim.config
-0
anim.data
Run mr-sim, the simulator, with the simulation file sim.config. If you are running the simulator and
the animator on the same machine you should run the simulator in the background. For example to
run the simulator with the input file sim.config use the command:
SmartPath User’s Manual
3
sm-sim-i
sim.con.ig &
Run sm-anim, the animator, next. The animator requires the file generated by sm-convert. You
should use the -w option to specify the name of the machine that the simulator is running on. As
described in the batch mode instructions sm-anim-i requires various files to run properly. To run the
animator in parallel with a simulator running on machine machinel use the command:
sm-anim-i
-w machinel anim.data
2-SmartPath Simulator
The SrnarrPath simulator requires an ascii input file that specifies simulation parameters such as
highway configuration, timing and platooning constraints. The output of the simulator in batch mode
is an ascii format file that contains information about the position, speed and maneuvers of each car
for the specified simulation time. In interactive mode the output of the simulator is sent directly to the
animator for viewing. The simulator also creates an error file (with the suffix .error appended to the
configuration file name) for each simulation run. In this section the format of the input, output and
error files will be described.
2.1- Simulator Input File
Figure 2.1 shows the format of the input file. Input parameters are divided into seven sections. Each
section starts with a heading containing the word SECTION and the section name. The sections
CONFIGURATION, JUNCTION, TIMING, PLATOON, CARCREATION and MANEUVER are
used by the simulator and the sections CONFIGURATION, JUNCTION and GEOMETRY are used
by the animator. A detailed description of the parameters in each section will follow.
SECTION CONFIGURATION :
The CONFIGURATION section defines parameters pertaining to the highway topology. It starts by
defining the number of highways in the network and their lane width. The format is:
[Number Highways] [Lane Width]
where
Number Highways: total number of highways.
Lane Width: the width of each lane in meters. This width applies to all highways.
Each highway will be described by two lines:
[Highway Name] [Highway Length] [Section Length] [Illegal Distance]
[Nuntber Lanes] [ Number Automated Lanes] [Number Entrances] [Number Exits]
Smartpath User’s Manual
4
//This is a comment. Substitute appropriate values for parameters inside brackets
SECTION CONFIGURATION
[number of highways] [lane width]
//one record for each highway
[highway name] [length] [section length] [illegal distance]
[number of lanes] [number of automated lanes] [number of entrances] [number of exits]
//one line for each entrance
[entrance name] [start position] [length]
//one line for each exit
] distance]
[exit name] [start position] [length] [ v e l o c i ~[exit
//record for next highway
SECTION JUNCTION
//one line for each highway and lane that has a junction
[source highway name] [lane number] [destination highway name] [lane number]
SECTION TIMING
[total simulation time] [granulari~]
SECTION PLATOON
[intraplatoon distance] [detection range]
//one line for each highway
[highway name] [target speed][target platoon size]
SECTION CARCREATION
//one line for each highway or entrance on which you want cars to be generated
[highway name] [entrance name or START] [start time] [end time] [interval] [velocity]
//
SECTION MANEUVER
None line for each car that wants to exit
[car id] [highway name] [exit name]
//
SECTION GEOMETRY
//one record per highway which will be described in section 3.1
Figure 2.1- The format of the simulator input file
where
Highway Name: a unique name used to identify the highway.
Highway Length: the length of highway in meters.
Section Length: the length of a section in the highway in meters.
Illegal Distance: the distance measured from the endof highway in meters where lane changes are
not allowed.
Number Lanes: the number of lanes in the highway. The innermost lane will be lane #1 and the
outermost lane will be lane #[Number lanes].
Number Automated Lanes: the number of automated lanes in the highway. Automated lanes start
from lane # l . The lanes that are not automated are called transition lanes. SmartPath requires that
Smartpath User’s Manual
5
highways with entrance or exit ramps have at least one transition lane.
Number Entrances: the number of entrances in the highway.
Number Exits: the number of exits in the highway.
If there are any entrances, they are described in the following format
[Entrance Name] [Start Position] [Length]
where
Entrance Name: a unique name in the highway used to identify this entrance.
Start Position: the start position of the entrance ramp which should coincide with the beginning of a
section. If it does not then the simulator will round the value to the beginning of the nearest section.
Length: the length of the entrance ramp. In this version of SmartPath this value is ignored and all
entrance lengths are equal to the length of the highway section.
If there are any exits, they are described in the following format
[Exit Name] [Start Position] [Length] [Start Exit Distance]
where
Exit Name: a unique name in the highway used to identify this exit.
Start Position: the start position of the exit ramp which should coincide with the beginning of a
section. If it does not then the simulator will round the value to the beginning of the nearest section.
Length: the length of the exit ramp. In this version of SmartPath this value is ignored and all exit
lengths are equal to the length of the highway section.
Start Exit Distance: the distance, measured from the beginning of the highway, when vehicles
should begin to change lanes in order to leave from this exit. The supervisor of a vehicle will initiate
an exit maneuver at this time.
SECTION JUNCTION :
The JUNCTION section defines how the highways are connected. There should be one line for each
lane in each highway if it has a junction. If no junction information is provided for a highway lane,
then it is inferred that the lane is a deadend. The format is
[Source Highway] [Source Lune #] [Destination Highway] [Destination Lane #]
where
Source Highway: the name of the source highway.
Source Lane #: the lane number in the source highway.
Destination Highway: the name of the destination highway that the source connects to.
Destination Lane #: the lane number in the destination highway.
SECTION TIMING :
The TIMING section defines the length and the granularity of the simulation. It has one line. If you
omit this line then default values will be used.
Smartpath User’s Manual
6
[Simulation Time] [Simulation Granularity]
where
Simulation Time: total simulation time in seconds. The default value is 60 seconds.
Simulation Granularity: simulation time step. The default is 0.1 seconds.
SECTION PLATOON
The PLATOON section defines platooning features. The first line specifies the distance between
vehicles in a platoon and the vehicle sensor range. These parameters apply to all platoons on all
highways.
[Intraplatoon Distance] [Detection Range]
where
Intraplatoon Distance: the distance in meters between vehicles in a platoon. The minimum value
should be one meter. Note that the length of a vehicle is five meters, so that the distance between the
center of a vehicle and the center of the vehicle behind it in a platoon is five plus the intraplatoon
distance.
Detection Range: the range in meters within which a vehicle can detect another vehicle in front of it
in the same lane. This is also the communication range. The minimum value should be 35 meters.
This parameter is used in the merge maneuver, and plays an important role in the steady state platoon
size distribution, because if the distance between two consecutive vehicles exceeds this range, so that
the rear vehicle cannot detect the front one, then the two vehicles will not merge into one platoon.
In the PLATOON SECTION each highway can specify a value for the optimum velocity and platoon
size. Default values are used for a highway missing this information.
[HighwayName] [Optimum Velocity][Optimum Platoon Size]
where
HighwayName: the name of the highway.
Optimum Velocity: The optimum velocity in metershecond for the highway. The default value is 20.
Optimum Platoon Size: The optimum platoon size for the highway. The default value is 20.
SECTION CARCREATION
The CARCREATION section specifies the time, place and interval that cars should be created in
automated lanes and entrances. This section can contain one line for each automated lane and one line
for each entrance of a highway. If a highway does not have a corresponding line then no vehicles will
be generated in that highway.
[HigltwayName] [Place] [Start Time][End Time][Interval] [Velocity]
where
HighwayName: the name of the highway.
Place: the place at which cars should be created. This can either be the name of an entrance or the
string AUTO to specify car creation for the automated lanes of the highway.
SmartPath User’s Manual
.
7
Start Time: the time in seconds to start creating cars.
End Time: the time in seconds to stop creating cars.
Interval: the interval in seconds at which cars are generated.
Velocity: the initial velocity of a vehicle created on this entrance ramp. As soon as a vehicle is
created it will attempt to reach the highway optimum velocity since it is under the control of the
tracking feedback law. The value of the velocity should be within 10 m/s of optimum velocity. This
value is ignored for automated lanes since cars are generated with optimum velocity in these lanes.
SECTION MANEUVER
The MANEUVER section is used to specify a destination for specific vehicles. The format is
[Car Id] [Highway Name] [Exit Name]
where
Car Id: the identification number of the car. The simulator will assign consecutive integers as
identification numbers to cars. You might have to run the simulation once to observe the id pattern of
cars and make sure that the car you specify to leave a highway at an exit is generated before the exit .
Highway Name: the highway name that contains the exit that the car should use.
Exit Name: the name of the exit
SECTION GEOMETRY
This section is used to specify a geometry for the network of highways. It is used only for animation
and will be explained in the next section
2.2- Simulator Output File
The simulator output file is generated when SmartPath is running in batch mode. This file is in ascii
format and has one line for each car for each unit of time. The format of each line is
time, highway, car id, platoon id, lane #, distance, message id, speed,
regulation layer law, lane change, destination lane, partner, acceleration
where
Time: current simulation time.
Highway: the highway ID that the car is in. The animator and simulator assign an ID to each highway
and use this ID, instead of the highway name, to exchange data.
Car Id : the identification number of the car.
Platoon Id: the identification number of the platoon the car belongs to.
Lane Number: the lane number that the car is in.
Distance: the distance in meters that the car has traveled measured from the beginning of highway.
Message Id: the id of the message that the car is sending. These are:
1 Request-Change-Lane
2 Ack-Request-Change
3 Decel-Your-Plat
Smartpath User’s Manual
16 Abort-Maneuver
17 Request-Merge
18 Ack-Request-Merge
8
4 Comp-Decel
5 Req-Promise
6 Ack-Promise
7 Start-Change
8 Not-Able-Change
9 Comp-Change
10 Request-Split
11 Ack-Req-Split
13 Split-Plat
14 Split-Begin
15 Split-Comp
19 Nack-Request-Merge
20 Comp-Merge
21 Busy
22 Not-busy
23 Updatecars
24 Update-Comp
25 Req-update-bcar
26 Ack-update-bcar
27 Change-head
28 Endchange-head
Speed: the current speed of the car in meterslsec
Regulation Layer Id: the id of the regulation layer law that the car is executing. The following laws
are currently implemented:
5 AccelMerge
6 SplitFree
7 DecelChange
8 Splitchange
9 MoveToAdjacent
10 AiccLead
11 FollowerLaw
Lane Change: specifies if the car is changing lane and the stage of change lane. Can have 4 values:
0
7
8
9
Idle
Start change lane
Abort change lane
Complete change lane
Destination Lane: the lane that the car is trying to change lane into.
Partner: the id of the car that this car is sending a message to.
Acceleration: the current acceleration in metershec 2 of the car.
2.3- Simulator Error File
Whenever you run a simulation an error file with the extension .error will be generated. The error
file records information about the errors occurring during simulation. Six events cause error message
to be written to this file. These errors and the action that the simulator will take in each case are
described below:
1- A vehicle ID that does not exist is specified in the MANUEVER section of the configuration file
to exit. The simulation proceeds without change. You should check the CARCREATION section of
the configuration file to figure out the total number of cars being generated in the simulation and
choose an ID less than this number.
2-A vehicle is unable to enter the transition lane before it reaches the end of entrance ramp. This may
happen when there is too much traffic in the transition lane, or the ramp length is too short. The
vehicle gracefully deletes itself from the highway and the simulation proceeds.
SmartPath User’s Manual
9
3- A vehicle is unable to leave from its designated exit ramp. The vehicle then chooses the next exit
ramp. If there is no such exit ramp, the vehicle moves along the transition lane until the end of the
simulation.
4- Two vehicles occupy the same location in the simulator’s discretization of highway locations. This
may represent a crash. The simulation continues, but one must be careful in interpreting what the
results mean after the “crash”,especially if it occurs during a maneuver.
5- A vehicle reaches the end of a highway that has no junctions. This will halt the simulation. You
should find the highway that the car is falling off of and either connect it to another highway or
increase its length.
6- A vehicle receives an event or a message that could not be interpreted. The cause of this error
could be an earlier crash in the highway or a programming error. In this case we request that you
document the error and forward it along with the input file to the authors.
Smartpath User’s Manual
10
3-Smartpath Animator
The SmartPath animator is a tool to view and examine the simulated data of the Automated Highway
System (AHS) in the most natural way. The data provides information about the position, speed and
maneuvers of each vehicle in the AHS at every unit of simulation time. With the animator, the user
views this data as if from the window of a traffic helicopter flying over the AHS. In addition, the user
can select a vehicle and view the protocol messages exchanged by vehicles engaged in a maneuver.
The user can control the motion of the helicopter, rewind the animation, and adjust its speed. The
motion of the helicopter can be restricted to the highway or forced to follow a specific car. This
feature allows close observation of message passing between cars.
The animator can be used either in batch mode or interactive mode. In batch mode the animator
displays precomputed data. In the interactive mode the animator executes in parallel with the
simulator and, in addition to the batch mode features, it provides the user with added interfaces to
control vehicles in the highway and interact with the simulator in real time. The user interface for
both modes is very similar and is explained in section 3.2. The additional features of the interactive
animator are described in Section 3.3.
The animator requires a description of the highway network and the simulation data. The highway
configuration is defined by the user in a file and the simulation data is generated by the simulator
module of SmartPath. This data should first be converted to a format suitable for animation. Section
3.1 explains details on how to convert this data to animation format.
3.1-Using the Converter
The main task of the converter is to compute a polygonal description for the highway network and
map the simulated car position data to each highway. The simulated car data is generated for an
abstract network of highways. The simulator works with general highway features such as their
lengths, number of lanes, ramps and junctions. The position of each car is computed as a lane
number and some distance traveled along a highway. This information is not sufficient for animation.
The animator needs exact geometric information for the highways and the cars moving on them.
To perform the conversion the converter needs three files. The first file contains the simulation
parameters. This should be the same file used to generate the simulation data. The converter uses the
sections CONFIGURATION, JUNCTION and GEOMETRY of this file. The format of the first two
sections are described in section 2.1 of this manual. The GEOMETRY section which is intended for
the animator will be described here.
The geometry specification should appear after the section heading SECTION GEOMETRY. Figure
3.1 shows the format of the GEOMETRY section. Each highway should have one geometry record.
The geometry of a highway is constructed by dividing the highway into an arbitrary number of line
/flhis is a comment
section GEOMETRY
//record for highway I
[highway name] [number of segments] [initial x][initial y ] [initial z ] [initial slope]
//one line for each segment
[ L or A ] [length] [radius] [R or L ] [elevation increase]
Figure 3.1- Format of the GEOMETRY Section
Smartpath User’s Manual
11
and alc segments. The length of all segments should add up to the length of the highway. A line
segment is defined by its length parameter and gradient. An arc segment is defined by its length,
radius, direction of curvature and gradient. You do not need to explicitly specify the initial and final
coordinates for each segment. The converter will compute these coordinates ensuring that segments
join with the same slope and ar the same elevation. However, you need to specify the initial
coordinate and slope of one and only one of the highways.
The GEOMETRY section contains one record for each highway. A record starts with a line stating
the name of the highway and the number of segments it contains. One of the highways should contain
its initial position and slope at the end of this line. The format of the first line is:
[Highway Name] [Number of Segments]
or
[Highway Name] [Number of Segments] [Initial x] [Initial y] [initial 21 [initial slope]
where
Highway Name: the name of the highway.
Number of Segments: the number of segments the highway is going to be divided into.
Initial x: the x coordinate of the beginning (first segment) of this highway.
Initial y: the y coordinate of the beginning of this highway.
Initial z: the z coordinate of the beginning of this highway.
Initial slope: the slope of the beginning of this highway in the xy plane.
For each segment of the highway a line describing the segment should follow. The format is:
L [Line Length] [Gradient]
or
A [Arc Length] [Arc Radius] [Arc Curvature Direction] [Gradient]
where
L: specifies that this segment is a line.
Line Length: the length of the line in meters.
Gradient: the gradient angle of the segment in degrees.
A: specifies that this segment is an arc.
Arc Length: the length of the arc in meters.
Arc Radius: the radius of the arc in meters. A reasonable radius for highways should be at least 300
meters. This radius is used to compute the innermost lane of the highway, i.e., lane #1.
Arc Curvature Direction: this can be either R (curving to the right) or L (curving to the left).
The converter will use the above information to compute a polygonal representation for all highways.
The layout of the highway will start from the highway that has its initial coordinates specified. We
will call this highway H W O . These coordinates specify the beginning of the first segment of
HWO.The converter will compute the coordinates of the end of this segment and will use it as the
beginning of the next segment. When all the segments of H W O are processed the converter will use
the information in the JUNCTION section to find the highways that are connected to HWO. The end
coordinates of the last segment of HWO will serve as the beginning of the highways that are
connected to HWO. This search and processing of highways is continued until all highways are
processed. The converter expects your highway configuration to be a connected network so all
highways could be reached from the first highway.
The converter will also compute the position of highway fixtures such as entrance and exit signs,
distance markers, lamp posts and railings for elevated segments at regular intervals.
SmartPath User’s Manual
12
/ ! h i s is a cumment
//each section should start with string SECTION and the section name
SECTION CONFIGURATION
//#highways, lane width
3 3
//highway name, length, section length, illegal distance
HWI 1000 200 100
//# lanes,# automated lanes, # entrances, # exits
3 2 1 1
Marina 200 200
//entrance name, start position , length
Ashby 600 200 200
//exit narne,start position, length, start exit distance
H W2 500 200 50
//highway name, length, section length, illegal distance
//# lanes,# autolanes, # entrances, # exits
2 2 0 0
HW3 400 200 50
//highway name, length, section length, illegal distance
2 I 0 0
//# lanes,# autolanes, # entrances, # exits
SECTION JUNCTION
HWI I HW2 1
//lane one of HWI goes to lane I of HW2
HWI 2 HW2 2
HWI 3 HW3 I
SECTION GEOMETRY
HWl3OOOO
//highway name, # segments, initial x, y , z, slope
L 1502
//Line, line length, gradient
//Arc, arc length, radius, curves to Right, gradient
A 400 300 R 0
A 450 300 L -2
HW2 2
A 300 300 L 0
L 200 0
HW3 I
A 400 300 R 0
Figure 3.2- Sample Input File
Figure 3.2 shows a sample input to sm-convert with only the CONFIGURATION, JUNCTION and
GEOMETRY sections. The sample file defines the three highways HW1, H W 2 and HW3. HWl is
1000 meters long, has 3 lanes, one entrance (Marina) and one exit (Ashby). HW2 is 400 meters long
with 2 lanes and no ramps. HW3 is 400 meters with 2 lanes and no ramps. From the JUNCTION
section it is clear that HW1 connects to the two other highways.
Given the CONFIGURATION and JUNCTION sections a general approach to the design of the
GEOMETRY section is to first divide each highway into segments. Highways look more realistic
when they have two consecutive arc segments with opposite curvatures. An arc segment should have
at least a radius of 300 meters. After defining the segments for each highway one highway should be
given initial coordinates (usually 0 0 0 0). At this point you may run the file through sm-convert
with the -v option to get a quick view of your design. You might have to change the parameters of
some segments to make the junctions look reasonable and prevent highways from crossing each other.
A good rule of thumb for a junction that forks out to two highways is to use arc segments with
opposite curvatures at the beginning of the two highways. In our sample file, HWl has junctions
with HW2 and HW3.. The first segments of H W 2 and HW3 are specified as arcs with opposite
curvatures .
Figure 3.3 shows the result of running the sample file through the converter. Each segment is labeled
with its highway name and segment number. As seen in the figure, HW1 ended up with more
segments than we asked for. This is because the converter breaks the segments at ramp boundaries
and at the illegal distance at the end of highway. It will also break arc segments that extend an angle
greater that 90 degrees.
In addition to the configuration file, the converter needs a geometric description for the cars. The file
ca1:ug is provided which consists of one car model described at three levels of detail (LOD). The
SmartPath User’s Manual
.
13
Figure 3.3- Output of Sm-convert
LOD feature is used to increase the frame rate of animation. When the observer is too far from a car
the description with the least level of detail is drawn and when the car is very close the most detailed
version is used. The format of this file is Berkeley UNIGRAFIX. The converter will search your
working directory and $(SMARTPATH)/libraries/modelsfor the file car.ug. In the absence of this
file the animator will construct a very simple model of a car.
The converter will process the configuration file and the car description file and will write the result
in binary format to a file to be used for animation. If SmartPath is used in batch mode the converter
will also map the simulated car position data to the physical highway and will append it to the output
file. In the interactive mode the mapping of car data to the physical highway is carried out by the
simulator before the data is sent to the animator for display.
It should be noted that in this version of SmartPath, the simulator does not have any notion of the
physical layout of the highway. The curvatures introduced to segments of the highway are just for
animation purposes. To the simulator all highways are straight lines. An artifact of introducing this
artificial curvature to highways in animation is that cars that are traveling with the same velocity on
the inner and outer lanes of a curved segment of a highway do not travel the same distance in
animation.
SmartPath User’s Manual
14
3.2-Using the Animator
The animator window consists of a control panel and an animation screen. Figure 3.4 shows
animator window. The animation screen displays the scene as seen by a helicopter flying over
highway. The control panel provides Fhe user with means to control the animation and to operate
helicopter. It is divided into three sections: helicopter control, plan view and animation control. In
following sections each component will be described.
Animation Screen
Helicopter Control
I
the
the
the
the
\
Plan View
I
Animation Control
Figure 3.4-Animator Window
The Animation Screen
This screen is basically a display screen. The highway and cars are displayed here as seen through the
window of a traffic helicopter flying over the highway. Cars are displayed with user-defined or
randomly selected colors and as they form platoons the followers will assume the color of the platoon
leader. On the upper left hand corner of the screen the simulation time is displayed and on the lower
Smartpath User’s Manual
15
right corner the performance of the animation in terms of the wmber of frames per second is printed.
The only user action allowed in the display screen is selecting a specific car. To select a car click the
left mouse button on it; a yellow antenna will appear on top of the selected car. If the car is sending a
message to another car the message will be printed next to the antenna and the receiver of the message
will be distinguished by displaying a shorter antenna on it. If the selected car is receiving a message,
the sender and the message are shown in the same manner. A car can be selected whether the
animation is running or stopped. To facilitate the selection, the animation will stop (if it is running ) as
soon as you move the mouse to the animation screen and will resume when the mouse leaves the
screen.
The Helicopter Control Panel
The helicopter panel consists of several buttons, a dial and a slider which allow the user to control the
motion and heading of the helicopter. Figure 3.5 shows the components of this panel.
3-View Turn Dial
5- Restriction Buttons
I
4-View Up or Down Slider
I
I
I
Figure 3.5-Helicopter Control Panel
1- Direction Buttons
A set of 6 direction buttons (up, down, left, right, forward and backward) are provided to determine
the movement direction of the helicopter. These are radio buttons, i.e. a set of push buttons where
only one can be selected at a time. Selecting a new direction will cancel the previous one. The default
direction is forward.
SmartPath User’s Manual
16
2- Motion Button
This button acts as the accelerator of the helicopter. It is a touch button, i.e., it is activated as long as
the user pushes it. Pushing this button will cause the helicopter to move and accelerate in the selected
direction. When the button is released motion is halted. The helicopter is allowed to move in all
directions as long as it does not surpass the predefined scene boundaries.
3- View Turn Dial
This dial allows the helicopter to turn its viewing direction in the horizontal plane. To turn press on
the dial indicator and drag towards left or right. The helicopter will turn in the specified direction as
long as the dial is pressed.
4- View Up or Down Slider
The helicopter can change its viewing direction in the vertical plane using this slider. The slider
position is initially in the middle, meaning the helicopter is looking straight ahead. Moving the slider
up or down will cause the helicopter to increase or decrease its viewing angle in the vertical plane.
5-Restriction Buttons
The motion of the helicopter can be in four modes: Free, FollowHw, FollowCar and Insidecar. Four
radio buttons are provided for mode selection. Only one mode can be selected at a time. When the
Free mode is selected, the helicopter is allowed to move freely in all directions. In this mode the
direction of movement is with respect to the viewing direction of the helicopter. For example, if the
helicopter is looking towards north then selecting the forward direction will cause the helicopter to
move north and selecting the left direction will cause the helicopter to move towards west.
In the FollowHw mode the motion of the helicopter is restricted to the highway. In this mode the
direction of movement is with respect to a highway. For example, selecting the forward direction
will cause the helicopter to move along the highway and selecting the left direction will make the
helicopter move perpendicular to the highway. When you select the FollowHw mode the animator
will select a highway for the helicopter to follow that is closest to it. The name of the highway and the
lane that the helicopter will follow will be displayed at the bottom of the plan view The selected
highway might not always be the one that you intended to follow, especially if the helicopter is close
to many adjacent highways. Finally, when the helicopter reaches a junction that leads to more than
one highway the lane that the helicopter is following will be used to decide which highway to go to
next.
The FollowCar mode enables the helicopter to follow a car at a certain distance and angle without
the need to press the motion button. To follow a car, press the FollowCar button and pick a car in the
animation screen. You will see a line connecting the helicopter and the selected car in the plan view.
As soon as you start the animation the helicopter will move and follow the selected car while
maintaining the initial relative position. You can still use the direction and motion buttons of the
helicopter to change the relative position of the helicopter with respect to the car. In this mode
moving in the forward or backward direction will take the helicopter closer to or farther from the
selected car and moving towards left or right will make the helicopter turn around the selected car. If
a car that is being followed exits the highway the helicopter will stay at the last position it has
detected the car and will revert to the Free mode.
The InsideCar button is used to position the helicopter inside a selected car. This will provide the
user with a driver’s view. In this mode the helicoptei motion is disabled because a driver shouldn’t
really jump around in hidher car.
The Plan View
The plan view provides a top view of the world consisting of the highway, the cars and the helicopter.
Figure 3.6 shows its components. The plan view consists of a display screen and a column of control
Smartpath User’s Manual
17
buttons. The OdOff button is provided to turn off the plan view display whenever it is nut desired in
order to improve the performance of the animation. The display is turned on when the Ordoff button
is activated (default) and can be turned off by deactivating the button. The Focus button provides the
option to focus the view on the helicopter. When the Focus button is activated the center of the plan
view will be positioned on the helicopter at all times. The arrow buttons are touch buttons that will let
the user move the plan view En the direction of the arrows. They operate only when the display is not
Plan View Display
I
On / O f f B u t t o n
Foc:us B u t t o n
Mov,e B u t t o n s -
zoc)m I n Butt011
zoc)m Out B u t t (3n
Figure 3.6-The Plan View
in Focus mode. The zoom buttons let the user zoom in or out of the plan view
.
The Animation Control Panel
This panel provides tools to control several features of the animation. It allows the user to start or stop
the animation, step through it, rewind or change its frame raLe, change features of the scene and the
camera and pop up an information window about a selected car. Figure 3.7 shows the components of
this panel. They are labeled and will be explained here.
1- Animation Stadstop Button
The Animation button is used to start or stop the animation. You will see the time slider move when
this button is activated and as time proceeds. The actual time is displayed at the top left corner of the
animation screen. To stop the animation deactivate the button. Another way to stop the animation is to
move the mouse to the animation screen. The program assumes that you have moved the mouse to the
screen to select a car and thus halts the animation. Animation will resume when the mouse leaves the
screen.
2- Animation Step Buttons
If you want to step through the animation one frame at a time use these two buttons. The right button
SmartPath User’s Manual
18
will step forward and the left button will do the reverse.
2- Animation Time Slider
This slider has two functions. It shows the passage of time and provides a tool for fast forward and
backward searches. To find a specific point in the animation move the slider towards right or left. If
the helicopter mode is FollowCar or InsideCar the helicopter view will also move as you search. In
this mode you might lose the car that you were following if the car exits the highway or if the
animation is rewound to the point where the car has not yet entered the highway. In the FollowHw or
Free mode the view will not change and moving the slider will only change the animation time.
5- Frame Rate Slider
This slider allows the user to control the speed of the animation. The default is set to maximum
speed. To slow down the animation move the slider towards left.
1-Start/Stop
Button
3-Animation Time
Slider
%-Animation Step
Buttons
4-Frame Rate
Slider
7-Scene Informat
Button
8-Camera Button
5-Animation Reset
Button
9-Car Informatic
Button
10-Index Button
6-Exit Button
Figure 3.7-Animation Control Panel
6- Animation Reset Button
Use this button to reset the animation. The Reset button will signal the program to halt the animation
(if running) and rewind it to one of two possible configurations. If you are working with an index
file (to be explained later) the animation will be reset to the configuration specified by the first entry
in your index. In the absence of indices the animation will rewind to time zero and the helicopter
will be positioned at the beginning of the highway, and all other buttons will have their default states.
7- Scene Information Button
The scene consists of several objects and visual effects. Activating this button will pop up a panel
that allows you to edit the scene and remove undesired objects to achieve a desirable frame rate.
Removing some objects like the background or effects like texture mapping will enhance the
performance of the animation. Figure 3.8 shows the Scene Information panel. The first four buttons
are provided to turn the display of the background, lamp posts, distance markers and communication
messages on or off. Turning Fog effect on will add more realism to the scene by making distant
objects look "washed out". The Texture button turns texture mapping on or off. Currently one texture
SmartPath User's Manual
19
Scene Obje ct
Buttons
Font Size
Slider
Car Color Ed i t c
Button
Figure 3.8-Scene Information Panel
is supported which will be applied to the front panel of a car when the view mode is Insidecar. The
texture files are in $SMARTPATH/libraries/textures.Make sure that the SMARTPATH environment
variable is set correctly. The FontSize slider will allow you to change the size of the displayed
message. The Colors button pops up a color editor for the cars. You can change the color of your
selected car by modifying its RGB components using three sliders. When you have your desired color
in the editor press the OK button and the selected car will assume this color. However, if the selected
car belongs to a platoon and is not the leader you can’t see its new color until it becomes a free agent.
Colors that are edited with the color panel are valid until you exit the program. To change the color
for a car permanently you should edit the color table for SmartPath. In SmartPath car colors are
chosen either randomly or from a color file. Sm-anim will search your current directory and
$SMARTPATWlibraries/modelsfor the file sm-colortable. Each line in this file has the ID of a car
and an RGB color (long format). For all the cars that have an entry in this file, the animator will use
the defined color. A random color will be used for cars that do not have an entry in the color file. If
you would like a car with a specific ID to appear with a certain color then edit the entry for that car in
the file snz-colortable.
8- Camera Button
This button will pop up an editor to change the helicopter view parameters. The helicopter view is
analogous to a view seen through the lens of a camera and this panel will allow you to change the
features of your camera. The FOV slider lets you change the field of view angle which has the effect
of zooming in and out. The ASPECT slider lets you change the aspect ratio (the ratio between width
and height) of the view. The NEAR and FAR sliders specify the distance range you want to see by
defining a near and a far clipping plane. Depending on whether you are inside or outside a car the
RESET CAMERA button will reset the camera parameters to their default values. Figure 3.9 shows
the Camera panel.
SmartPath User’s Manual
20
Field Of View Slider
-
Screen Aspect Ratio Slider
Near Clipping Plane Slider
Far Clipping Plane Slider
Reset Button
Figure 3.9-Camera Panel
Figure 3.10-Car Information Panel
SmartPath User’s Manual
21
9- Car Information Button
When a car is selected, its communication with other cars will be displayed on the animation screen.
This demonstrates the function of the Coordination Layer in the SmartPath AHS [2] [3]. However,
the selected car has other information that might be of interest to the user. Activating the Car
Information Button will pop up a panel that displays information about the selected car demonstrating
the function of the Regulation Layer [4].The speed and acceleration of the car are displayed on a
strip chart with their actual values printed below them. The identification numbers of the selected car
and its partner (the car that it is sending a message to or receiving a message from) are shown below
the charts. The name of the highway that the car is traveling in and the distance traveled by the car
are displayed next. The control algorithm being applied by the Regulation Layer is displayed at the
bottom of this panel. Figure 3.10 shows the Car Information panel.
10-Animation Index Button
As you are browsing through animation files you will notice that there are some interesting points and
views in the animation that you would like to come back to later. The index button will pop up a
panel that allows you to save the configuration of the animation at any point into a list and restore
the configuration at any time. Figure 3.1 1 shows the animation index panel. The panel consists of an
index list and an input field to enter names for index items. To make a new index item position the
animation at your desired time and view, enter a name in the input field and press the Add button.
Input Field
Index List
Figure 3.11-Animation Index Panel
Smartpath User’s Manual
22
The new index will be appended to the list. You can add up to 20 indexes. To delete or replace an
item select it in the list and press the corresponding button. To restore a configuration select its name
in the index list and press the GoTo button. You can also save the index list to a file and load other
files during animation using the Load and Save buttons. The index file can also be loaded by running
sm-anim with the option -i followed by the name of the index file. The animation will use the
configuration of the first entry in the index file for initialization. This is a convenient way to start an
animation at a certain point.
c
3.3-Using the Animator in Interactive Mode
The animator in interactive mode functions basically in the same way as in batch mode. The
differences are explained here.
The animation control panel in the interactive mode contains an extra button labeled Interaction. This
button will pop up a panel that allows the user to control the maneuvers of a selected vehicle. Figure
3.12 shows this panel. The user is allowed to make the selected vehicle change lane to right or left,
one lane at a time, by pressing the + or - buttons. The current lane and the desired lane of the vehicle
are displayed in this panel. When the change lane command is issued for a vehicle the vehicle might
be in the midst of another maneuver. If the vehicle was the initiator of the maneuver it will abort the
-
Change Lane Left
-
Change Lane Right
Speed Slider
- Manual/Automatic
Button
Figure 3.12-Interaaction Panel
SmartPath User’s Manual
23
maneuver and initiate the change lane protocol. If the vehicle is responding to another vehicle’s
request, for example, a merge or change lane request, then it can not abort its current maneuver. In
this case the vehicle waits for the completion of the current maneuver and then will initiate the change
lane maneuver requested by the user.
The user is also allowed to change the optimum velocity of the selected vehicle using a slider. The
desired speed is selected with the slider and the OK button will deliver the request to the vehicle.
Speed changes are not instantaneous and occur under the control of the regulation layer feedback
laws [4]. Also note that a follower vehicle will not achieve its assigned optimum speed until it
becomes a leader.
A vehicle that is instructed to change lane or speed by the user is considered to be manually driven.
Such a vehicle has no communication with the road side link layer controllers [5] and thus will not
receive lane change instructions or optimum speed assignments from the link layer controllers. To
indicate this difference the manual button at the bottom of the control panel will light up if any of the
above actions are requested. In the animation you would see a flashing siren on top of a manual
vehicle. You could change a manual vehicle back to automatic by deactivating the Manual button.
Another difference between the two modes is that the interactive animator does not allow the user to
reverse or fast forward the animation. This is because in the current version of SmartPath the
simulator does not have the capability to back track or jump ahead in time. Therefore the interactive
animator does not have the time slider and the button for backward stepping. Also, for the same
reason, the indexing capability of the animator is disabled in the interactive mode.
Smartpath User’s Manual
24