1
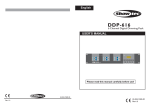
English
DP-619
6 CHANNEL DIGITAL DIMMER PACK
USER'S MANUAL
DP-619
CHANNELS ON
6 CHANNEL DIGITAL DIMMER PACK
1
2
3
4
5
6
POWER
CH. 1
CH. 3
CH. 5
CH. 2
CH. 4
CH. 6
DMX
MAP
UP
Please read before use
DOWN
YES
NO
Contents
Features 1
General Instructions 2
Overview 3
Front View 3
Rear View 5
Set-up 7
Power Up 7
Menu System 7
1. SET DMX ADDRESS? 8
2. SET CHANNELS? 9
3. SET SCENES? 12
4. TEST CHANNELS? 16
5. SET INPUTS? 16
6. UNIT SETUP? 17
7. SET TEXT? 17
8. SOFTWARE REV? 18
9. READ INFO? 18
Additional Information 22
Fan Cooling 22
Over Temperature Solving 22
Master/Slave Link Up 23
Lock the buttons 23
DP-619
6 CHANNEL DIGITAL DIMMER PACK
Improvement and changes to
specifications, design and this
manual, may be made at any time
without prior notice.
All rights reserved.
Technical Specifications 24
Features
Thank you for your purchasing. This product features
include:
6 DMX channels, 24 map in DMX channels
24 programmable scenes
10 shows from 24 programmed scenes
90 built-in chase programs
Each channel can be programmed with preheat level(0-20%),
maximum output level(30-100%), control curve(linear,square
and switch) and fade time(0.0s-999s).
Each scene can be programmed with the current output and fade time
24 map in DMX channels can be preset mapped to any of 10 scenes,
10 shows and 90 chase programs.
DMX only and Map only can be selectable
Several units can be linked in Master/Slave mode
Switch off protection in the event of over temperature
LCD display
Power failure memory
NOTE:
A knowledge of MIDI and DMX is required to fully utilize this unit.
1
General Instructions
Please read through this operating instructions before installing or using
your new product. After you have finished reading the instructions, put
them away in a safe place for future reference.
WARNING!
This product must be earthed.
To prevent fire or shock hazard, do not expose this product under
high temperature or moisture area.
Do not make any inflammable liquids, water or metal objects enter
the unit.
No user serviceable parts inside, do not attempt repairs. Should you
product fail, contact your local dealer.
CAUTION!
This product is intended for indoor use only.
Provide occasional ventilation during use.
Disconnect the power when not use for extended period.
Do not use the unit in places subject to excessive humidity, vibration
or bumps.
Do not dismantle or modify the unit.
2
3
DP-619
1
CH. 3
CH. 4
CH. 1
CH. 2
6 CHANNEL DIGITAL DIMMER PACK
CH. 6
CH. 5
MAP
DMX
POWER
3
4
5
YES
CHANNELS ON
DOWN
2
6
NO
3 4 5 6
UP
1
2
Overview
Front View
Overview
Front View
1. Circuit Breaker 16A
2. LCD Display
Shows the current activities or adjustments of menus.
3. UP Button
Scroll through the menus or increase the values.
4. DOWN Button
Scroll through the menus or decrease the values.
5. YES Button
Enter a submenu or store the settings.
6. NO Button
Leave the settings unchanged or go back one level of the menus.
4
Overview
Rear View
1
2
3
4
5
6
1. DMX INPUT
This connector accepts DMX input signal.
2. MAP INPUT
This connector is used to map in 24 DMX channel to control scene 1-24,
show 1-10 or program 1-90.
3. DMX OUTPUT
This connector sends DMX signal through to the next DMX device.
4. Cooling Fan
5. Terminal Output
6. Power Input
Single phase input or three-phase input
(For details, please refer to the wiring diagram printed on the top cover.)
5
Overview
Rear View
6
Set-up
Power Up
When power is applied to your dimmer, a self-test is performed, as indicated by its
LCD. The LCD reads "DMX ABSENT/ DMX RECEIVED OK/ DMX SIGNAL ERROR"
or "OVER TEMPERATURE".
After these initial test, a text message begins to scroll through the LCD. By default
these messages are "DIGITAL DIM PACK......".
Menu System
Tap the UP/DOWN button to scroll through this menu system. There are total 9 main
menus, the table below shows every main menu and also gives you an explanation.
MAIN MENU
1 SET DMX ADDR
2 SET CHANNELS
3 SET SCENES
YES
( )
FUNCTION
11 START ADDRESS
Start Channel ( 1~512 )
12 PATCH ADDRESS
Individual Channel ( 1~512 )
21 SET PREHEAT
All or 1-6 Channel ( 0%~20% )
22 SET MAX OUT
All or 1-6 Channel ( 30%~100% )
23 SET CURVES
Linear, Square, Switch
24 SET FADE TIMES
All or 1-6 Channel ( 0.0s~999s )
31 PLAY SHOW
Scene 1~24, Show 1~10, PROG 1~90
32 RECORD
Get Scene 1~24 or clear all scene
33 DMX FAIL
Last held, All off, Scene 24, Go no DMX, Go MAP
34 PRESET MAP
1-24 Channel Scene 1~24, Show 1~10 or PROG 1~90
35 FADE TIMES
All or 1~24 Scene ( 0.0s~999s )
36 NO DMX SCENE
Scene 1~24, Show 1~10 or PROG 1~90
4 TEST CHANNELS
41 CH[A] Y= TEST
All or 1-6 Channel Test
5 SET INPUTS
51 [ DMX ONLY ], [ MAP ONLY ]
DMX / MAP
6 UNIT SETUP
61 [ MASTER ], [SLAVE ]
MASTER / SLAVE
7 SET TEXT
71 TEXT
ASCII
8 SOFTWARE REV
81 REVISION
9 READ INFO
91 HOURS USED
00000~99999 Hours
92 TEMPERATURE
Max, Min, Now, Reset
93 DMX LEVELS
Channel (1-6) = 0~255
94 MENU ACCESS
Unlock / Lock
95 SET DEFAULTS
UP (
):
Scroll through Menu or increase the value.
DOWN (
):
Scroll through Menu or decrease the value
7
Factory Settings
YES (
):
Enter Sub-Menu store settings or display information etc.
No (
):
Go back one level of menu or leave setting.
Set-up
1. SET DMX ADDRESS?
1. Tap the UP/DOWN button to scroll to "1 SET DMX ADDR?".
1 SET DMX ADDR?
2. Press YES to enter next menu level, Start Address and Patch Address are
selectable using UP/DOWN.
Start Address
I. Tap UP/DOWN to scroll to the sub-menu
"11 START ADDR?", the LCD shows
1 SET DMX ADDR?
11 START ADDR?
II. Press YES, the LCD shows
1 SET DMX ADDR?
111 START [ 1]
III. Tap UP/DOWN to select desired DMX address(1~512)
for the start channel, its default address is 1.
IV. Press YES to store your setting, the LCD shows
1 SET DMX ADDR?
STORED OK
Patch Address
I. Tap UP/DOWN to scroll to the sub-menu
"12 PATCH ADDR?", the LCD shows
II. Press YES, the LCD shows
1 SET DMX ADDR?
12 PATCH ADDR?
1 SET DMX ADDR?
121 CHANNEL [1]
You may select the desired channel
using UP/DOWN.
III. Press YES again, the LCD shows
1 SET DMX ADDR?
1211 ADDR [ 1]
8
Set-up
1. SET DMX ADDR?
Patch Address
IV. Tap UP/DOWN to select desired DMX Address(1~512).
V. Press YES to store your setting, the LCD shows
1 SET DMX ADDR?
STORED OK
VI. Repeat steps II~V until every DMX channel has a separate address.
2. SET CHANNEL?
1. Tap UP/DOWN to scroll to "2 SET CHANNELS?"
2 SET CHANNELS?
2. Press YES to enter next menu level, you may select 21 SET PREHEAT
/ 22 SET MAX OUT/ 23 SET CURVES/ 24 SET FADE TIME using UP/DOWN.
SET PREHEAT
I. Tap UP/DOWN to scroll to the sub-menu
"21 SET PREHEAT?', the LCD shows
2 SET CHANNELS?
21 SET PREHEAT?
II. Press YES, the LCD shows
You may select all or channel 1-6
using UP/DOWN, default=A(all channels).
9
2 SET CHANNELS?
211 CHANNEL [A]
Set-up
2. SET CHANNELS?
III. Press YES again, the LCD shows
You may select desired value using
UP/DOWN, default=0%.
IV. Press YES to store your setting, the
LCD shows
2 SET CHANNELS?
2111 [-0-%]
2 SET CHANNELS?
STORED OK
SET MAXIMUM OUTPUT
I. Tap UP/DOWN to scroll to the sub-menu
"22 SET MAX OUT?", the LCD shows
2 SET CHANNELS?
22 SET MAX OUT?
II. Press YES, the LCD shows
You may select all or channel 1-6 using
UP/DOWN, default=A(all channels).
2 SET CHANNELS?
221 CHANNEL [A]
III. Press YES again, the LCD shows
You may select desired value using
UP/DOWN, default=100%.
2 SET CHANNELS?
2211 [100%]
IV. Press YES to store your setting,
the LCD shows
2 SET CHANNELS?
STORED OK
10
Set-up
2. SET CHANNELS?
SET CURVES
I. Tap UP/DOWN to scroll to the sub-menu
"23 SET CURVES?", the LCD shows
II. Press YES, the LCD shows
2 SET CHANNELS?
23 SET CURVES?
2 SET CHANNELS?
231 CHANNEL [A]
You may select all or channel 1-6 using
UP/DOWN, default=A(all channels).
III. Press YES again, the LCD shows
2 SET CHANNELS?
2311 CURVE [LIN]
You may select desired curve mode using
UP/DOWN, default=Linear.
Use linear for normal dimming, square for greater subtlety at the lower end
and switch for ON/OFF applications.
IV. Press YES to store your setting, the LCD shows
2 SET CHANNELS?
STORED OK
SET FADE
I. Tap UP/DOWN to scroll to the sub-menu
"24 SET FADE?", the LCD shows
2 SET CHANNELS?
24 SET FADE?
II. Press YES, the LCD shows
You may select all or channel 1-6 using
UP/DOWN, default=A(all channels).
2 SET CHANNELS?
241 CHANNEL [A]
11
Set-up
2. SET CHANNELS?
SET FADE
III. Press YES again, the LCD shows
2 SET CHANNELS?
2411 [0.0S]
You may adjust fade time within 0.0s~999s
using UP/DOWN, default=0.0s.
IV. Press YES to store your setting, the LCD shows
2 SET CHANNELS?
STORED OK
3. SET SCENES?
1. Tap UP/DOWN to scroll to "3 SET SCENES?"
3 SET SCENES?
2. Press YES to enter next menu level, you may select 31 PLAY SHOW/
32 RECORD/ 33 DMX FAIL/ 34 PRESET MAP/ 35 FADE TIMES/ 36 NO
DMX SCENE using UP/DOWN.
PLAY SHOW
I. Tap UP/DOWN to scroll to the sub-menu
"31 PLAY SHOW?", the LCD shows
II. Press YES, the LCD shows
3 SET SCENES?
31 PLAY SHOW?
3 SET SCENES?
311 GO [SCEN 1]
You may select scene 1-24/ show 1-10/
program 1-90 using UP/DOWN,
default=GO [SCEN 1](play scene 1).
III. Press YES to store your setting, the LCD shows
3 SET SCENES?
STORED OK
12
Set-up
3. SET SCENES?
RECORD
I. Tap UP/DOWN to scroll to the sub-menu
"32 RECORD?", the LCD shows
II. Press YES, the LCD shows
You may select Get scenes 1-24/ Clear scenes
using UP/DOWN, default=1(scene 1).
III. When you select Get scenes, press YES
to store your setting, the LCD shows
When you select Clear scenes, press YES,
the LCD shows
3 SET SCENES?
32 RECORD?
3 SET SCENES?
321 GET [SCEN 1]
3 SET SCENES?
STORED OK
3 SET SCENES?
ARE YOU SURE?
Press YES again, all scenes will be cleared,
the LCD shows
3 SET SCENES?
ALL SCEN CLEARED
DMX FAIL
I. Tap UP/DOWN to scroll to the sub-menu
"33 DMX FAIL", the LCD shows
3 SET SCENES?
33 DMX FAIL?
II. Press YES, the LCD shows
You may select LAST HELD/ ALL OFF/
SCENE 24/ GO NO DMX/ GO MAP using
UP/DOWN, default=LAST HELD.
13
3 SET SCENES?
331 [LAST HELD]
Set-up
3. SET SCENES?
DMX FAIL
[LAST HELD]:
the last signal received is held in the outputs.
[ALL OFF]:
all channels go to zero output.
[SCENE 24]:
scene 24 is output.
[GO NO DMX]:
menu 36 "NO DMX SCN" is recalled.
[GO MAP]:
map in signal is held in the outputs.
III. Press YES to store your setting, the LCD shows
3 SET SCENES?
STORED OK
PRESET MAP
I. Tap UP/DOWN to scroll to the sub-menu
"34 PRESET MAP", the LCD shows
3 SET SCENES?
34 PRESET MAP?
II. Press YES, the LCD shows
You may select channel 1-24using
UP/DOWN, default=CHANL [1] (channel 1).
III. Press YES again, the LCD shows
3 SET SCENES?
341 CHANL [ 1]
3 SET SCENES?
3411 DO [SCEN 1]
You may select scene 1-24/ show 1-10/
program 1-90 using UP/DOWN,
default=SCEN[ 1] (scene 1).
IV. Press YES to store your setting, the LCD shows
3 SET SCENES?
STORED OK
14
Set-up
3. SET SCENES?
SET FADE TIME
I. Tap UP/DOWN to scroll to the sub-menu
"35 FADE TIME?", the LCD shows
3 SET SCENES?
35 FADE TIME?
II. Press YES, the LCD shows
You may select all or scene 1-24 using
UP/DOWN, default=A(all scenes).
III. Press YES again, the LCD shows
3 SET SCENES?
351 SCEN [A]
3 SET SCENES?
3511 TIME [0.0s]
You may select fade time(0.0s~999s)
using UP/DOWN, default=0.0s.
IV. Press YES to store your setting, the LCD shows
3 SET SCENES?
STORED OK
NO DMX SCENE
I. Tap UP/DOWN to scroll to the sub-menu
"36 NO DMX SCN?", the LCD shows
3 SET SCENES?
36 NO DMX SCN?
II. Press YES, the LCD shows
You may select scene 1-24/ show 1-10/
program 1-90 using UP/DOWN,
default=DO [SCEN 1].
III. Press YES to store your setting, the LCD shows
15
3 SET SCENES?
361 DO [SCEN 1]
3 SET SCENES?
STORED OK
Set-up
4. TEST CHANNELS?
1. Tap UP/DOWN to scroll to "4 TEST CHANLS?"
2. Press YES, the LCD shows
4 TEST CHANNELS?
4 TEST CHANNELS?
41 CH [A]
You may select all or channel 1-6
using UP/DOWN, default=A(all channels).
3. Press YES once, the appropriate channel(s) will be fully on;
press YES twice, the appropriate channel(s) will be half on;
press YES three times, the appropriate channel(s) will go out.
5. SET INPUTS?
1. Tap UP/DOWN to scroll to "5 SET INPUTS?"
2. Press YES, the LCD shows
5 SET INPUTS?
5 SET INPUTS?
51 [DMX ONLY]
You may select DMX ONLY/ MAP ONLY
using UP/DOWN, default=DMX ONLY.
3. Press YES to store your setting, the LCD shows
5 SET INPUTS?
STORED OK
16
Set-up
6. UNIT SETUP?
1. Tap UP/DOWN to scroll to "6 UNIT SETUP?"
2. Press YES, the LCD shows
6 UNIT SETUP?
6 UNIT SETUP?
61 [SLAVE]
You may select MASTER/ SLAVE
using UP/DOWN, default=SLAVE.
3. Press YES to store your setting, the LCD shows
6 UNIT SETUP?
STORED OK
7. SET TEXT?
1. Tap UP/DOWN to scroll to "7 SET TEXT?"
2. Press YES, the LCD shows
7 SET TEXT?
7 SET TEXT?
ABC
[A]
You may change the blinking character using
UP/DOWN followed by YES.
When you've finished the new text, tap UP/DOWN until [END] appears,
press YES to store the new text.
If you press YES without [END], the new text won't be stored into memory.
If you want to clear all these characters, tap UP/DOWN until [CLR] appears,
press YES, the text will be cleared.
17
Set-up
8. SOFTWARE REV?
1. Tap UP/DOWN to scroll to "8 SOFTWARE REV?".
8 SOFTWARE REV?
2. Press YES, the LCD shows the software revision.
8 SOFTWARE REV?
REV1.0
05-26-01
9. READ INFO?
1. Tap UP/DOWN to scroll to "9 READ INFO?".
9 READ INFO?
2. Press YES to enter next menu level, you may select 91 HOUR USED/
92 TEMPERATURE/ 93 DMX LEVEL/ 94 MENU ACCESS/ 95 SET DEFAULT
using UP/DOWN.
HOUR USED
I. Tap UP/DOWN to scroll to the sub-menu
"91 HOUR USED?", the LCD shows
9 READ INFO?
91 HOUR USED?
II. Press YES, the LCD shows total hours used.
9 READ INFO?
911 00000 HOURS
18
Set-up
9. READ INFO?
TEMPERATURE
I. Tap UP/DOWN to scroll to the sub-menu
"92 TEMPERATURE", the LCD shows
II. Press YES, the LCD shows
9 READ INFO?
92 TEMPERATURE
9 READ INFO?
921 [MAX]
--C
You may select MAX/ MIN/ NOW/ temperature
or RESET using UP/DOWN.
III. When the LCD shows RESET, press YES to reset the maximum and minimum
temperature to now temperature.
DMX LEVELS
I. Tap UP/DOWN to scroll to the sub-menu
"93 DMX LEVELS?", the LCD shows
II. Press YES, the LCD shows
You may select channel 1-6 using UP/DOWN.
19
9 READ INFO?
93 DMX LEVELS?
9 READ INFO?
931 CH [1]=XXX
Set-up
9. READ INFO?
MENU ACCESS
I. Tap UP/DOWN to scroll to the sub-menu
"94 MENU ACCESS?", the LCD shows
II. Press YES, the LCD shows the default
setting "UNLOCKED". You may select
UNLOCK/LOCK using UP/DOWN.
III. When you select LOCK, press YES, the
LCD shows
IV. If you are sure to lock, press YES, the
LCD shows
9 READ INFO?
94 MENU ACCESS?
9 READ INFO?
941
[UNLOCKED]
ARE YOU
WANT TO
SURE
LOCK?
9 READ INFO?
LOCK STORED OK
If you are not sure, press NO to go back.
V. When the LCD shows
If you want to unlock the menu, tap UP/
DOWN, the LCD shows
Keep pressing UP for 5 seconds, tap DOWN
once, the LCD shows
9 READ INFO?
941
[LOCKED]
PLEASE PRESS KEY
TO CONFIRM!
9 READ INFO?
941
[LOCK]
20
Set-up
9. READ INFO?
MENU ACCESS
VI. Use UP/DOWN to scroll to UNLOCK,
press YES, the LCD shows
VII. Press YES, the LCD shows
If you are not sure, press NO several
times until the LCD shows
ARE YOU SURE
WANT TO UNLOCK?
9 READ INFO?
UNLOCK STORED OK
DO
YOU WANT
TO EXIT?
then press YES to leave the setting unchanged.
SET DEFAULTS
I. Tap UP/DOWN to scroll to the sub-menu
"95 SET DEFAULT?", the LCD shows
II. Press YES, the LCD shows
III. Press YES again, the LCD shows
IV. Press YES to set defaults to your dimmer.
21
9 READ INFO?
95 SET DEFAULT?
DO YOU WANT TO
SET DEFAULTS?
ARE YOU SURE
! ! !
Additional Information
Fan Cooling
The unit's fan is used to improve heat dissipation.
If the power is turned on, the cooling fan will automatically run. When the power is
turned off, it will stop.
Over Temperature Solving
A. When the recorded maximum temperature exceeds 70 Celsius and the ambient
temperature is below 70 Celsius, the LCD shows "OVER TEMPERATURE" and
only 50% of output remains. You may make RESET adjustment using menu 82 to
resume normal output.
B. When the recorded maximum temperature exceeds 70 Celsius and the ambient
temperature is also over 70 Celsius, the LCD shows "OVER TEMPERATURE" and
only 50% of output remains. You can not make any adjustments until over temperature
is solved.
C. In normal use, whenever over temperature occurs, the LCD should show " OVER
TEMPERATURE" immediately and only 50% of output remains.
22
Additional Information
Master/Slave Link Up
A. You can set up communications between several units using Master/Slave link up,
the first unit serves as the Master, and the others are Slaves.
(See menu 6 UNIT SETUP.)
B. The Master unit transfers the DMX signal and Map input signal to the Slave unit
using DMX cables, the Slave transfers the DMX input signal only but not the Map
input signal.
Lock the buttons
After power on, the LCD shows general status and test messages. Press and hold
down YES and NO buttons simultaneously for three seconds, the LCD should show
"L" in the down right corner indicating all the buttons are locked.
Press the two buttons for three seconds again, the "L" character disappears and the
buttons are unlocked.
In menu 311, you may also lock or unlock the buttons as described above.
In menu 311 or 41, if you don't make any adjustments within 10 minutes, the buttons
should be locked automatically, you may press and hold down YES and NO buttons
for three seconds to unlock the buttons and go on your setting.
In other menus, if you don't make any adjustments within 10 minutes, the buttons
should be locked automatically, the LCD shows the status messages and you
should restart your menu adjustments.
23
Technical Specifications
Power Input ......................................................... AC 120V~50-60Hz
Channel Output(Single phase)............................ 16A/CH., Total 96A
Channel Output(Three phases)........................... 16A/CH., Total 32A
DMX Output ............................................... 3 pin female XLR socket
DMX Input ..................................................... 3 pin male XLR socket
Map Input ...................................................... 3 pin male XLR socket
Dimensions .............................................................. 482x390x90mm
Weight(appro.) ......................................................................... 9.0 kg
24
24-004-0636
Rev 1.0 August 2001
All rights reserved