Download user manual - Sign Video, Ltd.
Transcript
The SignVideo
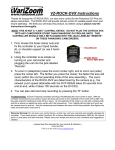
ZOOM COMMANDER® Pro
Made in USA
Patent Pending
Operations Manual
Copyright © 2002 by Sign video Ltd.
Included Items:
Controller, 6’ cable, v block clamp, flat mount plate, sloped mount plate (attached to clamp), 12’ & 25’ extension cables, screws.
HOOK UP
Selecting Mounting Plates
The V block clamp comes with the slope mounting plate attached. A flat mounting plate is also included. You may want to
switch to the flat mounting plate for a number of reasons. It may be more comfortable for you or make the controller easier to
see. On some tripod handles the flat plate will allow you to slip the controller down over the tripod handle handgrip. Either the
flat or slope mounting plate may also make it easier to fit the unit onto a small tripod handle, depending on how the tripod handle
is designed. The slope plate, for example, takes up less room on handles where you cannot slide the flat plate over the handgrip.
You may also want to use either the sloped plate or flat plate when mounting to places other than your tripod.
The mounting plates attach to the clamp with screws, and can be removed and replaced with the other plate.
Attaching The V Block Clamp
1 Place the V block over the tripod handle or other bar by opening the v block (swing open the section with the groove). Swing
the V block shut again over the bar (If you have a really small handle, and the V blocks will not close on the bar, then completely
unscrew the two sections. Then, flip one section over such that one v groove is facing the flat edge of the other section, and screw
the sections back together over the bar.).
2 Use the thumb screws to screw down and lock the V block clamp onto the bar.
Attaching and Orienting the Controller
1 The Velcro® lets you pop the controller on and off the mounting plate. Both the Zoom Commander® Pro and the mounting
plate are equipped with Velcro® surfaces. Simply press them together to attach, and peel them apart to detach.
2 The Velcro® also allows you to position the controller where you want it. Some users prefer to mount the unit sideways, for
example, as this provides a different reach pattern for the buttons. You can also move the controller up or down on the plate.
Position it where you find it most comfortable.
3 Included with your unit is a six foot cable with male plugs at both ends. Connect one end to the jack on the top edge of the unit.
Connecting the Controller to the Camera
1 Locate the Control L (LANC) jack. This is a small round jack often labeled with some kind of L symbol or I/O marking. You
may need a magnifier to read the marking. Consult your camera manual for the jack described as Control L or LANC or
described to be used for external control, video editing control etc. The jack itself may be hidden under a rubber flap.
2 Connect the controller cable by inserting the plug carefully into the jack, making sure it is a smooth fit and not the wrong jack.
Adding Optional Extension Cables
Two extension cables are provided, one 12 feet and one 25 feet. Each has one male and one female end. Connect the female end
to the controller cable to extend the distance you can move the controller away from the camera.
Operation
Setting Modes on Your Camera
1 Set camera to camera mode or the equivalent
If this does not power up camera, also switch on power
2 Switch camera to manual focus mode. to enable the controller remote focus control. Usually you will need to flip a switch or
push button or change a menu item (consult your camera manual if needed). To turn the auto focus ON/OFF using the Zoom
Commander® Pro see “Auto Focus ON/OFF Button” below.
WARNING: The remote focus will operate focus on some cameras even when the camera is left in automatic focus mode, BUT
there is no guarantee that the camera will not revert to automatic focus during a shot unless your camera manual says that it will
not, or you thoroughly test the camera to find out.
Zoom Controller Record Button
Press to begin recording. The red rec light will light.
Press again to pause recording. The red rec light will flash.
Focus Buttons
Press Left button to reduce focal distance.
Press Right button to increase focal distance.
Continued on reverse
Auto Focus ON/OFF Button
Press button to alternate between camcorder manual focus and auto focus mode. How and whether this function operates
depends on your camcorder. The auto/manual focus may not work with some camcorders with mechanical switches for
auto/manual focus. Some camcorders may have an indicator showing whether the camcorder is in or out of auto focus, others
may not. Also see “WARNING” above under “Switch camera to manual focus mode”. Test this function thoroughly with your
camcorder and become familiar with it before using.
Zoom Speed Preset Dials
There are two dials, one for each set of zoom controls.
Rotate dial to set the desired zoom speed before using the corresponding zoom control. Once set, the speed will be fixed and
zooms will repeat at the same, even speed every time you push the corresponding zoom buttons, until you change the setting
again. However, you can also adjust the speed dial during a zoom, and vary zoom speed while shooting.
Zoom Control Buttons
1 There are two sets of zoom control buttons. Both sets work the same way.
a Press the left button to zoom wider. Press the right button to zoom closer.
b Zoom speed will be constant throughout the zoom. If speed is too slow or fast, use the speed set dial to reset the speed and
try the zoom again.
4 To be able to change zoom speeds while still recording, there are two methods:
a Preset one set of zoom controls to a slow speed, the other set to a fast speed. For speed change during a single
zoom, slide thumb smoothly from one zoom button to the other.
b Push zoom button using one hand while rotating zoom preset dial with the other hand to vary zoom speed.
Automatic Power Down Override ON/OFF switch
1 Locate the slide switch. which is recessed into the top edge of the unit. It is set at the factory to the off position.
2 Insert ball point pen tip into recess to slide switch. Switch is ON when pushed toward the nearby jack, OFF when away from
the jack. When ON the auto camera power down override mode is activated (slide switch back to OFF at any time to deactivate).
3 Once mode is activated, any time your camcorder attempts to automatically power down, the controller will automatically
override this action, keeping your camera powered up and ready for use. However, you can still manually power down the
camcorder to standby at any time by pressing the Zoom Commander® Pro OFF button (or power up using the ON button).
4 You may also prefer to rely exclusively on the Zoom Commander® Pro manual camcorder power up and power down buttons
(described below) and leave the override on/off switch in the off position. You may also prefer to use the auto mode or manual
mode at different times and under different circumstances.
Camcorder Manual Power Up (ON) and Power Down (OFF) buttons
Press the ON button to power up the camcorder from standby.
Press the OFF button to power down the camcorder to standby. This mode is useful for conserving battery power.
VTR Controls
1 To activate VTR controls (play, rewind etc.) go to your camera and switch it to VTR or VCR or similar mode. Then controls
will perform as labeled in green. Also, ON and OFF buttons will remain active and will still power camera up and down.
Automatic power down override is not active in VTR mode. You must use the manual ON and OFF buttons.
2 Using record in VTR mode: To record, first press PAUSE, then press RECORD. This puts the camera into RECORD/PAUSE
mode. Press PAUSE again to actually record. Press PAUSE again to pause recording. To exit record, press STOP at any time.
ONE YEAR LIMITED WARRANTY
Sign video Ltd. warrants this product (including accompanying accessories) and all parts thereof, except as set forth below, for
a period of one year from the original date of purchase. Should the product be found to be defective, Sign Video Ltd. will repair
or replace the product at no charge.
To obtain warranty service telephone one of the numbers below or log on www.signvideo.com to obtain the current
telephone number for warranty repair.
The duration of any implied warranties is limited to the duration of the express warranty herein. This warranty does not cover
cosmetic damage or damage due to acts of god, accident, misuse, abuse, alteration, negligence, improper installation, tampering,
criminal acts, negligence, lack of reasonable care, or if serviced or repaired by anyone other than Sign video Ltd. or a repair
facility authorized by Sign video Ltd.
Sign Video Ltd. shall not be liable for any loss of use, or incidental or consequential damages resulting from the use of this
product or the failure or inoperability of this product in any respect, including from any cause whatsoever, or from breach of any
express or implied warranty. In no event shall Sign video Ltd. be liable for any amount in excess of the purchase price paid for
the product, except to the extent prohibited by applicable law.
Some states do not allow the exclusion or limitation of incidental or consequential damages, or permit limitations on how long
an implied warranty lasts, so these exclusions and limitations may not apply to you. This warranty gives you specific legal rights
and you may also have other rights which vary from state to state.
Sign Video Ltd.
(800) 373-8910
(503) 236-0000
www.signvideo.com


