1
Project title:
Enabling Communities of Interest to Promote Heritage
of European Regions
Project acronym:
Cipher
Project number:
IST 2001 - 32559
Partners:
The Open University, UK (Project co-ordinator)
Dublin Institute of Technology , Ireland
University of Art and Design, Helsinki, Finland
The Discovery Programme, Ireland
Czech Technical University, Czech Republic
Internet-Loesungen und Dienstleistungen RiS GmbH, Austria
Report title:
RATO – User’s Manual
Authors:
Petr Aubrecht, Kamil Matoušek, Petr Husták
E-mail: {aubrech, matousek}@labe.felk.cvut.cz
Deliverable:
D26/4
Version:
1.0
Report availability:
Internal
Date:
September 2004
Contents
1
INTRODUCTION
3
2
TECHNICAL BACKGROUND
4
3
RAT-O HOME PAGE
5
4
LOGIN
8
5
RESOURCE ANNOTATION
9
5.1
Creating a new resource annotation or editing an existing one
11
5.2
Saving an annotation to the server
14
5.3
Search for resources
14
5.3.1
Text-based search
14
5.3.2
Semantic search
16
6
AUTHORING PRESENTATIONS
18
6.1
Creating a new outline or editing an existing one
24
6.2
Saving an outline to the server
26
7
COLLABORATION
27
7.1.1
Document Versioning
27
7.1.2
Version Conflicts
27
7.2
8
Working areas and User Profiles
29
MAINTENANCE
30
8.1
Maintaining Annotations
31
8.2
Keywords tab scenarios
31
8.3
Outlines tab scenarios
32
8.4
Workspace management
33
8.5
Checking annotations validity
33
9
ACKNOWLEDGEMENT
34
2
RATO User Manual
1 Introduction
Resource Annotation and Outline Creation Tool (RAT-O) is a client/server software tool
aimed at creation of conceptual annotations of electronic resources yielding their simplified
later retrieval. It is one of the main CIPHER tools dedicated to collecting and organising
multimedia resources as an important phase of the whole process of exploring and presenting
cultural heritage by means of IST. RATO supports mainly descriptions of web pages and
images - in general, of any resource accessible through Internet. The following keywords are
crucial for RATO:
•
Annotation is a concise description of an article, book, musical piece or some other
masterpiece or, in general, an information resource. It includes important aspects of
content not evident in the title. In contrast to summaries, annotations are made with
respect to possible later retrieval of the individual resources.
•
Keywords represent another type of secondary information, which enables us to
identify the resources of our interest. Currently, there are plenty of advanced systems,
namely digital libraries utilising secondary information to store, process and retrieve
information of interest. In current terminology, intelligent approaches in this area can
be viewed as knowledge management methods.
•
Ontology is a structure of concepts. Ontology-based support for annotations gives
much more powerful descriptive formalism than simple keywords, where computers
may perform more focused and optimal search through a database of annotated
resources giving fast response times and more appropriate results.
•
Outline is a sketch of a narrative utilising the collected resources and making links to
them. It is expected that the user will enrich this outline by adding text paragraphs
and/or pictures. At the end, the outline represents a structured definition of a full
narrative rather than just its plot. The user can generate the html presentation of the
narrative based on the content of the respective outline object.
Once the database of resource annotations from a specific area is available, one may wish to
write a document summarising the information from an area of interest with the help of these
resources. If additional information is found, it can be later included. This is a typical kind of
research work, for example when writing an article with referencing a number of documents
or other information resources. Therefore a software annotation tool was extended by a
functionality of a document outline editor, which makes it possible to define the document
outline and later enrich it by hanging relevant text paragraphs, resource references, and/or
pictures to appropriate nodes of the tree representing the outline of the document.
Even the naive users may use the RAT-O tool. Moreover, the tool may be used in various
areas. For example, the RAT-O tool was used to create document outlines containing the
typology of chapels prepared by National Monument Institute in Southern Bohemia. In this
case, chapel pictures annotated with help of specialised ontology of chapels illustrate the
chapel types described in the created document outline.
3
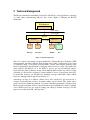
2 Technical Background
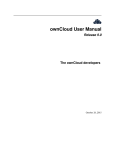
The Resource Annotation and Outline Creation Tool (RAT-O) is a web application, consisting
of a thin client communicating with two Java servers. Figure 1 illustrates the RAT-O
architecture.
Web Browser
RAT-O Client
Client computer
Server computer
http server
Outline Server
RAT Server
Ontology
Repository
Annotation
Outline
Web
Repositor Pages
Figure 1 - RAT-O architecture
The tool is aimed at annotating resources identified by Uniform Resource Identifiers (URI)
using structured annotation elements. Each of them can be either a simple keyword in a form
of a character string, or a keyword associated with a concept expressing the meaning of the
keyword. In principle, the annotation is a mapping of the resource to a tuple of keywords. The
value added by the RAT-O tool is the ability to process not only conventional (simple)
keywords in the form of character strings, but in addition, RAT-O makes it possible to assign
a meaning to a keyword by assigning a concept defined by classes of appropriate ontologies.
It means that resources are annotated by attaching concepts rather than simple textual
keywords, although such an approach is allowed, too.
Annotations are kept in a database, which can be later searched for given keywords or
concepts. From annotated resources, document outlines can be created. The outline can be
easily converted to an html presentation. A preview of the html presentation is displayed in an
Internet browser and final version of the presentation can be published by means of Outline
server. RAT-O itself does not support creating and editing of domain ontologies. For this
purpose we use the ApolloCH ontology editor.
4
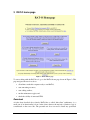
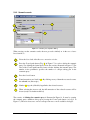
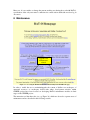
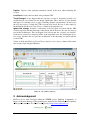
3 RAT-O home page
Figure 2 - RAT-O home page
To start working with the RAT-O tool, go to the RAT-O home page shown in Figure 2. This
page navigates the user in order to:
•
allow him to make his computer ready to run RAT-O,
•
start annotating resources,
•
start editing outlines,
•
run the maintenance applet, and
•
check the validity of annotated URIs.
Download
As it has been described above already, RAT-O has so called “thin-client” architecture; i.e. a
small part of its functionality is done on the client, whereas the majority of business logic is
concentrated on the server side. The potential user does not need to install any specialised
5
software applications on his computer. The only software he needs is any Internet browser
(preferably the Microsoft® Internet Explorer or the Netscape Navigator)*.
The Download push button on RAT-O main page (see Figure 2) makes possible to configure
properly user’s MS Internet Explorer in order to achieve a higher level of its integration with
RAT-O. In particular, the MS Windows registry file will be downloaded, which contains the
following three registry entries:
[HKEY_CURRENT_USER\Software\Microsoft\Internet Explorer\MenuExt\RAT-in]
@="http://krizik.felk.cvut.cz/Rato/IExplorerMenu/ratscriptin_default.htm"
"Contexts"=dword:00000001
[HKEY_CURRENT_USER\Software\Microsoft\Internet Explorer\MenuExt\RAT-in-image]
@="http://krizik.felk.cvut.cz/Rato/IExplorerMenu/ratscriptin_image.htm"
"Contexts"=dword:00000002
[HKEY_CURRENT_USER\Software\Microsoft\Internet Explorer\MenuExt\RAT-in-link]
@="http://krizik.felk.cvut.cz/Rato/IExplorerMenu/ratscriptin_link.htm"
"Contexts"=dword:00000020
By double clicking on the downloaded file, the entries will be added to the registry of user’s
computer. As a result, three new items will appear in the context menu of user’s MS Internet
Explorer:
•
RAT-in: By selecting this menu item, the annotation of the current html page will start.
•
RAT-in-image: Applicable, if the mouse cursor is located on a picture. By selecting this
menu item, the annotation of that picture will start rather than that of the whole html page.
•
RAT-in-link: Applicable, if the mouse cursor is located on an HTML link. By selecting
this menu item, the annotation of the referenced resource will start rather that of the
current html page.
Annotate
Enables the user to start annotation of a resource. For details see chapter 5.
Outline
Enables the user to start editing an annotation. For details see chapter 6.
Maintenance
The functionality under the Maintenance push button allows the user to maintain his own
workspace and/or provide his colleagues with his own content. For details see sections 8.1 8.4.
*
For these two Internet browsers, a configuration has been developed within the CIPHER project, which
provides users with a higher level of comfort. Nevertheless, any Internet browsers are suitable for running
RAT-O.
6
Check URLs
The functionality under the Check URLs push button makes the user able to test if the URLs
annotated in the past are still valid (they still exist) and/or whether they have been modified
since last time or not. For details see section 8.5.
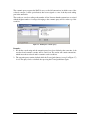
7
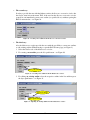
4 Login
Before the user can do any action, he has to login to the server. There is none explicit
command for invoking the login dialog. It appears automatically when the user requires
carrying out an action, but RAT-O does not know his credentials yet.
Figure 3 - RAT-O login dialog
Three data items are to be entered in the login dialog shown in Figure 3:
•
user’s name, i.e. the username under which the user is registered within the RAT-O
server.
•
user’s password
•
name of the working area, which the user wants to access. This field may remain empty.
In this case the user assumes by default that the user wants to access his private working
area and takes the name of the working area equal to the username entered in the first
field. Thus, repeating the username in the name of the working area as shown in Figure 3
is not necessary.
Status
user@working area
Figure 4 - RAT-O window status bar
After pressing the OK button, user’s credentials are sent to the server. The server checks
user’s authentication (i.e. matching his name and password) and his authorisation to the
specified working area.
If the authentication or the authorisation fails, a warning message appears on user’s screen
and no action will be carried out. If both the authentication and the authorisation succeed, the
window relevant to the required action will appear. All RAT-O windows have status bar at the
bottom as shown in Figure 4. There is a status of the recent action shown in the left part. In
the right part, there is shown the indication of the user (his username) logged-in and the name
of the working area the user is logged-in to.
8
5 Resource annotation
1
2
3
5
4
7
6
9
10
8
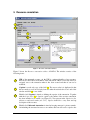
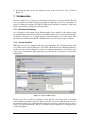
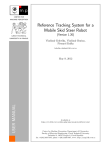
Figure 5 - Resource annotation window
Figure 5 shows the Resource annotation window of RAT-O. The window consists of the
following items:
1
2
3
4
URI of the annotated resource. As the URI is a unique identifier of any resource,
RAT-O uses the URI as an identifier of the annotation. URI is a read-only field. It is
assigned once to the annotation when it has been created and then it can not be
modified.
Caption is a read-only copy of the field (3). The reason, why it is duplicated is that
the user needs to see it in read-only form also when he activates the Search tab of the
window and field (3) is not visible.
Editable field Caption is aimed at defining the caption of the annotation. Together
with the Scope Note (5) is Caption copied to the outline, if the resource annotation
has been included to an outline (see Figure 25). Text present in the Caption is also
subject to text-based search (see 5.3.1). Caption should be a very short and apt
description of the resource.
Editable field Informal Annotation is aimed at keeping annotator’s private remarks.
On including the annotated resource to an outline, this text will not be copied to the
9
outline (see Figure 25). This field takes part in text-based search (see 5.3.1). This
field may be used for tagging annotations, which need a subsequent review, etc.
5
6
7
8
Editable field Scope Note is aimed at official and formal description of the content
represented by the annotated resource. On including the annotated resource to an
outline, this text will be copied to the outline (see Figure 25). This field takes part in
text-based search (see 5.3.1).
For comfortable editing large scope notes, the >> button offers a bigger text area in a
separate.
The field Keywords represents a list of all keywords associated with the annotated
resource. Button (9) makes possible to add a new keyword to the list. Button (10)
allows removing keywords from the list.
The keyword is a text string, which takes part in the text-based search (see 5.3.1).
However, the user can assign a meaning to it. In such a case the keyword takes part
also in the semantic (formal) search (see 5.3.2). The meaning can be assigned to a
keyword by selecting one or more concepts from one or more ontologies.
The Ontologies field (7) lists all available ontologies. On selecting any keyword in
(6), the set of checked checkboxes in (7) define, which ontologies take part in
providing the selected keyword with a meaning.
The selected ontology is shown in bold in (7).
The Ontology Tree field displays the hierarchy of concepts in the ontology selected
(bolded) in (7). Each node of the tree represents a concept. Concepts on lower levels
are specialisations of those on upper levels. There is a checkbox assigned to each tree
node. The user can assign a concept to the keyword selected in (6) by checking a
checkbox of the respective concept.
If at least one concept has been assigned to the keyword selected in (6), the checkbox
belonging to the selected (bold) ontology in (7) is checked. Figure 6 shows an
example, when the wall_cracks concept (belonging to ontology Damage) has been
assigned to the keyword selected in (6).
7
8
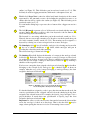
Figure 6 – Example: wall_cracks concept from ontology Damage
has been assigned to the keyword selected in (6)
If a checked checkbox assigned to a node is grey, then it means that not the node, but
some its specialisation in the collapsed sub-tree below the checked node has been
assigned to the selected keyword. For example, the Spatial_chapel in Figure 7 has a
greyed checkbox. It means that some specialisation of Spatial_chapel has been
assigned to the keyword selected in (6).
Important: In order to avoid non-necessary data transfer between the client and the
server, the ontology is loaded on its first usage. That is why the field (8) may be
empty, when opening the Annotation window for annotating a new resource.
10
Figure 7 - Greyed checkbox in ontology tree
The Add keyword push button allows adding new keywords to the list (6). It opens
the Add keyword dialog, which makes possible to add a brand new keyword or to use
an existing one.
9
Figure 8 - Add keyword dialog
10
The Remove keyword push button allows removing the selected keyword from the
list (6).
Remark: Only the membership of the keyword to the particular annotation will be
deleted. The keyword itself will remain defined. It will appear among existing
keywords in the Add keyword dialog next time. Use the maintenance applet (see
Maintenance button in Figure 2) to delete the keyword completely.
5.1 Creating a new resource annotation or editing an existing one
There are three ways how to start annotation of a resource:
•
The first way: Press the Annotate button in the RAT-O home page (see Figure 2). In this
case, the URI will not be assigned. The upper part of the Resource annotation window will
appear like Figure 9 rather than Figure 5.
Figure 9 - Annotation window with non-assigned URI
11
The annotation can go on only after determining the URI of the annotated resource. To
specify the URI, the user has to:
1. Press the Annotate URL … item of the main menu (see Figure 10).
Figure 10 - Annotate URL menu item
2. Specify the URI in the URI to Annotate modal dialog and press OK.
Figure 11 - URI to Annotate modal dialog
Remark: This way is applicable both to resources, which have not been annotated yet,
and to those, which have been already annotated. In the later case, the recently stored
annotation will be shown in the Resource annotation window.
•
The second way of starting resource annotation assumes that the user uses the MS Internet
Explorer and he updated the MS Windows registry of his computer as described in the
Download paragraph of chapter 3. Then the user proceeds following the steps below:
1) Open a web page containing the resource to be annotated in the MS Internet
Explorer. Then carry out one of the steps 2) or 3) or 4) according to the type of the
annotated resource.
2) If the annotated resource is the whole html page shown by the MS Internet
Explorer:
(a)
The mouse cursor shall be positioned anywhere on the page.
(b)
Click the right mouse button.
(c)
Select the Rat-in item of the context menu.
(d)
Click the left mouse button.
3) If the annotated resource is a picture shown in the current html page displayed by
the MS Internet Explorer:
(a)
Position the mouse cursor over the picture to be annotated.
(b)
Click the right mouse button.
12
(c)
Select the Rat-in-image item of the context menu
(d)
Click the left mouse button.
4) If the user wishes to annotate a resource referenced by a link included in the
current html page displayed by the MS Internet Explorer:
(a)
Position the mouse cursor over the link to the annotated resource.
(b)
Click the right mouse button.
(c)
Select the Rat-in-link item of the context menu
(d)
Click the left mouse button.
Remark: This way is applicable both to resources, which have not been annotated yet,
and to those, which have been already annotated. In the later case, the recently stored
annotation will be shown in the Resource annotation window.
•
The third way:
When the user is working in the Outline editing window (see Figure 19), he can access
the Resource annotation window directly from the Outline window:
1) Search for a resource in the Outline editing window (see Figure 25).
2) Select one of the resources enumerated in the list of all found resources (satisfying
the search condition).
3) Press the Annotate Selected menu item:
Figure 12 - Accessing Annotation window from the Outline window
4) The Resource annotation window appears. It will be filled-in with the annotation
data of the given resource.
Remark: This way is applicable only to already annotated resources.
•
The fourth way:
When the user is working in the Maintenance applet (see Figure 38 or the Maintenance
button in Figure 2), he can access the Resource annotation window by pressing the Edit
button (see Figure 13), while any of the URIs in the list of available annotations has been
selected.
13
Figure 13 - Accessing Annotation window from the Maintenance applet
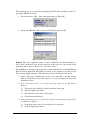
5.2 Saving an annotation to the server
Any modifications done in the Resource annotation window have been made only locally so
far. The changes will be made persistent only on submitting the changes to the RAT-O server.
Remark: Changes non-submitted to the server can not be taken into account by the process
searching for annotated resources whether using text-based or semantic search.
Figure 14 - Submitting an annotation to RAT-O server
The user is informed on successful submitting the annotation to RAT-server by a pop-up
message shown in
Figure 15 - Successful submission to RAT-server
5.3 Search for resources
RAT-O provides the user with the search functionality, which allows him to fast find
annotated resources, which fulfil the given search criteria.
RAT-O offers two ways of searching resources:
•
Text-based search – see section 5.3.1, and
•
Semantic search – see section 5.2.
5.3.1 Text-based search
Text based search is aimed at finding resources, whose annotation contain the specified
fragment of text in any of the following slots (see Figure 5 for interpreting the slots):
14
•
Caption,
•
Scope Note,
•
Informal Description,
•
Keywords.
5
1
6
2
3
7
4
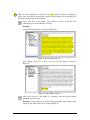
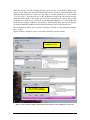
Figure 16 - Text-based search
To carry out the text-based search, the user shall follow the steps listed below. The numbering
of these steps corresponds to the numbers in yellow tags shown in Figure 16:
1
Select the Search tab of the Resource annotation window.
2
Enter the search string to the text box labelled Search (Tag (2) in Figure 16).
3
Press the Search button.
4
Annotations, which have been found, are listed in (4). By clicking on any of them the
resource becomes the selected one (blue stripe).
5
Number (5) tags the (clickable) hyperlink to the selected resource.
6
On selecting the Annotate tab, the full annotation of the selected resource will be
shown (ready to be further modified) in Resource annotation window.
7
When clicking on the Web Search button, the Internet-wide search will be done. This
step can be carried out any time after step (2).
15
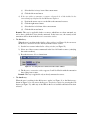
5.3.2 Semantic search
5
1
6
3
2
4
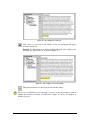
Figure 17 - Semantic query definition dialog
When carrying out the semantic search, the user proceeds similarly as in the case of textbased search, i.e.:
1
Select the Search tab of the Resource annotation window.
2
Press the Formal push button (Tag (2) in Figure 17) in order to define the semantic
query. For defining the formal query follow the scenario illustrated in Figure 17. The
label of the Formal push button becomes red after defining the semantic query. The
number in the parenthesis specifies the number of concepts taking part in the
semantic query.
3
Press the Search button.
4
Found annotations are listed in (4). By clicking on any of them the resource becomes
the selected one (blue stripe).
5
Number (5) tags the (clickable) hyperlink to the selected resource.
6
When selecting the Annotate tab, the full annotation of the selected resource will be
shown (ready to be further modified).
The scenario of defining the semantic query is illustrated in Figure 18. It starts by opening
the semantic query definition dialog upon pressing the Formal push button (see tag 2 in
Figure 17). The user selects zero or more concepts from zero or more available ontologies.
16
The semantic query requests the RAT-O server to find all annotations, in which some of the
selected concepts (or their specialisation) has been assigned to some of the keywords taking
part in the annotation.
The results are sorted according to the number of hits. It means that the annotations associated
with the highest number of concepts belonging to the semantic query will be on the top of the
result list.
Figure 18 - Defining the semantic query
Remarks:
1. If both the search string and the semantic query have been defined at the same time, both
text-based and semantic searches will be carried out. The results will contain annotations,
which meets the text-based and/or semantic search conditions.
2. The semantic query remains defined while the Formal push button (see tag 2 in Figure 17)
is red. The query can be re-defined after pressing the Formal push button again.
17
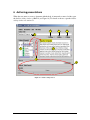
6 Authoring presentations
When the user wants to create a document with the help of annotated resources, he/she opens
the Outline editing window of RAT-O (see Figure 19). For details on how to open the Outline
editing window see section 5.1.
5
6
7
1
3
2
4
8
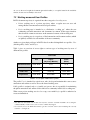
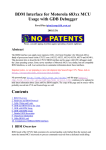
Figure 19 - Outline editing window
18
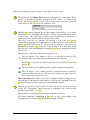
There are the following (groups of) controls on the Outline editing window:
1
The editable text field Outline Title is aimed at defining the title of the outline. This is
the title of the future presentation generated from the outline - see push buttons
Preview (5), Finalize (6), and Publish (7). It is not the name of the file, to which the
outline will be stored (see section 6.2) on RAT-O server.
2
The field (2) is aimed at defining the tree-like structure of the narrative, i.e. its outline
(also known as plot). Individual non-leaf nodes of the tree represent individual sections
or sub-sections of the outline, the leaf nodes represent individual text paragraphs or
annotated resources (typically pictures) included to the outline.
The nodes of the tree are selectable. On selecting a node in the tree (2), the
corresponding paragraph will be highlighted (its background will become yellow) in
the area (3). If the selected node is a non-leaf node (it represents a (sub)section), the
highlighted paragraph in (3) corresponds to the heading of that (sub)section. If the
selected node is a leaf, the highlighted paragraph in (3) is the text paragraph attached to
that leaf node.
Individual types of nodes are indicated by respective icons:
This icon denotes a node, which is a Topic, i.e. a (sub)section of the plot. The
heading of that (sub) section will represent this node in the narrative.
Note that the root node of the outline is represented by its Outline Title (1) in the
narrative (3).
This icon denotes a node, which represents a textual paragraph in the narrative.
This icon denotes a node, which represents an annotated resource (typically a
picture) included to the narrative. The node name (shown to the right to the icon)
is the caption of the annotated resource.
Plot re-structuring: The outline can be easily re-structured simply by dragging a node
and dropping it to the desired position in the tree. The respective paragraph in the area
(3) will follow the node to the respective position within the narrative.
3
The area (3) represents a simple textual view of the narrative. It consists of a linearly
ordered list of paragraphs, which correspond to individual nodes of the tree-like
structure of the narrative – see (2).
When clicking on a paragraph, this paragraph becomes the current one.
The current paragraph is highlighted in (3). The tree node corresponding to that
paragraph becomes selected in (2). The current paragraph is editable.
19
4
There are four push buttons located in the area (4), which are aimed at adding new
nodes to the plot and/or removing the selected node from the plot. In particular, the
following four push buttons are available:
Add a new Topic to the outline. Topic denotes a section of the first level
(immediately one level under the root node).
Example:
Let the current paragraph is as shown in Figure 20.
Figure 20 - Before adding a new topic
After adding a new Topic, a new level-one node will appear as shown in
Figure 21.
Figure 21 - After adding a new topic
Add a new Sub-topic to the outline. I.e. a narrative sub-section will be added
within the current section.
Example: Let the outline be as shown in Figure 20 again. After adding a new
sub-topic, the outline will look as shown in Figure 22.
20
Figure 22 - After adding a new sub-topic
Add a new text paragraph to the outline. A new text paragraph will appear
under the current one.
Example: Let the outline be as shown in Figure 20 again. After adding a new
sub-topic, the outline will look as shown in Figure 23.
Figure 23 - After adding a new text paragraph
This push button removes the selected node from the outline.
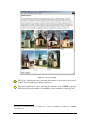
5
The Preview push-button causes showing a preview of the final narrative without
making the narrative persistent on RAT-server. Figure 24 shows an example of
narrative preview.
21
Figure 24 – A Preview example
†
6
The Finalize push button causes generating the narrative in html format and saving it
on RAT-O server without presenting it to the user.
7
The Publish push button causes generating the narrative in the CIPHER proprietary
XML-based format and submits it for publishing on the community of interest portal†.
For details on publishing narratives on CH-Portal see chapters CH-Publisher and CH-Portal in CIPHER
deliverable D15.
22
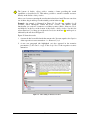
8
The bottom of Outline editing window contains a frame providing the search
capabilities as described in 5.3. This makes possible to search for suitable resources
directly on the Outline editing window.
After a set of resources meeting the search criterion has been found. The user can select
one of them, drag it and drop it to the suitable position in the tree (2).
Example: An example is illustrated in Figure 25. Let the user searches for all
resources, whose annotations contain the word “column”. The RAT-O search
functionality (see section 5.3) returns a set of three resources (Babice, Kamenny Ujezd,
and Mahous) in the list on the bottom of the Outline editing window. Let the user
selects Kamenny Ujezd drags it over the node Conclusion in the tree (2) and drops it as
indicated by the red arrow in Figure 25.
Figure 25 shows the result:
1. A new node has been added under the current node. Its name equals to the Caption
of the respective resource annotation – i.e. Kamenny Ujezd.
2. A new text paragraph (the highlighted one) has appeared in the narrative
presentation (3). Its text is a copy of the Scope Note of the respective resource
annotation.
Figure 25 - After adding an annotated resource
23
6.1 Creating a new outline or editing an existing one
There are the following two ways how to access the Outline editing window:
•
The first way:
1. The user pushes the Outline button on the RAT-O home
Figure 2). Then the Outline editing window (see Figure 19) appears.
page
(see
2. For creating a new outline the user selects the Outline→New menu item in the main
menu of the Outline editing window – see Figure 26.
Figure 26 - Creating a new outline
3. For editing an existing outline the user selects the Outline→Open menu item in the
main menu of the Outline editing window - Figure 27.
Figure 27 - Opening an existing outline
Then the user will be prompted to select the outline to be edited – see Figure 28.
Figure 28 – Load Outline dialog
24
•
The second way:
In order to provide the user with the highest comfort, the Resource annotation window has
the Outline item in its main menu. Thus, if the user has the Resource annotation window
opened, he can immediately create a new outline (as specified above) without opening the
RAT-O main window – see Figure 29.
Figure 29 – Creating a new outline from the Resource annotation window
•
The third way:
Also the Maintenance applet provides the user with the possibility to create new outlines
or edit existing outlines without having to open the RAT-O home page (see Figure 2):
1. Select the Outlines tab of the Maintenance window.
2. For creating a new outline press the New push button – see Figure 30.
New push button
Figure 30 – Creating a new outline from the Maintenance window
3. For editing an existing outline select the respective outline in the list and then press
the Open push button – see Figure 31.
Selected outline
Open push button
Figure 31 – Opening an existing outline from the Maintenance window
25
6.2 Saving an outline to the server
Note that all changes made to an outline have been made locally until the outline is saved to
RAT-O sever. The actions invoked by Preview, Finalize, and/or Publish buttons are made on
the content kept on the server. It means that an outline has to be saved to RAT-O server
before making a narrative preview if the preview shall take recent changes into account.
Saving the outline can be achieved by selecting the Outline → Save item of the Outline
editing window main menu as indicated in Figure 32.
Figure 32 – Opening an existing outline from the Maintenance window
If the old content of the preview needs to be kept, it is possible to save the current status of the
outline under another name. This can be achieved by:
Figure 33 – Opening an existing outline from the Maintenance window under another name
1. Selecting the Outline → Save As item of the Outline editing window main menu as
indicated in Figure 33.
Figure 34 – Outline Save dialog
26
2. Specifying the name of the new outline by mans of the Outline Save dialog shown in
Figure 34.
7 Collaboration
In order to enable user co-operation on annotations and creation of narrative outlines, RAT-O
tool was extended. Currently it supports investigation of heritage resources by communities of
interest. Technically speaking, new RAT-O functionality introduces annotation, outline and
keyword versioning, working areas and user profiles.
7.1.1 Document Versioning
In a collaborative environment, where different authors may contribute to the shared content
by submitting their individual documents and different authors may review and modify these
documents, a problem of a loosing document consistency/integrity can easily appear. This
phenomenon is well known in the IT community and is solved by special-purpose systems.
7.1.2 Version Conflicts
If RAT-O server was not equipped with appropriate algorithms, the following problem could
arise. When a user saved an annotation or an outline, which had been modified meanwhile by
another user, the recent modification would be lost without notifying any of the authors, who
took part on its modification. This particular case is well known as lost update in concurrency
management.
Figure 35 - Version conflict message
RAT-O server does not allow lost updates to arise. RAT-O server keeps track of document
version numbers and when a version conflict is detected, it rejects storing the new version of
the document, which is in conflict with the recently stored version, and warns the user, who is
trying to save his modifications. The user is informed of this situation by a warning message
(see the next figure).
27
After the user has closed the warning message pop-up window, a new RAT-O window will
appear. It will display the annotation/outline with current version of annotation/outline. The
originally edited window becomes read only. This is visually indicated by a violet banner
“read only mode”. Now, the user can see his modifications in the read-only window and can
manually transfer them to the newly opened window and update the current status of the
document in a consistent way. In order to provide him with a higher level of comfort, RAT-O
client has been equipped with the “drag and drop” functionality. Thus, the user can drag the
relevant information from the read-only window and drop it to the read-write window.
The mechanism described above prevents lost updates and thus loosing information without
user’s control.
Figure 36 shows a snapshot of user’s screen after detecting a version conflict.
The newly opened
read/write window
The originally opened
widow became read/only
Figure 36 - The read/write window automatically opened when a version conflict has been detected
28
As soon as the user brought the document (annotation/outline) to a required status in the read/write
window, he can save it normally to the server‡.
7.2 Working areas and User Profiles
RAT-O document repository is organised into three categories of working areas.
•
Private working area is a private repository, where a regular user can store and
manage his/her own annotations and developed outlines.
•
Project working area is intended as a collaborative “cooking pot”, where the user
community can build annotations and documents in common. In the target situation,
there should be common consensus on the structured contents of the working area.
•
Project working area is a repository of final annotations and document outlines, which
are publicly available for each member of the user community.
Authors are given their privileges in RAT-O based on three distinguished user profiles: User
(default profile), Public, and Project.
Table 1 gives an overview of access rights to various types of working areas by users of
different user profiles.
User Profile
User
Project
(Any Group Member)
Public
(Editor)
Owned Private Area
Read / Write
N/A
N/A
Other Private Areas
None
None
None
Public Area
Read-only
Read-only
Read / Write
Project Areas
Read / Write
Read / Write
Read / Write
Table 1 - Access rights of different user profiles§
The profile User is intended for typical users, who develop and maintain their own resource
annotations and outlines as well as access the shared working areas.
Public profile is assigned only to a (usually one) person, who is responsible for maintaining
the public annotations and outlines for the whole user community in the Public working area.
When a new project working area is to be set up, a user with Project profile is authorised to
create and maintain it.
‡
Note that in an unfortunate case another user may have saved the document meanwhile our resolving the
conflict. Naturally, in such a case a series of version conflicts may happen.
§
For read-only access, the RAT-client window gets the violet bar at the bottom indicating the read-only
restriction – see Figure 36.
29
Moreover, if a user wishes to change the current working area during the work with RAT-O,
specification of the only area name is sufficient via a menu action and he/she need not log in
once more.
8 Maintenance
Upgrade and
maintenance
related
Figure 37 - Accessing the RAT-O maintenance functionality from RAT-O home page
In order to enable the user to maintain/upgrade the content of his/her own workspace of
annotated resources or a workspace shared with others, development activities within
CIPHER project have been focused on developing RAT-O maintenance modules in final
stages of the CIPHER project.
The annotation tool has three tabs (see e.g. Figure 38), which are devoted to separate areas of
maintenance and are described in the following sections.
30
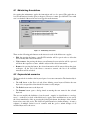
8.1 Maintaining Annotations
On opening the maintenance applet, the Annotations tab is to be opened. The applet has to
load all annotations from the given workspace. However, it must provide RAT server with
user’s credentials if the user has not been logged-in at the moment.
Figure 38 - Maintaining annotations
There are the following push buttons on the Annotations tab of the Maintenance applet:
•
Edit: On pressing the button, a new RAT-O window will be open in order to allow the
user to modify the selected annotation.
•
Visit resource: On pressing the button, a new Internet browser window will be open and
will show the respective resource, which is subject of the selected annotation.
•
Remove: On pressing the button, the selected annotation will be removed from the given
workspace. At the end of the Remove annotation scenario, the list of all available
annotations will be reloaded.
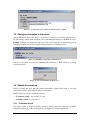
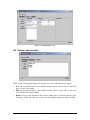
8.2 Keywords tab scenarios
The keywords tab is similar to the keyword part of a resource annotation. The functionality is
the same.
•
The Add button on the Keywords tab allows defining a new keyword. Before the new
keyword is accepted, the client checks if its name is really unique.
•
The Delete button removes the keyword.
•
The Rename button opens a dialog aimed at entering the new name for the selected
keyword.
The user can modify the definition of any keyword – namely its classification to ontology
tree(s) – on the Keywords tab of the Maintenance applet. These modifications are not sent to
the server immediately. Only on pressing the Submit push button, the changes of the selected
keyword are sent to the server. The Submit All push button has a similar meaning – it starts a
sequence of multiple Submit keyword scenarios with the goal to submit changes of all
modified keywords to the server.
31
Figure 39 - Maintaining keywords
8.3 Outlines tab scenarios
There are the following push buttons on the Annotations tab of the Maintenance applet:
•
New: On pressing the button, a new RAT-O window will be open in order to allow the
user to create a new outline.
•
Edit: On pressing the button, a new RAT-O window will be open in order to allow the
user to modify the selected outline.
•
Remove: On pressing the button, the selected outline will be removed from the given
workspace. At the end of the remove, the list of all available annotations will be reloaded.
32
8.4 Workspace management
Every user registered at the RAT server has his private workspace at disposal. The workspace
is identified by user’s name. There is also the public workspace available to all users
registered at the RAT server. In order to allow collaborative approach to organising resources,
there exist project-related workspaces. Every user registered at the RAT server has assigned
access rights to individual workspaces.
In order to allow exchange of content between users and/or projects, the design of RAT-O
makes possible to open simultaneously separate RAT-O windows for different workspaces
(i.e. also for different users) at the same computer. This generic approach is valid also for
maintenance windows. Having several maintenance windows opened on various workspaces,
user(s) can copy content between those workspaces simply by dragging and dropping
individual content items (keywords, annotations, outlines) from one maintenance window to
another one.
8.5 Checking annotations validity
If the user had annotated a resource located on a remote host, which is not under his control, it
may happen that the resource was modified or deleted after some time by its owner. In such a
case the collection of resource annotations created by the user may become inconsistent.
This may cause that some his presentations (outlines) may refer to non-existing or invalid
resources. That is why a module for checking validity of resources has been developed.
For each annotation, RAT-O server keeps a timestamp when the particular resource was
checked last time. The module implementing the “Check URL” functionality scans all
resources referenced by all annotations of given workspace. For each of them the module
sends a request (GET request applying the GETLASTMODIFIED attribute in terminology of
http protocol) for providing it with the resource if it has been modified since the last check.
For each annotation do:
1.
Select a URL.
2.
Load the timestamp associated with the URL. If there is none, take 0.
3.
Try to load the resource from its URL using the http GET command with the GETLASTMODIFIED
attribute set to the URL’s timestamp.
4.
Parse the server answer without actually downloading the resource. If the server has sent the actual
modification time of the resource, it is displayed for user information. Possible server replies are:
•
Error (resource not available, server not accessible etc.). It means that the resource is not
accessible and thus it is not possible to resolve its change status.
•
304 – NOT MODIFIED. The resource was not modified since the last check. The current time is
saved to the xml file as the last check.
•
Other. Although the HTTP contains MODIFIED reply, not all http servers reply appropriately. All
other replies are processed as modified.
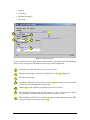
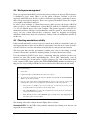
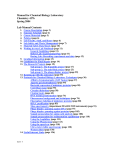
The meaning of the table columns shown in Figure 40 is as follows:
Annotated URL: It is the URL of the particular annotation. By clicking on it, the user can
inspect the resource visually.
33
Caption: Caption of the particular annotation entered by the user when annotating the
resource.
Last Check: result of the last check of the particular URL.
Track Changes: It may happen that the respective resource is frequently reported to be
modified, but its core content does not change significantly. This is the case of some dynamic
html pages on some http servers or pages containing dynamic advertisements. In such a case
the user may want to exclude this URL from the next check. He can do that simply by
unchecking the checkbox in Track Changes column for the particular row.
Ignore last change: Normally, a timestamp of the last check associated with the URL
would be replaced with the timestamp of the current check. However, the user may want to
prevent this modification. This can happen if he believes that the “resource not available”
result may be caused by a temporary failure of the target http server. By checking the Ignore
last change checkbox the user prevents modification of the timestamp associated with the
resource URL.
Values of all the checkboxes in Track Changes and Ignore last change columns will be taken
into account on pressing the OK button.
Figure 40 - Check URLs result page
9 Acknowledgement
RAT-O tool has been developed within the CIPHER project (Enabling Communities of
Interest to Promote Heritage of European Regions) funded by the 5th Framework Programme
of European Commission. For details on the project see http://www.cipherweb.org.
34