1
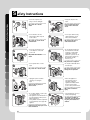
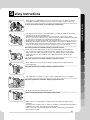
MFL63749073
OWNER’S MANUAL
LG HEAT PUMP DRYER
Please read this manual carefully before operating
your dryer and retain it for future reference.
TD-C901H
TD-C902H
MFL63749073
MFL63749073
F
eatures
Ultra big Capacity Drum
The ultra big capacity drum on this LG dryer allows you to
dry more washing at once, saving time!
Lower Energy Consumption
Energy
LG Heat pump dryers use less energy than conventional dryers due
to optimized heat exchanger and self cleaning technology.
This LG Heat pump dryer has been designed to save your money.
Reduced Drying Times
save
Drying times are now shorter due to Hybrid heating system
and optimized heat exchanger on this LG dryer.
Reduced noise levels
We have reduced the operating noise of this LG dryer by using
innovative sound-absorbing and noise-screening technologies,
making it much quieter than conventional dryers.
Steam Refresh
LG’s steam technology allows you to inject fabrics with a swirling
jet of hot steam to refresh clothes, reduce static, and make
ironing easier. Simply select the Steam Refresh cycle, or you can
add a steam option to selected cycles.
1%
-
-
-
Easy of Use
The wide, electronically controlled LCD display on this machine
is very easy to use. Simply select the cycle you require
and your LG dryer will do the rest.
SmartDiagnosis™ is available by a Phone.
C ontents
Safety Instructions
Installation Instructions
Appearance & Design
Operating Your Dryer
Additional Functions
Caring for Your Dryer
Additional Tips for Smart Use
Troubleshooting Guide
Technical Data
Disposal notice
2
3
6
12
13
17
19
22
24
27
28
S
afety Instructions
For your safety, the information in this manual must be followed to minimize the risk of fire or
explosion, electric shock, or to prevent property damage, injury to persons or death.
• Serious injury or death may occur when not observing the following rules.
• It is strictly forbidden to use the product for anything other than the manufacturer authorized
usage. LG doesn't take full responsibility for the damage by inaccurate and improper usages.
• Do not repair or replace any part of the dryer or attempt any servicing unless specifically recommended in the user-maintenance instructions or published user-repair instructions that you
understand and have the skills to carry out.
Hazards
• Before plugging in the power
cord, make sure cord is
earthed and connected to a
circuit breaker.
No earthing may cause
breakdowns or an electric
shock.
• Do not use a damaged power
cord or place heavy objects
on the cord.
A damaged power cord may
cause fire or electric shock.
• Do not plug into an adaptor. Do
not use with an extension lead.
• Do not touch the plug or
switch on with wet hands.
Abnormal heating of outlet
may cause a fire.
May cause an electric shock.
• Do not remove the top plate
when installing the dryer.
• Do not modify this product.
• Disconnect the power cord by
grasping the plug, not the
cord.
May cause breakdown, fire or
electric shock.
May cause damage of cord
resulting in fire or electric
shock.
• Keep the dryer away from
cookers, naked flames, or any
other inflammable objects.
• Wipe dirt and stains from the
power cord and insert the
plug firmly into the socket.
May cause fire or parts to melt.
Dirt and poor connections
may cause fire.
3
Safety Instructions
WARNING
afety Instructions
Safety Instructions
S
• Do not use if power cord,
plug or socket is damaged.
• Keep pets away from the
dryer.
May cause fire or electric
shock.
Pets may damage the dryer,
or may receive an electric
shock.
• Do not install or store the
dryer where it will be exposed
to the weather.
• Do not press buttons using
sharp implements such as
knives and screwdrivers.
May cause fire, electric shock
or malfunction.
May damage the dryer or
cause electric shock.
• Do not use an extension cord
or an adaptor to connect the
power cord.
• Do not dry articles that have
been cleaned in, washed in,
soaked in, or spotted with
combustible or explosive
substances (such as wax, oil,
paint, gasoline, degreasers,
dry-cleaning solvents,
kerosene, etc.).
May cause fire or electric
shock.
May cause fire or explosion.
• Do not splash water on to the
dryer.
• Do not place flammable items
near the dryer.
May cause fire or electric shock.
May cause toxic gases, parts
damage, fire or explosion.
• Unplug the power cord when
cleaning or not using the
dryer.
• Before the appliance is
removed from service or
discarded, unplug the
appliance then disassemble
the door and cut off the
power cord to prevent misuse.
Water or dirt may cause an
electric shock.
May cause accident and
injury.
• Do not allow children or pets to play
on or inside the dryer.
• The appliance is not intended for use
by young children or infirm persons
without supervision.
• Young children should be supervised
to ensure that they do not play with
appliance.
Children and pets may injure or suffocate themselves.
4
• The packing bag is not a toy.
Destroy after opening.
To avoid the possibility of
suffocation, keep the packing
bag away from babies and
children.
S
afety Instructions
• If this appliance is supplied with power from a cord extension set or an electrical connector,
the portable outlet device must be positioned so that is not subject to damp or splashing.
• Items that have been spotted or soaked with vegetable or cooking oil constitute as a fire hazard
and should not be placed in the tumble dryer.
• Items that have been soiled with substances such as cooking oil, acetone, alcohol, petrol,
kerosene, spot removers, turpentine, waxes and wax removers should be washed in hot water with
an extra amount of detergent before being dried in the tumble dryer.
• Oil-affected items can ignite spontaneously, especially when exposed to heat sources such as in a
tumble dryer. The items become warm, causing an oxidation reaction in the oil. Oxidation creates
heat. If the heat cannot escape, the items can become hot enough to catch fire. Piling, stacking or
storing oil-affected items can prevent heat from escaping and so create a fire hazard.
May cause spontaneous combustion leading to explosion and fire.
• Items made of foam, rubber, plastic, or other heat-sensitive fabrics (such as bathroom
rugs, nonslip mats or raincoats) should not be dried in a tumble dryer on a heat setting.
• Items such as foam rubber (latex foam), shower caps, waterproof textiles, rubber backed
articles and clothes or pillows fitted with foam rubber pads should not be dried in the
tumble dryer.
May cause spontaneous combustion leading to explosion and fire.
• Plastic articles such as shower caps or waterproof nappy covers should not be placed
in the tumble dryer.
May cause spontaneous combustion leading to explosion and fire.
• If the tumble dryer is installed on a carpet, it may be damaged due to poor air ventilation.
May cause spontaneous combustion leading to explosion and fire.
• Do not open the dryer door during steam cycles.
Failure to follow this instruction can result in a burn hazard.
• Fabric softeners, or similar products, should be used as specified by the fabric softener
instructions.
• To reduce the risk of injury to persons, adhere to all industry recommended safety procedures
including the use of long sleeved gloves and safety glasses.
Failure to follow all of the safety warnings in this manual could result in property damage,
injury to persons or death.
5
Safety Instructions
It may cause an electric shock, a fire, malfunction or deformation.
Installation Instructions
I
nstallation Instructions
The following instructions will guide you through the initial steps of setting up your dryer.
Please note that every section of this manual provides important information regarding the preparation and
use of your dryer, and it is important that you review this entire manual before proceeding with any
installation or use. Be sure to observe all listed warnings and cautions. These installation instructions are
intended for use by qualified installers. Read these installation instructions completely and carefully.
Safety Information
Risk of Injury
The dryer is very heavy so you shouldn’t try to
lift it alone.
Do not lift the dryer by grasping any of the
protruding parts, e.g. the jog dial or the door,
they may break off.
Risk of Falling or Tripping Up
Ensure there are no loose hoses or cables.
Check the dryer for damage occurred
during transportation.
Do not connect the dryer if it has visible signs of
damage.
If you are not confident, contact your local LG
agent. Always empty the dryer completely
before transporting it.
Your dryer should not be located near to a gas
hob, cooker, heater or grill, as flames from the
burners could damage your dryer. When the dryer
is fitted beneath a work surface, allow
30cm~50cm space at either side of the dryer and
at the back of the dryer to allow air to exit the rear
grille. This air flow is critical for condensation of
water during the drying process.
If you use this dryer near or stacked on top of
your washing machine, separate main plugs and
sockets must be used for each appliance.
Do not use 2-way adaptor or extension lead.
You can stack the dryer on top your washing
machine to save space. A stacking kit is available
from your local appliance specialist.
Stacking Installation Instructions
Your LG dryer can be placed on top of a front loading washing machine and securely fixed with a stacking kit (see following page for instructions). This installation must be conducted by an experienced
installer to ensure it has been installed correctly.
An installer will ensure you have the correct stacking kit for your model of washing machine and will
ensure it is firmly fixed. For these reasons, expert fitting is essential.
CAUTION
CAUTION Concerning the power cord
Most appliances recommend they be placed upon a dedicated circuit; that is, a single outlet circuit which
powers only that appliance and has no additional outlets or branch circuits. Check the specification page of
this owner's manual to be certain.
Do not overload wall outlets. Overloaded wall outlets, loose or damaged wall outlets, extension cords, frayed
power cords, or damaged or cracked wire insulations are dangerous. Any of these could result in and electric
shock or fire. Periodically examine the cord of your appliance, and if its appearance indicates damage or
deterioration, unplug it, discontinue use of the appliance, and have the cord replaced with an exact
replacement part by an authorized servicer.
Protect the power cord from physical or mechanical abuse, such as being twisted, kinked, trapped in a door,
or walked upon. Pay particular attention to plugs, wall outlets, and the point where the cord exits the appliance.
6
I
nstallation Instructions
Stacking Kit
In order to stack this dryer an LG stacking kit is
required.
Washer
This dryer may only be stacked on top of an LG washer. DO NOT attempt to stack this dryer on any other
washer, as damage, injury or property damage could
result.
• Incorrect installation can cause serious
accidents.
• The weight of the dryer and the height of
installation makes the stacking procedure
too risky for one person. This procedure
should be performed by 2 or more experienced service personnel.
• The dryer is not suitable for a built-in installation. Please do not install as a built-in
appliance.
• Do not operate if the dryer is disassembled.
3. Align the stacking kit holes and the rear cover
holes.
3-1) 23.6 inch(600mm)
Washer Top plate size
21.7 inch
(550mm)
23.6 inch
(600mm)
Shape
and
assembly
direction
Installation Procedure
1. Place the LG dryer on the LG washing machine.
2. Remove the two screws from the bottom of the
rear cover on each side as illustrated below.
3-2) 21.7 inch(550mm)
• Fasten the 2 screws that were removed earlier
from dryer to stacking kit.
• Use 4 screws in accessory box [0.6inch(16mm)]
to assemble washer rear cover and stacking kit.
• The procedure for the opposite side will be the
same.
7
Installation Instructions
Dryer
WARNING
MFL63749073
I
nstallation Instructions
Installation Instructions
Earthing Instructions
This appliance must be earthed. In the event of
malfunction or breakdown, earthing will reduce
the risk of electric shock by providing a path of
least resistance for the electric current.
This appliance is equipped with a earthed cord
and an earthing plug. The plug must be plugged
into an appropriate outlet that is properly
installed and earthed in accordance with
Standard.
Note
- For better drying performance, Please
keep the rear of product away from wall.
- Do not install the dryer where there is a
risk of frost (dust).
• The tumbles dryer may not be able to
operate properly or may be damaged by
freezing of condensed water in the
pump and drain hose.
Additional Grounding Procedure
Some countries may require a separate ground. In
such cases, the required accessory ground wire,
clamp and screw must be purchased
separately.
Condensed Water Drain
This appliance can be plumbed directly into
the mains waste with the adaptor supplied.
Condensed water will drain away. A plumber
will be required.
WARNING
The dryer should not be installed next to a
refrigeration appliance.
Do not install the Heat pump dryer next to
the high-temperature appliance like
refrigerator, oven or stove etc.
which can cause bad drying performance
and duration, and adversely affect the
proper functioning of the compressor.
The Heat pump dryer gives the best work
with the room temperature(23°)
8
WARNING
Avoid installing the product around the
place with the heat.
The warm air venting from the rear side of
the dryer must be well ventilated.
If not, this can bring on problems.
I
nstallation Instructions
Level the Dryer
1. Leveling the dryer prevents unnecessary noise
and vibration. Place your dryer on a solid,
level floor.
2. If the dryer is not properly level, adjust the
front levelling feet as necessary.
Turn them clockwise to raise and
counter-clockwise to lower until the dryer no
longer wobbles, both front-to-back and
side-to-side and corner-to-corner.
Adjustable Feet
Dryer is raised
Adjustable Feet
Dryer is lowered
Adjustable Feet
Diagonal Check
When pushing down the edges of the machine,
the machine should not move up and down at all
(Please, check both of two directions).
If machine rocks when pushing the machine top
plate diagonally, adjust the feet again.
9
Installation Instructions
Place the dryer in an area free from flammable
materials, condensation and not liable to
freezing.
I
nstallation Instructions
Connecting water supply hose
Installation Instructions
The dryer must be connected to the cold water tap using the new water supply hose. Do not use old
hoses.
Note
•
•
•
•
Water supply pressure must be between 100 kPa and 1000 kPa (1.0 - 10.0 kgf / cm2).
Do not strip or cross-thread when connecting inlet hose to the valve.
If the water supply pressure is more than 1000 kPa, a decompression device should be installed.
Periodically check the condition of the hose and replace the hose if necessary.
Periodically inspect and replace hoses if bulges, kinks, cuts, wear, or leaks are found.
Step1 : Check rubber seal in the inlet hose.
Two rubber seals are supplied with the water inlet
hoses.
They are used for preventing water leaks.
Make sure the connection to tap is sufficiently
tight.
Hose
connector
Rubber
seal
Y connector
Step2 : Check the installation environment.
A type
-. When using both washer and dryer with one
water tap.
Assemble Y connector and short hose.
Connect the female part of the short hose to the
water tap.
Connect the male part of Y connector to the
female part of the long hose.
Connect another male part of Y connector to the
female part of the inlet hose of washer.
B type
-. When using only the dryer from one tap.
Connect the female part of the long hose to the
water tap.
• Connect the water supply hoses to the COLD
water tap tightly by hand and then tighten another
2/3 turn with plier.
Long
hose
Short
hose
Y connector
A
B
Note
• After connecting inlet hose to water tap, turn on
the water tap to flush out foreign substances
(dirt, sand or sawdust) in the water lines.
Let water drain into a bucket, and check the
water temperature.
10
I
nstallation Instructions
Step4 : Turn on cold water tap.
Check for leaks.
Check that the water taps are turned on.
Check for leaks around “Y” connector, tap, and
hoses.
Note
• After completing connection, if water leaks
from the hose, repeat the same steps.
11
Installation Instructions
Step3: Connect hose to dryer.
• Connect the water supply hoses to the COLD
water tap tightly by hand and then tighten
another 2/3 turn with plier.
Make sure that there are no kinks in the hose
and that they are not crushed.
A ppearance & Design
Product Layout
Control Panel
Appearance & Design
Water Container
Door
Air Ventilation Grille
Control Panel
SmartDiagnosis™ function is
available only for the products
with a SmartDiagnosis™ mark.
LCD
Display
Options
High
1%
1:00
Time Left
Dry
-
-
• Time Delay
• Anti-Crease
• Favorite
• Buzzer
-
Additional
program
Power
Start/Pause
Cycle selector
12
• (More)
• Eco Hybrid
• Steam
(*Drum Light)
• Dry Level
(*Child Lock)
• (Less)
MFL63749073
O perating Your Dryer
Cycle Selection Table
Sensor Dry Cycle
Cycle
Cotton
Easy care
Bulky Item
Jeans
Detail
For thick and quilted fabrics
Extra
For thick and quilted fabrics that do not need to be
ironed
Very
For fabrics that do not need to be ironed
Cupboard
For fabrics that do not need to be ironed
Light
For fabrics that do need to be ironed
Iron
For thick and quilted fabrics that do not need to be
ironed
For fabrics that do not need to be ironed
Very
For fabrics that do need to be ironed
For polyamide, acrylic, and polyester that do not
need to be ironed
For polyamide, acrylic, polyester that do need to be
ironed
For bulky items
Steam Refresh
Shirts and blouses
Sports Wear
Soccer kit and training wear
Linen and towels, excluding
fabrics applied to delicate, sports For small loads of suitable fabrics with short drying
times
wear, bulky Item cycle.
For fabrics that are heat-sensitive like synthetic
Silk, fine fabrics and lingerie
fabrics
For wool fabrics
Wool
Timed Drying Cycle
Refresh clothes without tumble drying
Silk, wool, delicate lingerie
Tumbles without heat
All fabrics that need refreshing
Bath towels, bath robes,
Small Items & damp clothing
dishcloth and quilted fabrics
Everyday items suitable for heat drying
made of acrylic
Wool
Rack Dry
Cool Air
Warm Air
Iron
Cupboard
Iron
-
Sanitising non washable items quickly and easily
using the power of steam alone.
Recommend to use this cycle for cotton and
polyester material.
Crease release of fabric
Fabrics are not dried completely. Hang up fabrics!
For polyester material
Steam Hygiene
Delicate
Cupboard
For jeans which do not need to be ironed
Comforter bedding and
Children’s clothing
Quick Dry
Drying Level
-
CAUTION
If the load is less than 1kg, please use the “Warm Air” Cycle in Timed Drying Cycle.
Wool items should be dried using the “Wool” Cycle and heat-sensitive fabrics including silk, underwear and
lingerie should be dried using the “Delicate” Cycle. Please comply with the recommended laundry load when
you select your desired Cycle- found on page 22. Otherwise, your clothes may be damaged.
13
Operating Your Dryer
Mixed Fabric
Laundry Type
Towels, dressing gowns and bed
linen
Terry towels, tea towels, towels
and bed linen
Bath towels, tea towels,
underwear and cotton socks
Sheets, pillowcase and towels
Bed linen, table linen, towels,
T-shirts, polo shirts and work
clothes
Bed linen, table linen, tracksuits,
anoraks and blankets
Shirts and blouses
Trousers, dressers, skirts and
blouses
Shirts, T-shirts, trousers,
under-wear and socks
Shirts, T-shirts, under-wear,
anoraks and socks
Bed clothes, sheets
Jeans and colour fading
garments.
O perating Your Dryer
Please read before using your LG dryer for the first time
After removing the packaging, please carry out the following checks to ensure the LG dryer is
correctly installed and ready for use. (See installation instructions)
1. Check the dryer is well balanced by using a spirit level. If not, adjust the feet of the LG dryer until
the machine is balanced.
2. Check the water container, filter, control panel and drum to make sure everything is in place.
3. Set the machine to dry for 5 minutes to warm up the drum.
4. Open the door between loads the first few times you use the machine to allow any odours from the
interior of the LG dryer to disperse.
Operating Your Dryer
Note
The final part of a tumble dryer cycle occurs without heat (cool down cycle) to ensure that the items
are left at a temperature to ensure that the items will not be damaged.
1. Turn the power on.
Turn the
power on.
First, press the ‘‘Power’’ button. The indicator
light above the button will become illuminated
indicating that the machine is all set to run.
2. Open the door.
3. Check the filter and water container
are clean.
Open the
Door.
The filter is inside the door rim or in the back
of the door. It needs to be cleaned before and
after drying.
Open the door and check the filter is clean. If
not, please clean it referring to page 19.
Also check if water container need to be
empted for better drying results.
4. Place laundry into the drum after
sorting.
The clothes should be sorted by fabric type
and dryness level and all the strings and belts
of clothes should be well tied and fixed before
being put into the drum.
Push the laundry to the back to keep it away
from the door seal.
If not, the door seal and clothes may be
damaged.
CAUTION
Do not dry unwashed items in the tumble
dryer.
14
Glass Door
Opaque Door
Check the
filter.
O perating Your Dryer
5. Close the door.
Select the
desired
cycle.
Before you close the door, make sure fabrics are well placed inside and that foreign
objects, especially flammable ones, are not
caught around door.
CAUTION
- Be careful not to trap laundry between the
loading door and rubber seal.
6. Select the drying cycle you want.
Take out
the laundry.
7. Press the start button.
You will hear drum rotating.
8. After the cycle has finished, open the
door and remove the laundry.
CAUTION
Be careful! The drum inside could still be hot.
(Operation time varies depending on your cycle
selection or options.)
Clean the
filter.
(Replace
the filter
if it is
damaged.)
Note
The final part of a tumble dryer cycle occurs
without heat (cool down cycle) to ensure that
the items are left at a temperature that will not
damage them.
9. Clean the filter and empty water
container.
The filter should be cleaned after each load.
10. Turn off the dryer.
Press the ‘‘Power’’ button.
CAUTION
- Take care if using a vacuum cleaner to clean
the filter, as it is easily damaged and torn.
If there is a residue build up on the filter,
scrub the filter with a brush to remove.
- If you want to open the door while the dryer
is operating, please press the Start/Pause
button first, wait until the drum completely
stops and then open the door.
WARNING
Never stop a tumble dryer before the end of
the drying cycle unless all items are quickly
removed and spread out so that the heat is
dissipated.
CAUTION
It must not be used for purposes other than
those for which it was designed.
15
Operating Your Dryer
You can choose a cycle by turning the cycle
selector knob until the required cycle is indicated.
If you press Start/Pause button without choosing a
cycle, the dryer will proceed with the Cupboard
cycle. [Please refer to Cycle Selection table (page
13) for the detailed information.
O perating your dryer
Rack Dry
The dryer rack is placed inside the dryer like the
picture. Remove and discard packing material
before use.
The Rack Dry is designed for use with items that
must be dried flat, without tumbling, including
sweaters and delicate fabrics.
Note
Check the filter and remove any lint
accumulated from items dried on the Rack.
If preferred, set up Eco by pressing Eco
Hybrid button.
Operating Your Dryer
To use the Rack Dry :
1. Open the door.
1. Insert wire
edge to the
drum center.
2. Do not remove the filter.
3. Place dryer rack over the bottom of
the dryer door opening.
Reset the Rack on the dryer back
lodge.
Push down on the frame front to
secure over filter.
4. Place wet items on top of the rack.
Allow space around items for air to
circulate.
The rack does not move, but the drum
will rotate.
5. Close the door.
6. Turn power on and select Rack Dry.
16
2. Place delicate
fabrics or
sports shoes.
A dditional Functions
Option
buttons
High
1%
1:00
Time Left
Dry
-
Cycle
selector
Start/Pause
Power
• Press the Power button to turn power on
and off.
• To cancel the Time Delay function, the
power button should be pressed.
Cycle selector
• Cycles are available according to the
laundry type.
• The lamp will light up to indicate selected
cycle.
Start/Pause
• This Start/Pause button is used to start dry
cycle or pause the dry cycle.
• If stop the cycle temporarily, press the
Start/Pause button.
• When in Pause, the power is turned off
automatically after 4 minutes.
-
Additional program
buttons
LCD display
• The display shows the settings, estimated
time remaining, options, and status
messages for your dryer. The display will
remain on through out the cycle.
Options
• This allows you to select addition cycle and
will light when select.
Language Selection
• English is the default language. Language
can be changed only when LCD is on.
Power On and then press the Time Delay
and Anti Crease button simultaneously for 3
seconds until the Select a Language menu
is displayed.
Additional program
• Use these buttons to select the desired
options for the selected cycle.
English
Italiano
Français
Español
17
Additional Functions
Power
-
A dditional Functions
Time Delay
You can use the Time Delay option to
delay the finishing time of drying cycle.
Maximum Time Delay is 19 hours.
Minimum Time Delay is 3 hours.
1. Turn the dryer on.
2. Select a cycle.
3. Set time delay hour by press the
“ ”, “ ” button.
4. Press Start/Pause button.
Additional Functions
Anti-Crease
The Anti-Crease option prevents creases
that are formed when the laundry is not
unloaded promptly at the end of the drying
cycle. When Anti Crease is selected, the
dryer repeatedly runs and pauses, giving
you 2 hours to unload the laundry. If the
door is opened during the Anti-Crease
option, the option is cancelled.
Favorite
Favorite option allows you to store a customized dry cycle for future use.
1. Turn the dryer on.
2. Select a cycle.
3. Select the option or additional program.
(Steam, Anti-Crease, Eco Hybrid etc.)
4. Press and hold Favorite option button for 3
seconds.
The Favorite option is now stored for future
use. To reuse the stored cycle, select
Favorite option and press the Start/Pause.
Steam
WARNING
Do not open the dryer door during Steam
Cycles. Do not touch the steam nozzle in
the drum during or after the steam cycle.
Using the Steam cycle
The Steam Refresh cycle uses the power of
steam to quickly reduce wrinkles in fabrics.
1. Turn the dryer on.
2. Select steam cycle.
3. Press the “ ”, “ ” button.
4. Press the Start/Pause button.
For these settings, the dryer tumbles while
the water in the steam generator is heated.
Steam
cycle
Steam
option
cycle
Steam Hygiene
Steam Refresh
Easy Iron /
Static Shield
Static Shield
Cotton, Easy Care,
Mixed Fabric
Jeans,
Bulky Item
Note
Do not use Steam cycle for delicates such
as wool, silk, and easily discoloured clothes.
Child Lock (
)
High
20%
1:30
Time Left
Child Lock is on.
Drum Light
Whilst the dryer is running it is possible to
see inside the drum if you select the Drum
Light function.
Light on : Door is opened.
For 3 sec drum light button are
selected.
Light off : Door is closed.
Off automatically.
Eco Hybrid
This additional program is able to save
energy or time.
Eco: energy saving course.
(Heat Pump only)
Hybrid: time saving course.
(Heat Pump + Heater) You will see
“ speed ” indication on the LCD.
18
-
-
-
For the safety of your children, press Dry
Level button for about 3 seconds. You will
see “Child Lock is on ” indication on the LCD.
- All controls except Child Lock and Power
buttons will be disabled.
- Child Lock lasts after the end of cycle.
Note
For “Child Lock is off ”, press Dry Level
button for about 3 seconds.
Buzzer
This is a option to enable you to adjust
volume of beeper sound.
C aring for Your Dryer
Care and Cleaning is very Important
Empty Water Container
It’s not difficult to care for your dryer but it is important
that you do care for it. Follow the instructions below.
Condensed water is collected in the water container.
Empty the water container after every use.
Not doing so will affect the drying performance.
If the water container is full, the “Empty Water”
lamp glows and the buzzer sounds while the dryer
is operating. If this should occur, the water
container needs to be emptied within the next hour.
Clean Filter
Clean filter after each use and check it before each
use. It should also be cleaned if the ‘‘Clean Filter’’
light becomes illuminated and the buzzer sounds
whilst the dryer is in operation.
Cleaning or emptying the filter will reduce drying
times and energy consumption and lengthen the
dryer life.
CAUTION
1. Pull out the
water
container.
- The lint trap has to be cleaned frequently, if applicable.
- Lint must not to be allowed to accumulate around the
tumble dryer.
- Filter must be cleaned after every cycles are finished.
1. Open the door.
Caring for Your Dryer
2. Empty water
container in
the sink.
2. Pull the filter out.
3. Push it back into the dryer.
3. Clean the filter
by using a
vacuum cleaner
or rinsing under
the tap.
4. Press the Start/Pause button.
Note
A high atmospheric temperature and a small
room may both increase drying time as well as
energy consumption.
4. Replace the filter.
- Push the filter all
the way down to
avoid interference
with the door.
5. Close the door.
WARNING
Do not drink the condensed water.
CAUTION
- After washing the filter please dry thoroughly.
- Lint must not be left to accumulate in the dryer.
Note
If the filter is not in your dryer, you can not operate the dryer.
Clean Filter
Filter is clogged
with lint and dust.
Please clean the
filter.
If “Clean Filter” is displayed
during the operation, clean the
filter promptly.
1.Cool the dryer down and
follow the above steps.
2.Press the Start/Pause button.
CAUTION
If the laundry is not spun at a high speed
during washing, energy consumption and
drying time will increase.
In some instances, LCD window may
display “Empty Water” and the dryer may
stop because the water container is full.
19
C aring for Your Dryer
Ventilation Grille and Cool Air
Inlet Grille
Vacuum the front ventilation grille 3-4 times a
year to make sure there is no build up of lint or
dirt that may cause improper air flow.
3. Connect
drain hose
to the kit.
Moisture Sensor?
Caring for Your Dryer
Note
- Warm air is exhausted through the
ventilation grille.
- Adequate ventilation should be provided
to avoid the back flow of gases into the
room from units burning other fuels,
such as open fires.
Condensed Water Drain-out
Normally, condensed water is pumped up to the
water container where water is collected until
manually emptied. Water can also be drained
out directly to a mains drain, especially when the
dryer is stacked on top of a washing machine.
With a connecting kit for the mains drain hose,
simply change the water path and re-route to the
drainage facility as below:
1. Take
connecting
kit out.
2. Separate
water
container
hose from
the kit.
20
The device senses the moisture level of the
laundry during operation, which means it must
be cleaned regularly to remove any build up
of lime scale on the surface of the sensor.
Wipe the sensors inside drum. (as illustrated)
C aring for Your Dryer
Before cleaning the dryer's interior, unplug the power cord to avoid electric shock hazards.
• Turn off the stopcock if the machine is to be left for any length of time (e.g. holiday), especially if
there is no floor drain (gully) in the immediate vicinity.
The water inlet filter
•"
" icon will be displayed on the control panel when water does not enter the dryer.
• If water is very hard or contains traces of lime deposit, the water inlet filter may become clogged.
It is therefore a good idea to clean it from time to time.
1. Turn off the water tap.
Caring for Your Dryer
2. Unscrew the water inlet hose.
3. Care fully remove the filter from inlet valve and
clean the filter using a bristle brush.
4. Replace the filter and tighten up the inlet hose.
21
A dditional Tips for Smart Use
Additional Tips for Smart Use
Drying Guide
CYCLE
Capacity of dryer
Extra
Very
Cupboard
Cotton
Light
Iron
Very
Mixed
Cupboard
Fabric
Iron
Cupboard
Easy Care Iron
Bulky Item
Jeans
Steam Hygiene
Steam Refresh
Sports Wear
Quick Dry
Delicate
Wool
9 kg
9 kg
9 kg
9 kg
9 kg
4.5 kg
4.5 kg
4.5 kg
4 kg
4 kg
2 kg
3 kg
3 kg
Dress Shirts Max.5EA
2 kg
3 kg
1.5 kg
1 kg
Woollens
Dry woollens on ‘’wool’’ cycle. Be sure to follow fabric care
label "symbols“ first. Wool may not be completely dried
from the cycle, so don't repeat drying. Pull woollens to their
original shape and dry them flat.
Eco
200min
190min
180min
170min
160min
100min
90min
70min
70min
60min
120min
110min
56min
25min
50min
48min
Display Drying Time
(Including Cooling Time)
Speed
125min
120min
115min
103min
97min
53min
48min
41min
41min
35min
70min
60min
50min
29min
Below are fabric care labels.
Symbols
Instructions
Dry
Woven and Loopknit Materials
Tumble dry
Some woven and loopknit materials may shrink, depending on quality.
Permanent Press /
Crease resistant
Permanent Press and Synthetics
Do not overload your dryer. Take out permanent press
items as soon as the dryer stops to reduce creases.
Baby Clothes and Night Gowns
Gentle / Delicate
Do not tumble dry
Always check the manufacturer’s instructions.
Do not dry
Rubber and Plastics
High heating
Do not dry any items made from or containing rubber or
plastics such as:
a) Aprons, Bibs and Chair Covers
b) Curtains and Table Clothes
c) Bathmats
Fiberglass
Medium heating
Low heating
No heat / air
Do not dry fiberglass articles in your dryer.
Glass particles left in the dryer could be picked up by your
clothes the next time you use the dryer and irritate your skin.
Line Dry / hang to dry
Fabric Care Labels
Dry flat
Clothes have their own wash care labels, so drying
according to the wash care label is recommended.
Not only that, the laundry must be sorted according to size
and type of fabric.
For the best drying performance and most efficient energy
usage, do not overload the dryer.
22
Drip dry
In the shade
A dditional Tips for Smart Use
Spare Parts
Accessory Parts
Spare parts that are required under the terms
of warranty are provided free of charge. If the
warranty has expired then spare parts must be
purchased from the service center.
• Your dryer comes with accessories such as:
1. Condensing Drain Hose and Hose Holder
(Purchased Separately)
Disposal of the Dryer
2. Dryer Rack
Additional Tips for Smart Use
It is requested that you dispose of your dryer
safely to protect your children and others from
possible injury.
The door, lid and other protruding parts must be
removed and the power cord should be cut off
before safe disposal.
3. Y connector and hose
Service Contact
If there is a problem with your dryer, first consult
the Trouble Shooting Guide. If you cannot find
the error and you are unable to resolve the
problem, please contact the Service center.
Stacking Kit
A Customer Service representative will ask you
the following questions:
1. Name, address and postcode.
2. Phone number.
3. Description of problem.
4. Model number and serial number of your
dryer.
5. Date of Purchase.
Holder : 2EA, Screw : 4EA
Purchased Separately
• The stacking kit can be used for washer
top plate size 550mm and 600mm for
both.
If stacking is needed, you must stack
the dryer upon LG washing machine.
a stacking kit is sold separately.
23
T
roubleshooting Guide
Troubleshooting Tips
To save you time and money, the following page will help answer your questions before service call.
Troubleshooting Guide
Questions
What to do
Dryer won’t run
1.
2.
3.
4.
5.
Check dryer is plugged in.
Check "Start/Pause" button is pressed.
Check door is properly closed.
Check room temperature is below 5°C.
Check a fuse is blown or the circuit breaker is tripped and replace them.
(Caution : electric dryers generally use two fuses or breakers)
After emptying the water container and cleaning filter during operation,
you must press Start/Pause button, then the dryer will operate again.
It takes a long time
to dry
1.
2.
3.
4.
5.
6.
Filter should be cleaned after each load.
Check water container is emptied.
Select correct cycle setting for fabric type.
Check air ventilation grille or rear vents of dryer are not obstructed.
Check clothes are not excessively wet.
Check the dryer is overloaded.
Dryer is operating
but “Time Left” in
the display doesn’t
change.
This is not a malfunction.
Drying time is estimated and will recalculate throughout the cycle as it senses
the dryness of the load.
Clean Filter
Check filter is clean.
Filter is clogged
with lint and dust.
Please clean the
filter.
Clothes are
covered in fluff
1.
2.
3.
4.
5.
Check the filter is clean.
Check all the items in the dryer are clean.
Check all the laundry has been correctly sorted by fabric type.
Check the dryer is not overloaded.
Check if there are any paper, tissues or other degradable items amongst
the laundry and remove.
The drying time is
not consistent
The drying time for a load will vary depending on the heat setting, the size of
the load, the type of fabrics, the wetness of the clothes and the condition of
the filter.
Water is leaking
The clothes are
creased
Check the water hose or drain hose is properly connected.
Check the dryer is not overloaded. Try a shorter drying time and remove items
whilst they still retain a slight amount of moisture. Use the anti-crease option.
The garments have To avoid shrinkage, please follow the care and use instructions for your
garment, as some fabrics shrink naturally when washed and should not be
shrunk
placed in a dryer.
Insert Filter
The filter is not
replaced.
Please replace
the filter.
24
Please check the filter is in the dryer.
T
roubleshooting Guide
Error Mode
•
ERROR
The door is open.
Please close the
door completely.
: The door must be closed and Start/Pause button must be pressed for
re-operation.If error message continues to occur, unplug the power
cord and call the service center for advice.
ERROR
•
tE1
See owner’s manual…
ERROR
tE2
See owner’s manual…
ERROR
tE3
See owner’s manual…
ERROR
tE4
See owner’s manual…
ERROR
F1
See owner’s manual…
: If error message continues to occur, unplug the power cord and call the service center for
advice.
ERROR
Troubleshooting Guide
•
: Check the water tap properly open.
No water supply.
Check tap & hose.
Drum light does not work
• Contact the customer service center.
25
MFL63749073
T
roubleshooting Guide
Note
SmartDiagnosis™ function is available only for
the products with a SmartDiagnosis™ mark.
In case of a mobile phone with static option,
the smart diagnosis function may not operate.
Using SmartDiagnosis™
• Only use this feature when instructed to do so
by the call center. The transmission sounds
similar to a fax machine, and so has no
meaning except to the call center.
• SmartDiagnosis™ cannot be activated if the
dryer does not power up. If this happens, then
troubleshooting must be done without
SmartDiagnosis™.
If you experience problems with your dryer,
call to customer information center. Follow the
call center agent's instructions, and do the
following steps when
requested:
Troubleshooting Guide
1. Press the Power button to turn on the dryer. Do
not press any other buttons or turn the cycle
selector knob.
2. When instructed to do so by the call center,
place the mouthpiece of your phone close to the
"SmartDiagnosis™" icon and Power
button.
Max. 10 mm
3. Press and hold the “ More)” button for
three seconds, while holding the mouthpiece
of your phone close to the
"SmartDiagnosis™" icon and Power
button.
4. Keep the phone in place until the tone
transmission has finished.
The display will count down the time.
• For best results, do not move the phone
while the tones are being transmitted.
• If the call center agent is not able to get an
accurate recording of the data, you may be
asked to try again.
5. Once the countdown is over and the tones
have stopped, resume your
conversation with the call center agent, who
will then be able to assist you using the
information transmitted for analysis at the call
to customer information center.
Note
“Smart Diagnosis is a troubleshooting feature
designed to assist, not replace, the traditional
method of troubleshooting through service
calls. The effectiveness of this feature depends
upon various factors, including, but not limited
to, the reception of the cellular phone being
used for transmission, any external noise that
may be present during the transmission, and
the acoustics of the room where the machine is
located. Accordingly, LG does not guarantee
that Smart Diagnosis would accurately
troubleshoot any given issue.”
26
T
echnical Data
850 mm
640 mm
600 mm
Ventilation Requirement
Electrical Requirements
Australia,
New Zealand 230-240 V
Hertz
Watts
Alcove or
under counter
Closet
50 Hz
1800
Ensure air flow of
112 cu.ft./min
through dryer
Closet door must have
2(louvered) openings,
each having a minimum area of 60 sq.
inches (387 sq.cm),
located 3 inches (8 cm)
from bottom and top of
door.
Ensure you connect the dryer to the correct
electricity voltage. The ratings plate on your
dryer shows you what the voltage should be.
Max. capacity : 9 kg
Allowable temperature : 5 ~ 35°C
Depth with door open : 1090mm
27
Technical Data
Volts
Net Weight : 62 kg
MFL63749073
D
isposal notice
Disposal of your old appliance
1. All electrical and electronic products should be disposed of separately
from the municipal waste stream via designated collection facilities
appointed by the government or the local authorities.
2. The correct disposal of your old appliance will help prevent potential
negative consequences for the environment and human health.
3. For more detailed information about disposal of your old appliance,
please contact your city office, waste disposal service or the shop
where you purchased the product.
• Information of fluorinated greenhouse gases used as refrigerant of this
dryer
Chemical name Composition of Gases
R – 134a
100% HFC – 134a
Total GWP (kg CO2 –eq)
1300
Note
Disposal notice
• When disposing of the appliance, cut off the mains cable, destroy the plug and disassemble the
door to prevent children being trapped inside.
28
M emo
29
M emo
30
M emo
31
MFL63749073