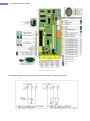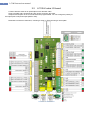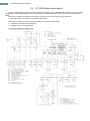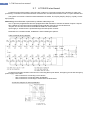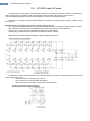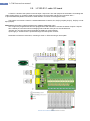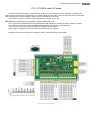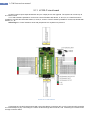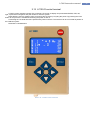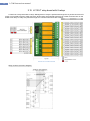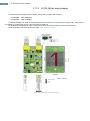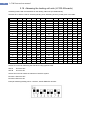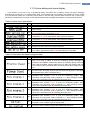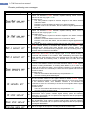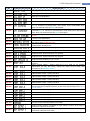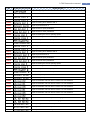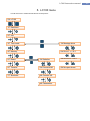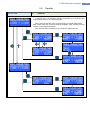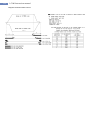
1
2 LC100 Instruction manual Contents General......................................................................................................................................4 LC100 boards description ......................................................................................................5 2.1 LC100-C main control unit ..............................................................................................5 2.2 LC100-K cabin I/O board ................................................................................................8 2.3 LC100-K2 cabin I/O board ..............................................................................................9 2.4 LC100-S safety circuit board ........................................................................................10 2.5 LC100-SR safety circuit board .....................................................................................15 2.6 LC100-E input-output unit for cabin calls ...................................................................16 2.7 LC100-E2 in/out board ..................................................................................................18 2.8 LC100-E3 cabin I/O board ............................................................................................20 2.9 LC100-E3.1 cabin I/O board .........................................................................................22 2.10 LC100-F in/out board .................................................................................................24 2.11 LC100-D control terminal ..........................................................................................25 2.12 LC100-Z cabin connection board .............................................................................26 2.13 LC100-R relay board with 4 relays ..........................................................................29 2.14 LC100-T relay board with 8 relays ...........................................................................30 2.15 LC100-I IN/OUT board...............................................................................................31 2.16 Boards for landing calls and signalization ..............................................................33 2.16.1 LC100-M5 dot matrix display ................................................................................33 2.16.3 LC100-M7 segment display ..................................................................................35 2.17 Adressing the landing call units (LC100-M boards) ..............................................38 2.18 LC100-J input/output board ......................................................................................39 2.19 LC100-V load measurement board .........................................................................41 2.20 LC100-B CAN bridge board ......................................................................................42 2.21 LC100-H CAN connection board .............................................................................43 3. Managment with LC100-D terminal ....................................................................................44 3.1 Basic view ............................................................................................................................44 3.1.1 Basic elevator state.....................................................................................................45 3.1.3 Display of current elevator station ............................................................................45 3.1.4 Safety line and drive display ......................................................................................46 3.1.5 Active delays and errors display ...............................................................................47 3.2 Menu structure ....................................................................................................................55 3.2.1 Statistics .......................................................................................................................56 4. Parameters .............................................................................................................................63 4.1 General - Type A ............................................................................................................64 4.2 Call processing – Type B ..............................................................................................66 4.3 Main drive - Type C........................................................................................................70 4.4 Doors - Type D ...............................................................................................................75 4.5 Positioning - Type E .......................................................................................................80 4.6 Stopping - Type F ...........................................................................................................83 4.7 Lift markings - Type G ...................................................................................................83 4.8 Timers - Type H ..............................................................................................................83 4.9 Protection - Type I ..........................................................................................................87 4.10 Configurations - Type N.............................................................................................90 OUTPUT FUNCTION TABLE .............................................................................................91 INPUT FUNCTIONS TABLE ...............................................................................................95 1. 2. LC100 Instruction manual CABIN CALLS SIDE A TABLE ...........................................................................................99 CABIN CALLS SIDE B TABLE ...........................................................................................99 4.11 P-M-L Modul - Type P ..............................................................................................100 4.12 Factory - Type T .......................................................................................................101 5. LC100 menu .........................................................................................................................105 5.1 Date/time .......................................................................................................................106 5.2 Info ..................................................................................................................................106 5.3 Test mode......................................................................................................................107 5.4 Memory ..........................................................................................................................107 5.6 Transfer..........................................................................................................................109 6. LC100-D ADDITIONAL MENU ................................................................................110 6.1 General ..........................................................................................................................110 6.2 Aditional menu structure .............................................................................................111 6.3 LC100-M5/M6/M7 addressing ..................................................................................112 6.4 ADL 200 parameters....................................................................................................113 6.5 CAN bus traffic analysis ............................................................................................114 6.6 CAN2 bus elevator select .........................................................................................115 6.7 Load measurement ....................................................................................................116 6.7 Utility ...................................................................................................................................119 6.8 User code...........................................................................................................................119 6.9 ELGO..................................................................................................................................119 APPENDIX 1. POSITIONING ...........................................................................................120 APPENDIX 2. TRAVELING CABLE CONNECTION .....................................................124 APPENDIX 3. CONNECTING THE CAN AND CAN BUS TERMINATION ...............125 APPENDIX 4. STANDARD CONFIGURATIONS OF PARAMETERS .......................128 3 4 LC100 Instruction manual 1. General LC100 is a microprocessor control system for elevators up to 40 stops and 8 elevators in multiplex work. The system is universal and applicable to a wide variety of requirements that are set to control a new generation of all types of elevators up to 4m/s.. The system is modular with the basic concept that signals are processed on the spot and the output signals are generated where needed. Communication between modules is realized with very robust standardized industrial CAN bus to meet the latest achievements in technology of CAN communications. System is mainly produced in SMT technology (surface mounting technology). The system is designed with components that meet the low power consumption. All boards have passed several tests: electrical test of printed boards before assembling, functional test after production and temperature and load test for each lot. The system meets the following standards: EN 81-1, EN 81-2, EN81-A3 EN 12015, EN 12016, EN 55011,EN 61000-4-2, EN 61000-4-3, EN 61000-4-4, EN 61000-4-5, EN 61000-4-6, EN 61000-4-11 Basic features: - The universal program for all types of installation with the possibility of complete user settings with LCD mobile terminal, personal computer or through the internet. - Applicability to all known types of drive elevators (adaptability to different systems of control plants), different types and kinds of doors, a passing cab. - A short floor distances, relabeling, door preopening, several types of parking, more fire zones, loading and unloading of the building, driving priority. - Different modes of call processing, with emphasis on energy saving and lighting and ventilation energy saving management. - Module connection with connectors – plugs & plays system. - Universal traveling cable for all kind of installation prewired for easy connecting. - Different types of copying the position of the cab. - Cabinet load measurement. - Monitoring the temperature of the engine and control cabinets. - Landing correction for each floor. - Parameter selection for signalization. - More than 100 parametric timers for various applications. - Real time failure statistics. - Small size plate which provide a control cabinet of width 120 mm. - Safety circuit voltage from 24 DC to 230 AC. - Adaptability to new installations and modernization. - Monitoring system via Internet. Modules of LC100 system: LC100-C Main control board LC100-K Cabin input-output board LC100-S Safety circuit controlling board LC100-Z Cabin connection board with emergency power suply 12VDC LC100-I Shaft input-output board LC100-B CAN bridge board LC100-M3, M4, M5, M6, M8 Landing call unit with dot matrix floor indicator LC100-M7 Landing call unit with seven segment floor indicator LC100-G Monitoring connection board LC100-R, T Relay board with 4 relays (R) and 8 relays (T) LC100-E,J Input-output board LC100-F Aditional in-out board (16 I/O) LC100-V Weight measurement board (available from 11/2011) LC100 Instruction manual 2. LC100 boards description 2.1 LC100-C main control unit LC100-C is a central control system plate of a LC100 system. In addition to processing input and output information management and storage system parameters, plate has the function of communication between peripheral I / O plate system. Communication between different parts of the system is based on CAN communication. The system has two independent CAN channels. One is used for CAN communication with the boards on the level of simplex and the other for connection of the landing call boards for multiplex and the communication to the monitoring system. Input Power for the system (XC13) is 24 VDC. Voltage tolerance is +10 / -20%. To operate the processor power is converted through a DC / DC converter to the 5V. Input voltage (24 VDC) is transmitted directly to the connectors XC1 to XC4, the power is connected across a diode to the XC12 connector for connecting a landing call boards in multiplex operation. All connectors are different colours and pitches. Main functions: - 2 independent CAN bus. - 14 programmable optocoupler inputs with status LED indicators. - 6 opt coupler inputs for connecting the LC100-S safety circuit board. - 8 programmable digital outputs. - Input for connection of an inductive sensor (NPN) that is used in certain types of copying the position of the cabin. - Analog input for PTC probe resistance measurement with adjustable resistance tripping. - Real-time clock with battery supply. - Measurement of ambient temperature with adjustable temperature range operation. . Pin: 2 on the input connector XC8 is used for connection of PTC sensor and has the ability to customize the level of tripping over the parameter I-01 and I-02. Pin XC7: 1 on the connector is for connecting an inductive sensor type NPN to copy elevator position. All digital inputs are optocoupler with LED status indication of input. Board is equipped with CR1220-C1 3V battery for storing parameters and statistics. All inputs and outputs than XC7.1 (inductive) and XC8.2 (PTC probe) are programmable Picture 1 - Example of connecting the inputs. The example in Figure 1 shows a way of connecting the inputs on the LC100-C plate, the polarity configuration inputs (NO or NC) is available on all inputs through the configuration parameters TYPE-N. 5 6 LC100 Instruction manual Picture 2 - LC100-C board Connection diagram for bimetal, ptc probe and inductive switch on overspeed governor: LC100 Instruction manual Power suply for LC100-C board: 7 8 LC100 Instruction manual 2.2 LC100-K cabin I/O board LC100-K board is used as an input/output unit for elevator cabin. Suply is 24VDC and is powered via CAN / power connector XK1, XK2. All inputs and outputs on the LC100-K board are programmable. You can change the polarity of the inputs (NO or NC) and output (NOR or INV). Dimensions of board is 155x72mm, mounting is done on TS35 rail using a carrier plate. Picture 3 - LC100-K board LC100 Instruction manual 2.3 LC100-K2 cabin I/O board LC100-K2 board is used as an input/output unit for elevator cabin. Suply is 24VDC and is powered via CAN / power connector XK1, XK2, XK3 All inputs and outputs on the LC100-K2 board are programmable. You can change the polarity of the inputs (NO or NC) and output (NOR or INV). Dimensions of board is 155x72mm, mounting is done on TS35 rail using a carrier plate. Picture 4 - LC100-K2 board 9 10 LC100 Instruction manual 2.4 LC100-S safety circuit board LC100-S safety board is used to connect elements of a safety circuit. Information about points of safety circuit is transfered to lower voltage through optocoupler and then transfered through XS15 flat connector to main LC100-C board. Elements of a safety circuit are connected to connectors XS1 to XS16 which are red coloured. On the board there is a safety fuse and status LED diodes. There is two versions of LC100-S board acording to the safety circuit voltage: 1. 220VAC and 48VAC (with capacitors) 2. 48VDC (short circued capacitors). Connection diagram for safety circuit: LC100 Instruction manual On LC100-S board there are also connectors for connecting the drive shaft light with LED indicator and controling the status for automatic control of the light (the light is powered automaticly when the inspection mode is on). Shaft lighting is controled by relay RL1 with output parameter XC10.8. - XS19 – input connector for shaft light power supply. XS25 – connector for shaft light box in the drive shaft pit. XS24 – connector for shaft light. Shaft light connection diagram: 11 12 LC100 Instruction manual XS27 connector is a power supply 230VAC for cabin, XS26 connector is output power suply for the cabin connected with the traveling cable. Cabin power supply connection diagram: LC100 Instruction manual Connectors XS20 to XS23 are use to connect to a voice device in the cabin, emergency power supply, alarm buttons, and indicator "elevator in the station " - XS20 output connector is used for connecting "elevator in the station " indicator, and connecting safety module for aplications whith releveling or preopening the doors.. - XS21 input connector for signals from the cabin (travelling cable) - XS22 connector for speaker phone in machine room. - XS23 connector for alarm pushbutton in drive shaft. Alarm and speaker phone connection diagram: 13 14 LC100 Instruction manual Picture 5 - LC100-S bord LC100 Instruction manual 2.5 LC100-SR safety circuit board LC100-SR safety board is used to connect elements of a safety circuit. Information about points of safety circuit is transfered to lower voltage through optocoupler and then transfered through XS3 flat connector to main LC100-C board. Elements of a safety circuit are connected to connectors XS1 to XS2 which are red coloured. On the board there is a safety fuse and status LED diodes. There is two versions of LC100-SR board acording to the safety circuit voltage: 3. 220VAC and 48VAC (with capacitors) 4. 48VDC (short circued capacitors). Connection diagram for safety circuit: 15 16 LC100 Instruction manual 2.6 LC100-E input-output unit for cabin calls LC100-E board of the system is used as input / output unit. The main purpose of the board is for cabin call processing. It consists of CAN communication connector XE1 and XE2,and connectors with I / O pins and XE3 XE4. XE5 connector for connecting additional input-output board LC100-F. The system can have two LC100-E boards addresses "0" and address "1 ". Addressing LC100-E board is performed by inserting a jumper JP3. - No jumper JP3 board address "0" - LC100-E0 - With jumper JP3 board address "1" - LC100-E1 All I / O pins are programmable and are equipped with LED indication to monitor the status of inputs / outputs. XE4.7 XE4.8 pins and are used for managing matrix indicator if the pins do not havefunction. Jumpers JP1 and JP2 are used to terminate the CAN bus communication. Input supply is 24VDC and it is powered through the CAN-power conector. Dimensions is 42x200mm board, installation is done installing the spacers. Cabin comands wireing diagram: LC100-E board also contains connectors for connecting alarm push button, emergency phone and emergency power supply in the cabin. - XE6 connector for connecting a voice device - XE7 connector for connecting alarm pushbutton. - XE8 connector for connecting LC100-E with LC100-Z board. Connection diagram for alarm pushbutton LC100 Instruction manual Picture 4 - LC100-E board 17 18 LC100 Instruction manual 2.7 LC100-E2 in/out board LC100-E2 board of the system is used as input / output unit. The main purpose of the board is for cabin call processing. It consists of CAN communication connector XE1 and XE2,and connectors with I / O pins and XE3 XE4. The system can have 8 LC100-E2 boards addresses LC100-E0, E1, E0(FC), E0(FD), E1(FC), E1(FD), LC100K(FC),K(FD).. Addressing LC100-E2 board is performed by software addressing menu All I / O pins are programmable and are equipped with LED indication to monitor the status of inputs / outputs. XE4.7 XE4.8 pins and are used for managing matrix indicator if the pins do not havefunction. Jumpers JP1 and JP2 are used to terminate the CAN bus communication. Input supply is 24VDC and it is powered through the CAN-power conector. Dimensions is 172x42mm board, installation is done installing the spacers. Cabin comands wireing diagram: LC100-E2 board also contains connectors for connecting alarm push button, emergency phone and emergency power supply in the cabin. - XE6 connector for connecting a voice device - XE7 connector for connecting alarm pushbutton. - XE8 connector for connecting LC100-E2 with LC100-Z board. Connection diagram for alarm pushbutton LC100 Instruction manual Picture 6- LC100-E2 board 19 20 LC100 Instruction manual 2.8 LC100-E3 cabin I/O board LC100-E3 board of the system is used as input / output unit. The main purpose of the board is for landing and cabin call processing. It consists of CAN communication connector XE3 and XE4,and connector with I / O pins and XE5 with parallel connection to XE6 and XE7 connector for managment relays. The system can have 8 LC100-E3 boards addresses LC100-E0, E1, E0(FC), E0(FD), E1(FC), E1(FD), LC100K(FC),K(FD).. Addressing LC100-E3 board is performed by software addressing menu All I / O pins are programmable and are equipped with LED indication to monitor the status of inputs / outputs. XE4.7 XE4.8 pins and are used for managing matrix indicator if the pins do not havefunction. Jumpers JP1 and JP2 are used to terminate the CAN bus communication. Input supply is 24VDC and it is powered through the CAN-power conector. Dimensions is 172x42mm board, installation is done installing the spacers. Cabin comands wireing diagram: LC100-E3 board also contains connectors for connecting alarm push button, emergency phone and emergency power supply in the cabin. - XE6 connector for connecting a voice device - XE7 connector for connecting alarm pushbutton. - XE8 connector for connecting LC100-E3 with LC100-Z board. Connection diagram for alarm pushbutton LC100 Instruction manual Picture 7- LC100-E3 board 21 22 LC100 Instruction manual 2.9 LC100-E3.1 cabin I/O board LC100-E3.1 board of the system is used as input / output unit. The main purpose of the board is for landing and cabin call processing. It consists of CAN communication connector XE3 and XE4,and connector with I / O pins and XE5 with parallel connection to XE6 and XE7 connector for managment relays. The system can have 8 LC100-E3.1 boards addresses LC100-E0, E1, E0(FC), E0(FD), E1(FC), E1(FD), LC100K(FC),K(FD).. Addressing LC100-E3.1 board is performed by software addressing menu All I / O pins are programmable and are equipped with LED indication to monitor the status of inputs / outputs. XE4.7 XE4.8 pins and are used for managing matrix indicator if the pins do not havefunction. Jumpers JP1 and JP2 are used to terminate the CAN bus communication. Input supply is 24VDC and it is powered through the CAN-power conector. Dimensions of board is 104x72mm, mounting is done on TS35 rail using a carrier plate. Picture 8- LC100-E3.1 bord LC100 Instruction manual 2.10 LC100-E4 cabin I/O board LC100-E4 board of the system is used as input / output unit. The main purpose of the board is for landing and cabin call processing and for inputs/outputs. It consists of CAN communication connector XE1 and XE2,and connector XE3 and XE4 with I / O pins and XE6 output connector and XE5 input connector. The system can have 4 LC100-E4 boards addresses LC100-E0, E1, E2, E3 Addressing LC100-E4 board is performed by software addressing menu All I / O pins are programmable and are equipped with LED indication to monitor the status of inputs / outputs. XE4.7 XE4.8 pins and are used for managing matrix indicator if the pins do not havefunction. Jumpers JP3 and JP4 are used to terminate the CAN bus communication. Input supply is 24VDC and it is powered through the CAN-power conector. Dimensions of board is 120x72mm, mounting is done on TS35 rail using a carrier plate. Picture 9- LC100-E3.1 bord 23 24 LC100 Instruction manual 2.11 LC100-F in/out board LC100-F board is input-output board with 16 input / output pins for the upgrade. The system can connect up to 6 LC100-F board. To LC100-K board is possible to connect two LC100-F boards with adress „C“ and „D“, to LC100-E0 board is possible to connect two board with adress „C“ and „D“, and to LC100-E1 board is possible to connect two boards with adress „C“ i „D“. Adressing the LC100-F boards is done with jumpers like it is explained on picture 6. Picture 10 - LC100-F board Connecting the LC100-F board is done with 10 pin flat cable to connectors XF1 or XF2 (connectors XF1 and XF2 are connected pin to pin). Connecting to LC100-E is done through XE5 connector, and connecting to LC100-K board through connector XK12. LC100 Instruction manual 2.12 LC100-D control terminal LC100-D control terminal consists of a 2x16 blue LCD screen to display and push-buttonENTER, ESC, left, right, up and down navigation and push-button to reset the system. Reset button is used for reseting some errors that can't be reset by recycling the power. By pressing the reset button for 5s procesor is reseted like switching the power of and on. Connecting the LC100-D terminal is performed by CAN connector. The terminal can be connected anywhere on the CAN bus system. Dimensions:145x90x25mm Picture 11 - LC100-D control terminal 25 26 LC100 Instruction manual 2.13 LC100-Z cabin connection board LC100-Z board is used for connecting the cabin safety circuit, door power, door managment, alarm pushbutton, car fan... Dimensions of plate are 229x72mm and mounting is done on TS35 rail using bracketplates or with spacers. (there are holes on the modul). Management of relays on the plate is carried out through input connector XZ20 which connects with LC100K XK9 output connector. Next to each relay is a status LED indication. Cabin power supply and door managmet connection diagram: LC100 Instruction manual Connectors XZ10 to XZ16 are used to connent cafety circuit. Safety circuit on the cabin connection diagram: LC100-Z circuit includes an emergency power supply. Circuit for emergency power supply is equipped with a 100mA fuse on the primary side of transformer, and 1A fuse on the side of the 12VDC power supply. On the board is installed potentiometer for setting the battery charging voltage. Connection diagram for alarm and emergency light is given in LC100-S board description. 27 28 LC100 Instruction manual Picture 12 - LC100-Z board LC100 Instruction manual 2.14 LC100-R relay board with 4 relays LC100-R is relay circuit board with 4 relays. Management of relays is performed through the 10 pin flat connector XR1 which is connected to XC10 or XK9 connector, managment of relays is also possible through XR2 connector. Relay modul consist of 4 releys – on R1, R2 i R3 normaly open contact connected to XR3, on R4 change over contact connected to XR3. Picture 13 - LC100-R board Relay module connection diagram: 29 30 LC100 Instruction manual 2.15 LC100-T relay board with 8 relays LC100-R is a relay board with 8 relays. Management of relays is performed through the 10 pin flat connector XT1 which is connected to XC10 or XK9 connector. When relays are powered trough XC10 or XK9 connector then on the board are 6 relays. If relays are powered trough XT2 connector then there are 8 relays. Picture 53 - LC100-T board Relay module connection diagram: LC100 Instruction manual 2.16 LC100-I IN/OUT board LC100-I is input-output board used mainly on elevators whithout mashine room when there is a control cabinet in the shaft. LC100-I consist of : 8 digital input connected to connector XI3 4 relay output connected to XI4 8 digital output connected to XI5 Analog current input 4-20mA on XI5 Connecting the inputs: Relay outputs connection: Digital output connection diagram: 31 32 LC100 Instruction manual Picture 64 - LC100-I board LC100 Instruction manual 2.17 Boards for landing calls and signalization 2.17.1 LC100-M5 dot matrix display LC100-M5 matrix dot display with resoluton 10x7 dots is made in two versions: LC100-M5B LC100-M5R Blue dot display Red dot display LC100-M5 displays are used as landing displays with connector for connecting the landing calls. Connection to the displays is made trough XC12 connector which is CAN2 bus. Each display is addressed for a floor. Addressing is done through the aditional menue for addressing. What the displays will show can be set trough P-M-L modules TYPE P. Picture 75 - LC100-M5 matrix display Connection diagram for connecting the pushbutton: 33 34 LC100 Instruction manual 2.17.2 LC100-M6 dot matrix display LC100-M6 matrix dot display with resoluton 16x16 dots is made in two versions: LC100-M6B LC100-M6R Blue dot display Red dot display LC100-M6 displays are used as landing displays with connector for connecting the landing calls. Connection to the displays is made trough XC12 connector which is CAN2 bus. Each display is addressed for a floor. Addressing is done through the aditional menue for addressing. What the displays will show can be set trough P-M-L modules TYPE P. Picture 86 - LC100-M6 dot matrix display LC100 Instruction manual 2.17.3 LC100-M7 segment display LC100-M7 landing display is done in two versions: LC100-M7B LC100-M7R Blue 7-segment display Red 7-segment display LC100-M7 displays are used as landing displays with connector for connecting the landing calls. Connection to the displays is made trough XC12 connector which is CAN2 bus. Each display is addressed for a floor. Addressing is done through the aditional menue for addressing. What the displays will show can be set trough P-M-L modules TYPE P. Picture 97 - LC100-M7 segment display 35 36 LC100 Instruction manual 2.17.4 LC100-M3 horizontal dot matrix display LC100-M3 board is produced in two versions: LC100-M3B LC100-M3R Blue DOT matrix display Red DOT matrix display LC100-M3 displays are used as a cabin displays and can be used as a landing units. When used as a cabin display it is connected to CAN1 bus, and used as a landing call units it is connected to CAN2 bus (connector XC12). Every landing call unit is adressed, adresses are given in the ADRESSING TABLE. To ensure that the landig calls are procesed through landing units parameter A-9 must be set. Configuration of the units is done through parameters P-M-L module TYPE-P. Picture 108 - LC100-M3 dot matrix display LC100 Instruction manual 2.17.5 LC100-M8 vertical dot matrix display LC100-M8 board is produced in two versions: LC100-M8B LC100-M8R Blue DOT matrix display Red DOT matrix display LC100-M8 displays are used as a cabin displays and can be used as a landing units. When used as a cabin display it is connected to CAN1 bus, and used as a landing call units it is connected to CAN2 bus (connector XC12). Every landing call unit is addressed, addressing is done trough addressing menue. To ensure that the landig calls are procesed through landing units parameter A-9 must be set. Configuration of the units is done through parameters P-M-L module TYPE-P. Picture 19 - LC100-M8 dot matrix display 37 38 LC100 Instruction manual 2.18 Adressing the landing call units (LC100-M boards) Adressing is done with microswitches on the landing calls units (LC100M boards). Switches S1 to S6 are used for adressing landing units, adressing is binary coded given in the table. STANICA S1 S2 S3 S4 S5 S6 STANICA S1 S2 S3 S4 S5 S6 1. 2. 3. 4. 5. 6. 7. 8. 9. 10. 11. 12. 13. 14. 15. 16. 17. 18. 19. 20. ON OFF ON OFF ON OFF ON OFF ON OFF ON OFF ON OFF ON OFF ON OFF ON OFF OFF ON ON OFF OFF ON ON OFF OFF ON ON OFF OFF ON ON OFF OFF ON ON OFF OFF OFF OFF ON ON ON ON OFF OFF OFF OFF ON ON ON ON OFF OFF OFF OFF ON OFF OFF OFF OFF OFF OFF OFF ON ON ON ON ON ON ON ON OFF OFF OFF OFF OFF OFF OFF OFF OFF OFF OFF OFF OFF OFF OFF OFF OFF OFF OFF OFF ON ON ON ON ON OFF OFF OFF OFF OFF OFF OFF OFF OFF OFF OFF OFF OFF OFF OFF OFF OFF OFF OFF OFF 21. 22. 23. 24. 25. 26. 27. 28. 29. 30. 31. 32. 33. 34. 35. 36. 37. 38. 39. 40. ON OFF ON OFF ON OFF ON OFF ON OFF ON OFF ON OFF ON OFF ON OFF ON OFF OFF ON ON OFF OFF ON ON OFF OFF ON ON OFF OFF ON ON OFF OFF ON ON OFF ON ON ON OFF OFF OFF OFF ON ON ON ON OFF OFF OFF OFF ON ON ON ON OFF OFF OFF OFF ON ON ON ON ON ON ON ON OFF OFF OFF OFF OFF OFF OFF OFF ON ON ON ON ON ON ON ON ON ON ON ON OFF OFF OFF OFF OFF OFF OFF OFF OFF OFF OFF OFF OFF OFF OFF OFF OFF OFF OFF OFF ON ON ON ON ON ON ON ON ON Switch S7 is used for adressing the side when using opposite calls. Side A Side B S7 set to OFF S7 set to ON Switch S8 is used to adress the elevator in DUPLEX system. Elevator A S8 set to OFF Elevator B S8 set to ON Example adressing landihg call on 11th floor, side B SIMPLEX elevator: LC100 Instruction manual 2.19 LC100-J input/output board LC100-I board is used as aditional input/output board. It is equipped with 8 in/out ant two CAN connectors. There are also microswitches for addressing or defining functions acordint to the instaled software. Picture 20 - LC100-J board Aplications examples using LC100-J board: 1. Floor units SIMPLEX elevator with binary coded landing display. Floor units are coded acording to the addressing table. LC100-J boards are connected to CAN2 bus, there is no need for parameterization because inputs and outputs are set as shown on the connection diagram. Connection diagram: 39 40 LC100 Instruction manual 2. Floor units DUPLEX elevator with „C“ i „D“ protocol displays. Floor units are coded acording to the addressing table. LC100-J boards are connected to CAN2 bus, there is no need for parameterization because inputs and outputs are set as shown on the connection diagram. When connecting speakers on XJ3.3 and 4 there is need for putting resistor with minimal value 100 Connection diagram: 3. Floor units for elevators without cabin calls. For LC100-J software for non passanger elevators addressing is not done, inputs are like on connection diagram. All the landing calls are connected in parallel. Connection diagram: NOTE! Here are only some examples on using LC100-J, other configurations are made on request. LC100 Instruction manual 2.20 LC100-V load measurement board LC100-V board is used to connect the load measurement cells. It has four connectors for connecting up to four cells and a flat connector for connecting it to the LC100-K board. Programming the load measurement is done with the LC100-D keyboard as explained in additional menu, section 5/7 LOAD MEASUREMENT Picture 21 LC100-V board Connection diagram for LC100-V: 41 42 LC100 Instruction manual 2.21 LC100-B CAN bridge board LC100-B CAN bridge board is used for connecting can devices which are not compatible with the LC100 CAN protocol (frequency inverter, encoders…). Board is connected to CAN1 bus of LC100 trough XB1 or XB2 connector. Picture 22 LC100-B board LC100 Instruction manual 2.22 LC100-H CAN connection board LC100-H board is used to multiply CAN connectors, it consist of 4 CAN conectors. LC100-H board connection: Picture 23 - LC100-H board 43 44 LC100 Instruction manual 3. Managment with LC100-D terminal Parameter setting, diagnostics and monitoring the system LC100 is enabled by using supervision and control terminal LC100-D. Supervisory-control terminal consists of four line LCD screen and the keyboard of the four buttons to scroll through the menus, pressing the Enter key to enter the menu and confirm the parameter, the Escape key to exit the menu and reset button as shown in Figure 3.1. LC100-D terminal can be connected anywhere on the CAN bus communication. After switching to the bus terminal is shows basic display status of elevators and after pressing the enter key it goes to the main menu. 3.1 Basic view The main display on the LC100-D terminal contains basic status of the system. Display status is divided into 6 parts: 1. The basic state status 2. A door status 3. B door status 1 1 . 2 . 3 4. Actual floor status 2 1 4 . 4 5 .7 .6 . 5 7 6 5. Safety circuit Status which turns in to drive status. 6. Active failure status 7. Allowing the ladning calls status: E:+ landing calla sre allowed E:- landing calls are not allowed LC100 Instruction manual 3.1.1 Basic elevator state Basic elevator state is shown on the top line on the primary screen of terminal LC100-D. Elevator state ID 4 5 6 7 8 9 10 11 12 Description Indicates that the service travel port is not defined FI-235. It is necessary to define service travel port in configuration. Indicates that the service travel is active. The message is recorded in the statistics without time delay after switching off service travel FI-235. Cabin calls are canceled. Landing calls are canceled in simplex mode. Indicates that the recall travel is activated. The message is recorded in the statistics without time delay after switching on recall travel FI-201. Indicates that the signals are simultaneously active service and recall travel. Service travel is priority and the recall travel is disabled. It is necessary to turn off service travel to get the recall control. Indicates that the „Simulator drive“ program is active. Indicates that the evacuation of passengers from elevator due to power failure is in process. Or evacuation input active FI-207. Elevator does evacuation depending on the type of evacuation defined parameter A-04. Indicates that the elevator is in the auxiliary power supply mode. Learning travel is in process. Normal travel is in process. 3.1.2 Elevator door state First three characters of the second line indicates door A state, and the first three characters of the third line for door B state. All views of state for door A are the same for door B. Door state Description Door A stoped Closing door A Closed door A Opening door A Open door A Erorr door A Indicates that the door A is in open position 3.1.3 Display of current elevator station Display of current elevator station is located in the middle of the second line. Indicates that the learning travel is not done. Indicates current station during normal travel. 45 46 LC100 Instruction manual 3.1.4 Safety line and drive display In standby (with no calls) last five characters of second line indicates the status of controlled points in safety circuit: - Indicates acive state - Indicates inactive state First field indicates the presence of safety circuitvoltage at terminal XS8:3 on theLC100-S board (presence of STOP in safety circuit) Second field indicates the presence of safety circuit voltage at terminal XS9:2 ( presence of landing door contact) Third field indicates the presence of safety circuit voltage at terminal XS10:2 ( car door A contact) Fourth field indicates the presence of safety circuit voltage at terminal XS10:4 ( car door B contact) Fifth field indicates the presence of sefety circuit voltage at terminal XS11:2 ( door lock contact) the the the the the After the drive command, safety circuit status turns into drive status: - Specifies the drive, and next two characters indicates the driving speed and direction. – Leveling speed – Nominal speed 1 speed – Second working speed – Third working speed – Inspection speed 1 – Inspection speed 2 – Releveling speed – Stopping (no speed command) – Direction up – Direction down LC100 Instruction manual 3.1.5 Active delays and errors display If an elevator in any way is not in operational state, the bottom line of primary screen will show messages describing the current error, or elevator failure state. All messages that are included in the statistics shoud be written in a way that the bottom line of primary screen flash on and off every second. When there are two or more error situations, the bottom line of primary screen will alternately show messages describing the current state of elevator. Table of active errors and failures: Elevator state ID 1 2 15 16 17 18 19 20 21 Description Indicates that the voltage is switched on. Indicates that the reset button is pressed on the LC100-D keyboard or reset input is active. Indicates that the inputs are active at the same time for button service travel up FI-236 and service travel down FI-237 Indicates that the upper reference switch input is not defined in system configuration FI-250 for rated speed. Service travel is disabled. Indicates that the lower reference switch input is not defined in system configuration FI-252 for rated speed. Service travel is disabled. Indicates that the upper reference switch is active FI-250 Indicates that the lower reference switch is active FI-252 Indicates that the low safety space input is active FI-206. Normal travel possible only after reset over LC100-D terminal. Indicates that after drive command is given to NGV hydraulic agregat there is no „ready“ signal active (input FI-288) and starting is not posible. Table of load meter and special program state: Screen message ID 30 31 32 33 34 35 36 37 Description Indicates that the priority tavel is active. Priority travel can be activated over input FI-243 (key in cabin) or over the monitoring system. Message is recorded in the statistisc without time delay. By activating priority travel all cabin calls are deleted, elevator takes only one cabin call, landing calls are not processed, and are deleted after the priority travel takes longer than 2 min. Indicates that the fireman travel is active (fireman program is activated using the same input as priority travel at the time when fire program is activated and elevator stops at the evacuation floor ) Indicates that the fire program is activated. Fire program is activated using adjustable input function FI-210 or over the monitoring system. Also evacuation floor parametar must be defined B-07 After activating elevator comes at the evacuation floor and standing with open door. Indicates that the fire program is activated. Fire program is activated using adjustable input function FI-211 or over the monitoring system. Also evacuation floor parametar must be defined B-08 After activating elevator comes at the evacuation floor and standing with open door. Indicates that the fire program is activated. Fire program is activated using adjustable input function FI-212 or over the monitoring system. Also evacuation floor parametar must be defined B-09 After activating elevator comes at the evacuation floor and standing with open door. Indicates that the fire program is activated. Fire program is activated using adjustable input function FI-213 or over the monitoring system. Also evacuation floor parametar must be defined B-10 After activating elevator comes at the evacuation floor and standing with open door. Indicates that the 80% load input is activated (input with parametar FI-241) more than 10 sec. Elevator ignores landing calls. Indicates that the 100% load input in activated (input with parametar FI-242) more than 10 sec. Elevator stays at the station with open door. 47 48 LC100 Instruction manual Safety circuit state messages: Screen message ID 38 39 40 41 42 43 44 Description Indicates that safey circuit is interrupted before the first series of control points on the connector XS8:3, or power circuit interruption between connectors XS1:1 and XS8:3 Indicates that safety circuit is interrupted at the landing door contact. No power on connector XS9:2 Indicates that safety circuit is interrupted at the car door A contact. No power on connector XS10:2 Indicates that safety circuit is interrupted at the car door B contact. No power on connector XS10:4 Indicates that safety circuit is interrupted at the landing door lock contact. No power on connector XS11:2 Indicates that the landing door lock contact is stuck, or there is a power on connector XS11:2 and there is no door lock command. Indicates that the upper end switch is actve, switch is controled by input function FI-229. System reset is necessary. Messages that describe the contactor deactivation failure in the control group: Screen message ID 45 46 47 48 49 50 51 Description Indicates a direction up contactor deactivation fault. Contactor is controled by defined input FI-220. Contactor must be off xx seconds after system turns off the output function FO-001. Indicates a direction down contactor deactivation fault. Contactor is controled by defined input FI-221. Contactor must be off 2 seconds after system turns off the output function FO-002. Indicates a high speed contactor deactivation fault. Contactor is controled by defined input FI-223. Contactor must be off 2 seconds after system turns off the output function FO-004. Indicates a low speed contactor deactivation fault. Contactor is controled by defined input FI-222. Contactor must be off 2 seconds after system turns off the output function FO-003. Indicates motor contactors deactivation fault, used with frequency regulated elevators. Contactors are controled by defined input FI-225 Indicates a „star“ contactor deactivation fault, used with hydraulic elevators. Contactor is controled by defined input FI-227. Contactor must be off 2 seconds after system turns off the output function FO-013. Indicates a „delta“ contactor deactivation fault, used with hydraulic elevators. Contactor is controled by defined input FI-228. LC100 Instruction manual Messages that describe the contactor activation failure in the control group: Screen message ID 52 53 54 55 56 57 58 59 60 61 62 Description Indicates a direction up contactor activation fault. Contactor is controled by defined input FI-220. Contactor must be on 2 seconds after system turns on the output function FO-001. Indicates a direction down contactor activation fault. Contactor is controled by defined input FI-221. Contactor must be on 2 seconds after system turns on the output function FO-002. Indicates a high speed contactor activation fault. Contactor is controled by defined input FI-223. Contactor must be on 2 seconds after system turns on the output function FO-004. Indicates a low speed contactor activation fault. Contactor is controled by defined input FI-222. Contactor must be on 2 seconds after system turns on the output function FO-003. Indicates motor contactors activation fault, used with frequency regulated elevators . Contactors are controled by defined input FI-225. Indicates a failure to activate electromechanical elevator brake. Brake control is done over brake contact at the input FI-224. Signal must be present while traveling, and max 2 seconds after direction contactors activation. Indicates a frequency regulator fault. Controled by input FI-226. Regularity signal must be present all time. Indicates a „star“ contactor activation fault used with hydraulic elevators. Contactor is controled by defined input FI-227. Contactor must be on 2 seconds after sytem turns on the output function FO-013. Indicates a „delta“ contactor activation fault used with hydraulic elevators. Contactor is controled by defined input FI-228 Indicates a motor fan contactor fault. Contactor is controled by defined input FI-209. Contactor must be on after system turns on output function FO-018. Indicates a phase presence and sequence control relay fault. Relay is controled by input FI-204. Table with warnings and other failures: Screen message ID 63 64 65 Description Indicates that the resistance of PTC sensor is above limit set by parameter I-02 (hot state PTC resistance). Error remains on for another five min after the signal, or once the probe resistnace falls below the value set by parameter I-01 (cold state PTC resistance). Current PTC resistance can be monitored in the menu inputs/outputs. Indicates that the elevator after establishment of control signals from the control group was not initiated in time set by parameter I-03. As a start control, group takes into account all the signals except for a pulses for copying used in copiying type 4 or 5 E-01. Parameter should be set to a sufficient value needed to elevator pass the path between the 2 copiyng signals when traveling at low speed increased by approximately 20%. After activating the error it is necessary to reset the control disconnecting power supply or using the reset button on LC100-D terminal. Inspection travel is possible. Indicates that the elevator after start from the station has not moved for logner that the time set by parameter I-03. This message is identical to the protection Start failure with the difference that after the start at least one copying signal has changed . It is necessary to reset the control disconnecting power supply or using the reset button on LC100-D terminal. 49 50 LC100 Instruction manual Screen message ID 66 67 68 69 Description Indicates that the elevator is travelling at low speed for longer than the time set by parameter I-04, and that in the meantime stopping switch signal did not activate. Since the above error may occur as a result of copying error (stopping switch) elevator must do a first travel again. It is necessary to reset the control disconnecting power supply or using the reset button on LC100-D terminal. Indicates that the elevator is traveling at releveling speed for longer than the time set by parameter I-05, and that in the meantime stopping switch signal did not activate. It is necessary to reset the control disconnecting power supply or using the reset button on LC100-D terminal. Indicates that the temperature measured by the processor on LC100-C board rose above the value set by parameter I-12. Indicates the elevator brake deactivation error. Brake control is done over mechanical contact on input FI-224. Elevator door error messages: Screen messages ID 70 71 72 73 74 75 76 77 Description Indicates a door A opening failure: - If there are end-switch – Elevator door A were not opened until endswitch, FI-260 in time set by parameter D-13. - If there are no end-switch – after opening sequence, system continues to have the information from safety circuit that the door is closed . Indicates a door B opening failure: - If there are end-switch – Elevator door B were not opened until endswitch, FI-270 in time set by parameter D-21. - If there are no end-switch – after opening sequence, control cabinet continues to have the information from safety circuit that the door is closed. Indicates a failure closing the door A which means that the door A is not closed until end-switch FI-261 if it exists, or to safety circuit contact if there is no end-switch. Indicates a failure closing the door B which means that the door B is not closed until end-switch FI-271 if it exists, or to safety circuit contact if there is no end-switch. Indicates a landing door contact failure. After the information about cabin door closed over the end-switch FI-261 or FI-271 within 3 seconds did not activate landing door signal from safety circuit. Indicates a cabin door A contact failure. After closing the cabin door A, the system has recieved information on the end-switch FI-261, and within 3 seconds was not activated cabin door A closed signal from safety circuit. Indicates a cabin door B contact failure. After closing the cabin door B, the system has recieved inormation on the end-switch FI-261, and within 3 seconds was not activated cabin door B closed signal from safety circuit. Indicates a landing door locking failure, that occurs: - At the door with mechanical locking 3 seconds after closing the door - At the door with electrical locking 3 seconds after door locking output signal FO-48. LC100 Instruction manual Screen messages ID 78 79 80 81 82 83 84 85 86 87 89 90 Description Indicates an obstacle signal too long (>30s) while closing door A FI-262. The message is information about input state, elevator is holding the door open until signal deactivation. Function is off during inspection travel. Indicates an obstacle signal too long (>30s) while closing door B FI-272. The message is information about input state, elevator is holding the door open until signal deactivation . Function is off during inspection travel. Indicates a photocell signal active on side A, FI-263. If there is fireman program active photocell input is ineffective. The message is information about input state FI-263, elevator is holding the door open until signal deactivation . Indicates a photocell signal active on side B, FI-273. If there is fireman program active photocell input is ineffective. The messege is information about input state FI-273, elevator is holding the door open until signal deactivation. Indicates a open door A button signal active FI-264. Indicates a open door B button signal active FI-274. Indicates a close door A button signal active FI-265 for longer than 30 seconds. The message is information for user, control sets standard exit time at stop D-30=0.0 seconds. Indicates a close door B button signal active FI-275 for longer than 30 seconds. The message is information for user, control sets standard exit time at stop D-30=0.0 seconds. The message is information that the door A is both on end-switch open and end-switch close (active inputs FI-260 and FI-261). Door A stops and the elevator is blocked until logic input state is established (door can be on one end-switch only). Function is off during inspection travel. The message is information that the door B is both on end-switch open and end-switch close (active inputs FI-270 and FI-271). Door B stops and the elevator is blocked until logic input state is established (door can be on one end-switch only). Function is off during inspection travel. Indicates that the input for door in the car is active. Function FI-246. Indicates that the photocell signal FI-263 or FI-273 interrupted during travel if there is no automatic car door. Cabin call can start elevator. After activating alarm elevator can't be started over landing calls before reseting. 51 52 LC100 Instruction manual Elevator positioning error messages: Screen messages ID 91 92 93 94 95 96 97 98 99 Description Elevator stopped at the station, 1st station copied, and the lower reference switch not activated FI-252. Elevator repeats learning travel. Error is effective for the copy type E-01=2 Possible errors: - Too many stations copied so elevator stopped in the station without reference switch. - Elevator is in the 1st station but there is no reference switch. - Elevator is not in the 1st station, but the reference signal appeared and then lost. Elevator stopped at the station, last station copied, and the upper reference switch not activated FI-250. Elevator repeats learning travel. Error is effective for the copying type E-01=2 Possible errors: - Too many stations copied so elevator stopped in the station withoput reference switch. - Elevator is in the last station but there is no reference switch. - Elevator is not in the last station, but the reference signal appeared and then lost. Both upper and lower reference switch active at the same time FI-250 and FI-252. Switch activity is controled with elevator in the station . After establishing the logical input state elevator does learning travel. The message does not indicate during inspection travel and learning travel, if elevator does not start from the station. Both upper end lower reference switch for medium speed active at the same time FI-251 and FI-253, for the copying type E-01=5. Switch activity is controled with elevator in the station. After establishing the logical input state elevator does learning travel. The message does not indicate during inspection travel and learning travel, if elevator does not start from the station. Indicates counting downwards switch error, FI-255 for the copying type E01=2 or 3. As elevator comes to the lower reference switch, FI-252, system controls counting downwards. If counting state differs by 2 or more as it comes to the reference switch, error indicates. Elevator is not blocked but continues to travel. It is necessary to check the count signals and the lower reference switch. Possible errors: - There is more stations than defined by the parameterA-01. - Incorrect counting downwards signal. Indicates counting upwards error, FI-254 for the copying type E-01=2 or 3. As the elevator comes to the upper reference switch, FI-250, system controls counting upwards. If counting state differs by 2 or more as it comes to the reference switch, error indicates. Elevator is not blocked but continues to travel. It is necessary to check the count signals and the upper reference switch. Possible errors: - There is more stations than defined by the parameter A-01. - Incorrect counting upwards signal. Indicates stopping upwards switch deactivation failure FI-256. Entering the deceleration zone system controls signal activity (must be inactive). Otherwise, the elevator can not perform the alignment and the preopening until signal deactivation . Indicates stopping downwards switch deactivation failure FI-257. Entering the deceleration zone system controls signal activity (must be inactive). Otherwise, the elevator can not perform the alignment and the preopening until signal deactivation. Indicates copying impulse failure. During drive betwen two stations there was no change on the input for counting or inductive switch input. LC100 Instruction manual Screen messasges ID 100 101 102 103 104 105 109 110 111 112 113 115 Description Message can be displayed if coping type is E01=4 or 5. First travel (learning travel) is done through entire shaft from top to bottom station. Stopping in station FI-256 and FI-257 and impulse switch XC7:1 are controlled during learning travel. System counts the stations so between stations must be at least 10 impulses. If system didn't count stations correct, first travel is repeated. Possible errors: - Elevator pass through end station. - There is too many stations in relation to parameter A-01. Message can be displayed if coping type is E01=4 or 5. First travel (learning travel) is done through entire shaft from top to bottom station. Stopping in station FI-256 and FI-257 and impulse switch XC7:1 are controlled during learning travel. System counts the stations so between stations must be at least 10 impulses. If system didn't count stations correct, first travel is repeated. Possible errors: - No impulse change at all or at least between two stations so system didn't count number of stations in relation to parameter A-01. - Not enough station signals in relation to parameter A-01. Indicates fault on the UCM safety device. Device is controlled trough the input with FI-300. Fault can't be reset with reseting the power. Fault must be reset with the reset button on the LC100-D keypad. If service drive is switched on than controller will give a reset command on the first inspection drive command is reseting is possible. Indicates that when attempting to drive overspeed governor coil was not powered on. Control of the overspeed governor coil is done trough the input with the function FI-290. Fault must be reset trough reset button on the LC100-D keypad. Indicates that when stopping the elevator overspeed governor coil was not powered off. Control of the overspeed governor coil is done trough the input with the function FI-290. Fault must be reset trough reset button on the LC100-D keypad. Indicates that there is UCM test active. Test is started trough the LC100/test menu. Indicates that the automatic evacuation last more than time set by parameter I-06. Reset should be done. Indicates safety device for preopening and leveling error. Reset should be done. Indicates car light error. Car light is controlled over input FI-245. Indicater that building loading program is active. Indicater that building unloading program is active. Indicates that setting time is needed. Time can be set trough Time menu. If the time is not remembered while switching off the controller check the batery 53 54 LC100 Instruction manual Communication error messages: Screen messages – ID 116 117 Description Communication error between LC100-C with LC100-I board. Communication error between LC100-C with LC100-K board. – 120 Communication error between LC100-C with LC100-E board with address 0. Communication error between LC100-C with LC100-E board with address 1. Communication error between LC100-C with LC100-C board of elevator „A“ in duplex mode. – 121 Communication error between LC100-C with LC100-C board of elevator „B“ in duplex mode. – 122 Communication error between LC100-C with LC100-C board of elevator „C“ in duplex mode. – 123 Communication error between LC100-C with LC100-C board of elevator „D“ in duplex mode. 124 Indicates reset of the processor in the event of unforeseen flow of program code. – 118 – 119 LC100 Instruction manual 3.2 Menu structure 1/6 Statistics 1/4 ACT.ERRORS 2/6 Monitor 1/2 Input/Output 2/4 ALL ERRORS 3/6 CALLS 2/2 CAN status 3/4 Analysis err 4/6 Parameters 1/12 GENERAL type A 5/6 LC100 2/12 Call processing type B 6/6 Language 3/12 Main drive type C 4/12 Doors type D 5/12 Positioning type E 6/12 Stopping type F 7/12 Stop marking type G 8/12 Timers type H 9/12 Protections type I 10/12 Configurations type N 11/12 P-M-L moduls type P 12/12 Factory settings type T 4/4 COUNTERS 55 56 LC100 Instruction manual 3.2.1 Statistics 1/6 Statistics 1/4 Active errors Active error Number of error Time when error apeared Floor Message ID Active errors menu displays active errors. In the first row error is displayed. Means number of error. The last error is the one with number 0, the one before is number 1 and so on. Means message ID. Means floor in which error occurred. Third row shows date and time when error happened. If there are more active errors, pushing the button left or right it is possible to see other errors. 1/6 Statistics 2/4 All errors Active error Number of error Time when error apeared Time when error ended Floor Message ID All errors menu displays all errors. In the first row error is displayed. Means number of error. The last error is the one with number 0, the one before is number 1 and so on. Means message ID. Means floor in which error occurred. Third row shows date and time when error happened. Fourth row shows date and time when error ended. If there are more errors, pushing the button left or right it is possible to see other errors. 1/6 Statistics 3/4 Error analysis Message ID Error In the error analysis menu it is possible to filter errors. After entering the menu select the error which is wanted to filter by pressing the buttons left or right. After choosing the error and pressing the „Enter“ button error is filtered. If there are no errors filtered massage apears. LC100 Instruction manual 1/6 Statistics 4/4 Counters In „Counter“ menu there are few counters. After entering the menu „total counter is shown. Pressing the left or right button it is possible to chose user counter, daily counter, monthly counter and annual counter. Total counter shows number of starts from instaling the elevator. Total counter can be reset though the RESET menu. User counter can be reset so the user can monitor number of drives through specific time interval. Reset of the user menu can be done through RESET menu. Daily counter shows number of drives through a specific day. Counter shows days in active month, changing the day is done by pressing the up or down button. Monthly counter shows number of drives through a specific month. Counter shows months in active year, changing the month is done by pressing the up or down button. Annually counter shows number of drives trough a specific year. Counter shows active year, changing the year is done by pressing the up or down button. 57 58 LC100 Instruction manual 3.2.2 Monitor 2/6 Monitor 1/2 Input/output Input/output menu is used to monitor status of the inputs-outputs of all boards in the system. First row shows the LC100 board. Second row displays connector, third row displays pin on the connector. In the fourth row under the pin sign means that the input/output is active, active status for the safety circuit and PTC is shown with the sign Chosing the input/output is done by pressing the „Left“ or „right“ button. Status of the input signals on LC100-S board, for connectors XS8, XS9, XS10 and XS11. On the example XS8 and XS9 are active, other inputs are not active. Status of the input signals on LC100-C board for connectors XC5, XC6 and XC8 Status of the counter for inductive switch (input XC7.3). Every thime the drive is reset status of the counter is set to 00000. When driving down the counter counts backwards and when driving up counter counts foward. Third row displays active floor. Fourth row displays resistance of the motor PTC probe and the status of the PTC input XC8.2. Active input is presented with sign and means that the probe resistance reached the limit defined with the parameter I-02. Status of the output signals on the LC100-C board for the connector XC10. Status of the input signals on LC100-I board for connector XI3, and status of the analog output XI5. Display exist only if the LC100-I board is included through parameter A-05. Status of the output signals on LC100-I board for conector XI6, and status of the relay outputs XI4. Display exist only if the LC100-I board is included through parameter A-05. Status of the input signals on LC100-K board for connectors XK4, XK5 and XK6. Display exist only if the LC100-K board is included through parameter A-06. Status of the input signals on LC100-K board for connector XK8, and status for input signals for connectors XK10 and XK11. Display exist only if the LC100-K board is included through parameter A-06. LC100 Instruction manual Status of output signals on LC100-K board for connector XK9. Display exist only if the LC100-K board is included through parameter A-06. Status of input/output signals on LC100-F board adress „C“ connected to LC100-K board for connectors XF3 and XF4. Display only exist if the LC100-F board adress „C“ is included through parameter A-06. Status of input/output signals on LC100-F board adress „D“ connected to LC100-K board for connectors XF3 and XF4. Display only exist if the LC100-F board adress „D“ is included through parameter A-06. Status of input output signals on LC100-E board adress „0“ for connectors XE3 and XE4. Display only exist if the LC100-E board adress „0“ is included through parameter A-07. Status of the input/output signals on LC100-F board adress „C“ conected to LC100-E board adress „0“ for connector XF3 and XF4. Display only exist if the LC100-F board adress „C“ is included through parameter A-07. Status of the input/output signals on LC100-F board adress „D“ conected to LC100-E board adress „0“ for connector XF3 and XF4. Display only exist if the LC100-F board adress „D“ is included through parameter A-07. Status of input output signals on LC100-E board adress „1“ for connectors XE3 and XE4. Display only exist if the LC100-E board adress „1“ is included through parameter A-08. Status of the input/output signals on LC100-F board adress „C“ conected to LC100-E board adress „1“ for connector XF3 and XF4. Display only exist if the LC100-F board adress „C“ is included through parameter A-08. Status of the input/output signals on LC100-F board adress „D“ conected to LC100-E board adress „1“ for connector XF3 and XF4. Display only exist if the LC100-F board adress „D“ is included through parameter A-08. Status of the input/output signals on LC100-P, M or L boards for pins 2 and 3 on connector XP3 or XM3. A-10 means first ten adreses of P or M boards on side „A“. Second row presents floor, third row is status of the pin 2, fourth row is the status of the pin 3. Display only exist if the P or M boards are included through parameter A-09. 59 60 LC100 Instruction manual Status of the input/output signals on LC100-P, M or L boards for pins 2 and 3 on connector XP3 or XM3. A-20 means second ten adreses of P or M boards on side „A“. Second row presents floor 1=adress 11, 2=adress 12, ond so on. Third row is the status of the pin 2, fourth row is the status of the pin 3. Display only exist if the P or M boards are included through parameter A-09. Next dysplay is A-30 which is status for adresses 21 to 30 same as for A20, than also A-40 for adresses 31 to 40. Status of the input/output signals on LC100-P, M or L boards for pins 2 and 3 on connector XP3 or XM3. B-10 means first ten adreses of P or M boards on side „B“. Second row presents floor, third row is status of the pin 2, fourth row is the status of the pin 3. Display only exist if the P or M boards are included through parameter A-09. Status of the input/output signals on LC100-P, M or L boards for pins 2 and 3 on connector XP3 or XM3. A-20 means second ten adreses of P or M boards on side „B“. Second row presents floor 1=adress 11, 2=adress 12, ond so on. Third row is the status of the pin 2, fourth row is the status of the pin 3. Display only exist if the P or M boards are included through parameter A-09. Next dysplay is B-30 which is status for adresses 21 to 30 same as for B20, than also B-40 for adresses 31 to 40. LC100 Instruction manual 2/6 Monitor 2/2 CAN status In CAN status menu it is posible to see status of communication between main control board LC100-C with other LC100 units connected to CAN bus. After entering the menu communication with LC100-I, K, E0 and E1 board is displayed. Sign „ “ means that the communication with the board is correct. If the communication is not correct sign „ “ will apear. Units which don't have any sign are not included in the system through parameter A-05 to A-08. Pushing the „right“ button display shows next communication status: This display shows communication status with other elevators in multiplex and communication status with the LC100-G board. Next display is CAN communication status for P or M boards adress side „A“ on floors 1 to 10, and communication status for P or M board with adress „0“. For SIMPLEX elevators sign “ “ means that the communication is correct. For DUPLEX elevators sign for communication is: Sign „ „ for „A“ elevator Sign „ „ for „B“ elevator Next display is A-20 which is status of communication for P or M board adress „A“ on the floors 11 to 20, then A-30 for floors 21 to 30, A-40 for floors 31 to 40. Next are communication statuses for P or M boards adressed „B“. B10 for floors 1 to 10, B-20 for floors 11 to 20, B-30 for floors 21 to 30 and B40 for floors 31 to 40. 61 62 LC100 Instruction manual 3.2.3 Calls 3/6 Calls In the calls menu it is possible to monitor cabin and landing calls. It is also possible to assign a cabin call. First row is reserved for monitoring the calls from first ten floors. Second row shows calls for floors 11 to 20, third floor is for calls 21 to 30 and fourth row is for calls 31 to 40. „ “ presents active cabin call. „ “ presents active landing call up. „ “ presents active landing call down. „ “ presents cursor position on the display. „ “ presents active position of the cabin. At the same time there can be active cabin and the landing call on the same floor which is then shown as in example where in the 7th floor are active landing call up and landing call down. In 9th floor active are both landing calls and cabin call. To assign a cabin call, set a cursor with the buttons left, right, up and down to wanted floog and press enter button. In the example there is set cabin floor for station 23. LC100 Instruction manual 4. Parameters Menu parameters is used for monitoring and setting parameters of the LC100 system. Viewing the parameters is possible without password while to change the values of parameters password is needed. Parameters are divided into 12 submenus: 1/12 2/12 3/12 4/12 5/12 6/12 7/12 8/12 9/12 10/12 11/12 12/12 General Call processing Main drive Doors Positioning Stopping Stop marking Timers Protections Configurations P-M-L moduls Factory settings type A type B type C type D type E type F type G type H type I type N type P type T After entering the „parameters“ menu ba pressing left or right button choosing the parameters submenu is made. After choosing the submenu entering is done by pressing the „enter“ button. Overview of parameters is done by pressing left or right button, choosing the parameter is done by pressing enter and changing the value by buttons up or down. Confirming the change of the parameter is done by pressing enter button. Parameter range is written in brackets. Example of parameter description in manual: SUBMENU MAIN MENU 4/6 Parameters A-1 1/12 General TYPE OF PARAMETER Type A Number of stops PARAMETER MASSAGE ON LC100-D 2-40 Parameter description RANGE OF PARAMETER 63 64 LC100 Instruction manual 4.1 4/6 Parameters A-1 General - Type A 1/12 General Type A Number of stops 2-40 Setting the number of floors. It is possible to set up to 40 floors. A-2 Number of elevators 1-8 Number of elevators in multiplex. It is possible to set up to 8 elevators in multiplex. A-3 Elevator marking A-H Elevator marking im multiplex mode. When elevator is working in multiplex mode it is necessairly to define the elevator marking. First elevator is „A“, second is „B“ and so on. In multiplex there can't be two elevators with same marking because the communication and landing calls processing will not work correctly. A-4 Evacuation 0-2 Parameter for choosing the type of emergency passanger evacuation. 0 – there is no emergency evacuation 1 – automatic evacuation of the passangers 2 – manual evacuation by pressing the brake open button from the cabin. A-5 Configuration LC100 --- Parameter to include the LC100-I, LC100-VFD, LC100-Y, LC100-SR board into system. If there exist board connected to CAN bus it needs to be included through A-5 parameter. Including is done by placeing the sign „ “ under the „board“ character. A-6 Configuration LC100 --- Parameter to include the LC100-K, LC100-K2, LC100-V, LC100-V2 bord into system. If there exist bord connected to CAN bus it needs to be included through A-6 parameter. Including is done by placeing the sign „ “ under the „board“ character. LC100 Instruction manual 4/6 Parameters A-7 1/12 General LC100-Ex Type A --- Parameter to include LC100-E board into the system. Including is done by placeing the sign „ “under the „board“ character. (list below) 0 – LC100-E0 4 – LC100-E1 (FC) 1 – LC100-E1 5 – LC100-E1 (FD) 2 – LC100-E0 (FC) 6 – LC100-K (FC) 3 – LC100-E0 (FD) 7 – LC100-K (FD) A-8 Configuration LC100 --- Parameter to include ADL inverter or ELGO absolute position system into the system. A-9 LC100-P, L100-M, LC100-L --- Parameter to include P or M modules and choosing the function on the input pins X3:2 and X3:3 on P or M modules. A – Landing call side A B – Landing call side B When there is no function active (there is no P or M modules) landing calls must be set through configurations parameters. 65 66 LC100 Instruction manual 4.2 4/6 Parameters B-1 Call processing – Type B 2/12 Call processing Call proces type Type B 0-3 Type of landing calls processing 0 – One call reserved. Elevator process landing call only if it is in standstill (there are no active calls, safety circuit is correct and “lift occupated“ time has ended B-02.) 1 – One way collective to main floor. If the elevator has landing call and the car is driving elevator will stop for this call only if the landing call is in same direction as car travelling, and there is no „80% car load“ input active. Also the car will not stop if the elevator had passed slow down zone for the floor in wich the call is given. Else the elevator will finish the drive, and than process the landing call. Landing call in the main floor which is defined with parameter B-06 includes both directions. 2 – Full collective with two button. Collective system with two buttons with functions landing call up, and landing call down. Stopping condition is the same as for „one way collective“ system. 3 – Full collective with one button. Same as full collective with two buttons, but the function for landing call up and down is given through one input. B-2 Priority time for car call 0-25s Time for „car in use“ function when using „one call reserved“ type of call procesing (Parameter B-01=0). During this time elevator does not accept new calls and the output function „car in use“ FO-069 is active. Time is mesured from the end of the previous drive. B-3 Multiplex program 1-2 Chossing the type of call procesing in duplex elevators. 1 – Standard call procesing 2 – Program for direct calling of the „A“ elevator. - If the landing call button is pressed longer than 3s elevator „A“ will process this call. LC100 Instruction manual 4/6 Parameters B-4 2/12 Call processing Program A/B side Type B 0-1 Program A/B side 0 – Cabin doors are opened according to the parameters for door side (D-02 to D-11) independently to landing call side. (ex. if in the 2nd floor has two doors (A and B) landing call is always A side but elevator will open both doors 1 - Cabin doors are opened according to the parameters for door side (D-02 to D-11) with the side control acording to the landing call side (ex. if in the 2nd floor has two doors (A and B) landing call on one side is „A“, and on the other side is „B“. the elevator will open only the door on side on which the landing call is made. B-5 Program lift-boy 0-1 Program lift boy is the function to control elevator only with cabin comands. By pressing the landing call blinking signalization is switched on in the cabin for matching call. After that lift boy is processing the calls from the cabin. 0 – „lift boy“ function not on 1 – „lift boy“ function activated B-6 Main landing floor 1-A1 Choosing the main floor. In the main floor elevator with the „one way collective“ system of landing call procesing (B-1=1) has the function for both direction collecting. B-7 Fire stop zone 1 0-A1 Defining the floor for evacuation in case of fire program 1. Fire program 1 is activated through the input with the function parameter FI-210. When the fire program is activated elevator erases all existing cabin and landing calls and switch on the cabin call to the fire stop zone 1 floor. Then elevator goes to the fire stop tone 1 floor and opens the door. If the elevator was driving when fire program was activated it will end current drive and then go to fire stop floor. B-8 Fire stop zone 2 0-A1 Defining the floor for evacuation in case of fire program 2. Fire program 2 is activated through the input with the function parameter FI-211. Fire program 2 has lower priority than fire program 1. B-9 Fire stop zone 3 0-A1 Defining the floor for evacuation in case of fire program 3. Fire program 3 is activated through the input with the function parameter FI-212. Fire program 3 has lower priority than fire program 2 and 1 67 68 LC100 Instruction manual 4/6 Parameters B-10 2/12 Call processing Type B Fire stop zone 4 0-A1 Defining the floor for evacuation in case of fire program 3. Fire program 3 is activated through the input with the function parameter FI-212. Fire program 4 has lower priority than fire programs 3, 2 and 1. B-11 False calls erasing 0-8 Erasing the false cabin calls: 0 – Erasing the calls is disabled 1 – Erasing the calls after first call 2 – Erasing the calls after second call 3 – Erasing the calls after third call 4 – Erasing the calls after fourth call 5 – Erasing the calls after fifth call 6 – Erasing the calls after sixth call 7 – Erasing the calls after seventh call 8 – Erasing the calls after eight call False call erasing: if there are many cabin calls, when the elevator stops at the floor and the landing doors are not opened or there is no pasing through photocell this is called false call. B-12 Parking program 1-2 Choosing the parking type program. 1. MASTER elevator decides which elevator is going to park. Parking stop set on the master elevator is active for parking. In the parking stop there is one elevator which is parked and proces only landing calls from that stop and exits from the parking floor if there is more landing calls than free elevators in multiplex. 2. Every elevator parks to it's parking floor after time set in parameters B14 or B-16 expires. Elevator in parking stop is procesing landing calls acording to the program of landing calls. B-13 Parking stop 1 0-A1 Setting the parking stop 1. 0 – Not activated – parking program is not active. 1-A1 – Parking floor. After the time set in the parameter B-14 expires elevator goes to parking stop. B-14 Time for parking 1 0-41min 40s Time for parking for parking zone 1. LC100 Instruction manual 4/6 Parameters B-15 2/12 Call processing Type B Parking stop 2 0-A1 Setting the parking stop 2. 0 – Not activated – parking program is not active. 1-A1 – Parking floor. After the time set in the parameter B-16 expires elevator goes to parking stop. B-16 Time for parking 2 0-41min 40s Time for parking for parking zone 2. B-17 Landing call disable 0-41min 40s Parameter is used to disable landing and cabin calls. Function for disabling the calls is on the input with function FI-296. Parameter B-17 is used to define the condition for calls disabling. How to set the B-17 parameter is explained in „configurating disable calls“ manual. B-18 Cancel cabine Calls 0-1 Parameter is used to enable/disable cancle cabine calls. If is enabled, when you press cabin call and you want cancel cabin call just need press against the same cabin call and it will be canceled and elevator will stop in first nearest station. 69 70 LC100 Instruction manual 4.3 4/6 Parameters C-1 Main drive - Type C 3/12 Main drive Main drive type Type C 1-4 Parameter is used for defining the main drive type. 1 –Not regulated AC1 – One speed elevator. When the drive is one speed not regulated than also parameter E-01 must be set to 1. Also parameter C15 must be set to 1. 2 – Not regulated AC2 – Two speed not regulated elevator. 3 – Regulated VVVF – Frequency regulated elevator. 4 – Hydraulic HID – Hydraulic elevator. C-2 Nominal speed V1 --Parameter is used to set speed encoding for nominal speed V1. Parameter is available only for frequency regulated elevators (C-01=3). Sign „ “ under a specific letter means that in nominal speed board activates the outputs with the belonging parameter Meaning of the letters: V – Output on which „high speed“ function is set FO-004. M – Output on which „low speed“ function is set FO-003. R – Output on which „inspection speed“ is set FO-005. P – Output on which „relevelling speed“ is set FO-006. I – Output on which „intermidiate speed“ is set FO-007. C-3 Nominal speed V2 --Parameter is used to set speed encoding for nominal speed V2. Parameter is available only for frequency regulated elevators (C-01=3). Sign „ “ under a specific letter means that in nominal speed board activates the outputs with the belonging parameter. Meaning of the letters is explained in parameter C-2. C-4 Nominal speed V3 --Parameter is used to set speed encoding for nominal speed V3. Parameter is available only for frequency regulated elevators (C-01=3). Sign „ “ under a specific letter means that in nominal speed board activates the outputs with the belonging parameter. Meaning of the letters is explained in parameter C-2. C-5 Stopping speed --Parameter is used to set speed encoding for stopping speed (levelling speed). Parameter is available only for frequency regulated elevators (C-1=3). Sign „ “ under a specific letter means that in stopping speed board activates the outputs with the belonging parameter. Meaning of the letters is explained in parameter C-2. LC100 Instruction manual 4/6 Parameters C-6 3/12 Main drive Type C Leveling speed --Parameter is used to set speed encoding for relevelling speed. Parameter is available only for frequency regulated elevators (C-01=3). Sign „ “ under a specific letter means that in relevelling speed board activates the outputs with the belonging parameter. Meaning of the letters is explained in parameter C-2. C-7 Inspection speed 1 --Parameter is used to set speed encoding for inspection speed 1. Parameter is available only for frequency regulated elevators (C-01=3). Sign „ “ under a specific letter means that in intermidiate speed board activates the outputs with the belonging parameter. Meaning of the letters is explained in parameter C-2. Example for encoding the nominal speed and inspection speed. On the diagram there is a example for speed encoding for frequency regulated elevator. In the start the speed encoding is for nominal speed C-03 (active is outut for nominal speed FO-004 and output for low speed FO00-3). When slowing down elevetor switches to levelling speed C-04 (output for nominal speed is switched off FO-004, and output for slow speed FO-003 stays on). When driving with the service speed elevator switches on the outputs defined through parameter C-05 (output for inspection speed FO-005). Example on the diagram is only informative, it is shown based on the example of parameters in this manual. Real encoding for the speeds depends on type of frequency regulator and wireing of the cabinet. 71 72 LC100 Instruction manual 4/6 Parameters C-8 3/12 Main drive Type C Inspection speed 2 0-2,5s Parameter is used to set speed encoding for inspection speed 1. Parameter is available only for frequency regulated elevators (C-01=3). Sign „ “ under a specific letter means that in intermidiate speed board activates the outputs with the belonging parameter. Meaning of the letters is explained in parameter C-2. C-9 Delay time for switching off the motor contactors 0-25s Delay for switching of the motor contactors (function FO-001 or FO-002) from the moment when stopping comand is given (when elevator reaches the stopping switch FI-256 or FI-257). C-10 Time for switching on the brake contactors 0-2,5s Delay time for switching on the brake contactors (function FO-011) from the moment start command is given (function FO-001 or FO-002). C-11 Delay time for switching off the brake contactor 0-2,5s Delay time for switching off the brake contactor (function FO-011) from the moment stopping command is given (when elevator reaches the stopping switch FI-256 or FI-257). C-12 Time for brake holding voltage 0-25s Time for low brake voltage. Function for brake holding voltage, FO-12 is switched on parallel with function for the brake FO-11 and is on during time defined with parameter C-12. C-13 Working time for main drive fan 0-250s Working time for main drive fan FO-18. Function for fan FO-18 is switched on when bimetal input signal is switched on FI-208, and it is on during time defined with parameter C-13. C-14 Starting time for motor pump 0-25s Starting time for motor pump for hydraulics elevators C-01=4. It defines time for function „start pump“ FO-13. LC100 Instruction manual 4/6 Parameters C-15 3/12 Main drive Service speed Type C 0-1 Setting the command for service speed. 0 – Service speed is done with low speed ( function FO-03) 1 – Service speed is done with high speed ( function FO-04) Parameter is active only for C-01=2 or 4, while for one speed elevators it must be set to „1“ C-01=1. For frequency regulated elevators C-01=3 parameter is not valid because service speed is encoded through parameter C-05. C-16 Time for valve UP function 0-2,5s Parameter is used for hydraulics elevators. Functions FO-14 and FO-15 are switched on with delay C-16 after checking that all elements for drive up are switched on. C-17 Additional time for motor pump 0-2,5s Additional working time for pump for hydraulics elevators C-01=4. When elevator reaches the stopping switch outputs for powering the valves are switched off (FO-14 i FO-15). Output for controlling the motor (FO-1) is on for this additional time. C-18 Relevelling 0-2 Defining the relevelling program. 0 – Relevelling is not active. 1 – Releveling is done only with closed doors. 2 – Relevelling is done wit open or closed doors. When elevator in normal drive exits the floor levell, if relevelling function is on drive gives command for returning to the floor level. If the cabin has lowered down – output for stopping in direction up FI-256 is switched off. Conditions for relevelling is that elevator is still on the other stopping switch (active input FI-257) and zone switch is active (active input FI-258). In that case drive switch on the relleveling enable output FO-21 which then activates the safety device for relevelling. If the safety device is correct (control on the input with function FI-205) drive switches relevelling in up direction. Releveling is done with low speed for drive types C-01=2 or 4, while for C-01=3 relevelling is done with encoded speed defined by parameter C-06. If the cabin has lowered down – output for stopping in direction down FI-257 is switched off. Conditions for relevelling is that elevator is still on the other stopping switch (active input FI-256) and zone switch is active (active input FI-258). In that case drive switch on the relleveling enable output FO-21 which then activates the safety device for relevelling. If the safety device is correct (control on the input with function FI-205) drive switches relevelling in down direction. Releveling is done with low speed for drive types C-01=2 or 4, while for C-01=3 relevelling is done with encoded speed defined by parameter C-06.. C-19 Additional relevelling time 0-2,5s Additional time for relevelling. In the normal drive elevator aproaches to stopping magnet in slow speed, after comand for stopping because of inertion there is some distance from command to complete stop in the floor levell. While relevelling this inercion is lower so the car sometimes will not reach the floor levell. In that case additional relevelling time is needed for car to reach the floor level. 73 74 LC100 Instruction manual 4/6 Parameters C-20 3/12 Main drive Open brake time on evacuation Type C 0-2,5s Parameter is used for setting the „on“ time of output function FO-36. C-21 Close brake time on evacuation 0-2,5s Parameter is used for setting the „on“ time of output function FO-36. LC100 Instruction manual 4.4 4/6 Parameters D-1 Doors - Type D 4/12 Door Type D Cabin door 0-2 Cabin door type selection: 0- No door or manual door 1- One automatic cabin door 2- Two automatic cabine doors In the case of two cabin doors, door opening in the stations must be defined over the parameters D-02 to D-11. D-2 A-side door for stations 1 to 8 --- A-side door opening selection in case of two cabin doors (D-01=2). Parameter D-02 select door opening in the stations 1 to 8. Example shows door opening in the stations 1, 2 and 3. D-3 A-side door for stations 9 to 19 --- A-side door opening selection in case of two cabin doors (D-01=2). Parameter D-03 select door opening in the stations 9 to 16. Example shows door opening in the stations 14, 15 and 16. D-4, D-5, D-6 A-side door --- D-4 - same as D-3 but for the stations 17 to 24 D-5 - same as D-3 but for the stations 15 to 32 D-6 - same as D-3 but for the stations 33 to 40 D-7 B-side door for stations 1 to 8 --- B-side door opening selection in case of two cabin doors (D-01=2). Parameter D-07 select door opening in the stations 1 to 8. Example shows door opening in the stations 3, 4 and 5. D-8 B-side door for stations 9 to 16 B-side door opening selection in case of two cabin doors (D-1=2). Parameter D-08 select door opening in the stations 9 to 16. Example shows door opening in the stations 14, 15 and 16. D-9, D-10, D-11 B-side door D-9 - same as D-8 but for the stations 17 to 24 D-10 - same as D-8 but for the stations 15 to 32 D-11 - same as D-8 but for the stations 33 to 40 --- 75 76 LC100 Instruction manual 4/6 Parameters D-12 4/12 Door Type D A-side door orders --Voltage holding definition (command open or close active) for cabin door at A-side. A – Close door output FO-41 is active during travel. B – Open door output FO-40 is active during passanger passing time. C – Close door output FO-41 is active when the door is closed. D – Close door output FO-41 is active during inspection travel FI-235 or feedback control FI-201 except while open door order is active. E – Close door output FO-41 is active during normal travel when elevator is not in the station (active input FI-256 or FI-257), except while open door order is active.. F – Includes door manipulation over the feedback control (applies to the door B). D-13 A-side door opening time 0-25s Door A opening time defining. It is used in case of no door end-switches (FI-260 and FI-261) or as maximum door manipulation time during inspection travel. D-14 A-side landing door type 0-3 A-side landing door type: 0 – Semi-automatic or manual door with mechanical locking. 1 – Automatic door with mechanical locking. 2 – Semi-automatic or manual door with electrical locking 3 – Automatic door with electrical locking. D-15 A-side automatic door open in stations 1 to 8 --- Defining stations in which elevator waiting with door A open. For stations 1 to 8. Parameter has function with automatic landing door A D-14=1 or 3. Symbol „ “ below the number means that elevator waits in that station with door open. Example shows that elevator in standby in stations 1, 2 and 3 waiting with door open. In other stations keeps door closed. D-16 A-side automatic door open in stations 9 to 16 --- Defining stations in which elevator waiting with door A open. For stations 9 to 16. Parameter has function with automatic landing door A D-14=1 or 3. Symbol „ “ below the number means that elevator waits in that station with door open. Example shows that elevator in standby in stations 14, 15 and 16 waiting with door open. In other stations keeps door closed. LC100 Instruction manual 4/6 Parameters D-17, D-18, D-19 4/12 Door Type D Door A open --- D-17 - same as D-16 but for stations 17 to 24 D-18 - same as D-16 but for stations 15 to 32 D-19 - same as D-16 but for stations 33 to 40 D-20 B-side door orders 0-7 Voltage holding definition definition (command open or close active) for cabin door at B-side. A – Close door output FO-45 is active during travel. B – Open door output FO-44 is active during passanger passing time. C – Close door output FO-45 is active when the door is closed. D – Close door output FO-45 is active during inspection travel FI-235 or feedback control FI-201 except while open door order is active. E – Close door output FO-45 is active during normal travel when elevator is not in the station (active input FI-256 or FI-257), except while open door order is active. F – Includes door manipulation over the feedback control (applies to the door B). D-21 B-side door opening time 0-25s Door A opening time defining. It is used in case of no door end-switches (FI-270 and FI-271) or as maximum door manipulation time during inspection travel. D-22 B-side landing door type 0-3 B-side landing door type: 0 – Semi-automatic or manual door with mechanical locking. 1 – Automatic door with mechanical locking. 2 – Semi-automatic or manual door with electrical locking 3 – Automatic door with electrical locking. D-23 B-side automatic door open in stations 1 to 8 --- Defining stations in which elevator waiting with door B open. For stations 1 to 8. Parameter has function with automatic landing door B D-22=1 or 3. Symbol „ “ below the number means that elevator waits in that station with door open. Example shows that elevator in standby in stations 1, 2 and 3 waiting with door open. In other stations keeps door closed. 77 78 LC100 Instruction manual 4/6 Parameters D-24 4/12 Door Type D B-side automatic door open in stations 9 to 16 --- Defining stations in which elevator waiting with door B open. For stations 9 to 16. Parameter has function with automatic landing door B D-14=1 or 3. Symbol „ “below the number means that elevator waits in that station with door open. Example shows that elevator in standby in stations 14, 15 and 16 waiting with door open. In other stations keeps door closed. D-25, D-26, D-27 Door B open --- D-25 - same as D-24 but for stations 17 to 24 D-26 - same as D-24 but for stations 15 to 32 D-27 - same as D-24 but for stations 33 to 40 D-28 Preopening 0-1 Door preopening: 0 – Door preopening off. 1 – Door preopening on. D-29 Preopening delay 0-2,5s Door open delay time in preopening mode. D-30 Passenger passing time 0-25s Door open time when elevator comes to the station. D-31 Passenger passing time after photocell 0-25s Passenger passing time after photocell input is activated or landing door opening if not automatic. Interrupting FI-263 or FI-273 open door time is set by parameter. LC100 Instruction manual 4/6 Parameters D-32 4/12 Door Passenger passing time after cabin call Type D 0-25s Passenger passing time after new cabin call while in station. By giving new cabin command passenger passing time is set by parameter. D-33 Door deceleration time 0-25s Parameter is used to activate input function FO-42 (for A door) or FO-46 (for B door) with doors with no before end-switches. Parameter estimates the time of opening or closing the door and activates a low speed depending on the parameter. D-34 Door reversing time 0-2,5s Parameter is time with no active commands for open and close door while reversing. D-35 Door resistors time 0-25s The parameter is the time of the resistors to reduce the mechanical strain of the door if resistor function is in use FO-43 for A-side door, FO-47 for B-side door. D-36 Door locking time 0-2,5s After door lock acivating, system filtrates input for stabilizing door lock contact and starts traveling after filter set by parameter. The parameter is used to prevent safety circuit break after start command. 79 80 LC100 Instruction manual 4.5 4/6 Parameters E-01 Positioning - Type E 5/12 Positioning Type E Positioning type 1-5 Choosing the positioning type: 1 – Positioning type for one speed elevator. For positioning type 1 referent switches are used and stopping switch is used. Elevator is driving with one speed, floors are counted when passing through stop switch according to the driving direction. 2 – Positioning type with two switches for counting. There are also two referent switches and stopping switch. Elevator counts the floors +1 when pasing counting up switch and -1 when passing by the counting down switch. Counting switches are also the slowing down point for the middle floors while for the end floors slowing down point is the referent switch. 3 – Possitioning type with bistabile counting switch. There are also two referent switches and stopping switch. Elevator counts the floors when passing by counting switch according to the travelling direction. Counting switch is also the slowing down point for the middle floors while for the end floors slowing down point is the referent switch. 4 – Positioning type with inductive switch. There are also two referent switches and stopping switch. Elevator countc the floors accordint to the traveling direction and the number of the impulses. Slowing down point for the final floors are referent switches while for middle floors slowing down point is the same impulse numbers as for the final floors. When using frequency regulator on CAN bus impulses are taken from the motor encoder. 5 – Positioning type with inductive switch and two nominal speeds. There are also two referent switches for nominal speed, two referent switches for lower speed and stopping switch. First drive elevator goes with the lower speed C-07 and slows down while passing the lower referent switch FI-251 or FI-253. Driving betwen two next floors is always done with lower speed C-07. Driving two or more floor distances elevator is driving with nominal speed C-03. If the relevelling (C-18=1 or 2) or preopening the doors (D-28=1) is activated then there are two stopping switches: stopping UP (FI-256) and stopping DOWN (FI-257), and one switch for door zone (FI-258). If there is no releveling or preopening the doors activated one stopping switch is used. It is connected to input with function stopping UP (FI-256) and it is used for stopping in both direction. Connecting the positioning switches and magnets position in the shaft is explained in appendix POSITIONING. E-02 Learning drive direction 0/1 Choosing the direction for the learning drive. It is possible to chose direction for the possitioning type E-01=1, 2 i 3. While when using positioning type 4 or 5 parameter is not in use. 0 – Learning drive is in direction UP 1 – Learning drive is in direction DOWN. E-03 Decelerating zone correction [imp] 0-250imp Parameter is active when using positioning type E-01=5 if there are no referent switches inputs defined (functions FI-251 and FI-253). Decelerating zone for nominal speed is defined as a sum of impulses for lower speed zone and this parameter. When using this positioning type 5 subtype choosing the speed for the drive is calculated with the floor to floor distance and decelerating zone calculated by measurement and this parameter. This way it is possible that the one floor distance is driven by lower or the nominal speed. LC100 Instruction manual 4/6 Parameters E-04 5/12 Positioning Type E Preopening speed [imp/s] 0-100imp Parameter is used as a speed control for preopening the doors. Speed is measured by the number of impulses on the inductive switch (positioning type E-01=4 or 5). If the speed is lower than one defined in the parameter E-04 then output with the „preopening enabled“ function FO-21 is switched on. E-05 Stopping delay in direction UP 0-2,5s Parameter for stopping delay when driving up. When elevator reaches the stopping magnet drive command is switched off and elevator stops. With this parameter it is possible to extend the driving time after reaching the stopping switch. Parameter is used for leveling adjustment and it is active for all floors. Leveling adjustment for each floor by itself is done by parameters for stopping F-XX. E-06 Stopping delay in direction DOWN 0-2,5s Parameter for stopping delay when driving down. When elevator reaches the stopping magnet drive command is switched off and elevator stops. With this parameter it is possible to extend the driving time after reaching the stopping switch. Parameter is used for leveling adjustment and it is active for all floors. Leveling adjustment for each floor by itself is done by parameters for stopping F-XX. E-07 Short floor distance 1-8 --- Parameter for defining short floor distances for floors 1 to 8. Short floor means that the distance betwen two floors is shorter than the deceleration distance. Setting the short floors is done by putting the „ “ sign betwen the floors wich have the short distance. Between the floors that are set elevator is driving with slow speed. On the example between the 3th and 4th floor and betwen 4th and 5th floor elevator will drive in slow speed. E-08 Short floor distance 9-16 --- Parameter for defining short floor distances for floors 9 to 16. Short floor means that the distance betwen two floors is shorter than the deceleration distance. Setting the short floors is done by putting the „ “ sign betwen the floors wich have the short distance. Between the floors that are set elevator is driving with slow speed. On the example between the 12th and 13th floor and betwen 15th and 16th floor elevator will drive in slow speed. E-09,E-10,E-11 Short floor distance E-09 - same as E-08 but for floors 17 to 24 E-10 - same as E-08 but for floors 15 to 32 E-11 - same as E-08 but for floors 33 to 40 --- 81 82 LC100 Instruction manual 4/6 Parametri E-12 5/12 Kopiranje Decelerating distance for speed V2 [imp] Tip E 1.00-3.00 Parameter is used for positioning type 5. E-12 represent the decelerating zone for V2. If there is an input for second referent switch FI-251 and FI-253 then the zone is defined by the input. If the inputs are not defined then decelerating zone can be calculated as multiplier of zone for V1 R1 – is deceleration distance for V1. E-12 – represent R2 (deceleration distance for V2) I.e. Decelerating zone for V1 is 1m (I.e 1000imp) where speed V1=1m/s. If there is need to set aditional speed V2=1,6m/s with deceleration distance 2,5m E-12 will be set to E12=2.5xR1. Then deceleration zone for V2 is set to 2,5m (2500imp). Assumption is that 1mm=1imp Which can be diferent in real situation. E-13 Decelerating distance for speed V3 [imp] 1.00-3.00 Parameter is used for positioning type 5. E-13 represent the decelerating zone for V3. Parameter is used to define deceleration distance for V3 as a multiplier of zone for V2 R2 – is deceleration distance for V2 (parameter E-12). E-13 – represent R3 (deceleration distance for V3) I.e. Decelerating zone for V2 (E-12) is 2,5m (I.e 2500imp) where speed V2=1,6m/s. If there is need to set aditional speed V3=2m/s with deceleration distance 5m E-13 will be set to E-13=2.00xR2. Then deceleration zone for V3 is set to 5m (5000imp). Assumption is that 1mm=1imp Which can be diferent in real situation. E-14 Condition distance for V2 [imp] 1.00-3.00 Parameter is used to determine drive speed. When drive command is given elevator will start with the speed V2 if condition E-14 is satisfied. R2 – presents deceleration distance for V2 (parameter E-12). I.e. We want to drive with the speed V2 (1,6m/s) if the driving distance is more than 6m. E-12 is set to 2,5m (2500imp), than we must set the E-14 to E-14=2.4xR2 which means 6m (6000imp). If the drive distance is more than E-14 (6m) the elevator will drive with the speed V2 othervise it will start with V1. E-15 Uvjet za izbor vožnje brzinom V3 [imp] 1.00-3.00 Parameter is used to determine drive speed. When drive command is given elevator will start with the speed V3 if condition E-15 is satisfied. R3 – presents deceleration distance for V3 (parameter E-13). I.e. We want to drive with the speed V3 (2,5m/s) if the driving distance is more than 12m. E-13 is set to 5m (5000imp), than we must set the E-15 to E-15=2.4xR3 which means 12m (12000imp). If the drive distance is more than E-15 (12m) the elevator will drive with the speed V3 othervise it will check conditions for speed V2 (parameter E-14) E-16 Learning travel 0-4 Parameter is used to activate the learning travel when using positioning type E-01= 4 ili 5. When all Positioning elements are set and parameters E-12 to E-14, if used, learning drive must be done. To do a learning travel parameter E-16 must be set to „0“, after that parameter change the value as follows: 0 – Learning drive command is given. 1 – Learning drive in progres. 2 – Calculating the results 3 – Learning travel done 4 – Not used LC100 Instruction manual 4.6 4/6 Parameters F-xx Stopping - Type F 6/12 Stopping Type F Stopping delay for x floor 0-2,55s Parameter for setting the levelling adjustment. Parameter F-01 is setting for 1th floor, F-02 for 2nd … In bracket the floor marking is shown which is set through parameters G-XX. It is possible to set delay for each floor from up and down direction. Parameter is set in seconds and represents stopping delay from reaching the stopping magnet. 4.7 4/6 Parameters G-xx Lift markings - Type G 7/12 Lift markings Type G Marking for the lift on display on M boards --- Parameters for setting the lift markings. Lift marking is displayed on LC100-M landing call boards. Parameter G-00 is marking for the unknown car position G-01 is marking for the first floor, G-02 for second… In order to LC100-M board showing the floor marking it is needed to set PML parameters ( put „ “ sign under the letter „A“ for floors in which is the LC100M board). 4.8 4/6 Parameters H-01 8/12 Timers Timers - Type H Type H Type of car fan control 1-2 Parameter for setting the car fan control type. 1 – Car fan (function FO-50) is switched on after the input car fan is trigered (FA-561) and is switched on time set in parameter H-02. 2 – Car fan (FO-50) is switched on automaticly every time that car is driving and is switched off after car has stopped and time H-02 has expired. H-02 Working time for car fan Parameter for setting the working time for car fan. 0-250s 83 84 LC100 Instruction manual 4/6 Parameters H-03 8/12 Timers Type H Car light control type 1-2 Car light control type selection. 1 – Standard – Function for controling the cabin light FO-51 is switched off afert time set in H-04 expired. 2 – Reserved. H-04 Working time for the car light 0-250s Parameter for setting the working time for car light. After all conditions for powering the light off are made this time must expire before switching the power off. H-05 OFF time for shaft light 0-250s Parameter for setting the time to power off the shaft light. The shaft light is switched on automaticly when inspection input is activated (FI-235), and it is switched off after putting to normal drive and this time has expired. H-06 Programable relay T1 Time settings: „ H-08 --- Parameter for setting the time relay T1 . It is possible to set 3 type of time relays: 1. BISTABIL Output function FO-33 changes every time on positive puls on input function FI-216. 2. IMPULS Output function FO-33 switches of after time set in this parameter after positive puls on input function FI-216. 3. DELAY Output function FO-33 is activated after time set in this parameter after positive puls on input function FI-216. „ - „aa“-hours, „bb“ minutes, „cc“ seconds, „dd“miliseconds“ Programable relay T2 --- Parameter for setting the programabile relay T2. Setting is the same as for T1, parameter H06. Input function FI-217, output function FO-34. LC100 Instruction manual 4/6 Parameters H-10 8/12 Time GONG signal duration Type H 0-2,55s The parameter is used to adjust the duration of the gong signal coming to the station. The arrival of the elevator on the slowdown zone switch triggers the GONG signal. For display LC100-M or L displays to signalize gong PML parameters must be set (mark „ “ below letter „C“ for stations with LC100-M or L display). H-11 UNLOCKING signal duration 0-25s The parameter is used to adjust the duration of landing door unlocking signal. Time H-09 is unlocking signal delay after cabin door opening. Unlocking signal is used with semi-automatic landing door and automatic cabin door. For display LC100-M or L to signalize unlocking PML parameters must be set (mark „ “ below letter „E“ for stations with LC100-M or L display). H-12 PHOTOCELL signal activation 0-250s Parameter is used to delay photocell (FI-263 or FI-273) signalization on LC100-M or L display. If the photocell input is active longer than the time set by parameter, it is saved in the statistic and signaled on display. For display LC100-M or L to signalize photocell activity PML parameters must be set (mark „ “ below letter “I“ for stations with LC100-M or L display). H-13 CLOSING OBSTACLES signal activation 0-250s Parameter is used to delay closing door obstacle (FI-262 or FI-272) signalization on LC100-M or L display. If the closing door obstacle input is active longer than the time set by parameter, it is saved in the statistic and signaled on display. For display LC100-M or L to signalize closing door obstacle PML parameters must be set (mark „ “ below letter “I“ for stations with LC100-M or L display). H-14 STOP signal activation 0-41min40s Parameter is used to delay safety circuit STOP interrupt signalization on LC100-M or L. If the safety circuit STOP input is interrupt longer than the time set by parameter, it is saved in the statistic and signaled on display. For display LC100-M or L to signalize safety circuit STOP interruption PML parameters must be set (mark „ “ below letter “G“ for stations with LC100-M or L display). H-15 LANDING DOOR signal activation 0-41min40s Parameter is used to delay landing door open on LC100-M or L display. If the landing door input is active longer than the time set by parameter, it is saved in the statistic and signaled on display. For display LC100-M or L to signalize landing door open PML parameters must be set (mark „ “ below letter “H“ for stations with LC100-M or L display). 85 86 LC100 Instruction manual 4/6 Parameters H-16 8/12 Time GONG signal duration Type H 0-1 Parameter is used for switching on the power saving mode. In the power saving mode after time set in parameter H-17 all the displays are switched off and output for power saving FO-57 is switched on. Trough relay with the power saving FO-57 it is posible to disconnect all unnessesary power consumers. H-17 UNLOCKING signal duration 0-25s The parameter is the time after which power energy mode is switched on. H-18 Output FO-058 OFF delay 0.0-3.0s Output function FO-058 OFF delay. It is used for A3 overspeed governer. H-19 Acceleration time (for time positioning) 0.0-20.0s Estimated elevator acceleration time. (time it takes the elevator to reach full speed for standstill; used only for time positioning system) LC100 Instruction manual 4.9 4/6 Parameters I-01 Protection - Type I 9/12 Protection Type I Cold state PTC resistance 0-9999 Cold state PTC resistance. When the resistance of the PTC probe connected to the input XC8:2 rises above the value defined by parameter I-02 elevator ends current travel, activates motor fan, if there is any, and waits for PTC resistance to fall below the value I-01. I-02 Warm state PTC resistance 0-9999 Warm state PTC resistance. I-03 Normal travel max. time 0-250s Maximum time of normal travel. I-04 Leveling max. time 0-250s Maximum time of leveling travel. Maximal time of traveling in low speed. From order to slow to activating stoping in station switch should not take more than the time set by parameter . Otherwise elevator indicates error „slow speed fail.“. I-05 Releveling max. time 0-250s Maximum time of relevening. From order to relevel to activating stoping in station switch should not take more than the time set by the parameter. Otherwise elevator indicates error „releveling fail.“ I-06 Evacuation max. time 0-250s Maximum evacuation travel time. Maximum passenger evacuation time from cabin. 87 88 LC100 Instruction manual 4/6 Parameters I-07 9/12 Protection Type I Maximal time for door opening 0-25s Maximal time for opening the doors. When the end switches for the doors are used (FI-260 or FI-270) opening signal is active until door open signal is active. I-07 is maximal time in which open signal must apear. If signal does not apear Door A open err“ or „Door B open error“ occurs. I-08 Maximal time for door closing 0-25s Maximal time for closing the doors. When the end switches for the doors are used (FI-261 or FI-271) closing signal is active until door close signal is active. I-08 is maximal time in which door signal must apear. If signal does not apear „Door A close err“ or „Door B close error“ occurs. I-09 Maximal time for locking the doors 0-25s Represents the time for door locked signal to apear. It is the time from locking the doors command to signal that the doors are locked. If in this time door locked signal is not active „door locking err“ occurs. I-10 Temperature for switching off the control board 0-85°C Parameter for switching off the control board. If the temperature measured on the procesor reaches the set value the control board is switched off (the program is not procesed) after the temperature falls below the value set in I11 the board is switched on again. I-11 Temperature for switching on the control board 0-85°C Parameter for setting the temperature for switching on the control panel. LC100 Instruction manual 4/6 Parameters I-12 9/12 Protection Type I Temperature for switching the control board fan ON 0-85°C Parameter for setting the temperature for control board fan. If the procesor temperature reaches the set value the output with the function FO-35 is switched on. Output for control board fan stays active until the temperature falls below the value set in I-13. I-13 Temperature for switching the control board fan OFF 0-85°C Parameter for setting the temperature for switching off the control board fan. 89 90 LC100 Instruction manual 4.10 Configurations - Type N 4/6 Parameters 10/12 Configurations Type N Configurations menu is for programing the input and output pins of LC100 boards. Example of configuring pin XC6:1 to have a function „program recall“: Pin to which the parameter is set. ID number of the function. Input function are displayed as FI, output FO and calls as CALL Status of the input/output: Active status Not active status neaktivno stanje Function description Location= setting the type of function: INPUT – input function FI-xxx OUTPUT – output function FO-xxx CALL A – call function A side CALL B – call function B side Polarity of the function. For input function polarity is: NC – normaly closed contact NO – normaly open contact For output function polarity is:: NOR – normal (on when the function is active) INV – inverted (of when the function is active) Main rule for parameters: If some parameters are not set then the function of that parameter is swithed of (Example: If the limit switches for the door are not set then doors are opened as defined by the parameter D-13 and closing is done until safety circuit is closed). Polarity of the function can be set only with input and output function while polarity of the calls is preset to NO and can't be changed. LC100 Instruction manual OUTPUT FUNCTION TABLE NO DYSPLAY ON LC100-D DESCRIPTION FO-001 Up travel command. FO-002 Down travel command. FO-003 Slow speed travelling command. FO-004 High speed travelling command. FO-005 Inspection speed travelling command. FO-006 Leveling speed travelling command. FO-007 Medium speed travelling comand. FO-013 Motor contactor start command for frequency regulated elevator. The function is impuls which is activated simultaneously with the function drive up or drive down and is active during the time set by parameter T-5. Motor contactors command for frequency regulated elevator. The function is switched on parallel with the function drive up or drive down and lasts entire drive. Frequency inverter reset function. Function is on when the input FI-226 „inverter control“ is activated. Reset function is on for 1s and repeats to switch on every 5s until inverter control is ok. Function to switch on contactor for the brake. Function is used for frequency regulated elevators. Time to power on and power of the brake can be set through parameters C-10 and C-11. Function for energy saving on the brake. Function is powered simultaneously with the brake control function and lasts time which is programable through parameter C-12. Function for starting the pump on the hydraulic elevators. FO-014 Function for powering the up direction valve. FO-015 Function for powering the high speed up direction valve. FO-016 Function for powering the high speed down direction valve. FO-017 FO-022 Function for powering the relevelling pump. Function for main motor cooling fan. Function is on when FI-208 „bimetal sensor“ is on and lasts until time C-13 expires. Supply contactor command. It is used with frequency regulated elevators with automatic evacuation of passangers. Function is on when time T-3 expires if there is no input on function for evacuation FI-207. Emergency power supply contactor command. It is used with frequency regulated elevators with automatic evacuation of passangers. Function is on when time T-4 expires if the evacuation input FI-207 is active. Function to enable relevelling and preopening the door. Function is active when releveling if the inputs „stopping zone“ (FI-258) and one of the stopping inputs (FI-256 or FI-257) are active. Frequency inverter enable function. Output is active if safety circuit is on. FO-023 Function for motor pump used in NGV agregats. FO-024 Aditional hydraulic pump function.. FO-025 FO-026 Function is active when the car is in floor level - FI-256 or FI-257 is active. FO-027 Function is active if the elevator is in normal drive, and there is no error active. FO-028 Function is active when the lift is in error. End of evacuation function. It is used in elevators with automatic passenger evacuation. The function is on when automatic evacuation is over. Fire program on function. Function is active when there is one of the fire programs active – functions FI-210 to FI-214. FO-008 FO-009 FO-010 FO-011 FO-012 FO-018 FO-019 FO-020 FO-021 FO-029 FO-030 91 92 LC100 Instruction manual NO FO-031 FO-032 FO-033 FO-034 DYSPLAY ON LC100-D DESCRIPTION End of fire program function. Function is on when fire program has ended. Function for controlling the shaft light. Function is on when inspection drive is on, and turned off when turned back to normal drive and time H-05 expired. Function is not working if the function elevator test FI-219 is on. Output function for time relay 1. Setting of the relay is explained in the parameters type H. Output function for time relay 2. Setting of the relay is explained in the parameters type H. FO-035 Output function for control panel fan managment. FO-036 Output function for brake opening in evacuation. FO-037 Output function is active in case UCM fault. FO-038 FO-039 FO-040 Open door A command FO-041 Close door A command. FO-042 FO-043 Low speed command to door A. It is used for frequency regulated cabin doors. Function is activated according to the functions FI-266 or FI-267. Function for controling the resistor for reversing the cabin doors A. Function is used for doors with spindle. When reversing the doors power for the doors is given through resistors. Time for this function can be set through parameter D35. FO-044 Open door B command FO-045 Close door B command. FO-046 FO-047 FO-048 FO-049 FO-050 FO-051 FO-052 FO-053 FO-054 FO-055 Low speed command to door B. It is used for frequency regulated cabin doors. Function is activated acording to the functions FI-266 or FI-267. Function for controlling the resistor for reversing the cabin doors B. Function is used for doors with spindle. When reversing the doors power for the doors is given through resistors. Time for this function can be set through parameter D35. Function for managment the retaring cam. Function is active during drive. Low voltage control for retaring cam. Cabin fan control function. It is activated acording to the type of control – parameter H-01. Engage time for fan is defined by parameter H-02. Cabin light control function. It is activated acording to the type of control – parameter H-03. Engage time for cabin light is defined by parameter H-03. New stop output function. Function is impulse after changihg the floor. Engage time of the function is when cabin pass by counting switch. Alarm enable function. Function is active when the car is at floor and the doors are opened. New cabin call function. Function is impulse and it is triggered every time when cabin call is activated. Stopping impulse function. Funcition is triggered when elevator is slowing down – when cabin pass by counting switch for selected floor. FO-056 Function active when elevator is out of order. FO-057 Output function for energy saving mode. FO-058 Output for powering the overspeed governor coil. FO-059 FO-060 Reserved direction up signalization. FO-061 Reserved direction down signalization. LC100 Instruction manual NO DYSPLAY ON LC100-D DESCRIPTION FO-062 Flashing reserved direction up signalization. FO-063 Flashing reserved direction down signalization. FO-064 Next drive up signalization. FO-065 Next drive down signalization. FO-067 Gong for next travel down. FO-068 FO-069 FO-070 FO-071 FO-072 FO-073 Lift in use signalization. Function is used for single travel elevators, parameter B-01=0. Function is activated when call is made, and is deactivated when drive has ended and the time B-02 has expired. Flashing lift in use signalization. Function is used for single travel elevators, parameter B-01=0. Function is activated when call is made, and is deactivated when drive has ended and the time B-02 has expired. Car overload signalization. Function is active when input 100% load is active, FI-242. Leave the car signalization. Photocell active signalization. Function is active when photocell side A, or side B is active, inputs FI-263 or FI-273 Signalization for unlocked landing door. Function is used when having semiautomatic landing doors. FO-074 Output function for door A unlocking device. FO-075 Output function for door B unlocking device. FO-076 Output function, active when door A is opened. FO-077 Output function, active when door B is opened. FO-078 Output function pulsating 1s „on“ 1s „off“ FO-079 FO-080 Output function for reset, active when reset button on LC100-D keypad is pressed. Cabin position output – binary code bit 0. It is used for car position signalization the way that binary outputs are active for the active floor according to the ADRESS TABLE. FO-081 Cabin position output – binary code bit 1. FO-082 Cabin position output – binary code bit 2. FO-083 Cabin position output – binary code bit 3. FO-084 Cabin position output – binary code bit 4. FO-085 Cabin position output – binary code bit 5. FO-087 Cabin position output – gray code bit 0. It is used for car position signalization the way that binary outputs are active for the active floor aording to the GRAY CODE TABLE Cabin position output – gray code bit 1. FO-088 Cabin position output – gray code bit 2. FO-089 Cabin position output – gray code bit 3. FO-090 Cabin position output – gray code bit 4. FO-091 Cabin position output – gray code bit 5. FO-100 Function for the unknown position of the cabin. FO-086 FO-092 FO-093 Output function directly connected to input function FI-301, wnen input is active then output FO-92 is active. Output function directly connected to input function FI-302, wnen input is active then output FO-93 is active. 93 94 LC100 Instruction manual NO DYSPLAY ON LC100-D DESCRIPTION FO-101 Function cabin at floor 1. FO-102 Function cabin at floor 2. FO-1xx Function cabin at floor XX. LC100 Instruction manual INPUT FUNCTIONS TABLE NO DYSPLAY ON LC100-D DESCRIPTION FI-201 Input function for switching to recall program. FI-202 Recall pushbutton up input function. FI-203 Recall pushbutton down input function. FI-204 Input function for power supply phase loss relay control. FI-205 FI-206 FI-207 FI-208 FI-209 FI-210 FI-211 FI-212 FI-213 Input function for controling the safety circuit control device used for relevelling and preopening the doors. Input function for elevators with short safety space. After the input is once activated (input FI-206) elevator is blocked until reset button on the LC100-D is pressed. Input function for emergency passanger evacuation. After the input is active elevator begins evacuation acording to the parameter A-04 Input function for motor bimetal sensor. After the input is activated function motor fan FO-18 is switched on. Input for fan contactor control. Input for fire program 1. After the input is activated elevator goes to fire program, existing calls are ignored, elevator goes to the station which is defined in the parameter B-07. After the elevator ends with the fire program it is blocked until input is switched off. Input for fire program 2. After the input is activated elevator goes to fire program, existing calls are ignored, elevator goes to the station which is defined in the parameter B-08. After the elevator ends with the fire program it is blocked until input is switched off. Input for fire program 3. After the input is activated elevator goes to fire program, existing calls are ignored, elevator goes to the station which is defined in the parameter B-09. After the elevator ends with the fire program it is blocked until input is switched off. Input for fire program 4. After the input is activated elevator goes to fire program, existing calls are ignored, elevator goes to the station which is defined in the parameter B-17. After the elevator ends with the fire program it is blocked until input is switched off. FI-214 Reset input for LC100-C board. FI-215 Input for out of order status of the elevator. FI-216 FI-217 Input function for time relay 1. Setting the time relay is explained in parameters type H Input function for time relay 2. Setting the time relay is explained in parameters type H FI-218 Input for disableing the landing calls. FI-219 Input for elevator test mode. After the input is activated elevator is in normal drive but the landing calls are disabled and shaft light control is disabled. FI-220 Input for up travel contactor control. FI-221 Input for down travel contactor control. FI-222 Input for low speed contactor control. FI-223 Input for high speed contactor control. 95 96 LC100 Instruction manual NO DYSPLAY ON LC100-D DESCRIPTION FI-224 Input for brake control. FI-225 Input for motor contactor control, used for frequency regulated elevators. FI-226 Input for frequency regulator control. FI-227 Input for star contactor control for hydraulics elevators. FI-228 Input for delta contactor control for hydraulics elevators. FI-229 Input for upper final limit switch control. When the input is activated elevator is blocked until manual reset. FI-230 Safety circuit control input for STOP when LC100-S board not used. FI-231 Safety circuit control input for LANDING DOOR when LC100-S board not used. FI-232 Safety circuit control input for DOOR A when LC100-S board not used. FI-233 Safety circuit control input for DOOR B when LC100-S board not used. FI-234 Safety circuit control input for LANDING LOCK when LC100-S board not used. FI-235 Inspection drive input FI-236 Inspection drive up input function. FI-237 Inspection drive down input function. FI-238 Input to control the presence of the person in the elevator cabin. FI-239 Input for 25% load in the cabin. FI-244 Input for 50% load in the cabin. It is used with frequency regulated elevators with evacuation to determine direction for evacuation. When the load is under 50% (input not active) evacuation is in direction up, when the input is active evacuation is in direction down. Input for 80% load in the cabin. It is used to determine if the cabin is full loaded. When the input is active the elevator does not stop for landing calls until the input is deactivated. Input for 100% load in the cabin. When the input is activated car overload signalization is on, and elevator is blocked until deactivation of the signal. Priority travel input function. When input is activated cabin calls are erased and elevator waits for the priority cabin call. Landing calls are remembered but are not processed until priority drive is deactivated. Fireman travel input. FI-245 Cabin light control input function. FI-246 Input for door inside the cabine. FI-247 Function for holding the cabin calls for platform use. FI-248 Brake activation input when using manual evacuation A-04=2 FI-249 Input for activating service speed 2. FI-250 Input for upper reference switch for nominal speed. FI-251 Input for upper reference switch for second nominal speed. FI-252 Input for lower reference switch for nominal speed. FI-253 Input for lower reference switch for second nominal speed. FI-254 Counting input for up direction travel. FI-255 Counting input for down direction travel. FI-256 Stopping switch input for up direction travel. FI-257 Stopping switch input for down direction travel. FI-240 FI-241 FI-242 FI-243 LC100 Instruction manual NO FI-258 DYSPLAY ON LC100-D DESCRIPTION Input for stopping zone switch. FI-259 FI-260 Opening limit switch input for door A FI-261 Closing limit switch input for door A FI-262 Input for closing door obstacle side A FI-263 Input for photocell door A FI-264 Input for door A open pushbutton. FI-265 Input for door A close pushbutton. FI-266 Input for slowing the door A opening speed. FI-267 Input for slowing the door A closing speed. FI-268 Additional input for door A open pushbutton. FI-269 Additional input for door A close pushbutton. FI-270 Opening limit switch input for door B FI-271 Closing limit switch input for door B FI-272 Input for closing door obstacle side B FI-273 Input for photocell door B FI-274 Input for door B open pushbutton. FI-275 Input for door B close pushbutton. FI-276 Input for slowing the door B opening speed. FI-277 Input for slowing the door B closing speed. FI-278 Additional input for door B open pushbutton. FI-279 Additional input for door B close pushbutton. FI-280 Additional input for photocell door A FI-281 Additional input for photocell door B FI-282 Input for automatic call from floor 1 to floor 2 for car elevators. FI-283 Input for automatic call from floor 2 to floor 1 for car elevators. FI-284 Input for automatic call from floor 1 to floor 3 for car elevators. FI-285 Input for automatic call from floor 3 to floor 1 for car elevators. FI-286 Input for automatic call from floor 2 to floor 3 for car elevators. FI-287 Input for automatic call from floor 3 to floor 2 for car elevators. FI-288 Input control for READY relay from NGV agregat. FI-289 Input control for RUN relay from NGV agregat. FI-290 Overspeed governor coil control input. FI-291 Overspeed contact control input. FI-292 Overspeed contactor control input. 97 98 LC100 Instruction manual NO DYSPLAY ON LC100-D DESCRIPTION FI-293 Aditional input function for elevator with short pitt . After input FI-293 is active elevator is blocked until reset on the LC100-D keypad. Function is identical as function FI-206. FI-294 Input for open door button for both csbin doors „A“ and „B“ FI-295 Input for close door button for both csbin doors „A“ and „B“ FI-296 Input function for disabeling the calls defined by the parameter B-17. FI-297 Input for power supply control phase „R“ FI-298 Input for power supply control phase „S“ FI-299 Input for power supply control phase „T“ FI-300 Input for controlling the UMD safety device. FI-301 Input function for activating output function FO-92. FI-302 Input function for activating output function FO-93. FI-303 Input function for earthquake program. Elevator stops in the nearest floor and stays with the open doors until input is deactivated. FI-304 Input for leveling speed control. FI-305 Input function for door A opening in case of automatic evacuation. FI-306 Input function for door B opening in case of automatic evacuation. FI-307 Input for activating the lift boy program. FI-308 FI-309 Input for control of the landing door contact for the first floor door, used in elevators with the short pit space. Input for control of the pillion in the pitt, used in elevators with the short pit space. FI-310 Input for controlling the aditional valve for down drive. FI-311 Input for control of the UPS.. FI-312 Input for active function for testing norme 2454-2 FI-313 Input for control of the Bucher I-Valve LC100 Instruction manual CABIN CALLS SIDE A TABLE NO DYSPLAY ON LC100-D DESCRIPTION 401 Cabin call A side for 1st floor. 402 Cabin call A side for 2nd floor. ... ...... 440 Cabin call A side for 40th floor. 441 Landing call up A side for 1st floor. 442 Landing call up A side for 2nd floor. ... ...... 479 Landing call up A side for 39th floor. 482 Landing call down A side for 1st floor. 483 Landing call down A side for 2nd floor. ... ...... 520 Landing call down A side for 40th floor. 561 Car fan input. CABIN CALLS SIDE B TABLE NO DYSPLAY ON LC100-D DESCRIPTION 601 Cabin call B side for 1st floor. 602 Cabin call B side for 2nd floor. ... ...... 640 Cabin call B side for 40th floor. 641 Landing call up B side for 1st floor. 642 Landing call up B side for 2nd floor. ... ...... 679 Landing call up B side for 39th floor. 682 Landing call down B side for 1st floor. 683 Landing call down B side for 2nd floor. ... 720 ...... Landing call down B side for 40th floor. 99 100 LC100 Instruction manual 4.11 P-M-L Modul - Type P 4/6 Parameters 11/12 P-M-L Modul Type P In the PML modul menu it is possible to set the work of the signalization modules LC100-P, LC100-M or LC100-L. Sign „ “ under the letter means that for that module is activated mode which is explained in the description: Example shows setting of the cabin signalization module (adress 0) which will display: Cabin position (A) Car travel direction (B) Sound signal for stopping (D) Sound and light signal for STOP (G) Adress of P, M or L modul A – 00 Cabin modul A side. A – xx Landing modul A side in xx floor. B – 00 Cabin modul B side. B – xx Landing modul B side in xx floor. Configuration for cabine and landing calls modules: A – Car position signalization Displays floor markings defined in G-00 to G-40 parameters. B – Car travelling direction signalization Displays up and down arrow when elevator is driving C – Next car travel direction signalization Displays up and down arrow when elevator is driving, and after stopping shows next drive direction D – Sound signal for car stopping (arriving to the floor) E – Sound signal for unlocking the landing doors F – Sound and light signal for cabin overload G – Sound and light signal for STOP H – Sound and light signal for landing door open. I – Sound and light signal for active photocell J – „Out of order“ light signalization K – „Fire program active“signalization L – Disable landing call M – „Landing call button pressed“ sound signal, for modul A-0 „New cabin call“ sound signal V- speaker volume (1 to 7) LC100 Instruction manual 4.12 Factory - Type T 4/6 Parameters T-01 12/12 Factory Type T Standard 1-3 Parameter for choosing the standard for software. 1 – EN81 standard 2 – Reserved 3 – Reserved T-02 Time for starting the inverter 0-25s Time for powering the frequency inverter. Defines the time for regulator to power up to ready state. Controlling the regulator is done through input with function FI-226. T-03 Time for powering the main supply contactor 2-25s Time for switching on the main supply contactor. Defines the delay to switch on the output function FO-019. It is used for frequency regulated elevators with evacuation. When the control cabinet is powered if the input for evacuation FI207 is not active output for main supply contactor (FO-019) is switched on with delay T-03. If the input FI-207 is active then output for UPS contactor (FO-020) is switched on with delayT-04. T-04 Time for powering the UPS contactor 0-25s Time for switching on the UPS supply contactor. Defines the delay to switch on the output function FO-020. It is used for frequency regulated elevators with evacuation. When the control cabinet is powered if the input for evacuation FI207 is not active output for main supply contactor (FO-019) is switched on with delay T-03. If the input FI-207 is active then output for UPS contactor (FO-020) is switched on with delayT-04. T-05 Time for start motor conntactors 0-2s W orking time for the motor start function (FO-08). T-06 Next service DAY 0-31 Function is used for elevators with surveillance system to keep track for servicing the elevators. Parameter T-06 is for setting the day in the month, parameter T-07 is for setting the month and T-08 is for setting the year. 101 102 LC100 Instruction manual 4/6 Parameters T-07 12/12 Factory Type T Next service MONTH 0-12 Function is used for elevators with surveillance system to keep track for servicing the elevators. Parameter T-06 is for setting the day in the month, parameter T-07 is for setting the month and T-08 is for setting the year. T-08 Next service YEAR 0-99 Function is used for elevators with surveillance system to keep track for servicing the elevators. Parameter T-06 is for setting the day in the month, parameter T-07 is for setting the month and T-08 is for setting the year. T-09 Monitoring type 0/1 Monitoring type (filtering the parameters): 0 – on parameter filtering is switched on. 1 – off parameter filtering is switched off. When the filtering is switched off all parameters of the system are visible through the LC100-D terminal. When the filter is „on“ parameters and functions are visible according to each other. If some parameters are not reacheable that means the filter is „on“. Example 1: If the parameter „Main drive“ is set to C-01=3 (frequency regulated elevator). Then all other parameters that are related are visible (C-02, C-03 ... C-12, C-13), while all other parameters are not visible (C-14, C-15, C-16, C-17 – parameters for hydraulic elevators). Example 2: If the parameter „Cabin door“ is set to D-01=1 (one automatic door). Then all parameters for door A are visible and parameters for door B are hidden. Example 3: Parameter „Number of stops“ is set to A-01=7 (elevator with 7 floors). Then for cabin calls is possible to set only seven calls, and all other parameters that are for higher floors are not visible. T-10 CAN frequency 0-99 Parameter for changing the CAN baudrate. LC100 Instruction manual T-11 Factory setting A – Close button priority off B – Automatic reset EN81 error and give output FO-79 - after service travel C – deactivating phase control from LC100-VFD plate D – weight scale deactivating E– F– G– H– T-12 Output tables bin/gray codes Output table selection for the display; Bin=0 – first station start with binary 0001 Bin=1 – first station start with binary 0000 Gry=1 – standardy gray code output Gry=2 – shifted gray code output (Turkey market) T-13 Simulator enable 0/1 Enable possibility to show simulator mode in LC100 menu. T-14 Control times valve down A3 Parameter for changing the CAN baudrate. T-15 Delay on order direction ALGI 103 104 LC100 Instruction manual T-16 ADL config A – Drive direction (no selected – normal, selected – inverted) B – Impulse direction (no selected – normal, selected – inverted) C – Reset by CAN enable/disable (no selected – enable, selected – disable) D – Contactor status signal transfer from ADL by CAN (no selected – enable, selected – disable) E – Brake status signal transfer from ADL by CAN (no selected – enable, selected – disable) F – ADL ready signal transfer from ADL by CAN (no selected – enable, selected – disable) G H G H G H G H T-17 Positioning system by encoder on ADL enable with resolution 1 Impulses = impulses / 1 Positioning system by encoder on ADL enable with resolution 2 impulses = impulses / 2 Positioning system by encoder on ADL enable with resolution 3 impulses = impulses / 4 Positioning system by encoder on ADL disable (another source of impulses in use) 0-40 Stp NORM 2454-2 After activation of input FI-312 elevator reach the station which is defined with parameter T-17, without opening the doors, descent automatically elevator for lenght which is define by parameter T-18, open the doors and waiting with opened doors until deactivated input FI-312, then start normal travel. While the function FI-312 is activated, elevator don't accept landing and cabin calls. T-18 Drv NORM 2454-2 * 100ms / *10mm 0-100 Defining times / descent time in the zone test. (For the absolute possitioning type - descent is T-18 x 10 mm) (For other positioning type – descent length was determined by the T-18 x 100 ms) LC100 Instruction manual 5. LC100 menu LC100 menu has 7 submenus like shown on the picture: 5/6 LC100 1/7 Date/time 2/7 Info 3/7 Test mode 1/4 Montage drive 4/7 Memory 2/4 Drive 1 <-> A-1 5/7 Reset 1/4 Statistics 3/4 Drive N <-> N+1 6/7 Transfer 2/4 Counters AB 4/4 No open doors 7/7 Simulator 3/4 Counter US 4/4 Parameters 105 106 LC100 Instruction manual 5.1 5/6 LC100 1/7 Date/time Date/time In the date/time menu the time is set, it is also possible to monitor the processor temperature. Date format is xx-yy-zz, where the: xx is day yy is month zz is year Clock format is aa-bb-cc, where the: aa is hour bb is minute cc is second After entering the menu setting is done by pressing the enter button. Changes are made with up, down, left or right button. Saving the changes is done by pressing the enter button. 5.2 5/6 LC100 2/7 Info Info Info menu shows the current software version installed at LC100-C board. LC100 Instruction manual 5.3 5/6 LC100 3/7 Test mode Test mode For elevator testing there is possible to change the 4 drive modes: 1/6 Montage drive – Switches on the montage drive. Montage drive presents driving the elevator without the cabin connection box (only with the contol cabinet in the machine room). If there is no cabin board LC100-K connected there is „Comm err with –K“ error – communication error with the LC100-K board. In that case elevator is in service drive because the input for service is on the „K“ board. Switching on the montage drive inputs on the „K“ board are ignored and the drive is possible with the recall buttons from the machine room. Switching off the montage drive is always when power down the LC100-C board. Also montage drive is switched automaticly after there is communicaton with the cabin board (connecting the LC100_K board to CAN communication bus). It is possible to switch the montage drive through the digital input. 2/6 Drive 1 <-> A-1 – Switches on the automatic drive only to first and the last floors. 3/6 Drive N <-> N+1 – Switches on the automatic drive with floor to floor drive. Elevator drives only one floor at a time.. 4/6 NO OPEN doors – Switches on the automatic drive without the door managing function. Elevator is working normally but the doors are not opened. 5/6 UCM (A3) UP –Switches on the automatic field test of UCM safety device. Elevator must be in the floor. After starting the test elevators opens the doors and starts relevelling in up direction. After exit the floor zone switches safety device must stop the elevator with the error UCM (A3). Reset can be done only with the reset button on the LC100-D keypad. 6/6 UCM (A3) DOWN – Identical as the test UP but in down direction. 5.4 5/6 LC100 4/7 Memory Memory Factory parameter for monitoring the values of internal memory. 107 108 LC100 Instruction manual 5.5 5/6 LC100 5/7 Reset Reset In the reset menu it is possible to reset statistics, countersand parameters. After entering the menu type of reset is chosen by pressing left or right button. After choosing the reset, press enter button, then press left or right and confirm with the enter button. After reset there is a message „*RESET FINISHED*“ Reset statistics erases all dana in STATISTICS menu. Reset counters A sets all counters in the COUNTERS menu to 0. Reset counters U sets USER counter to 0. Parameter reset sets all parameters to factory value. After confirming the parameter reset it is needed to choose which factory set of parameters to use. After choosing the set confirm with enter button and message „*RESET FINISHED*“ appears. Parameters for each factory set are shown in the „STANDARD CONFIGURATIONS OF PARAMETER“ Factory sets are different only in the drive type (type C) and configurations (type N) parameters. Other parameters must be set manually (number of stops, doors, positioning... ). LC100 Instruction manual 5.6 5/6 LC100 6/7 Transfer Transfer In transfer menu it is possible to transfer parameters from LC100-C board to the internal memory of LC100-D keypad. When enter the transfer menu chose direction for transfer parameters, after confirm there are 4 memory locations available , after choosing memory location confirm with enter button. After transfer there is posibility to give a name to parameter set. 109 110 LC100 Instruction manual 6. LC100-D ADDITIONAL MENU 6.1 General In addition to the regular menus described in the main User Guide, LC100-D has an additional menu for the following purposes: LC100-M5, LC100-M6 and LC100-M7 module addressing CAN bus traffic analysis Elevator selection (if LC100-D is connected to CAN2 bus) Load sensor calibration and settings LC100-D Additional menu LC100-D additional menu can be accessed by pressing UP and DOWN keys simultaneously. Keys don’t have to be pressed at the exactly same moment, it’s sufficient that both are held pressed at the same time. To return from the additional menu, press ESC. Upon exiting from additional menu, LC100-D returns to the state it was in before entering. There are two situations, other than the one described, in which LC100-D is going to enter the additional menu: When LC100-D is connected to the CAN2 bus, elevator selection menu will be brought up automatically. When LC100-D is connected to a CAN bus where no LC100-C is present, the additional menu root will be brought up automatically. This behavior is useful for addressing signalization modules without connecting them to an elevator or analyzing CAN traffic on a bus that has no LC100-C connected to it e.g. standalone signalization module. LC100 Instruction manual 6.2 Aditional menu structure 1/8 Addressing 1/3 Installed 2/8 ADL 200 2/3 Standalone 3/8 CAN Analysis 1/2 Trafic 4/8 CAN2 elevat. 2/2 Errors 5/8 Load cell 1/7 Status 6/8 Utility 2/7 Zero load 7/8 User code 3/7 Ref. load 8/8 ELGO 4/7 Capacity 5/7 Save par. 6/7 Load par. 7/7 Sensors 3/3 DUPLEX 111 112 LC100 Instruction manual 6.3 1/8 Addressing Multiple elevators LC100-M5/M6/M7 addressing 1/2 Installed First addressing mode is used for signalization modules that are already installed and connected to a LC100-C module. Signalization modules are addressed for one elevator at a time. Therefore, it’s first necessary to select an elevator whose signalization modules are to be addressed. Picture on the left depicts LC100-D screen for elevator A. If there are multiple elevators connected to the CAN2 bus, LC100-D will draw arrows next to selected elevator designator, indicating that it’s possible to select other elevators using LEFT and RIGHT keys. If there is only one elevator, no arrows will be drawn. Single elevator With the elevator chosen, the next step is to drive that elevator to a stop whose signalization module is to be addressed. Then, by pressing call pushbutton the signalization module whose pushbutton has been pressed is assigned to the selected elevator in the current stop. If the selected elevator has front and rear doors, each press of the call pushbutton will alternate between door A and door B. By pressing and holding RESET key for more than 3 seconds, all signalization modules will be reverted to the default address (stop 0 i.e. cab indicator). After exiting the menu all of the signalization modules will save their assigned addresses, so no further action from the user is required. 1/8 Addressing 2/2 Standalone Second addressing mode is used when, for any one reason, the first mode is impossible to use or is considered impractical e.g. the elevator cannot drive at the moment or the signalization modules aren’t connected to an elevator at all. First step is to select an address which is to be assigned to a signalization module, by pressing UP, DOWN, LEFT and RIGHT keys accordingly. Number next to address represents stop number, first letter represents elevator selection (A, B, C or D) and the third letter represents door selection (A or B). When the address is set, pressing a call pushbutton on a signalization module will assign the selected address to that module. Signalization modules automatically save their new address when call pushbutton is pressed, so no further action from the user is required. By pressing and holding RESET key for more than 3 seconds, all signalization modules will be reverted to the default address (stop 0 i.e. cab indicator). Image on the left shows LC100-D screen when stop 12, elevator B and landing door A is selected. LC100 Instruction manual 1/8 Adresiranje 3/3 DUPLEX Third way of addressing is for DUPLEX elevators with one button connected to both displays. Choosing the wanted address is done with up, down, left and right button. When pressing the pushbutton one display will be for the „A“ elevator, other one will be for „B“ elevator. When pressing pushbutton again they will change elevator address. As long as LC100-D is in any one of the addressing modes, all of the connected dot-matrix signalization modules will display their assigned address via two interchanging screen images. One of them displays stop number and the other one displays two characters, left one representing elevator assignment (A, B, C or D), and the right one representing landing door assignment (A or B). 6.4 2/8 ADL200 ADL 200 parameters ADL parameters In ADL 200 menu it is possible to change parameters in frequency inverter. Inverter must be connected to CAN comunication. Parameter description are given in ADL200 user manual. 113 114 LC100 Instruction manual 6.5 3/8 CAN Analysis CAN bus traffic analysis 1/2 Traffic Measurement time period Current bus load maximum Current error counter maximum (displayed: 3%) - - - - Global bus load maximim Global error counter maximum (displayed: 7%) Traffic analysis menu displays CAN bus load and transfer error number. Two types of data are displayed: global and current. Current data are refreshed every 500ms. Global data are updated only when a current value is bigger than an existing global value. Global data can be reset by pressing the RESET key CAN bus load is a percentage of measurement time period during which the CAN bus is busy transmitting messages. Error counter is an error message percentage out of total number of messages transmitted during measurement time period. Every and symbol represents 1%. symbol represents global error counter maximum , and symbol represents current error counter maximum. Measurement time interval can be changed by pressing UP and DOWN keys (from 10ms to 5000ms). Display refresh period is fixed to 500ms. Therefore, it’s obvious that for measurement time periods shorter than that multiple measurement periods will pass between two screen refreshes. In that case display will be updated with biggest values from the ones available. Expected CAN bus load values vary with number of connected LC100 modules and selected measurement time period. In general, the values measured during the short time periods will be greater than ones measured during longer time periods. Reason for that lies in combination of random distribution of messages in time and described measurement results display method. Therefore, it’s considered normal for bus load to temporarily go up to 100% for short measurement time periods (10, 20 and 50 ms). Current error counter value of 2% or less is not considered problematic. Constantly present current error counter value of 5% or more indicates a serious electrical problem on the CAN bus. LC100 Instruction manual 3/8 CAN Analysis ... 1/2 Errors Upon entering error analysis menu, LC100-D searches the CAN bus for connected LC100 modules. Modules must have firmware version 4.00 or newer in order to be able to transfer their error counters. 2 -3s After the search is finished, LC100-D will display a menu containing all of the connected modules (image shows an example of LC100-M5 module, addressed for 1. stop, elevator A and door A). Module can be selected by pressing LEFT and RIGHT keys (provided that there is more than one module). By pressing ENTER key, LC100-D will enter selected modules’ error counter menu. Error counter menu displays error counter values which can be listed through by pressing UP and DOWN keys. There are 7 values in total: 1. REC – CANREC 2. TEC – CANTEC 3. Stuff – bit stuffing error counter 4. Form – form error counter 5. Ack – ACK error counter 6. Bit – bit error counter 7. CRC – CRC error counter Error types description can be found in the CAN bus specification. CANREC and CANTEC counters display the current values of the CAN counters from the modules’ CAN controller. Other counters accumulate values until they are reset to zero by pressing REEST key. 6.6 CAN2 bus elevator select 4/8 CAN2 Side Present elevators - Chosen elevator CAN2 side select menu can be used to connect LC100-D to an elevator via CAN2 bus. Menu shows elevators present on the CAN2 bus in real time If there are no elevators connected to the CAN2 bus message like the one on the right picture is displayed. Elevator can be selected by pressing LEFT and RIGHT keys. To connect to the selected elevator user has to press the ENTER key. After the key press, LC100-D will exit the CAN2 side menu and display chosen elevator’s main menu. 115 116 LC100 Instruction manual 6.7 5/8 Load cell Load measurement 1/7 State The status screen displays current cab load in kilograms and in percentage of rated capacity. If load measurement system isn’t calibrated, message “Not Calibrated” is displayed. If the load measurement system isn’t operational, message “Load cell absent” is displayed. There are multiple possible reasons for this state: Module LC100-V isn’t connected to LC100-K Module LC100-V faulty Module LC100-K isn’t connected to the elevator Module LC100-K faulty 5/8 Load cell 2/7 Zero load Zero load menu is used to calibrate load measuring system to an empty cab. If zero load calibration is not already done, “Not defined” message is displayed. Zero load calibration procedure can be started by pressing ENTER key. The cab should be unloaded now and ENTER key should be pressed to commence with zero load calibration. After key press, LC100-D will display the outcome of the zero load calibration (“Successful” or “Communication error”). After successful zero load calibration, LC100-D will return to the load cell menu and display “Defined” as the zero load status. If zero load value is set and user tries to redefine it, a warning will be displayed. Pressing the ENTER button dismisses the warning and proceeds with the calibration process. LC100 Instruction manual 5/8 Load cell 3/7 Ref. load Ref. load menu is used to calibrate load measuring system to a known load. If known load calibration is not already done, “Not defined” message is displayed. Known load calibration procedure can be started by pressing ENTER key. The cab should be loaded uniformly with a known weight now. Load weight in kilograms should be entered using UP, DOWN, LEFT and RIGHT keys. Known load calibration will commence upon pressing the ENTER key. After key press, LC100-D will display the outcome of the known load calibration (“Successful” or “Communication error”). After successful known load calibration, LC100-D will return to the load cell menu and display load weight as the known load status. If known load value is set and user tries to redefine it, a warning will be displayed. Pressing the ENTER button dismisses the warning and proceeds with the calibration process. 5/8 Load cell 4/7 Capacity set Rated capacity menu is used to define rated capacity of an elevator. If rated capacity is not already defines, “Not defined” message is displayed. Rated capacity can be defined by pressing the ENTER key. Rated capacity in kilograms should be entered using UP, DOWN, LEFT and RIGHT keys. Rated capacity is confirmed by pressing the ENTER key. After key press, LC100-D will display the outcome of the rated capacity definition (“Successful” or “Communication error”). If rated capacity value is set and user tries to redefine it, a warning will be displayed. Pressing the ENTER button dismisses the warning and proceeds with the calibration process 117 118 LC100 Instruction manual 5/8 Load cell 5/7 Save par. “Save parameters” and “Load parameters” menus can be used to temporarily store load measurement system parameters on the LC100-D and restore them at a later time, if LC100-K module has to be replaced (similar to “Parameter transfer from LC100-C to LC100-D”). There is no need to save parameters to LC100-D in any other situation. If parameter saving is successful, “Par. Saved to LC100-D” message is displayed. If parameter saving fails (e.g. because of communication error), “LC100-K absent” message is displayed. 5/8 Load cell 6/7 Load par. “Save parameters” and “Load parameters” menus can be used to temporarily store load measurement system parameters on the LC100-D and restore them at a later time, if LC100-K module has to be replaced (similar to “Parameter transfer from LC100-C to LC100-D”). There is no need to save parameters to LC100-D in any other situation. If parameter loading is successful, “Par. Saved to LC100-D” message is displayed. If parameter loading fails (e.g. because of communication error), “LC100-K absent” message is displayed. If there are no load measurement system parameters previously saved on LC100-D, and user tries to load parameters, “No saved params on LC100-D” message is displayed. 5/8 Load cell 7/7 Sensors “Sensors” menu shows direct AD conversion results from each of the four LC100-V analog inputs and is used to troubleshoot sensor problems. LC100 Instruction manual 6.7 Utility 6/8 Utility Utility menu is used as as a service menu. Trough utility menu it is possible to change some system parameters which are not a part of standard menu. For accessing the boards address must be put as follows: 1- LC100-K, 2-LC100-E0, 3-LC100-E1, 4-LC100-I, 5-LC100-J, 6Reserved, 7-LC100-B… IMPORTANT!! For changing the parameters in utility menu contact MLC electronic technical department. 6.8 User code 7/8 User code User code menue is used for coding the LC100 boards. How to code the system is explained in „User Code manual“. 6.9 ELGO 8/8 ELGO ELGO menu is used for setting the absolute possitioning system. How to set the parameters is explained in „absolute possitioning system manual“. 119 120 LC100 Instruction manual APPENDIX 1. POSITIONING Positioning of the elevator implies to following the car position in the elevator shaft. In order to know the right position magnetic sensors (monostabil and bistabil) and inductive switch are used. Acording to the configuration, type of elevator (electric, hydraulic) and speed of the elevator there are 5 types of posittioning sistem which is set through parameter E-01. With any type of posittioning elevator always goes to first drive after switching the power on, switching from inspection drive to normal drive, or switching from recall to normal drive. When using possitioning type 1-3 first drive is only in one direction (adjustable through parameter E-02) while when using positioning type 4 or 5 first drive direction is to down floor and then up to the last floor. In the first drive elevator slows down when reaching the referent switch (up or down), same is in the normal drive, while slowing down for other floors is counting sensor switch or the impulse from the inductive switch depending on the positioning type. Positioning type 1: It is used for one speed elevators. Two bistabiles are used for final floors, and monostabile switch for stopping in the floor level. Positioning type 2: It is used for two speed elevators (regulated or not regulated). It is usually used when the deceleration distance is higher than ½ of the floor to floor distance. Two bistabiles are used for final floors, one monostabile switch for stopping in the floor, and two monostabiles for counting the floors and slowing down. Slowing down for first and the last floor is referent switch and for other floors slowing down is counting switch up or down according to direction of travel. Positioning type 3: It is used for two speed elevators (regulated or not regulated). It is usually used when the deceleration distance is lower than ½ of the floor to floor distance. Two bistabiles are used for final floors, one monostabile switch for stopping in the floor and one bistabile switch for counting the floors and slowing down. Slowing down for first and the last floor is referent switch and for other floors slowing down is counting switch. Positioning type 4: It is used for two speed elevators (regulated or not regulated). It is used when having annular gear on the overspeed guvernor or frequency inverter with close loop connected to CAN. Two bistabiles are used for final floors, one monostabile switch for stopping in the floor or optical sensor, and inductive switch on the overspeed guvernor. Slowing down for first and the last floor is referent switch and for other floors slowing down is impulse information from the inductive switch. Positioning type 5: It is used with frequency regulated elevators with two high speeds when the speed is so high that when driving froom floor to floor there is not enough space to accelerate to nominal speed before slowing down. In that case possitioning 5 is used and the speed between two floors is lower than nominal speed of the elevator. Two bistabiles are used for final floors for high speed, and two bistabiles for lower speed, one monostabile switch for stopping in the floor and inductive switch on the overspeed guvernor. Slowing down for first and the last floor is referent switch and for other floors slowing down is impulse information from the inductive switch. First drive is done with lower speed in down direction and up direction. In normal drive speed from floor to floor is lower while when driveing two or more floors speed is nominal. LC100 Instruction manual Table of switches acording to positioning type: RDD FI-250 XK6.1 RDG FI-252 XK6.2 BG FI-254 XK6.4 BD FI-255 XK6.5 ZUSG FI-256 XK6.7 E01=1 BIST. BIST. E01=2 BIST. BIST. E01=3 BIST. BIST. E01=4 BIST. BIST. MON/OPT E01=5 D28=1 or C18=1, 2 BIST. BIST. MON/OPT RDD2 FI-253 XK6.5 BIST. BIST. ZUSD FI-257 XK6.8 ZONA FI-258 XK6.9 MON/OPT MON/OPT MON/OPT MONO . BIST. MONO. MON/OPT MON/OPT Connect switches acording to the positioning type + E-01=positioning type D-28=preopening the doors C-18=relevelling BIST.=bistabile magnetic switch MON=monostabil magnetic switch (NO or NC) OPT=optical sensor Conecting the positioning switches: Magnetic switch position : RDD2 FI-251 XK6.4 121 122 LC100 Instruction manual Magnetic switches status in drive: LC100 Instruction manual 123 124 LC100 Instruction manual APPENDIX 2. TRAVELING CABLE CONNECTION While instaling the LC100 elevator system standard prewired traveling cable is used. Connectors are on both side of the cable. Traveling cable consist of 22 wires, 0,75mm2 intersection. Traveling cable structure: - 18 black wires numbered from 1. to 18. - 2 white wires numbered 1. and 2. in steel shell. - 2 yellow wires numbered 1. and 2. In steel shell. LC100 Instruction manual APPENDIX 3. CONNECTING THE CAN AND CAN BUS TERMINATION In order to have communication on the CAB bus „CAN BUS TERMINATION“ must be done. Without CAN bus termination system is not working. CAN bus termination is done by putting the jumpers to the places on the boards on which the termination is done (LC100-C, LC100-E, LC100-I, LC100-P or M) LC100-K bord has implemented CAN bus termination. Correctly terminated CAN bus means that the termination is done on both ends of the CAN communication bus. On simplex elevators termination is done on the LC100-K (integrated) and on the LC100-C board for CAN 1 communication and for the landing calls (CAN2) termination is done on the LC100-C bord and the farthest landing call module (LC100-P or M). When the CAN bus is correctly terminated resistance betwen CAN_L and CAN_H line has to be cca 68(betwen pins XC1.2 and XC1.3) Examples of correctly terminated CAN bus: Picture 21 Terminating the CAN on SIMPLEX elevators 125 126 LC100 Instruction manual Picture 12 Terminating the CAN bus on DUPLEX elevators LC100 Instruction manual 127 LC100 Instruction manual 128 APPENDIX 4. STANDARD CONFIGURATIONS OF PARAMETERS Standard parameter sets after factory reset: MAIN DRIVE TYPE C CALL PROCESSING TYPE B GENEGAL TYPE A Typ. Parameter Description Range INIT Factory settings VVF-AD HID-YD AC2-T1 A-1 Number of stops 2-40 12 A-2 Number of elevators 1-8 1 A-3 Elevator marking A-H A A-4 Evacuation program 0-2 0 A-5 Config LC100-I I --- A-6 Config LC100-K K,FC,FD K A-7 Config LC100-E0 E0,FC,FD E0 A-8 Config LC100-E1 E1,FC,FD --- A-9 Config LC100-P, M, L A, B A B-1 Type call processing 0-4 1 B-2 New call time 0-25 s 3s B-3 Program multiplex 1-2 1 B-4 Program A/B side 0-1 0 B-5 Program lift boy 0-1 0 B-6 Main stop 1-A1 1 B-7 Fire stop zone 1 0-A1 0 B-8 Fire stop zone 2 0-A1 0 B-9 Fire stop zone 3 0-A1 0 B-10 Fire stop zone 4 0-A1 0 B-11 False calls erasing 0-A1 0 B-12 Parking program type 1-2 1 B-13 Parking stop 1 0-A1 0 B-14 Time for parking 1 0-41:40min 2:00 min B-15 Parking stop 2 0-A1 0 B-16 Time for parking 2 0-41:40min 2:00 min C-1 Main drive type C-2 1-4 2 3 4 2 Starting sequence VMRPI --- --- --- --- C-3 Nominal speed VMRPI --- V --- --- C-4 Stopping speed VMRPI --- --- --- --- C-5 Service speed VMRPI --- M --- --- C-6 Leveling speed VMRPI --- P --- --- C-7 Medium speed VMRPI --- VM --- --- C-8 Time for starting sequence 0-2,5 s 0 0 --- --- C-9 Time OFF motor contactor 0-25 s 0 0 --- --- C-10 Time ON brake contactor 0-2,5 s 0 0 --- --- User: LC100 Instruction manual DOORS TYPE D MAIN DRIVE TYPE C Typ. Parameter Description Range INIT Factory settings VVF-AD HID-YD AC2-T1 C-11 Time OFF brake contactor 0-2,5 s 0 0 --- --- C-12 Time low brake voltage 0-25 s 2s 2s --- 2s C-13 Main drive fan working time 0-250 s 30 s 30 s 30 s 30 s C-14 Starting time for motor pump 0-25 s --- --- 2s --- C-15 Service speed direction 0-1 --- --- 0 0 C-16 Time ON valve up 0-2,5 s --- --- 0 --- C-17 Additional time for pump 0-2,5 s --- --- 0 --- C-18 Releveling program 0-2 0 0 2 --- C-19 Additional time for releveling 0-2,5 s 0 0 0 --- D-1 Type of car door 0-2 1 D-2 Door A side for floors 1-8 1-8 --- D-3 Door A side for floors 9-16 9-16 --- D-4 Door A side for floors 17-24 17-24 --- D-5 Door A side for floors 25-32 25-32 --- D-6 Door A side for floors 33-40 33-40 --- D-7 Door B side for floors 1-8 1-8 --- D-8 Door B side for floors 9-16 9-16 --- D-9 Door B side for floors 17-24 17-24 --- D-10 Door B side for floors 25-32 25-32 --- D-11 Door B side for floors 33-40 33-40 --- D-12 Orders for door A ABCDEF AC D-13 Opening time door A 0-25 s 4s D-14 Type of landing doors A 0-3 1 D-15 Open door A for floors 1-8 1-8 --- D-16 Open door A for floors 9-16 9-16 --- D-17 Open door A for floors 17-24 17-24 --- D-18 Open door A for floors 25-32 25-32 --- D-19 Open door A for floors 33-40 33-40 --- D-20 Nalozi vrata B ABCDEF AC D-21 Opening time door B 0-25 s 4s D-22 Type of landing doors B 0-3 1 D-23 Open door B for floors 1-8 1-8 --- D-24 Open door B for floors 9-16 9-16 --- D-25 Open door B for floors 17-24 17-24 --- D-26 Open door B for floors 25-32 25-32 --- D-27 Open door B for floors 33-40 33-40 --- D-28 Preopening doors 0-1 0 D-29 Delay for preopening 0-2,5 s 0s D-30 Standard exit time at stop 0-25 s 5s User. 129 LC100 Instruction manual 130 Description Range INIT Factory settings VVF-AD HID-YD AC2-T1 Waiting time after photocell 0-25 s 2s D-32 Waiting time after new call 1-25 s 1s D-33 Door deceleration time 0-25 s 1s D-34 Door reversing time 0-2,5 s 0,05 s D-35 Door resistors time 0-25 s 0s D-36 Door locking time 0-2,5 s 0,3 s Positioning type 1-5 3 E-2 Learning drive direction 0-1 0 E-3 Decelerating zone correction 0-250imp 0 imp E-4 Preopening speed 0-100imp/s 0 imp/s E-5 Stop delay in UP drive 0-2,5 s 0s E-6 Stop delay in DOWN drive 0-2,5 s 0s E-7 Short floor distance 1-8 1-8 --- E-8 Short floor distance 9-16 9-16 --- E-9 Short floor distance 17-24 17-24 --- E-10 Short floor distance 25-32 25-32 --- E-11 Short floor distance 33-40 33-40 --- F-X Stopping delay for x floor 2-2,55 s 0s G-X PROT. TYPE I TIME TYPE H POSITIONING TYPE E E-1 TYPE F D-31 TYPE G DOOR TYPE D Typ. Parameter Stopping delay is factory set to 0 s, user sets it for each floor on the building Marking for the floor 1, 2, 3, 4, 5, 6 .... 37, 38, 39, 40 Factory seting is from 1 to 40 H-1 Car fan type 1-2 1 H-2 Working time for car fan 0-250s 30 s H-3 Car light type 1-2 1 H-4 Working time for car fan 0-250s 30 s H-5 OFF time for shaft light 0-250s 60 s H-6 Programabile relay T1 --- --- H-7 Programabile relay T2 --- --- H-8 GONG/UNLOCK time 0-2,55s 0,03 s H-9 DOOR UNLOCK time 0-25s 0s H-10 PHOTOCELL time 0-250s 20 s H-11 DOOR OBSTACLE time 0-250s 30 s H-12 STOP signal time 0-41:40min 3:20 min H-13 LADNING DOOR signal time 0-41:40min 10:00 min I-1 PTC resistance in cold state 0-9999 700 I-2 PTC resistance im hot state 0-9999 1620 I-3 Max. drive in normal travel 0-250s 20 s User. LC100 Instruction manual CONFIGURATIONS TYPE N Range INIT Factory settings VVF-AD HID-YD AC2-T1 Max. drive in low speed 0-250s 20 s I-5 Max. drive time in releveling 0-250s 20 s I-6 Max. drive in evacuation 0-250s 120 s I-7 Max. time for door opening 0-25s 10 s I-8 Max. time for door closing 0-25s 10 s I-9 Max. time for locking door 0-25s 3s I-10 Temp. for switch off panel 0-85°C 0°C I-11 Temp. for switch on panel 0-85°C 0°C I-12 Temp. for panel fan on 0-85°C 50°C I-13 Temp. for panel fan off 0-85°C 40°C Board Typ. Description I-4 LC100-C PROTECTION TYPE I Typ. Parameter User. Factory settings Pin Description INIT VVF-AD HID-YD AC2-T1 XC5.1 Programabile input 0 FI-225 NO FI-228 NO FI-223 NO XC5.2 Programabile input 0 FI-226 NO FI-227 NO FI-222 NO XC5.3 Programabile input 0 FI-224 NO FI-220 NO XC5.4 Programabile input 0 --- FI-221 NO XC5.5 Programabile input 0 XC5.6 Programabile input 0 FI-207 NO --- XC5.7 Programabile input 0 FI-205 NO --- XC5.8 Programabile input 0 --- --- --- XC5.9 Programabile input 0 --- --- --- XC5.10 Programabile input 0 XC6.1 Programabile input FI-201 NC XC6.2 Programabile input FI-202 NO XC6.3 Programabile input FI-203 NO XC8.1 Programabile input 0 XC10.1 Programabile output 0 FO-01 XC10.2 Programabile output 0 FO-02 XC10.3 Programabile output 0 XC10.4 Programabile output 0 XC10.5 Programabile output 0 FO-12 --- F0-12 XC10.6 Programabile output 0 FO-18 FO-21 FO-18 XC10.7 Programabile output 0 FO-10 --- --- XC10.8 Programabile output 0 FI-209 NO FI-210 NC FI-208 NO FO-03 FI-242 NC FO-13 FI-208 NO FO-03 FO-04 FO-32 User. 131 LC100-K LC100-E0 CONFIGURATIONS TYPE N Typ. Board LC100 Instruction manual 132 Factory settings Pin Description INIT VVF-AD HID-YD AC2-T1 XK4.1 Programabile input 0 FI-242 NO (CAR LOAD 100%) XK4.2 Programabile input 0 FI-241 NO (CAR LOAD 80%) XK4.3 Programabile input 0 FI-240 NO (CAR LOAD 50%) XK5.1 Programabile input FI-235 NC (INSPECTION DRIVE) XK5.2 Programabile input FI-236 NO (INSPECTION DRIVE UP) XK5.3 Programabile input FI-237 NO (INSPECTION DRIVE DOWN) XK6.1 Programabile input 0 FI-250 NO (REFERENT SWITCH UP) XK6.2 Programabile input 0 XK6.4 Programabile input 0 FI-252 NO (REFERENT SWITCH DOWN) FI-254 NO (COUNTING) XK6.5 Programabile input XK6.7 Programabile input XK6.8 Programabile input 0 FI-257 NO 0 XK6.9 Programabile input 0 FI-258 NO 0 XK9.1 Programabile output FO-51 INV (CAR LIGHT) XK9.2 Programabile output FO-50 NOR (CAR FAN) XK9.3 Programabile output FO-40 NOR (OPEN DOOR A) XK9.4 Programabile output FO-41 NOR (CLOSE DOOR A) XK9.5 Programabile output FO-53 INV (ALARM ENABLE) XK9.6 Programabile output 0 XK9.7 Programabile output 0 XK9.8 Programabile output 0 XK10.1 Programabile input 0 XK10.2 Programabile input 0 XK10.3 Programabile input 0 FI-262 NO (OBSTACLE DOOR A) XK10.6 Programabile input 0 FI-263 NO (PHOTOCELL DOOR A) XK11.1 Programabile input 0 XK11.2 Programabile input 0 XK11.3 Programabile input 0 XK11.6 Programabile input 0 XE3.1 Programabile input/output 0 FA-401 (CABIN CALL 1 A) XE3.2 Programabile input/output 0 FA-402 (CABIN CALL 2 A) XE3.3 Programabile input/output 0 FA-403 (CABIN CALL 3 A) XE3.4 Programabile input/output 0 FA-404 (CABIN CALL 4 A) XE3.5 Programabile input/output 0 FA-405 (CABIN CALL 5 A) XE3.6 Programabile input/output 0 FA-406 (CABIN CALL 6 A) XE3.7 Programabile input/output 0 FA-407 (CABIN CALL 7 A) XE3.8 Programabile input/output 0 FA-408 (CABIN CALL 8 A) 0 0 FI-256 NO (STOPPING UP) User. LC100 Instruction manual Factory settings Board LC100-E0 Typ. Pin INIT VVF-AD HID-YD AC2-T1 XE4.1 Programabile input/output 0 FA-409 (CABIN CALL 9 A) XE4.2 Programabile input/output 0 FA-410 (CABIN CALL 10 A) XE4.3 Programabile input/output 0 FA-411 (CABIN CALL 11 A) XE4.4 Programabile input/output 0 FA-412 (CABIN CALL 12 A) XE4.5 Programabile input/output 0 FA-561 (CAR FAN PUSHBUTTON) XE4.6 Programabile input/output 0 FI-264 NO (OPEN DOOR A) XE4.7 Programabile input/output 0 FI-265 NO (CLOSE DOOR A) XE4.8 Programabile input/output 0 FI-243 NO (PRIORITY DRIVE) INIT Factory settings VVF-AD HID-YD AC2-T1 Typ. Parameter TYPE P Description Description Range P-00 Config for P or M module --- A, B, D, F, G P-01 Config for P or M module --- A, B P-xx Config for P or M module --- A FACTORY TYPE T P-00 –setting for cabin signalization module, P-xx –setting for landing signalization module T-01 Standard 1-3 1 T-02 Time for starting inverter 0-25s 5s T-03 Main supply contactor delay 0-25s 5s T-04 UPS suply contactor delay 0-25s 5s T-05 Motor contactor delay 0-2s 1s T-06 Next service day 1-31 0 T-07 Next service month 1-12 0 T-08 Next service year 0-99 0 T-09 Monitor type 0/1 1 User. User. 133 134 LC100 Instruction manual List of picture with description: Picture 1 - Example of connecting the inputs. ..................................................................................... 5 Picture 2 - LC100-C board ....................................................................................................................... 6 Picture 3 - LC100-K board....................................................................................................................... 8 Picture 4 - LC100-S board ..................................................................................................................... 14 Picture 5 - LC100-E board ..................................................................................................................... 17 Picture 6 - LC100-F board ..................................................................................................................... 24 Picture 7 - LC100-D control terminal .................................................................................................. 25 Picture 8 - LC100-Z board ..................................................................................................................... 28 Picture 9 - LC100-R board ..................................................................................................................... 29 Picture 10 - LC100-T board ................................................................................................................... 30 Picture 11 - LC100-I board .................................................................................................................... 32 Picture 12 - LC100-M5 matrix display ................................................................................................ 33 Picture 13 - LC100-M6 dot matrix display ......................................................................................... 34 Picture 14 - LC100-M7 segment display ............................................................................................ 35 Picture 15 - LC100-M3 dot matrix display ......................................................................................... 36 Picture 16 - LC100-M8 dot matrix display......................................................................................... 29 Picture 17 - LC100-J board .................................................................................................................... 39 Picture 18 - LC100-V board...................................................................................................................33 Picture 19 - LC100-B board...................................................................................................................34 Picture 20 - LC100-H board..................................................................................................................35 Picture 21 - Terminating the CAN bus on SIMPLEX elevators.....................................................114 Picture 22 - Terminating the CAN bus on DUPLEX elevators......................................................115 LC100 Instruction manual NOTES: _______________________________________________________________________________________ _______________________________________________________________________________________ _______________________________________________________________________________________ _______________________________________________________________________________________ _______________________________________________________________________________________ _______________________________________________________________________________________ _______________________________________________________________________________________ _______________________________________________________________________________________ _______________________________________________________________________________________ _______________________________________________________________________________________ _______________________________________________________________________________________ _______________________________________________________________________________________ _______________________________________________________________________________________ _______________________________________________________________________________________ _______________________________________________________________________________________ _______________________________________________________________________________________ _______________________________________________________________________________________ _______________________________________________________________________________________ _______________________________________________________________________________________ _______________________________________________________________________________________ _______________________________________________________________________________________ _______________________________________________________________________________________ _______________________________________________________________________________________ 135 136 LC100 Instruction manual