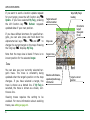
1
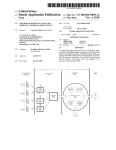
TWIG TRACER
USER’S MANUAL
Publication number: YZ3008
All rights reserved © Benefon Oyj, 2007
CONTENTS
CONTENTS
STARTING TWIG TRACER . . . . . . . . . . . . . . . . . . . .3
APPLICATION VIEWS . . . . . . . . . . . . . . . . . . . . . . . .4
Target List view . . . . . . . . . . . . . . . . . . . . . . . . . .4
CREATING NEW TARGET . . . . . . . . . . . . . . . . .4
MY TWIG . . . . . . . . . . . . . . . . . . . . . . . . . . . . . . .5
TARGET LIST OPTIONS. . . . . . . . . . . . . . . . . . .5
Map view . . . . . . . . . . . . . . . . . . . . . . . . . . . . . . . .5
MAP VIEW OPTIONS . . . . . . . . . . . . . . . . . . . . .7
ZOOMING THE MAP . . . . . . . . . . . . . . . . . . . . 15
Track. . . . . . . . . . . . . . . . . . . . . . . . . . . . . . . . . .
REQUEST UPDATE. . . . . . . . . . . . . . . . . . . . .
REQUEST AND CANCEL TRACKING . . . . . .
REQUEST AND CANCEL AREA TRACKING .
15
16
16
16
Refresh my position . . . . . . . . . . . . . . . . . . . . . 17
Send my position . . . . . . . . . . . . . . . . . . . . . . . . 17
Remote configuration . . . . . . . . . . . . . . . . . . . . 18
Clear . . . . . . . . . . . . . . . . . . . . . . . . . . . . . . . . . . 18
Twig key. . . . . . . . . . . . . . . . . . . . . . . . . . . . . . . 11
Settings . . . . . . . . . . . . . . . . . . . . . . . . . . . . . . .
MAP HANDLING. . . . . . . . . . . . . . . . . . . . . . .
TITLE AND SOFT KEYS . . . . . . . . . . . . . . . . .
DATA VIEW CONTENT . . . . . . . . . . . . . . . . . .
...................................
Selecting data fields . . . . . . . . . . . . . . . . .
VERSION . . . . . . . . . . . . . . . . . . . . . . . . . . . . .
Twig key menu . . . . . . . . . . . . . . . . . . . . . . . . . 11
Target info . . . . . . . . . . . . . . . . . . . . . . . . . . . . . 21
TWIG TRACER MAIN MENU . . . . . . . . . . . . . . . . . 13
Deleting Target . . . . . . . . . . . . . . . . . . . . . . . . . 22
Guide view . . . . . . . . . . . . . . . . . . . . . . . . . . . . . . .8
GUIDE VIEW OPTIONS . . . . . . . . . . . . . . . . . . .8
Data view . . . . . . . . . . . . . . . . . . . . . . . . . . . . . . . .9
DATA VIEW OPTIONS . . . . . . . . . . . . . . . . . . . .9
TWIG KEY AND TWIG KEY MENU . . . . . . . . . . . . 11
Editing . . . . . . . . . . . . . . . . . . . . . . . . . . . . . . . . 13
Map. . . . . . . . . . . . . . . . . . . . . . . . . . . . . . . . . . . 14
PANNING THE MAP . . . . . . . . . . . . . . . . . . . 14
2
19
19
19
19
19
20
21
STARTING TWIG TRACER
STARTING TWIG TRACER
To exit Twig Tracer application, press - Exit.
Twig Tracer is a special application for real time
monitoring and viewing movements and positioin of e.g. your partner or Twig Locator device.
With Twig Tracer you can, when requested,
communicate your exact position to other people. You can also follow-up the movements of
your partners who are listed as targets in the
application. You can request position, tracking
and area tracking of the selected target(s), and
view your own as well as your targets' position
on map. In addition, you can configure the GPS
mode of a selected target device.
Twig Tracer targets can be any GSM devices with
GPS positioning and support for MPTP commands, such as another Twig Discovery phone,
or other Benefon GPS-GSM devices.
Note that not all commands might not be implemented in all devices.
To enter the application, press ~ and select
Tracer. To enter the menu grid while in stand-by
mode, you can also press
".
3
APPLICATION VIEWS
APPLICATION VIEWS
Target List view
There are four views available in Twig Tracer
application: Target List view together with Map
view, Guide view and Data view. When the
application is launched, the Target List view is
displayed. The other three views can then be
accessed via the Target List view.
Target List displays all available targets stored
in the Twig Tracer application.
Map view, Guide view and Data view are parallel with each other. When the views are
accessed for the first time, the Map view is displayed as a default. Later, the first displayed
view is the one you have used previously.
You can switch between the Map, Guide and
Data views by pressing the arrow keys n left/
right. While on any of these three views, you
can close the view and return back to the Target List by pressing the right function key Back.
4
You can view target information by selecting a
desired target and pressing the left function
key . Open. Target is opened on your previously selected view: Map view, Guide view or
Data view. You can also call directly to the target by pressing the hook-up key l.
CREATING NEW TARGET
If you wish to create a new target, highlight
New target in the Target List and press the middle key " to open it. Then key in target information as described in editing on page 13.
You can also create a new target via Twig
Inbox. Select the desired message from the
message list and save the sender as a target by
selecting Save as target. For more information
on, see the user manual for twig discovery pro, twig
inbox and twig configurator on page 13.
APPLICATION VIEWS
MY TWIG
My Twig represents your own position and it is
created automatically by the Tracer application.
My Twig can be handled the same way as targets, although some options depend on
whether a target or My Twig is currently
selected.
TARGET LIST OPTIONS
You can access Target List options menu by
pressing the middle key " while in the Target
List. Highlight the desired option and select it
by pressing the middle key ".
The Target List options are:
Edit, Track, Refresh my position, Send my
position, Remote configuration, Clear, Settings, Target info and Delete.
The available options depend on whether you
have currently selected a target or My Twig. For
more information about the Target List options
and how to use them, see twig tracer main
menu on page 13. Note that the target device
does not necessarily support all commands
even if they are displayed in the target list
options.
Map view
The map view displays targets on the map. If
the map view is entered from the Target List,
the map is opened up centered on the selected
target. If My Twig is selected, the map is centered on your own position.
You can handle the map by zooming and panning it. Zoom the map in by using the star key
+. Or zoom out by using the hash key §.
To switch into the panning mode, press the
alphanumerical key 0. To return back to the
normal map view, press 0 again. For more
information about map handling, see map on
page 14.
Current Target position
An icon with circle around it displays the position of the selected target. If the target is moving, its direction is displayed with an arrow.
5
APPLICATION VIEWS
If you want to send a location update request
for your target, press the left function key .
Update. If you have selected My Twig, pressing
the left function key . Refresh requests
updated data of your own position.
Target name and
shortcut number
If you have defined shortcuts for specified targets, you can also press and hold down the
alphanumerical keys 1... 7 and 9 to
change the current target on the map. Pressing
the Twig key 8 displays My Twig.
Map scale
Note that the map view is blank if there is no
known position for the selected target.
Target’s/My Twig’s
heading
Direction to
target/
Base point
(if set)
Target’s trace
Trace
You can also see your currently selected target’s trace. The trace is constantly being
updated when the target’s position on the map
changes. If you have selected a target, the
trace is shown as a dotted line. If My Twig is
selected, the trace is shown as a black, continuous line.
Viewing traces requires the setting to be
enabled. For more information about enabling
traces, see editing on page 13.
6
Data box with distance,
speed and position age
information
Target’s current
position
APPLICATION VIEWS
Other targets and base point
Besides the current target on the center of the
map, you can also see all the defined targets
that have their position known and are within
the map scale. The targets are represented on
the map by icons defined in the Target List.
There are no traces leading to these targets.
If there is a base point set and it is within the
map scale, you can also see an icon displaying
its position. For more information about the
base point, see twig key menu on page 11.
Data box
In data box you can see information about target’s speed and distance from your own position, as well as the time of the last target
location update. You can also see an icon representing the battery level of the selected target or My Twig. If you have selected My Twig,
the distance information field displays distance
to base point. This requires that the base point
has been set and guidance to it is on.
The data box is displayed again if any key is
pressed or if the phone receives new position
information. For more information, see title and
soft keys on page 19.
MAP VIEW OPTIONS
While on the Map view, you can open the Map
view options by pressing the middle key ".
Then highlight the desired option and select it
by pressing the middle key " again.
Map view options include:
Map, Track, Refresh my position, Send my
position, Remote configuration, Clear, Settings, and Target info.
The available options depend on whether you
have selected a target or My Twig. For more
information about the Map view options and
how to use them, see twig tracer main menu on
page 13. Note that the target device does not
necessarily support all commands even if they
are displayed in the Map view options.
If you do not want the data box to be displayed, you can set Hide on timeout in Settings.
7
APPLICATION VIEWS
Guide view
Guide view is used to guide you to the current
target. A dial card and a compass needle are
displayed showing you the direction to the target. This requires that both your own position
and the target position are known.
If you have currently selected My Twig, and
guidance is on, the compass will guide you
from your current position to your previously
defined base point. For more information about
the base point, see twig key menu on page 11 .
If your current target does not have a known
position, the target arrow is invisible. The target arrow is invisible also when the base point
is not defined and you have currently selected
My Twig. If the dial card is invisible, there is no
valid information of your own position.
If you have defined shortcuts for specified target, you can also press and hold down the corresponding alphanumerical key 1...7 and
9 to quickly change the target you are being
guided to.
8
Target’s name and
shortcut number
Your current
direction
Direction to
north
Distance to
target/ base
point
Target arrow:
Direction to
the target/
base point
Target’s
current
speed/Your
current
speed (if My
Twig is
selected)
Direction
to south
Age of the last location update
GUIDE VIEW OPTIONS
While on the Guide view, you can open the
Guide view options by pressing the middle key
APPLICATION VIEWS
". Then highlight the desired option and select
it by pressing the middle key " again.
Guide view options include:
Track, Refresh my position, Send my position,
Remote configuration, Clear, Settings and
Target info.
The available options depend on whether you
have selected a target or My Twig. For more
information about the Guide view options and
how to use them, see twig tracer main menu on
page 13. Note that the target device does not
necessarily support all commands even if they
are displayed in the Guide view options.
Target’s name and
shortcut number
Age of the
last location update
Estimated
Time
Enroute
Target’s
speed
Bearing
Number of updates
Data view
On data view, you can see various details about
the current target, depending on whether you
have selected a target or My Twig. You can customize the data view contents by selecting the
desired data fields in Settings. See data view
content on page 19 for more information.
DATA VIEW OPTIONS
While on the Data view, you can open the Data
view options by pressing the middle key ".
9
APPLICATION VIEWS
Then highlight the desired option and select it
by pressing the middle key " again.
Data view options include:
Track, Refresh my position, Send my position,
Remote configuration, Clear, Settings and
Target info.
The available Data view options depend on
whether you have selected a target or My Twig.
For more information about the Data view
options and how to use them, see twig tracer
main menu on page 13. Note that the target
device does not necessarily support all commands even if they are displayed in the Data
view options.
10
TWIG KEY AND TWIG KEY MENU
TWIG KEY AND TWIG KEY MENU
Twig key
The Twig key 8 is a special key within Twig
Tracer application. While on the Target List
view, pressing this key opens up your own
position, called My Twig. The position is displayed on the map by a dedicated icon.
If you have selected My Twig and you are on
Map, Guide or Data views, pressing the Twig
key opens up Twig key menu. In Twig key
menu you can easily store your current position
as a base point and, once the base point is set,
start guidance to it any time later on.
Twig key menu
You can access Twig key menu by pressing the
alphanumerical key 8 while in Twig Tracer
application. Twig key menu options are: Guide
to base point/ Cancel guidance/ Set base point/
Clear base point. Select the desired option by
highlighting it and pressing the middle key ".
You can exit the menu by pressing the right
function key - Back.
• Guide to base point: This option is available
when the base point has been set. Selecting
this option will start guidance to base point
from your current position. After selecting
this option, a notification informs you when
guidance is started and you will be directed
back to your previously selected view.
• Cancel guidance: If you are currently being
guided to base point, you can cancel the
guidance by selecting this option. Press the
left function key . Yes to confirm your
choice, or the right function key - No to
cancel the operation and return back to your
previously selected view.
• Set base point: Selecting this option enables
you to save your current position as base
point. After setting the base point, you can
select guidance to it from any position by
selecting Guide to base point. If there is
already a base point set, selecting Set base
point will cause the phone to ask you if you
11
TWIG KEY AND TWIG KEY MENU
want to clear the existing base point and set
a new one. Press the left function key .
Yes to set the new base point. Pressing the
right function key - No returns back to
your previously selected view without setting the new base point.
• Clear base point: With this option you can
clear the currently set base point. If there is
an ongoing guidance to the base point,
selecting this option will cause the phone to
ask you if you want to clear the base point
and cancel the guidance. Pressing the left
function key . Yes cancels the guidance
and clears the base point. Pressing the right
function key - No cancels clearing the
base point and returns back to your previously selected view without making any
changes.
12
TWIG TRACER MAIN MENU
TWIG TRACER MAIN MENU
Pressing the middle key " while in any of the
views launches the main menu for Twig Tracer
application. You can select main menu options
by highlighting the desired option from the list
and pressing the middle key " to open it. If
you want to exit the menu, press the right
function key - Back to return back to your
previously selected view.
Editing
You can edit your currently selected target’s
information by choosing Edit. The available
options for editing are Name, Number, Icon,
Show trace, Authorization and Shortcut. These
options are available also when New target is
chosen from the Target List view options.
• Name: Key in target name and save it by
pressing the left function key . Save. Or
you can add the name by pressing the
middle key " and then selecting the desired
contact from the phone’s contact list. Picking
up a contact automatically fills contact’s
name and number to the corresponding target information fields.
• Number: Key in target number and save it by
pressing the left function key . Save. Or
you can pick the number from the phone’s
contact list by pressing the middle key "
and then selecting the desired number from
the contact list. If there is already a name
defined for the target, picking the phone
number will not change the name. If the
name is not yet defined, picking the phone
number will add both the number and the
name to the corresponding target information fields.
• Icon: The icon option shows you a list of
icons available for the target. Use the arrow
keys n to highlight the desired icon and
choose it by pressing the middle key ". If
you want to cancel the operation and keep
the current icon, press the right function key
- Cancel.
13
TWIG TRACER MAIN MENU
• Show trace: You can select whether you want
to see a trace to the selected target on the
map view or not. The available trace options
are Not shown, Short or Long. Select your
choice by pressing the middle key " or cancel the procedure without changes by pressing the right function key - Cancel.
• Authorization: With the authorization option,
you can decide whether the target is authorized to get your position automatically or
not. If you receive a location request from
an authorized target, your phone replies it
automatically by sending your location
update. If a location request is received from
unauthorized target, you need to approve
sending your position.
• Shortcut: You can select a shortcut number
for the target. Shortcuts can be assigned for
the alphanumerical keys 1... 7 and
9. Choose the number you want by highlighting it and pressing the middle key ". If
the shortcut is already in use, you will be
asked whether you want or not to replace
the current assignment. Press the left func14
tion key - Yes to set the new assignment
or the right function key . No to return
back to the shortcut selection list.
Map
While on the map view, you can open Map...
from the main menu options list by pressing
the middle key " and selecting Map.... The
available options include: Pan, Zoom in and
Zoom out. Highlight the desired option and
press the middle key " to select it.
PANNING THE MAP
You can activate map-panning mode by choosing Pan from the map sub-options list. The panning mode enables you to scroll the map view
to desired directions.
You can use the arrow keys n to pan the map
up, down, left and right. Or you can use the
alphanumerical keys 1.. 4 and 6... 9
to pan the map to the corresponding directions.
Press the keys repeatedly to the desired direc-
TWIG TRACER MAIN MENU
tion. Pressing and holding down the selected
key will increase the panning speed.
While in the panning mode you can open panning options list by pressing the middle key ".
The options include Zoom in, Zoom out and Cancel panning. Highlight the desired option from
the list and select it by pressing the middle key
".
Select Zooming in or Zooming out if you want to
zoom the map. You can also zoom the map in
by using the star + and out by using the
hash key §. Select Cancel panning if you want
to return back to the normal map view. When
the panning mode is active you can also use
the right function key . Cancel to return back
to the normal map view.
Pressing the alphanumerical key 0 switches
off the panning mode and returns to the map
view.
ZOOMING THE MAP
Choosing Zoom in will zoom the map one level
in while Zoom out is used to scale the map one
level out. Highlight the desired option from the
list and press the middle key ". Note, that if
either Zoom in or Zoom out is invisible this option
is not available.
You can also zoom the map by using the star
and the hash key. Pressing the star key +
zooms the map in while pressing the hash key
§ zooms the maps out.
Track
Tracking sub-options include Request update,
Request tracking, Cancel tracking, Request area
tracking and Cancel area tracking. Highlight the
desired option and select it by using the middle
key ". You can return back to the main menu
options list by pressing the right function key
- Back.
15
TWIG TRACER MAIN MENU
REQUEST UPDATE
Select Request update if you wish to get updated
information of your target’s position. The
request is sent for your currently selected target.
Confirm request sending by pressing the left
function key . Yes or cancel the request by
pressing the right function key - No. After
sending the request, you will return back to
your previously selected view.
REQUEST AND CANCEL TRACKING
Selecting Request tracking option enables you to
define the time interval and number of updates
for tracking your target.
• Interval: When you enter this option for the
first time, the default value for tracking
update interval is 15 minutes. You can set
the interval to any value between 20 seconds
(00:00:20)
and
100
minutes
(99:59:99).
16
• Updates: When entered for the first time, the
default value for Updates is 5. You can select
from 1 to 9 updates.
The application will remember your last defined
setting, so the same values are automatically
used for next tracking. Select Request tracking
again, if you want to change these settings.
Selecting Cancel tracking cancels ongoing tracking. Confirm your choice by pressing the left
function key - Yes. If you do not want to
cancel the tracking, press the right function key
- No.
REQUEST AND CANCEL AREA TRACKING
Request area tracking enables you to define the
interval, radius and trigger settings for area
tracking your target.
• Interval: When you enter the option for the
first time, the default value for area
updating interval is 15 minutes. You can set
the interval to any value between 20
seconds (00:00:20) and 100 minutes
(99:59:99).
TWIG TRACER MAIN MENU
• Radius: With this option you can set the
radius for the tracking area. The center of
the area is your target’s last known position.
Highlight the desired radius from the list and
select it by pressing the middle key ".
• Trigger: You can set the area tracking trigger
to While out or On exit. If On exit is selected,
the trigger is launched once when the target
leaves the defined area. If While out is on,
the trigger is launched first time when the
target leaves the defined area. While the
target stays outside the defined are, the
trigger is repeated at certain time interval.
Select Cancel area tracking if you want to terminate area tracking. Confirm your choice by
pressing the left function key . Yes or cancel
the operation by pressing the right function key
- No.
Refresh my position
If you want to get updated information of your
own position, choose Refresh my position. After
selecting the option, updating position starts
automatically and you will be taken back to
your previously selected view.
A Position refreshed-notification is shown when
the location update is completed. Note that this
may sometimes take several minutes.
Send my position
With Send my position option you can send your
own position information as a location update
or as an SMS message.
• Send update: Selecting this option sends an
update of your own position to one or many
targets. Select the desired targets from the
target selection list by highlighting them and
pressing the middle key ". Then press the
left function key . Send to send the location update.
17
TWIG TRACER MAIN MENU
• SMS with coordinates: Select the format of
position coordinates by choosing either Standard or your currently used format. The SMS
editor opens up a message with your last
known coordinates. You can add your own
message, select the recipient(s) from the
phone’s Contacts list and send the message
by pressing the left function key . Send.
For more information about sending SMS
messages, see creating and sending an sms on
twig discovery user’s manual page 33.
Remote configuration
With Remote configuration you can set your target’s GPS mode. First, select GPS by pressing
the middle key ". Then highlight the desired
mode Off/ Economy/ Full power and select it by
pressing the middle key ". Confirm your
choice by pressing the left function key .
Send.
Remote configuration is not available if you
have currently selected My Twig. Note that the
18
target device needs also to support remote
configuration before this function is possible.
Clear
You can clear Meters or Trace. Highlight the
desired option and press the middle key ".
• Meters: You can clear Odometer or Speed or
both. Select the meter you wish to clear by
highlighting it and pressing the middle key
" and confirm the clearing by pressing the
left function key . Clear.
• Trace: Selecting this option clears your own
trace from the phone’s memory. Confirm the
clearing by pressing the left function key
- Yes or cancel the operation by pressing
the right function key - No.
Note that Clear option is only available if you
have currently selected My Twig.
TWIG TRACER MAIN MENU
Settings
MAP HANDLING
• Show data fields: You can define whether data
fields are shown while on the map view.
Select Not shown, Always or Timeout if you
want the data fields slide out of the view
after few seconds. If Timeout is selected the
data fields will slide back whenever any key
is pressed or new position information is
received from a target. The fields then stay
visible for a moment before sliding out of the
view again.
• Show labels: You can define which data field
labels are shown while on the map view. The
available options are Name and shortcut,
Name, Shortcut or Not shown. Select the
desired option by highlighting it and pressing the middle key ".
• Automatic zoom: You can set the automatic
zoom On or Off. When switching between different maps, the automatic zoom scales to
correspond to the most accurate map that is
available in the phone’s memory. If the
automatic zoom is off, the zooming can be
done manually. For more information, see
zooming the map on page 15.
TITLE AND SOFT KEYS
You can set the title and soft key areas to hide
automatically. Select Always shown if you want
these areas to be visible all the time or Timeout
if you wish the areas to slide out of the view
after a certain time.
If Timeout is selected you can make the title
and soft key areas slide back again by pressing
any key. The areas will then stay visible for a
few seconds after which they will slide out
again if none of the phone keys is pressed.
DATA VIEW CONTENT
You can select data for five data fields. Press
the middle key " to open data view selection
list or the right function key - Cancel to exit
the option without making any changes.
19
TWIG TRACER MAIN MENU
Selecting data fields
The available items for data view fields depend
on whether you select target data view or My
Twig data view. Highlight the desired option
and press the middle key " to select it.
• Coordinates: Target position as coordinates.
Available for both target and My Twig data
views.
• Position age: Age of the last location update
in days/hours/minutes/seconds. If the last
update is older than 100 days, the label of
this field is Timestamp and day unit is
replaced by the date of the last location
update. Available for both target and My Twig
data views.
• Date: Your current date. Available for My Twig
data view.
• Time: Your current time. Available for My
Twig data view.
• Odometer: Displays travelled distance. Available for My Twig data view.
20
• Travel time: Displays travelled time. Available
for My Twig data view.
• Speed: Target’s current travelling speed.
Available for both target and My Twig data
views.
• Distance: Distance to the target or base
point.
• Altitude: Height above sea level.
• Tracking updates: Displays a sequence number for the last tracking update/ total number of updates.
• Area tracking updates: Displays a sequence
number for the last area tracking update/
total number of updates.
• ETE (Estimated Time Enroute): The approximate time to reach the target or base point.
• ETA (Estimated Time of Arrival): Estimated
time of arriving to the target or base point.
• Course: The current direction in degrees.
• Bearing: The direction in degrees to be followed to reach the target or base point.
TWIG TRACER MAIN MENU
• Dawn: The time at which sun is 6 degrees
below the horizon. There is already enough
sunlight for objects to be distinguishable.
• Sunrise: The time at which sun arises above
the horizon.
• Sunset: The time at which sun sets below the
horizon.
• Dusk: The time at which sun is 6 degrees
below the horizon. There is just enough sunlight for objects to be distinguishable.
• Battery level: Displays the battery charge
level.
Note that you can select units used for distance, speed, altitude and coordinates is phone
settings. You can also select in which way time
and date are presented. For more information,
see phone settings on twig discovery user’s manual page 49.
VERSION
You can see information on your current application version.
Target info
Target info option displays the information
related to your currently selected target. The
information depends on whether you have
selected a target or My Twig. The list includes
the following details:
• Coordinates: Target position as coordinates.
• Course: Current direction in degrees.
• Bearing: Direction in degrees to be followed
to reach the target or base point.
• Timestamp: Age of the last location update in
days/hours/minutes/seconds.
• Tracking updates: Displays a sequence number for the last tracking update/ total number of updates.
• Area tracking updates: Displays a sequence
number for the last area tracking update/
total number of updates.
• Distance: Distance to the target or base
point.
21
TWIG TRACER MAIN MENU
• ETE (Estimated Time Enroute): The approximate time to reach the target or base point.
• ETA (Estimated Time of Arrival): Estimated
time of arriving to the target or base point.
• Speed: Current travelling speed.
• Average speed: Average travelling speed.
• Top speed: Top travelling speed.
• Odometer: Displays travelled distance. Available for My Twig data view.
• Travel time: Displays travelled time.
• Altitude: Height above sea level.
• Battery: Displays the battery charge level.
• Dawn: The time at which sun is 6 degrees
below the horizon. There is already enough
sunlight for objects to be distinguishable.
• Sunrise: The time at which sun arises above
the horizon.
• Sunset: The time at which sun sets below the
horizon.
22
• Dusk: The time at which sun is 6 degrees
below the horizon. There is just enough sunlight for objects to be distinguishable.
Deleting Target
You can delete targets from the Target List one
by one. Highlight the target you wish to delete
by using up and down arrow keys n. Then
choose Delete from the options list by pressing
the middle key ". You will be asked to confirm
the operation. To confirm your choice, press the
left function key . Yes, or cancel the operation by pressing the right function key - No.