1
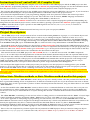
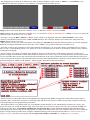
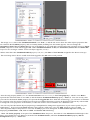
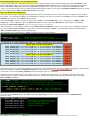
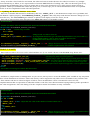
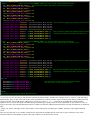
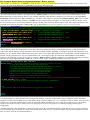
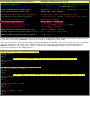
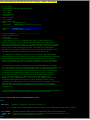
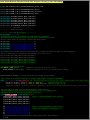
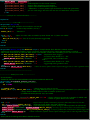
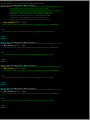
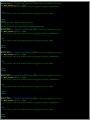
A MegaHurts Advanced V-TFT Tutorial
Grouped Buttons Pointer methods for management and using Objects event handler pointer
Property for easy Button State Machine Control.
Version 1.02
Contents:
Instructions for mC and mPASCAL compiler users
Project description
Other State Machine methods vs State Machine method used in this project:
The Screens Components:
The Menu Buttons operations explained: (How they are grouped and made to behave as Toggle Switches)
Using Solid Single Color(s) for each Buttons State:
The Code Elements to Implement:
mBASIC Code Examples of Button User Pointers implementation usages:
Alternate State Indication Method Challenge Exercise:
The Menu Set Selection Button and its Handler Routine:
The Common Button State management Routine:
Code Listings Element Color Conventions:
Projects 'Main' File code listing
Projects 'Event_Code' File code listing
The user Button Function Code areas:
FLOWCHARTS:
Tutorial Summary:
Other V-TFT information resources:
“Almost every program to be written or ever written has a design requirement that the programmer must first decide how to implement a code solution
for, How to represent something that is in the real world, in the virtual world of code or mathematical equations that emulates the real world thing
accurately and as completely as required.”
Mr. Blake. (1975-1977)
My First Computer Programming Teacher (BASIC).
Author: Robert Townsley (2014)
Instructions for mC and mPASCAL Compiler Users:
Hello to all V-TFT users and different compiler users. This tutorial for the V-TFT project and the V-TFT project are done
in the mBASIC programming language. Users of mC or mPASCAL programming languages can use the information about
how this project works (concepts/methods) to make use of the same practices in the compiler language you use.
The concepts and methods will work in any V-TFT project language selected in V-TFT for your own use, if you do not have
any trouble understanding the concepts and implementation of them that I did for this project tutorial.
Just convert the implementations to your programming language used. Sorry that I do not have the means to provide a
version of this in every compiler language for you all. This is the best I can do for now, BASIC language and detailed
information of how it works and what everything that is User Code is, and there for.
If anyone that uses mC or mPASCAL that tries to convert this to their compiler language has problems understanding anything about how this tutorial project works, contact me either by posting a question in the LibStock projects page comments
or PM me from the forum or post a question in the V-TFT general area for me (and everyone) to see, or email me at:
[email protected]
I hope everyone finds this information useful and easy to use in your own projects, Robert.
Project Description:
This V-TFT project is an example tutorial of how to make indexed user pointers to 2 groups (sets) of 5 button objects and
make use of the pointers built in to V-TFT objects to allow easy re-tasking/reusing the 5 buttons to make 10 (or more),
Menu Buttons and State Management (Machine) Control of the grouped button objects so they behave like Toggle Switches,
(press to turn On, press again to turn Off), each turning a user designed function On or Off and the buttons appearance changing
from Gradient colors fill (Off) to solid Red color fill (On) with each click of any Menu Button on the TFT Touch Panel.
The methods used with object pointers are derived from a Mikroelektronika forum thread in the V-TFT General area, that I
started and Aleksandar responded with the technical details of how to implement and alternatives to concepts proposed by me
and a few other users. Many thanks need to go to Aleksandar (again) for the priceless knowledge he shared with us and does
in other forum threads and to those who contributed to the discussions on this topic.
This tutorial consists of a V-TFT project for PIC32 mmB (HW Ver 1.10) that has 1 screen with 7 V-TFT Components
(Objects) on it. 1 Box object for background area of function menu buttons, 5 Button Objects that can represent different sets
of 5 functions and a Menu select Round Button object that cycles thru the different sets of functions, 2 sample screen images
(.bmp), a exported screen file of the projects screen and a PDF tutorial manual that contains project file code listings of the
'main' and 'events_code' modules and images that code comments refer to. It also has image graphics that are easy to
understand that shows the concepts for these methods of pointer usage and Button State Management.
You can import the supplied screen of this project into your project or use this project as a starting point to your V-TFT
project(s). Or you can just use this as a reference to help you use the methods practiced in it in your own projects you start
from scratch in V-TFT. There is also a challenge exercise for you to try, or not, included.
Why do State Machine management of buttons? Best reason is because most TFT screens are limited in display area and this
allows more features and functions to be available to the applications Creator and operators by reusing objects and their screen
area being used.
Other State Machine methods vs State Machine method used in this project:
If you know what the term “State Machine” means, then you may have already written code that performs this function and
have a good understanding of how to implement it, in different variations maybe also. If you do not know the term or did not
before now, there is still a good chance you have written code that performs this function, only you did not know it was called
“State Machine”.
So lets first establish what “State Machine” means so that we have a common definition to work from. Since everyone can
not communicate to others reading this what they define it to mean, you reading this are going to get the way I define it to
mean to me. This way we should still have everyone starting this out with a common ideal of what it means in this tutorial
context.
The “State Machine” terminology for our use here refers to coding practices or methods that track the “State” of a user input
control or Hardware modules operational “State”. State means just that: what state is it in now or it was in previously.
So it can be applicable to many things in programming. For this tutorial, I use it to refer to the ON/OFF States of the 10
Menu Buttons Functions each is assigned. Even though each button may control vastly different functions or operations to be
done by the application, they have a common characteristic that binds them in such a way that a “State Machine”
management method for them needs to be able to track and handle all 10 buttons states as a single group, because the buttons
are managed and displayed on the TFT as groups or sets of 5 different functions on 5 buttons at a time.
There is also one important key element required for any methods in V-TFT projects that you intend to change an objects
appearance (or any of its properties) with run-time code, that Objects 'Static' Property Must be set to “False” in V-TFT.
The 2 images below show the 2 different sets they are able to display on the screen as, Menu (set) 1 and Menu (set) 2,
of 10 different functions assigned to the 5 buttons, with 5 functions available per set.
IMAGE 1
IMAGE 2
Image 1 shows the first 5 functions available (Func 0-4) and their “States” are all set at OFF.
Image 2 shows the next 5 functions available (Func 5-9) and shows “Func 6” and “Func 9”'s “States” as set to ON, while the
other functions (5,7,8) 'States' are set to OFF.
Pressing (clicking) the Blue “MENU x” Button cycles which set is displayed and if the “State Machine” code works
correctly, each buttons function state of ON or OFF should be also correctly displayed, no matter how many times the
MENU Select button is pressed.
Only pressing (clicking) on a Function Button will change the ON/OFF State that the Function will be set to and cycling the
different sets displayed should always show the correct “State” every buttons function is currently set at.
Now that you know the parameters of how these buttons should work, you are maybe already formulating how to achieve
this in code.? If not thinking about it yet, please do so now, and when you are done or do not know where to start, continue
reading next paragraph.
Did you figure since there are actually only 5 buttons, that you would just have each buttons “OnClick” pointer set to
point to a single event handler routine that will then test which set is active (displayed) and which button was actually pressed
so you can either then execute the code needed for that function in the same routine that tests for button function pressed or
call a routine for the function code after the button pressed is determined and then a separate routine afterwords to update the
functions displayed “State” on the button? Simple graphic flowchart of this shown below:
If that scenario best describes what you had planned for implementing 'State' management of the buttons and assigned
functions, then you did it the way that is commonly used and the more obvious solution most people would first come up
with, depending on your programming experience.
This method where every button calls one event handler routine that has to test which button of which set is active was
pressed is what you would do without using V-TFT, but there is no reason to repeat in the user code, what the V-TFT core
code has already done-, determined which button was pressed! Why negate and then duplicate that operation? That
methodology just wastes code space and program execution time doing so for most case scenarios. There is also a moderate
degree of logic failure possible in the complex conditional testing code required by that method (no insult intended, but can
happen to anyone), and does not keep the code as simple and readable as possible, in a V-TFT project environment.
If this is not your goal also reader (wasting program space/time), then you should like the “State Machine” solution I present
here. This methodology is new for V-TFT projects and so, still being explored and trialed for other uses. These techniques
may have other uses and applications yet to be discovered also. The graphic image below shows its structure in a simple
manor with only the first routine to a set detailed, the others button handler routines are identical except for what number is
passed to Button_State(X) routine that tells it which button needs to be state flipped and display updated.
The major difference between the two methods is that the MENU Select buttons event handler has a role in the state
management by changing all 5 buttons OnClick event pointer properties to different button handler routines depending on
which menu set is active (it is simpler than image indicates also). For set 1, the buttons are pointed to these handler routines:
Scrn1Btn_Menu1_Btn1_.OnClickPtr
Scrn1Btn_Menu1_Btn2_.OnClickPtr
Scrn1Btn_Menu1_Btn3_.OnClickPtr
Scrn1Btn_Menu1_Btn4_.OnClickPtr
Scrn1Btn_Menu1_Btn5_.OnClickPtr
=
=
=
=
=
@Scrn1Btn_Menu1_Btn1_OnClick
@Scrn1Btn_Menu1_Btn2_OnClick
@Scrn1Btn_Menu1_Btn3_OnClick ' these routines are made by V-TFT for the Buttons.
@Scrn1Btn_Menu1_Btn4_OnClick
@Scrn1Btn_Menu1_Btn5_OnClick
For set 2 the Buttons “.OnClickPtr” properties event handler pointers are changed to point to these event handler routines:
Scrn1Btn_Menu1_Btn1_.OnClickPtr
Scrn1Btn_Menu1_Btn2_.OnClickPtr
Scrn1Btn_Menu1_Btn3_.OnClickPtr
Scrn1Btn_Menu1_Btn4_.OnClickPtr
Scrn1Btn_Menu1_Btn5_.OnClickPtr
=
=
=
=
=
@Scrn1Btn_Menu2_Btn1_OnClick
@Scrn1Btn_Menu2_Btn2_OnClick
@Scrn1Btn_Menu2_Btn3_OnClick ' these routines have to be made by the programmer.
@Scrn1Btn_Menu2_Btn4_OnClick
@Scrn1Btn_Menu2_Btn5_OnClick
And they (the routine location pointers) are stored for programmers use in a User Code Constant 2 dimension array as follows
const EVENT_TABLE as longword[2][5] = (
(@Scrn1Btn_Menu1_Btn1_OnClick , ' menu set 1 buttons handler routine pointers
@Scrn1Btn_Menu1_Btn2_OnClick ,
@Scrn1Btn_Menu1_Btn3_OnClick ,
@Scrn1Btn_Menu1_Btn4_OnClick ,
@Scrn1Btn_Menu1_Btn5_OnClick )
,
(@Scrn1Btn_Menu2_Btn1_OnClick , ' menu set 2 buttons handler routine pointers
@Scrn1Btn_Menu2_Btn2_OnClick , ' (each set of 5 pointers is enclosed by "()")
@Scrn1Btn_Menu2_Btn3_OnClick ,
@Scrn1Btn_Menu2_Btn4_OnClick ,
@Scrn1Btn_Menu2_Btn5_OnClick )
)
There is no need to do any conditional testing to determine which set is active and which button was pressed with this
methodology. It is easy to add additional sets of functions to the project also. See the comments in the code listing of the
“events_code” file for details of what to change and where to add the stuff needed for additional button sets of functions.
It is very easy to expand the number of sets because this method uses indexed pointers (arrays) to the 5 buttons that also
allows iteration loops to be used to make group changes and adjusting for more function sets to be included in array indexing.
Much of the code needed for a third set is already in the code, but commented out waiting to be put to use by you users doing
this tutorial walkthru and shows how easy additional sets can be added.
The program code is easy to read and following program flow is also easier. The actual Functions implementation code
blocks are easily found by MenuX – BtnX routine identifiers in the routines names and separated from each other by being in
their own routines completely. But it is up to you users if this way is how you want to have button objects reused many times.
(The 'X' in “MenuX” indicates which set the button event handler routine(s) belong to and 'X' in “BtnX” is the Button Number.)
The Screens Components:
There are only 7 Components used to make this tutorial project and all are on one screen. If you load this V-TFT project in to
V-TFT, you will see that there are 2 Layers for the screen though. The first Layer is labeled “Back Ground” and it only has
one object on it, the background Box object that has White-to-Silver Gradient colors filling it, and it's 'Static' Property is set
to 'True'. This makes the objects structured data constants, so no changes can be done to it during run-time.
The other Layer labeled “Menu Buttons” has all of the Buttons used in this project on it. You can double-click the visibility
controls to hide one or the other to see what components disappear.
The 5 Menu buttons are of the square Button Component type, and are required to have the 'Static' Property set to 'False' in
order to work because the run-time code needs to change some of their properties.
The last component for this 'State Machine' controlled Menu management is the Round Button, that when pressed changes
which set of button functions are displayed. It also must be a Dynamic (Static = False) object in order for this to work because
its Caption Property needs to be changed to show which set number is being displayed (active). The Screen itself is set to
'Static' in this project, but you can change it if you want to or need to for your applications needs.
The 5 Menu Buttons Captions text are set in V-TFT to contain the first sets labels, because they will be the default power-up
set shown. Since these Caption properties will be modified during run-time, a constant 2 dimensional array of 2 x 5 elements,
that are defined as a user type 6 character length strings that contain both sets button caption labels text are user code
declared, to be copied to the buttons captions properties.
These can be modified as you wish, but must be 6 characters or less in length in order to work correctly and not cause
compiler errors, unless you change these button objects Caption Max Length property. They are all set at 6 characters length
in V-TFT project file, so to change that property, it must be done to the projects objects in V-TFT or you would have to dig
through the projects 'driver' file to find the proper declarations to be changed while in a compiler.
The Menu Buttons operations explained:
(How they are grouped and made to behave as Toggle Switches)
Another feature I put to use in this project is making regular button components behave like toggle switches, since there are
not any Components that do this available in V-TFT for regular TFT displays. The EVE display controller does have a
Toggle Switch like component built in to its display driver/controller, but I seen someone ask about this for mmB type
displays (in the forum) and included a simple way to make a button object do the same thing as a toggle switch (2 states possible,
On or Off) for controlling anything a user would need this type of simple user input control of.
Think of it (the button object) like a real world SPST* toggle switch on a control panel, but done virtually with graphics and
screen Touch Panel input to 'Flip' the switches, or a push-on, push-off control switch. *(Single Pole Single Throw)
The first thing that needs to be done to make a button operate like a toggle switch, is deciding how to make it visually change
so that it is easy to see which state, or position, it is set at, so application users won't have troubles using the application or be
confused about what controls are set to ON or OFF.
A method I like to use, and it is easy to do with V-TFT objects, is to use the objects 'Gradient Enabled' property to make a
button objects appearance change drastically (a lot). Any method that can do the same thing would work, but I like this one
the most. It is easy to do and takes advantage of a characteristic the designers of V-TFT built in to many of the Components.
The next image shows this projects selected (in V-TFT) Button 1 – 'Func 0' in the default OFF state and the buttons important
properties that make its appearance as shown.
The image (above) shows that 'Gradient-Enabled' is set 'True' (1) and the red arrows show the other objects properties that
are related to the Gradient property, and are actually active, defining how the button appears. You can change the
Orientation, Start Color and End Color for any of the buttons as you wish and it will not affect the operation of it as a Toggle
Switch, only how it looks when toggled off. When Gradient-Enabled = False, the Orientation, Start Color and End Color
Properties are no longer “active” to how an Object appears (visually).
*Please note that when Gradient-Enabled property is 1 (True), the State of the Function assigned to the Button is 0 (Off)!
The next image shows how it would look when toggled to the ON state/switch position.
Now the only property active (other than Gradient-Enabled inside the red box), is the Color property*, which I set to Red to
represent the Functions State is now ON (1) and the buttons Gradient-Enabled property = False (0). You can use any color
you want for the buttons Color property to represent the Toggled-ON State. With this methodology, you can have each button
use a unique color also and it would be used on each set of button functions cycled to be displayed with out any code needed
to change the color properties of the buttons, or add code to have each sets buttons use a different color.
You can vary how the button objects properties get manipulated to change their appearance as you want or prefer for your
application(s). Even reverse the State indicator color scheme, solid single color for OFF, Gradient colors for ON.
All Component Objects Properties are set in the V-TFT project to be configured for Power/Start Up Initial settings for
displaying all Functions - Off, both in V-TFT and Users Code initializing.
*Note: The Color property is not part of the Gradient Colors Properties, but rather it is the Alternative Solid Single Color
that is to be displayed (inside Object fill) instead of the Gradient Colors, when the Gradient-Enabled property and the
Transparent Property = False also.
Using Solid Single Color(s) for each Buttons State:
If you would rather have the buttons flip between two different single colors instead of flipping between Gradient colors
and a single Color, this is easily done by setting both Gradient Start and End Colors to the same color that represents the
buttons Function is OFF, and setting the single Color property to the color you want to represent the Function is ON.
Then you can still use the code I provided for this tutorial project that uses the objects Gradient-Enabled property to switch
between displaying the OFF and ON State Colors you picked.
The Code Elements to Implement:
Now that colors for the changing buttons appearances have been chosen, the rest of the elements to implement the method
are needed. For tracking the “State” of something that changes, the obvious solution is a Variable. All of the variables and
constants declarations are Global Program scope.
The first Variable identifier declared, is to track the “State” of which Menu Set is active and displayed: MENU_SET
of Byte type, where a 0 value represents Menu Set 1 and a 1 value represents Menu Set 2. This tracker is changed by
pressing the Menu Select Button (right most large Blue gradient colors Button).
The next thing we need “State” tracked, is the 5 Menu Function Buttons. In this case we have 2 sets of 5 button functions,
so a 2 dimensional array variable is what will be used for tracking the “States” of all 10 button functions independently:
BTN_STATE of Byte type and 2 x 5 dimensions.
The program code to declare these “State” tracking variables is shown below:
' user code variables declarations
dim MENU_SET as byte
' holder for current menu set active. (0 or 1)
BTN_STATE as byte[2][5] ' [menu set]-adjust for new sets. [set buttons]-do not change.
The On/Off State Logic and Indexing Table of the BTN_STATE[2][5] Array Variable is:
MENU SET 1 STATE TRACKING
BTN_STATE[0][0] = 0 ' Function Off, else = 1 Function On for Menu Button 1 “Func 0”
BTN_STATE[0][1] = 0 ' Function Off, else = 1 Function On for Menu Button 2 “Func 1”
BTN_STATE[0][2] = 0 ' Function Off, else = 1 Function On for Menu Button 3 “Func 2”
BTN_STATE[0][3] = 0 ' Function Off, else = 1 Function On for Menu Button 4 “Func 3”
BTN_STATE[0][4] = 0 ' Function Off, else = 1 Function On for Menu Button 5 “Func 4”
MENU SET 2 STATE TRACKING
BTN_STATE[1][0] = 0 ' Function Off, else = 1 Function On for Menu Button 1 “Func 5”
BTN_STATE[1][1] = 0 ' Function Off, else = 1 Function On for Menu Button 2 “Func 6”
BTN_STATE[1][2] = 0 ' Function Off, else = 1 Function On for Menu Button 3 “Func 7”
BTN_STATE[1][3] = 0 ' Function Off, else = 1 Function On for Menu Button 4 “Func 8”
BTN_STATE[1][4] = 0 ' Function Off, else = 1 Function On for Menu Button 5 “Func 9”
Now there needs to be a matching indexing constant array of 2 x 5 dimensions, 6 character length text strings to permanently
hold the 2 Menu Sets 5 Buttons Caption Property Function Labels text (lite red area of L&I Table above).
Its identifier name will be BTN_LABELS in the declaration show in code below.
But before that declaration in the code, there needs to be another declaration first; a user defined type that will be this
Constant arrays “as type” dimensional element type. It is a 6 character length string type definition shown first, then the
BTN_LABELS Constant :
typedef STR6 as string[6] ' user type for 6 character length string variables
' This constant array holds each menu sets buttons caption label. 6 characters maximum.
' [2] = menu sets index (adj. for # of sets) , [5] = menu set buttons index (do not change from 5)
const BTN_LABELS as STR6[2][5] = (
("Func 0", "Func 1", "Func 2", "Func 3", "Func 4"), ' [0][0,1,2,3,4] Menu Set 1
("Func 5", "Func 6", "Func 7", "Func 8", "Func 9")) ' [1][0,1,2,3,4] Menu Set 2
And one more Constant Array of V-TFT made user defined type to allow indexed access to the 5 Menu Buttons
Properties also.
const MENU_BTNS as TButtonPtr[5] =
( @Scrn1Btn_Menu1_Btn1_ , ' indexed pointers to the actual 5 buttons.
@Scrn1Btn_Menu1_Btn2_ , ' used to allow indexing to each buttons
@Scrn1Btn_Menu1_Btn3_ , ' Caption, Gradient Enable and
@Scrn1Btn_Menu1_Btn4_ , ' OnClickPtr Properties.
@Scrn1Btn_Menu1_Btn5_
)
'----------- End of User code declarations -----------'
(uses V-TFT defined pointer type “TButtonPtr” to make a 5 element array of that type to hold pointers to button structures.)
mBASIC Code Examples of Button User Pointers implementation usages:
Changing Button 1's Gradient-Enabled property to False and True
MENU_BTNS[0]^.Gradient = 0 ' False, show solid Red color Fill in Button 1
MENU_BTNS[0]^.Gradient = 1 ' True, show Gradient colors Fill in Button 1
The array index value ([0]) can also be a variable for iterated loops to effect en-mass (whole group/set) changes.
Replacing the “.Gradient” object property structure element identifier name with any proper property structure element
“.IdentifierName” allows you access to all available object properties, like next example for object “Visibility” property.
MENU_BTNS[0]^.Visible = 0 ' False, Button 1 will not get redrawn by DrawScreen() or DrawButton() functions.
MENU_BTNS[0]^.Visible = 1 ' True, Button 1 will get redrawn by DrawScreen() or DrawButton() functions.
And an example for using the button pointer to redraw all 5 Menu buttons with a For-Next loop:
for Index = 0 to 4
DrawButton(MENU_BTNS[Index])
next Index
' redraw each button
There are plenty of examples in the projects code and fully commented for you to examine in the code listings and
documented comments of exactly how this State management methodology is implemented.
Alternate State Indication Method Challenge Exercise:
There is one more method I like to use and want to share with you also, but I will only show an example of 4 buttons
functions @ OFF States and 1 @ ON State using the same V-TFT projects objects used in this tutorial and the important
object properties to be used in the 'State' management code. As for the actual code, I challenge you to come up with the
programming code to make this method work as described. This is an exercise for you to use what tricks and methods you
may already have and what I have shown you here to see if you are ready and able to create something similar from scratch.
This image is of the modified tutorial menu buttons showing buttons 1, 3, 4 and 5 are OFF state and button 2 is ON state.
I changed some color properties and made the background Box a little bigger (taller) so the ON State buttons will still fit
inside of the background Box and moved all buttons up 2 pixels. This method does not use the Gradient-Enabled property
to flip buttons fill colors. It requires 2 button properties to be modified each time the State changes for a button.
The Properties are: Pen Width and Pen Color.
Alternative addition: Caption Font Color. Make it the same as button boarder color when 'On' or something contrasting.
You can tackle this test exercise at your leisure after you finish the tutorial. There is more important information still to be
seen that you might need before trying it (the exercise).
The Menu Set Selection Button and its Handler Routine: Scrn1BtnRnd_SetMenu_OnClick()
This section of the tutorial will cover the multiple functions of the “MENU x” menu selection Button. They (the functions)
will be detailed in separate topics below the Button's overview of its operations in this method of button reuse and state
management.
Menu Select Button Overview:
The Menu Select Button is a V-TFT ButtonRound (code identifier name type) Object that was named “ButtonRound1” by
V-TFT originally. It is (and needs to be) a Dynamic object. I have renamed it to: “Scrn1BtnRnd_SetMenu_”.
The event handler routine identifier name is then: “Scrn1BtnRnd_SetMenu_OnClick()”
The only object property this tutorial program code changes is its Caption text to reflect which menu set is actively
displayed. This action code is Aleksandars (forum) posted optimized code logic solution to my original “if-then-else-end if”
conditional “test-set-else-set-end” menu button tracking logic code I posted.
So you mC/C language programmers should love it, for mBASIC and mPASCAL programmers, more proof that “C
programmers” are speaking alien, or at least “Think” in alien. ;^) (Everything is explained in the code comments)
The tasks this button is required to take care of are: 1- Updating the menu button's set number currently active. 2- Changing
the 5 functions listed on the 5 menu function buttons. 3- Changing the 5 menu function buttons “OnClickPtr” properties to
point to the corresponding set of button event handler routines. 4- Change/update the 5 buttons properties that indicate current
“State” of the function assigned (Gradient-Enabled On/Off) and finally, 5- Call draw button routine (multiple times) to visually
update the screens displaying of the Menu Items.
It may seem like a lot of tasks for one button, but when each task is broken down to be coded, it becomes very straight
forward and easy to follow, as it is representative of normal V-TFT blocks of tasking code. This was the main goal of my
pursuing this methodology idea, to keep it simple and as close to the framework of a V-TFT projects normal layout as
possible. I think you will find that it does this pretty well, at least I hope you do. The different button tasks are explained
below as to how implemented with code and operations.
1- Updating the Menu Set Number Active Task:
There are 2 variables that need to be modified by this task, “MENU_SET” (a User declared Global Byte Tracking Variable) and
the Buttons Caption property, “Scrn1BtnRnd_SetMenu__Caption” that really only needs the last character changed, so it is
done this way. The Menu Button gets redrawn to update screen display of set now active; 1 or 2.
That code is shown below in the first part of the Menu Set buttons event handler routine:
' Event Handlers
'
' START OF MENU SET MANAGEMENT BUTTON HANDLER ROUTINE
sub procedure Scrn1BtnRnd_SetMenu_OnClick()
dim BI as byte ' routine temp variables.
TS as STR6
inc(MENU_SET)
' change menu set value to next set
MENU_SET = byte(MENU_SET mod 2) ' by using MOD function to get constrained permutations (0 to (mod value-1))
' change MOD number value to same as number of menu sets
' if additional button function set(s) are added.
Scrn1BtnRnd_SetMenu__Caption[5] = MENU_SET + 1 + 48 ' change character 6 to menu set number (by ASCII value)
DrawRoundButton(@Scrn1BtnRnd_SetMenu_)
' redraw to update Menu select button
Tasks 2, 3, 4 and 5:
These tasks are able to be iterate index coded and done one by one inside a 5 (0-4) count for-next loop, shown next:
for BI = 0 to 4
' loops 5 times to update each buttons properties and redraw them one at a time.
TS = BTN_LABELS[MENU_SET][BI]
' load temp string holder (TS) with caption text
strcpy(MENU_BTNS[BI]^.Caption, TS)
' copy TS string to object caption string (by indexed pointer de-reference)
MENU_BTNS[BI]^.OnClickPtr = EVENT_TABLE[MENU_SET][BI] ' also change objects OnEvent pointer to array indexed address
MENU_BTNS[BI]^.Gradient = not BTN_STATE[MENU_SET][BI]
' set objects gradient state to match/mirror buttons toggle state
DrawButton(MENU_BTNS[BI])
' redraw each button, updates buttons caption and toggle state (1-red or 0-gradient colors)
next BI
end sub
' End of Menu Set Management Button Handler Routine
'-----------------------------------------------------
And that's it, simple menu set management. As you can see, the key here is to use the MENU_SET variable in any arrays that
have a first dimension set reference. Then code activity can be targeted to only affect active set buttons in any routines code.
If the routine code above is hard to digest or follow, I have included here a more conventional version of code
implementations that are equivalent to what that routines code does, but without iteration looping indexing of the operands in
the value assignments. This code listing is for the complete routine and without as many comments:
' Event Handlers
'
' START OF MENU SET MANAGEMENT BUTTON HANDLER ROUTINE
sub procedure Scrn1BtnRnd_SetMenu_OnClick()
dim TS as STR6
if ( MENU_SET = 1) then ' adjust this test value to the number of menu button sets-1
MENU_SET = 0
else
inc(MENU_SET)
end if
Scrn1BtnRnd_SetMenu__Caption[5] = MENU_SET + 1 + 48 ' change character 6 to menu set number (by ASCII value)
DrawRoundButton(@Scrn1BtnRnd_SetMenu_)
' redraw to update Menu select button
select case MENU_SET
case 0
' Only executed when MENU_SET = 0, value for set 1 menu button functions.
TS = BTN_LABELS[MENU_SET][0] ' this code block updates the buttons caption labels for set 1
strcpy(Scrn1Btn_Menu1_Btn1_.Caption, TS)
TS = BTN_LABELS[MENU_SET][1]
strcpy(Scrn1Btn_Menu1_Btn2_.Caption, TS)
TS = BTN_LABELS[MENU_SET][2]
strcpy(Scrn1Btn_Menu1_Btn3_.Caption, TS)
TS = BTN_LABELS[MENU_SET][3]
strcpy(Scrn1Btn_Menu1_Btn4_.Caption, TS)
TS = BTN_LABELS[MENU_SET][4]
strcpy(Scrn1Btn_Menu1_Btn5_.Caption, TS)
Scrn1Btn_Menu1_Btn1_.OnClickPtr = @Scrn1Btn_Menu1_Btn1_OnClick ' this code block updates the buttons event pointers
Scrn1Btn_Menu1_Btn2_.OnClickPtr = @Scrn1Btn_Menu1_Btn2_OnClick
Scrn1Btn_Menu1_Btn3_.OnClickPtr = @Scrn1Btn_Menu1_Btn3_OnClick
Scrn1Btn_Menu1_Btn4_.OnClickPtr = @Scrn1Btn_Menu1_Btn4_OnClick
Scrn1Btn_Menu1_Btn5_.OnClickPtr = @Scrn1Btn_Menu1_Btn5_OnClick
Scrn1Btn_Menu1_Btn1_.Gradient = not BTN_STATE[MENU_SET][0]
Scrn1Btn_Menu1_Btn2_.Gradient = not BTN_STATE[MENU_SET][1]
Scrn1Btn_Menu1_Btn3_.Gradient = not BTN_STATE[MENU_SET][2]
Scrn1Btn_Menu1_Btn4_.Gradient = not BTN_STATE[MENU_SET][3]
Scrn1Btn_Menu1_Btn5_.Gradient = not BTN_STATE[MENU_SET][4]
' this code block updates the buttons function states
' displayed to match current State stored for set 1.
case 1
' Only executed when MENU_SET = 1, value for set 2 menu button functions.
TS = BTN_LABELS[MENU_SET][0]
' this code block updates the buttons caption labels for set 2
strcpy(Scrn1Btn_Menu1_Btn1_.Caption, TS)
TS = BTN_LABELS[MENU_SET][1]
strcpy(Scrn1Btn_Menu1_Btn2_.Caption, TS)
TS = BTN_LABELS[MENU_SET][2]
strcpy(Scrn1Btn_Menu1_Btn3_.Caption, TS)
TS = BTN_LABELS[MENU_SET][3]
strcpy(Scrn1Btn_Menu1_Btn4_.Caption, TS)
TS = BTN_LABELS[MENU_SET][4]
strcpy(Scrn1Btn_Menu1_Btn5_.Caption, TS)
Scrn1Btn_Menu1_Btn1_.OnClickPtr = @Scrn1Btn_Menu2_Btn1_OnClick ' this code block updates the buttons event pointers
Scrn1Btn_Menu1_Btn2_.OnClickPtr = @Scrn1Btn_Menu2_Btn2_OnClick
Scrn1Btn_Menu1_Btn3_.OnClickPtr = @Scrn1Btn_Menu2_Btn3_OnClick
Scrn1Btn_Menu1_Btn4_.OnClickPtr = @Scrn1Btn_Menu2_Btn4_OnClick
Scrn1Btn_Menu1_Btn5_.OnClickPtr = @Scrn1Btn_Menu2_Btn5_OnClick
Scrn1Btn_Menu1_Btn1_.Gradient = not BTN_STATE[MENU_SET][0]
Scrn1Btn_Menu1_Btn2_.Gradient = not BTN_STATE[MENU_SET][1]
Scrn1Btn_Menu1_Btn3_.Gradient = not BTN_STATE[MENU_SET][2]
Scrn1Btn_Menu1_Btn4_.Gradient = not BTN_STATE[MENU_SET][3]
Scrn1Btn_Menu1_Btn5_.Gradient = not BTN_STATE[MENU_SET][4]
' this code block updates the buttons function states
' displayed to match current State stored for set 2.
end select
DrawButton(@Scrn1Btn_Menu1_Btn1_)
DrawButton(@Scrn1Btn_Menu1_Btn2_)
DrawButton(@Scrn1Btn_Menu1_Btn3_)
DrawButton(@Scrn1Btn_Menu1_Btn4_)
DrawButton(@Scrn1Btn_Menu1_Btn5_)
' this code block updates the buttons screen display.
' Executed whenever this routine gets called.
end sub
' End of Menu Set Management Button Handler Routine
'-----------------------------------------------------
As you can see, the first way is much better optimized and less bulky, but this last example may be easier to read and digest.
Functionally, they are the same and do the same manipulations to the necessary object elements. But adding additional menu
sets beyond the original 10 means adding more select case values (2, 3, 4.....) code blocks to handle the 5 menu buttons
updates. Not as easy as using the iterated looping methodology. It pretty much is easily adjustable to any number of sets, as
long as the other arrays that hold button data are edited to match the additional menu button sets and declarations are adjusted
also.
I hope you got the ideology of how that routine works and its part in making this “State” machine code implementation
work.
The next section will cover another routine that is important to making this all work also. It gets called by every menu
function buttons event handler routine when any of them are clicked on the screen.
The Common Button State management Routine: Button_State(x)
This routine is considered a “Common” routine because every (all 5) menu function buttons do a call to it as the first code
executed in each of the 10 button event handler routines by this call format:
Button_State(n)
' Where “n” is a numeric byte type value of 0, 1, 2, 3 or 4 and is the logical index number for the Button “Clicked” on the TP.
' In this tutorials code examples for each buttons event handler routines, the number is a numeric constant.
It is important that the number value passed to the “Button_State()” common routine is the correct index number for the
button detected as being clicked. There is also another indexing value that this routine uses to correctly set the right State
Tracking 2 dimensional array (BTN_STATE[x][y]) variables value, and it is stored in the Global “MENU_SET” byte variable.
Since this active set tracking variable is a Global variable, there is no need to pass its value to the common routine, it will
use it to reference the correct array dimension along with the passed numeric button index value. The common routines code,
as found in the tutorial program “events_code” file, is listed below (the program comments explain each lines function):
sub procedure Button_State(dim BUTTON as byte) ' Simple Button State Machine common routine.
' Updates the passed button numbers toggle on/off state. Executed whenever a menu function button is clicked.
If ( BTN_STATE[MENU_SET][BUTTON] = 0 ) then ' Flip buttons state (toggle)
BTN_STATE[MENU_SET][BUTTON] = 1 ' it was 0, Set button State Holder to 1 – ON
MENU_BTNS[BUTTON]^.Gradient
= 0 ' toggled Off, show solid Red color
else
'
BTN_STATE[MENU_SET][BUTTON] = 0 ' it was 1, Set button State Holder to 0 – OFF
MENU_BTNS[BUTTON]^.Gradient
= 1 ' toggled On, show gradient colors
end if
DrawButton( MENU_BTNS[BUTTON] )
' redraw the button, updates buttons caption and toggle state (1-red or 0-gradient colors)
end sub
'----------------------------------------------------This routines code is the compilation of tasks that each menu function buttons event handler routine would need to do in
order to do just the buttons screen appearance and state tracking variable updating, so using the iterated indexing arrays and
button (object) pointers allowed these tasks to be placed here in a routine that each buttons event handler routine can then call
instead, saving program space for your applications code. An example of the first Function Menu Buttons event handler
routine is shown below so you can see how it calls the “Button_State()” routine and how I pre-coded the selecting of turning
the buttons assigned function On or Off code to be executed with a “if-then-else-end if” code block selector:
sub procedure Scrn1Btn_Menu1_Btn1_OnClick()
Button_State(0) ' Toggle the 1st buttons off-gradient colors/on-solid Red color state
' to opposite of what state it is at now. This routine call
' takes care of any menu buttons toggled On/Off states and screen updates.
' After return, function state will be set opposite, so following
' condition test code performs new state change for function
' assigned to the button by you users. Each buttons handler
' routines are nearly identical to this one, waiting to be
' finished by you for its actual functions to be done in your
' V-TFT project. Each routines 'Button_State()' call is already set with correct argument passing value.
If ( BTN_STATE [0] [0] = 0 ) then
' your code for what to do if button function is toggled to Off now. (GRADIENT)
'
'
else
' your code for what to do if button function is toggled to On now. (RED)
'
'
end if
end sub
You should notice by now that this state management method is actually implemented across multiple routines that work
together to make it work. While it may seem that a single routine method (if possible?) would be easier or better, once you have
a full grasp of how this method really works by using the inherent framework of a V-TFT project layout, you will see how
easily it is to do this for any V-TFT project you may need to reuse screen space by re-tasking existing screen/project
components.
Another advantage this method has, is that since each part of the state management is small and not every part of it needs to
be executed for every occasion of screen menu button TP activity, it has a very small impact on program execution time and
runs very fast, even on less powerful MCU's.
Code Listings Element Color Conventions :
Examples of Element Usage Code
Programmer Comments :
Starts with a single quote- “ ' “ and is only for the line started on.
User made Routine Identifier names :
Init_Vars() , Button_State(dim BUTTON as byte)
V-TFT & mBASIC Routine Identifier names :
DrawButton(@Scrn1Btn_Menu1_Btn1_) , DrawScreen(Screen1ScreenID)
User declared Variables (all Bold CAPS) :
MENU_SET , BTN_STATE( )
V-TFT Screen Object Names (Static and Dynamic) :
Scrn1Btn_Menu1_Btn1_ , Scrn1Btn_Menu1_Btn2_
V-TFT Object Property Structure Identifier :
Scrn1Btn_Menu1_Btn1_.Gradient , Scrn1Btn_Menu1_Btn1_.Caption
User & V-TFT declared Data Type :
typedef STR6 as string[6]
User declared Object Pointers :
MENU_BTNS as TButtonPtr
User declared Constants (all Bold CAPS) :
BTN_LABELS[ ][ ] , EVENT_TABLE[ ][ ]
Numeric value Constants (Bold) :
0 , 128 , x00ff , %10100101
String Character Constants (inside quotes “Abc”) :
“Func 1” , “MENU 1” , “Func 9”
mBASIC Compiler Language Keywords (lowercase) :
dim , if – then – else – end if , main:
mBASIC Compiler language Punctuation Characters :
(),@,[],:,.
I have colorized the following program files code listings in the colors shown above in hopes that it makes it easier for you
to read and see the different mBASIC elements that are used by V-TFT and my User Code.
There is another point I need to make/explain about my code practices, and that is the use of parenthesis “( )” to encapsulate
every test argument in a 'if – then – else – end if' conditional test expression. The parenthesis are not required by the
mBASIC compiler for single argument parameter evaluations, but are required for multiple argument parameters
evaluations and shown in the examples below.
Single argument parameter conditional test example:
if ( X > 128 ) then
Z=X/2
end if
Either is acceptable by mBASIC compiler, but I like visually the first example, so my code uses it.
if X > 128 then
Z=X/2
end if
Double argument parameters conditional test example:
if ( ( X = 128 ) and ( Z > 64 ) ) then
Z=X/2
end if
The above example is required by mBASIC compiler, while below examples causes mBASIC compiler error(s).
if X = 128 and Z > 64 then
Z=X/2
end if
if ( X = 128 ) and ( Z > 64 ) then
Z=X/2
end if
if ( X = 128 and Z > 64 ) then
Z=X/2
end if
State Menu Buttons Tutorial Visual-TFT Projects “Main” file listing:
'*
' * Project name:
' PIC32mmB_VTFT_StateMenuButtons.vtft
' * Generated by:
' Visual TFT
' * Date of creation
' 8/12/2014
' * Time of creation
' 6:44:16 PM
' * Test configuration:
' MCU:
P32MX460F512L
' Dev.Board:
MikroMMB_for_PIC32_hw_rev_1.10
'
http://www.mikroe.com/mikromedia/pic32/
' Oscillator:
80000000 Hz
' SW:
mikroBasic PRO for PIC32
'
http://www.mikroe.com/mikrobasic/pic32/
' * Program Authors:
' Robert Townsley 2014
' Aleksandar
' * Program Description:
' This V-TFT project is an example tutorial of how to make indexed user
' pointers to 2 groups (sets) of 5 button objects and make use of the pointers
' built in to V-TFT objects to allow easy re-tasking/reusing 5 to make 10 (or more),
' Menu Buttons and State Management (Machine) Control of the grouped button
' objects so they behave like toggle switches, each turning a user designed
' function On or Off and the buttons appearance changing from Gradient colors
' fill (Off) to solid Red color fill (On) with each click on Touch Panel.
'
' The methods used with object pointers are derived from a Mikroelektronika
' forum thread in the V-TFT General area, that I started and Aleksandar responded
' with the technical details of how to implement and alternatives to concepts
' proposed by me and a few other users. Many thanks need to go to Aleksandar
' for the priceless knowledge he shared with us and does in other forum threads.
'
' This tutorial consists of a V-TFT project for PIC32 mmB (HW Ver 1.10) that
' has 1 screen with 7 V-TFT Components (Objects) on it. 1 Box object for background
' area of function menu buttons, 5 Button Objects that can represent different
' sets of 5 functions and a Menu select Round Button object that cycles through
' the different sets of functions, 2 sample screen images (.bmp), a exported
' screen file of the projects screen and a PDF tutorial manual that contains
' project file code listings of the 'main' and 'events_code' modules and
' images that code comments refer to. It also has image graphics that are easy
' to understand that shows the concepts for these methods of pointer usage
' and Button State Management. Users of mPASCAL and mC compilers can use the
' PDF listings to guide them with making a ported version to their compiler
' language used. The concepts and methods will work with those programming
' languages also.
'
' For more information about how this projects concepts and methods implemented
' work, Please read / look over everything in the PDF tutorial manual.
'*
program PIC32mmB_VTFT_StateMenuButtons_main
main:
Start_TP()
' initialize V-TFT project and objects routine call.
Init_Vars()
' initialize User Code Variables routine call. This is only modification/editing done to this file.
while TRUE ' START OF MAIN LOOP FOR TP CHECKING AND EVENT HANDLING
Check_TP() ' Check for TP activity and do event handling if TP activity detected routine call.
wend
' Loop to do TP Checking again – Forever.
end.
State Menu Buttons Tutorial Visual-TFT Projects “Events_Code” file listing:
module PIC32mmB_VTFT_StateMenuButtons_events_code
include PIC32mmB_VTFT_StateMenuButtons_objects
include PIC32mmB_VTFT_StateMenuButtons_resources
include PIC32mmB_VTFT_StateMenuButtons_driver
sub procedure Scrn1Btn_Menu1_Btn1_OnClick()
sub procedure Scrn1Btn_Menu1_Btn2_OnClick()
sub procedure Scrn1Btn_Menu1_Btn3_OnClick()
sub procedure Scrn1Btn_Menu1_Btn4_OnClick()
sub procedure Scrn1Btn_Menu1_Btn5_OnClick()
sub procedure Scrn1BtnRnd_SetMenu_OnClick()
'--------------------- Externals ---------------------'
'----------------- End of Externals ------------------'
'-------------- User code declarations ---------------'
sub procedure Init_Vars()
' the following interface declarations are required for any additional
' menu button sets of function routines after the ones V-TFT makes by default
' that are shown above the 'Externals' comment line that is above.
sub procedure Scrn1Btn_Menu2_Btn1_OnClick()
sub procedure Scrn1Btn_Menu2_Btn2_OnClick()
sub procedure Scrn1Btn_Menu2_Btn3_OnClick()
sub procedure Scrn1Btn_Menu2_Btn4_OnClick()
sub procedure Scrn1Btn_Menu2_Btn5_OnClick()
' un-comment these module interface declarations lines to add the 3rd menu set "Menu 3" and change the
' arrays 1st dimension to 3 and in the event handlers area where set 2 at.
'sub procedure Scrn1Btn_Menu3_Btn1_OnClick()
'sub procedure Scrn1Btn_Menu3_Btn2_OnClick()
'sub procedure Scrn1Btn_Menu3_Btn3_OnClick()
'sub procedure Scrn1Btn_Menu3_Btn4_OnClick()
'sub procedure Scrn1Btn_Menu3_Btn5_OnClick()
' user code variables declarations
dim MENU_SET as byte
' holder for current menu set active. (0 or 1)
BTN_STATE as byte [2] [5] ' [menu set]-adjust for new sets. [set buttons]-do not change.
typedef STR6 as string[6] ' user type for 6 character length string variables
' This constant array holds each menu sets buttons caption label. 6 characters maximum.
const BTN_LABELS as STR6 [2] [5] = ' [2] = menu sets index (adj. for # of sets) , [5] = menu set buttons index (do not change from 5)
(("Func 0", "Func 1", "Func 2", "Func 3", "Func 4") ,
' Indexing: [0][0,1,2,3,4]
("Func 5", "Func 6", "Func 7", "Func 8", "Func 9")) code ' Indexing: [1][0,1,2,3,4]
' ("Func10", "Func11", "Func12", "Func13", "Func14")) ' menu set 3. un-comment and replace the last ")" above with ","
' this constant array holds each sets button handlers routine pointers.
' add new handler routine pointers for each button in a new set (5 buttons) here
' and adjust first array value to match number of new sets.
const EVENT_TABLE as longword [2] [5] = (
(@Scrn1Btn_Menu1_Btn1_OnClick , ' menu set 1 buttons handler routine pointers
@Scrn1Btn_Menu1_Btn2_OnClick ,
@Scrn1Btn_Menu1_Btn3_OnClick ,
@Scrn1Btn_Menu1_Btn4_OnClick ,
@Scrn1Btn_Menu1_Btn5_OnClick )
,
(@Scrn1Btn_Menu2_Btn1_OnClick , ' menu set 2 buttons handler routine pointers
@Scrn1Btn_Menu2_Btn2_OnClick , ' (each set of 5 pointers is enclosed by "()")
@Scrn1Btn_Menu2_Btn3_OnClick ,
@Scrn1Btn_Menu2_Btn4_OnClick ,
@Scrn1Btn_Menu2_Btn5_OnClick )
' put additional menu sets button handler routine pointers here, after adding ",("
) code
const MENU_BTNS as TButtonPtr[5] =
( @Scrn1Btn_Menu1_Btn1_ , ' indexed pointers to the actual 5 buttons.
@Scrn1Btn_Menu1_Btn2_ , ' used to allow indexing to each buttons
@Scrn1Btn_Menu1_Btn3_ , ' Caption and Gradient Enable Properties.
@Scrn1Btn_Menu1_Btn4_ , ' “TButtonPtr” is a user pointer type declared by V-TFT code generation,
@Scrn1Btn_Menu1_Btn5_
' for core code usage, but users can also use it to make their own pointers.
) code
'----------- End of User code declarations -----------'
implements
'--------------------- User code ---------------------'
sub procedure Init_Vars()
' Initialize User Code Variables. Executed once on start up.
dim X , Y as byte
' routine temp variables ( Local ).
MENU_SET = 0
' Menu Set 1
for X = 0 to 1
' adjust 'to' count value to number of menu button sets -1 if more are added.
for Y = 0 to 4
BTN_STATE [X] [Y] = 0 ' Sets all 10 (2x5) functions toggled Off.
next Y
next X
end sub
'----------------------------------------------------sub procedure Button_State( dim BUTTON as byte ) ' Simple Button State Machine common routine.
' Updates the passed button numbers toggle on/off state. Executed whenever a menu function button is clicked.
' This routine called from any function menu button event handler routine that is handling screen TP event detected.
If ( BTN_STATE [MENU_SET] [BUTTON] = 0 ) then ' Flip buttons state (toggle)
BTN_STATE [MENU_SET] [BUTTON] = 1
' Set button State Holder to 1 – ON
MENU_BTNS [BUTTON]^.Gradient
=0
' toggled On, show solid Red color
else
' OR
BTN_STATE [MENU_SET] [BUTTON] = 0
' Set button State Holder to 0 – OFF
MENU_BTNS [BUTTON]^.Gradient
=1
' toggled Off, show gradient colors
end if
DrawButton( MENU_BTNS [BUTTON] ) ' redraw the button, updates buttons caption and toggle state (1-red or 0 gradient colors)
end sub
'----------------------------------------------------'----------------- End of User code ------------------'
' Event Handlers
' START OF MENU SET MANAGEMENT BUTTON HANDLER ROUTINE
sub procedure Scrn1BtnRnd_SetMenu_OnClick()
dim I as byte ' routine temp variables ( Local ).
TS as STR6
inc( MENU_SET )
' change menu set value to next set
MENU_SET = byte( MENU_SET mod 2 ) ' by using MOD function to get constrained permutations (0 to (mod value-1))
' change mod NUMBER value to same as number of menu sets
' if additional button function set(s) are added.
Scrn1BtnRnd_SetMenu__Caption [5] = MENU_SET + 1 + 48 ' change character 6 to menu set number by ASCII code
DrawRoundButton( @Scrn1BtnRnd_SetMenu_ )
' redraw to update Menu select button
for I = 0 to 4
' loops 5 times to update each buttons properties and redraw them one at a time.
TS = BTN_LABELS [MENU_SET] [I] ' load temp string holder (TS) with caption text
strcpy( MENU_BTNS [I]^.Caption, TS ) ' copy TS string to object caption string (by indexed pointer de-referenced)
MENU_BTNS[I]^.OnClickPtr = EVENT_TABLE[MENU_SET][I] ' also change objects OnEvent pointer to array indexed address
MENU_BTNS[I]^.Gradient = not BTN_STATE[MENU_SET][I] ' set objects gradient state to match/mirror buttons toggle state
DrawButton( MENU_BTNS [I] )
' redraw each button, updates buttons caption and toggle state (1-red or 0-gradient colors)
next I
end sub
' End of Menu Set Management Button Handler Routine
'----------------------------------------------------' START OF MENU SET 1 BUTTONS HANDLER ROUTINES
sub procedure Scrn1Btn_Menu1_Btn1_OnClick()
Button_State(0) ' toggle the 1st buttons off-gradient colors/on-solid Red color state
' to opposite of what state it is at now. This routine call
' takes care of any menu buttons toggled On/Off states and screen updates.
' After return, function state will be set opposite, so following
' condition test code performs new state change for function
' assigned to the button by you users. Each buttons handler
' routines are nearly identical to this one, waiting to be
' finished by you for its actual functions to be done in your
' V-TFT project.
If ( BTN_STATE [0] [0] = 0 ) then
' your code for what to do if button function is toggled to Off now. (GRADIENT)
'
'
else
' your code for what to do if button function is toggled to On now. (RED)
'
'
end if
end sub
sub procedure Scrn1Btn_Menu1_Btn2_OnClick()
Button_State(1) ' toggle the 2nd buttons off-gradient colors/on-solid Red color state
if ( BTN_STATE [0] [1] = 0 ) then
' your code for what to do if button function is toggled to Off now. (GRADIENT)
'
'
else
' your code for what to do if button function is toggled to On now. (RED)
'
'
end if
end sub
sub procedure Scrn1Btn_Menu1_Btn3_OnClick()
Button_State(2) ' toggle the 3rd buttons off-gradient colors/on-solid Red color state
if ( BTN_STATE [0] [2] = 0) then
' your code for what to do if button function is toggled to Off now. (GRADIENT)
'
'
else
' your code for what to do if button function is toggled to On now. (RED)
'
'
end if
end sub
sub procedure Scrn1Btn_Menu1_Btn4_OnClick()
Button_State(3) ' toggle the 4th buttons off-gradient colors/on-solid Red color state
if ( BTN_STATE [0] [3] = 0 ) then
' your code for what to do if button function is toggled to Off now. (GRADIENT)
'
'
else
' your code for what to do if button function is toggled to On now. (RED)
'
'
end if
end sub
sub procedure Scrn1Btn_Menu1_Btn5_OnClick()
Button_State(4) ' toggle the 5th buttons off-gradient colors/on-solid Red color state
if ( BTN_STATE [0] [4] = 0 ) then
' your code for what to do if button function is toggled to Off now. (GRADIENT)
'
'
else
' your code for what to do if button function is toggled to On now. (RED)
'
'
end if
end sub
' End Of Menu Set 1 Buttons Handler Routines
'-------------------------------------------------------' START OF MENU SET 2 BUTTONS HANDLER ROUTINES
sub procedure Scrn1Btn_Menu2_Btn1_OnClick()
Button_State(0) ' toggle the 1st buttons off-gradient colors/on-solid Red color state
if ( BTN_STATE [1] [0] = 0 ) then
' your code for what to do if button function is toggled to Off now. (GRADIENT)
'
'
else
' your code for what to do if button function is toggled to On now. (RED)
'
'
end if
end sub
sub procedure Scrn1Btn_Menu2_Btn2_OnClick()
Button_State(1) ' toggle the 2nd buttons off-gradient colors/on-solid Red color state
if ( BTN_STATE [1] [1] = 0 ) then
' your code for what to do if button function is toggled to Off now. (GRADIENT)
'
'
else
' your code for what to do if button function is toggled to On now. (RED)
'
'
end if
end sub
sub procedure Scrn1Btn_Menu2_Btn3_OnClick()
Button_State(2) ' toggle the 3rd buttons off-gradient colors/on-solid Red color state
if ( BTN_STATE [1] [2] = 0 ) then
' your code for what to do if button function is toggled to Off now. (GRADIENT)
'
'
else
' your code for what to do if button function is toggled to On now. (RED)
'
'
end if
end sub
sub procedure Scrn1Btn_Menu2_Btn4_OnClick()
Button_State(3) ' toggle the 4th buttons off-gradient colors/on-solid Red color state
if ( BTN_STATE [1] [3] = 0 ) then
' your code for what to do if button function is toggled to Off now. (GRADIENT)
'
'
else
' your code for what to do if button function is toggled to On now. (RED)
'
'
end if
end sub
sub procedure Scrn1Btn_Menu2_Btn5_OnClick()
Button_State(4) ' toggle the 5th buttons off-gradient colors/on-solid Red color state
if ( BTN_STATE [1] [4] = 0 ) then
' your code for what to do if button function is toggled to Off now. (GRADIENT)
'
'
else
' your code for what to do if button function is toggled to On now. (RED)
'
'
end if
end sub
' End Of Menu Set 2 Buttons Handler Routines
'-------------------------------------------------------' Add as many 5 button sets of function routines as you want
' (up to 9 total easily, 10 or more requires more code changes to be done).
' the next sets name is "Scrn1Btn_Menu3_Btn1_OnClick()" & "Btn2,3,4,5".
' Add the routine names to the indexed OnClick buttons EVENT_TABLE[A][B] array
' and add 1 (for each set added) to the first array dimensions declaration [2]
' to all set referenced 2 dimension arrays and loops and conditional tests
' that are indicated by my comments in the code above.
'
' The rest of the V-TFT projects screen(s) user(s) assigned objects event handler
' routines will be placed below this line automatically as they are created.
end.
The user Button Function Code areas:
Coding your applications functions to the Buttons.
Each of the 10 Button event handler routines have 2 areas the user needs to finish with their code for the function they want
to assign to the Buttons. One (1) area for code that turns on the function, and one area for code that turns the function off.
The function you assign to each button is totally up to you. It can turn a hardware module On/Off, set a PORT Pin
High/Low, set or clear a flag (variable) that another routine function your application has, then responds accordingly to.
How well you know your hardware and your programming skills will determine how easy you can use this Button
management practice.
A simple On/Off toggle control of somethings may not be enough functionally for your needs, but these menu buttons do not
have to be coded as On/Off toggle controls either. They can be coded to pop-up a more extensive dialog of screen based
controls if needed also, or to switch to another screen entirely for more screen space for controls and data displaying.
If you do not need to have a Button behave like a toggle switch, remove all of the code I have placed in that Buttons event
handler routine and replace it with your own code to do what you want it to do instead.
Here is an example of the Menu Set 2, Button 5 event handler routine redone to switch to a second Screen called
“Screen2”:
sub procedure Scrn1Btn_Menu2_Btn5_OnClick()
DrawScreen(Screen2ScreenID) ' Switch to Screen 2 to do functions it has been designed to do.
end sub
Compare the above example with the original “Scrn1Btn_Menu2_Btn5_OnClick()” event handler routine code in the code
listing shown at top of this page to see the changes done.
You can have a mix of 'toggled' buttons with non 'toggled' buttons in any Menu Button Set. My Button State Management
method does not care if any state tracking array element never gets used or does, it will still handle any buttons toggle state
that you want to behave as one.
Some other things that the Menu Function Buttons can be tasked to do:
Change the format or unit of data your application displays on the screen.
Switch between 2 scale factors that affect data your application displays.
Turn ADC Channel sampling On/Off.
Change between 2 sets of other on screen input controls so more controls available on a single screen in your application.
I hope this gives you an idea of how versatile this methodology for these buttons is, and you use your imagination to find
other ways it can be put to use.
FLOWCHARTS:
Files:
START-UP FLOWCHART
MAIN
Before Main “While TRUE” Loop
EVENTS_CODE
DRIVER
Start_TP()
1-START UP
main:
Init_MCU()
InitializeTouchPanel()
Calibrate()
InitializeObjects()
DrawScreen(32768)
Start_TP()
End sub
Init_Vars()
Init_Vars()
End sub
End sub
MAIN LOOP FLOWCHART
End sub
No TP activity detected
Check_TP()
End sub
While TRUE
Check_TP()
End sub
wend
MENU BUTTON 1 CLICKED FLOWCHART
Button_State(0)
While TRUE
Menu Set 1 Active (MENU_SET = 0)
Check_TP()
Check_TP()
flip BUTTON_STATE[0][0]
flip Menu Button1 Gradient
End sub
DrawButton(MENU_BTNS[0])
TP touchedProcess_TP_Press()
Scrn1Btn_Menu1_Btn1_OnClick()
End sub
End sub
End sub
End sub
wend
Scrn1Btn_Menu1_Btn1_OnClick()
Button_State(0)
End sub
if BUTTON_STATE[0][0]=1 turn on
Func 0, else turn off Func 0.
DrawButton(Btn1)
End sub
End sub
MENU SELECT CLICKED FLOWCHART Change active Menu Set (MENU_SET =1)
Scrn1BtnRnd_SetMenu_OnClick()
Change SetMenu Buttons Caption (1 or 0)
While TRUE
Check_TP()
DrawRoundButton(@Scrn1BtnRnd_SetMenu_)
End sub
End sub
wend
MENU_BTNS[BI]Caption=BTN_LABELS[1][BI]
MENU_BTNS[BI]OnClickPtr=EVENT_TABLE[1][BI]
MENU_BTNS[BI]Gradient=Previous States
DrawButton(MENU_BTNS[1][BI])
End sub
End Loop if done
End sub
wend
End sub
DrawRoundButton(@Scrn1BtnRnd_SetMenu_)
End sub
DrawButton(MENU_BTNS[1][BI])
End sub
MENU BUTTON 1 CLICKED FLOWCHART
Check_TP()
TP touchedProcess_TP_Press()
Scrn1BtnRnd_SetMenu_OnClick()
End sub
Start Loop 5 times BI=0 to 4
This routine either sets MENU_SET
variable to 1 or 0 and the Menu
Buttons Captions and OnClickPtr and
Gradient Properties accordingly every
time the SetMenu Button is clicked, so
only shown once here.
While TRUE
Check_TP()
Button_State(0)
flip BUTTON_STATE[1][0]
flip Menu Button1 Gradient
DrawButton(MENU_BTNS[0])
End sub
End sub
Scrn1Btn_Menu2_Btn1_OnClick()
Button_State(0)
End sub
if BUTTON_STATE[1][0]=1 turn on
Func 5, else turn off Func 5.
End sub
End sub
Menu Set 2 Active (MENU_SET = 1)
Check_TP()
TP touchedProcess_TP_Press()
Scrn1Btn_Menu2_Btn1_OnClick()
End sub
End sub
DrawButton(Btn1)
End sub
The Flowcharts above use a color tracking scheme as follows, and each section begins with the “main” file Main Loop.
All routine calls are shown in a box with an arrow pointing towards the file containing the routine and its color will be that of
the files color column. Program execution flow is from top to bottom in every procedure box that represents a routine.
Each routine (box) ends with a “end sub” statement in a non-file colored box with arrow pointing, again, to the file where
program flow continues at the “end sub” flow down pointing boxes that are colored to match.
So start in left column (main file), then top to bottom following routine call colors and 'end sub' routine return color
matching boxes to follow the programs execution flow paths back to the “main” file Main Loop 'wend' statement, which is
the end of that Flowchart. There are 5 program execution conditions Flowcharts shown above that represent a sample of any
Menu Function Button items clicked during run-time.
Not every buttons event handler routines are flow-charted, just Button 1 is, with Menu Set 1 active, then Menu Set 2 active.
Tutorial Summary:
This tutorial example project was done with keeping it as simple and easy to understand as possible, but it in no way should
give you the impression that what I have shown in it, is the limit of how this methodology can be put to use.
My hopes are that you are inspired by the coding solutions shown and use them as guides to be improved on instead and you
have success using this tutorials material to create your own unique usage based on it.
I would love to show more examples of having an actual function assigned to some of the buttons, but there can be almost
anything controlled by them and it is ultimately up to you to decide what the buttons actually do.
I made the buttons in this tutorial without any functions because I did not want you to be biased or your thinking influenced
by any example functions so you will be free to try anything yourself without thinking there is a limit to what they can be
used for.
This tutorials (User) code is not dependent on any hardware, so it can be ported to any TFT device supported by V-TFT.
If you use this project (use a copy) as a starting point for your own project (and you can do this), as you declare your own User
Code Variables, place an entry in the “Init_Vars()” routine also that zeros or pre-sets them to start up values.
The Init_Vars() routine is called from the “Main” project file after the “Start_TP()” routine is finished. Putting an entry for
your variables in this routine ( Init_Vars() ) forces the compiler to allocate memory space* for them, even if you have not used
the variable(s) in your own code yet. This practice helps you keep track of memory resources as you develop your
applications.
*(the compilers will optimize out/remove any variables that are not actually used by or seen to be used by executable code )
If you have a project you want to use this methodology in, but are having problems implementing it into your design, please
post your questions or example of problem in the V-TFT General Forum area and I will try to help out getting your issue
resolved. If you have any questions about this tutorial or its contents, you can post them there also.
Other V-TFT information resources:
If this is the first V-TFT tutorial of mine you have read, you should get and read the beginners “New Users to V-TFT
Tutorial” I also made. It has very useful information about using V-TFT that I did not include in this tutorial.
This tutorials code layout and coding practices follow those described in that tutorial. Some terminology used in this manual
is defined in that tutorial also, so I suggest you have it available to reference if something in this manual is unclear to you.
It is free and can be downloaded from LibStock.com also, along with a few other example V-TFT projects I have made
available there also. The right side of the tutorials web page has links to the other projects I have put there also. They all are
listed under the “Graphics” and “TFT” categories.
Here is the web link to the other tutorial:
new-users-to-v-tft-project-for-user-code-tutorial-and-example-event-counter
You can download the entire project or just the latest update of its PDF Tutorial Manual (links to the PDF in the Blog area).
The PDF download link in the Blog will have a newer version than the one included in the full project download file.
Another information source you will need to reference a lot, is the Compiler Language Help File and User Manual for the
programming language you use. All V-TFT projects ultimately are subject to the rules and format of the programming
language you use, mC, mBASIC or mPASCAL. V-TFT projects are nothing more than previously made code for the
projects objects in the compiler language you select in the project settings in V-TFT. How and where you put your code must
follow the format your chosen compiler expects, so solving issues when there are compile errors usually means referencing
your compilers help and user guides to find answers, while some errors are solved by looking through the V-TFT help file
about the object that is having compiler issues because your code that references it won't compile.
And of course, the Forum for V-TFT and the Compiler language you are using should be checked also.
Stop by and say “Hi” in the forum and I hope Happy Programming to you, Robert.
(If you liked this tutorial project and found it helpful, please login to Libstock and give it a Star* rating, as many as you like, Thank you.)
*You must be logged in to give a Star Rating for a download and by placing your mouse pointer on the Star you want to give and clicking it.
V-TFT (Visual-TFT), mikroBASIC (mBASIC, mB), mikroC (mC), mikroPASCAL (mPASCAL, mP) and Libstock are
trademarks and copyrighted Software/web site by MikroElektronika. See www.mikroe.com