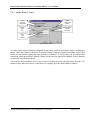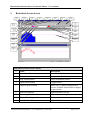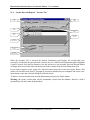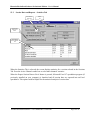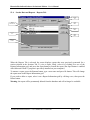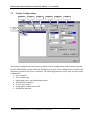
1
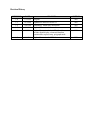
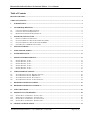
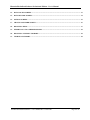
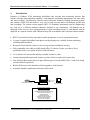
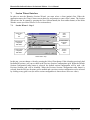
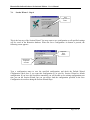
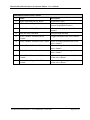
Bionetica Biofeedback Software Professional Edition Software Version 1.5 User’s Manual 1999, 2000 Web Ideas International, All Rights Reserved Web Ideas International Company PMB 13200 Summit Square Center Rt.413 & Doublewoods Road Langhorne PA 19047, U.S.A. http://www.webideas.com/bionetica Revision History REVISION DATE CHANGES AUTHOR 1.0 12/15/99 Original WII 1.1 01/28/00 Updated for software version 1.1 WII 1.2 02/03/00 Formatting, added more description WII 1.3 03/11/00 Updated for version 1.3 WII 1.4 03/22/00 Updated for version 1.4 (AAPB). New features include digital display, automated database optimization, express setup, polygraph mode. WII 1.5 08/15/00 Updated for version 1.5 PDF format. WII Bionetica Biofeedback Software Professional Edition – User’s Manual Table of Contents REVISION HISTORY................................................................................................................................................. 2 TABLE OF CONTENTS ............................................................................................................................................. 3 1. INTRODUCTION............................................................................................................................................... 5 2. SYSTEM REQUIREMENTS ............................................................................................................................. 6 2.1. 2.2. 2.3. 3. 3.1. 3.2. 3.3. 3.4. COMPUTER HARDWARE REQUIREMENTS ............................................................................................................ 6 COMPUTER SOFTWARE REQUIREMENTS: ............................................................................................................ 6 BIOFEEDBACK HARDWARE REQUIREMENTS: ...................................................................................................... 6 SOFTWARE INSTALLATION ......................................................................................................................... 7 BACKING UP BIONETICA SOFTWARE................................................................................................................... 7 INSTALLING BIONETICA SOFTWARE FROM FLOPPY DISKS ................................................................................... 7 INSTALLING BIONETICA SOFTWARE FROM CD-ROM:......................................................................................... 7 USING BIONETICA HASP PROTECTION KEY ....................................................................................................... 7 4. GETTING STARTED ........................................................................................................................................ 8 5. MAIN WINDOW SCREEN................................................................................................................................ 9 6. INSTRUMENT SETUP .................................................................................................................................... 11 7. SESSION WIZARD INTERFACE................................................................................................................... 13 7.1. 7.2. 7.3. 7.4. 7.5. 7.6. 8. 8.1. 8.2. 8.3. 8.4. SESSION WIZARD – STEP 1 .............................................................................................................................. 13 SESSION WIZARD – STEP 2 .............................................................................................................................. 14 SESSION WIZARD – STEP 3 .............................................................................................................................. 15 SESSION WIZARD – STEP 4 .............................................................................................................................. 16 SESSION WIZARD – STEP 5 .............................................................................................................................. 17 SESSION WIZARD – STEP 6 .............................................................................................................................. 18 AUDIO FEEDBACK OPTIONS ...................................................................................................................... 19 AUDIO FEEDBACK OPTION: BEEP PITCH SOUND ............................................................................................... 19 AUDIO FEEDBACK OPTION: MIDI SOUND ........................................................................................................ 20 AUDIO FEEDBACK OPTION: WAVE SOUND ....................................................................................................... 21 AUDIO FEEDBACK OPTION: AUDIO CD SOUND................................................................................................. 22 9. BIOFEEDBACK SESSION SCREEN.............................................................................................................. 23 10. BIOFEEDBACK SESSION STATISTICS....................................................................................................... 25 11. CLIENT DATABASE....................................................................................................................................... 26 12. SESSION DATA AND REPORTS ................................................................................................................... 28 12.1. 12.2 12.3. 12.4. 15. SESSION DATA AND REPORTS – PATIENT TAB .................................................................................................. 28 SESSION DATA AND REPORTS – SESSIONS TAB ................................................................................................. 29 SESSION DATA AND REPORTS – STATISTICS T AB .............................................................................................. 30 SESSION DATA AND REPORTS – REPORTS T AB.................................................................................................. 31 SESSION CONFIGURATIONS ....................................................................................................................... 32 Bionetica Biofeedback Software – User’s Manual. Rev 1.5 08/15/00 Page 3 of 38 Bionetica Biofeedback Software Professional Edition – User’s Manual 14. DATA BACKUP SCREEN............................................................................................................................... 33 15. DATA RESTORE SCREEN............................................................................................................................. 34 16. OPTIONS SCREEN.......................................................................................................................................... 35 17. CHANGE PASSWORD SCREEN.................................................................................................................... 36 18. BIONETICA HELP .......................................................................................................................................... 37 19. EXPORT DATA TO OTHER PROGRAMS ................................................................................................... 38 20. BIONETICA INTERNET UPGRADE............................................................................................................. 38 21. TECHNICAL SUPPORT ................................................................................................................................. 38 Bionetica Biofeedback Software – User’s Manual. Rev 1.5 08/15/00 Page 4 of 38 Bionetica Biofeedback Software Professional Edition – User’s Manual 1. Introduction Bionetica is Windows 95/98 multimedia biofeedback and real-time data monitoring software that includes real-time data acquisition capability, client database and backup management, real time audio and video feedback. The Bionetica software utilizes Microsoft Windows Multiple Document graphic user interface (MDI GUI) that makes it very easy to setup, run and analyze biofeedback sessions and data recordings. The current version supports J&J I-330 (modular) instruments from J&J Engineering Inc. with up to 4 different modules (channels) installed in any combination. All channels can be displayed on the screen at once (polygraph mode or signal recording session) or each channel could be displayed in a separate window with a threshold setup for each channel. Other software features include: • RS232 serial interface that accepts data from the instruments via serial communication port; • 14 types of graphic biofeedback and signal recording displays are available for data monitoring, recording and biofeedback; • Bionetica Wizard Interface makes is easy to setup and run biofeedback sessions; • Fully compatible with widely used Microsoft Office 97 software. Export your data to Excel spreadsheet and/or save reports in Microsoft Word format; • View statistics for each session and play recorded sessions as video; • Contains integrated backup/restore feature to archive client’s personal and session data; • Four audio feedback modes allows to play different types of sound (MIDI, WAV, Audio CD) during sessions and data acquisition; • Built-in Web browser for automatic software upgrades via the Internet. • Automatic database optimization and smart client search. Biofeedback Instrument Bionetica Software Your Windows 95/98 PC Bionetica Software Provides: Data Acquisition Numerous Graphic Displays Biofeedback Sessions and Data Recording Session Analysis and Reports Automated Backup Integrated Web Browser Simulation and Real-Time Mode Automated Internet Upgrade Audio and Video Feedback Bionetica Biofeedback Software – User’s Manual. Rev 1.5 08/15/00 Page 5 of 38 Bionetica Biofeedback Software Professional Edition – User’s Manual 2. System Requirements 2.1. Computer Hardware Requirements • • • • • • • • • IBM PC compatible computer with 32-bit Microsoft Windows 95 (OSR2) or 98 installed Sound Blaster compatible sound card At least 256-color monitor with suggested at least 2Mb video card installed RS-232 serial communication port Parallel or USB port Mouse/keyboard At least 10Mb of free space on a hard drive 32 Mb or RAM (64 or more recommended) Modem (optional) for Bionetica integrated Internet software upgrades 2.2. • • • • Computer Software Requirements: Microsoft Windows® 95/98 32-bit Operating System (OSR2 or later) Microsoft Word 97 (optional, required for report generation) Microsoft Excel 97 (optional, required for exporting data) Dial-up or LAN Internet Connection software (optional, for Bionetica Internet upgrades) 2.3. • Biofeedback Hardware Requirements: J&J Engineering I-330 4-channel instrument (Modular) with up to four J&J modules installed in any combination: § EMG Electromyograph Module T-501 § TMP Thermometer Module T-601 § EEG Electroencephalograph Module E-201 § EDG Electrodermal Module T601 § PPG Photoplethysmograph Module P-401 § PNG Pneumograph Module R-301 § GPT Gage Pressure Module G-701 § DCA DC Amplifier A-101 § ISA Isolation Amplifier I-801 § GLP Goniometer Limb Position Module L-901 Bionetica Biofeedback Software – User’s Manual. Rev 1.5 08/15/00 Page 6 of 38 Bionetica Biofeedback Software Professional Edition – User’s Manual 3. Software Installation 3.1. Backing up Bionetica Software If you received the software on floppy disks, please make a backup copy of your original Bionetica diskettes. Put the originals in a safe place in case of damage to your computer or backup diskettes. Brand new disks are recommended for the backups, as old or used disks may be corrupted. 3.2. Installing Bionetica Software from Floppy Disks Insert your back-up copy of the Bionetica installation disc into the floppy drive A. 1) Insert Disk #1 into your floppy disk drive 2) Run SETUP.EXE from Disk #1 3) Follow instructions on the screen 4) Insert the last disk into floppy drive and run HDD.EXE program. This will install the HASP device driver on your computer. Follow instructions on the screen. 3.3. Installing Bionetica Software from CD-ROM: Insert the CD into your CD-ROM drive. The Bionetica setup program should run automatically. If it does not, double-click on the SETUP.EXE icon from your Windows Explorer application on CD-ROM drive. The SETUP program installs all necessary files and creates a program group for you so can you start up the program by simply clicking on an icon from within the program manager. The default installation directory is C:\Program Files\Bionetica. 3.4. Using Bionetica HASP Protection Key In order to run the software on your PC, you need to install a protection key supplied with the software. If you receive a parallel key, insert it into PC’s parallel port, and install a USB key into your PC’s USB (Universal Serial Bus) port. If you remove the protection key during program execution, you get a Bionetica HASP Protection system message, and this will affect the software execution. Bionetica Biofeedback Software – User’s Manual. Rev 1.5 08/15/00 Page 7 of 38 Bionetica Biofeedback Software Professional Edition – User’s Manual 4. Getting Started Before you start a session with a real device, we recommend you to try the program in simulation mode. You can test all features without having an instrument connected. Once you learned it, you can run Bionetica with a J&J I-330 modular biofeedback device: • Connect the instrument to the computer’s serial communication port using serial cable and electrodes to subject. • While you are in Windows, select Bionetica icon from Start | Program Files | Bionetica (or folder that you've setup for the application) program group. • Check communication port assignments. COM2 port is usually assigned to external devices on desktop computers and COM1 is usually assigned for notebooks. • Power up the instrument. You can test the device in the second step of the Bionetica Wizard or from the Session Configurations screen where you can setup numerous hardware configurations that could be used later in the program. Bionetica Biofeedback Software – User’s Manual. Rev 1.5 08/15/00 Page 8 of 38 Bionetica Biofeedback Software Professional Edition – User’s Manual 5. Main Window Screen Session Menu Data Menu View Menu Help Menu Menu Bar New Session Button Tool Bar Session Configurations Button Patient's Data Button Session Data andReports Button Options Button Bionetica News Button Status Bar Help Button Status Message Panel Instrument Panel Current Date Main Window Screen Content # Description 1 Label Session Menu 2 Data Menu 3 View Menu Contains Data menu items: Patients, Sessions and Reports, Backup, Restore and Change Password Contains View menu items: Toolbar, Status Bar, Options, Bionetica News 4 Help Menu Contains Help menu items: Contents, Search for Help On… and About Bionetica 5 Menu Bar Contains Menu items: Session, Data, View, Window and Help 6 Tool Bar Contains Toolbar buttons Contains Session menu items: New Session, Configurations and Exit Bionetica Biofeedback Software – User’s Manual. Rev 1.5 08/15/00 Page 9 of 38 Bionetica Biofeedback Software Professional Edition – User’s Manual Main Window Screen Content # Label Description 7 Status Bar Displays Status messages, current date, current mode and instrument selected 8 Current Date Panel Shows current date 9 Instrument Panel Shows instrument selected and simulation mode (if selected) 10 Status Message Panel Shows status messages 11 Help Button Access Help by pressing this button 12 Bionetica News Button Shows Bionetica software news via integrated Web browser (your computer must be connected to the Internet) 13 Options Button Shows Options screen where you can setup global setting for the software and change modes (simulation or real device mode), passwords, etc. 14 Session Data and Reports Button Shows Session Data and Reports screen. 15 Patient’s Data Button Shows Patient Data screen 16 Session Configurations Button Shows Session Configurations screen 17 New Session Button Show New Session screen Bionetica Biofeedback Software – User’s Manual. Rev 1.5 08/15/00 Page 10 of 38 Bionetica Biofeedback Software Professional Edition – User’s Manual 6. Instrument Setup There are two modes of operation in the Bionetica software: simulation and active device mode. To change modes, open the Options screen and check/uncheck the Simulation check box shown below: Device Combo Box Simulation Check Box Communication Port Combo Box In order to use a device for biofeedback sessions, you must test the device during step 2 of the Session Wizard (see Session Wizard – Step 2 section of this document). Sensor Combo Box Active Channel Check Box Filter Combo Box Range Combo Box Reading Data Field Communication Port Combo Box Test Button Status Line Close Button When a channel (A, B, C or D) is selected by clicking on the Active Channel check box, the Sensor combo box appears and any supported sensor type (EMG, EEG, TEMP, GSR etc) can be selected from the list. If the selected sensor is EMG, the Filter combo box and the Range combo box appear where appropriate filter and range can be selected for specified channel (consult your hardware manual for more information on how to change the filter and range of the J&J I-330 EMG module. The Filter and Range switches are located on the back panel of the EMG module). Bionetica Biofeedback Software – User’s Manual. Rev 1.5 08/15/00 Page 11 of 38 Bionetica Biofeedback Software Professional Edition – User’s Manual Once you selected the sensors and specified sensor’s parameters, you are now ready to test the device. Verify that the device is connected via serial cable to the communication port specified in the Communication Port combo box and change the settings to the appropriate communication port if necessary. Also verify that the device is powered up. Press the Test Button to test the communication with the device. Read the Status Line of the screen that shows the communication progress with. If there are communication problems reported in the Status line or the screen, check connection again and verify that you do not use other programs such as modem or phone dialer programs that might use the same communication port. Close all other programs that use serial communication and/or reboot the computer if the problems persist. Once the communication is established, you will be able to see the values received from the device in the Reading Data Field. Press the Close button to continue with the other Session Wizard steps. Bionetica Biofeedback Software – User’s Manual. Rev 1.5 08/15/00 Page 12 of 38 Bionetica Biofeedback Software Professional Edition – User’s Manual 7. Session Wizard Interface In order to start the Bionetica Session Wizard, you must select a client (patient) first. When the application starts, the Client’s Name screen shows up and prompts to enter client’s name. The Session Wizard can also be started by pressing the New Session button (the first toolbar button) of the Main Window screen (see Main Window Screen section above). 7.1. Session Wizard – Step 1 Client's Name Text Box Select Client Button Previous Session Configutaion Name Default Session Configuration Radio Button Previous Session Configuration Radio Button Previous Session s Grid Session Wizard - Step 1 In this step, you can change a client by pressing the Select Client button. If this client has previously had biofeedback sessions, you can see them in the Previous Session Configurations grid. When the Default Session Configuration radio button is selected, the default session configuration will be used (the Previous Sessions grid will be disabled. When the Previous Session Configuration radio button is selected, then the Previous Sessions grid is enabled and a previous session configuration can be selected by clicking on any grid’s row (the active session configuration is shown above in reverse video). Bionetica Biofeedback Software – User’s Manual. Rev 1.5 08/15/00 Page 13 of 38 Bionetica Biofeedback Software Professional Edition – User’s Manual 7.2. Session Wizard – Step 2 Current Channel Configuration Select Configuration Button Channel 1 Check Box Main Feedback Channel Check Box Name Tag Text Box Session Wizard - Step 2 You may want to select a different configuration (previously saved) by pressing the Select Configuration button. Check the Channel 1 check box to activate Channel 1 and type a name in the Name Tag text box for the selected channel. Repeat the same actions for Channels 2, 3 and 4 if they will be used for data acquisition. Mark up the Main Feedback Channel check boxes for appropriate channels if these channels are primarily used for biofeedback. You must test the biofeedback device (at least once) in order to proceed with other steps. Press the Test button to setup and test the device. After the test is complete, press the Next button to continue. Bionetica Biofeedback Software – User’s Manual. Rev 1.5 08/15/00 Page 14 of 38 Bionetica Biofeedback Software Professional Edition – User’s Manual 7.3. Session Wizard – Step 3 Channel Combo Box Graph Type Combo Box Graph Type Example Step 3 is Graph Setup. Select a graph plotting method for each channel by clicking on the Graph Type combo box. Select the MultiScreen radio button for biofeedback sessions or select the Poligraph radio button for data recording or polygraph biofeedback session with a threshold selected to one Main Feedback Channel only. Polygraph mode can also be used for monitoring. The MultiScreen session type shows each signal with threshold in separate windows; the Poligraph session type shows all signals in one window with or without a threshold. Bionetica Biofeedback Software – User’s Manual. Rev 1.5 08/15/00 Page 15 of 38 Bionetica Biofeedback Software Professional Edition – User’s Manual 7.4. Session Wizard – Step 4 Set Duration Combo-box Up/Down Control Start Button If the Poligraph session type was selected in the previous step, then Step 4 will be skipped. If you selected the MultiScreen session type, then you must measure baseline parameters of the signal first in order to calculate thresholds for each active channel selected in the previous steps. Set duration of the baseline measurement by clicking on the Set Duration combo box if necessary. Press the Start button to measure baseline parameters. After the baseline measurement is finished, you may want to change the threshold by pressing the Up/Down control of the form (Note: You can also change the threshold later during the session by dragging the threshold line on the screen). Press the Next button to go to the next step. Bionetica Biofeedback Software – User’s Manual. Rev 1.5 08/15/00 Page 16 of 38 Bionetica Biofeedback Software Professional Edition – User’s Manual 7.5. Session Wizard – Step 5 Session Duration Up/Down Control Audio Feedback Check Box Session Name Text Box Session Notes Text Box Sound Logic Button In this step, you can type the session name and notes that could be useful for reports later. Select session duration by changing the value in the Session Duration Up/Down control. Type session name in the Session Name text box for your references. Pre-session notes could be typed in the Session Notes text box. Activate audio feedback options by marking up the Audio Feedback check box. Press the Sound Logic button to setup audio feedback options described later in this chapter (see Audio Feedback Options chapter). Bionetica Biofeedback Software – User’s Manual. Rev 1.5 08/15/00 Page 17 of 38 Bionetica Biofeedback Software Professional Edition – User’s Manual 7.6. Session Wizard – Step 6 Save Configuration As Button This is the last step of the Session Wizard. You may want to save configuration so all specified settings will be saved in the Bionetica database. When the Save Configuration As button is pressed, the following screen appears: Configuration Name Text Box Default Session Configuration Check Box Type a configuration name to save the specified configuration, and check the Default Wizard Configuration check box if you want this configuration to be used by Session Wizard as default configuration. If you leave the check box unmarked, you will be able to use existing configuration next time you run the Session Wizard, but you can always load the configuration specified in the Save Configuration As text box during the Session Wizard Steps. Bionetica Biofeedback Software – User’s Manual. Rev 1.5 08/15/00 Page 18 of 38 Bionetica Biofeedback Software Professional Edition – User’s Manual 8. Audio Feedback Options There are four audio feedback options available in the Bionetica software for biofeedback sessions: • Beep Pitch Sound (proportional pitch) • MIDI Sound • Wave Sound • Audio CD (music CD-ROM) Sound These options described below in detail. 8.1. Audio Feedback Option: Beep Pitch Sound Beep Pitch Audio Feedback Option Beep Pitch Sound Frequency Combo Box Test Button Averaging Option Combo-box Sound Volume Control When the Beep Pitch radio button is selected, the Beep Pitch Sound Frequency combo box displays sound frequency of the beep sound. The sound frequency can be changed by selecting options of the Beep Pitch Frequency combo box. The Averaging combo box displays time for calculating the feedback sound frequency proportional to the acquired signal during biofeedback sessions. To test the sound option, click on the Test button of the screen. Press the Ok button to accept selected audio feedback settings or press the Cancel button to go to the previous screen without changes made on this screen. Bionetica Biofeedback Software – User’s Manual. Rev 1.5 08/15/00 Page 19 of 38 Bionetica Biofeedback Software Professional Edition – User’s Manual 8.2. Audio Feedback Option: MIDI Sound MIDI Sound Feedback Radio Button MIDI Sound Type Combo Box When the MIDI Sound radio button is selected, the MIDI Sound Type combo box becomes available. There are two sound type options: short tone and long tone. Press the Test button to hear the differences in these options. Sound volume can be changed using the volume control of the screen. Press the Ok button to accept selected audio feedback settings or press the Cancel button to go to the previous screen without changes made on this screen. Bionetica Biofeedback Software – User’s Manual. Rev 1.5 08/15/00 Page 20 of 38 Bionetica Biofeedback Software Professional Edition – User’s Manual 8.3. Audio Feedback Option: Wave Sound Wave Sound Audio Feedback Radio Button Test Button Wave Sound FileName Combo Box Sound Logic Combo Box Sound Volume Control When the Wave Sound radio button is selected, the Wave Sound File Name combo box and the Sound Logic combo box are enabled. Microsoft Windows WAV sound files can be selected to be played during the biofeedback session. To make WAV sound files available in the Wave Sound File Name combo box, they should be placed into the \Bionetica folder. Press the Test button to hear the specified Wave sound. There are following options available in the Sound Logic combo box: § Play continuously § Play above threshold only § Play below threshold only § Increase sound volume when threshold is reached § Decrease sound volume when threshold is reached Bionetica Biofeedback Software – User’s Manual. Rev 1.5 08/15/00 Page 21 of 38 Bionetica Biofeedback Software Professional Edition – User’s Manual 8.4. Audio Feedback Option: Audio CD Sound Audion CD Audio Feedback Radio Button Audion CD Display When the Audio CD radio button is selected (enabled only if your computer has an Audio CD-ROM drive), CD’s music tracks are selected to be played during biofeedback sessions. Insert audio CD into your audio CD-ROM drive to activate this option and select tracks using the Audio Track Selection combo box. Press the Test button to hear the selected sound track. Press the Ok button when done to continue. Bionetica Biofeedback Software – User’s Manual. Rev 1.5 08/15/00 Page 22 of 38 Bionetica Biofeedback Software Professional Edition – User’s Manual 9. Biofeedback Session Screen Start Session Button Pause Session Button Stop Session Button Sound On/Off Button Graph Properties Button End Session Button Remaining Time Text Box Elapsed Time Progress Bar Sound Volume Control Active Channel Upper Scale Value Control Signal Smoothing On/Off Button Active Channel Lower Scale Value Control Active Channel Graph Color Control X Axis Zoom Value Control (points per screen) Active Channel Graph Type Control Active Channel Threshold Value Control Drag and Drop Threshold Line Active Channel Threshold Color Control Active Channel Threshold On/Off Control Biofeedback Session Screen Content # 1 Label Start Session Button Description Starts biofeedback session 2 Pause Session Button Pauses biofeedback session 3 Stop Session Button Stops biofeedback session 4 Sound On/Off Button Toggles sound 5 Graph Properties Button Shows active channel graph properties screen. Available when session is stopped or paused only. 6 End Session Button Ends biofeedback session 7 Remaining Time Text Box Shows time remaining for this session 8 Elapsed Time Progress Bar Shows session’s elapsed time 8 Sound Volume Control Adjusts feedback sound volume Bionetica Biofeedback Software – User’s Manual. Rev 1.5 08/15/00 Page 23 of 38 Bionetica Biofeedback Software Professional Edition – User’s Manual Biofeedback Session Screen Content # Label Description 9 Signal Smoothing On/Off Button Extrapolates signal 10 Active Channel Graph Color Control Allows to change graph color of the active channel (highlighted window) 11 Active Channel Graph Type Control Allows to change graph type of the active channel 12 Drag and Drop Threshold Drag and drop threshold 13 Active Channel Threshold On/Off Control Toggles threshold of the active channel 14 Active Channel Threshold Color Control Allow to change threshold color of the active channel 15 Active Channel Threshold Value Control Allow to change threshold value of the active channel 16 X Axis Zoom Value Control Allow to change X Axis range of the active channel 17 Active Channel Lower Scale Value Control Allow to change the lower scale (Y Axis) of the active channel 18 Active Channel Upper Scale Value Control Allow to change the upper scale (Y Axis) of the active channel Bionetica Biofeedback Software – User’s Manual. Rev 1.5 08/15/00 Page 24 of 38 Bionetica Biofeedback Software Professional Edition – User’s Manual 10. Biofeedback Session Statistics When the biofeedback session is finished, the following Session Statistics screen appears: Channel Combo Box Statistics Grid If there are more than one channel was used for the session, click on the Channel combo box to view statistics for other channels. These session parameters are saved in the database for reports and further analysis. Bionetica Biofeedback Software – User’s Manual. Rev 1.5 08/15/00 Page 25 of 38 Bionetica Biofeedback Software Professional Edition – User’s Manual 11. Client Database When the program is started, the New Client screen appears and the user must enter client’s name. If the client’s data is in the database already, the program suggests client’s first and last name using “Smart Find” technology developed for this program: Smart Find Prompt Last Name Text Box First Name Text Box Middle Name Text Box If the client is not in the database, the Client’s Data screen appears where client’s information can be entered as shown below: FindClient Button Add New Client Button Clear All Fields Button Delete Record Button Bionetica Biofeedback Software – User’s Manual. Rev 1.5 08/15/00 Page 26 of 38 Bionetica Biofeedback Software Professional Edition – User’s Manual To search for a specific client, press the Find button and type the last name in the Find screen: Smart Find Feature This feature works the same way as the New Client screen specified above. Bionetica Biofeedback Software – User’s Manual. Rev 1.5 08/15/00 Page 27 of 38 Bionetica Biofeedback Software Professional Edition – User’s Manual 12. Session Data and Reports There are four tabs in the Session Data and Reports screen: 12.1. Session Data and Reports – Patient Tab Device Combo Box Patient Tab Show Real Mode Radio Button Find Client Button Show Simulation Radio Button Personal Data Button Patient Session Grid Close Button Press the Session Data and Reports button on the Main Window screen (see Main Windows Screen section above) or select Data | Session Data and Reports menu item to open the Session Data and Reports screen shown above. To search for a specific client’s data, press the Find button or scroll the Patient Session grid. To view client’s personal information such as address, phone, e-mail, insurance data etc, press the Personal Data button. When the Show Simulation radio button is selected, only simulation data becomes available for review. To view data collected from the biofeedback device, select the Show Real Mode radio button. Highlight a Patient Session grid line to select a client, and then press the Session Tab, Statistics Tab or Reports tab (if enabled) to view sessions, statistics and reports for the specified sessions. Press the Close button to exit the screen. Bionetica Biofeedback Software – User’s Manual. Rev 1.5 08/15/00 Page 28 of 38 Bionetica Biofeedback Software Professional Edition – User’s Manual 12.2. Session Data and Reports – Sessions Tab Sessions Tab Delete Button Play Button Creat New Report Button Rename Button Session Note Text Box Session Information Grid Session Duration Text Box Sound/Music Support Text Box When the Sessions Tab is selected, the Session Information grid displays all sessions that were previously recorded for the selected client. Click on any row of the Session Information grid to highlight a specific session. Press the Play button to view the session as it was recorded. Press the Rename button to change the Session Name shown in the Session Name column of the Session Information grid. If you wish to generate a new report for a selected session, press the Create New Report button. This action will start Microsoft Word 97 program (if previously installed on your computer) and create a new report based on the data collected during the selected session. To delete a session selected in the Session Information grid, press the Delete button. Warning: the client’s session data will be permanently erased from the database. However, client’s personal data will still remain in the database. Bionetica Biofeedback Software – User’s Manual. Rev 1.5 08/15/00 Page 29 of 38 Bionetica Biofeedback Software Professional Edition – User’s Manual 12.3. Session Data and Reports – Statistics Tab Active Channel Combo Box Statistix Tab Export Session Data to Excel Button Active Channel Session Statistics Grid When the Statistics Tab is selected, the screen displays statistics for a session selected in the Sessions Tab. Press the Active Channel combo box to select other channels’ statistics. When the Export Session Data to Excel button is pressed, Microsoft Excel 97 spreadsheet program (if previously installed on your computer) is launched and all session data are exported into an Excel spreadsheet. This option could be helpful for the statistical analysis of session data. Bionetica Biofeedback Software – User’s Manual. Rev 1.5 08/15/00 Page 30 of 38 Bionetica Biofeedback Software Professional Edition – User’s Manual 12.4. Session Data and Reports – Reports Tab Reports Tab Report Information Grid Open Button Rename Button Active Report Bar Delete Button Report Type Text Box When the Reports Tab is selected, the screen displays reports that were previously generated for a session selected in the Sessions Tab. To view a report, firstly, select it by clicking on a row of the Reports Information grid, and press the Open button to launch the report (the Open button is enabled when Microsoft Word 97 program is previously installed on your computer). To rename a report, press the Rename button, type a new name and press Ok button. This will change the report name in the Report Information grid. If you wish to delete a report, select it on a Report Information grid by clicking a row, then press the Delete button. Warning: the report will be permanently deleted from the database and will no longer be available. Bionetica Biofeedback Software – User’s Manual. Rev 1.5 08/15/00 Page 31 of 38 Bionetica Biofeedback Software Professional Edition – User’s Manual 13. Session Configurations Device Combo Box Add Button Delete Button Description Tab Setup Device Button Channels Tab Available Configurations List Box The Session Configurations screen appears when the Session Configurations toolbar button is pressed from the Main Window Screen. When the Add button is pressed, a new configuration is created for the instrument specified in the Device combo box. The following parameters can be setup for each session configuration: § Active channel § Active channel tag § Signal graph color, type and plotting method § Threshold color and type § X Axis scale (zoom) § Graph update method (auto scroll) § Description and name Bionetica Biofeedback Software – User’s Manual. Rev 1.5 08/15/00 Page 32 of 38 Bionetica Biofeedback Software Professional Edition – User’s Manual 14. Data Backup Screen Default Backup Folder Radio Button Other Folder Radio Button Use the Data Backup feature to create a backup of your database. Select the Bionetica Backup Folder radio button to save backup file into the Bionetica default directory. If you wish to save your backup file in other folders or media (floppy disks or backup drives), then select the Other radio button and specify a new drive/folder. Bionetica Biofeedback Software – User’s Manual. Rev 1.5 08/15/00 Page 33 of 38 Bionetica Biofeedback Software Professional Edition – User’s Manual 15. Data Restore Screen Other Folder Radio Button Default Backup Folder Radio Button To restore backup data, click on Data | Restore menu item from the Main Window screen. Choose the default directory if it was used for backup, otherwise select the Other Folder radio button to specify different drive/folder. If there is a backup file, a message will appear on the bottom of the screen. Select the backup file and press the Ok button to continue. Bionetica Biofeedback Software – User’s Manual. Rev 1.5 08/15/00 Page 34 of 38 Bionetica Biofeedback Software Professional Edition – User’s Manual 16. Options Screen General Options Tab Device Options Tab The Options screen is available when the Options toolbar button is pressed (see the Main Window Screen chapter). The General Tab options: • Show/Hide the Logo (splash) Screen when the program starts • Show Full Screen/Normal Main Window Screen when the program starts • Enable/Disable Password when the program starts • Sound Beep Warnings On/Off. Device Combo Box Simulation Check Box Communication Port Combo Box The Device Tab Options: • Simulation Mode On/Off • J&J I-330 Device Option • Default Communication Port (COM1, COM2, COM3 or COM4) Bionetica Biofeedback Software – User’s Manual. Rev 1.5 08/15/00 Page 35 of 38 Bionetica Biofeedback Software Professional Edition – User’s Manual 17. Change Password Screen Old Password Text Box New Password Text Box Confirma Password Text Box The Change Password Screen can be accessed by selecting the Data | Change Password menu item from the Main Window Screen. If order to change your password, type the old one in the Old Password text box and then type a new password twice in the New Password and the Confirm Password text boxes. Press the Ok button when finished. The Password option can be enabled/disabled from the Options screen. Note that password is case sensitive. If you forgot the password, the only option to enter the program when the password is enabled is to delete the database files. Contact our technical support if this problem occurred. Bionetica Biofeedback Software – User’s Manual. Rev 1.5 08/15/00 Page 36 of 38 Bionetica Biofeedback Software Professional Edition – User’s Manual 18. Bionetica Help The Help Screen appears when the Help Button is pressed from the Main Window Screen or F1 key is pressed from any screen. Use the Contents, Index and Find tabs to find any topic of interest. Press the Close button when the help is no longer needed. Bionetica Biofeedback Software – User’s Manual. Rev 1.5 08/15/00 Page 37 of 38 Bionetica Biofeedback Software Professional Edition – User’s Manual 19. Export Data to Other Programs The Bionetica software utilizes Microsoft Word 97 (tm) templates for reports generation. If you’d like to use the report feature, then Microsoft Word 97 must be installed on your computer prior the use of the Bionetica software. You will be able to customize the templates so your clients or insurance companies can get well-formatted reports. There are two options available for Reports: Text Reports and Text Reports with embedded graph sessions. All reports are stored in the client database in Microsoft Word 97 format. Sophisticated users can utilize the ability to export session data into Microsoft Excel 97 spreadsheet for further analysis and customized reports. 20. Bionetica Internet Upgrade The latest version of the Bionetica software could be received via the Internet. You would an Internet connection provided by your local ISP. New version notifications could be received via e-mail if you subscribe to the Bionetica User’s eGroup, [email protected] 21. Technical Support For technical support, please contact The Bionetica Web site: http://webideas.com/bionetica E-mail: [email protected] The Bionetica User’s eGroup: [email protected] Mailing address: Web Ideas International Co. Biofeedback Technologies Dept. PMB 13200 Summit Square Center Rt. 413 & Doublewoods Road Langhorne PA 19047 Phone: (215) 968-2186 Fax: (801) 459-8096 * Microsoft Windows 95/98, Microsoft Office, Microsoft Word, Microsoft Excel, Microsoft Internet Explorer and Peedy character are registered name of Microsoft Corporation, 1996-2000, All rights reserved. Bionetica is a registered name of Web Ideas International Co., 1999-2000, All rights reserved. Bionetica Biofeedback Software – User’s Manual. Rev 1.5 08/15/00 Page 38 of 38