1
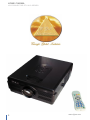
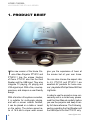
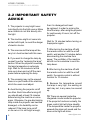
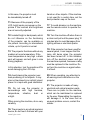
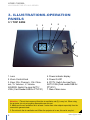
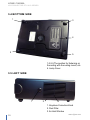
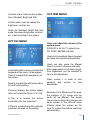
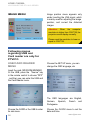
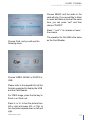
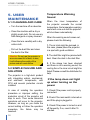
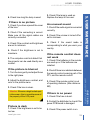
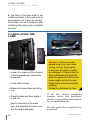
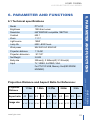
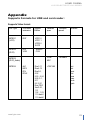
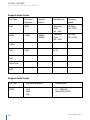
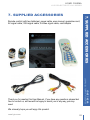
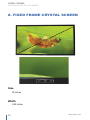
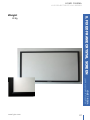
HOME CINEMA
LCD PROJECTOR PTV-01C SERIES
2
www.tgius.com
HOME CINEMA
LCD PROJECTOR PTV-01C SERIES
1. PRODUCT BRIEF
4
2. CAUTIONS
5
5
6
2.1 CAUTIONS
2.2 IMPORTANT SAFETY ADVICE
4. OPERATION INTRODUCTION
11
11
12
5. USER MAINTENANCE
18
18
18
20
6. PARAMETER AND FUNCTION
6.1 TECHNICAL SPECIFICATION
6.2 MAIN FUNCTION
21
21
22
7. ACCESSORIES
25
8. FIXED FRAME CRYSTAL SCREEN
26
9. PROJECTOR CEILING MOUNT PM4365
28
4.1 REMOTE CONTROL
4.2 OPERATION
5.1 CLEANING AND CARE
5.2 SIMPLE FAILURE AND SOLUTION
5.3 REPLACING THE LAMP
9.1 HOW TO INSTALL THE CELLING MOUNT
TO THE PROJECTOR
www.tgius.com
29
3
HOME CINEMA
8
8
9
9
10
10
3.1 TOP SIDE
3.2 FRONT SIDE
3.3 BACK SIDE
3.4 BOTTOM SIDE
3.5 LEFT SIDE
LCD PROJECTOR PTV-01C SERIES
3. ILLUSTRATIONS-OPERATION PANELS
CONTENT
CONTENT
HOME CINEMA
LCD PROJECTOR PTV-01C SERIES
1. PRODUCT BRIEF
T
he new version of the Home Cinema Video Projector PTV01C and
PTV01C-1 has the unique function
of Zoom. PTV01C also has the Card
Reader and the USB input. They also
integrate TV playing, AV playing and
VGA signal input. With a fine, novel appearance, and shape is a user-friendly
design.
With a function of keystone correction,
it is suitable for multi-angle playing,
and with a screen rotation function,
it can be placed on a table or mount
on the ceiling. The picture aspect ratio of 16:9 and a super wide screen
4
give you the experience of been at
the movies but at your own home.
You can also choose the aspect ratio
to 4:3. PTV01C and PTV01C-1 are
excellent AV products for home cinema/ playstation/Ps2/ps3/xbox360//bar
/nightclub.
In order to use the projector more conveniently and in a correct way, please
read this User Manual carefully before
you use the projector and keep it handy for future reference. The Following
section regarding the Card Reader and
the USB input is for the PTV01C only.
www.tgius.com
HOME CINEMA
LCD PROJECTOR PTV-01C SERIES
Electrical devices are not for children
There is intense light in the lens. Do not look into the lens
directly. Never allow children to look directly into the lens.
Keep the device and batteries out of reach of small children.
Ifa battery is swallowed seek medical help immediately.
Moisture and Cleaning
2. CAUTIONS
2.1 CAUTIONS
This product is not waterproof! Do not immerse the player in
water or let it come in contact with water.
If water penetrates into the player, it can cause serious damage. Do not use cleaning agents, which contain alcohol, ammonia, benzene, as these can damage the player. Use a soft,
damp cloth for cleaning.
Heat
Do not expose the device to direct sunlight. Ensure that the
device is not exposed to any direct sources, such as radiatorsor open fires. Ensure that the ventilation slots of the devices
are not covered.
If TV or radio interference occurs during use, place the device
in a different location of the room/building.
Batteries and packaging should not be disposed of in the
trash. Batteries must be handed over to a collection center for
used batteries to help with the protection of the environment.
www.tgius.com
5
HOME CINEMA
Batteries-Instruction on environment
protection
Professional recycling
LCD PROJECTOR PTV-01C SERIES
Interference with other equipment
HOME CINEMA
LCD PROJECTOR PTV-01C SERIES
2.2 IMPORTANT SAFETY
ADVICE
1. The projector is very bright never
look directly into the light source. Make
sure children do not look directly into
the light.
2. The machine might not come into
contact with liquid, to avoid the danger
of electric shocks.
3. The area around the lamp will be
very hot. Avoid contact with this area.
4. If you want to change the lamp by
yourself, see the “replacing the lamp”
section. When the projector is working,
the lamp temperature is extremely
high. Wait for 45 minutes to let the
lamp cool down and cut off the main
power before replacing the lamp.
5. The encasing may not be opened
there is no part inside of the machine,
which the users must adjust.
6. Avoid turning the projector on/off
too often. Each time after turning off,
you should wait at least 15 minutes
before turning the machine on once
again. Otherwise, the gas-discharging
lamp inside the projector can become
damaged, or its durability can be
reduced. If the lamp turns on/off
on its own or it is not bright enough,
6
then it is damaged and must
be replaced. In order to prolong the
life of the lamp, after using the projector
for continuously 4 hours, turn off the
projector.
Wait for 15 minutes before turning on
theprojector again.
7. After turning the machine off with
the remote control or with the on/off
switch, wait another 10 minutes before
disconnecting the machine from
power. The ventilator of the machine
will still run for sometime to cool the
lamp down.
8. After turning the machine off with
the remote control or with the on/off
switch, the remote control is without
function for 10 minutes.
9. Because the temperature around
the lamp is very high, the existing air
vent may not, in any case, be covered
up.
10. There are several protective
integrated circuits inside the projector.
If the projector functions normally, the
green control light will shine steadily.
If the temperature inside the projector
exceeds the alarm will sound and the
blue control light will shine.
www.tgius.com
HOME CINEMA
LCD PROJECTOR PTV-01C SERIES
In this case, the projector must
be immediately turned off.
11. Because of the property of the
hands or other objects. If the machine
is not used for a certain time, set the
dust protection cap on the lens.
LCD, bright spots can appear on the
picture if the contrast and brightness
are not correctly adjusted.
17. To avoid abrasion on the machine,
12. Isolated bright or dark pixels, which
18. Turn the machine off when there is
do not influence on the functioning
of the projector, can be available on
the picture. According to international
criteria, up to 8 points is normal.
13. The projector functions without any
use the remote control to operate the
machine.
a storm and pull out the power plug 10
minutes later to avoid damages from
lighting strikes or electrical sparks.
19. If the projector has been used for
In this situation, turn the machine off to
avoid damaging the LCD chip.
several years, it can happen that the
lamp still burns when the projector
has been turned off. In this situation,
turn off the electrical power and get
the machine repaired, because a relay
must be replaced in the machine. Do
not turn the machine on again before
it is fixed.
14. Avoid placing the projector near
20. When operating, pay attention to
problem at room temperature. If the
room temperature is very high a black
spot will appear, and will grow in size
during playback.
heat-producing or hot objects. It may
also not be placed in an airtight closet;
place it in a spot with good ventilation.
15. Do not use the projector in
surroundings with high moisture,
temperature, vibration, dust or
unlight.
When moving the machine, do so very
carefully.
all warnings and instructions on the
projector.
21. The projector is made of many
electrical and optical precision parts.
There are no parts on the machine,
which can be maintained or replaced
by the user. Dissembling the machine
will damage it. In the case that an
unusual problem occurs, contact the
retailer.
16. The projector is an optical precision
device; do not touch the lens with your
www.tgius.com
7
HOME CINEMA
LCD PROJECTOR PTV-01C SERIES
3. ILLUSTRATIONS-OPERATION
PANELS
3.1 TOP SIDE
3
4
5
6
7
1
2
1. Lens
2. Zoom Control Knob
3. Keys: CH+ Channel+ , CH- Channel-, V+ Volume+, V- VolumeSOURCE: Switch the input AV/TV/
VGA/ (Card Reader/USB for PTV01C)
4. Power indicator display
5. Power On/Off
6. PC/TV: Switch the input from
AV/TV/VGA (Card reader/USB for
PTV01C)
7. Menu: Main menu
Attention: 1.The air that comes out from the air ventilation net (2) is very hot. When using
the projector, do not put anything flammable near this net.
2. Make sure the air ventilation net is at least 1 meter from other objects especially from the
ones which generate heat.
3. Do not touch the air ventilation net. When the projector is in use, this net is very hot.
8
www.tgius.com
HOME CINEMA
LCD PROJECTOR PTV-01C SERIES
3. ILLUSTRATIONS-OPERATION PANELS
3.2 FRONT SIDE
1
2
1. Remote control sensor
2. Screws to adjust the height
3.3 BACK SIDE
LCD PROJECTOR PTV-01C SERIES
10
9
8
7
6
5
1. Main Power Input
2. Air Ventilation Net
3. AV Out
4. AV In
5. Card Reader (only for PTV01C)
www.tgius.com
2
3
HOME CINEMA
1
4
6. USB Input (only for PTV01C)
7. S-Video Input
8. Remote Control Sensor
9. VGA input
10. TV Input
9
HOME CINEMA
LCD PROJECTOR PTV-01C SERIES
3.4 BOTTOM SIDE
1
3
4
2
5
1-2-3-5 The position for fastening on
the ceiling with the ceiling mount, etc.
4. Lamp Cover
3.5 LEFT SIDE
1
2
3
1. Keystone Correction Knob
2. Dust Filter
3. Air Inlet Window
10
www.tgius.com
HOME CINEMA
LCD PROJECTOR PTV-01C SERIES
4. OPERATION INTRODUCTION
4. OPERATION INTRODUCTION
4.1 REMOTE CONTROL
Power:
Press the Power Key to turn on the
projector/ Press the Power Key twice
to turn off
Menu:
Changing OSD menus
CH+/- :
Browsing the channels
0—9:
Selecting channel from 0-9 or selecting functions in OSD
-/-- :
Channel number Setting
LCD PROJECTOR PTV-01C SERIES
V+/- :
Setting the volume or changing the
selected function in OSD
HOME CINEMA
SOURCE:
Selecting TV, AV, VGA, For PTV01C:
Card Reader, USB input. DPF is for
selecting USB or Card Reader
MUTE
Volume ON/OFF
www.tgius.com
11
HOME CINEMA
LCD PROJECTOR PTV-01C SERIES
Operation Key for USB or Card Reader
(only for PTV01C):
Choose Previous Item
OK: Confirm
Choose Next Item
“-”:
Stop/Begin
“+”: Increase the Volume
Return to previous menu
V-, V+: Turn the picture left or right
Lower the Volume
SET: Zoom in/Zoom out the picture
CH-,CH+: Turn the picture upside
Replacing Batteries: Open the
batterycompartment and insert two
type AAA/LR3/R3 batteries. Pay
attention to thepolarities as indicated
in the battery compartment.
Operation Distance: The maximum
operation distance from the remote
control to the projector is 5 meters, and
60 degrees from the remote sensor.
4.2 OPERATION
Turning on
Place the projector in the desired
position. Place the power cable
connection jack, and the other end
in the outlet.
Turn on the main switch. The
operation display will glow
momentarily yellow and then
green.
Turn the machine on by pressing
12
down or upright
the button ON/OFF on the machine
or with the remote control.
Turning off
Turn the machine off by pressing
the button ON/OFF(twice) on the
machine or with the remote control.
When you press ON/OFF for the first
time, the screen will display “power
down”, this is to indicate if you
confirm to turn off the projector.
Press ON/OFF again within 10
seconds (before “Power Down”
www.tgius.com
HOME CINEMA
LCD PROJECTOR PTV-01C SERIES
disappears), then you can turn off
the projector.
Wait at least 10 minutes, so that
the fan can cool the lamp down.
Turn the machine off with the main
switch.
Keystone Corrections
After turning the projector on, the
picture will slowly become brighter.
After each assembly of the
projector, the picture can be
distorted. Turn the keystone
correction key to correct the
distortion (+- 15 degrees).
Carefully turn the setting regulator
Zoom Function and
focusing the picture.
Turn the zoom control knob (No.
2 in the above picture) to zoom in
or zoom out the picture. The zoom
ratio is 1:1.17. Carefully turn the
lens (No.1 in the above picture) to
focus the picture.
The projector must be at least 1.13
meters away from the projection
surface, so that a sharp picture can
be produced. If the projector is 1.13
meters from the wall, the lens must
be unscrewed as far as possible.
Connection
Turn off the projector and the
machine, you want to use with the
projector.
Connect the machine in the proper
way to the projector; normally this
means connect the computer with
a VGA jack, a DVD player/recorder
with a S-video jack (in case your
machine has a corresponding
outlet) or with a video input jack,
and connect the TV antenna to the
TV input in the projector.
3
1
4
2
www.tgius.com
13
HOME CINEMA
LCD PROJECTOR PTV-01C SERIES
For PTV01C:
Plug in the USB to the USB input
Plug in the card (SD/XD/MS/SM/MMC card) to
the reader input
If your card is not suitable to plug in the card reader input,
use the card adapter (in the accessories) to plug in the card
Input Selection
Press the SOURCE button on the
remote control. The OSD menu
displays the actual selected
input.
Press the SOURCE button again if
the OSD is still being displayed, to
change the input.
TV
AV IN
S-Video
VGA
DPF
TV input
Video input
S-Video input
VGA input
USB input or
Card input (Only
for PTV01C)
DPF supports:
USB input, SD/XD/MS/SM/MMC card.
The default format in DPF is for
displaying the picture. Press RETURN
to return to the previous menu.
Menus
Press the MENU button to display
the OSD menu.
You can move up and down in
the menu with the CH+ or CHbuttons.
You can access the menu points
and change the setting with the
Vand V+ buttons.
You can access higher menu levels
with the MENU button.
PICTURE MENU
The formats that DPF supports are
MP3, MP4, VCD, DVD, and JPEG
etc.
Please refer to the appendix for all the
formats supported to display the USB
input and the Card Reader.
14
www.tgius.com
HOME CINEMA
LCD PROJECTOR PTV-01C SERIES
In picture menu, there are four modes:
User, Standard, Bright and Soft.
SYSTEM MENU
In User mode, users can adjust the
brightness, contrast, etc.
Under the Standard, Bright and Soft
mode, the value of brightness, contrast,
etc. is set according to the system.
OPTION MENU
Users can adjust the volume in the
system menu.
S-ROLOC is for the TV system from
Pal, NTSC, SECAM and Auto.
Users can choose Auto Search to select
and save the channels automatically.
In the Option Menu users can select the
language of the menu. (9 languages)
Trans is to adjust the transparency of
the picture.
Reset is to adjust the setting according
to initial factory setting.
Choosing Scaling, the picture aspect
ratio can be switched from 4:3 to 16:9.
H Flip is to reverse the picture
horizontally (for rear projection).
V Flip is to reverse the picture vertically
(projector mounted on the ceiling).
www.tgius.com
Users can also press the Manual
Search to search channels manually.
If the image search is not clear enough,
Fine Adjustment can be selected to
have a fine adjustment.
Press volume + in order to tune
upwards, and volume- to tune
downwards.
Because of the difference of the area,
the systems of TV image and the
audio will be different. You should
choose the corresponding images and
audio system in the channel menu
(Please adjust the system as the
local TV system first before searching
automatically).
15
HOME CINEMA
LCD PROJECTOR PTV-01C SERIES
IMAGE MENU
Image position menu appears only
under inserting the VGA signal, which
is mainly used for adjusting the image
position, and correct the distorted
images.
Attention: When the computer
resolution is higher than 1024*768, the
projector cannot display normally.
Please reset the resolution to lower or
equal to 1024*768.
Following menus
regarding USB and
Card reader are only for
PTV01C.
USB/CARD READER
MENU
Choose the SET UP menu, you can
change the OSD language, etc
Insert the card (SD/XD/SM/MS/MMC)
Or the USB; press the “Source” key
in the remote control to choose “DPF”
, and then you can enter the USB and
the Card Reader menu.
The OSD languages are English,
German, Spanish, French and
Portuguese.
Choose the CARD or the USB to enter
its sub menu.
16
Choose the CLOCK menu to set the
date and time.
www.tgius.com
HOME CINEMA
LCD PROJECTOR PTV-01C SERIES
Choose MUSIC and the audio in the
card will play. If you would like to listen
to music and have a photo at the same
time, you can press “exit” and then
choose “PHOTO”.
Press “-“ and “+” to increase or lower
the volume.
Choose Card, and you will see the
following menu.
The operation for the USB is the same
as the Card Reader.
Choose VIDEO, MUSIC or PHOTO in
USB.
Please refer to the appendix for all the
formats supported to display the USB
and the Card Reader.
For JPEG image, press the Set key to
Zoom in or Zoom out.
Press V- or V+ to turn the picture from
left or right and press CH- or CH+ to
turn the picture upside down or left and
right.
www.tgius.com
17
HOME CINEMA
LCD PROJECTOR PTV-01C SERIES
5. USER
MAINTENANCE
5.1 CLEANING AND CARE
Turn the machine off as describe.
Clean the machine with a dry or
slightly moist cloth. Do not use any
fluid detergents or spray cleaners.
Clean the lens carefully with a dry
cotton cloth.
Pull out the dust filter and clean
the dust in the filter.
Attention: Do not use the projector in
an environment full of dust, or else,
it will influence the quality of the
picture and will cause failure.
5.2 SIMPLE FAILURE AND
SOLUTION
The projector is a high-tech product
with integrating optical, mechanical,
and electronic components, with
CPU and several protection circuits
installed.
In case of violating the operation
procedure or improper setting, the
protection circuit of the projector will
stop to work. Then some abnormal
symptoms will occur to the projector.
However, as long as you make the
correct setting or follow the operation
procedure, the failure may be
resolved.
18
Temperature Warning
Sound
When the inner temperature of
the projector exceeds the normal
temperature, the temperature warning
sound will come out and the projector
will shut down automatically.
When the warning sound comes out,
please check the following:
1. The air inlet might be jammed, in
this case, please place the projector
in a spot with good ventilation.
2. The dust filter might be jammed with
dust. Clean the dust in the dust filter.
3. If the above has been checked
and there is still a warning sound, the
cooling fan or the inner circuit might be
failed. Please consult the distributor for
help.
If the lamp does not light
up when turning on the
power
1. Check if the power cord is properly
connected.
2. Check if the main switch is turned on
and if the plug is plugged in.
3. Check if the power is turned on and
off frequently. If so, reset it after 15
minutes.
www.tgius.com
HOME CINEMA
LCD PROJECTOR PTV-01C SERIES
If there is no picture
1. Check if you have opened the cover
of the lens.
2. Check if the connecting is correct.
Make sure all the signal cables are
correctly connected.
3. Check if the contrast and brightness
are set to minimum.
4. Check if the brightness is set to
maximum.
5. The computer could not detect that
the projector can be used directly as a
monitor.
If the picture is blurred
1. Turn the lens gently and adjust focus
to the right place.
3. Check if the lens is clean.
Picture is dark
1. Check if the brightness is set to be
too low.
www.tgius.com
1. Check if the audio signal is connected
correctly.
2. Check if the volume is turned off or
set to minimum.
3. Check if the sound mode is
corresponding to what you use in your
country.
If the remote control does
not work
1. Check if the batteries in the remote
are used up or if the batteries are
installed.
2. Check if there is an obstacle between
the remote control receiving part of the
PTV, and the remote control.
3. Check if the remote control is out
of operating distance. (Max distance:
5M)
If there is no power
1. Check if the fuse is burnt.
2. Contact the distributor to check if the
power PCB board is damaged.
3. Check if the power switch is on.
19
HOME CINEMA
Attention: If there is a bright or dark spot
in the screen, this is normal because of
the property of the LCD panel.
An unusual sound
LCD PROJECTOR PTV-01C SERIES
2. Adjust the brightness, contrast, and
color in the picture menu.
2. Check if the lamp is used up.
Replace the lamp in this case.
5. USER MAINTENANCE
4. Check how long the lamp is used.
HOME CINEMA
LCD PROJECTOR PTV-01C SERIES
4. The lamp or the lamp cover is not
installed correctly. In this case, shut up
the projector, cool it down for at least
45 minutes. Turn on the projector after
confirming if the lamp cover is installed
correctly.
5.3 REPLACING THE
LAMP
Loosen the screws on the covering
of the lampshade and remove the
lampshade.
Loosen both screws.
Remove the lampshade by pulling
it up.
Press the lamp and then wiggle it
in and out.
Insert a new lamp of the same
type, and assemble the lamp cover
and the lampshade again.
20
Attention: IIf there is smoke,
peculiar smell, too much noise
coming out from the projector,
or the case, the parts or cables
are damaged, or there is liquid or
other substances going into the
projector, please turn off the main
power supply, pull out the main
supply cable, and stop using the
projector.
Contact the distributor for help.
If all the above methods
cannot solve the problem,
please contact the distributor
or us immediately.
Do not open the machine by
yourself.
www.tgius.com
HOME CINEMA
LCD PROJECTOR PTV-01C SERIES
6. PARAMETER AND FUNCTIONS
6. PARAMETER AND FUNCTIONS
6.1 Technical specifications
Model
Brightness
Resolution
Contrast
Zoom
Light source
Lamp life
Work power
Projection distance
Projection dimension
Net Weight
Body size
Input
PTV-01C
1200 Ansi Lumen
640*RGB*480 compatible 1280*768
600:1
1:1.17
150W
6000 –8000 hours
90V-240V AC 50/60 HZ
1.13-4M
30”-120”
3.8 KG
320mm(L) X 260mm(W) X 120mm(H)
TV, VIDEO, S-VIDEO, VGA,
For PTV01C:USB, Memory Card(SD/XD/SM/
MS/MMC)
1.13m
1.96m
2.37m
2.62m
Aspect ratio
4:3 16:9
4:3 16:9
4:3 16:9
4:3 16:9
Image size
www.tgius.com
3.3m
4:3
16:9
30’’-35’’ 27’’-32’’ 50’’-61’’ 47’’-55’’ 60’’-70’’ 57’’-67’’ 70’’-82’’ 66’’-77’’ 80’’-94’’ 77’’-90’’
21
HOME CINEMA
Projection
Distance
LCD PROJECTOR PTV-01C SERIES
Projection Distance and Aspect Ratio for Reference:
HOME CINEMA
LCD PROJECTOR PTV-01C SERIES
6.2 MAIN FUNCTION
1 Signal compatibility: TV (75Ω), SVideo, VGA (PC), Video, Audio, For
PTV01C: USB, Memory Card
2 Keystone correction and picture
rotation, the picture aspect ratio can
be switched from 16:9 to 4:3.
3 OSD screen display function
4 The fan continues to work after the
projector is turned off (lasting for 10
minutes so as to prolong the life of the
lamp)
5 Zoom Function
6 Alarm protection function in case of
excessive hot
7 Alarm function when heat elimination
fan does not work
8 Entire remote operation
9 Manual focus adjustment
22
www.tgius.com
HOME CINEMA
LCD PROJECTOR PTV-01C SERIES
Appendix
Supports Formats for USB and card reader:
Supports Video format:
File Type
File name
extension
Support
Edition
MPEG1
(VCD)
.DAT
VCD1.0
VCD1.1
VCD2.0
SVCD
MPEG2
(DVD)
.DAT
.VOB
www.tgius.com
.AVI
.MP4
.DIV
.DIVX
Transfers
speed
PCM/
MLP
<9.6MB/s
Subtitle
Without
CSS
MPEG2
(DVD_Audio)
MPEG4
Detailed
spec
Divx3.11
Divx4.12
Divx5.0,
5.02
5.03 , 5.04
5.05, 5.1,
5.11
5.2, 5.21
Divx PRO
Xvid1.00,
1.01
1.02 , 1.03
1.10-beta1
1.10-beta2
<720*480
.srt
.sri
.smi
.txt
.ssa
.ass
.sub
.psb
23
HOME CINEMA
LCD PROJECTOR PTV-01C SERIES
Support Audio format
File Type
File name
extension
Mp3
.MP3
WMA
.WMA
Support
Edition
WMA8
WMA9
Detailed spec
Transfers
speed
Sampling
Rate:
8K ~ 48K
Bit Rate:
8K ~320K
Sampling
Rate:
8K ~ 48K
Bit Rate:
5K ~320K
CDDA
WAV
.WAV
44.1k
ASF
QuickTime
AAC
Support Audio format
File Type
File name extension
Detailed spec
JPEG
.JPG
.BMP
.GIF
x*y < 5200000
(About 2600*2000)
24
www.tgius.com
HOME CINEMA
LCD PROJECTOR PTV-01C SERIES
Remote control (with two batteries), power cable, user manual, guarantee card,
AV signal cable, VGA signal cable, S-Video signal cable, card adapter
HOME CINEMA
LCD PROJECTOR PTV-01C SERIES
Thank you for reading this User Manual. If you have any questions please feel
free to contact us, and we will be happy to assist you in any way you may
need.
We sincerely hope you will enjoy this product.
www.tgius.com
7. SUPPLIED ACCESSORIES
7. SUPPLIED ACCESSORIES
25
HOME CINEMA
LCD PROJECTOR PTV-01C SERIES
8. FIXED FRAME CRYSTAL SCREEN
80’’
Size
80 inches
Width
2.50 inches
26
www.tgius.com
LCD PROJECTOR PTV-01C SERIES
HOME CINEMA
HOME CINEMA
LCD PROJECTOR PTV-01C SERIES
27
www.tgius.com
8. FIXED FRAME CRYSTAL SCREEN
Weight
20 Kg
HOME CINEMA
LCD PROJECTOR PTV-01C SERIES
9. PROJECTOR CEILING MOUNT
PM4365
installation of long or short clutches 4)
Suitable for above 90% of projectors
on the market 5) With concealed
buckle, artistic and beautiful frame
6) Convenient and safe in wiring
BB12 series ceiling mount kit: 1)
Made of A3 hot-rolling steel plate
Product Name: Universal Ceiling
Mount Kit
Model Number: PM4365, PM63100,
PM100180, BB12
Place of Origin: China
Extension height:
1) PM4365: 430 ~ 650mm
2) PM63100: 630 ~ 1000mm
3) PM100180: 1000 ~ 18000mm
4) BB12: 500 ~ 1000mm
PM series ceiling mount kit:
1) Made of refined quality aluminum
alloy materials 2) Auxiliary auto
dismantling wrench 3) Easy to
assemble, upright or opposite
28
Inner packing: PM4365: 1 set/paper
box
Dimensions: 32 x 11 x 6cm
N.W.: 1.3kg
PM63100: 1 set/paper box
Dimensions: 52 x 11.5 x 6cm
N.W.: 1.6kg
PM100180: Separate package of long
drop pole and auxiliary adjustment
head and top plate
N.W.: 2.2kg BB12: 1 set/paper box
Dimensions: 66 x 20 x 11cm
N.W.: 3.4kg
Outer packing:
PM4365: 20 sets /carton
Carton dimensions: 47 x 33 x 31cm
G.W.: 32kg
PM63100: 15 sets/carton
Carton dimensions: 54 x 33 x 37cm
G.W.: 30kg PM100180: 10pcs /carton
Carton dimensions: 12 x 12.6 x
105cm
G.W.: 23.5kg
BB12: 10 sets/carton
Carton dimensions: 60 x 44 x 68cm
G.W.: 35kg
www.tgius.com
HOME CINEMA
LCD PROJECTOR PTV-01C SERIES
1
Take out this part from the ceiling
mount package.
3
Loose the screws and take out the
these two small parts.
5
2
Use this spanner to unscrew or screw
in
4
9. PROJECTOR CEILING MOUNT
9.1 How to Install the Ceiling Mount to the Projector
Use these parts in the small polybag
LCD PROJECTOR PTV-01C SERIES
7
HOME CINEMA
Use the screws in the small polybag
and install as shown.
6
Install this part to the bottom part
which has been installed.
Screw out these parts, which are to
adjust the height of the ceiling mount
www.tgius.com
29
HOME CINEMA
LCD PROJECTOR PTV-01C SERIES
8
Adjust the height of the ceiling mount
and fixed the screw to fasten this part.
Install the parts in last step to the
bottom part.
9
Use the screws in the small polybag
to fix the 4 holes.
The mounting angle to the ceiling can
be adjusted here.
10
Install the top part to the previous part
and use the screws in the small
polybag.
30
11
The whole ceiling mount is finished.
www.tgius.com
HOME CINEMA
LCD PROJECTOR PTV-01C SERIES
12
Unscrew the two front legs of the
projector and take out the two
back legs.
14
Take out the four screws from the
polybag, which packs the User
Manual.
13
Screw in the four screws to into the
four holes.
It is ready to install the ceiling mount.
Install the ceiling mount to the four holes of the screws and use the
screws in the small polybag to fasten them.
Pictures are as follows:
www.tgius.com
31
Triangle Global Industries., Inc.
5401 N. Haverhill Rd., Unit 105, West Palm Beach, Fl 33407
Telephone: (561) 688-2899 Toll free: 1 (866) 688-2206 Fax (561) 688-2249
website: www.tgius.com E-mail: [email protected]