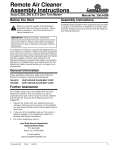
1
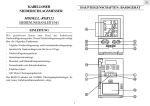
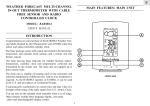
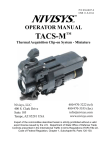
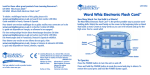
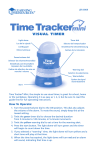
GB
REMOTE RAIN GAUGE
MAIN FEATURES: MAIN UNIT
MODEL: RGR122
USER’S MANUAL
INTRODUCTION
Congratulations on your purchasing the RGR122 Remote Rain
Guage. The rain guage is equipped with the following functions:
- Daily and total rainfall display
- Nine-day rainfall history
- Rainfall alarm
- Indoor temperature display
- Maximum and minimum temperatures
- Real-time calendar clock
- Daily alarm
- 300-feet transmission range
The RGR122 operates at 433MHz. No wire installation is required.
1
GB
A. FOUR-LINE DISPLAY
- For displaying the total rainfall, current rainfall or rainfall
history, indoor temperature and calendar clock
B.
-
I. [°C/°F] SWITCH
- Selects between degree Centigrade (°C) and Fahrenheit (°F)
J. [in/mm] SWITCH
- Selects between inch and millimeter
RAIN RESET / SINCE BUTTON
Displays the start day for total rainfall
Presses and hold to clear the total and current rainfall
Press and hold to reset the date stamp
K. RAIN AL ON / OFF SWITCH
- Turns on or off the rainfall alarm
L. RESET BUTTON
- Returns all settings to their default values
C. RAIN SEARCH BUTTON
- Enforces a search for the rain guage sensor
M. CLOCK AL ON / OFF SWITCH
- Turns on or off the daily alarm
D. MODE BUTTON
- Changes among the clock, calendar and daily alarm in normal
mode
- Presses and hold to enter the setting mode
N. BATTERY COMPARTMENT
- Accommodates two UM-3 or AA-sized batteries
O. REMOVABLE TABLE STAND
- For securing the main unit on a flat surface
E. TEMP MEM BUTTON [ ]
- Changes among the maximum, minimum and current indoor
temperatures in normal mode
- Presses and hold to clear the temperature memory in normal
mode
- Decreases a value in setting mode
MAIN FEATURE: RAIN COLLECTOR
F. RAIN HIST BUTTON [ ]
- Displays the rainfall history in normal mode
- Increases a value in setting mode
2
G. RAIN ALARM [
] BUTTON
- Displays the rain alarm setting
- Presses and hold to enter the rain alarm setting mode
H. ANTENNA
- Receives radio signal from rain collector
2
GB
INSTALLATION
"AA" UM3 1.5V
3
"AA" UM3 1.5 V
TOP VIEW
1. Position the main unit and rain collector within effective
range (300 feet).
2. a) Insert batteries into the rain collector.
b) Mount the rain collector on a level surface
c) Put drops of water on the cross at the base to check the
leveling
Water stay at
position 1 - 4
means the gauge
is not leveled
4
!
"
d) Use the metal ring to adjust the leveling of the rain collector
P.
Q.
R.
-
ANTENNA
Transmits radio signal to main unit
CROSS
Checks the leveling of the rain collector
BATTERYCOMPARTMENT
Accommodates two UM-3 or AA-sized batteries
METAL RING
3
GB
3. Remove the fiber tape from around the bucket assemblies.
Note : Every time the battery in the main unit is changed, repeat
installation step 4 to 7 before use.
TOTAL RAINFALL
The total rainfall is displayed on the top line of the LCD display.
Use the [IN/MM] switch to select between inch and millimeter.
To display the commencing date of the record, press [RAIN RESET/
SINCE] once. The date will appear on the bottom line of the display.
To clear the record, hold [RAIN RESET/SINCE] for two seconds.
Note that this will also clear the current (Day 0) rainfall.
4. Insert batteries into the main unit.
RAINFALL HISTORY
MODE L NO. RG R12 2
C
in
F
mm
RAIN
C LOC K
RESE T
The rainfall history is displayed on the second line of the LCD
display. The main unit can record up to nine days of rainfall.
"AA" U M3 1.5V
Use [RAIN HIST / ] to display the record for a particular day. The
day of the record will be displayed with a minus (-) sign. Zero (0)
means the record is for the current day.
To clear the current day rainfall, hold [RAIN RESET/SINCE] for two
seconds. Note that this will also clear the total rainfall record.
"AA" U M3 1.5V
5. Press the [RESET] button on the main unit to initiate operation.
6. Set the calendar and clock.
7. Press [RAIN RESET / SINCE] to display the date stamp. Press
and hold to reset the date stamp to current date.
RAINFALL ALARM
To set the rainfall alarm,
1. Press and hold [RAIN ALARM]. The alarm will be activated
automatically. The rain alarm indicator will light up.
LOW BATTERY WARNING
There are two low-battery indicators, one appears on the total
rainfall display section and one on the indoor temperature display
section. The former represents the batteries of the remote rain
collector, the latter those of the main unit. Replace the batteries
immediately when the respective indicator lights up.
2. Use [RAIN HIST / ] to increase the setting or [TEMP MEM /
] to decrease the setting.
4
GB
The alarm will go off for one minute when the rainfall reaches the
preset value and the rain alarm indicator will flash. A reminder beep
will be emitted every minute. Once the rain alarm is on the indicator
will not stop flashing unless [RAIN AL] switch is turned off or the
rain alarm value is reset or normally pass to next day. To stop the
alarm and reminder beep, press any button or reset the rainfall alarm
value.
CALENDAR CLOCK
The calendar clock is displayed on the bottom line of the display.
Use [MODE] to change among the clock, calendar and daily alarm.
To set the clock,
1. Press [MODE] to display the clock or calendar.
2. Press and hold [MODE] for two seconds.
To deactivate the alarm all together, turn off the [RAIN AL] switch.
3. Use [RAIN HIST / ] or [TEMP MEM / ] to set the desired
value.
4. Press [MODE] and repeat from Step 3 to complete all settings.
5. Press [MODE] to confirm.
DISCONNECTED SIGNALS
If without obvious reason the display for the main unit goes blank,
press [RAIN SEARCH] to enforce an immediate search.
If that fails, check:
- The remote rain collector is still in place.
- The batteries of the main unit and rain collector are still good.
Replace them if necessary.
- The transmission is within range and path is clear of obstacles
and interference. Shorten the distance if necessary.
To set the daily alarm,
1. Press [MODE] to display the daily alarm. The daily alarm will be
activated automatically. The daily alarm indicator will light up.
2. Press and hold [MODE] for two seconds.
3. Use [RAIN HIST / ] or [TEMP MEM / ] to set the desired
value.
4. Press [MODE] and repeat from Step 3 to complete all settings.
Then press [RAIN SEARCH] again.
When active, the daily alarm will go off for one minute at the set
time and the daily alarm indicator will flash. Press any button to
stop the alarm. The alarm is still active and will go off at the set time
the following day.
INDOOR TEMPERATURE
The indoor temperature is displayed on the third line of the LCD
display. Use the [°C/°F] switch to select between degree Centigrade
and Fahrenheit.
Use [TEMP MEM] to display the maximum and minimum
temperatures in record. The reading will go from maximum to
minimum to current and back. To clear the memory, press and hold
[TEMP MEM] for two seconds.
To deactivate the function all together, turn off the [CLOCK AL]
switch.
5
GB
SPECIFICATIONS
THE RESET BUTTON
This button is used only when the unit is operating in an
unfavorable way. Use a blunt stylus to hold down the button. All
settings will return to their default values.
Main unit
Display rainfall range (total)
PRECAUTIONS
This product is engineered to give you years of satisfactory service
if you handle it carefully. Here are a few precautions:
1. Do not immerse the unit in water.
2. Do not clean the unit with abrasive or corrosive materials. They
may scratch the plastic parts and corrode the electronic circuit.
3. Do not subject the unit to excessive force, shock, dust,
temperature or humidity, which may result in malfunction,
shorter electronic life span, damaged battery and distorted
parts.
4. Do not tamper with the unit’s internal components. Doing so
will invalidate the warranty on the unit and may cause
unnecessary damage. The unit contains no user-serviceable
parts.
5. Only use fresh batteries as specified in the user’s manual. Do
not mix new and old batteries as the old ones may leak.
6. Always read the user’s manual thoroughly before operating the
unit.
: 0 - 999.99 inches
(0 – 25,400 mm)
Display rainfall range
(history / daily)
: 0 - 99.99 inches
(0 – 2,540 mm)
Rainfall resolution
: 0.04 inches (1 mm)
Display temperature range
: 23.0°F to 122.0°F
(-5.0°C to +50.0°C )
Proposed operating range
: 23.0°F to 122.0°F
(-5.0°C to +50.0°C )
Temperature resolution
: (0.1°C) to 0.2°F
Remote Rain Collector
Proposed operating range:
: 33.8° F to 140.0°F
(1.0° C to 60.0°C )
General
6
RF Transmission Frequency
: 433 MHz
RF Transmission Range
: 300 feet (100 meters)
Temperature sensing cycle
: around 30 seconds
GB
Power
NOTE ON COMPLIANCE
Main unit
: 2 pcs UM-3 or “AA” 1.5V
battery
Remote sensing unit
: 2 pcs UM-3 or “AA” 1.5V
alkaline battery
Weight
Main unit
: 6.10 ounces (173 gm)
Remote sensing unit
: 9.17 ounces (260 gm)
Dimensions
Main unit
Remote sensing unit
This device complies with Part 15 of the FCC Rules. Operation
is subject to the following two conditions: (1) This device
may not cause harmful interference, and (2) This device must
accept any interference received, including interference that
may cause undesired operations.
Warning: Changes or modifications to this unit not
expressly approved by the party responsible for compliance
could void the user’s authority to operate the equipment.
FCC :
NOTE: This equipment has been tested and found to comply
with the limits for a Class B digital device, pursuant to Part
15 of the FCC Rules. These limits are designed to provide
reasonable protection against harmful interference in a
residential installation. This equipment generates, uses and
can radiate radio frequency energy and, if not installed and
used in accordance with the instructions, may cause harmful
interference to radio communications.
However, there is no guarantee that interference will not
occur in a particular installation. If this equipment does
cause harmful interference to radio or television reception,
which can be determined by turning the equipment off and
on, the user is encouraged to try to correct the interference by
one or more of the following measures:
- Reorient or relocate the receiving antenna.
- Increase the separation between the equipment and receiver.
- Connect the equipment into an outlet on a circuit different
from that to which the receiver is connected.
- Consult the dealer of an experienced radio/TV technician
: 5.24 x 3.54 x 0.98 inches
(133 x 90 x 25mm)
: Dia 5.51x5.71 inches
(140 x 145mm)
7