1
Device for plant monitoring
SUNNY VIEW
User Manual
SunnyView-BA-BEN121211 | Version 1.1
EN
SMA Solar Technology AG
Table of Contents
Table of contents
1
Information on this Manual. . . . . . . . . . . . . . . . . . . . . . . . . 6
2
2.1
2.2
Safety . . . . . . . . . . . . . . . . . . . . . . . . . . . . . . . . . . . . . . . . . . 9
Intended Use. . . . . . . . . . . . . . . . . . . . . . . . . . . . . . . . . . . . . . . . 9
Safety Precaution . . . . . . . . . . . . . . . . . . . . . . . . . . . . . . . . . . . . 9
3
3.1
3.2
Product Description . . . . . . . . . . . . . . . . . . . . . . . . . . . . . . 10
Sunny View . . . . . . . . . . . . . . . . . . . . . . . . . . . . . . . . . . . . . . . . 10
Type Label . . . . . . . . . . . . . . . . . . . . . . . . . . . . . . . . . . . . . . . . 12
4
4.1
4.2
Operation . . . . . . . . . . . . . . . . . . . . . . . . . . . . . . . . . . . . . . 13
Menu Structure . . . . . . . . . . . . . . . . . . . . . . . . . . . . . . . . . . . . . 13
Operating the Sunny View . . . . . . . . . . . . . . . . . . . . . . . . . . . . 14
5
5.1
5.2
5.3
"Home" Menu Item . . . . . . . . . . . . . . . . . . . . . . . . . . . . . . 15
Layout of the "Home" Slides . . . . . . . . . . . . . . . . . . . . . . . . . . . 15
Header layout. . . . . . . . . . . . . . . . . . . . . . . . . . . . . . . . . . . . . . 16
Plant Data . . . . . . . . . . . . . . . . . . . . . . . . . . . . . . . . . . . . . . . . . 16
5.3.1
Slides without SMA CT Meter. . . . . . . . . . . . . . . . . . . . . . . . . . . . . . . . . . . . 17
5.3.2
Slide with SMA CT Meter . . . . . . . . . . . . . . . . . . . . . . . . . . . . . . . . . . . . . . . 18
5.4
Online Data . . . . . . . . . . . . . . . . . . . . . . . . . . . . . . . . . . . . . . . 19
6
"Charts" Menu Item . . . . . . . . . . . . . . . . . . . . . . . . . . . . . . 20
7
"Events" Menu Item . . . . . . . . . . . . . . . . . . . . . . . . . . . . . . 22
8
8.1
8.2
8.3
8.4
8.5
"Settings" Menu Item . . . . . . . . . . . . . . . . . . . . . . . . . . . . . 24
Adjusting the Brightness . . . . . . . . . . . . . . . . . . . . . . . . . . . . . . 24
Disabling the Display . . . . . . . . . . . . . . . . . . . . . . . . . . . . . . . . 24
Setting the Scaling of the Daily Chart . . . . . . . . . . . . . . . . . . . . 24
Setting the Error Alert . . . . . . . . . . . . . . . . . . . . . . . . . . . . . . . . 25
Setting the Key Clicks . . . . . . . . . . . . . . . . . . . . . . . . . . . . . . . . 25
User Manual
SunnyView-BA-BEN121211
3
Table of Contents
SMA Solar Technology AG
8.6
8.7
8.8
8.9
8.10
8.11
8.12
8.13
8.14
8.15
8.16
8.17
8.18
8.19
8.20
8.21
8.22
8.23
Identifying the Sunny View . . . . . . . . . . . . . . . . . . . . . . . . . . . . 25
Setting the Language . . . . . . . . . . . . . . . . . . . . . . . . . . . . . . . . 25
Country Settings . . . . . . . . . . . . . . . . . . . . . . . . . . . . . . . . . . . . 26
Setting the Date and Time. . . . . . . . . . . . . . . . . . . . . . . . . . . . . 26
Searching for a New Plant . . . . . . . . . . . . . . . . . . . . . . . . . . . . 27
Adding a New Device . . . . . . . . . . . . . . . . . . . . . . . . . . . . . . . 28
Replacing an Existing Device with a New Device . . . . . . . . . . 29
Changing the Device Name . . . . . . . . . . . . . . . . . . . . . . . . . . . 29
Changing the Plant Password . . . . . . . . . . . . . . . . . . . . . . . . . . 30
What to Do in Case of Lost Plant Password . . . . . . . . . . . . . . . 30
Changing the Device Password . . . . . . . . . . . . . . . . . . . . . . . . 30
Displaying Connected Devices . . . . . . . . . . . . . . . . . . . . . . . . . 31
Setting Up a WLAN Connection. . . . . . . . . . . . . . . . . . . . . . . . 32
Checking and Setting Up a Bluetooth Connection . . . . . . . . . . 32
Configuring Online Data . . . . . . . . . . . . . . . . . . . . . . . . . . . . . 33
Changing the Duration of the Slide Show . . . . . . . . . . . . . . . . 33
Selecting PV Visualisation . . . . . . . . . . . . . . . . . . . . . . . . . . . . . 33
Activating Demo Mode. . . . . . . . . . . . . . . . . . . . . . . . . . . . . . . 34
9
9.1
9.2
9.3
9.4
9.5
Maintenance and Care . . . . . . . . . . . . . . . . . . . . . . . . . . . 35
Safe removal of the SDHC card . . . . . . . . . . . . . . . . . . . . . . . . 35
Performing an Update. . . . . . . . . . . . . . . . . . . . . . . . . . . . . . . . 35
Restoring Default Settings . . . . . . . . . . . . . . . . . . . . . . . . . . . . . 36
Generating a Back-up File . . . . . . . . . . . . . . . . . . . . . . . . . . . . 36
Restoring Sunny View Data from Back-up File . . . . . . . . . . . . . 38
10
10.1
10.2
Decommissioning . . . . . . . . . . . . . . . . . . . . . . . . . . . . . . . . 39
Decommissioning the Sunny View. . . . . . . . . . . . . . . . . . . . . . . 39
Disposing of the Sunny View . . . . . . . . . . . . . . . . . . . . . . . . . . 39
4
SunnyView-BA-BEN121211
User Manual
SMA Solar Technology AG
Table of Contents
11
Troubleshooting . . . . . . . . . . . . . . . . . . . . . . . . . . . . . . . . . 40
12
Technical data. . . . . . . . . . . . . . . . . . . . . . . . . . . . . . . . . . . 45
13
Contact . . . . . . . . . . . . . . . . . . . . . . . . . . . . . . . . . . . . . . . . 47
User Manual
SunnyView-BA-BEN121211
5
1 Information on this Manual
1
SMA Solar Technology AG
Information on this Manual
Validity
This manual is valid for the Sunny View type VIEW-10.GR1.
The type designation can be found on the type label on the back of the Sunny View.
Target group
This manual is intended for end users.
Additional information
Additional information is available at www.SMA.de/en.
Title
Document type
Sunny View
Quick reference guide
SMA CT Meter*
Installation manual
* For Japan only
Symbols
Symbol
Explanation
Indicates a hazardous situation which, if not avoided, will result in death
or serious injury.
Indicates a hazardous situation which, if not avoided, could result in death
or serious injury.
Indicates a hazardous situation which, if not avoided, could result in minor
or moderate injury.
Indicates a situation which, if not avoided, can result in property damage.
Indicates information that is important for a specific topic or objective, but
is not safety-relevant.
6
☐
Indicates a requirement for meeting a specific goal.
☑
Desired result.
✖
A problem that could occur.
SunnyView-BA-BEN121211
User Manual
SMA Solar Technology AG
1 Information on this Manual
Typographies
Typography
"light"
Usage
Example
• Enter your e-mail address
and password in the
"E-mail" and "Password"
text boxes.
• Display messages
• Parameters
• Connections
• Slots
• Text boxes
bold
• Elements to be selected.
• Elements to be entered.
>
[Button/Key]
• Enable the dynamic
option.
• Series of elements that are to be
selected on the software user
interface or display.
• Select Settings > Date.
• Buttons
• Select [Next].
• Keys
Nomenclature
The following nomenclature is used in this manual:
Complete designation
Designation in this manual
System comprising PV array, devices to monitor Plant
plants, and inverters
SMA Bluetooth® Wireless Technology
User Manual
Bluetooth
SunnyView-BA-BEN121211
7
1 Information on this Manual
SMA Solar Technology AG
Abbreviations
Abbreviation Description
Explanation
NetID
Network Identification
Identification number for SMA Bluetooth
network
MSL
Mean Sea Level
-
PUK
Personal Unlocking Key
Code number, which enables access to
SMA Bluetooth devices, after the loss of
the password
PV
Photovoltaics
-
SDHC
Secure Digital High Capacity
Memory card with a storage capacity
up to
WLAN
Wireless Local Area Network
-
Wi-Fi
8
SunnyView-BA-BEN121211
User Manual
SMA Solar Technology AG
2
2 Safety
Safety
2.1 Intended Use
The Sunny View is a communication device that receives, displays and stores data from
SMA inverters.
The Sunny View is only suitable for indoor use.
The Sunny View may only be used with accessories that are produced or recommended by
SMA Solar Technology AG.
The data collected by Sunny View on the amount of power generated by your plant may deviate from
the electricity meter data.
• The Sunny View data cannot be used for billing purposes.
The Sunny View may only be used in accordance with the enclosed documentation. Any other use
can result in personal injury or property damage.
• The Sunny View is only to be operated using the supplied plug-in power supply and in the
voltage range intended for this (see Section 12 "Technical data", page 45).
The enclosed documentation is an integral part of this product.
• Read and follow the documentation for the proper and optimum use of the Sunny View.
• Keep the documentation (quick reference guide and user manual CD) in a convenient place for
future reference.
2.2 Safety Precaution
Preventing unauthorised access
Plants are delivered with "0000" as the default password. In other words, unauthorised users can gain
access to the data of the plant.
• Change the default plant password (see Section 8.14).
User Manual
SunnyView-BA-BEN121211
9
3 Product Description
3
SMA Solar Technology AG
Product Description
3.1 Sunny View
The Sunny View is a communication device that receives, displays and stores data from SMA inverters.
The Sunny View displays plant data in the form of slides on the display.
The Sunny View can be connected to the Internet via a WLAN. If there is a connection to the Internet,
the Sunny View can display data from Facebook and Twitter, as well as newsfeeds.
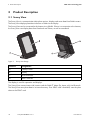
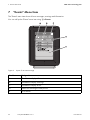
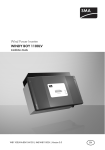
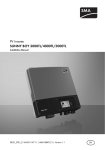
Figure 1:
Sunny View design
Position
Designation
A
Tabletop stand
B
Display
C
Grid connection
D
SDHC card slot
The display is used for operation and displays.
The Sunny View communicates with inverters and the SMA CT Meter (for Japan only) via Bluetooth.
The Sunny View saves plant data in its internal memory. If an SDHC card is available, save the plant
data on the SDHC card.
10
SunnyView-BA-BEN121211
User Manual
SMA Solar Technology AG
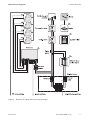
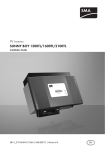
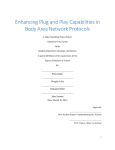
Figure 2:
User Manual
3 Product Description
Illustration of a plant with Sunny View (example)
SunnyView-BA-BEN121211
11
3 Product Description
SMA Solar Technology AG
3.2 Type Label
You can identify the Sunny View by the type label. The type label can be found on the rear of the
Sunny View. If the Sunny View is positioned on the tabletop stand, you must remove it from the
tabletop stand to see the type label.
The information on the type label is intended to help you use the Sunny View safely and receive better
customer support from the SMA Service Line. The type label must be permanently affixed to the
Sunny View. You can read out the following information from the type label:
• Type designation
• Serial number
• WLAN MAC address
• Operating temperature
12
SunnyView-BA-BEN121211
User Manual
SMA Solar Technology AG
4
4 Operation
Operation
4.1 Menu Structure
The menu consists of several menu items. Using the menu items, you can control the slides displayed
and configure the Sunny View settings.
You can call up the menu using
Home
Charts
Events
Settings
General
.
Display
Sounds
Information
Date & time
International
Slide show
Wireless
Slide duration
PV visualization
Online Data
Bluetooth
Wi-Fi networks
PV plant
Service
User Manual
New search
Brightness
Display activity
Scaling of day charts
Error alert
Key clicks
Serial number
Firmware version
Hardware
Bluetooth version
WLAN Mac ID
Automatic
24-hour format
Time zone
Date
Time
Language
Country
Newsfeed
Facebook
Twitter
Weather
Connection quality
NetID
Refresh after
Refresh after
Other networks
Plant search
Device search
Information
Plant password
Update
Factory settings
SunnyView-BA-BEN121211
13
4 Operation
SMA Solar Technology AG
Back-up file
Generate back-up file
Restore back-up file
4.2 Operating the Sunny View
Touch the display with your finger or the supplied touch-screen stylus pen to navigate the Sunny View
and to enter information.
Sharp or pointed objects can damage the display.
• Use your finger or the touch-screen stylus pen to control the Sunny View.
Symbol
14
Name
Description
Button
To activate a button, simply tap it once.
Menu
Tap this button to access the menu.
Back
Tap this button to go back to the previous menu.
Text box
To enter numbers or text, tap the text box. A keyboard
will appear on the display.
Drop-down list
Simply tap drop-down lists once to open up lists.
List
Lists are marked by a bar on the right-hand side of the
display. You can scroll through lists by sliding your finger
up or down to any position on the display.
Option
To enable an option, simply tap it. Enabled options are
coloured. Only one option may be enabled at any one
time.
Checkbox
You can enable or disable a checkbox by tapping it.
Enabled checkboxes are coloured.
Slider
You can move the slider by dragging your finger to the
left or right.
Info symbol
Press this symbol to display additional information.
SunnyView-BA-BEN121211
User Manual
SMA Solar Technology AG
5
5 "Home" Menu Item
"Home" Menu Item
5.1 Layout of the "Home" Slides
The slides in the "Home" menu item display the status of the plant and the plant data. If there is a
connection to the Internet, the "Home" slides display online data from the Internet. The slides in the
slide-show automatically change after a preset display time (see Section 8.21). You can manually
scroll through the "Home" slides by dragging your finger from the left or right.
You can call up the "Home" slides using
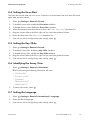
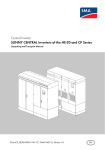
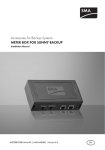
Figure 3:
Layout of the "Home" slides
Position
Designation
A
Header
B
Plant data
C
Online Data
User Manual
> Home.
SunnyView-BA-BEN121211
15
5 "Home" Menu Item
SMA Solar Technology AG
5.2 Header layout
The header of the "Home" slides is located in the top section of the display.
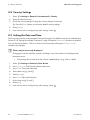
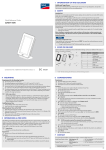
Figure 4:
Header layout
Position
Designation
Description
A
Name
Name of the slide
B
Date and time
Current date and time
C
WLAN
Quality of the WLAN connection
D
Bluetooth signal
strength
Quality of the Bluetooth connection
E
Menu
Tap this button to access the menu.
F
Event symbol
If there is an unread event, the symbol for the relevant
event is displayed (see Section 7 ""Events" Menu
Item", page 22). If there are several unread events, the
symbol for the most serious event is displayed. Tip: tap the
symbol to access the "Events" view.
5.3 Plant Data
Plant data is divided into multiple slides. You can scroll through the slides to the left or right. The slides
change automatically after a preset time. You can change the preset time (see Section
8.21 "Changing the Duration of the Slide Show", page 33).
You can enable or disable the slides under settings (see Section 8.22 "Selecting PV
Visualisation", page 33). If an SMA CT Meter is connected, additional slides will be available with
information on household power consumption.
16
SunnyView-BA-BEN121211
User Manual
SMA Solar Technology AG
5 "Home" Menu Item
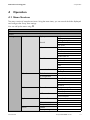
5.3.1 Slides without SMA CT Meter
Designation
Description
Overview
This slide provides an overview of the entire yield of your plant.
Power and energy
This slide shows the current power, the daily power and the total
energy yield of the plant.
Power chart
This chart shows the daily power of the plant.
Yield estimate
This slide shows the total and daily remuneration for grid feed-in.
CO2 avoidance
This slide shows the daily and overall amount of CO2 saved.
Kilometres/miles saved
This slide shows the daily and overall amount of kilometres/miles
saved.
Errors and warnings
This slide appears automatically when an error or warning occurs.
An alarm only sounds when an error event occurs and the inverter
stops feeding power to the grid (see Section 8.4 "Setting the Error
Alert", page 25).
Press the [Close] button to acknowledge the event. Press the
[Details] button to access the event list (see Section 7). If not
acknowledged, the alarm will sound again after a preset interval.
Weather
If meteorological data is available from the Internet, this slide
shows the following meteorological data for the preset location:
• Current weather
• Forecast for the next 3 days
User Manual
SunnyView-BA-BEN121211
17
5 "Home" Menu Item
SMA Solar Technology AG
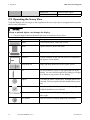
5.3.2 Slide with SMA CT Meter
Designation
Description
Overview
This slide provides an overview of the entire yield of your plant.
Current power overview
This slide shows the current power of the plant, the energy
currently being used, the grid feed-in and the purchased
electricity.
Power chart
This chart shows the purchased electricity (grey) as well as the
grid feed-in (blue) and the level of self-consumption (green) from
the plant yield (for the meanings of the colours see
Section 6 ""Charts" Menu Item", page 20).
Today's energy overview
This slide provides you with an overview of the purchased
electricity (grey) as well as the amount of daily power (blue) and
self-consumption (green) from the plant's daily yield.
Yield estimate
This slide shows the total and daily remuneration for grid feed-in.
To calculate the remuneration, you must enter the feed-in tariff and
the invoice amount in kWh (see Section 8.22 "Selecting PV
Visualisation", page 33). By specifying the invoice amount, you
can view the purchased electricity costs. The amount may differ
from that invoiced by your electric utility company.
Maximum daily consumption
This slide shows the current rate of daily consumption in relation
to target consumption rate. You can set the target consumption
rate (see Section 8.22).
CO2 avoidance
This slide shows the daily and overall amount of CO2 saved.
Kilometres/miles saved
This slide shows the daily and overall amount of kilometres/miles
saved.
Errors and warnings
This slide appears automatically when an error or warning occurs.
An alarm only sounds when an error event occurs and the inverter
stops feeding power to the grid (see Section 8.4 "Setting the Error
Alert", page 25).
Press the [Close] button to acknowledge the event. Press the
[Details] button to access the event list (see Section 7). If not
acknowledged, the alarm will sound again after a preset interval.
Weather
If meteorological data is available from the Internet, this slide
shows the following meteorological data for the preset location:
• Current weather
• Forecast for the next 3 days
18
SunnyView-BA-BEN121211
User Manual
SMA Solar Technology AG
5 "Home" Menu Item
5.4 Online Data
Requirement for displaying online data:
☐ An Internet connection must be established (see Section 8.18 "Setting Up a WLAN
Connection", page 32).
The online data changes after a set interval. You can scroll through the data to the left or right. By
tapping the online data you can zoom to a full-screen view. Tap the [Close] button to minimise the
view.
The following types of online data are available:
• Facebook
• Twitter
• Newsfeed
The Sunny View only displays the last 10 messages if these are less than 7 days old. Control elements
within the messages (e.g. hyperlinks) do not work. The displays can be enabled or disabled
individually (see Section 8.20 "Configuring Online Data", page 33).
You cannot send data via the Internet using the Sunny View.
User Manual
SunnyView-BA-BEN121211
19
6 "Charts" Menu Item
6
SMA Solar Technology AG
"Charts" Menu Item
The "Charts" menu item presents the yield of the entire plant or an individual inverter depending on
the selected time period.
For Japan only: if the SMA CT Meter is connected via Bluetooth, the Sunny View will also show the
self-consumption and the purchased electricity.
You can call up the "Charts" menu item using
> Charts > My plant.
You can scroll through the daily, monthly and annual charts by dragging your finger from the left or
right.
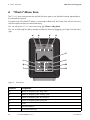
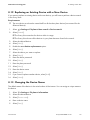
Figure 5:
Chart layout
Position
Designation
A
Button for displaying the daily yield
B
Button for displaying the monthly yield
C
Button for displaying the annual yield
D
Button for displaying the total yield
E
Chart
F
Self-consumption*
G
Purchased electricity*
20
SunnyView-BA-BEN121211
User Manual
SMA Solar Technology AG
Position
Designation
H
Daily, monthly, annual or total consumption*
J
Rate of self-consumption*
K
Grid feed-in*
L
Daily, monthly, annual or total yield**
6 "Charts" Menu Item
* Requires the SMA CT Meter
** If not connected to the SMA CT Meter, the Sunny View will also show the current power in the daily chart.
Meaning of chart colours when SMA CT Meter is connected:
Colour
Meaning
Blue
Grid feed-in
Green
Self-consumption of electricity generated by the plant
Grey
Purchased electricity
Blue+green
Plant yield
Green+grey
Household consumption
User Manual
SunnyView-BA-BEN121211
21
7 "Events" Menu Item
7
SMA Solar Technology AG
"Events" Menu Item
The "Events" menu item shows all error messages, warnings and information.
You can call up the "Events" menu item using
Figure 6:
> Events.
Layout of an event message
Position
Designation
A
Checkbox to display information
B
Checkbox to display warnings
C
Checkbox to display errors
D
Buttons for selecting the time period
E
List of events
22
SunnyView-BA-BEN121211
User Manual
SMA Solar Technology AG
7 "Events" Menu Item
Types of event:
Sunny View displays symbols to indicate the 3 types of event.
Type of event
Description
Error
The inverter is not working properly and is not feeding power to the grid.
• Open the event details for more information.
• Contact your installer and inform him/her about the event message
and the serial number of the inverter in which the event occurred.
Warning
The inverter is not working properly, but is still feeding power to the grid.
The warning symbol is displayed if, for example, there is a frequent grid
overvoltage.
Information
Settings have been configured on the inverter (e.g. parameters have been
changed).
Symbols and meaning of event types
• Incoming: the event is occurring.
• In progress: the event has existed for some time and could not yet be automatically remedied.
• Outgoing: the event does not exist any longer.
Symbol
Designation
Error in progress
Incoming error
Outgoing error
Warning in progress
Incoming warning
Outgoing warning
Information in progress
Incoming information
Outgoing information
User Manual
SunnyView-BA-BEN121211
23
8 "Settings" Menu Item
8
SMA Solar Technology AG
"Settings" Menu Item
8.1 Adjusting the Brightness
The display may be too bright or too dark depending on lighting conditions. If this is the case, you
can adjust the brightness of the Sunny View.
1. Select
> Settings > General > Display.
2. Drag the brightness slider to the right or left to adjust the brightness to the preferred level.
8.2 Disabling the Display
You can disable the display or configure the settings in such way that it automatically disables after
a preset time. When disabled, the display is switched off. This means the Sunny View requires less
electricity.
1. Select
> Settings > General > Display.
2. Set the desired time period for disconnection.
3. If you would like to disconnect after a preset time:
• Enable the Off after option.
• Select the desired time in the appropriate drop-down list.
4. If you do not wish to configure any other settings, select
.
☑ After the preset time, the display will be disabled.
5. Simply touch the display to re-enable it.
8.3 Setting the Scaling of the Daily Chart
You can choose between static or dynamic scaling for the daily chart. If static scaling is selected, the
chart can be scaled to a set maximum threshold (e.g. the maximum power of your plant). With
dynamic scaling, the maximum thresholds of the measured values are used as the basis for scaling.
1. Select
> Settings > General > Display.
2. If you prefer static scaling for the daily chart:
• Enable the Static option.
• Enter the power of your plant in the appropriate text box.
Tip: You can reset the scaling to match the maximum power of your plant's inverter by pressing
the [Reset to plant power] button. This value can deviate from the actual maximum power of
your plant.
3. If you prefer dynamic scaling for the daily chart, enable the Dynamic option.
4. If you do not wish to configure any other settings, select
24
SunnyView-BA-BEN121211
.
User Manual
SMA Solar Technology AG
8 "Settings" Menu Item
8.4 Setting the Error Alert
The error alert sounds when an error occurs. If the error is not eliminated, the error alert will sound
again after a preset interval.
1. Select
> Settings > General > Sounds.
2. To enable the error alert, enable the Error alert checkbox.
3. To disable the error alert, disable the Error alert checkbox.
4. Select the repetition interval for the error alert in the "Alarm tones every" drop-down list.
5. Drag the volume slider to the left or right until you reach the preferred volume.
6. Select the alarm tone in the "Alarm tone" drop-down list.
7. If you do not wish to configure any other settings, select
.
8.5 Setting the Key Clicks
1. Select
> Settings > General > Sounds.
2. To enable the key clicks, enable the Key clicks checkbox.
3. To disable the key clicks, disable the Key clicks checkbox.
4. Drag the volume slider to the left or right until you reach the preferred volume.
5. If you do not wish to configure any other settings, select
.
8.6 Identifying the Sunny View
1. Select
> Settings > General > Information.
☑ A list containing the following information will open:
– "Serial number"
– "Firmware version"
– "Hardware"
– "Bluetooth version"
– "WLAN Mac ID"
2. To return to the menu, select
.
8.7 Setting the Language
1. Select
> Settings > General > International > Language.
2. Select the desired language.
3. If you do not wish to configure any other settings, select
User Manual
.
SunnyView-BA-BEN121211
25
8 "Settings" Menu Item
SMA Solar Technology AG
8.8 Country Settings
1. Select
> Settings > General > International > Country.
2. Select the desired country.
3. Check the country settings. Change the country settings if necessary.
Tip: Press the [Reset] button to restore the default country settings.
4. Select [Next].
5. If you do not wish to configure any other settings, select
.
8.9 Setting the Date and Time
The Sunny View can be set for automatic time synchronisation if a WLAN connection is available (see
Section 8.18 "Setting Up a WLAN Connection", page 32) and the "Automatic" checkbox is enabled.
You can choose between a 12-hour or 24-hour time format by selecting the "24-hour format"
checkbox accordingly.
Charts may be incorrectly displayed
Changing the set time while the inverter is feeding in can cause charts to be displayed with
permanent errors.
• Only change the set time when the inverter is not feeding in (e.g. when it is dark).
1. Select
> Settings > General > Date & time.
2. In the "Time zone" field select the desired time zone.
3. In the "Date" field, select the date.
4. Set the date using [+] and [-].
5. Select [Accept].
6. In the "Time" field, select the time.
7. Set the time using [+] and [-].
8. Select [Set].
9. If you do not wish to configure any other settings, select
26
SunnyView-BA-BEN121211
.
User Manual
SMA Solar Technology AG
8 "Settings" Menu Item
8.10 Searching for a New Plant
If you want the Sunny View to monitor a different plant, you can search for a new plant.
Requirements:
☐ The plant may have a maximum of 12 inverters.
1. Select
> Settings > PV plant > New search > Plant search.
2. Select [Search].
Settings and CSV files
All Sunny View settings are saved. If an SDHC card is inserted, it will also contain the CSV
files of the previous plant.
☑ The Sunny View searches for plants within its range.
☑ The Sunny View shows all plants found in the search with their NetIDs.
3. Select the desired plant.
4. Select [Next].
Possible restart of Sunny View
If the Sunny View was previously connected to another plant, it will restart itself.
5. Enter the plant password.
6. Select [Next].
7. If you want to use the 24-hour format for the time display, enable the 24-hour format
checkbox.
8. Set the time zone, date format and time.
9. Select [Next].
10. Select the desired slides for the plant.
11. Select [Next].
User Manual
SunnyView-BA-BEN121211
27
8 "Settings" Menu Item
SMA Solar Technology AG
8.11 Adding a New Device
If you are commissioning a new device and the Sunny View does not automatically add the device
to the plant, you need to carry out a device search.
Requirements:
☐ The plant may have a maximum of 12 inverters.
☐ The new device must have the same NetID as all the other plant devices (see manual for the
Bluetooth device).
1. Select
> Settings > PV plant > New search > Device search.
☑ The Sunny View lists the new devices.
2. Select the desired device.
3. Select [Next].
4. Enable the as a device replacement option.
5. Select [Next].
6. Enter the password for the new device.
Default password on delivery
The default password on delivery is 0000.
☑ The Sunny View connects with the new device and transfers the existing plant password to
the new device.
7. Select [Next].
8. Enter the device name.
9. Select [Next].
10. If you want to add another device, select [Add] and proceed to Item 2.
11. Select [Home].
28
SunnyView-BA-BEN121211
User Manual
SMA Solar Technology AG
8 "Settings" Menu Item
8.12 Replacing an Existing Device with a New Device
If you want to replace an existing device with a new device, you will have to perform a device search
in the Sunny View.
Requirements:
☐ The new device must have the same NetID as all the other plant devices (see manual for the
Bluetooth device).
1. Select
> Settings > PV plant > New search > Device search.
2. Select [Search].
☑ The Sunny View searches for devices within its range.
☑ The Sunny View shows all the devices in your plant that were found in the search.
3. Select the desired device.
4. Select [Next].
5. Enable the as a device replacement option.
6. Select [Next].
7. Select the device you want to replace.
8. Select [Next].
9. Enter the device password.
10. Select [Next].
11. Enter the plant password.
12. Select [Next].
13. Enter the device name.
14. Select [Next].
15. If you want to replace another device, select [Add].
16. Select [Home].
8.13 Changing the Device Name
The default name of the device is the serial number of the inverter. You can assign a unique name to
the device.
1. Select
> Settings > PV plant > Information.
2. Select the desired device.
3. Select [Device name].
4. Enter a device name.
5. Select [Save].
User Manual
SunnyView-BA-BEN121211
29
8 "Settings" Menu Item
SMA Solar Technology AG
8.14 Changing the Plant Password
The plant password is used for all devices in the plant to prevent unauthorised access. The plant
password can have a maximum of 12 characters. The password may contain the following
characters: A … Z, a … z, 0 … 9, ? , _ , ! and - .
1. Select
> Settings > PV plant > Plant password.
2. Enter a new password in the "Set password" and "Confirm password" text boxes.
3. Select [Save].
8.15 What to Do in Case of Lost Plant Password
If you have forgotten the plant password, contact the SMA Service Line. You will be given a personal
unlocking key (PUK) for each device which can then be used to unblock the device. After you enter
the PUK, the password for each device must be changed to a shared plant password (see Section
8.16).
If you are not the plant owner, you must communicate the new plant password to the plant owner.
8.16 Changing the Device Password
The device password can have a maximum of 12 characters. The password may contain the following
characters: A … Z, a … z, 0 … 9, ? , _ , ! and - .
1. Select
> Settings > PV plant > Information.
2. Select the desired device.
3. Select [Device password].
4. Enter a new password in the "Set password" and "Confirm password" text boxes.
5. Select [Save].
30
SunnyView-BA-BEN121211
User Manual
SMA Solar Technology AG
8 "Settings" Menu Item
8.17 Displaying Connected Devices
1. Select
> Settings > PV plant > Information.
☑ The Sunny View displays a list of connected devices with the following symbols:
Symbol
Status
Meaning
Neutral
The status of the device is currently being
updated.
OK
The device is operational and working
properly.
Warning
The device is not working properly, but can
still feed power to the grid.
Error
The device is not working properly and
does not feed power to the grid.
Communication error
Unable to communicate with the device at
the moment. Possible causes include the
overnight shutdown setting for the inverter.
Lock
A password other than the plant password
has been entered for the device. Unable to
access the device.
2. Select the desired device.
☑ Sunny View displays the type, serial number and software version of the device.
User Manual
SunnyView-BA-BEN121211
31
8 "Settings" Menu Item
SMA Solar Technology AG
8.18 Setting Up a WLAN Connection
The WLAN router is used to establish a wireless connection to the Internet. You can define the interval
in which the Sunny View updates online data. The WLAN connection is disabled by default.
Router requirements:
☐ The router must support DHCP and DHCP must be enabled for the router.
☐ The router must support the transmission standard IEEE 802.11b or IEEE 802.11g.
1. Select
> Settings > Wireless.
2. Enable the Wi-Fi networks checkbox.
3. If the desired network is not displayed, search for the network:
• Select [Other networks].
• In the "Name" field, enter the name of the network.
• In the "Security" field, select the desired encryption method.
• Select [Accept].
4. If the network is password-protected, enter the password in the text box.
5. Using the drop-down list "Refresh after", set how often the Sunny View online data is updated
from the Internet.
6. If you do not wish to configure any other settings, select
.
8.19 Checking and Setting Up a Bluetooth Connection
The connection to your plant is established via Bluetooth. You can check the quality of your Bluetooth
connection and the NetID, and set how often the Sunny View plant data is updated.
1. Select
> Settings > Wireless.
☑ The quality of the Bluetooth connection and the NetID is displayed.
2. Using the drop-down list "Refresh after", set how often the Sunny View plant data is updated.
3. If you do not wish to configure any other settings, select
32
SunnyView-BA-BEN121211
.
User Manual
SMA Solar Technology AG
8 "Settings" Menu Item
8.20 Configuring Online Data
1. Select
> Settings > Slide show > Online data.
2. If you want a newsfeed:
• Enable the Newsfeed checkbox.
• Type the Internet address of the RSS or Atom feed in the "URL" text box.
3. If you want to connect to Facebook:
• Enable the Facebook checkbox.
• Enter the e-mail address and password of the Facebook account in the "E-mail" and
"Password" text boxes.
• Select [Sign in].
4. If you want to connect to Twitter:
• Enable the Twitter checkbox.
• Enter the user name/e-mail address and password of the Twitter account in the
"User name or e-mail" and "Password" text boxes.
• Select [Sign in].
5. If you want to display the weather:
• Enable the Weather checkbox.
• Enter the city or postcode in the "City/postcode" text box.
6. If you do not wish to configure any other settings, select
.
8.21 Changing the Duration of the Slide Show
The slides in the slide show change after a preset display time.
1. Select
> Settings > Slide show.
2. Select the desired display time in the "Slide duration" drop-down list.
3. If you do not wish to configure any other settings, select
.
8.22 Selecting PV Visualisation
Sunny View only shows the slide show with slides that you have selected. For some slides you will
need to specify additional information using the text boxes, checkboxes and sliders. Tap the Info
symbol for more information. You will find an overview of the slides in the "Plant data" section
(see Section 5.3).
1. Select
> Settings > Slide show > PV visualization.
☑ A list of all slides will open.
2. Select and enable the slides you want to display.
3. If you do not wish to configure any other settings, select
User Manual
.
SunnyView-BA-BEN121211
33
8 "Settings" Menu Item
SMA Solar Technology AG
8.23 Activating Demo Mode
The demo mode simulates the process of operating a plant. It can therefore be used to demonstrate
how the Sunny View operates. The Sunny View simulates a plant with a capacity of 4.5 kWp. If the
country setting is set to Japan, the Sunny View will also simulate an SMA CT Meter.
Activating demo mode after commissioning
Requirements:
☐ The Sunny View must not be connected to a plant.
1. Select
> Settings > PV plant > New search > Plant search.
2. Select [Demo mode].
3. If you do not wish to configure any other settings, select
34
SunnyView-BA-BEN121211
.
User Manual
SMA Solar Technology AG
9
9 Maintenance and Care
Maintenance and Care
9.1 Safe removal of the SDHC card
Always remove the SDHC card according to the following procedure.
Damage to the SDHC card
If the SDHC card is removed while data is being written to it, it may be damaged and data may be
lost.
• Safely remove the SDHC card.
1. Call up the menu using
.
2. In the lower section of the menu, select Safely remove the SDHC card.
☑ The message "The SDHC card can now be removed." appears.
3. Remove the SDHC card.
9.2 Performing an Update
Perform an update so that the Sunny View can download the latest data. When the Sunny View is
updated, all plant data and display settings will be saved.
Necessary equipment:
☐ Computer with Internet connection and an SDHC card slot.
☐ SDHC card
1. If you have not previously carried out an update using the SDHC card, you must connect the
SDHC card to the computer and create a folder labelled UPDATE on the SDHC card.
2. Download the update file in the download section of www.SMA.de/en and save it on the
SDHC card in the "UPDATE" folder.
3. Remove the SDHC card from the computer.
4. Insert the SDHC card into the slot on the Sunny View.
5. Select
> Settings > Service > Update.
☑ The following message appears: "New update file found on the SDHC card. Do you wish to
start the update?"
✖ If the message is not shown:
The SDHC card does not contain an update file. The update file or SDHC card is defective.
• Perform update again.
• If the update fails after several attempts, contact the SMA Service Line.
User Manual
SunnyView-BA-BEN121211
35
9 Maintenance and Care
SMA Solar Technology AG
6. Select [Start update].
☑ The update procedure starts. The Sunny View displays the message "Update successful!" and
restarts.
✖ "Update failed!" message appears on the display.
The update file or SDHC card is defective.
• Perform update again.
• If the update fails after several attempts, contact the SMA Service Line.
Damage of the Sunny View due to disconnection from the electricity supply
Disconnecting the Sunny View from the electricity supply during the update procedure or when
restarting may cause damage to the Sunny View.
• Do not remove the plug-in power supply from the socket during the update procedure or
when restarting.
9.3 Restoring Default Settings
If you wish to restore the default settings of the Sunny View, note that all plant data and display
settings will be deleted. The saved plant data and CSV files will remain on the SDHC card.
Restoring the default settings can take several minutes.
1. Select
> Settings > Service > Factory settings.
☑ The following message appears: "After a reset to factory settings, your plant data and settings
are deleted."
2. Select [Reset].
9.4 Generating a Back-up File
When you generate a back-up file, the Sunny View will save all plant data and settings to your SDHC
card. A back-up file will allow you to restore all your data when you replace the Sunny View or reset
the device to the default settings.
You can generate back-up files automatically or manually. In automatic mode the Sunny View will
automatically generate a back-up file at regular intervals.
Requirements:
☐ An SDHC card must be inserted in the slot.
1. Select
> Settings > Service > Back-up file > Generate back-up file.
2. If you prefer automatically generated back-up files:
• Enable the Automatic option.
• Select the desired interval from the drop-down list.
3. If you would like to generate a back-up file manually, enable the Manual option.
36
SunnyView-BA-BEN121211
User Manual
SMA Solar Technology AG
9 Maintenance and Care
4. Select [Next].
☑ The following message appears: "Back-up file was generated successfully!"
☑ The following message appears: "Please insert an SDHC card with at least xx MB free
space."
The SDHC card does not have enough memory available or is not inserted into the device.
• Insert a SDHC card with enough memory.
• Select [Repeat].
User Manual
SunnyView-BA-BEN121211
37
9 Maintenance and Care
SMA Solar Technology AG
9.5 Restoring Sunny View Data from Back-up File
Overwriting plant data and settings
When you restore a back-up file, all plant data and display settings will be overwritten.
Requirements:
☐ An SDHC card containing the back-up file must be inserted in the slot.
1. Select
> Settings > Service > Back-up file >Restore from back-up file.
☑ The following message appears: "Do you want to restore the back-up file with all data and
settings on this Sunny View?"
2. Select [Restore].
☑ The following message appears: "The data and settings were successfully restored from the
back-up file!"
✖ The following message appears: "No back-up file found".
• Make sure an SDHC card with the back-up file is inserted into the device.
38
SunnyView-BA-BEN121211
User Manual
SMA Solar Technology AG
10 Decommissioning
10 Decommissioning
10.1 Decommissioning the Sunny View
• Remove the plug-in power supply from the Sunny View and the socket.
10.2 Disposing of the Sunny View
• Be sure to observe all applicable regulations when disposing of the Sunny View.
• To have SMA dispose of the Sunny View, send the Sunny View back to
SMA Solar Technology AG at your own cost, labelled "ZUR ENTSORGUNG"
("FOR DISPOSAL").
User Manual
SunnyView-BA-BEN121211
39
11 Troubleshooting
SMA Solar Technology AG
11 Troubleshooting
Problem
Cause
Sunny View does not list the
NetID of your plant.
In your plant, no device is within the radio range of the
Sunny View.
Corrective measures:
• Reduce the distance between the Sunny View and the plant
device.
Devices of your plant are not in operation.
Corrective measures:
• Commission the devices.
The NetID 0 (Bluetooth off) is set for the devices.
Corrective measures:
• Set the NetID of your plant for the devices.
Sunny View does not list all the Sunny View completed the plant search before all devices were
devices of your plant.
connected to one another. For plants with many devices, it may
take several minutes for all devices to be connected to one
another.
Corrective measures:
• Repeat plant search.
Not all devices are connected to one another. The wireless
connection of certain devices may be disturbed by ambient
conditions.
Corrective measures:
• Check the connection quality of the devices (see the
appropriate manual). The connection quality of all devices
must be at least "Good".
Not all devices are connected to one another. The NetID of your
plant may not be configured on certain devices.
Corrective measures:
• Make sure that the NetID of your plant is configured on the
devices.
40
SunnyView-BA-BEN121211
User Manual
SMA Solar Technology AG
Problem
11 Troubleshooting
Cause
Inverters with retrofitted SMA Bluetooth Piggy-Back (if applicable)
shut down overnight. Therefore, the Sunny View cannot establish
a connection to these inverters at night.
Corrective measures:
• As soon as the inverters switch on in the morning, the
Sunny View is able to establish a connection to them.
The Sunny View lists your
inverters as well as other
inverters from other plants.
A different Bluetooth plant within the radio range of the
Sunny View uses the same NetID as your Bluetooth plant.
Corrective measures:
• Determine a free NetID for your plant and configure it on all
devices.
The Sunny View is not
connecting with the Bluetooth
devices.
A different NetID is configured for the Sunny View than for the
other Bluetooth devices.
Corrective measures:
• Make sure that the NetID configured on the Sunny View is
the same as on the other Bluetooth devices.
There are too many masters in the Bluetooth plant
(e.g. Sunny Beam, Sunny WebBox with Bluetooth).
Corrective measures:
• For plants with up to 2 inverters, a maximum of 2 masters
can be used.
• For plants with 3 or more inverters, a maximum of 4 masters
can be used.
Bluetooth connection quality of The Sunny View is too far away from your plant or there is
the Sunny View is worse than
interference with the wireless connection. Disturbances can be
"Good".
caused by, for example, walls or ceilings that shield the wireless
signal too effectively.
Corrective measures:
• Place the Sunny View closer to a device of your plant.
Instead of the plug-in power supply provided, you are using a
plug-in power supply that is not suitable for the Sunny View.
Corrective measures:
• Only use the plug-in power supply provided.
User Manual
SunnyView-BA-BEN121211
41
11 Troubleshooting
Problem
SMA Solar Technology AG
Cause
An alarm sound can be heard. An error has occurred in an inverter.
Corrective measures:
• Call up the error details.
• Contact your installer and inform him/her about the event
message and the serial number of the inverter in which the
event occurred.
Tip: If you no longer wish to be notified of errors, you can
switch off the alarm sound (see Section 8.4 "Setting the
Error Alert", page 25).
Alarm does not sound when an The alarm sound is disabled or the volume is too low.
error occurs.
Corrective measures:
• Set the alarm sound (see Section 8.4).
Instead of the plug-in power supply provided, you are using a
plug-in power supply that is not suitable for the Sunny View.
Corrective measures:
• Only use the plug-in power supply provided.
The display does not switch on. Corrective measures:
• Check the grid connection.
Instead of the plug-in power supply provided, you are using a
plug-in power supply that is not suitable for the Sunny View.
Corrective measures:
• Only use the plug-in power supply provided.
42
SunnyView-BA-BEN121211
User Manual
SMA Solar Technology AG
Problem
11 Troubleshooting
Cause
None or only some of the online WLAN connection is not enabled.
data is displayed.
Corrective measures:
• Make sure the router is switched on.
• Make sure the router supports DHCP.
• Make sure DHCP is enabled for the router.
• Check the WLAN connection (see Section 8.18) and your
access data (see Section 8.16).
WLAN connection is too weak. The wireless connection may be
disturbed by ambient conditions.
Corrective measures:
• Check the quality of the WLAN connection on the
Sunny View. Place the Sunny View closer to the router, if
necessary.
Online data is not enabled.
Corrective measures:
• Make sure that online data is configured properly
(see Section 8.20).
Instead of the plug-in power supply provided, you are using a
plug-in power supply that is not suitable for the Sunny View.
Corrective measures:
• Only use the plug-in power supply provided.
Consumption data is not
properly displayed or not
displayed at all (only valid in
Japan for plants with the
SMA CT Meter).
SMA CT Meter is not connected properly or the Bluetooth
connection is too weak.
Corrective measures:
• Reduce the distance between the Sunny View and the
SMA CT Meter.
• Make sure the SMA CT Meter is installed properly
(see installation manual of the SMA CT Meter).
Charts are displayed with gaps After the Sunny View was commissioned, the time in the
or pointed forms.
Sunny View was set forwards or backwards.
This action only affects the chart display, not the calculated
energy values.
User Manual
SunnyView-BA-BEN121211
43
11 Troubleshooting
SMA Solar Technology AG
Problem
Cause
The "Home" slides do not
change.
Only one slide is enabled.
Corrective measures:
• Select other slides for display (see Section 8.22 "Selecting
PV Visualisation", page 33).
Unable to activate demo mode. Demo mode is only available when the Sunny View is not
connected to a plant.
Corrective measures:
• Restore the default settings (see Section 9.3).
IMPORTANT: If you restore the default settings of the
Sunny View, all plant data and display settings will be
deleted.
44
SunnyView-BA-BEN121211
User Manual
SMA Solar Technology AG
12 Technical data
12 Technical data
Mechanical dimensions
Width x height x depth without tabletop stand
Width x height x depth with tabletop stand
Weight without tabletop stand
Weight with tabletop stand
151.9 mm x 109 mm x 23.5 mm
151.9 mm x 109 mm x 25.5 mm
245 g
293 g
Voltage supply
Voltage supply
Input voltage
Typical power consumption
Plug-in power supply
90 V … 240 V AC, 50 Hz/60 Hz
3.75 W
Maximum power consumption
8W
Maximum current consumption
1.6 A
Ambient conditions
Ambient temperature
Humidity, non-condensing
Degree of protection*
Installation site
0°C … +40°C
5% … 95%
IP20
Indoors
* Degree of protection as required by DIN EN 60529
Communication
Inverter communication
Maximum number of devices: inverters
Maximum number of devices: SMA CT Meter
Maximum range in free-field conditions
User Manual
Bluetooth Wireless Technology Class 1
12
1
100 m
SunnyView-BA-BEN121211
45
12 Technical data
SMA Solar Technology AG
Features
Display
Resolution
Operation
Memory
Internal memory for plant data
SDHC card type
Minimum memory of the SDHC card
Recommended maximum memory of the
SDHC card
Minimum data volumes depending on
SDHC card memory
LCD display
480 px x 800 px
Touch screen
Ring buffer*
16 MB
MicroSD
512 MB
8 GB
Daily yields: 90 days
Monthly yields: 30 years
Events: 50
* Always contains the last 13 monthly files and 90 daily files.
46
SunnyView-BA-BEN121211
User Manual
SMA Solar Technology AG
13 Contact
13 Contact
If you encounter technical problems with our products, contact the SMA Service Line. We require the
following information in order to provide you with the necessary assistance:
• Hardware version of the Sunny View
• Firmware version of the Sunny View
• Hardware version and firmware version of the SMA CT Meter (if available)
• Firmware version of the SMA Bluetooth Piggy-Back in the inverter (if available)
• Type of inverter and serial number
SMA Solar Technology AG
Sonnenallee 1
34266 Niestetal, Germany
www.SMA.de
SMA Service Line
Inverters:
+49 561 9522 1499
Communication: +49 561 9522 2499
Fax:
+49 561 9522 4699
E‑Mail:
[email protected]
User Manual
SunnyView-BA-BEN121211
47
13 Contact
48
SMA Solar Technology AG
SunnyView-BA-BEN121211
User Manual
SMA Solar Technology AG
Legal Restrictions
The information contained in these documents is property of SMA Solar Technology AG. Any publication, whether in whole or in
part, requires prior written approval by SMA Solar Technology AG. Internal reproduction used solely for the purpose of product
evaluation or other proper use is allowed and does not require prior approval.
Declaration of Conformity
SMA Solar Technology AG hereby declares that this equipment is in compliance with the essential requirements and other relevant
provisions of Directive 1999/5/EC. You can find the entire CE declaration of conformity at www.SMA.de.SMA manufacturer
warranty
The current warranty regulations are included with your device. You can download the version on the Internet at www.SMA.de or
obtain a printed version from the regular distribution channels.
SMA Manufacturer Warranty
The current warranty regulations are included with your device. You can download the version on the Internet at www.SMA.de or
obtain a printed version from the regular distribution channels.
Online services, libraries, open source licences
When using this equipment you will also be using online services from other providers. These are listed in the section
"Online services". The use of these services is governed by the current terms of use of each of the providers listed in the section
"Online services". By using the online services you also declare your agreement with the regulations listed. The use of libraries and
software provided by 3rd parties is governed in the same way as that of online services.
Online services
This software is provided “as is” and any express or implied warranties and liability to correct errors are disclaimed. In no event
shall Supplier be liable for any direct, indirect, incidental or consequential damages or infringement of any Intellectual Property
Rights arising in any way out this software. Customer assumes all risk for the selection of this software, including risks to achieve
Customer's intended results and for the installation, use and results obtained from it. Furthermore, this software uses/may use
3rd party services. The 3rd party service is governed under separate terms & conditions which are available at
• Facebook Terms of Use: http://www.facebook.com/terms.php
• Facebook Platform Policies: http://developers.facebook.com/policy/
• Twitter Terms of Service: http://twitter.com/tos
• Twitter API Terms of use: https://dev.twitter.com/terms/api-terms
• Google Weather http://www.google.com
Customer accepts that these terms and conditions shall be applied to this software. Same applies for the use of the chosen
Newsfeed service.
Libraries
The Sunny View software uses the AChartEngine library licensed under ASL 2.0, the microlog4android library licensed under
Apache 2.0 and MIT, and the twitter4j-core-android library licensed under JSON.
Open source licences
Sunny View is based on the Android 2.6.35.3 kernel and the U-Boot 2009.08 version, which are licensed under the GPLv2 Open
Source Licence. A copy of the GPLv2 Licence is provided on the included CD. You can request the source code with modifications
from the SMA Service Line. Copyright notices are integrated into the source code.
In addition, the Sunny View uses the Apache Licence 2.0 with Android 2.2 (API level 8, revision 2). A copy of the Apache Licence
2.0 is provided on the included CD.
User Manual
SunnyView-BA-BEN121211
49
Legal Restrictions
SMA Solar Technology AG
Trademarks
All trademarks are recognised, even if not explicitly identified as such. A lack of identification does not mean that a product or
symbol is not trademarked.
The Bluetooth® word mark and logos are registered trademarks owned by Bluetooth SIG, Inc. and any use of these marks by
SMA Solar Technology AG is under licence.
SMA Solar Technology AG
Sonnenallee 1
34266 Niestetal
Germany
Tel. +49 561 9522-0
Fax +49 561 9522-100
www.SMA.de
E-mail: [email protected]
© 2004 to 2012 SMA Solar Technology AG. All rights reserved.
50
SunnyView-BA-BEN121211
User Manual
4."4PMBS5FDIOPMPHZ
XXX4."4PMBSDPN
4."4PMBS5FDIOPMPHZ"(
XXX4."EF
4.""NFSJDB--$
XXX4.""NFSJDBDPN
4."5FDIOPMPHZ"VTUSBMJB1UZ-UE
XXX4.""VTUSBMJBDPNBV
4."#FOFMVY413XXX4."#FOFMVYDPN
4."#FJKJOH$PNNFSDJBM$P-UE
XXX4."$IJOBDPN
4."$[FDI3FQVCMJDTSP
XXX4."$[FDIDPN
4."'SBODF4"4
XXX4."'SBODFDPN
4.")FMMBT"&
XXX4.")FMMBTDPN
4."*C©SJDB5FDOPMPHB4PMBS4-
XXX4."*CFSJDBDPN
4."*UBMJB4SM
XXX4."*UBMJBDPN
4."5FDIOPMPHZ,PSFB$P-UE
XXX4.",PSFBDPN