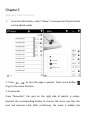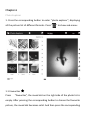
1
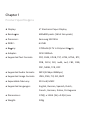
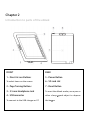
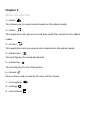
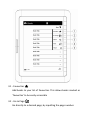
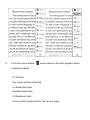
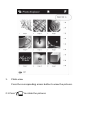
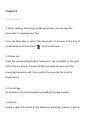
KGN<ϲs
USER MANUAL
Chapter 1
Product Specifications
Chapter 2
Button Instructions
Chapter 3
Menu Introduction
Chapter 4
eBook Library
Chapter 5
Music Player
Chapter 6
Picture Explorer
Chapter 7
My Bookmarks
Chapter 8
My Favourites
Chapter 9
Recent
Chapter 10
File Explorer
Chapter 11
Settings
Chapter 12
Inputting
Chapter 13
Charging
Chapter 14
USB connection
Chapter 15
Importing DRM Contents
Chapter 1
Product Specifica ons
● Display:
6” Electronic Paper Display
● Resolu on:
600x800 pixels (16 bit Greyscale)
● Processor:
Samsung S3C2416
● DDR2 :
64 MB
● Ba ery:
1700mAh/3.7V Li-Polymer Ba ery
● Adapter:
DC5V 800mA
● Supported Text Formats:
PDF, CHM, EPUB, TXT, HTM, HTML, RTF,
PDB, DJVU, DJV, iw44, iw4, FB2, OEB,
PRC, MOBI, TCR, OPF
● Supported Audio Formats:
MP3 (32kbps-384kbps)
● Supported Image Formats:
JPEG, PNG, TIF, GIF, BMP
● Expandable Memory:
SD Card/ MMC
● Supported Languages:
English, Russian, Spanish, Dutch,
French, German, Italian, Portuguese
● Dimensions:
178(L) x 128.4 (W) x 9.9(H) mm
● Weight:
228g
Chapter 2
Introduction to parts of the eBook
FRONT
REAR
1–Direct Access Buttons
5–Power Button
To select items on the screen
6–SD card slot
2–Page Turning But tons
7–Reset Button
3– 3.5 mm Headphone Jack
To reset the eBook reader, use a pen or
4–USB connector
other sharp- pped object to depress
To connect to the USB charger or PC
the bu on
Chapter 3
Menu Introduction
1 – Books
This allows you to access books loaded on the eBook reader
2 – Music
This application lets you access and play audio files stored on the eBook
reader
3 – Photos
This application lets you view photos loaded onto the eBook reader
4 – Bookmarks
This will display the saved bookmarks
5 – Favourites
This will display the list of favourites
6 – Recent
Recent items read or used by the user will be shown.
7 – File explorer
8 – Settings
9 – User Manual
Chapter 4
eBook Library
1.
Press the corresponding button of the category you wish to
choose
2. Operate the
3. Press menu button
buttons to turn pages
once submenu function appears
3.1 - Favourites
Add books to your list of favourites. This allows books marked as
‘favourites’ to be easily accessible
3.2 - Go to Page
Go directly to a desired page, by inputting the page number.
3.3 - Search
Find a book stored on the eBook reader by inpu ng a word or
phrase from its tle
3.4 – Music
Go to music playback interface to access and control the music
available on the eBook reader
3.5 – Return
Closes the drop down menu and returns to the book’s menu
4. Choose a book to read
4.1 Press
to turn the page
5.
Press the menu button
once submenu function appears when
reading an eBook
5.1 Refresh
The screen will be refreshed
5.2 Bookmark view
Displays bookmarks
5.3 Bookmark add
Press to add a bookmark for the current page.
5.4 Music
Press to go to the music player
5.5 Settings
Mark: if there is text passing the edges in PDF mode
5.5.1 Font
Select different Fonts: Microsoft Yahei, Arial, Courier, Times, ARIALN
5.5.2 Encode
If the encoding is incorrect
5.5.3 Margins
To set the margins
5.5.4 Line spacing
To set line spacing
5.5.5 Hyphenation
To make adjustments for sentence structure
5.5.6 Bold
To display text in bold
5.5.7 Italic
To display text in italic
5.5.8 Book information
Press to see information on the eBook currently opened
* Please note that features 5.5.1, 5.5.3 & 5.5.7 are not compatible
with ePub or PDF files.
5.6 Directory view
Press “Directory view” to go into this book’s directory, and select favourite
directory to read directly
5.7 Search
The search contents will be displayed. Press the corresponding bu on
of
to look up the previous or next key words
5.8 Page Jump
Allows you to move to the desired page by entering the page number
5.9
Rotate the text 90°
5.10 Zoom
To zoom in or zoom out
5.11 Return
Press
to close the drop down menu and return to the Books menu
Chapter 5
Selecting from music list
1. From the Main Menu, select “Music” to browse the Playlist stored
on the eBook reader
2. Press
to turn the page in playlist. Press menu button
to go to the menu function:
2.1 Favourites
Press “favourites”, the spot on the right side of playlist is empty.
Operate the corresponding button to choose the music you like, the
spot will become solid. After confirming, the music is added into
“favourites”. Enter “favourites” under the main menu; you can listen to
the saved music
2.2 Go to Page
Press “go to page” and enter the page you want to go and confirm. The
playlist will skip to the page.
2.3 Search
Press “search” and enter the key words of the music you want, then
press search.
2.4 Return
Press “Return” to return from sub-menu.
3
Operate the button of corresponding music to play music. Operate
the menu to adjust the music.
3.1 To skip to the next track or return to the previous track, press on
the “
” button, press”
3.2 Press “volume up”
” to the sub-menu.
/”volume down”
to adjust the
volume.
3.3 Press “mute”
to enter mute mode, press again to resume
the volume.
3.4 Press on the button “play mode” to change the music play mode.
There are 3 modes: Random
, Loop
and Repeat Once
.
3.5 Press “play/pause”
to play or pause current audio
playback.
3.6 Press “stop” to stop the current playing music.
3.7 Press “Return” to return back to the Music list.
Remarks: 1. The eBook reader only supports MP3 audio files.
2. The eBook reader allows you to listen to your favourite
MP3s while you are reading.
Chapter 6
Photo Explorer
1. Press the corresponding button to enter “photo explorer”, displaying
all the picture list of different formats. Press “
” to show sub-menu:
1.1 Favourites
Press
“favourites”, the round dot on the right side of the photo list is
empty. After pressing the corresponding button to choose the favourite
picture, the round dot becomes solid. And then press the corresponding
button to add the picture into “favourites”. You can find your favourite
pictures by entering “Favourites” under the main menu.
1.2 Go to Page
Go directly to the desired page by inputting the page number.
1.3 Search
Find a photo stored in the eBook; by inputting a word from its title.
1.4 Thumbnails
View Photos in Thumbnails.
1.5 Music
Go to music playback interface to access and control the music available
on the E-book.
1.6 Return
Close the drop-down menu and return to the Photo Explorer.
1.
Photo view
Press the corresponding access button to view the pictures.
2.1 Press “
”to rotate the pictures
1.2 Press “
“ to zoom in /out. A er zoom in/out, press the
corresponding bu on to move the picture up and down, le and
right.
1.3 Moving direc on key
Press
to move the picture up.
Press
to move the picture right.
Press
to move the picture le .
Press
to move the picture down .
2.4 Return
Press
to return to the last interface.
Chapter 7
My Bookmarks
Press “
” to show sub-menu
7.1 Delete
7.2 Go to page
many bookmarks in your e-book read.
7.3 Search
from it’s filename.
7.4 Music
Go to music playback interface to access and control the music available
on the E-book.
7.5 Return
Close the drop down menu and return to the previous interface
Chapter 8
My Favourites
1. When reading, listening or browsing pictures, you can use ‘My
Favourites’ to organise your files
From the Main Menu, select “My Favourites” to browse all the lists of
my favourites and then Press”
” for the sub-menu.
1.1 Move out
Press the corresponding button “move out”, the round dot on the right
of the files are empty. Choose the files you want to move out. The
round dot becomes solid. Press confirm to move the file into the
favourite list.
1.2 Go to Page
Go directly to the desired page, by inputting the page number.
1.3 Search
Find an audio file stored in the EBook by inputting a word or phrase
from its filename.
1.4 Music
Go to music playback interface to access and control the music available
on the eBook.
1.5 Return
Close the drop down menu and return to the my favourites
Chapter 9
Recent
1. Press the corresponding button “recent” to show all the latest read
book list. Press “menu” key
to show the submenu.
1.1 Moving files
To press the corresponding menu & choose the file to move out of the
favorite list;
1.2 Favourites
Choose the book you want to collect by press Favourites to add in the
list. When you instruct the main menu, you can read your favourites
directly from Favourites.
1.3 Go to page
To input the page number then press confirm to show the exact page
you want to see.
1.4 Search
Choose “Search” with input interface, input the key words for search
then click it, it will show the files searched.
1.5 Music
Choose “music” to work with music mode quickly, click return to
withdraw the submenu
1.6 Return
Click “return” to return back from the submenu.
Chapter 10
File explorer
1. Press the corresponding direct access button to enter “file explorer”
to view all the files in SD card. Press “menu”
drop-down menu has the following options:
1.1 Cut
in SD card, the
Press the corresponding access bu on “cut”, the round dots on the
right of the list are empty. Choose the file which you want to cut by
pressing the corresponding bu on, then the chosen round dot becomes
solid
. Press confirm to choose the file you want to put in the cut file
and press “menu”
to paste. Then the chosen file will be cut into
this file.
1.2 Copy
Press the corresponding access bu on “copy”, the round dot on the
right side of the list is empty, choose the file you want to copy by
pressing the corresponding bu on, the round dot becomes solid, press
confirm and press “menu”
to paste. Then the chosen file will be
copied into this folder.
1.3 Delete
Press “delete”, the round dot on the right of the list is empty. Choose
the file you want to delete by pressing the corresponding bu on, the
bu on becomes solid. Press confirm to delete the chosen files.
1.4 Paste
Choose the files you want to cut or copy and paste into the folder.
1.5 Favourites
Press “Favourites”, the round dot on the right of the list is empty,
choose the favourite files by corresponding button, then the round dot
becomes solid
. Press confirm to save the files.
1.6 Go to page
Press “go to page”, popup the inputting box, enter the page you want
and confirm to show the page you want;
1.7 New folder
Press “New folder” to jump to the interface of inputting, enter the file
name and confirm, the list will show the new folder name;
1.8 Search
Press “search”, popup the inputting interface, enter the key word of the
file and press “search”, the popup window shows the list of searched
files;
1.9 Music
Press “music” to enter the music player instantly;
1.10 Return
Press “Return” to return back from sub-menu.
Choose the file to move then press confirm. To Copy or Paste the file &
put the files to the file you want to save.
1.2 Delete
Select “Delete” from the drop down menu to delete files or folders
stored on the SD Card.
Select files or folders in the selection menu to be deleted. Press the
“Done ” button to confirm files or folders to be deleted.
*Files deleted are non-recoverable.
1.3 Favourites
Choose the file with a filled circle
to save it under collection menu.
Books & music undergoing can be collected.
1.4 Go to Page
To input the page# then press confirm to show the exact page you want
to see.
1.5 New Folder
You can create new folders to organize your files better.
Select “Menu”
in the Directory you want to create the new folder
in. Press on “New Folder” on the Drop down Menu to create the folder.
1.6 Search
Choose “Search” with input interface, input the key words for search
then click it, it will show the files searched.
1.7 Music
Choose “music” to work with music mode quickly, click return to
withdraw the submenu.
1.8 Return
Press Return to get back to last menu bar
Chapter 11
System Settings
The ‘Settings’ sub-menu will list:
Device Setting, Auto Shutdown Settings, About Product and Restore
Factory Settings.
1. Device settings
1.1 Press “Device Name” Select Device Name to personalize the
eBook name. A text input menu will appear to allow you to input the
text.
1.2 Press “Language”, then press on the corresponding Direct Access
Button for multiple languages set;
2. Auto Shutdown Settings
2.1 Press “Auto Shutdown Settings”, there are 10 minutes for you to
make your choice, eBook to shut down automatically after it idles for a
preset duration;
(default 10 minutes to shut down itself automatically)
3. About Product
3.1 This page provides information of the eBook including its software
version and its customer
4. Restore Factory Settings
4.1 Using the buttons located on the left side of the screen to confirm
the restoration. Press on the button indicating “Return
” to exit the
restoration. Press on the “Confirm ” to validate the restoration. The
eBook will be restored to its original factory settings
Chapter 12
Input methods
TEBR-700 eBook reader offer 5 kinds of input methods ,:“Pinyin”、
“abc”、“ABC”、“123”“Russian”
1.Pinyin
1.1 Input Pinyin:Press
to toggle Pinyin input method,
repeated pressing the right corresponding Direct Access Button will
get all desired Pinyin alphabet, when pressing Direct Access Button,the
Pinyin alphabet on the display keep changing, After inputting the last
Pinyin alphabet,we can ignore the other Pinyin alphabets left on the
display
1.2 Delete:press
Press
can delete the left character of cursor
to confirm input finished,then press the corresponding Direct
Access Button to choose Hanzi, Press
for next page, and
for
previous page
2. Press
to toggle to number input method;
3. Press
to toggle to Punctuations input method;
4. ABC
4.1 Press
toggle to “ABC” input method
4.2 Click once the corresponding Direct Access Button to input the
first letter,Click twice for the second letter,and so on,you need to wait
until cursor appears again if desired letter is located on the same Direct
Access Button as previous letter.
4.3 Delete:press
can delete the left character of cursor
5. ABC
5.1 Press
toggle to “abc” input method;
5.2 Click once the corresponding Direct Access Button to input the
first letter,Click twice for the second letter,and so on,you need to wait
for the cursor to appear again if desired letter is located on the same
Direct Access Button as previous letter.
5.3 Delete:press
can delete the left character of cursor;
Chapter 13
Charging
There are two methods for charging your eBook reader
1. Connect the eBook to the computer's USB Port via the supplied USB
Cable
2. Connect the eBook to the USB wall charger
Chapter 14
USB Connection
1. Attach USB cable to device and computer
2. To charge device, select ‘charge’
3. For data transfer follow on-screen instructions
Chapter 15
Importing Content
Importing DRM Contents
The eBook reader supports Adobe DRM contents. Adobe Digital
Editions (ADE) is required
Installing Adobe Digital Editions (ADE)
• Connect the eBook reader to your PC via the supplied USB cable and
open the eBook reader as removable disk. Go to [My Computer],
double click on the reader’s disk to open
• You can download the installer from
http://www.adobe.com/products/digitaleditions/#fp .
• As a first time user, you will need to get a free Adobe ID from
www.adobe.com
• Enter your email address and complete the online form as per
instructions
Importing and Transferring Content
Authorizing PC and Reader
• Upon registration, return to the ADE window. Enter the username
and password to activate your Adobe account.
• After activation, connect the eBook reader to your PC. ADE will detect
the eBook reader and you will be prompted to authorise the device.
• After authorization, you will be able to find the eBook reader
recognized in ADE.
• You can now start downloading or buying eBooks from online eBook
stores supporting Adobe DRM.
• Purchased or downloaded eBooks will be stored in [My Digital
Editions] in [My Documents].
Transferring DRM eBooks to Reader
• From ADE menu, click on *All Items+ in the left hand column
• Items in [My Digital Editions] will be listed in right window.
• Select the desired item(s) to be transferred.
• Drag and drop the selected item(s) into the eBook reader’s drive
located on the last row of the left hand column.
Opening Book
• Books transferred to the eBook reader will be listed in the Home
Menu.
• The eBook reader supports eBooks in epub, PDF & txt format.
• Use the <Directional> buttons to move the cursor to select book and
press <OK> to open.
Turning book page
• On reading page, press <Next Page> or <Directional-Right> button to
turn to next page. To turn to previous page, press <Previous Page> or
<Directional-Left> button.