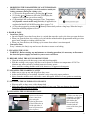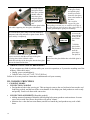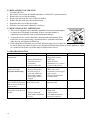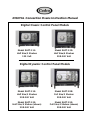
1
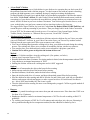
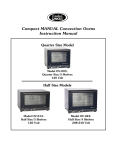
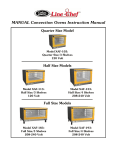
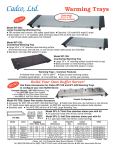
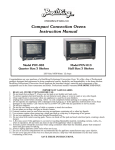
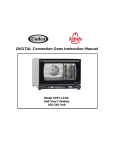
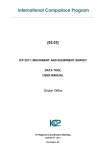
DIGITAL Convection Ovens Instruction Manual Digital Classic Control Panel Models Model XAFT-111: Half Size/3 Shelves 120 Volt Model XAFT-130: Half Size/4 Shelves 208-240 Volt Digital Dynamic Control Panel Models Model XAFT-115: Half Size/3 Shelves 208-240 Volt Model XAFT-188: Full Size/3 Shelves 208-240 Volt Model XAFT-135: Half Size/4 Shelves (shown) 208-240 Volt Model XAFT-195: Full Size/4 Shelves (shown) 208-240 Volt INDEX: I. Instructions For The Installer ............................................................................................................. 3 1. Data Plate ....................................................................................................................................... 3 2. Certification .................................................................................................................................... 3 3. Installation - Preliminary Operations .............................................................................................. 3 3.1 – Location of Installation ....................................................................................................... 3 3.2 – Feet Assembly ..................................................................................................................... 3 3.3 – Positioning .......................................................................................................................... 3 3.4 – Removing Protective Film ................................................................................................. 3 4. Installation ...................................................................................................................................... 4 4.1 - Electrical Connection .......................................................................................................... 4 4.2 - Water Connection (for applicable models) .......................................................................... 4 II. Instructions For The User .................................................................................................................. 4 1. Instruction For The Operator .......................................................................................................... 5 2. Notes For Use ................................................................................................................................. 5 3. Control Panel .................................................................................................................................. 5 3.1 –Control Panel Features ......................................................................................................... 6 Button / Light Functions ..................................................................................................... 6 Operating Notes .................................................................................................................. 7 3.2 – Operating in Manual Mode ................................................................................................. 7 3.3 – Operating in Programmed Mode....................................................................................... 10 4. Door & Fans ................................................................................................................................. 11 5. Cleaning Oven .............................................................................................................................. 11 6. Turning Off In Case Of Breakdown ............................................................................................. 12 III. Cooking Principles .......................................................................................................................... 12 1. Cooking Modes ............................................................................................................................. 12 2. Cooking Variables ........................................................................................................................ 13 3. Use of Wire Grids & Sheet Pans .................................................................................................. 13 IV. Maintenance ..................................................................................................................................... 13 1. Ordinary Maintenance .................................................................................................................. 13 2. Special Maintenance ..................................................................................................................... 13 2.1 – Replacement of Internal Lamp ......................................................................................... 13 2.2 – Replacement of The Fuse ................................................................................................. 13 2.3 – Reset The Safety Thermostat ........................................................................................... 13 2.4 – Troubleshooting ................................................................................................................ 14 2.5 – Remove and Reattach the Oven Door ............................................................................... 15 V. Optional Oven Accessories ................................................................................................................ 16 VI. Cooking Guide .................................................................................................................................. 17 VII. Warranty.......................................................................................................................................... 22 2 I. INSTRUCTION FOR THE INSTALLER Congratulations! You have just purchased a new Cadco Digital Convection Oven. Let’s go over some of the basics before you start using your new oven. 1. DATA PLATE (Located on side of oven) 2. CERTIFICATION 2.1 The “MET” mark on our data labels and on our user manual refers to the following listings: Certifications are listed under UNOX S.p.A., MET file #E112912, including XAFT series oven models. http://corp.metlabs.com/safety/listing.asp Class Number: 2831-03 DESCRIPTION: HEATERS-Cooking and Liquid - Stationary Type Class Number: 2831-83 DESCRIPTION: HEATERS-Cooking and Liquid-Stationary TypeCertified to the requirements of UL 197 (for USA) and CSA C22.2 No. 9 (for Canada) 2.2 The “NSF” mark refers to listing including XAFT series oven models under UNOX SPA for NSF/ANSI STANDARD 4: Commercial Cooking, Rethermalization and Powered Hot Food Holding and Transport Equipment. http://info.nsf.org/Certified/Food/Listings.asp?Company=79610&Standard=004 3. INSTALLATION - PRELIMINARY OPERATIONS All electrical connections and installation operations must be done by qualified personnel, and comply with all existing codes. 3.1 CHECK THE LOCATION OF INSTALLATION Verify the overall measurements and the exact position of the electrical and water connections (where applicable) before installing the oven. Refer to the illustrations in the separate “technical data” document for your model. 3.2 FEET ASSEMBLY You will find the feet packed inside your oven’s cooking cavity. The feet must be used when your oven is in operation. Never use your oven without its feet properly installed. Assemble the feet as shown. (Full size models now come with tall feet that screw into place; all other models come with shorter feet that pop into place.) 3.3 POSITIONING Place your oven so the back and sides can be easily reached. This will make the electrical connections and any servicing points easily accessible. Your oven is not designed for built-in applications or for side by side positioning. Cadco suggests you leave a minimum distance of 4” between the back of the oven and the wall to allow for the escape of moisture. The oven must be placed upon a support, a stand, or on top of a counter made of non-combustible material. Never install the oven directly on the floor. If the oven is placed near walls, dividers, kitchen cabinets, decorated edges or drapes, they must be made of non combustible material. 3.4 REMOVE THE PROTECTIVE FILM Carefully remove all the protective film from the external walls of your oven. Be sure to remove any residual glue left on the outside of the oven with an appropriate solvent. 3 4. INSTALLATION 4.1 ELECTRICAL CONNECTION • Connection to the electrical power source must be done according to all state and local codes. Before connecting your oven, make sure that the voltage and the amps comply with those stated on the data plate of your oven. Avoid using patch cords and multiple jacks. • The appliance must be placed so that the connection plug to the outlet can be easily reached. When the appliance is in operation, the power supply voltage must not diverge from the value of the nominal voltage, written on the technical data plate, by more than + or – 10%. • Ovens are equipped with cordset and NEMA plug (single phase; 120V or 208-240V, depending on oven model.) It is sufficient to insert the plug in the proper outlet (the outlet must be suitable for the plug assembled on the oven.) 4.2 WATER CONNECTION (available on all digital models EXCEPT XAFT-111 & XAFT-130, per below) • WARNING: The water supplied to the oven must be free from chloramine, or else with levels not exceeding .5ppm. Any damage caused by chloramine within the water is not covered by warranty. • WATER SUPPLY SPECIFICATIONS ♦ Water supply must not exceed 86°F, and must be potable. ♦ Water must have a maximum conductivity of 150 μS/cm. If greater than 150 μS/cm, use a filter to avoid limescale and/or other minerals from depositing inside the oven. ♦ Water must have a hardness between 0.5° and 5°F (to avoid formation of lime deposits inside the electric valve and inside the cavity). • CONNECTION TO THE WATER NET: Full Size digital oven models (XAFT-188 & XAFT-195) come with an electrovalve for direct water connection. ♦ A mechanical filter must be placed between the water system and the water connection of the oven. ♦ Before connecting the water pipe to the oven, flush it out with water, to clean the duct from any residue. ♦ A shut-off valve should be positioned between the water supply and the oven. ♦ Water used in the oven must have a pressure between 22 – 87 psi (150-600 kPa). If the pressure of water supply at the inlet is too low (22 psi/1.50 bar), a pump with a suitable flow rate should be used (minimum flow rate of 1.32 gpm (300 l/h). ♦ Cadco suggests you use a decalcification filter in order to maintain fan balance. • AUXILIARY WATER PUMP: Half Size digital ovens with Dynamic control panels (XAFT-115 & XAFT-135) come with an EL080 Auxiliary Water Pump included, for manually pumping water from a bucket or other container. WARNING: Before using the water pump, always make sure that there is water in the tank. Damage to the pump can occur if it is operated without water in the tank and it will void your warranty. If the pump makes “groaning” sounds, it is probably due to lack of water in the tank or the pump is simply running an air bubble through the system. • Hot air and steam will exit the oven from the back exhaust port. During most cooking cycles, you will have hot and humid exhaust coming out from this exhaust port (temperature and humidity of this exhaust depend on the cooking parameters being used.) The steam that comes out of the exhaust port can also be vented outside if desired. II. INSTRUCTIONS FOR THE USER Never allow grease splatters or spills to collect on the inside walls, floor, or ceiling of your oven. A simple cleaning with soap and water is usually enough to keep your oven spotless and in “like new” condition for years. Your oven should never be cleaned with a water hose or anything more powerful than a spritz bottle. For tougher cleaning and built up grease, we suggest using Foam Plus® from Discovery Products Corporation (Tel. 877.822.8500.) 4 1. INSTRUCTIONS FOR THE OPERATOR You will find important information about maintaining and operating your new oven in this manual. Please read the manual and become familiar with your new oven before you begin to operate it. Keep the manual in a safe place and make sure everyone reads it before operating the oven. Please use only Cadco authorized service centers and always require quality UNOX-OEM parts. Failure to comply with these standards can compromise safety and will void your warranty. 2. NOTES FOR USE • Your Cadco oven was designed to cook food and must be used only for that specific purpose. Any other use may void your warranty. The usable operating temperature range is approx. 175°F to 500°F. It is suggested that you allow about 2-3” between trays for proper air circulation during the cooking process. Use your Cadco oven for: ♦ Baking all types of bread and pastry, both fresh and frozen. ♦ Cooking any meat, fish, or fowl. ♦ Rethermalizing any cooled or frozen cooked foods. ♦ Cooking (not steaming) any kinds of vegetables. • Avoid salting your food products while they are inside the cooking cavity. Salt is very corrosive and may, over time, damage the interior of your oven. 3. CONTROL PANEL XAFT digital oven models are operated by pressing the relevant spots (“buttons”) on the “Touch Control” screen-printed keypad on the oven control panel. Press ONLY with fingers. DO NOT press with any other objects, such as knives, forks, etc... This technology makes cleaning the control panel quick and easy, while guaranteeing maximum reliability and durability and helping to avoid mechanical failure. OVEN MODEL XAFT-111 XAFT-115 XAFT-130 XAFT-135 XAFT-188 XAFT-195 CONTROL PANEL TYPE CLASSIC DYNAMIC CLASSIC DYNAMIC DYNAMIC DYNAMIC HUMIDITY CAPABLE NO YES NO YES YES YES CAPABLE OF RUNNING OPTIONAL PROOFER NO XALT135 NO XALT135 XALT195 XALT195 ALL XAFT Series Digital Control Convection Ovens models may be used in either MANUAL or PROGRAMMED mode. MANUAL MODE requires the user to set the parameters listed in the table below for each cooking cycle. These parameters are NOT saved and must be input for each successive cooking cycle. (See example of Setting a Cooking Cycle on next page.) COOKING PARAMETERS CLASSIC MODELS Cooking Time 0 minutes to 9 hours 59 minutes Oven Temperature 175° – 500°F Humidity % Not available DYNAMIC MODELS 0 minutes to 9 hours 59 minutes 175° – 500°F OFF to 100% in 20% increments 5 PROGRAMMED MODE allows a program to be saved for use during successive cycles. (Up to 99 programs may be saved.) Each program contains 4 potential phases: - PHASE 1: initial preheating; - PHASES 2 - 4: up to 3 cooking STEPS, each characterized by different cooking parameters. Cooking does not necessarily require all three STEPS; set only those required for your task. The appliance automatically passes from one cooking phase (STEP) to the next. 3.1 CONTROL PANELS FEATURES “CLASSIC” CONTROL PANEL (Models XAFT-111 & XAFT-130) The CLASSIC control panel can operate in “Manual” and in “Programmed” modes. For each cooking cycle (both in the Manual and in the Programmed mode) the operator can set Preheat temperature plus up to 3 cooking steps. For each cooking step, you enter cooking time and oven temperature. (Classic control models have no humidity feature and cannot run optional proofer.) “DYNAMIC” CONTROL PANEL (Models XAFT-115, XAFT-135, XAFT-188 & XAFT-195) The DYNAMIC control panel can operate in Manual and in Programmed modes. For each cooking cycle (both in the Manual and in the Programmed mode) the operator can set Preheat temperature plus up to 3 cooking steps. For each cooking step, you enter cooking time, oven temperature, and humidity %. (Dynamic control models have humidity feature and can run optional Cadco proofer.) BUTTON / LIGHT FUNCTIONS: 1) Press the STEP button repeatedly to select Preheat and up to 3 cooking STEPS to set their cooking parameters. 2) These LEDs indicate the current STEP (PRE = Preheat; 1 = STEP 1; 2 = STEP 2; 3 = STEP 3) during the parameter setting phase and during the cooking phase. 3) LED Display Window. 4) When this LED is on, the Cooking Time parameter is in the setting process. 5) When this LED is on, the Temperature parameter is in the setting process. 6) (Dynamic control models only) When this LED is on, the Humidity parameter is in the setting process. 7) Press the SELECT button repeatedly to select the parameters to set (Temperature, Cooking Time, etc.) 8) Press to increase or decrease the values shown on the LED display, one unit at a time. (Holding the button down increases/ decreases the value rapidly.) 9) START / STOP button starts/ interrupts cooking. 10) - “Quick Access” buttons allow quick selection of 6 pre-set programs that you have previously 6 entered, or to start setting parameters for a program to be saved to one of these 6 buttons. 11) Press the Program button to access saved programs or to start setting parameters for a new program. 12) Press the Memory button to save a newly set program to memory. 13) (Dynamic control models only) Press to switch from “OVEN” to optional “PROOFER” and vice versa. Make sure that the "OVEN" LED is on when using the oven. OPERATING NOTES: Before using the appliance for the first time, be sure to thoroughly clean the inside of the oven cavity (see page 11). Then let the oven run empty for about 30 minutes at a temperature of 350°F to eliminate any odors caused by residual protective factory grease. When the oven is connected to the power supply, the control panel switches on automatically. When the oven door is opened, heating and fan operation stops automatically. The built-in fan brake is activated. (The fan continues to rotate for a short time only). If the appliance is left running for more than 15 minutes without selecting an operating mode, START/STOP LED STAND-BY MODE is automatically engaged for energy savings. Only the will remain lit. To exit STAND-BY MODE, simply press the START/STOP button. Operate the appliance at a room temperature between 41°F to 95°F. Do not salt food inside the oven cavity. If this is not possible, clean the oven as soon as possible. 3.2 MANUAL MODE requires the user to set the parameters (Preheat, Time, Temperature, and Humidity if applicable) for each cooking cycle; these parameters are NOT saved and must be input for each successive cooking cycle. • SWITCHING ON / SWITCHING OFF ♦ When the power is turned on, the light in the cooking cavity will come on and remain on while there is power to the oven or when in stand-by mode. The display window will read “0.00” (this shows the time in hours and minutes). ♦ STAND-BY MODE: 15 minutes after a preset program ends or the cooking time expires, the light inside the cooking chamber will automatically shut off and the oven will go into stand-by mode for START / STOP light. To energy savings. The display and lights will be off, except for the blue exit stand-by mode and reactivate the electronic controls, simply press the START / STOP button. • STEP BUTTON The STEP button allows the operator to select preheat and one, two, or three cooking steps. These steps will run in sequence when cooking values (Time, Temperature, and Humidity if available) have been entered in each step, and may be saved as a program if desired. (See “PROGRAMMED MODE”, page 6.) • SETTING PREHEAT TEMPERATURE ♦ (1) Press the STEP button ♦ (2) The corresponding “PRE” LED lights up. ♦ (3) Press the or buttons until the red LED display shows the desired preheating temperature. (Maximum = 500°F ) ♦ It is always better to preheat the oven to a temperature about 15-20% higher than is required for cooking, in order to reduce the effects of heat lost when opening the oven door to place food in the oven. ♦ Preheating allows only temperature adjustments. The duration of the preheating phase depends on the temperature set (the appliance heats up to the temperature in the least time possible). ♦ Always preheat oven cavity before placing food in the oven. 7 • SELECT STEP 1 ♦ (1) Press the STEP button ♦ (2) The LED corresponding to STEP 1 lights up • SELECT BUTTON The SELECT button allows the operator to select and set these functions for STEPS 1, 2, and 3: TIME, TEMPERATURE, and (Dynamic control models only) HUMIDITY. • SETTING THE COOKING TIME / DURATION ♦ (1) To choose the Time function, press the SELECT button repeatedly until the blue Time LED is lit next to the Time icon (clock) on the control panel. ♦ (2) To set the time function, use the or button. Hold the button down to quickly scroll to desired setting. ♦ (3) The LED display shows the time in hours and minutes (ex. 130 =1 hour and 30 minutes) ♦ The maximum time allowed in each step is 9 hours and 59 minutes, which will show in the display window as “959”. Minimum time per step is 1 minute. ♦ FOR CONTINUOUS OPERATION, (the oven will operate in continuous mode until the operator intervenes): STEP 1 > Press the button when time is set at “0”, and “INF” will appear in the display window. START / STOP button. The oven will then work continuously until you stop it by pressing the • SETTING THE COOKING TEMPERATURE ♦ (1) Press the SELECT button until the blue Temperature LED is lit next to the Temperature icon (thermometer) on the control panel. ♦ (2) To set the desired temperature, use the or buttons. Hold the button down to quickly scroll to desired setting. ♦ (3) The LED display shows the temperature setting in Fahrenheit. ♦ The usable operating temperature range is approx. 175°F to 500°F. The default temperature is 356°F. ♦ START-UP DELAY: To obtain an oven start-up delay or to pause the oven for a certain time (useful for leavening) set “PAU” (PAUSE) on the "cooking temperature" parameter, and set the pause duration with the "cooking time" parameter (see previous section). Access the “PAU” setting by pressing the button until it goes below 32°F to “PAU” on the LED display. During “PAU” the oven is paused: the fan and resistors are off. • SETTING HUMIDITY (Dynamic control models only) ♦ (1) Press the SELECT button until the blue Humidity indicator light is lit next to the Humidity icon (water drops) on the control panel. ♦ (2) To set the percentage of humidity, press the or buttons. Humidity can be set from low of 0 (“oFF”) to a high of 100, in increments of 20. These ovens are not designed for steaming foods. ♦ (3) The LED display shows the percentage of humidity. ♦ When operating below 300°F, a maximum humidity setting of 40 or less is recommended. Otherwise, the oven may develop excess water in the cooking cavity. ♦ The parameter HUMIDITY is: Optional (if the parameter is not set, the oven uses standard convection cooking with no humidity.) Available only if the temperature is equal to or above 194°F (90°C). Available with the following settings: 0% (“oFF”) - 20% - 40% - 60% - 80% - 100%. 8 • SELECTING & SETTING THE NEXT STEPS (OPTIONAL) • Cooking does not necessarily require all three STEPS available; set only those required for your cooking task. To set STEP 2: (1) Press the STEP button (2) The “2” LED lights up. Set the various parameters (duration, temperature, etc...) as described in the previous sections. If necessary, select and set STEP 3 in the same way. • START COOKING / INTERRUPT COOKING / OVEN SHUTDOWN First, set a cooking cycle with the desired STEPS, as explained above (pages 7-8.) ♦ (1) To start or stop the cooking cycle, press the START / STOP button. ♦ (2) The Start/Stop LED lights up and the preheating cycle starts, indicated by the “PRE” LED lighting up (3). The LED display shows the preheat temperature previously set. ♦ The oven beeps and the “PRE” LED blinks when the preheating temperature has been reached. ♦ Place food in the oven. (4) After the food is placed in the oven and the door is closed, the “1” STEP LED lights up and the first cooking STEP starts automatically. ♦ (5) The total cooking cycle duration countdown blinks in the LED window. Remember, the LED window shows the time in hours and minutes (ex. 130 =1 hour and 30 minutes) In the example above: 130 (=1 hour:30 min.) (duration of STEP 1) + 30 min. (duration of STEP 2) + 0 min. (duration of STEP 3) = 200 = 2 hours, 00 minutes (shown in LED display) ♦ (6) The next STEP starts automatically at the end of STEP 1. (In this example, STEP 2 was set for 30 minutes, and there was no STEP 3 set, so the total remaining time at beginning of STEP 2 is 30 minutes.) ♦ At the end of the cooking cycle, the heating element(s) and fan(s) will stop running and a beep will sound. ♦ Press the START / STOP button for 2 – 3 seconds if you want to INTERRUPT the cooking cycle before it has finished. ♦ If you want to activate the “STAND-BY” mode, press the START / STOP button for about 6 seconds. Only the START / STOP LED will remain lit. When ready to reactivate, press the START / STOP button. • TO MODIFY COOKING PARAMETERS DURING THE COOKING CYCLE If the oven is operating in the MANUAL MODE, it is possible to view the cooking parameters and modify them while the oven is in its cooking cycle. To view the different parameters (Time, Temperature, and Humidity if applicable) Press the STEP button until the LED corresponding to the desired STEP lights up. Then press the SELECT button until the LED light corresponding to the desired parameter lights up. 9 If you select “Time”, the LED display shows the remaining time. If you select “Temperature”, the LED display will alternate between the set temperature (steady light) and the actual temperature (flashing light). If you select “Humidity”, the LED display will show the percentage of humidity you originally selected for that step. Then use the or buttons to modify the value of your chosen parameter. The modification(s) will take immediate effect without pressing any other buttons. 3.3 PROGRAMMED MODE • There is room to save up to 99 programs in your oven’s memory for “One Touch Cooking”. Each program can have a maximum of 3 cooking steps in addition to “Preheat”. NOTE: The 6 programs that you save by assigning to P01 – P06 will be the ones later accessed by the - “Quick Access” buttons on the control panel. (See callout #10 on page 6.). • TO ASSIGN AND SAVE A PROGRAM: 1. Access the Program menu by pressing the P button, OR by ). pressing a “Quick Access” button ( 2. Assign a program number between P1 and P99 as follows: - Press any one of the - (P1 – P6) “Quick Access” buttons to assign a program to one of the first 6 positions. (We recommend saving the programs used most often in these positions.) - Use the or buttons to assign programs P7- P99. 3. The program number will show in the LED display window. 4. Set the cooking parameters (Time, Temperature, and [Dynamic control models only] Humidity if applicable.) See MANUAL MODE section above (pages 7-9) for how to set cooking parameters. NOTE: If preheating is not set, the oven will propose a temperature of 356°F. 5. Save the program by pressing the Memory button until you hear a long beep. When the beep is heard, the program is saved. 6. To start the program, press the START / STOP button. 7. You may press the P button to go back into the manual mode at any time. • TO RECALL AND START A SAVED PROGRAM: 1. For Programs P1 through P6 (Quick Access Programs), Press the - (P1 – P6) “Quick Access” button corresponding to the desired program. The LED window will show the selected Program number. 2. For Programs P7 through P99, (1) press the P button, (2) then select the number of the program you wish to use by pressing the or button until the desired program number appears in the LED window. START / STOP 3. To start the selected program, (3) press the button. 10 • MODIFYING THE PARAMETERS OF A SET PROGRAM: (NOTE: When using a program, you will be unable to modify the cooking parameters during the cooking cycle.) (1) Access the Program menu by pressing the P button. (2) Use the or buttons to call to the LED display the number of the program you wish to modify. (3) Reconfigure the cooking parameters (Time, Temperature, and [Dynamic control models only] Humidity if applicable) as explained in MANUAL MODE section above (pages 7-9) . (4) Save the program by pressing the Memory button until you hear a long beep. When the beep is heard, the modified program is saved. 4. DOOR & FANS • Oven Door Safety ♦ On each Digital Convection Oven, there is a switch that stops the cook cycle when you open the door. ♦ When you open the door, the cooking cycle (in both the manual and the programmed mode) goes into pause mode, though no cooking values are lost. ♦ When you close the door, the cooking cycle restarts from where it was interrupted. • Convection Fans Every 2 minutes, the fan(s) stop and reverse direction to assure even baking. 5. CLEANING THE OVEN • WARNING: Before starting any maintenance or cleaning operation, it is necessary to disconnect the electrical power supply and wait for your oven to cool down. 5.1 BEFORE USING THE OVEN FOR FIRST TIME ♦ Clean the metal parts with hot soapy water and rinse thoroughly. ♦ With the cooking cavity empty, heat the oven for about 30 minutes at a temperature of 350°F to eliminate any odors caused by residual protective factory grease. ♦ Never wash the cooking chamber with acids, abrasives, or aggressive detergents. 5.2 CLEANING THE COOKING CAVITY ♦ Make sure to wipe up any and all spills as they occur. ♦ At the end of the day (or as needed), clean the cavity using only proper products. ♦ Never clean the stainless steel with acids, caustic detergents, abrasives or any products containing chlorine. 5.3 CLEANING THE OUTSIDE OF YOUR OVEN ♦ Wipe up spills, as they occur, with a damp cloth. ♦ Never use a spray of water in to clean the outside of your oven. This may damage the electrical components and void your warranty. 5.4 CLEANING THE OVEN DOOR GLASS Glass holder tab Open oven door and remove inner door glass using the following directions. (Glass holder tabs on left & right sides of door keep inner door glass in place.) 1 1) With oven door open completely, use fingers to pull left and right glass holder tabs forward until fully extended and the corner of the door glass is visible. 11 2) Using fingers to 2 hold glass holder tabs open, position thumbs under the inner door glass and push glass up until it just clears the glass holder tabs. Release glass holder tabs while supporting the door glass with thumbs. 3) Grasp both sides of the glass firmly and pull the glass toward you until it clears the door glass 3 slots at the bottom of the door. Door glass slot (Be careful to support the glass when pulling it toward you, to avoid the back edge of the glass dropping onto the outer door glass below it.) Lift the glass and place gently on countertop. 4) Clean the door glass, using a soft cloth moderately dampened with soap and water or glass cleaner. Rinse glass and dry it completely. 6 5 YES NO 5) Position cleaned inner door glass over the open oven door so that the oval logo on the glass is facing down in the left back corner. Slide the back edge of the door glass into the door glass slots at the bottom of the door. 7 Glass holder tab 6) Lower the glass until it is resting on the glass holder tabs. 7) Pull the glass holder tabs forward until the glass drops into place in the door. Then release the glass holder tabs to hold the glass in place. 6. TURNING OFF IN CASE OF BREAKDOWN If you encounter any kind of problem while your oven is in operation, or if you notice anything out of the ordinary, follow these steps: ♦ Unplug your oven immediately. ♦ Consult Cadco, Ltd. at 877-603-7393 (Toll-Free) Failure to do so may result in a hazardous condition and void your warranty. III. COOKING PRINCIPLES 1. COOKING MODES • CONVECTION COOKING ♦ Food products bake in hot, moving air. This moving air removes the cool air barrier between the cool food being cooked, and the heat of the oven chamber. It also helps your food products to cook evenly and quickly. Foods cook faster with convection. • 12 CONVECTION & HUMIDITY (Humidity models) ♦ Adding measured amounts of humidity while baking helps many products retain moisture. In some cases, such as with Pate Choux, the product will gain in volume. ♦ Moisture also makes the heat seem hotter (similar to a humid day) and products may cook a little faster. 2. COOKING VARIABLES • TEMPERATURE ♦ The exact setting of your oven temperature assures proper cooking of your food, both inside and outside: Too low – your food cooks too slowly and will dry out. Too High – your foods burns and cooks unevenly. ♦ If you are new to convection cooking, Cadco suggests setting your Convection Oven to a temperature of about 30ºF - 50ºF lower than what you would have set it at in a conventional oven. Let the food tell you what it needs; if it browns too fast, turn the oven temperature down. • TIME ♦ The higher the temperature the quicker your foods will get done. ♦ The quicker foods (especially protein products) cook, the more moisture they tend to lose. ♦ Most bakery products can take high temperatures better than protein products. • HUMIDITY The more humidity in the cooking cavity, the harder it will be for your food products to brown. • QUANTITY OF FOOD ♦ One piece of chicken will take less time to cook than 2 or 3 pans of chicken. That’s “Mother Nature” pure and simple. Convection cooking is fantastic, but it’s NOT magic. ♦ Overloading the oven can result in uneven cooking. ♦ Avoid placing baked goods touching each other on the pan before baking. 3. USE OF WIRE GRIDS AND SHEET PANS • It is recommended to use wire grids for meat items. This will elevate your food items and allow air to circulate all around during the cooking process. Place your wire rack in a sheet pan to collect the juice. This reduces clean-up time also. • Use sheet pans for bakery items such as pastries, bread and rolls, and cookies. IV. MAINTENANCE 1. ORDINARY MAINTENANCE • All maintenance operations must be done only by trained qualified personnel. • Before starting any maintenance operation, disconnect your oven from the electrical power supply and wait for it to cool down. • The parts that need ordinary maintenance can be reached by removing the front control panel and the back of the oven. 2. SPECIAL MAINTENANCE • All maintenance operations must be done only by trained qualified personnel. • Before starting any maintenance operation, disconnect your oven from the electrical power supply and wait for it to cool down. 2.1 REPLACEMENT OF INTERNAL LAMP (WHERE APPLICABLE) To replace the internal lamp: • Disconnect your oven from the power supply system and let it cool down. • Remove the side rails. • Unscrew the glass cover and replace the lamp with an identical bulb. • Screw the glass cover back on. • Reassemble the side rails. 13 2.2 REPLACEMENT OF THE FUSE To replace the fuse: • Press on the cover of the fuse holder and rotate it of about 20° counterclockwise. • Remove the cover of the fuse holder. • Remove the fuse from the cover of the fuse holder. • Replace the fuse with one with an identical one. • Reposition the cover of the fuse holder. • Press the cover and rotate it about 20° clockwise. 2.3 RESET THE SAFETY THERMOSTAT • This oven is equipped with a manually resettable safety thermostat designed to protect the oven against overheating. If there is an intervention, it completely deactivates the oven to avoid permanent damage. • To reset this device, remove the black cap positioned to the bottom of the back of the oven by unscrewing it counterclockwise, push the reset button under the cap, and replace the black cap. • If the safety thermostat shuts your oven off, before turning your oven back on, be sure to check your entire circuit to verify that the total amps being drawn by all the appliances, lights, etc. on that circuit do not exceed the amps available on that circuit. 2.4 TROUBLESHOOTING Problem Oven is completely switched off No humidity is produced in the oven cavity (Dynamic models only) After the time has been set and START/STOP button has been pressed, the oven does not start Water escapes from the door gasket when the door is shut. 14 Possible Cause - No power - Safety thermostat has intervened to avoid overheating - Oven is out of order - Water inlet is closed - Oven is connected to the water supply or water tank incorrectly - Water tank is empty - Water supply filter is clogged Door is open or has not been shut correctly - Gasket is dirty - Gasket is damaged - Door handle mechanism is loose Possible Solution - Check that unit is plugged into correct outlet type - Reset the safety thermostat (see 2.3 above) - Contact Cadco Service - Open water inlet - Make sure oven is connected to water supply/ tank correctly - Fill the tank with water - Clean the filter Problem Solution Contact Cadco Service Make sure the door is completely shut Contact Cadco Service - Clean the gasket with a damp cloth - Replace gasket - Get handle mechanism repaired or replaced Contact Cadco Service Contact Cadco Service 2.5 REMOVE AND REATTACH THE DOOR Open door completely as in Fig. 1 Fig. 1 Fig. 2 Using a screw driver or other object, swing door safety lock down as shown in Figs 2 – 3 – 4 Fig. 4 Fig. 3 With door completely down and door safety lock in its down position, move door in a closing direction until door safety lock stops the closing action as in Fig. 5. ~~~~~~~~ Hold door as shown in Fig. 6. Fig. 6 Fig. 5 Slightly lift and swing door out of unit as shown in Figs. 7 & 8 Fig. 7 Fig. 8 For the door to be properly installed, the notch on the bottom of the hinge finger (Fig. 9) must be seated in the inner door hinge frame (Fig. 10) Fig. 10 Fig. 9 Reverse above procedure to attach door to oven - see Figs. 7 & 8 15 V. OPTIONAL DIGITAL CONVECTION OVENS ACCESSORIES • XALT195 Full Size Proofer Must be used with a full size Digital Oven with Dynamic control panel (oven models: XAFT-188 and XAFT-195) ♦ Oven and proofer are both set using the Digital Oven Dynamic control panel. ♦ The proofer must be on a separate power source from the oven. ♦ Capacity of 8 full sized (18”x 26”) sheet pans. ♦ • XALT135 Half Size Proofer Must be used with a half size Digital Oven with Dynamic control panel (oven models: XAFT-115 and XAFT-135). ♦ Oven and proofer are both set using the Digital Oven Dynamic control panel. ♦ The proofer must be on a separate power source from the oven. ♦ Capacity of 8 half sized (13”x 18”) sheet pans. ♦ • OV-HDS Heavy-Duty 2-Oven Stand with Wheels (half +/or quarter size size) ♦ Accommodates two half or quarter size Cadco Convection Ovens • OST-195 Oven Stand with Wheels (full size) (Note: Shorter oven feet must be used when placing oven on this stand.) ♦ Accommodates oven models: XAF-183, XAFT-188, XAF-193 & XAFT-195 • OST-34 Oven Stand with Wheels (half size) ♦ Accommodates oven models: XAFT-111, XAF-113, XAFT-115, XAFT-130, XAF-133, XAFT130 & XAFT-135 • Oven Baskets: Stainless steel oven baskets enhance even airflow around food for quicker, crisper results with oven-baked: Fries & other Potato Products; Chicken Wings, Nuggets, Tenders; Seafood: Shrimp, Fish Sticks, Oven Specific Battered Fish; Onion Rings, Roasted Vegetables; Appetizers: Corn Dogs, Mozzarella Sticks, Stuffed Jalapeños, Etc. COB-F Oven Basket (Full Size) COB-H Oven Basket (Half Size) COB-Q Oven Basket (Quarter Size) • Pizza Heat Plates provide very fast baking times, up to 50% faster than traditional baking pans. It takes as little as 4-5 minutes to bake a fresh Pizza on the aluminum heat plate! The plates are manufactured from alloys which provide superior heat storage and produce fast, even cooking of both top and bottom of the food product simultaneously. These plates also help maintain better temperature stability under normal door opening/ closing conditions. Great for pizza, breads & other baked goods. ♦ ♦ CAP-F Pizza Heat Plate (Full Size) CAP-H Pizza Heat Plate (Half Size) CAP-Q Pizza Heat Plate (Quarter Size) • XC606 Air Deflector Plate ♦ Deflects the strong airflow in oven cavity; for baking delicate foods like puff pastry Attaches quickly to fan grid; no tools required. • Stacking Kits for XAFT Half-Size & Full-Size Convection Ovens ♦ ♦ 16 Everything needed to securely stack one XAFT oven on top of another and protect the top oven’s control panel from heat rising from bottom: ♦ - 4 Special size oven legs (2-3/4” high) for the top oven ♦ - Brackets ♦ - Heat Baffle (protects top oven's control panel from heat generated by lower oven) ♦ - Bottom oven vent extension ♦ - All needed screws & clamps XC646 Full Size Stacking Kit XC646 Half Size Stacking Kit VI. COOKING GUIDE The first and most important step will be: Have your new oven hooked up to the proper power and (if applicable) water source. If there is any doubt about the proper power or the connections, have the oven installed by a qualified electrician according to your local codes. Use this cooking guide to help determine which time and temperature works best for your specific food items. If your specific product isn’t addressed, you will probably find something similar. You’ll find many helpful hints in this cooking guide. Our aim is to help you use your Cadco Digital Convection Oven to its fullest, rather than teach you how to cook. The Cadco Digital Convection Ovens work on the principle of moving air. This air movement removes the “Hot Spots” so we get very even browning, rapid preheats (10 minutes), and faster cooking. Here are some basic do’s and don’ts and guidelines for convection cooking: ♦ Use pans that have sides no taller than a common sheet pan. ♦ Preheat the oven to approximately 20% above your baking temperature. After loading your product, remember to reset the oven to the desired baking temperature. ♦ Set the oven for your desired cooking temperature after you have placed the food inside. ♦ If you notice uneven cooking, set the oven temperature down 25º-30ºF. Let the product tell you if it needs more or less heat. ♦ Aluminum foil can get pulled into the fan and cause damage. ♦ Don’t overload the oven. ♦ Maintain a minimum 2”-3” between the product being cooked and the next shelf. Remove shelves if necessary. ♦ Your Cadco Convection Oven is a powerful tool, so don’t hesitate to utilize its full capacity. ♦ Keep your oven clean. Wipe up spills as they occur. Never allow grease to build up on the interior of the oven, or collect on the bottom of the cooking cavity. ♦ Frozen products draw more heat from the oven and may require a longer recovery time. ♦ When roasting meats we suggest using a cooking rack to elevate the product and facilitate even roasting. Smaller cuts such as boneless chicken breasts, or seafood portions may be baked directly on the pan if desired. ♦ Lower temperatures will reduce shrinkage and save money with all of your roasted meat products. ♦ Higher geographical elevations will often affect cooking time and temperature parameters. Have fun and experiment with your new Cadco Convection Oven. Your times and temperatures will vary with the different products you prepare. Refer to this Cadco Cooking Guide for direction or contact the Cadco Culinary Manager (877.603.7393) or the Cadco, Ltd. website (www.cadco-ltd.com), for specific answers to your cooking needs. We look forward to hearing from you, Cadco, Ltd. 17 Cookies Baking Temperature One of the most common items baked in your Cadco Convection Oven will be cookies. There are dozens of cookie manufacturers, and their products all have different baking characteristics. Most of the cookie recipes suggest a baking temperature of 325º - 350ºF. We have found that “Lower is better”. Over the years we have found that cookies bake best in a preheated oven at about 285º - 300ºF, assuming a 1.5 ounce cookie from refrigerated/frozen dough. By baking at a lower temperature, they tend to remain higher after cooling and produce a more eye appealing finished product. Bake for about 12-18 minutes, depending on what you think is the perfect cookie. Variables ♦ Lower the temperature for larger cookies. ♦ Cookies bake from the outside in...so to make picture perfect cookies we have to consider two variables before we begin baking, in any oven, or we may not be happy with our results. These two factors come into play mostly when we make cookies from "scratch", (but they apply to all cookies): 1. The temperature of the dough Room temperature dough will spread out more than frozen or refrigerated dough. The colder the dough, the less the cookie will spread / flatten out during baking. Dough baked from frozen produces a thicker, better-looking cookie than ones that are baked from refrigerated, or room temperature, which will spread out and therefore, have less height. 2. The fat content of the dough. A higher ratio of fat to flour will make the cookie spread out more during baking. • Cheesecake People generally love cheesecake and it’s not hard to make. Let’s start with a basic cheesecake batter: ♦ #3 cream cheese ♦ 1 ½ cups sugar ♦ 5 eggs ♦ lemon to taste ♦ 2 cups Half and Half (approx.) This will make enough batter for a 10” springform pan. There are so many fun options for making cheesecake, such as: ♦ Substitute chocolate milk for Half and Half in a triple chocolate cheesecake. ♦ Orange juice for an orange cheesecake. ♦ Baileys Irish Cream. ♦ Cookie dough. ♦ Turtle cheesecake. ♦ Lemon poppy seed. ♦ Pumpkin…peanut butter…pistachio…what else? For crust, we usually spray the inside of the springform pan with vegetable oil and dust it with graham cracker crumbs. There are endless options for crusts such as shortbread, brownie, or Ladyfingers, or a simple dusting of graham crumbs. It’s your choice. Bake in a 200ºF oven for 4 hours, then cool, cut and serve. Have fun with some imaginative sauces also: ♦ Walnut, caramel and chocolate chip sauce. ♦ Lemon sauce. ♦ Pear sauce ♦ Pistachio sauce. ♦ Cinnamon Squared² Sauce (cinnamon stick and candies). 18 • Muffins ♦ 15 minutes at 325ºF/ 20% humidity works well for most standard size muffins. ♦ For jumbo muffins set the oven temp at 300ºF/ 20% humidity and bake the muffins for 20 minutes or until a toothpick comes out clean. ♦ The more dense your batter is the longer your muffins will take to bake. • Biscuits For the test we used a basic baking powder biscuit about 3” in diameter. Bake at 350ºF for 10-12 minutes. Some suggestions: ♦ A simple glaze can be made of powdered sugar and water. ♦ Glaze while your biscuits are still hot. ♦ Try peanut butter, lemon poppy seed, cinnamon raisin, cheese and bacon, sour dough, and of course, good old buttermilk biscuits. ♦ Drop biscuits take about the same amount of time to bake and they are wonderful. • Bread ♦ Large loaves (1 lb -1 ½ lb) baked in 30 - 40 minutes at 325ºF. ♦ We found that you can bake dinner rolls using the same method as you do for biscuits. • Pies The variables for bakery products are endless, and pies are no exception. These are some of the things which will affect your cooking time: ♦ Amount of sugar in the crust. ♦ Size of your pie tin and the amount of filling used. ♦ Butter or oil in the crust. ♦ Amount of shortening to flour. ♦ Your choice of canned or fresh filling. For test pies we used 9” pie tins with homemade apple filling. Our crust was made using a basic 3-2-1 recipe: ♦ 3 parts flour ♦ 2 parts shortening ♦ 1 part (approx.) water ♦ With a little salt and a four finger pinch of sugar added The Cadco Convection Oven was preheated to 325ºF and the pies were baked for 45 minutes to an hour depending on the filling. The aroma coming out of the Cadco Training Center was fantastic! • Pizza There are so many pizzas it’s hard to know where to start. The pizza we used for our tests were the 11”, frozen, self rising type from the grocery store. They were all baked at 350ºF for 8 - 20 minutes on Cadco Pizza Heat Plates (see page 14), and our results were great on all of them. (The pizza manufacturers suggested a temperature of 400ºF for 20-30 minutes). 19 • “Oven Fried” Chicken Let’s say that you want to serve fried chicken in your food service operation but you don't want all of the problems associated with a chicken program. You don't want to deal with an expensive breading program, the high insurance costs, constantly buying oil, employee training, the dangerous cleaning/filtering of French fryers, and the high cost of purchasing equipment. Cadco has the answer: how about "Oven Fried" chicken. We take cooked, frozen, browned chicken and season it with the seasoning(s) of your choice to produce the most delicious, unique chicken your customers have ever tasted...and it's all done in your oven in about 30 minutes. Your chicken goes from the freezer, to the oven, to the display case (and your customers) in less time than it takes to fry from raw. We suggest Pierce Super Chicken; lay it out in a Cadco Oven Fry Basket (Model COB-F/Full Size), and season the pieces with any seasoning of your choice. Then you simply bake it in the Cadco Convection Oven at 325ºF for 20 minutes and it's ready to serve. You can have Cajun, Lemon Pepper, Italian, TexMex, Smoky, Jamaican, or…Whatever flavor you want, “Oven Fried” Chicken! • “Rotisserie Style” Chicken Tired of paying the grocery store to make those delicious rotisserie chickens for you? Once you make your own “Rotisserie” chickens, in your Cadco Convection Oven, you’ll never buy another cooked chicken from the store again (and I’ll bet your customers won’t either). ♦ You’ll need a baking sheet pan and a cooking rack to keep your chicken elevated during the cooking process. The cooking rack allows air to circulate all around the chicken, similar to a rotisserie. ♦ You can also place your chicken directly on the oven rack and let it drip into a pan below. ♦ Caution! Never allow grease to drip onto the bottom of the oven! Method ♦ Season a #3 chicken and place it on the cooking rack. (For options, see below) ♦ Preheat your Convection Oven to 325ºF. ♦ Roast the chicken for about 45 minutes. If a crispier product is desired, raise the temperature to about 350ºF. ♦ Cook chicken to an internal temperature of 180ºF. ♦ Stuffing the chicken will increase cooking time and it is NOT suggested. Options ♦ Slip slices of lemon under the skin on the breast before roasting. ♦ Italian sausage under the skin of the breast before roasting. ♦ Sun dried tomatoes, fresh herbs, under the skin before roasting. ♦ Spray the chicken with olive oil, season, and dust with mashed potato flakes before roasting. ♦ Save the chicken fat after roasting and chill it. Mix the fat, and a little stock, with left over shredded chicken, and season with salt and pepper, to make a spread on slices of French bread. Needless to say…this is NOT heart-healthy fare, but it sure is good. ♦ Truss the chicken before roasting for more even cooking and eye appeal. Call for my quick method of trussing a bird. • 20 Burgers ♦ Lay your ¼ pound frozen burgers out onto a sheet pan and season to taste. Place them into 350ºF oven for about 10 to 12 minutes. ♦ Hamburger should be cooked to an internal temperature of 165ºF to be safe according to HACCP guidelines. ♦ Try cooking your burgers at 250ºF for 15 to 20 minutes and notice how juicy they are. Browning is not as pronounced using the low temperature method, but the added flavor makes up for it. • Rare Roast Beef ♦ Rare beef is considered by most people to be 130ºF. ♦ The USDA states that full muscle beef when roasted to an internal temperature of 130ºF and maintained at that temperature for 121 minutes is considered safe to eat. ♦ Overnight roasting requires a roast that is 7 pounds or larger. ♦ Seasonings will penetrate the roast about 1/4” deep. ♦ Cook elevated on a roasting rack for air circulation all around during the roasting process. ♦ Cook over a shallow sided pan to collect the pan juices for jus or gravy. Roast Tenderloin (quick roast and serve method) – Preheat your oven to 400ºF ♦ Load the tenderloin in the oven and reduce the roasting temperature to 350ºF ♦ Roast the tenderloin to an internal temperature of 120ºF and remove from the oven. The roast will continue to rise in temperature. ♦ In about 10 minutes (130ºF) the tenderloin will be ready to slice and serve ♦ • Jus ♦ Use your pan drippings to make jus. Many people say “I’m going to make some au jus”. This is incorrect and professionals will notice. Au jus means “with juice”. Prime Rib becomes “Prime Rib Au Jus” when you add jus to the plated Prime Rib. ♦ Use beef/veal/chicken stock to dissolve all that wonderful tasting brown gooey material in the bottom of your roasting pan. Some add a little red wine, some add tomato, and some make their jus to theme: Cajun, Southwest, Oriental…..you get the idea. 21 VII. WARRANTY • Cadco, Ltd. warrants all products (in the United States and Canada) to be free from defects in material and workmanship for a period of one year from date of purchase, unless otherwise noted below.*** • Warranty does not apply in cases of misuse, abuse or damage from external service or repair attempts by unauthorized personnel. • Copy of original invoice is required for proof of purchase date for warranty coverage. • ALL WARRANTY / SERVICE ISSUES MUST BE AUTHORIZED FIRST! PLEASE CALL TOLLFREE (877) 603-7393. • WARRANTY PERIODS: ♦ DIGITAL CONVECTION OVENS: (XAFT-111, XAFT-115, XAFT-130, XAFT-135, XAFT-188, XAFT-195) Two Year Limited Warranty (One year On-site service & parts, 2nd year parts only)*** ♦ ***ALL OVENS (INCLUDING DIGITAL CONVECTION OVENS): 90 day warranty on all light bulbs and gaskets. NOTE: These items are easily changeable on-site by user and do not qualify for service center warranty assistance. Call Cadco directly for warranty replacement of these items. 30 day warranty on glass. ALL CONVECTION OVEN MOTORS ARE BACKED BY A ONE YEAR WARRANTY • WARRANTY PROCEDURES: ♦ Please do not take your unit to the store where you purchased it for warranty repair. For the Cadco authorized US service agent nearest you, please contact: Cadco, Ltd., 145 Colebrook River Road, Winsted, CT 06098 Tel. (860) 738-2500, Fax (860) 738-9772 E-mail: [email protected], Web site: www.cadco-ltd.com 7/9/2014 RV00 22