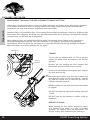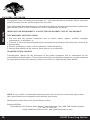
1
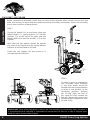
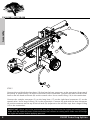
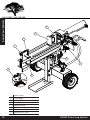
22 Ton Petrol
Log Splitter
Model: FM22P
IMPORTANT: Read this manual fully before assembly and use and
observe all safety rules and operating instructions
Contents
Technical Specification
2
Technical Specification
Safety
Assembly Diagram
Assembly
Know Your Log Splitter
Operation
Maintenance
Exploded View
Parts List
Warranty
Maximum Log Diameter
Maximum Log Length
Splitting Force
Cycle Time
Working Positions
Maximum Hydraulic Pressure
Hydraulic Oil Capacity (when cold)
Gear Pump
Hydraulic Oil
Engine
Length (horizontal operation)
Width
Working Height (horizontal operation)
Height (vertical stored)
Dry Weight
Maximum Towing Speed
2
3
5
6
10
11
15
17
18
20
600 mm / 23.5” (Duocut)
550 mm / 21.65”
22 ton
12.5 sec
0, 30 & 60 degrees
3625 psi
13 litres / 2.86 gallons
2 stage 50 lpm / 11 gpm
10WT A W32, ASLE H-150 or ISO32
208 cc 6.5 hp
1.7 M / 5’ 6”
0.9 M / 2’ 11”
0.85 M / 2’ 9”
1.73 M / 5’ 9”
230 kg / 506 lbs
5 mph
FM22P Petrol Log Splitter
IMPORTANT: Please read these instructions carefully. Note the safe operational requirements,
warnings & cautions. Use the product correctly
and with care for the purpose for which it is intended. Failure to do so may cause damage and/
or personal injury and will invalidate the warranty. Please keep these instructions safe for future
use.
DO NOT operate the log splitter if the engines
switch does not turn it on or off. Any petrol powered machine that cannot be controlled with
the engine switch is dangerous and must not be
used until repaired or replaced.
Make sure to read and understand all the instructions and safety precautions as outlined in the Engine Manufacturer’s Manual, packed separately
with this unit. Do not operate this machine until
you know how to properly operate and maintain
the engine and how to avoid accidental injuries.
Keep hands away from moving parts of the log
splitter.
WORKSHOP/ENVIRONMENTAL SAFETY
Locate the log splitter on dry, level and solid
ground in a suitable work area with adequate
lighting. Keep the area clean and tidy and free
from unrelated materials. Do not leave tools, logs
or other items lying around where they could become a trip hazard.
DO NOT operate the log splitter in an enclosed
area. The exhaust fumes contain carbon monoxide an odourless and deadly gas. Operate this
unit only in a well ventilated area.
DO NOT operate the log splitter in areas where
fumes from paint, solvents, or flammable liquids
pose a potential hazard.
OPERATOR SAFETY
Remove ill fitting clothing. Remove ties, watches,
rings and other loose jewellery, and secure long
hair so that it is above shoulder level.
Wear protective clothing such as safety shoes and
work gloves. Always wear safety goggles when
operating the machine, everyday spectacles are
not sufficient protection.
Maintain correct balance and footing, do not
over-reach. Ensure the floor is not slippery and
wear non-slip, protective footwear.
DO NOT allow untrained persons to operate the
log splitter.
DO NOT operate the log splitter with the guards
or guides removed.
DO NOT operate the log splitter when you are
tired or under the influence of alcohol, drugs or
intoxicating medication.
FM22P Petrol Log Splitter
Safety
The log splitter must always be operated by one
person only.
Keep hands away from splits and cracks which
open in logs. They may close suddenly which
could cause serious personal injury. For this reason do not attempt to remove jammed logs by
hand. A jammed log is a log which is only partially split and continues to grip the splitting wedge.
Be sure the engine is off before transporting the
machine or performing any maintenance or service on the unit. Never transport, maintain or
service a machine with the engine on.
SAFETY OF OTHERS
DO NOT allow another person to help you with
a jammed log.
Keep children and unauthorised persons away
from the work area.
The log splitter must always be operated by one
person only. Other people must keep a safe distance from the log splitter especially when it is
in operation.
Store the log splitter in a safe area away from
children and other people not qualified to use
the log splitter.
GENERAL SAFETY
DO NOT make any modifications to the log splitter.
DO NOT exceed the stated log capacity of the
log splitter.
DO NOT use the log splitter for a task it is not
designed to perform.
DO NOT force the log splitter to work beyond its
specified capacity.
Ensure that there are no nails, screws or other
foreign objects in logs to be split.
3
MACHINE USE AND CARE
Safety
Position the machine in such a way that it cannot
move during maintenance, cleaning, adjustment,
assembly and under storage.
Do not change the engine governor settings or
over-speed the engine. The governor controls the
maximum safe operating speed of the engine.
Do not run the engine at a high speed when you
are not working.
The machine contains a static blade and a moving
blade, keep hands away from both blades when
operating the machine.
Avoid contact with hot oil, exhaust fumes and
hot surfaces. Do not touch the engine or exhaust,
these parts get extremely hot from operation
and remain hot for a time after the unit is turned
off. Allow the engine to cool before doing
maintenance or adjustment.
If the machine should start to make an unusual
noise or vibration, immediately shut off the
engine, disconnect the spark plug wire and
check for the cause. Unusual noise or vibration
is generally a warning of trouble.
Maintain the machine. Check for misalignment
or binding of moving parts, breakage of parts
and any condition that may affect the machines
operation. If damaged, have the machine repaired
before use. Poorly maintained equipment can
cause accidents.
Whenever you leave the operating position or if
you have to remove processed material or debris
from around the machine, always shut down the
engine.
DO NOT change the splitting position while the
engine is running. Various parts of the engine
become very hot and contact can cause serious
burns.
NEVER attach a rope, cable or other device to the
control levers of the log splitter.
DO NOT tilt the machine while the engine is
running,
4
Always stop the engine before moving the
machine.
Do not alter or adjust any part of the machine
or engine that is sealed by the manufacturer or
distributor.
Always check the oil level of the engine before
use.
Inspect all nuts and bolts to ensure they are
tight and properly connected before using the
machine.
Check the air pressure in the tyres prior to use
and pay attention to sharp objects when moving
the machine to prevent the tyres being pierced.
TOWING
This log splitter is for off road use only. Never
attempt to tow the machine on public, highways,
roads or thoroughfares.
Serious injury or death can occur if towing safety
rules are not followed.
Always secure and lock the log splitter to the
vehicle hitch before moving.
Drive safely. Be aware of the added length of the
log splitter.
Never ride or transport cargo on the log splitter.
Turn off the vehicle before leaving the log splitter
unattended.
Block the log splitter wheels to prevent unintended
movement.
DO NOT tow the log splitter if the tires are worn
or will not hold air.
DO NOT exceed the maximum 5 MPH towing
speed.
WARNING! The warnings, cautions and
instructions referred to in this manual cannot
cover all possible conditions and situations that
may occur. It must be understood that common
sense and caution must be applied by the
operator when using the log splitter.
When not in use, store the log splitter in a safe,
dry, childproof location.
FM22P Petrol Log Splitter
Fixed Blade
M10 x 70 hex bolt (1 off)
Moving pusher blade
M10 Nut
Ram locating plate
M10 hex bolt (8 off)
M10 spring washer (8 off)
M10 flat washer (8 off)
Ram assembly
Handle
11
12
13
14
15
16
17
18
19
20
M8x20 bolt (2 off)
M8 spring washer
M8 flat washer (4 off)
Main assembly
Towing bracket
O Ring 14 x 2.5
Hydraulic hose (long)
Hydraulic hose (short)
O Ring 11.2 x 2.4
M8x40 bolt (2 off)
10
11
12
9
6
7
Assembly Diagram
1
2
3
4
5
6
7
8
9
10
20
8
13
14
15
4
5
3
2
1
19
16
17
18
FM22P Petrol Log Splitter
5
Before commencing assembly, check that you have all the required parts and the correct nuts and
bolts and ensure you have read and understood these assembly instructions. Ensure the assembly
area is clean and free of obstructions.
Assembly
STEP 1
Secure the handle (10) to the beam using two
M8x20 bolts (11), spring washers (12) and flat
washers (13) at the top of the plate and two
M8x40 bolts (20) with flat washers (13) at the
bottom.
Note that the flat washer should be against
the plate of the handle and the spring washer
between it and the head of the bolt.
Lower the rear support leg and ensure it is
secured with the lock pins.
Rear
Support
Leg
STEP 2
R Clip
Lock
Pin
To make it easier to support the
ram assembly when installing
it, the main beam should be
rotated from the vertical position
in which it was packed, to the
horizontal position. Remove
the “R Clip” from the end of
the “Lock Pin” then remove the
lock pin. Rotate the beam to the
horizontal then replace the Lock
Pin and R Clip.
IMPORTANT: Parts of the log splitter (such as the ram assembly) are extremely heavy therefore it
is recommended that assembly is undertaken by two persons so that one is able to support parts
while the other secures them in place.
6
FM22P Petrol Log Splitter
STEP 3
Assembly
Lift the ram assembly (9) (caution it is heavy)
onto the beam and engage the two round
projections at the front, in the U shaped
slots in the mounting plates. Note the control levers must be positioned as shown in
the adjacent figure.
While one person supports the ram assembly, place the ram locating plate (5) over
the ram so that the u slots engage with the
round projections on the ram assembly.
Secure the plate with the 8 M10 flat washers (8), 8 M10 spring washers (7) and 8 M10
bolts (6). The flat washer should be placed
against the plate, with the spring washer between it and the head of the bolt.
STEP 4
Place the moving pusher blade (3) on the
end of the beam. Insert the base of the
blade under curved guide rails and slide
it along the beam so that the tubular
mount on the back of the blade engages
with the ram. Secure the blade to the ram
with the M10 bolt (2) and M10 nut (4).
FM22P Petrol Log Splitter
7
Assembly
C
B
D
A
D
B
A
STEP 5
Connect the end (A) of the short hose (18) that has the bent connector, to the connector (A) on top of
the pump. A small O Ring (19) must be inserted in the connection. Connect the other end (B) of the
hose to the left hand connector (B) on the control valve. Use a small O Ring (19) in the connection.
Connect the straight connector (C) on the long hose (17) to the right hand connector (C) on the
control valve. Use a large O Ring (16) in the connection. Connect the end with the bent connector
(D) to the connector on the top of the oil tank (D) (adjacent to the oil filler cap). Use a large O Ring
(16) in the connection.
IMPORTANT: Hoses need to be positioned were they are clear from the engine and cutting wedge.
Make sure the hydraulic hoses do not touch any hot surfaces or cutting areas. Make sure all fittings
are tight and secure before applying pressure.
8
FM22P Petrol Log Splitter
STEP 6
Assembly
Insert the fixed blade (1) into the slot in
the end of the beam and set at the desired
height by tightening the “T handle”
T Handle
STEP 7
Add Engine Oil
Make sure the log splitter is on a level surface. Remove oil fill cap/dipstick to add oil. Refer to the
separate owner’s engine manual for the amount needed of SAE10W-30 engine oil. Replace oil fill cap/
dipstick. Check engine oil level daily and add as needed.
STEP 8
Add Petrol To Engine
Use only clean, fresh, regular unleaded fuel with a minimum 85 octane rating. DO NOT mix oil with
fuel. Remove the fuel cap and slowly add fuel to the tank. DO NOT overfill allow approximately
¼ inch of space for fuel expansion. Screw on the fuel cap and wipe away any spilled fuel. Before
refuelling allow the engine to cool.
STEP 9
Add Hydraulic Oil
The log splitter needs to be on a flat, level surface before adding the hydraulic oil. Remove the oil
cap from the hydraulic oil tank. Add 13 litres / 2.86 gallons of hydraulic oil 10WAW32, ASLE H-150,
ISO 32 are all acceptable types of fluid. Check the hydraulic oil level. Start engine and use the
control lever to extend and retract wedge several times to remove air from the lines. With the wedge
retracted, check hydraulic oil level again and fill if necessary.
WARNING: DO NOT remove the hydraulic oil filler cap when the engine is running or hot. Hot oil
can escape causing severe burns. Always allow the log splitter to cool completely before removing
the hydraulic oil cap.
Make sure all fittings are tight and secure before applying pressure.
FM22P Petrol Log Splitter
9
Know Your Splitter
4
3
2
1
6
5
8
7
1
2
3
4
5
6
7
8
10
4 Way Cover
Fixed Blade
Pusher Plate
Moving Blade
Control Levers
Beam Locking Pin
T Handle
Hydraulic Oil Filler
FM22P Petrol Log Splitter
The log splitter must have at least seven feet of clearance from combustible material. It needs to
be on a dry and level surface with good footing. Do not work on mud, ice, brush or snow. When
using the log splitter the work zone must be maintained at all times.
Operation
Before operating or using the log splitter, review the instructions below and all safety information.
Failure to follow these instructions may result in property damage or injury to the operator or
bystanders.
STEP 1
Put the rear support leg in the down position
to prevent the log splitter moving during
operation and block both tyres.
Adjust the log splitter beam to the desired
working position, horizontal or angled.
Remove the R Clip and the locking pin then
adjust the beam. Replace both the locking pin
and R Clip.
Locking Pin
When lowering the beam do not allow it to drop
as it could crush fingers or cause damage to
the log splitter.
The horizontal position is used for lighter
logs that can easily be loaded onto the beam.
The angled positions are used for heavy logs
or large logs that are difficult to lift onto the
beam.
Rear Support Leg
WARNING: Always ensure the beam is locked in position with the locking pin and the R clip in
place to secure the locking pin.
FM22P Petrol Log Splitter
11
Step 2
Operation
Start the engine as instructed in the engine manufacturer’s handbook / user manual.
The hydraulic oil needs to be above -12C° (10°F) before starting the engine. Cold hydraulic oil can
damage the hydraulic pump. If outdoor air temperature is below 0C° (32°F) allow the log splitter to
warm up by extending and returning the wedge several times before splitting wood.
STEP 3
Load a log onto the beam. Do not exceed the max log length
given on page 2.
When using the splitter in the horizontal position, the log
should be placed against the edge of the fixed blade.
ü
For best results the logs to be square cut. However if one end
is cut at an angle, then this end should be placed against the
fixed blade, so that the pusher plate pushes against the square
end.
Split Log
STEP 4
Push both control levers up to split the log.
Push both control levers down to return the
moving blade to it’s original position.
DO NOT attempt to attach rope, cord or any
other device to the control levers to attempt
to operate the splitter one handed.
DO NOT remove the guard between the levers,
this will invalidate the warranty.
Retract
blade
WARNING: The wedge can cut through skin and break bones. Keep both hands away
from the moving blade, fixed blade and beam slide. Do not allow anyone else in the
work zone while operating the splitter.
WARNING: NEVER place a log on the log splitter so that you are splitting across the grain. Always
place logs so that you are splitting along the grain.
12
FM22P Petrol Log Splitter
The Forest Master logging cart (sold
seperately) can be used with the log
splitter to catch the logs as they are
split.
This saves back breaking bending down
to pick up split logs and makes it easier
to keep the work area tidy and safe.
The cart can be used both with the
splitter horizontal and angled.
Operation
LOGGING CART
DUOCUT OPERATION
When
using
the
log
splitter
horizontally, the log splitter can be
used as a DUOCUT log splitter, by
removing the pusher plate.
The splitter will then split the log with
two opposing blades, which increases
the efficiency and reduces the time
taken to split logs.
It also means that the splitter is very
unlikely to get stuck if one of the
blades encounters a knot, as it will
continue to split with the other blade.
NOTE: If a log gets stuck, embedded or will not split completely. Push the control levers in the
reverse direction to retract the moving blade. Undo the two bolts holding the pusher plate to the
moving blade. Push the control levers forward to split the log.
FM22P Petrol Log Splitter
13
MAINTAINING THE DUOCUT BLADE ALIGNMENT DURING SPLITTING
Operation
Under most circumstances when using your Duocut electric log splitter there will not be a problem
if the blades encounter a knot, as the log splitter will simply stop splitting with the blade that
encounters the knot and continue splitting at the other blade.
However there is a possibility that, if the moving Duocut blade encounters a knot at a shallow angle
then rather than stopping, the blade may be deflected off line and if splitting continues the moving
carriage arms can be bent out of alignment.
When splitting logs, you should therefore monitor the moving duocut blade and if you observe
the blade being deflected away from the centreline of the splitter, you should stop splitting
immediately. After the blade has returned to its stop you should turn the log through 90 degrees
about the long axis and try splitting the log again.
Locking Pin
TOWING
Towing
Bracket
To tow the log splitter with an ATV or garden
tractor the beam must be locked in the vertical
position.
Remove the pin holding the rear support feet
horizontal and raise them to the vertical.
Loosen the hand wheel locking the rear support
leg and raise the leg.
Feet
Place the tow bracket over the rear support leg
and align the holes in the tow bracket, support
leg and the raised feet so that the pin can be
inserted through them all.
NEVER attempt to tow with the beam horizontal
or angled.
DO NOT exceed the maximum towing speed of
5 mph.
DO NOT tow the log splitter on public roads or
highways.
MOVING BY HAND
When moving the log splitter around by hand,
it is easiest if the beam is in the 1st angled
position, 30 degrees from the horizontal. The
weight is then best distributed for moving it.
14
FM22P Petrol Log Splitter
After performing any maintenance, make sure all guards, shields and safety features are put back in
place before operating the log splitter.
Before operating make sure the tires have the RECOMMENDED TIRE PRESSURE.
Regularly grease axle and wheel bearing area or when needed.
Periodically check all fasteners and hoses for tightness and leaks.
Maintenance
Before performing maintenance, the log splitter must be placed in maintenance mode. Turn off the
engine and move the control lever forward and backwards to relieve the hydraulic pressure.
Annually clean and lightly lubricate all moving parts or when needed.
Use a glossy enamel spray paint to touch up scratched or worn painted metal surfaces.
Never exceed load capacity rating of 22 tons it will damage the log splitter.
What
Hoses
When
Each Use
Hydraulic
Fittings
Nuts and Bolts
Beam
Moving Parts
Each Use
Each Use
Each Use
Each Use
How
Inspect hoses for exposed wire mesh and leaks. Replace all
worn or damaged hoses before starting the engine.
Inspect fittings for cracks and leaks. Replace all damaged
fittings before starting the engine.
Check for loose bolts, tighten before operating.
Apply grease to beam surface.
Clear debris from log splitter.
Refer to the Engine Owner’s Manual for engine maintenance.
STORAGE
Before storing make sure the log splitter is clean and dry for years of trouble free service.
Lightly lubricate all log splitter surfaces and moving parts to prevent rust.
If the log splitter is to be stored for 1 month or more, drain the fuel from the engine. If left standing
for a long period, unleaded fuel oxidises which can subsequently cause probles starting the engine.
Additives are available for petrol that can prevent this.
Store indoors or protected area during severe weather and winter months.
IMPORTANT: If a part needs replacement, only use parts that meet the manufacturer’s specifications.
Replacement parts that do not meet specifications may result in a safety hazard or poor operations.
FM22P Petrol Log Splitter
15
TROUBLESHOOTING
Maintenance
Problem
Cylinder rod will not move
Causes: A,D,E,H,J
Slow cylinder rod speed when extending or
Causes: A,B,C,H,I,K,L,M
retracting
Wood will not split or splits extremely slowly Causes: A,B,C,F,I,K
Engine bogs down during splitting
Causes: G,M
Engine stalls under low load condition
Causes: D,E,M,N,O
Engine starting problem
Causes: O
Cause
Solution
A-Insufficient oil to pump
Check oil level in reservoir
B-Air in oil
Check oil level in reservoir
C-Excessive pump inlet vacuum
Check pump inlet hose for blockage or kinks
D-Blocked hydraulic lines
Flush and clean the splitter hydraulic system
E-Blocked control valve
Flush and clean the splitter hydraulic system
F-Low control valve setting
Adjust control valve with a pressure gauge
G-High control valve setting
Adjust control valve with a pressure gauge
H-Damaged control valve
Return control valve for authorized repair
I-Internal control valve leak
Return control valve for authorized repair
J-Internal cylinder leak
Return cylinder for authorized repair
K-Internally damaged cylinder
Return cylinder for authorized repair
L-Hydraulic oil filter clogged
Remove and clean the hydraulic oil filter
M-Engine Control out of adjustment
Adjust idle control nuts
N-Engine is loaded during idle down mode
Use shorter log length (550 mm / 21.65” or less) to
allow engine to speed up before contact.
Refer to the engine owner’s manual
O-Engine operation
16
Possible Causes
FM22P Petrol Log Splitter
Exploded View
17 70
FM22P Petrol Log Splitter
17
Parts List
Part #
18
Description
Quantity
1
Cylinder Assembly
1
2
Connector
2
3
Metal Hydraulic Hose
1
4
Control Valve
1
5
130° Elbow Connector (M24)
1
6
O Ring Ø14x2.5
2
7
Hydraulic Hose(valve-Oil Tank)
1
8
O Ring Ø11.2x2.4
2
9
Hydraulic Hose(valve-Gear Pump)
1
10
130° Elbow Connector (M22)
1
11
Connector
1
12
Hex Bolt M10x20
8
13
Lock Washer Ø10
8
14
Flat Washer Ø10
9
15
Handrail Assembly
1
16
Hex Bolt M8x20
3
17
Lock Washer Ø8
12
18
Flat Washer Ø8
14
19
Bottom Plate of Small Support Leg (Right)
1
20
Bottom Plate of Small Support Leg (Left)
1
21
Lock Pin
2
22
Hex Bolt M10x75
1
23
Nylon Lock Nut M10
1
24
Bushing
2
25
Small Support Leg
1
26
Clamp
2
27
Hydraulic Hose
1
28
Connector of Oil Filter
1
29
Oil Filter
1
30
Oil Tank
1
31
Hand Wheel
3
32
Wheel
2
33
Flat Washer Ø16
2
34
Nylon Lock Nut M16
2
35
Oil Plug
1
36
Large Support Leg
1
FM22P Petrol Log Splitter
Description
Quantity
37
Hex Bolt M12x100
2
38
Flat Washer Ø12
4
39
Nylon Lock Nut M12
5
40
Oil Bolt
1
41
Press Handle
1
42
Pin
1
43
Hinge Pin
1
44
Beam
1
45
Fixed Blade
1
46
4 Way Cover Cross Wedge
1
47
Big Flat Washer Ø8
1
48
Hex Bolt M12x60
2
49
Pusher Plate
1
50
R Pin
2
51
Hex Bolt M12x65
1
52
Moving Blade
1
53
Cylinder Cover
1
54
Engine
1
55
Hex Bolt M8x25
4
56
Hex Bolt M5x10
4
57
Coupler Cover
1
58
Screw M6x10
1
59
90° Elbow Connector (M22)
1
60
Gear Pump
1
61
Steel Wire Snap Ring for Shaft
1
62
Gear Coupler
1
63
Engine Coupler
1
64
Engine Bushing
1
65
Hex Bolt M8x30
4
66
Nylon Lock Nut M8
8
67
Gear Pump Stand
1
68
Hex Bolt M8x45
4
70
Hex Bolt M8x40
2
FM22P Petrol Log Splitter
Parts List
Part #
19
This product carries a limited parts warranty for 1 year from the date of purchase. Please keep your
proof of purchase as this will be required for any claim.
Warranty
Should this product become defective, contact the store where it was purchased and either replacement
parts will be issued, it will be repaired or it will be replaced free of charge.
IMPORTANT: NO RESPONSIBILITY IS ACCEPTED FOR INCORRECT USE OF THIS PRODUCT.
THIS WARRANTY DOES NOT COVER:
1.Any part that has become inoperative due to misuse, abuse, neglect, accident, improper
maintenance, or alteration; or
2.The unit, if it has not been operated and/or maintained in accordance with the owner’s manual; or
3.Normal wear;
4.Routine maintenance items such as lubricants, blade sharpening;
5.Normal deterioration of the exterior finish due to use or exposure.
TRANSPORTATION CHARGES:
Transportation charges for the movement of any power equipment unit or attachment are the
responsibility of the purchaser. The purchaser must pay transportation charges for any part submitted
for replacement under this warranty unless such return is requested by Forest Master.
NOTE: It is our policy to continually improve products and as such we reserve the right to alter
data, specifications and component parts without prior notice.
Manufactured under license for Forest Master Limited.
Registered Office:
Forest Master Ltd, Industry Road, Heaton, Newcastle Upon Tyne, NE6 5XB, United Kingdom.
Tel: +44 191 2966939
email: [email protected] - web: www.forest-master.com
20
FM22P Petrol Log Splitter