1
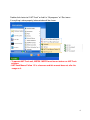
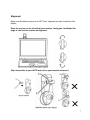
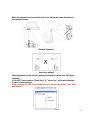
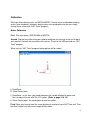
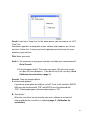
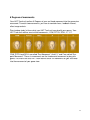
HAT-Track unit
MSFS USER MANUAL
(MED1.51-30JULY09)
Please read this manual before operating your
units and keep it for future reference.
VRinsight
Virtual Reality Insight
All stated here is subject to change without advanced notice for improvement.
Tel : +82-31-284-7090~91 Fax : +82-31-284-7092 E-mail : [email protected] Web site : www.vrinsight.com
1
BEFORE USE : Thanks for purchasing VRi’s HAT-Track unit.
Before operating your units, please read through this manual and keep it for future
reference.
For any further question, visit www.wilcopub.com or contact us below:
Fax : +32-2-33107 51
E-mail (Support team) : [email protected]
Please see the “VRinsight HTML document” and setup necessary software for your games.
NOTE : This manual could be redistributed unless you modify the contents.
This manual has been written out on a HAT-Track basis.
All software (& software versions) stated here (MED1.51-30JULY09) is subject to
change without advanced notice for improvement.
If you want to download the latest driver version & application programs,
visit www.vrinsight.com
If you play MSFSX, before using HAT-Track, please do software patch
(Acceleration or SP1, SP2) first.
HAT-Track Mouse Follow 1.5 is a freeware and this manual does not offer the
usage of it.
Box contents
2
VRinsight
HAT-Track
The HAT-Track of VRinsight offers dynamic view changes that makes you feel
more reality-like gaming. It is completely interfaced with MSFS9 and MSFSX
through add-on software “HAT-Track”, the HAT-Track enables dynamic view
changes with simple connection your computer through USB.
The HAT-Track is comprised of receiver and transmitter. The receiver filters IR rays
in it’s effect range and process the movements of IR rays itself resulted in very low
CPU utilization.
• HAT-Track software supports all functions to HAT-Track unit
• If you want to use a USB hub, be sure that the USB hub is USB 2.0 compliant.
Otherwise it may cause a malfunction.
3
Features
• Less hand controls by movement of your real head let you go deep into your games
• All aspects of your small motion are amplified and/or adjusted
• Simple installation and calibration makes your games more easier
• Dynamic view point synchronized with your will to see
• Extends the distance between you (Transmitter installed onto your headset) and your
monitor (Receiver installed) ; About Min 0.7m – Max 2.8m. (Extension cable used)
You can use your large LCD, PDP, Projection TV as a monitor
• Very low CPU utilization
• 46 Degrees HORIZONTAL field of view / 30 Degrees VERTICAL field of view
• Headset clip type
• One year warranty
Technical specifications
• USB interface type to computer
• 5cm(W) x 6cm(H) : Receiver / 17cm(L) x 13cm(W) : Transmitter
• 0.1Kg
Compatibility software
• Flight simulator 2004 / FSX by Microsoft
Operating software
• HAT-Track
4
Minimum system requirements
• Windows 2000, Window XP or VISTA
• Pentium 1GHz
• One (1) megabyte of free hard disk space
• 128 megabytes of RAM
• Free USB Port on computer
HAT-Track Installation
With HAT-Track, an “Install DVD” is included. When you insert it in DVD driver of your
computer, “VRinsight HTML” document will be shown. Then click “HAT-Track”
(operating software) and install it at a proper folder.
“HAT-Track” is the main operating software of VRinsight used for HAT-Track unit.
HAT-Track software supports full functions of HAT=Track and completely interfaced
with MSFS9 and MSFSX enables dynamic view changes with simple connection your
computer through USB.
USB Connection
The connection between HAT-Track and your computer is made using a USB cable
that plugs into an USB port on your computer. If you want to use a USB hub, be
sure that the USB hub must compliant with USB 2.0 standard. Otherwise it may
cause a malfunction.
When you connect HAT-Track to your computer at first, your computer will detect it
and will describe the process step by step.
Power Connection
Power supplying of HAT-Track is done by USB port of your computer. Make sure that
before trying to operate HAT-Track, you must confirm the USB connection first in order
to prevent malfunction.
Run “HAT-Track”
When you confirm all setup processes done; “HAT-Track” installation, “USB
connection” and “Power connection”, you are ready to operate HAT-Track unit.
Download & install “FSUIPC”
Refer to “Download & install FSUIPC” at “Download” part of www.vrinsight.com
5
Double click shortcut of “HAT-Track” or find it in “All programs” of “Start menu .
If everything is done properly, below window will be shown.
• To operate HAT-Track unit, MSFS9 / MSFSX must be run before run HAT-Track
software
• HAT-Track Mouse Follow 1.5 is a freeware and this manual does not offer the
usage on it.
6
Alignment
Make sure that before trying to use HAT-Track, alignment must be checked as like
follows;
Place the receiver on the left side of your monitor, facing you. And Adjust the
angle of the receiver to make an alignment.
Clip a transmitter of your HAT-Track unit on your headset and wear it
7
Make an alignment the transmitter with front facing the same direction as
the monitor screen.
Optimal alignment
Less than optimal
When alignment of the receiver and the transmitter is done, run HAT-Track
software.
In the HAT-Track window, “Dead Zone” & “Vector line” will move following
to your head movement.
(If you can not see HAT-Track window, check “Power connection” and “USB
connection”.)
8
Calibration
VRinsight offers default values for MSFS9 /MSFSX. Default values are decided made by
testers (over hundreds). However, default values are not absolute and you can simply
change these values with “HAT-Track” program.
Before Calibration
First. Run your games (MSFS9 2004 or MSFSX).
Second. Clip the transmitter onto your headset and place the receiver on the left & top of
your monitor. Connect the transmitter with receiver. Plug it to the USB port and run “HATTrack” program.
When you run “HAT-Track” program, below picture will be shown;
HAT-Track
1
2
1) Dead Zone
2) Virtual Center-point
1) Dead Zone : in this area, your head movement will not be reflected to game view.
You can adjust the size with DH & DV values. (Refer to page 13 & 14)
2) Virtual Center-point : the center point of your transmitter.
Third. Place your head to face the same direction of receiver of your HAT-Track unit. Then
new line(=Vector line) with certain angle will be shown :
9
Fourth. If you find a “Vector line” as like above picture, you are ready to use “HATTrack” unit.
Sometimes regardless of completion of your software and hardware, you still can
not see a “Vector line”. It means you haven’t placed your head to face the same
direction of your receiver.
Fifth. Move your head.
Sixth. A. The movement of your game view does not follow your head movement?
Go to Seventh.
B. Everything goes alright? Then enjoy your game. (But you must see the
rest parts for future problems) . If you do not satisfy the sensitivity, Go to
Calibration the sensitivities. (page 11)
Seventh. There are two possibilities.
A. control mode problem.
If you do not select game title and just run HAT-Track, it will not effect. MSFS9
2004 must be interfaced with “FS9” and MSFSX must be interfaced with
“FSX”. Check proper game interface mode and press “OK”.
B. “Sensitivities”.
When the sensitivities are not tuned to your taste, calibrate to customize it.
How to calibrate the sensitivities is explained page 11. (Calibration the
sensitivities)
10
6 Degrees of movements
Your HAT-Track unit realizes 6 Degrees of your real head movement into the game view
movement. To match two movements, you have to consider focus, feedback interval,
effect range and etc.
Prior to deep study, let learn what your HAT-Track unit can do with your games. Your
HAT-Track unit realizes most critical movements ; YAW, PITCH, ROLL, X, Y, Z.
YAW, PITCH and ROLL are called “Pan Movement”. And X, Y and Z are called “Eyepoint Movement”. These six movements are the fundamental movement to play your
games. Let make sure that HAT-Track realizes these six movements of your real head
into the movement of your game view.
11
Calibration the sensitivities.
When your double click “HAT-Track” program and place your head to face the same
direction of your receiver a “Vector line” will be shown.
(Refer to the picture of page 9).
Three IR rays emitted form your transmitter for 6 Degrees of movement are received by
your receiver and then inverted as a “Vector line” on “HAT-Track window”. As you move
your head, the “Vector line” will be changed to find a new phase and displacement.
I mean when you move your head as like above picture, the “Vector line” will change.
Each movement is called in this manual as follow;
YAW (Left / Right) = DX
PITCH (Up / Down) = DY
ROLL (Tilted angles) = DT
X (Left / Right) = DH
Y (Up / Down) = DV
Z (In / Out) = DZ
YAW, PITCH, ROLL are called “Pan Movement”. And X, Y, Z are called “Eye-point
Movement”
Your “HAT-Track” analyzes your movement 60 frames per second. And even if you don’t
feel tiny movement of your head, “HAT-Track” analyzes and then reflect on your game.
You will be quite dizzy.
To prevent this, there is a “Dead Zone” . You can adjust the size of a “Dead Zone” with
“DH” & “DV”.
12
Run “HAT-Track” program and then double click “Setting”.
A
G
4
3
C
B
75
7H
2
D
6
9
E
I
F
J
“Configuration” window shows all necessary adjustments. All digits of above picture are
“Default values”. This will be shown, when you run “HAT-Track” program and press “Setting”.
13
A. Calibrate “Smooth”
Decide the smooth of game view change
Getting close to 01, game view change will be done with some delay.
Getting close to 4094, game view change will be very smoothly done .
B. Calibrate “Sensitivity”
DX (01~200) : Decide amplification rate of “YAW” movement of your head to “YAW”
movement of game view.
Getting close to 01, the amount of your head movement will be smaller than the amount
of game view movement.
Getting close to 200, the amount of your head movement will amplify the amount of game
view movement.
DY (01~200) : Decide amplification rate of “PITCH” movement of your head to “PITCH”
movement of game view.
Getting close to 01, the amount of your head movement will be smaller than the amount
of game view movement.
Getting close to 200, the amount of your head movement will amplify the amount of game
view movement.
DZ (01~200) : Decide amplification rate of “ZOOM” movement of your head to “ZOOM”
movement of game view.
Getting close to 01, the amount of your head movement will be smaller than the amount
of game view movement.
Getting close to 200, the amount of your head movement will amplify the amount of game
view movement
DT (01~200) : Decide amplification rate of “ROLL” movement of your head to “ROLL”
movement of game view.
Getting close to 01, the amount of your head movement will be smaller than the amount
of game view movement.
Getting close to 200, the amount of your head movement will amplify the amount of game
view movement
DH (01~200) : Decide length of “Dead zone”.
Getting close to 01, length of “Dead zone” will be getting smaller.
Your tiny movements (YAW, ROLL, X) will be reflected to game view. But hard to
concentrate your game.
Getting close to 200, length of “Dead zone” will be getting bigger.
Your tiny movements (YAW, ROLL, X) will not to reflected to game view.
14
DV (01~200) : Decide width of “Dead zone”.
Getting close to 01, length of “Dead zone” will be getting smaller.
Your tiny movements (PITCH, Y) will be reflected to game view. But hard to
Concentrate your game.
Getting close to 200, length of “Dead zone” will be getting bigger.
Your tiny movements (PITCH, Y) will not to reflected to game view.
C. Select calibration method(POLAR, CIRCLE, LINEAR, POLAR/INV,CIRCLE/INV,
LINEAR/INV)
Drop down to select calibration method.
For instance, even if you calibrate “YAW” motion for your taste, DX value may not
satisfy. Then change calibration method so that you can find the best calibration
method for your game. In some games, the direction of your head movement and
game view is opposite. In this case, select POLAR/INV, CIRCLE/INV or LINEAR/INV.
D. Floating Dead-Zone : DIS (Digital Image Stabilization) function
When you are staring a point, even if you think you do not move and just stare a point,
game view will be moving somewhere. Since you can not realize tiny movement of
you head. It prevents looking a point precisely.
DIS function will solve this problem and furthermore you can adjust it for your tastes.
Range : Decide how long you will use DIS function to stare a game view.
Getting close to 01, game view staring will stop shortly.
While moving your head to see sceneries and then you stop to stare a point, game
view will shortly stop to help you seeing it.
Getting close to 20, game view staring will stop little more longer.
While moving your head to see sceneries and then you stop to stare a point, game
view will stop to help you seeing it.
Count : Decide how frequently you will use DIS function to stare a game view.
Getting close to 01, DIS function will activate more frequently. So game view staring
will move very little.
Getting close to 10, DIS function will activate at long interval. So game view staring
will move frequently.
Each digit means 0.3 sec. (01=0.3sec / 10=3sec)
Note : To get best performance, you should adjust Range & Count value
together.
15
E. Game interface
“FS9” mode is needed only for playing MSFS9 2004. “FSX” mode is needed only for
playing FSX.
F. User Configuration
When you finish value setting, you can save it at any name. And also you
can load any of your saved game.
G. Center
If you satisfy the current alignment, press “Set”. (Dead Zone will move to the current
vector line). If you want to change the current alignment, press “Reset” and find a new
alignment and then press “Set”.
H. Hot Keys
You can assign Hot Keys for each command. To change “Hot Keys”, place your cursor at
the current command and press any button you want to assign. After assignment, all Hot
Keys are available while playing your game. If you do not want to use them press “Arrow
button”(
)
Pause : To pause HAT-Track function while enjoying your game, press Hot-Key button.
It means even if HAT-Track function is stopped, you can enjoy your games without HATTrack.
Center : Go to the initial game view what you set the “Center”. While enjoying your
game, press Hot-Key button. It means when you press “Hot Key” for “Center”, game
view what you are seeing moves to the initial game view what you set the “Center”.
Show DOTs : To hide or show your “Vector line” on “HAT-Track” window while enjoying
your game, press Hot-Key button. When you want to see the movement of Vector line,
press the “Hot-Key” for “Show DOTs” to overlap the vector line with dead zone at game
view. This is very useful function for anyone who is not used to using HAT-Track.
With this function, you can feel how much of default value should be changed for your
taste.
16
I. View Offset
All games offers default view. However, it is not always the best default view for each
user. Using “View Offset”, you can change any of game view as a default view. Select
“View Offset” mode for your tastes “Yaw/Pitch”, “Pan X/Y” or “Zoom/Tilt”.
Up : Move to upper for using it as a new default view.
Dn : Move to lower for using it as a new default view.
Lt : Move to left for using it as a new default view.
Rt : Move to right for using it as a new default view.
J. OK & Cancel
If you satisfy the current setting values, press “OK” to apply it. If you want to exit,
press “Cancel”.
17
Trouble shooting.
Run “HAT-Track” program trouble – Link test
1. Check whether your USB port is dead or not.
2. If you are using UBS hub, check whether it is compliant with UBS 2.0 standard or not.
Vector line trouble – Arrangement & Configuration test
1. Check whether the transmitter is clipped on your headset or not.
2. If “Vector line” is not shown, place your head to face the receiver of your HAT-Track.
3. Confirm whether “Show Dot” is checked or not (Even if HAT-Track is working, the vector
line may not be shown. It means “Show Dot” is checked.)
4. Read Calibration the sensitivities (page 13) again.
5. If you move to a new place, reset “Center” for your “Vector line”
No movement of game view – Game Interface
1. Please check that you have downloaded & installed “FSUIPC”.
On “FSUIPC”, refer to “Download & install FSUIPC” at Download.
2. If you play MSFS9 2004, please go to the “Game Interface” of “Setting” of HAT-Track
software and check “FSUIPC” is checked.
3. If you play MSFSX, please go to the “Game Interface” of “Setting” of HAT-Track
software and check “Simconnect” is checked.
4. Check your game view is in 3D mode or not.
MSFS9 2004 : Default cockpit view is 2D. Press “S” button to change 3D virtual cockpit
view.
MSFSX : Go to main game screen. Find “Setting” and click. Find “Customize…” and
click. Find “Aircraft” and verify “3-D virtual cockpit” of “Default cockpit view”
is checked.
5. If you play MSFSX, before using HAT-Track, please do software patch
(Acceleration, SP1, SP2) first.
6. Even if FSUIPC4.x is properly installed and it says its okay, but you load MSFSX
and still find no "Add-Ons" menu. In this case, it is simply a matter of telling the
firewall or privacy program to trust FSX, to move it to the trusted and internet
zones.
7. Avid using HAT-Track at any strong rays around user.
8. Any mirror around a user may cause malfunction.
Other troubles or further more question contact us ([email protected])
18