1
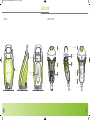
Manuel E-ONE 2010 FR>English_Manuel EOne 01/07/11 12:13 Page1
U s e r
M a n u a l
Manuel E-ONE 2010 FR>English_Manuel EOne 01/07/11 12:13 Page2
TABLE DES MATIERES
PACK CONTENT
PRECAUTIONS FOR USE
LEXICON
INFORMATION PROVIDED BY THE
TOUCH SCREEN
HAIR REMOVAL WITH THE
4
8
12
14
18
Dear Customer,
Thank you for buying the
.
Lifestyles are changing and the
is a perfect example
of this. Professional and safe hair removal is now brought to
you in the comfort and privacy of your own home.
I give my own personal guarantee that each
is
manufactured to the highest standard and as you will see,
the
is a remarkable product.
I hope that you will be fully satisfied with your purchase and
I invite you to share your remarks on our company's official
website.
CHANGING THE OPTIC CARTRIDGE
SOFTWARE OPTION
WHAT NOT TO DO
USING THE ACCESSORIES
MAINTENANCE
MARKING
ERROR MESSAGES
STANDARDS
SHOW ROOM
GARANTEE
2
30
Best regards,
40
42
44
46
48
49
50
51
Yves Vincent
creator
3
Manuel E-ONE 2010 FR>English_Manuel EOne 01/07/11 12:14 Page4
E>ONE PACK CONTENT
1
base - details page 12-13
1
applicator - details page 12-13
1 Optic - cartridge (consumable)
(included with your
applicator)
1 stop - marking plate
1 Clean - optical spray
1 Patches
1 extractor
adhesive patches
extraction tool
N
ATTENTION:
DO NOT DISPOSE OF ANY OF
THE PACKAGING
1 marking Pen - for marking, with sharpener
1 gel - optical gel
1 Mask - protective glasses
1 depilation diary
1 user manual
NOTE: E-Swin is exclusively authorised to sell the
and
its accessories: optic, stop, clean, patches, pen, gel,
mask, fun, etc. on its website www.e-swin.com.
AVERTISSEMENT
4
The E>One is intended for private domestic use only and must not be used for any
commercial or professional means.
The 2-year manufacturer’s parts
and labour guarantee is only valid
if the item is returned in all of its
original packaging.
Please therefore keep all of the
packaging in which the
was
delivered in a safe place.
The manufacturer’s guarantee will be lost if, at any time, the machine is used professionally. If an E>One
loses its guarantee, it cannot be reapplied, even when a guarantee extension has been initially set.
5
Manuel E-ONE 2010 FR>English_Manuel EOne 01/07/11 12:14 Page6
Manuel E-ONE 2010 FR>English_Manuel EOne 01/07/11 12:14 Page8
PRECAUTIONS FOR USE
FOR YOUR SAFETY
Please read the following information carefully before using your
• This item can only be repaired using specialised tools. In the event of any after-sales
problems please contact us via our website on www.e-swin.com via your personal
area.
:
• Voltage: 100 - 240 V~
• Nominal frequency : 50-60 Hz
• Maximum power : 240 VA
• Check that the voltage matches that of your mains electricity. Incorrect connection
may cause irreversible damage that is not covered by the guarantee.
• Check that the outlet to which your E-One is connected is undamaged and in perfect
condition, and does not preclude the proper use of your E-One (the socket must be
easily accessible)
• The
is for private and domestic use only. It should not be used for professional purposes.
• Do not disconnect by pulling on the
lead.
• Do not use an extension cord with the
• Never handle the
.
with wet hands.
• The
must not be used in the shower or bath or in any place where water
may splash onto it (applicator or base).
• Never immerse the
base, applicator or Optic cartridge in water.
• Never use the
if it is damaged, if faulty operation is indicated on the touch
screen, or if it has been dropped (non-visible damage may put your safety at risk).
• The Optic cartridges and all other accessories should only be ordered from our website www.e-swin.com via the "My account" and "New Accessories Order" sections. We
decline all liability for the use of cartridges and accessories provided by other manufacturers.
• During use, the
not likely to fall.
must be placed on a flat surface and in a place where it is
• E-SWIN SAS declines all liability for any damage resulting from improper use of the
item or any use other than provided for in this user manual.
• The
comes with a pair of protective glasses (mask): these glasses must
be worn throughout use. Any other persons in the vicinity at the time of use of the
must also wear a mask.
• During operation the
must not come into contact with your hair, the
must not be used for
periocular region protected by the mask (the
eyebrow and eyelash removal for example), clothing or other objects, so as to
prevent any risk of injury, blocking or deterioration.
• The applicator tip must not be touching the mask during the shot.
• Never use near aerosols, a heat source or near other electronic devices.
• Do not place on top of other electronic devices.
• Your
comes with a mains cord (2m) and an applicator cord (2m). Do not
use an extension cord or any cable other than those provided by E-Swin
Only people able to read and understand their user manual can use the
8
.
Only person who meet the usage criteria detailed in this manual are authorized to use the
themselves.
on
9
Manuel E-ONE 2010 FR>English_Manuel EOne 01/07/11 12:14 Page10
PRECAUTIONS FOR USE
YOU SHOULD NOT USE THE
• If you are pregnant or diabetic.
• If you have a skin disorder (eczema, inflammation, acne etc.)
• To remove grey or red hair. In particular, individuals born with skin photo type I and
red hair. In adulthood the fundamental orange colour may wane in these individuals,
however the hair's melanin structure retains the characteristics on which pulsed-light
depilation technology is ineffective.
• If you are receiving photosensitizing treatment (ask your doctor for advice).
• On very dark or black skin (please consult our website at www.e-swin.com - "Clinical
information" section).
• On damaged, burnt or infected skin.
• On skin having suffered sunburn and healed less than one month ago.
• On skin lesions requiring a medical opinion.
• If you have a history of dermatological disorders. Please seek medical advice before
using the
.
• Not to be used on animals.
UV Precautions:
Sunbeds: be cautious when using sunbeds after treatment.
Particularly concerning the more high powered machines; it is recommended to
leave a few days before or after your tanning session prior to using the E-One.
Natural UV: when exposed to sunlight after a IPL session with the E-One, it is
imperative to apply sunblock on the areas treated during the 2 weeks following
the session.
• On high-risk areas (spots, birth marks, warts, unhealed wounds etc.)
• on moles: if they are located on the area to be treated, you must cover them with
the adhesive Patches - supplied with the
.
• on tattooed areas: makeup tatoos (eg, lip lining), or tattoo designs, whatever the
color, must be protected by the stop marking plate that comes with your
.
KEEP OUT OF THE REACH OF CHILDREN
• Any use of the E-One on a minor should be performed under the supervision of an
adult.
10
Sunless Tanning:
Do not use the E-One if a self-tanner has been applied to the area to be treated;
wait for the complete disappearance of the self-tanner before using the E-One.
Only use the pen, the gel, Patches, stop
marking plate and Mask provided with your
.
The use of any other products may lead to skin burns
NEED HELP?
PERSONS WITH HIRSUTISM
For more information please consult the FAQs in the "Community" section on our official
website forum.
The E>One is certified for use on persons with hirsutism (hormonal or idiopathic).
11
Manuel E-ONE 2010 FR>English_Manuel EOne 01/07/11 12:14 Page12
LEXI CON
❙ BASE
❙ APPLICATOR
Light
guide tip
Mobile head
sprockets
Touch screen
Lower
shell
Applicator
lead storage
Applicator
housing
Mobile head
Air
vents
Trigger
button
Shot
ready
LED
Upper
shell
12
13
Manuel E-ONE 2010 FR>English_Manuel EOne 01/07/11 12:14 Page14
INFORMATION PROVIDED BY THE
1
The steady state icon indicates that no component is
overheating. When blinking it indicates that certain components have exceeded the permissible temperature.
The switches to standby mode automatically until normal
temperature is reached again.
THE
TOUCH SCREEN__
BASE IS EQUIPPED WITH A TOUCH SCREEN
10 Shot intensity gauge.
11
These icons are used to increase or decrease the
shot intensity.
12 Selections can be confirmed with icons 7, 8, 9, 10
2 This icon warns that the projection of water on any
part of the
and 11.
is strictly prohibited.
2
1
3
4
6
5
13
Once the settings have been confirmed and the
safety icons unlocked, the
is ready for use.
Pressing this icon places the
in pause mode,
thus disabling emission of shots from the applicator.
Press icon 12 to leave the pause mode.
3 Warning or precaution for use. The following number
icon shows which page of the manual should be consulted.
4 Where a warning or precaution for use is displayed,
8
this icon shows which page of the manual should be
consulted.
13
7
14 This icon is used to change the selection made pre-
viously on icons 7, 8, 9 and 11.
5 This icon indicates that the
must not be used
in certain physiological or medical contexts (during
pregnancy, when taking photosensitizing medicine etc).
11
10
12
6 This icon indicates that the (mask) must be worn at
16 These icons make it possible to browse the various
14
all times during use.
8 These icons show 4 different hair thicknesses, from
the finest (on the left) to the thickest (on the left).
9 These icons represent 5 types of skin colour, from
the fairest (on the left) to the darkest (on the right). Black
skin is not shown as the
cannot be used on
black skin.
14
can be switched on and off by means
of this icon.
9
7 These icons are used to select "male" or "female".
15 The
15
16
17
18
19
menus.
17 Real-time information display.
These characters enable menu browsing and language
selection and can be used to enter a personal identification number or Optic cartridge activation codes.
18 Consumable level gauge (Optic cartridge).
19 This icon is used to confirm the information entered
in the characters (no. 17).
15
Manuel E-ONE 2010 FR>English_Manuel EOne 01/07/11 12:14 Page16
Manuel E-ONE 2010 FR>English_Manuel EOne 01/07/11 12:14 Page18
HAIR REMOVAL WITH THE
❙ BEFORE EACH USE
______
This enables visual access to the filter, tube, light guide and internal side. The filter (red, glass flat part) must be
intact, not split and must have a flat and regular surface. It must be clean and dust-free. For effective
performance it is recommended that you clean the filter before each use with the clean spray provided (see
instructions for use of the spray in the appendix).
• Check that the mains lead is not pinched or squashed and that there are no bare wires.
• Check that there is no visible damage to the cable linking the base to the applicator.
• Check the
's external and internal optical parts.
- Checking the external optical parts
> Check that the applicator's glass tip (light guide) is intact. If it is not the case (light guide split or chipped) it
must be changed. This part can be ordered on the www.e-swin.com website (go to "My account", "New
Accessories Order", "mobile applicator head")
- Checking the internal optical parts
> Before switching on and using your
, please check that all internal optical parts are intact: tube, filter (red,
glass flat part) and light guide. To do this, with the extractor, remove the mobile applicator head from the applicator
body by pressing on both sides of the mobile head at the same time as shown below (see photo 2)
p
18
2
❙ STEP 2
CHOOSE THE BEST TIME FOR USING THE
PREPARING YOUR SKIN
If your usual depilation method is:
• Your skin should be clean and dry and cleansed of any
cosmetic products.
- The razor
You may use the
straight away.
• Do not apply any cream, moisturizer, oil or any other
substance to the skin.
- Depilatory cream
You will only be able to use the
the last depilation.
- Waxes, electric epilator, tweezers
You will only be able to use the
after the last depilation.
p
1
❙ STEP 1
one week after
three weeks
- Laser or flash lamp technology and other methods
You will only be able to use the
once regrowth
has begun.
3
• Shave the area to be treated.
It is essential that the areas of the skin to be treated
are freed of all hair by shaving (wax, cream, electric
epilator or any other method that plucks the hair
should not be used). The skin should be damp upon
shaving to minimize the harsh effect of the razor.
• Rinse the skin thoroughly with water after shaving to
remove any remaining cut hairs.
4
19
Manuel E-ONE 2010 FR>English_Manuel EOne 01/07/11 12:15 Page20
HAIR REMOVAL WITH THE
______
❙ STEP 3
SWITCHING THE
SETTINGS
• Depilation settings
- SELECT YOUR PROFILE
"Male" or "female" by pressing the relevant side
of the body.
The profile selected remains displayed: the other
fades away.
ON AND ADJUSTING THE
Reminder:
Icon definitions can be found on pages 14 and 15
Your
is already equipped with a pre-installed
optic cartridge. You do not to have to enter activation
codes to operate your device.
• Plug the
mains lead in
3 beeps sound and 2 icons are displayed on the
screen:
- "E>One" product icon (top left).
- On/Off icon (bottom left, icon 15 p. 15).
The screen backlighting is not yet lit
• Press the on/off icon bottom left
- The backlighting comes on.
- All icons are displayed.
- The
internal test procedure begins and
ends after a few seconds.
- At the end of the test procedure, the dropdown text at the bottom of the screen proposes
"Epilation".
- Press the validation icon bottom right (icon 19
p. 15) to access the clinical settings menu.
20
5
- SELECTING HAIR THICKNESS
Once the profile is selected, the 4 hair thickness
icons are displayed from the finest hair on the
left to the thickest hair on the right. Press the
desired thickness: the icon flashes.
7
- SELECTING SKIN COLOUR
Once the hair thickness has been selected 5 skin
colour icons are displayed, from the fairest skin
on the left to the darkest skin on the right.
Very dark and black skin options are not
available as they are incompatible with the
.
8
6
Press on the colour selected. It will start to blink.
21
Manuel E-ONE 2010 FR>English_Manuel EOne 01/07/11 12:15 Page22
HAIR REMOVAL WITH THE
-
______
SETTING THE DESIRED INTENSITY:
Once the skin colour is selected the intensity
gauge appears. Icon 11 (see page 15) is used to
increase or decrease the shot intensitys
The intensity is set to low by default. This value produces good results for the majority of
users in optimum conditions of safety in 100% of cases. Increasing the intensity will result
in the following:
- Enhanced results
- Reduction in the number of sessions required to obtain a lasting result
- Increased skin sensation upon application
- Increased risk of redness or even burns on highly pigmented skin (dark skin) after one session
NOTE
- Icon 12 is used to confirm the intensity level
(see page 15)
• Unlocking the safety system
- Once the previous settings are confirmed by
icon 12, icons 2, 3, 4, 5 and 6 as shown on page
14 begin to blink
9
This procedure recalls the basic safety guidelines:
- Water must not be projected on the
- The
must not be used if taking
photosensitizing medicine and the skin must be
healthy
- The Mask must be worn throughout the session
Important: the darker the skin treated (whether this is natural or through tanning), the more it is
recommended to set the
to a low intensity.
Always start with a test patch at the lowest setting (default setting
IN PRACTICE proposed
by the
) then increase the intensity level gradually by 1
point each time. Apply a shot then wait for 5 minutes to evaluate the skin's reaction. If no reaction occurs
you may then treat the entire area or increase the intensity by 1 point and re-evaluate the reaction (and
so forth).
N.B.: the
will not emit a shot until all safety
elements have been unlocked (by pressing on each
flashing icon)..
22
10
23
Manuel E-ONE 2010 FR>English_Manuel EOne 01/07/11 12:15 Page24
HAIR REMOVAL WITH THE
❙ EXAMPLES
______
❙ STEP 4
Reminder: the Pen, Gel, Patches, Stop marking
plate and Mask should be provided with your
. The use of any other products may lead to
skin burns and are not covered by the guarantee
APPLICATION
• Circle the area to be treated using the pen.
"I am a man with fair skin and I want to epilate my
armpits."
The following selections apply:
. Male
. Fair skin (1st colour)
. Thickest hair (4th thickness)
. Intensity level gauge (1st level)
• Cover the small areas to be protected (moles etc.) with
the patches.
• Apply the gel in a thin layer to the area to be treated.
11
"I am a woman with dark skin and I want to epilate my
arms."
The following selections apply:
. Female
. Darkest skin (5th colour)
. Hair (2nd thickness)
. Intensity level gauge (1st level)
• If necessary, use the stop to hide any large areas not
to be treated (tattoo etc.)
Observation: if you wish to treat a large area, do not
spread the gel on the whole area straight away as it will
dry and become ineffective in terms of optical transmission. Spread the gel on the area in question gradually as
you go. Once the gel has been applied to the skin and
treated it must not be reused on another area. Once the
gel has been subjected to a shot, changes are likely to
occur in its optical characteristics.
• Put the mask mask on. Any other persons in the vicinity during use must also wear a mask. Important: do
not apply shots to the periocular area (under the Mask
protecting your eyes, eyebrows, eyelashes etc.).
12
TIPS !
To remove easily the applicator from its base, you should hold its
big white cable and lift up. The applicator can be then taken
down easily.
24
25
Manuel E-ONE 2010 FR>English_Manuel EOne 01/07/11 12:15 Page26
HAIR REMOVAL WITH THE
• Shot emission
- To be able to emit shots the glass applicator tip
(light guide) must be placed on the skin. Pressure
must then be applied so as to snap on the applicator head.
______
If you wish to clean the
after use, you
must wait until the applicator fan has stopped
before unplugging the base. This enables the
optical parts to cool down fully.
The applicator must only be used once the
green light is on (if the applicator is pressed
to the skin too early (before the green light
comes on), no shot will be emitted.
- Shot emission can then be triggered by pressing the button on the side of the applicator.
13
14
- Pressure must then be released for the applicator to come away from the skin.
- The applicator is then moved to an adjacent
area. The next shot may only be applied once the
LED is green (if the applicator is applied before
the LED turns green, no shot will be emitted).
- Take care to stretch the skin in those areas in
which it is finest to ensure that the glass part of
the applicator tip (light guide) comes into
contact with the skin and that hair is removed
correctly from the treated area.
❙ STEP 5
END OF THE SESSION
15
16
• Store the
in a suitable place.
Observation: After depilation, small red spots may
appear: it is a normal reaction, they will disappear
shortly afterwards.
Observation: If you have sensitive skin, do not use a
depilatory cream on the treated areas for one week
after depilating with the
• Press button 15.
Observation: Each time a shot is emitted the area epilated is the area covered by the light guide tip, 3 x 2
= 6 cm_. Upon releasing the pressure on the applicator, a slight imprint can be seen in the gel enabling
you to see where you are up to.
The glass surface (light guide) at the tip of the applicator must be placed flat on the skin.
• You may unplug the E>One from the mains once the
fan has switched off (after approximately 10 minutes).
• Clean the glass applicator head (light guide) with a
damp cloth.
17
26
18
• Finish cleaning with the Clean spray
(photos 19 and 20).
19
20
27
Manuel E-ONE 2010 FR>English_Manuel EOne 01/07/11 12:15 Page28
Manuel E-ONE 2010 FR>English_Manuel EOne 01/07/11 12:16 Page30
__CHANGING THE OPTIC CARTRIDGE
❙ STEP 3
• Switch the
off
• Unplug it from the mains
❙ STEP 4
23
24
25
26
27
REMOVING THE CARTRIDGE WITH THE EXTRACTOR
❙ STEP 1
• Hold the applicator so that the air vents are facing you.
Insert the extractor between the mobile head and the
lower shell of the applicator (photo 22)
The cartridge must be changed when "Change cartridge"
is displayed on the screen.
• Push the extractor inside the mobile head to the end
(photo 23)
The Optic cartridge must not be changed
before this message is displayed.
Cartridges changed too early cannot be
used again.
You may track the cartridge status on the touch screen
at any time.
22
p
ATTENTION
p
Great care must be taken when changing the cartridge. Incorrect handling
may lead to irreversible damage to the applicator and to the
in
general. In the event of improper handling the guarantee will no longer be valid. We therefore recommend that you follow the official procedure closely.
• Push the 2 mobile head sprockets at the same time and
remove the mobile head (photo 24)
• Remove the extractor and gently place the mobile
head on a flat surface (photo 25)
21
• Identify the cartridge positioning notches (photo 26)
• Gently extract the cartridge and remove it completely
(photo 27)
❙ STEP 2
• Wait for the fan in the applicator to stop before switching off and unplugging your
minutes). This procedure enables the internal optical parts of the applicator to cool down..
30
(this may take a few
Diagrams of different parts of the applicator are shown on
p. 13
31
Manuel E-ONE 2010 FR>English_Manuel EOne 01/07/11 12:16 Page32
__CHANGING THE OPTIC CARTRIDGE
❙ STEP 5
p
p
INSERTING A NEW CARTRIDGE
• Identify the way in which the new cartridge should be
inserted (photo 28).
28
29
p
Another red dot on the applicator shows you the direction
(both red dots should be on the same side).
30
• After having inserted the cartridge it must be ensured
that it is in the right position: it must be aligned with the
tip of the fixed part of the applicator (photo 30).
If this is not the case (if it overlaps by more than 2 mm)
33
34
35
p
p
To guide you, a red dot indicates the underside of the cartridge. This must be placed to face the side of the epilator
with the air vent.
Attention: when inserting the cartridge care must be
taken not to touch or snag the very fine metal wire
shown in photo 29.
32
• Check that the cartridge is firmly in place.
p
Observation: the cartridges are not symmetrical and
must therefore be inserted in a certain way and care
should be taken not to insert them the wrong way.
this means the cartridge has been incorrectly inserted: it
must therefore be removed and you should check that:
- the red dots are on the same side (photo 28)
- the electrodes have not been twisted (photo 31)
If the electrodes have been twisted, the Optic cartridge must
not be inserted in the
. This may cause serious
damage to your
You must therefore return the
damaged cartridge to us and order a new one.
31
Precautions: throughout cartridge replacement procedure you must not touch
- The tube or its reflector (photos 32 and 33 )
- The tube electrodes (photo 34)
- The short metal wire attached to the applicator (photo 29)
- The copper contact studs at the base of the
applicator
If you have inadvertently touched the tube or its reflector, we recommend that you return your cartridge to us
in order to have it replaced.
❙ STEP 6
• Before repositioning the mobile head of the applicator,
always clean the filter (in the applicator head) on the
accessible side with the Clean spray (photo 35). The
filter is the red glass part..
OBSERVATION:
32
the cartridges are not symmetrical and must therefore be inserted in a certain way and care
should be taken not to insert them the wrong way.
33
Manuel E-ONE 2010 FR>English_Manuel EOne 01/07/11 12:16 Page34
__CHANGING THE OPTIC CARTRIDGE
❙ STEP 7
- Using the browser icon 16 (see page 15), enter
the first code provided (5 digits).
Icon 16 enables you to change the digit in each
box and move from one box to another. Once the
full code has been entered, confirm by pressing
icon 19. You will then need to enter the second
activation code and confirm it by pressing icon
19.
• Snap the mobile head back in by pressing gently as
shown opposite.
❙ STEP 8
ACTIVATION CODES
36
37
If you have entered the wrong code an error message is
displayed. You must then enter the two activation codes
again one after the other.
• Plug the
in.
• Switch it on by pressing the on-off icon bottom left.
- After validating the Optic cartridge replacement
request a message is displayed asking for the first
activation code of the cartridge inserted to be
entered.
These activation codes will have been sent to you by
e-mail at the time of ordering. They will be available in
your personal customer account. To access them, you
have to connect to the website - www.eswin.co.uk, enter
your username and password, and then confirm. You
then go in to your homepage, and click on “optic
cartridge activation codes”. For your very first cartridge
change, you’ll need to first accept the conditions for
acquiring the codes by clicking on “I have read the
information above and I confirm they are correct”. You
will then be able to select the serial number which
corresponds to the new cartridge.
34
38
A pop-up message is displayed ; it provides activation
code 1 and activation code 2, informs you that a copy of
those codes has been sent to your email address and
that you can also find that e-mail in your personal space
in the “My account” section. Each activation code is
unique and contains the serial number of the
. It
will, therefore, not work on another
.
39
If the activation codes entered are correct, the message
“codes accepted” will appear on the screen. You should
then switch off your
, switch it back on again,
and wait for the menu to appear in order for the activation codes to be taken into account. You may then use
your
normally; the counter displays the number
of shots available. In case the “Chg cartridge” menu
would appear instead of the “Depilation” menu, please
contact the after-sales service.
40
35
Manuel E-ONE 2010 FR>English_Manuel EOne 01/07/11 12:16 Page36
CHANGING THE OPTIC CARTRIDGE
❙ CHANGING THE OPTIC CARTRIDGE - SPECIAL PROCEDURES
For each special procedure removal of a cartridge,
please adhere strictly to the instructions given by our
technical staff.
To protect the environment please use the Optic
cartridge packaging to return the used cartridge to us.
When the
is switched on, 4 menus are available.
A set of icons (16) can be used to access the other sub-menus:
1)
2)
3)
4)
Only our technical department is authorized
to ask you to change the optic’ cartridge in a
special procedure case. Each cartridge removal or acquisition of new cartridge codes that has
been made without our technical staff’s specific instructions will entail the irreversible loss of the
remaining flashes on the optic’ cartridge ; you will
then have to purchase a new optic’ cartridge.
You may need to change the cartridge before the
number of shots initially provided runs out due to a
broken tube or a tube that no longer works for example.
OPTION DU LOGICIEL
«
«
«
«
Depilation » : please refer to heading « HAIR REMOVAL WITH THE E>One », p. 20, step 3.
Chg cartridge » : please refer to heading « CHANGING THE OPTIC CARTRIDGE », p. 30, step 1.
Accessories » : this menu allows you to directly access the remaining flashes quantity.
Configuration »: through the menu configuration, you can access the 5 sub-menus:
• Personal identification code
You can secure access to your
by entering a personal identification number.
This number is 0000 by default. If you do not change your PIN number it will not be requested when the
is switched on. If, however, you change the default PIN (0000), you must enter the new PIN each
time the
is switched on.
41
Each time a used cartridge is returned to E-Swin, you will
be offered 3 extra Pens after your next accessories order
is processed.
To change the PIN you must follow the instructions on the screen. Enter the old PIN then the new PIN etc.
You may quit this sub-menu using the cursor key adjacent to this line of information.
IMPORTANT:
If you entered a PIN code which you do not remember, it will be necessary to return your
to E-Swin before you can use it again. In fact, only our technical department will be able to unlock
your
• Language selection
• Key "Beep": the key "Beep" is activated by default but it can also be deactivated.
• " Date / hour " : sets the date and time on the system
• Maintenance
This access is for use by the after sales team only.
WARNING : It is strictly forbidden to make any changes of any nature whatsoever on your
36
.
37
Manuel E-ONE 2010 FR>English_Manuel EOne 01/07/11 12:17 Page38
Manuel E-ONE 2010 FR>English_Manuel EOne 01/07/11 12:17 Page40
WHAT NOT TO DO_
❙ BELOW IS A NON EXHAUSTIVE LIST OF WHAT NOT TO DO WITH YOUR
The following are prohibited as they may endanger your own personal safety or cause irreversible damage to your
.
Do not try to open your
machine: any alterations must be performed exclusively by persons
duly authorized by the manufacturer.
p
p
40
Do not cover the ventilation screen on the
applicator with your
hand or any other
object.
Do not cover the
E>One base with any
fabric to prevent obstruction of the upper air vent
Do not place the
E>One base on a non
rigid surface (a bed for
example) as this may
obstruct the lower air
vent
Do not touch the tube
or the reflector with the
fingers or any other
object
When
the
Optic
cartridge has been
removed, only touch the
plastic parts and not the
electrodes, tube or
reflector
Never attempt to put
your fingers into the
applicator base when
the Optic cartridge has
been removed
When the Optic cartridge has been removed, never touch the
short metal wire in the
middle of the opening
Never attempt to take
the applicator apart
41
Manuel E-ONE 2010 FR>English_Manuel EOne 01/07/11 12:17 Page42
USING THE ACCESSORIES
The pen is used to circle the area to be treated before the
gel is applied.
Important: this pen only must be used to mark out the
areas to be treated and is designed to be shot-resistant. Any other pen or pencil may cause skin
burns if the pulse is directed on the line
drawn on the skin.
The mask must be worn by all persons present at the time of
shot emission. It masks the
area that should not be
exposed to the treatment
(eyelashes, eyebrows etc).
Pen
mask
Made in China
The gel must be stored at ambient temperature.
It is to be applied in a thick layer, gradually throughout the
session to prevent it from drying on the skin. Once the gel has
been applied to the skin and exposed to the shots it must not
be re-used on another area. The gel's optical characteristics are subject to change after treatment.
The gel is to be removed at the end of the session
either in the shower or using a damp towel. It
should also be removed from the optical parts and
from the mobile head of the applicator using a
slightly damp cloth and the clean spray.
Made in China
This plate is made from a shot-resistant material. It is used to
protect any areas from unwanted treatment (i.e. a tattoo). The
glass applicator tip (light guide) is safe to use overlapping the
stop and the skin.
The clean spray is used for the cleaning and maintenance of:
• the optical parts of the mobile applicator head:
- external optical parts: spray on directly then wipe
with a dry cotton cloth.
- internal optical parts: never spray directly on the
internal optical parts. Spray onto a dry cotton cloth
then clean the filter (red, glass flat part) using the
dampened cloth. Polish with the dry part of the cloth.
The spray must only be used when the E>One has been
unplugged and when the optical parts have cooled down.
If you are cleaning the E>One immediately after use it must be
ensured that the applicator fan has fully stopped before
unplugging the base. This enables the optical and other parts
to cool down properly.
• the applicator touch screen: never spray
directly onto the touch screen. Spray onto a
dry cotton cloth then clean the screen using
the dampened cloth. Polish using the dry part
of the cloth.
Active components:
Methylisothiazolinone and Methylchloroisothiazolinone (MCI/MI). Their
quantities, in a ratio of 3:1, is 0,0008%. Does not contain formaldehyde.
Keep away from light - External use only. Do not use on damaged, burnt
or infected skin.
gel
Made in Europe
stop
Made in France
See all our products on our website at
42
clean
Made in France
These patches are used to protect small areas that are not to
be treated (i.e. moles).They must be placed after shaving
and before application of the gel. The designated
areas can then be treated without having to worry
about moles. The patches should be removed at
the end of the session.
patches
Made in France
This tool allows you to separate the
mobile head from your applicator to
clean the optical parts or to insert a
new cartridge
extractor
Made in China
These stencils can be used to mark out areas to be left untreated in order to keep hair in fun shapes in specific places (see
the templates on our website at www.e-swin.com). They are to
be applied after shaving and gel application. The gel helps hold
the stencils in place. The applicator is safe to use overlapping
the edge of the stencils so as to form a clear outline of the
shape required.
fun (option)
Made in France
www.e-swin.com
43
Manuel E-ONE 2010 FR>English_Manuel EOne 01/07/11 12:17 Page44
MAINTENANCE
Check that your
is unplugged before cleaning.
If you are cleaning the
immediately after use it must be ensured that the applicator fan has fully
stopped before unplugging the base. This enables the optical and other parts to cool down properly.
❙ BASE
❙ APPLICATOR
❙ BASE - APPLICATOR CABLE
❙ STORAGE
• Plastic parts
All of the
's plastic parts must be cleaned using
a clean cloth dampened with water only.
• Mobile head
Your
will continue to perform well if the
optical parts (internal and external) of the mobile head
are cleaned with the Clean spray before and after
each use. Never spray directly onto the internal parts
of the applicator.
This cable must be kept clean at all times and not show
any visible damage. It must never be folded or pinched.
If you have any doubts as to the cable's condition you
must stop using your
immediately.
• Store your
• Touch screen
The screen must be cleaned using a cloth dampened
with the Clean spray (never spray directly onto the
touch screen).
• Mains lead
Check that the mains lead is in perfect condition, that it
is not pinched or squashed and that there are no bare
wires. Clean the lead using a cloth dampened with water
only.
44
• Applicator body
All plastic applicator parts must be cleaned using a
clean cloth dampened with water only.
Take care not to drip any water into the lower shell air
vent.
❙ BASE AND APPLICATOR AIR
INLETS
The applicator and the base are both ventilated. Air vents
are present on the lower part of the applicator and the
lower and upper back parts of the base. It must be
ensured that these vents are clean and unobstructed.
and accessories in their box.
• Store your
at ambient temperature (25°
maximum) away from any sources of excessive
humidity (i.e. bathroom) and vibrations (i.e.: on a
washing machine).
• If the
is dropped or knocked it must be
ensured that all optical parts are intact.
• You must stop using the E>One immediately if you
notice any visible damage to the optical parts (filter red, glass flat part; light guide; tube, etc).
45
Manuel E-ONE 2010 FR>English_Manuel EOne 01/07/11 12:17 Page46
MARKING
❙ MACHINE USE
❙ SPECIFICATIONS
:
Clinic
Reference of the depilation machine E>One (Clinic)
Recycling and reprocessing
Numéro de série
……………………
2011
E SWIN
5 rue de la Noue
78113 Adainville
0120
IP 2X
Serial number of your E>One (unique)
Year of manufactore of your unit and address of manufacturer
Medical device meets the requirements of EU Directive 93/42, certified by an
independent body
Device protected against solid foreign objects of 12.5 mm in diameter or more (IP
classification)
Earth ground terminal
Logo corresponding to a degree of protection against electric shock from the parts
applied on to the patient (Type BF applied part)
Medical device in Class II
❙ MACHINE USE
Directive relating to the reprocessing of waste products:
The WEEE Directive (Waste Electrical and Electronic Equipment) 2002/96/EC was
implemented in order to ensure that products are recycled using the most effective
processing, recovery and recycling techniques available and thus contribute to
protecting the environment and human health.
Your product has been designed and manufactured using high quality materials that can
be recycled and reused.
E-SWIN SAS is a member of an environmental organisation responsible for collecting and
processing our products at the end of their life cycle. Do not dispose of your product with
your usual household waste.
Ensure that you dispose of your E>One in containers for the separate collection of
electrical and electronic equipment bearing this symbol:
Please use one of the following reprocessing options:
1. Dispose of the E>One in its entirety (including the cables, plugs and accessories) in
designated WEEE collection points.
2. If you have purchased a new replacement product return your old product in its
entirety to E-SWIN SAS in its original packaging.
The device must be used indoors
Keep it dry
Store away from light and heat
Obligation to refer to the user manual
100 - 240 V~
50-60 Hz
240 VA
Operating conditions (supply voltage (alternative current), voltage frequency,
maximum power)
Warning, dangerous voltage device
46
47
Manuel E-ONE 2010 FR>English_Manuel EOne 01/07/11 12:17 Page48
ERROR MESSAGES
Screen display
Meaning
SECU01
No flash detected
SECU03
SECU04
Your machine is blocked
What to do ?
Contact our technical team - go to your customer area
on www.eswin.co.uk and select "Contact and customer
service"
SECU08
SECU06
❙ CERTIFICATION
E-SWIN SAS, exclusive manufacturer of the
ISO 9001 and ISO 13485-certified
SECU05
SECU02
STANDARDS
The machine does not
detect a cartridge
Insert the new cartridge according to the handling and
access instructions (cartridge code)
Temporary blockage
Wait for the internal optical parts of the applicator to cool
for this process to be completed
❙ PRECAUTIONS FOR USE
, is
❙ COMPLIANCE
E-SWIN hereby declares that the
is compliant
with the essential requirements of Directive 93/42/EEC,
Appendix II, Article 3 and is EC-labelled by SGS.
It therefore meets the requirements of the EN 60601-1,
EN 60601-1-1, EN 60601-1-2 standards and appendices,
EN 60601-1-6 and EN 60601-1-8.
The base and the applicator must not come into contact
with water. To avoid exposure to high voltages do not
attempt to open the base or the applicator. Never use
any cartridges or accessories other than those
designated and sold for the
and by E-SWIN.
❙ PROTECTION OF THE ENVIRONMENT
Local legislation must be observed when disposing of the
packaging and consumables. Promote effective recycling
as far as possible.
The EC certificate is available on the website at
www.e-swin.com.
48
49
Manuel E-ONE 2010 FR>English_Manuel EOne 01/07/11 12:18 Page50
SHOWROOM
GUARANTEE
Your
is covered by a two-year guarantee for
private and domestic use only.
The guarantee does not cover any connection errors,
improper handling or use other than that for which the
is intended.
E-SWIN declines all responsibility for any accident occurring from improper use or non-observance of the instructions in this manual or in the information provided on
labelling or on the touch screen.
The 2-year manufacturer's parts and material guarantee
is only valid if the item is returned in its original
packaging.
Please keep the packaging in which the
delivered in a safe place.
was
E>One devices and their accessories are also available in our showroom.
E-Swin UK Ltd. 3 Lloyd's Avenue EC3N 3DS London
version 1.5 [10.05.2011]
For after-sales advice or ordering spare parts
consult our website at www.e-swin.com.
50
51
Manuel E-ONE 2010 FR>English_Manuel EOne 01/07/11 12:18 Page52
www.e-swin.com
0120
2008