1
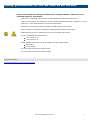
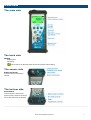
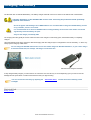
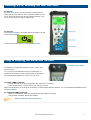
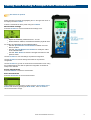
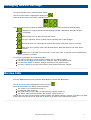
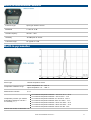
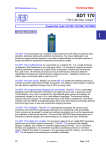
Operating instructions You can download the latest version of this manual by visiting the SDT International website: www.sdt.eu
SDT International sa-nv
Bd de l'Humanité 415, B-1190 Brussels (Belgium)
Tel: ++32-(0)2-332.32.25 - Fax: ++32-(0)2-376.27.07
email: [email protected] - website: www.sdt.eu
DC.R179.SDT200.MA.001.EN--01--
1
Table of contents
Safety precautions for the SDT200 ATEX version
Overview
Getting started
Charging the battery
Turning on & off the SDT200
Plug & unplug a sensor
Functions reference guide
Taking and storing an ultrasonic measurement
Taking and storing a temperature measurement
Review measurements stored in the SDT200
Download data to pc
Erasing SDT200 memory
Updating the SDT200 firmware
Changing device settings
Device info
Technical specifications
SDT200 receiver
Built-in ultrasound sensor
Built-in pyrometer
Battery charger
Miscellaneous
Declaration of conformity
Warranty and responsability
Copyright
DC.R179.SDT200.MA.001.EN--01--
2
Safety precautions for the SDT200 ATEX version
Please read carefully the safety precautions before using the SDT200 - ATEX version in a
potentially explosive environment.
Make sure your SDT200A protection class is suited regarding the environment it will be used.
Under no circumstances, do not attempt to service or replace SDT200 ATEX version components. In case of
malfunction, contact SDT International or SDT local representative.
Maintenance must always be performed outside potentially explosive environments.
Battery charge must exclusively be performed outside potentially explosive environments.
FUBATTR270-02 is the only authorized power source for SDT200 ATEX version.
The max. permissible room temperature is:
-15°C to 50°C for T3.
-15°C to 60°C for T2.
Potential danger of static electricity for the display. Avoid electrostatic charge:
Avoid friction.
No dry cleaning.
Do not use USB connectivity in dangerous area.
Do not use SDT carrying case in dangerous area
Related links
Technical specifications of SDT200 ATEX version
DC.R179.SDT200.MA.001.EN--01--
3
Overview
The main side
The back side
Marking
Serial Number
CE marking
The rear side of the SDT200 ATEX version has a specific ATEX marking
The sensor side
Built-in pyrometer
Activation of this functionality is
optional
The bottom side
Reset button
Insert a needle to make a reset.
(Reset causes a restart of the device
but the data stored are not deleted)
DC.R179.SDT200.MA.001.EN--01--
4
Charging the battery
The SDT200 uses an internal NiMH battery. The battery charger outlet will connect to a socket on the bottom side of the SDT200.
Charging the battery of the SDT200 ATEX version must exclusively be performed outside potentially
explosive environments.
Due to the typical self-discharge rate of NiMH batteries it is recommended to charge the SDT200 battery at least
every 3 months, even if it is not used.
It is recommended not to store the SDT200 with an uncharged battery for more than a few weeks. This would
significantly reduce the battery life span.
Only use the charger provided by SDT.
The charging time will typically be 6 hours. When the LED of the charger is continuously green, the SDT200 battery is completely
charged.
Like most batteries these days, leaving the SDT200 charging after the charger says it is charged does not hurt the battery – in fact it very
slowly tops the charge up a little more.
You can charge the SDT200 switched off. You can also trickle charge the SDT200 switched on, so you can be using it
to load and unload data, for example, and charge it at the same time.
SDT200 bottom side
SDT Universal charger for SDT200
A fully charged battery will give you about 8 hours of continuous use. This will vary of course depending upon your need to use the
backlight and the power drain of certain external sensors that you might be using.
You can increase the autonomy by adjusting the
backlight.
Auto Power Down
and the time before switching off the
Related link
Battery charger
DC.R179.SDT200.MA.001.EN--01--
5
Turning on & turning off the SDT200
To turn on:
Press the Power button on the bottom right of the keypad. The
status LED will shine dark blue. Then, a few seconds later you will
see on the screen the SDT logo and the message “loading”. If you
do not see this display your battery might be flat.
To turn off:
Push the Power button on the bottom right of the keypad. You will
see the following display:
Confirm the device shut down by pressing the Enter button.
Plug & unplug an external sensor
The SDT200 is equipped with a LEMO connector, used to plug
external sensors.
It is a commonly used industrial connector, considered for its
reliability and robustness. It have a sprung-loaded knurled barrel
and mechanical polarisation to go only in one way round.
To plug a LEMO connector:
Line up the red dot on the plug with the red mark on the connector.
Insert the plug into the connector without any rotating movement.
When an external sensor is connected to the SDT200, it is automatically selected. Howerver, you can switch between available sensors
using the F1 button.
To unplug the LEMO connector
Move up, towards the cable, the ring located on the bottom of the plug.
Only pull the connector without any rotation.
Please, never pull on the cable itself.
DC.R179.SDT200.MA.001.EN--01--
6
Taking and storing an ultrasonic measurement
Select the desired ultrasonic sensor using the F1 button if necessary.
Set up amplification using Up and Down arrow buttons, till the up and
down amplification adjustment indicators disappear .
Activate or deactivate the laser pointer using the F2 button.
Measurement settings
Press the F3 button to enter the measurement settings menu.
Adjust the acquisition time using Up and Down arrowbuttons.
If the acquisition time is set to 0 second, the RMS, Max RMS, Peak and
Crest Factor are refreshed every 250 milliseconds. This mode enables the
operator to take data on the fly.
If the acquisition time is set at 1 second or more, the RMS, Peak and Crest
Factor will be calculated over the complete acquisition time. The Max RMS
will be the highest sub RMS reached over the complete acquisition time.
Each sub RMS is calculated during 250 milliseconds. The maximum
acquisition time is 10 seconds.
Use the F1 button to save the settings as preferred configuration
Use the F2 button to load the settings associated to the preferred
configuration
Use the F3 button to go back to the ultrasound measurement screen using the modified settings. Note that the preferred configuration is
reloaded at startup of the SDT200.
Getting data
Press the M button:
To freeze RMS and Max RMS values when the acquisition time is set to 0 second.
To start the acquisition when the acquisition time is set to 1 second or more.
At the end of the acquisition time, a screen detailing RMS, Max RMS, Peak and Crest factor values, is displayed.:
Press the F3 button or the Store button to save the data (or the F1 button to come back to the measurement screen without saving the
data)
Then choose the desired memory location using the Up and Down arrow buttons and confirm by pressing the Enter button.
DC.R179.SDT200.MA.001.EN--01--
7
Taking and storing a temperature measurement
This feature is optional.
Select the built-in pyrometer by highlighting the T in the upper left corner of
the display with the F1 button.
Activate or deactivate the laser pointer using the F2 button
Measurement settings
Press the F3 button to enter the Measurement Settings menu.
You can :
Adjust the emissivity coefficient from 1 to 0.01
Switch between Celsius, Fahrenheit and Kelvin physical units
To modify the parameters of the selected setting :
Use the Up and Down arrow buttons to switch form one
field to another.
Use the Left and Right arrow buttons to modify the value
of the selected field.
Use the Enter button to save the changes and return to the
previous menu.
Use the F1 button to save the settings as preferred configuration
Use the F2 button to load the settings associated to the preferred
configuration
Use the F3 button to go back to the ultrasound measurement screen using
the modified settings. Note that the preferred configuration is reloaded at
startup of the SDT200.
Freeze measurement
Press the M button to freeze the measurement.
Store measurement
Press the Store button to save the measurement.
Then highlight the chosen memory location using the Up and Down arrow
buttons and confirm by pressing the Enter button, or the F1 button to
cancel measurement storage.
DC.R179.SDT200.MA.001.EN--01--
8
Review measurements stored in the SDT200
From the Measurement screen press the Enter key to access the Main Menu.
Use the arrow buttons to highlight the Node Tree icon:
Press the Enter button to display the list of memory locations:
Note: the “+” sign placed before a memory location means it contains recorded
measurements.
Select the desired memory location using Up and Down arrow buttons. Expand the memory location using
the Right arrow button. The saved measurements are filtered regarding the sensor used:
Select the desired sensor using Up and down arrow buttons. Display the list of saved measurements by
using the Right arrow button. The data are filtered according to the recording time stamp:
Select a time stamp by using the Arrow Buttons, then and press the Enter button to visualize the data:
Press the F1 button to come back to the list of recording timestamps:
To delete a recording, select its timestamp using the Up and down arrow buttons and press the F2 button.
To come back to the measurement screen, press a few times the F1 button.
DC.R179.SDT200.MA.001.EN--01--
9
Download data to PC using SDT DataDump
Do not connect your SDT200 device to the computer before the SDT200 USB
driver is installed.
Note : be sure that the SDT200 USB driver and SDT DataDump software are correctly installed on your
computer before continuing this section.
Start the SDT DataDump application on your computer.
The SDT DataDump window appears.
Verify the USB radio button is ticked then click on Collect.
The report is generated and opened via your web browser:
Each measurement includes the sensor used, the time stamp, RMS, Peak and Crest Factor
values.
You are able to export data to MS Excel by a right click on the Internet Explorer web browser interface:
Note : You must first enable one time the add-on by opening the menu File/Preferences and clicking
the button “Add export IE to Excel registry rule”.
The report is automatically stored on your computer using the format: "report dd-mm-yy.xml". By default, the path is:
C:\Users\Public\Documents\SDT\SDT270DataDump\Reports\504 or 505xxxxxx or 505xxxxxx which is the serial number of your SDT200
device.
Other SDT DataDump functions
Erasing the SDT200 memory:
Verify the USB radio button is ticked, then click on Device (menu) and Delete all device
data. You can also use the keyboard shortcut CTRL+U.
Updating the SDT200 firmware:
Select the menu "Device / Update Firmware". On the Device update window, tick the radio
button "USB'' and then click "Check for updates". Note that this requires an internet
connection. Updating the SDT200 firmware is possible during the warranty period.
DC.R179.SDT200.MA.001.EN--01--
10
Changing device settings
To access the Main menu, press the Enter button.
Use the arrow buttons to highlight the Settings icon:
Press the Enter button to access the Settings menu:
Use the arrow buttons to select the desired icon and the Enter button to select the desired setting.
Language icon: change device interface language (English, Nederlands, Français, Deutsch,
Italiano or Español).
Date and time icon: set date, time and their format
LCD icon: adjust the screen contrast and the operating time of the backlight
Auto power down icon: adjust the time before device auto power down when it is unused.
Reset icon: force a factory reset of the SDT200 device. Note that this does not erase saved
measurements.
Escape icon: to get back to the main menu. In the main menu, to get back to the measurements
screen, press the F1 button
To modify the parameters of the selected setting :
Use the Up and Down arrow buttons to switch form one field to another.
Use the Left and Right arrow buttons to modify the value of the selected field.
Use the Enter button to save the changes and return to the previous menu.
Use the F1 button to go back to the previous menu without saving the changes.
Device Info
From the Measurements screen press the Enter Button to access the Main Menu
Use the arrow buttons to highlight the Device Info icon:
Press the Enter Button to display device information:
The version of your instrument (screen 1)
Its calibration date (screen 2)
The serial number of the battery and its remaining capacity (screen 4)
The device and PCB serial numbers, the firmware version (screen 5)
Use the Up and down arrow buttons to switch between the different screens. Push the F1 button to go back
to the main menu and push once again the F1 button to go back to the measurements screen.
DC.R179.SDT200.MA.001.EN--01--
11
SDT200 technical specifications
Technical specifications for all SDT200 versions
For SDT200 ATEX version specific technical specifications, please see next page
Function
Multifunction detector
Display
Graphic LCD with backlighting (128 x 64)
Keyboard
12 function keys
Built-in sensors
Ultrasonic sensor
Pyrometer (according to the version)
External sensors
Through specific connector (Lemo 7 pin connector)
Data Logger
- 20 Measurement Nodes (measurement points)
- Total 4000 Measurements (measurements data)
Communication
USB interface
Software for transferring data
to PC
DataDump Application
Battery pack (*)
Rechargeable battery type: 8 cell, 4.8 V, NiMH (Nickel Metal Hydride)
Nominal capacity: 4.4 Ah
Life span: 500 to 1,000 charge/discharge cycles
Autonomy: 6 to 7 hours
Protections: short-circuit, reverse polarity and temperature protected
Auto power down
Auto power down after preset time
Operating temperature
-15 °C to +60 °C / 14 °F to 140 °F non condensing
Housing
Extruded aluminium
Weight
±770 g / 27 oz.
Dimensions
226 x 90 x 40 mm / 8.90 x 3.54 x 1.57 inches (L x W x H)
Headphones
noise isolating, NRR 25 dB (tested in an accredited NVLAP laboratory)
(*) f or optimum performance, this battery pack is equipped with an electronic management system (includes digital serial
number, capacity and temperature management).
DC.R179.SDT200.MA.001.EN--01--
12
Specific technical specifications for the SDT200
ATEX version
The SDT200 ATEX version is certified ATEX II 1 G Ex ia IIC T3/T2 Ga, according to IEC 60079-0,
60079-11 and 60079-26.
Check room temperature for use of the SDT200 ATEX version in potentially explosive
environments. The max. permissible room temperature is:
-15°C to 50°C (T3).
-15°C to 60°C (T2).
The SDT200 ATEX version has the following marking on the rear side: Electrical specification for non SDT sensors used with the SDT200
ATEX version
Check electrical compatibility of non SDT sensors, for use in potentially explosive environments, before
connecting them to the SDT200 ATEX version.
Max. outer voltage V0
Max. outer current intensity I0
Max. outer effective capacitance C 0
Max. outer effective inductance L 0
20.4V
68.7mA
96nF
1mH
DC.R179.SDT200.MA.001.EN--01--
13
Built-in ultrasound sensor
Function & type
Open type ultrasonic sensor
Bandwidth
± 2 kHz at -6 dB
Central Frequency
40 kHz ± 1 kHz
Sensitivity
-65 dB/V/µbar at 40 kHz
Total beam angle
55° typical at -6 dB
Built-in pyrometer
Field of view
Sensor type
Infrared temperature sensor
Temperature calibration range
sensor temperature:-40…+125 °C
object temperature: -10... +380 °C
Measurement resolution
0.1°C
Temperature precision (for ambiant
temperature between 0 and 50°C –
for emissivity = 1 )
For
For
For
For
For
For
For
measured
measured
measured
measured
measured
measured
measured
temperature
temperature
temperature
temperature
temperature
temperature
temperature
between
between
between
between
between
between
between
-70°C and -40 °C : ±2°C
-40°C and 0°C : ±1°C
0°C and 60°C : ±0.5°C
60°C and 120°C : ±1°C
120°C and 180°C : ±2°C
180°C and 240°C : ±3°C
240°C and 380 : ±4°C
Field of view at 50% of attenuation 10°
DC.R179.SDT200.MA.001.EN--01--
14
Battery charger
Charger type:
specific for SDT200NiMH battery pack
Power supply:
110 VAC to 230 VAC +15 % / -10 % 50/60 Hz
Output voltage:
+4.0 or 8.5 V DC (depends on operating mode)
Power:
7,5 W
Protection:
temperature protected, limit set at 60°C / 140 °F
Status indicator:
Green LED is continuously lit: battery is fully charged
Green LED flashes evenly: normal charge
One red flash every 5 seconds : Battery Voltage error
Two red flashes every 5 seconds: Over temperature error
Three red flashes every 5 seconds: Timeout full charge
Four red flashes every 5 seconds: Timeout Rapid charging
Five red flashes every 5 seconds: Timeout Activate charging
Six red flashes every 5 seconds: 1 Wire communication error
Isolation:
double isolation
Weight:
300 grams / 10.6 ounces
Housing:
PPE
Conformity:
IEC 60950 (CB certificate)
conform with CA and US national conditions
DC.R179.SDT200.MA.001.EN--01--
15
Declaration of conformity
SDT International n.v. s.a.
Boulevard de l’Humanité 415
B - 1190 BRUSSELS
BELGIUM
declares that
SDT200 Multifunction Detector
making the object of this declaration, is built in conformity with the applicable European Directives:
Electrical equipment for measurement IEC EN 61010-1
EMC Directive 2004/108/CE
Low voltage Directive 2006/95/CE.
The equipment hence displays the EC logo of being compliant to the current EC regulations.
To be able to operate by state of the art rules, as stipulated in the directive, it has been designed by the following rules:
The SDT200 does not radiate electromagnetic waves (EMC)
The SDT200 is immunized against external electromagnetic radiation (EMI)
The SDT200 is protected against electrostatic discharges (ESD).
Note: the owner is obliged to preserve the present users manual with the obligation to pass it on to future users, or been resold to
another user.
Brussels, January 2012.
The Manager.
Warranty and responsibility limits
Warranty
SDT International guarantees the SDT200 unit against manufacturing faults for a period of 2 (two) years, with the exception of the battery
and accessories (charger, headphones, sensors, etc.) these are guaranteed for a period of 6 (six) months. The warranty covers all
material supplied and implies the free replacement of all parts that contain a manufacturing fault.
Warranty does not include shipping, handling and importation.
The warranty is void if misused, or accident damages the product, if the product is altered in any way, if an unauthorized party attempts
repair, or the unit is opened without written authorization of SDT International.
In the event of a defect, contact your local SDT representative or SDT International.
Responsibility limits
Neither the company SDT International, nor any related company, will in any circumstances be liable for any damages, including, without
limitation, damages for loss of business, business interruption, loss of information, defect of the SDT200 unit or its accessories, bodily
harm, loss of time, financial or material loss or any other indirect or consequential loss arising out of the use, or inability to use this
product, even when it has been warned of possible damages.
Copyright
© 2012 SDT International n.v. s.a.
All rights reserved.
No one is permitted to reproduce or duplicate, in any form, the whole or part of this document without the written permission of SDT
International n.v. s.a.
The information herein is believed to be accurate to the best of our knowledge.
Due to continued research and development, specifications of this product can change without prior notice.
DC.R179.SDT200.MA.001.EN--01--
16