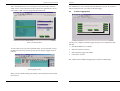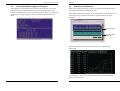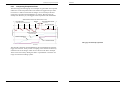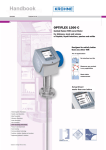
1
Manual – Evaporation Monitoring System – Model 6529
Manual
Automatic Evaporation System
Model 6529
Revision History
File name / Revision
Date
Authors
Previous version BX
2004
RS/ JH
Unidata Manual - 6529 Evaporation Monitoring System Issue 2.0
2007
AB/CB/JH/MS/KC
Copyright © Unidata Pty Ltd 2000-2008. All rights reserved. No part of this publication may be reproduced, transmitted,
transcribed, stored in a retrieval system, or translated into any spoken or computer language, in any form or by any means.
Electronic, mechanical, magnetic, optical, chemical, manual or otherwise, without prior written permission of Unidata Pty Ltd 40
Ladner St, O’Connor Western Australia 6163.
Unidata Manual - 6529 Evaporation Monitoring System Issue 2.0
Automatic Evaporation System
UNIDATA
5.4.3
5.4.4
5.4.5
5.4.6
5.4.7
5.4.8
5.4.9
Contents
1
INTRODUCTION. . . . . . . . . . . . . . . . . . . . . . . . . . . . . . . . . . . . . . 1
1.1
1.2
1.3
1.4
1.5
2
EVAPORATION MONITORING TECHNIQUES . . . . . . . . . . . . . 11
3.1
3.2
4
6.2
6.3
6.4
6.5
7
Site Visits . . . . . . . . . . . . . . . . . . . . . . . . . . . . . . . . . . . . . . . . . 41
7.1.1
Preparing for the Site Inspection . . . . . . . . . . . . . . . . . . 41
7.1.2
Carrying Out The Site Inspection . . . . . . . . . . . . . . . . . . 42
7.1.3
Initial Inspection . . . . . . . . . . . . . . . . . . . . . . . . . . . . . . . 42
7.1.4
Reviewing The Data . . . . . . . . . . . . . . . . . . . . . . . . . . . . 43
7.1.5
Recovering The Data . . . . . . . . . . . . . . . . . . . . . . . . . . . 43
7.1.6
Carry Out Tests And Maintenance . . . . . . . . . . . . . . . . . 44
7.1.7
Resetting the Logger . . . . . . . . . . . . . . . . . . . . . . . . . . . 44
7.1.8
Final Site Check . . . . . . . . . . . . . . . . . . . . . . . . . . . . . . . 44
7.2
Data Processing And Management . . . . . . . . . . . . . . . . . . . . 45
7.3
Site Maintenance . . . . . . . . . . . . . . . . . . . . . . . . . . . . . . . . . . . 46
7.3.1
Overview . . . . . . . . . . . . . . . . . . . . . . . . . . . . . . . . . . . . 46
7.3.2
Site Surrounds . . . . . . . . . . . . . . . . . . . . . . . . . . . . . . . . 46
7.3.3
Evaporation Pan and Level Monitoring System . . . . . . . 46
7.3.4
Input Water Supply . . . . . . . . . . . . . . . . . . . . . . . . . . . . . 47
7.3.5
Solenoid/Pump . . . . . . . . . . . . . . . . . . . . . . . . . . . . . . . . 47
Using Evaporation Pan Data . . . . . . . . . . . . . . . . . . . . . . . . . . 12
Some Sources Of Errors In Evaporation Pans . . . . . . . . . . . 12
3.2.1
Systemic Errors . . . . . . . . . . . . . . . . . . . . . . . . . . . . . . . 12
3.2.2
Operating Errors. . . . . . . . . . . . . . . . . . . . . . . . . . . . . . . 13
Site Requirements For All US Class A Evaporation Pans . . 15
4.1.1
Water Supply . . . . . . . . . . . . . . . . . . . . . . . . . . . . . . . . . 16
4.1.2
High Pressure Supply. . . . . . . . . . . . . . . . . . . . . . . . . . . 16
4.1.3
Low Pressure Supply . . . . . . . . . . . . . . . . . . . . . . . . . . . 17
4.1.4
Underground Supply . . . . . . . . . . . . . . . . . . . . . . . . . . . 18
INSTALLING THE EQUIPMENT . . . . . . . . . . . . . . . . . . . . . . . . 19
5.1
5.2
5.3
Installing The Model 6529C Evaporation Pan . . . . . . . . . . . . 19
Installing The Model 6529A Enclosure. . . . . . . . . . . . . . . . . . 19
Installing The Stillwell Assembly . . . . . . . . . . . . . . . . . . . . . . 20
5.3.1
Connect The Stillwell To The Pan. . . . . . . . . . . . . . . . . . 21
5.3.2
Fill The Pan And Set The Water Level Instrument . . . . . 22
5.3.3
Prepare The Float System And Stillwell Assembly. . . . . 22
5.3.4
Install The Water Level Instrument . . . . . . . . . . . . . . . . . 23
5.3.5
Set And Test The System. . . . . . . . . . . . . . . . . . . . . . . . 24
5.4
The Level Control System . . . . . . . . . . . . . . . . . . . . . . . . . . . . 25
5.4.1
Overview . . . . . . . . . . . . . . . . . . . . . . . . . . . . . . . . . . . . 25
5.4.2
Level Control Module . . . . . . . . . . . . . . . . . . . . . . . . . . . 26
i
Software Requirements . . . . . . . . . . . . . . . . . . . . . . . . . . . . . . 31
6.1.1
Overview Of The 6529E Scheme . . . . . . . . . . . . . . . . . . 31
Preparing To Log Data . . . . . . . . . . . . . . . . . . . . . . . . . . . . . . . 31
6.2.1
To Adjust The Scheme Details To Suit Your Project . . . . 32
To Start Logging Data . . . . . . . . . . . . . . . . . . . . . . . . . . . . . . . 36
To Check Data While Logging Is In Progress . . . . . . . . . . . . 37
Data Recovery And Review . . . . . . . . . . . . . . . . . . . . . . . . . . . 38
6.5.1
Interpreting Evaporation Data . . . . . . . . . . . . . . . . . . . . 39
SITE VISITS AND MAINTENANCE . . . . . . . . . . . . . . . . . . . . . . 41
7.1
SITE REQUIREMENTS AND LAYOUT . . . . . . . . . . . . . . . . . . . 15
4.1
5
Manual Recording System . . . . . . . . . . . . . . . . . . . . . . . . . . . . 5
Automatic Evaporation Recording . . . . . . . . . . . . . . . . . . . . . . 7
6529E Automatic Evaporation Recording And Level Control 8
OPERATING THE SITE . . . . . . . . . . . . . . . . . . . . . . . . . . . . . . . 31
6.1
SPECIFICATIONS AND DETAILS . . . . . . . . . . . . . . . . . . . . . . . . 5
2.1
2.2
2.3
3
6
Major Components Of Model 6529-3 . . . . . . . . . . . . . . . . . . . . 2
Superseded Models . . . . . . . . . . . . . . . . . . . . . . . . . . . . . . . . . . 3
Automating Existing Evaporation Pans . . . . . . . . . . . . . . . . . . 3
Logging Evaporation . . . . . . . . . . . . . . . . . . . . . . . . . . . . . . . . . 3
Example of Logged Data . . . . . . . . . . . . . . . . . . . . . . . . . . . . . . 4
Fill System . . . . . . . . . . . . . . . . . . . . . . . . . . . . . . . . . . . 26
Drain System . . . . . . . . . . . . . . . . . . . . . . . . . . . . . . . . . 27
Power Supply . . . . . . . . . . . . . . . . . . . . . . . . . . . . . . . . . 27
Installing The Level Control System . . . . . . . . . . . . . . . . 28
Install The Battery And Solar Panel . . . . . . . . . . . . . . . . 29
Install The Fill Solenoid . . . . . . . . . . . . . . . . . . . . . . . . . 30
Install The Drain Pump. . . . . . . . . . . . . . . . . . . . . . . . . . 30
ii
Automatic Evaporation System
1
UNIDATA
A water temperature sensor and a range of weather sensors can be added to
identify the relationship between pan evaporation and site conditions. This is
required for evaporation and evapo-transpiration studies and modelling. An
optional telemetry system can be connected to the datalogger. Landline,
cellular, satellite and radio communicationlinks can be used to monitor data
and operate the site.
INTRODUCTION
1.1
n
Water level monitoring
and control system
This supplement describes the installation and operation of UNIDATA’s
Model 6529 Automatic Evaporation System. This is an advanced system that
automatically operates an evaporation pan and records the evaporation and
rainfall data. The instrument is normally supplied as a complete package with
a US Class A evaporation pan and all installation fittings. It can be connected
to any other type of pan.
The system is designed to operate for long periods without maintenance. The
water level transducer and data logger operate for one year from internal
batteries. The water level control system is solar powered. The water supply
to refill the evaporation pan is provided by the user from a tank or a
reticulated water supply pipe. Rainfall removed from the pan can be recycled
if required.
INTRODUCTION 1
Automatic Evaporation System
Model 6529A
Water level monitoring system for STARLOGGER.
Model 6529A/C
Water level monitoring system with integrated
Micrologger to record data.
Model 6529E
Automatic water level controller.
n
Evaporation pan
with bird guard
Major Components Of Model 6529-3
Evaporation Pan And Bird Guard
Model 6529C
Evaporation pan 1200mm diameter, fibreglass.
Model 6529D
Bird and leaf guard for Model 6526C.
n
Weather Monitoring Instruments
Additional instruments that can be added to the Model 6529A/C are:
Model 6529B
Thermistor and float assembly to measure pan water
temperature.
Model 6506A
Tipping bucket rain gauge.
If the Model 6259A and STARLOGGER are used, any additonal UNIDATA
instruments can be added such as:
Model 6504FS
Wind speed and direction.
Model 6501DU
Air temperature, relative humidity, and solar radiation.
Model 7201A
Net Radiation.
Model 6513A
Soil Moisture.
Model 6522B
Barometric Pressure.
2 INTRODUCTION
Automatic Evaporation System
UNIDATA
1.5
1.2
Example of Logged Data
Superseded Models
This system supercedes the previous UNIDATA Model 6529-1 instrument
which is now refered to as the Model 6529-1X.
1.3
Automating Existing Evaporation Pans
The evaporation instrument system and optional weather instruments can be
added to any evaporation pan installation. Contact your nearest UNIDATA
support office for advice on upgrades.
1.4
Logging Evaporation
A special instrument and scheme have been created within the UNIDATA
software to monitor the recorded water level, extract the evaporation and
rainfall data, and reset the pan water level. These have been included with
STARLOG v3.09E (or later) and are supplied on disk with initial releases of
the instrument. Alternatively, you can obtain this update from the technical
support section on the UNIDATA web site - www.unidata.com.au. Refer to
Software Requirements on page 31 for details on how to install the update.
This scheme offers you the options to log the raw water level, total
evaporation and total rainfall. You can log either one daily total or
measurements throughout each day. The evaporation data accumulates all
0.2mm water level falls, and the rainfall data all 0.2mm rises. The effects of
any pan water level resets and minor water level pulsations are not recorded.
INTRODUCTION 3
This page intentionally left blank.
4 INTRODUCTION
Automatic Evaporation System
UNIDATA
Model 6529D
Bird guard
2
Model 6529M
Level gauge
Model 6529E
Drain pump
SPECIFICATIONS AND DETAILS
Evaporation System
Pan Type:
Range:
Resolution:
Accuracy:
Level Reset:
Reset rate:
2.1
US Class A compatible.
30mm to 250mm. Pan empty to full.
0.2mm of evaporation or rainfall.
+/- 0.4mm
Programmable. Default reset to 200mm (+/- 1mm) at a
preset time each day. Also resets 10mm below the
overflow level.
Pumps 50mm out in 3 minutes. Fills 3mm per minute with
10kpa (1m) head. Rate of refill increases as head increases.
Manual Recording System
Model 6529C
Evaporation pan
Model 6529C Evaporation Pan
Dimensions:
Operating depth:
Material:
Model 6529D Evaporation Pan Bird Guard
200mm.
Dimensions:
Material:
229 litres.
Fibreglass. Internal surface gloss white. Pre-drilled with
two 20mm diameter holes for hose fittings.
Intake:
Bulkhead fitting for 12.5mm ID hose. Connects level
gauge to stillwell.
Refill:
Bulkhead fitting for 12.5mm ID hose. Connects level
control system to pan.
Pan weight:
Mounting:
Mounting weight:
Inlet hose to stillwell
Internal diameter 1208mm, outside diameter 1290mm.
Depth 250mm.
Volume at operating
depth:
Mounting pallet
12kg.
Finish:
Weight:
20kg.
SPECIFICATIONS AND DETAILS 5
Frame - 8mm steel rod. Mesh - 12mm square steel mesh.
Hot dip galvanised.
12kg.
Model 6529M Point (Level) Gauge
Material:
Connectors:
Timber frame 1300 x 1300. Treated plantation softwood.
Outside diameter 1200mm. Height 250mm.
PVC or Stainless Steel cylinder with point gauge at
200mm.
Hose and fittings to connect to intake from stillwell.
Volumetric Flask
Material:
Clear PVC graduated container.
Capacity:
2000ml
6 SPECIFICATIONS AND DETAILS
Automatic Evaporation System
2.2
UNIDATA
Automatic Evaporation Recording
Hose:
Two stainless steel hose clamps supplied.
Model 6706A Aluminium Enclosure
Dimensions:
Material:
Mounting:
12.6mm heavy-duty flexible hose, 1.8 metres long.
Hose guide:
320mm x 300mm x 750mm (Width x Depth x Height).
PVC pipe, 40m diameter, and 1300mm long.
Vertically sliding front door. With hole for (purchaser
supplied) padlock.
Model 6541 Water Level Instrument
2mm aluminium sheet. Powder coat finish.
See the User Guide for the Model 6541 instrument for specifications.
1300mm long galvanised steel pipe, 40mm diameter with
cap. Two U-bolt assemblies to suit pipe.
Float system:
Float pulley 100mm circumference. Offset pulley fitted.
Float 115mm PVC. Counterweight -160 grams.
Floatline 0.4mm diameter stainless steel. 690 mm long.
Model 6706A
Aluminium enclosure for evaporation
system. “U” bolt to post.
2.3
Model 6904B
Solar Panel on
top of cabinet.
Model 6541-31
Precision water level instrument
with display. Rotate 90° to view
and check float pulley.
6529E Automatic Evaporation Recording And Level
Control
6912BR/12 Level Controller
Circuit card with relays to operate fill solenoid and drain pump, and a solar
charge regulator for battery.
6541-31/C
Integrated Micrologger
(optional).Connect to
computer with a
9 pin cable.
Model 6907B
12V battery.
Enclosure:
Size:
Terminals:
Model 6529-1
Level control module.
Cables:
Model 6529A-2
PVC stillwell assembly.
UV stabilised polycarbonate, IP67.
125mm x 75mm x 75mm (L x W x D).
Pluggable terminal strip with terminals for fill solenoid,
drain pump, solar panel, battery and test.
1m cable to data logger terminal block of 6541-31/C.
0.3m battery leads.
Model 6529A-3
Float system inside.
PVC 115mm float,
line, counterweight,
and offset guide pulley.
Model 6529-1
Refill solenoid with filter.
Fill Solenoid
Type:
Power:
Solenoid valve with 10mm bore and nitrite seals. Cable
length 0.5m.
12 volts @ 1.2 amps.
High Pressure Application
Model 6529G Stillwell Assembly
Dimensions:
Material:
Stillwell Cap:
Connector:
370mm high, 150mm diameter, with sealed bottom.
High Pressure
Solenoid:
Goyen 10BWJ-CNBNT-61D7.
Maximum pressure 1000kPa.
PVC pipe.
Minimum recommended pressure 10kpa.
PVC Cap predrilled for float system and 6541. Cap rotates
to allow rear of 6541 to be visible.
Spare parts kit:
GOYEN KM1664.
Bottom fitting for 12.6mm hose to evaporation pan.
SPECIFICATIONS AND DETAILS 7
8 SPECIFICATIONS AND DETAILS
Automatic Evaporation System
UNIDATA
Low Pressure Application
Low pressure solenoid:
GOYEN 10BL2-CNBNT-61D7 direct acting solenoid.
Maximum pressure:
70kPa.
Minimum pressure:
0kPa.
Recommended
minimum:
Spare parts kits:
Pump:
Inlet Hose:
10kPa.
GOYEN KM1423.
Optional pump (same as drain pump) if gravity feed not
possible.
12.5mm heavy-duty flexible hose, 2 metres long to connect
to tank.
Two stainless steel hose clamps supplied.
Inlet filter installed upstream of solenoid.
Drain Pump
Type:
Power:
Marine bilge pump. Located in pan. Cable length 2 metres.
12 volts @ 1.2 amps.
Capacity:
Maximum 20 litres/minute.
Housing:
PVC enclosure attached to inside of pan.
Drain Hose:
This page intentionally left blank.
12.5mm hose can be connected. Not normally supplied.
Power Supply
Power supply:
Maximum 0.3 ampere hour/day with daily level reset.
Battery:
Model 6907B 12 volt, 7 ampere-hour sealed lead acid
battery.
Charger:
Model 6904B 12 volt, 2 watt solar panel on enclosure roof.
Regulated by circuit in level control system.
SPECIFICATIONS AND DETAILS 9
10 SPECIFICATIONS AND DETAILS
Automatic Evaporation System
UNIDATA
3.1
3
EVAPORATION MONITORING TECHNIQUES
Evapo-transpiration is the endless cycle of moisture returning to the
atmosphere to condense and fall again as rainfall. Evaporation occurs from
soil and water surfaces, and transpiration from vegetation. The energy that
drives the process comes from solar and terrestrial radiation. The rate is
influenced by a complex interaction of many factors including the
topography, geology and botany of the area, the moisture content of the soil,
the moisture availability to vegetation and the local weather. As many of
these factors vary throughout each day, and with the seasons, the rates are
continually changing at any given site. Evapo-transpiration is too complex to
measure directly.
An evaporation pan is a practical way to measure the loss of water from a
small water surface. This is not a real measurement of any part of the natural
evapo-transpiration process. Evaporation rates from lakes, soil surfaces and
vegetation will be different from a pan.
Historically, many different shapes of evaporation pan and methods of
installation have been used. Different designs produce unique results. If data
from one pan is to be compared with another, both pans must be the same. To
allow the standardisation of data and research across different sites and
countries, the World Meteorological Organisation (WMO) recommends the
use of the United States Class A pan as a general-purpose network
instrument. This type of pan is widely used in many countries.
The UNIDATA evaporation pan conforms to the dimensions of the
US Class A pan.
Networks of US Class A evaporation pans are operated by many
organisations in many countries. The records can extend back for 50 years or
more. This data is typically a daily reading of the total evaporation. This is
measured manually by an observer visiting the site at the same time each day
and reading the total loss (or gain) in the pan water level, and adjusting for
the rainfall. The pan water level is then reset to the operating level.
The UNIDATA evaporation system with level control is designed to simulate
this daily operation. This will produce data comparable with a manual pan.
Using Evaporation Pan Data
The daily total evaporation can vary from 0 on a cool and misty day, to more
than 25mm on a hot, dry and windy day. Care must be taken in extrapolating
the pan evaporation data to other sites or to estimating losses from natural
water bodies. For instance studies indicate that lake evaporation varies
between 75% and 100% of pan evaporation, depending on location and
climatic conditions.
If there is a manual evaporation site in your region with a long history of
evaporation data, it is often possible to develop a relationship between the
monthly and annual evaporation at the two sites. With a reliable correlation
based on several years of data, you can theoretically extend the period of data
from your site back in time, using the historic data.
The pan data from your site can be used to estimate some aspects of nearby
evapo-transpiration only if the relationships are known or can be estimated.
These relationships can only be measured by controlled experiments. Much
research has been completed using US Class A pan data to estimate lake
evaporation, soil evaporation and local evapo-transpiration. Several different
formulae and models have been developed to compute the potential
evaporation, based on solar radiation and weather data. Experienced
hydrologists can frequently determine reasonable relationships between pan
evaporation and lake and soil evaporation from nearby areas of interest. Pan
evaporation is then the simplest way to carry out the basic long-term
monitoring. Some additional soil moisture and weather data may be required
for evapo-transpiration monitoring.
3.2
Some Sources Of Errors In Evaporation Pans
3.2.1
Systemic Errors
Bird guards are required at many sites, to stop animals drinking the water
and to keep out wind blown debris. These guards reduce the recorded
evaporation by about 10%-12% because the mesh and frame partially shades
the water surface, reduces the airflow, and intercepts some rainfall.
UNIDATA recommends that measured evaporation data should be increased
by 10% if a bird guard is used.
Water quality has a minor effect. Seawater evaporates 2% to 3% less than
fresh water. Turbidity has no apparent effect.
EVAPORATION MONITORING TECHNIQUES 11
12 EVAPORATION MONITORING TECHNIQUES
Automatic Evaporation System
UNIDATA
UNIDATA recommends no adjustments are normally required.
Pan corrosion changes the interior surface colour and texture. The difference
between a black painted and unpainted galvanised iron pan is approximately
10%.
UNIDATA pans are constructed of white fibreglass to minimise discolouring
or deterioration with poor water quality.
3.2.2
Operating Errors
Evaporation pans are normally manually operated and require daily reading
and resetting. This is difficult or impossible at remote sites and data quality is
compromised.
Water level too high will result in rainfall splashing or blowing from the
tank when it is near full, and overflowing when it is full.
Water level below the reference mark increases the shading from the sides
of the tank and reduces evaporation by up to 2.5%/10mm below the reference
level, in temperate regions.
Water level very low records increased evaporation as the temperature of
water in the pan increases.
This page intentionally left blank.
UNIDATA recommends these errors be avoided by automatically controlling
the water level.
EVAPORATION MONITORING TECHNIQUES 13
14 EVAPORATION MONITORING TECHNIQUES
Automatic Evaporation System
UNIDATA
6m x 6m fenced enclosure located in full sun with free air flow
4
Water Supply
SITE REQUIREMENTS AND LAYOUT
4.1
Mounting
Pole
Model 6529E Water
Level Control System
Site Requirements For All US Class A Evaporation Pans
Site requirements are frequently a compromise. The following features are
desirable when selecting a site. They are listed in order of importance.
Optional Model
6506A Rain
Gauge
· If the site is near a water body or a spray irrigation or reticulation system,
it should be at least fifty metres away and on the prevailing upwind side.
· The site should be secure from unauthorised interference and easy to
Level monitoring
flow
Model 6529A Water
Level Monitoring
System
Water Drain
to waste or
recycling
access and service.
Optional Model
6529B Water
Temperature
Instrument
· Select a level, open site, free from obstructions such as trees, bushes and
buildings that will shade or shelter the site from wind. The evaporation pan
should be in the full sun.
· Any obstruction should be at a distance from the pan of at least 4 times the
Model 6529C
Evaporation
Pan on Pallet
height above the pan rim.
· Select an area six metres square. If necessary fence the area using an open
To Equator
fencing system with minimum wind resistance.
· Maintain the ground cover within the fenced compound in a similar
condition to the natural surroundings. Keep vegetation trimmed to below
the pan rim height.
4.1.1
Water Supply
The evaporation pan is refilled each day by the level control system. The
automated refill is controlled by a solenoid switched on by the datalogger in
response to the level registered on the water level transducer.
The instrument must be permanently connected to a reliable supply of potable
water. Some typical examples are shown in the following sections. Solenoids
and pumps can be supplied to suit all applications.
4.1.2
High Pressure Supply
The simplest method is to connect to a reticulated water supply of potable
water. A pipeline is required to the site, terminating in a tap or shut-off valve.
A short length of m12.5 hose can be used to connect to the solenoid filter.
A high pressure solenoid with a range of 10-100kPa is available as an option.
SITE REQUIREMENTS AND LAYOUT 15
16 SITE REQUIREMENTS AND LAYOUT
Automatic Evaporation System
UNIDATA
4.1.4
Underground Supply
Where the water supply is scarce or inconvenient, it is possible to install a
tank large enough to be self-sustaining at most sites. Any excess rainfall
captured in the pan can be recycled back into the storage tank. A roof over the
tank can be used to capture additional rainfall. If required, the tank can be
buried and a small pump used to refill the pan.
Model 6529-2H
High Pressure Solenoid
(10-100kPa)
mounted in enclosure
Low level roof with gutters
to capture additional rainfall
Shut-off valve
Reticulated
water mains
Drain pump hose outlet
configured to prevent
siphoning from pan
The maximum desirable pressure is 200kPa. In some circumstances a
pressure reducing valve may be required to prevent high pressure leaks.
4.1.3
Low Pressure Supply
The water supply can be from a mains system or a special storage tank. The
supply pressure should be between 10kpa (1 metre head) and about 50kpa (5
metre head). The supply is normally a tank that is refilled at regular intervals.
A 1000 litre tank will replace about 750mm of evaporation. The tank capacity
that you need depends on the expected evaporation at your site, and when you
can conveniently refill the tank.
1000 litre supply
tank on stand
Optional hose from
drain pump. Enters
top of tank to prevent
siphoning.
Ground
level
Fill pump substituted
for solenoid
Buried tank for water supply
The expected annual evaporation and rainfall, and the monthly distribution
can be estimated from published data from your national weather office. This
can be used to design the capacity of your supply tank.
1 metre
head
Model 6529-2L
Low Pressure Solenoid
(0-70kPa)
mounted in enclosure
Suppply hose with
valve at tank
SITE REQUIREMENTS AND LAYOUT 17
18 SITE REQUIREMENTS AND LAYOUT
Automatic Evaporation System
5
Concrete the 40mm galvanised pipe firmly into the ground. Attach the
enclosure to the pole using the U-bolts supplied. Face the side with the hole
for the stillwell hose toward the pan. Move the enclosure up/down the pole
until the bottom is 20mm below the bottom of the evaporation pan.
INSTALLING THE EQUIPMENT
5.1
UNIDATA
Installing The Model 6529C Evaporation Pan
Ensure the pole will not
shadow the solar panel
Solar Panel
Your
padlock
The evaporation pan should be located in the centre of the compound. The
pan is installed on an open timber palette constructed from timber treated
with suitable preservatives. The pallet should be firmly bedded into the
natural surface with the top 50mm to 75mm above ground level. Do not
install the pan on a concrete, bituminous or gravel pad. It is essential that air
circulates freely beneath the pan, and that any leaks can be seen.
Point gauge assembly
in middle of pan
approx.
850mm
Refill hose from water
level control system
1300mm
200mm
Floor level 20mm
below the bottom
of the evaporation pan
12.5mm hose
12.5mm
hose
75mm
To water level monitoring system
Rest the pan centrally on the pallet. Rotate it to orient the hole in the pan
toward the location of the stillwell assembly. Assemble the hose fittings
through the hole at the bottom of the sidewall of the pan. Seal the joints with
a smear of silicon. The assembled fitting has a hose barb on each side of the
tank wall.
Install the Model 6529-C1 level gauge. Attach the 550mm hose to the gauge
and to the inside barb in the pan wall. No hose clamps are used because
(very) small leaks will not affect operation. Position the level gauge in the
middle of the evaporation pan.
5.2
5.3
Installing The Stillwell Assembly
Do the following:
1.
Leave the 6541 instrument off the stillwell during initial installation.
2.
Thread the 1.5 metre hose through the hole in the side facing the pan.
3.
Connect the hose to the barb fitting in the base of the stillwell. Fix it with
a hose clamp.
Installing The Model 6529A Enclosure
The stillwell enclosure is located 1.5 metres from the pan, on the side away
from the equator, where it will not shadow the pan. Near the equator, install it
on the western side of the pan.
INSTALLING THE EQUIPMENT 19
20 INSTALLING THE EQUIPMENT
Automatic Evaporation System
4.
Put the stillwell assembly into the enclosure. It stands on the enclosure
floor at the back. Clamp the stillwell to the bracket with the stainless
steel hose clamp supplied.
UNIDATA
5.3.2
Fill The Pan And Set The Water Level Instrument
Fill the pan with water to near the reference point in the pan level gauge.
Check the hose connections and the pan for leaks and fix any problems.
Confirm that the water level in the stillwell is the same as in the evaporation
pan, and that they move together. An airlock in the hose system can prevent
this happening. To check, take some water from the pan and almost fill the
stillwell. Check that it drains back to the previous level. If it doesn’t, clear the
air lock.
6541-31/C (can be
rotated 90° on
stillwell)
Enclosure
To clear an airlock, remove the hose from the level gauge and blow through it
until it bubbles into the stillwell. Replace the hose and confirm the water
transfer is OK.
5.3.3
Prepare The Float System And Stillwell Assembly
Do the following:
SS hose clamp
Stillwell mounting
bracket and battery
shelf
1.
Bolt the Model 6541-31/C instrument to the stillwell cap, with the two
bolts provided. The instrument must be fitted with a
100mm-circumference float pulley and an offset pulley.
Stillwell
2.
Prepare the float system. This is normally supplied as an assembly, ready
for installation. However, if you need to prepare it yourself, follow these
steps:
m12.5 hose to
evaporation pan
- Loop one end of the floatline through the eye of the float. Use two
crimps to fix the loop.
5.3.1
Connect The Stillwell To The Pan
A flexible hose is used to link the stillwell to the evaporation pan. It is
normally buried to protect it from accidental damage. This hose ensures that
the water level in the pan and stillwell are the same at all times.
- Place the float in the bottom of the stillwell. Thread the floatline up
through the centre hole in the stillwell cap. Place the cap and instrument
in position on the stillwell.
An air lock could form in the hose if there are any high points. This can
restrict or block water transfer and prevent the system from operating
correctly.
To keep the hose straight, sleeve it with a piece of 40mm PVC pipe before it
is buried. This also serves as a duct for the fill hose and the drain pump cable.
Lay the sleeved hose into a shallow trench between the stillwell and pan. Cut
the hose to length and connect it to the pan, using a hose clamp.
INSTALLING THE EQUIPMENT 21
22 INSTALLING THE EQUIPMENT
Automatic Evaporation System
Cut-away illustration of
float system in stillwell
Float pulley and
offset pulley on
rear of 6541
Float assembly:
float, line and
counterweight
Stillwell cap
Stillwell
m12.5 hose to
evaporation pan
- Thread the floatline over the instrument pulley, then the offset pulley,
and loop it through the eye of the counterweight. Adjust the length such
that the counterweight eye is just above the side hole in the stillwell cap.
Use two crimps to fix the loop.
5.3.4
Install The Water Level Instrument
The 6541 sits on top of the stillwell. The display normally faces the front. The
instrument can be rotated ninety degrees if you need to see the floatline at the
back.
UNIDATA
4.
Place the instrument into its final position on the stillwell.
5.
Rotate it to a side-on position. With the floatline installed on both the
float pulley and offset pulley, check that the float and counterweight can
rise freely from the bottom to the top of the stillwell, without clashing, or
touching the sides.
6.
Rotate the instrument back to its operating position.
See the 6541 User Manual (publication number 6209) for detailed
information on the operation of the 6541 instrument.
Remove the front cover from the 6541. Confirm that the following transducer
switch settings have been selected. These are required for the correct
operation of this instrument.
Switch
Number
Switch
Position
1
Off
Direction of rotation to increase display as level rises.
2
On
Direction of rotation to increase display as level rises.
3
Off
Reserved.
4
Off
Reserved.
5
On
Switches display to a resolution of 0.2mm.
6
Off
Switches display to a resolution of 0.2mm.
7
Off
Switch on only to reset to zero.
8
On
Internal battery On.
5.3.5
To install the 6541 instrument:
1.
Remove the rear sliding plate. This is not required at these sites, and
there is not room to lift it off inside the enclosure. Keep the rear plate for
later use.
2.
Place the float onto the water surface in the stillwell.
3.
Rest the instrument on the side of the stillwell. Thread the counterweight
up through the centre hole in the cap, over the pulleys and down through
the outer hole.
INSTALLING THE EQUIPMENT 23
Function
Set And Test The System
Adjust the level of the water in the evaporation pan to the exact level of the
point gauge. Turn on the 6541 and set the display to read 200.0 mm using the
arrow keys.
To test the system, use the measuring flask to add or remove water from the
evaporation pan. The display should change by 0.2mm for each 230 ml of
water added or removed from the tank. The stillwell level will slowly adjust
to the new pan level. Confirm that the display moves in the same direction as
the pan water level changes.
24 INSTALLING THE EQUIPMENT
Automatic Evaporation System
5.4
5.4.1
The Level Control System
Overview
UNIDATA
5.4.2
The purpose of the level control system is to reset the evaporation pan water
level back to its reference level at a regular time each day. You can set the
reset time to suit your project. This replicates the operation of a manual
evaporation pan, and produces similar data. After operating for 24 hours the
water lost to evaporation is replaced from a tank or other water supply. If the
pan is overfull from rainfall the excess is pumped from the pan. This can be
recycled back to the supply tank if site water is scarce.
Level Control Module
This self contained instrument is normally located near the battery and
solenoid or pump. There are no internal settings or adjustments. A cable
connects it to the site data logger terminals.
16
Signals from site data logger
The pan water level recorded by the data logger is used to control the reset.
At the specified time the logger will decide if water is to be added or
removed. It then switches on the appropriate device until the reference level is
reached. If the pan is in danger of overflowing from heavy rainfall the pan
will also be reset.
Power for GSM MODEM
TOP
Power from solar panel
Test power
Battery
A level control module consisting of a switch card in a polycarbonate
enclosure controls the reset. This switch card is operated by the site
MICROLOGGER or by an associated STARLOGGER or PROLOGGER.
This card has relays with the capacity to operate either solenoids or small
pumps. Either device may be used depending on the site. Power is supplied
by a solar powered battery system. A regulator on the switch card manages
battery charging. All devices connect to the row of pluggable terminals
located at the front of the enclosure.
Drain system
Fill system
1
The other components of the system plug into the marked terminals.
A Test terminal socket is provided. This has continuous 12V power. Plug in
your fill or drain device if you want to test run it.
Contact your local UNIDATA support centre for advice if you wish to fit the
controller to an existing instrument, or use it for another purpose.
5.4.3
Fill System
A solenoid valve is normally used to turn on a water supply and add water to
the evaporation pan. This is typically turned on by the data logger at 0900
each day, if the water level is low and turned off when the level is correct.
The solenoid is located in the base of the instrument enclosure. The outlet of
the solenoid is connected to the evaporation pan by a 12.5mm (½”) hose. This
hose enters the pan above water level to avoid any chance of water siphoning
back out of the pan.
INSTALLING THE EQUIPMENT 25
26 INSTALLING THE EQUIPMENT
Automatic Evaporation System
5.4
5.4.1
The Level Control System
Overview
UNIDATA
5.4.2
The purpose of the level control system is to reset the evaporation pan water
level back to its reference level at a regular time each day. You can set the
reset time to suit your project. This replicates the operation of a manual
evaporation pan, and produces similar data. After operating for 24 hours the
water lost to evaporation is replaced from a tank or other water supply. If the
pan is overfull from rainfall the excess is pumped from the pan. This can be
recycled back to the supply tank if site water is scarce.
Level Control Module
This self contained instrument is normally located near the battery and
solenoid or pump. There are no internal settings or adjustments. A cable
connects it to the site data logger terminals.
16
Signals from site data logger
The pan water level recorded by the data logger is used to control the reset.
At the specified time the logger will decide if water is to be added or
removed. It then switches on the appropriate device until the reference level is
reached. If the pan is in danger of overflowing from heavy rainfall the pan
will also be reset.
Power29
for GSM
See page
for MODEM
Power from solar panel
pin connection
TOP
Test power
Battery
A level control module consisting of a switch card in a polycarbonate
enclosure controls the reset. This switch card is operated by the site
MICROLOGGER or by an associated STARLOGGER or PROLOGGER.
This card has relays with the capacity to operate either solenoids or small
pumps. Either device may be used depending on the site. Power is supplied
by a solar powered battery system. A regulator on the switch card manages
battery charging. All devices connect to the row of pluggable terminals
located at the front of the enclosure.
Drain system
Fill system
1
The other components of the system plug into the marked terminals.
A Test terminal socket is provided. This has continuous 12V power. Plug in
your fill or drain device if you want to test run it.
Contact your local UNIDATA support centre for advice if you wish to fit the
controller to an existing instrument, or use it for another purpose.
5.4.3
Fill System
A solenoid valve is normally used to turn on a water supply and add water to
the evaporation pan. This is typically turned on by the data logger at 0900
each day, if the water level is low and turned off when the level is correct.
The solenoid is located in the base of the instrument enclosure. The outlet of
the solenoid is connected to the evaporation pan by a 12.5mm (½”) hose. This
hose enters the pan above water level to avoid any chance of water siphoning
back out of the pan.
INSTALLING THE EQUIPMENT 25
26 INSTALLING THE EQUIPMENT
Automatic Evaporation System
A filter is located upstream of the solenoid. This has a removable element to
simplify cleaning. The filter connections suit a 12.5mm (½”) hose from the
supply tank. A small pump may be operated if an underground water supply
is used.
5.4.4
Drain System
A small pump is used to remove surplus water (rainfall) from the pan. If the
data logger detects the water level is higher than the reference at the reset
time (0900hrs), the pump is turned on until the level is correct. The pump is
also switched on to reset the pan level if rainfall increases the tank level to
240mm. The pump has the advantage of moving the water quickly and being
able to recycle it to a tank.
UNIDATA
5.4.6
Installing The Level Control System
There is a row of 16 pluggable terminals on the level control module. A strip
of 8 terminals permanently connects the data logger, GSM modem and solar
panel. Strips of two terminals are used to connect the battery and the drain
and fill devices. The Test socket is normally empty. You can plug in the
Drain or Fill device at any time to test it or to manually adjust the pan water
level.
The pump mounts in a housing designed to stand within the evaporation pan,
and discharge water over the side through a 12.5mm (½”) hose fitting. A hose
can be connected to this fitting to direct the pumped water to storage or away
from the site.
The end of any drain hose should discharge into air at a higher level than the
pan top to prevent water siphoning in or out of the tank.
The submersible bilge pump is installed inside a small housing made from
PVC. Terminals beneath the lid connect the pump with the cable to the
control system. The pump housing can be lifted from the well, separated in
the middle and the pump lifted out for cleaning. The bottom of the pump can
be removed to clean and service the impeller.
The pump must be inverted when installed for reliable self-priming; the inlet
must be at about 190mm above the pan bottom. This prevents a
malfunctioning pump from draining the evaporation pan.
5.4.5
Power Supply
The system is powered by a 12-Volt, 7 Ampere-Hour sealed lead acid battery.
This is recharged by a 12-Volt 2-Watt solar panel located on the top of the
enclosure. A regulator on the relay card maintains the battery in a fully
charged condition. This will power the level control system for an expected
service life of at least three years.
The battery capacity is sufficient for up to two months of operation, without
recharging. When the sun shines the solar charger can replace the typical
daily power consumption within one hour.
INSTALLING THE EQUIPMENT 27
28 INSTALLING THE EQUIPMENT
Automatic Evaporation System
Control
Module
Terminal
Connected
Device
1
5.4.8
To
Remarks
+
Switched on to add water to evaporation
pan.
Fill System
2
-
3
+
Drain System
4
-
5
+
Testing
6
-
7
+
Battery
8
-
9
+
Switched on to remove water from
evaporation pan.
Normally vacent . Plug in the fill or
draw system to test.
Connectes to rechargeable selaed klead
acid battery.
+
GSM MODEM
12
-
Provides power for GSM MODEM (if
required).
6541-31C
13
14
Data Logger
Relay control
signals
15
Place the solenoid outlet through the front hole of the three at the bottom of
the left-hand wall of the cabinet. Attach the hose to the pan, and seal it with a
hose clamp. Connect the pan end of the hose to the fitting in the top hole of
the pan, and fasten it with a hose clamp.
Push the filter and short joiner hose through the hole in the opposite side of
the cabinet. Join the hose to the solenoid inlet with a hose clamp. Connect
your water supply hose to the inlet of the filter. Fit a tap or shut-off valve at
the water supply point.
Connect the solenoid lead and plug it into terminal 1(+) and 2 (-) of the
terminal strip. You can test the solenoid operation by plugging in to the test
position. The solenoid should click open when you plug it in and click shut
when you unplug it.
5.4.9
-
11
Install The Fill Solenoid
Connects to solar panel.
Solar Panel
10
UNIDATA
STAR-
PRO-
LOGGER
LOGGER
OUT0
Terminal 3
FTS 42
44
UPS
(OUT1)
Terminal 1
FTS 47
45
+
Terminal 11
FTS 1
1
-
Terminal 13
FTS 2
2
Install The Drain Pump
Stand the pump assembly in the pan near the inlet. Direct the outlet fitting
through the mesh of the bird guard. You will have to cut out a small panel of
mesh. Attach the pump assembly to the mesh of the bird guard using the
stainless steel hose clamp provided. Run the cable alongside the inlet hose
and into the cabinet through the cable gland provided.
Plug the pump cable into terminals 3(+) and 4(-) of the terminal strip. To test
the pump, transfer the plug to the test position. The pump should run when
you plug it in, and stop when you unplug it.
External Power
16
5.4.7
Install The Battery And Solar Panel
Stand the battery on the bracket holding the stillwell. Use the cable supplied
to connect the battery to terminals 7(+) and 8(-).
Bring the solar panel wires through the gland in the cabinet roof. Mount the
solar panel onto the top bracket with the two screws in the panel frame. Use
tamper-proof screws if security is a concern. Connect the solar panel to
terminals 9(+) and 10(-).
INSTALLING THE EQUIPMENT 29
30 INSTALLING THE EQUIPMENT
Automatic Evaporation System
UNIDATA
6.2.1
6
To Adjust The Scheme Details To Suit Your Project
Select System from the toolbar and Scheme Editor from the drop-down menu.
Start your Starlog system and a list of schemes will be displayed. Select the
6529E Scheme from the Menu.
OPERATING THE SITE
This instrument is operated in the same way as any other UNIDATA
Instrument. You use the same software to program and test the logger and
unload and view data. See the Version 3 Software Manual for detailed
information.
6.1
Software Requirements
You will need a laptop computer, a cable, and Starlog Version 3.09E (or
later) software. You can obtain updates from the technical support section on
www.unidata.com.au. A special Evaporation Instrument and Scheme have
been created to monitor the recorded water level, extract the evaporation and
rainfall data, and reset the pan water level. This software is supplied on disk
with initial releases of the instrument. Copy the files:
· 6529E*.* to the Starlog\Schemes folder.
· PDL6529E.SRC to the Starlog folder.
· PDLTRANS.MET to the Starlog\Eng folder.
6.1.1
Overview Of The 6529E Scheme
Selecting the Scheme Editor.
This scheme offers you the options to log the raw water level, total
evaporation and total rainfall. You can log either one daily total or details
throughout each day. The evaporation data accumulates all 0.2mm water level
falls, and the rainfall data all 0.2mm rises. The data is logged in increments of
0.4mm. The effects of any pan water level resets and minor water level
pulsations are not recorded.
The following screen will open. You may have to select Window option, then
All Options and Tile the Display for the most convenient display. Click on
the appropriate box to open it for editing.
The time of the day at which the water level will be reset has been set to
0100. You may wish to change this to the Bureau of Meteorology standard of
0900. The level at which the rainfall will be pumped out to prevent overflow
has been set to 240mm but can be adjusted.
6.2
Preparing To Log Data
Select the 6529E scheme. This can be edited to your logging requirements
and saved with your project name. It can then be loaded to your logger and
used to log, unload and review data the same as any other Unidata project.
OPERATING THE SITE 31
32 OPERATING THE SITE
Automatic Evaporation System
UNIDATA
Select the Program Panel to edit the log interval and other details. The
following settings are recommended for a normal project. You may prefer a
15 minute log interval to reduce the volume of logged data.
The Program Panel.
Displaying Editing Options.
Select the General Panel to change the description to your site name.
Click on the Events panel to open the listing of events. Double click on event
3 if you wish to change the reset time. Event 2 sets the level at which rainfall
will be drained. Event 3 sets the time at which the daily level reset will start.
The General Panel.
The Events Panel.
OPERATING THE SITE 33
34 OPERATING THE SITE
Automatic Evaporation System
The events detail box for event 3 will open. This event sets the reset time
when A=B. A is the TOD (Time of Day) and B is the required time. 100 is 1
AM. 1300 is 1 PM. You can change the time and hit OK.
UNIDATA
You should save it with a scheme name that identifies your site. This scheme
must be used each time you connect to this data logger.
6.3
To Start Logging Data
Connect your computer to the data logger using the correct UNIDATA cable
and then:
The Events Detail Panel.
To select what to log, open the Log Buffer panel. Use the spacebar to select
the data you wish to log at each log interval (the spacebar toggles the X on
and off).
1.
Start the STARLOG V3 software.
2.
Select the scheme for the site.
3.
Select Program logger with scheme.
4.
Click OK to continue.
The scheme will be loaded and logging will commence automatically.
The Log Buffer Panel.
When you have finished editing the Scheme, select Scheme from the toolbar,
then Save As.
OPERATING THE SITE 35
36 OPERATING THE SITE
Automatic Evaporation System
6.4
To Check Data While Logging Is In Progress
Select Scheme Test Mode from the main menu for the scheme. The screen
that appears shows complete details of the current logging situation. The
display is updated each scan. You can use this screen as often as you like and
for as long as you like; logging continues normally while in Scheme Test
Mode.
UNIDATA
6.5
Data Recovery And Review
Refer to the software manual for Version 3 Software for detailed descriptions
on operating the software and displaying data.
Select Display a Data File from the menu. The following screen allows you to
select from a range of Reports that you have created, and files you have
unloaded.
Select the display
Select the unload
file to view
Plots will be displayed as requested, and axes may be expanded and
compressed.
An ASCII file, or Lotus file can be created and used with a spreadsheet to
further analyse the data.
OPERATING THE SITE 37
38 OPERATING THE SITE
Automatic Evaporation System
6.5.1
UNIDATA
Interpreting Evaporation Data
The following (annotated) graph is an example of typical data from a period,
and how it can be interpreted. Three sets of data are logged. The pan water
level trace is a full record of all level changes. You can analyse this and
extract the evaporation and rainfall data you require. However this has
already been done for you, and logged as the evaporation and rainfall data.
Pan water level
Rainfall
Level reset after rainfall
(evaporation reset at 0100 each day)
No reset required
Manual intervention to be
removed from data
Derived evaporation
Derived rainfall
This page intentionally left blank.
The derived evaporation and rainfall data is the accumulated total since the
logger was last reset. It may contain corrupting events if there has been any
artificial water level changes. There are two shown in the above example.
These can be removed by editing the data in a spreadsheet or with one of a
range of commercial editing systems.
OPERATING THE SITE 39
40 OPERATING THE SITE
Automatic Evaporation System
UNIDATA
7.1.2
Carrying Out The Site Inspection
At the site your objectives are to:
7
SITE VISITS AND MAINTENANCE
The purpose of installing the site is to obtain a continuous and reliable record
of pan evaporation. This data may be used for a range of process,
management and environmental purposes, sometimes in unexpected ways. It
is important that the site be operated to a consistent standard by staff with a
basic understanding of data collection and management.
Although the equipment can operate for up to 1 year, the site may deteriorate
to an unacceptable condition within a few months. Regular site checks and
equipment servicing is essential. The site should be inspected and serviced at
least monthly. The purpose of the site inspection is to check that the present
data is accurate and that this will continue. Experienced site operators prepare
for the site visit and use a report form and checklist to record details of the
visit. Instrument manuals, documents, site access details, special instructions
and visit reports should be kept in a site file, and taken to the site each visit.
Data should be regularly recovered from the site and securely archived in a
system that will permanently preserve the raw data. A copy of this data
should be reviewed and edited to adjust any anomalies or errors, and saved as
an archive for future analysis and use.
7.1
7.1.1
Site Visits
Preparing for the Site Inspection
Do the following:
· Recover the recorded data and verify its quality, and
· Ensure the site will keep operating correctly and the next period of data
will be of good quality.
Your common sense will help you achieve this.
At times it will be better to do nothing, and to return another day. For
example if it is raining heavily and the site has no protection, you will
damage the instruments and your test equipment if they get wet. Rushing
through a site visit, or trying to use a faulty computer, can also cause
problems.
If you encounter a problem, think logically through the process and carry out
checks and tests to eliminate probable causes. It is important to identify the
real problem so it can be fixed. Check the most obvious things first. e.g. is
your computer connected and operating properly? Is the water supply
functional? Do not jump to conclusions.
Do not fiddle with things that are OK. If it is working well, leave it alone.
When you proceed, prepare a comfortable and safe work environment for
yourself, lay out the tools and equipment you will need and work through
your visit in a logical sequence, such as suggested in the following section.
Fill in a report as you go and complete one part of the procedure before
proceeding to the next.
· Check the report from the previous site visit. Prepare to complete any
special work that is required.
· Check your computer. Confirm you have an adequate power supply and
the correct cable.
· Check and adjust the computer time and date. This will be used to reset the
logger.
· Carry any required spare parts and check instruments.
· Take the visit file.
7.1.3
Initial Inspection
Before touching anything, inspect and note the condition of the site,
installation and instruments.
· Are there any signs of damage or interference?
· Is the pan water level OK?
· Is the water supply functional and sufficient to last to the next inspection?
· Are the instruments clean, dry and secure?
· Is the water level transducer displaying the correct water level?
SITE VISITS AND MAINTENANCE 41
42 SITE VISITS AND MAINTENANCE
Automatic Evaporation System
UNIDATA
If you notice any problems try and work out what has happened and how to
prevent it reoccurring.
6.
Check that the derived rainfall is sensible and supported by the
evaporation data.
7.1.4
7.
Select the ASCII report. The file will be saved in the Starlog\Schemes
folder as name.A##. This is a flat ASCII file sited for spreadsheets and
data processing systems.
8.
Copy the ASCII file to a disk and leave it at the site, as a backup.
Reviewing The Data
To review the data:
1.
Connect your computer to the data logger. Start the STARLOG Version 3
Software.
2.
Select the Scheme for the site.
3.
Select Scheme Test Mode and review the display of present logging.
4.
Note the logger time and date and any difference with real time.
5.
Note the water depth in the pan, the transducer display and the logged
value.
6.
Note the total evaporation and rainfall and the battery voltage.
7.
Check the memory remaining, and then estimate the expiry date.
8.
Scan the recent data listed. Look for any anomalies that may indicate
faults.
7.1.5
Recovering The Data
To recover the data:
1.
2.
Select Unload Data from Logger. Data is saved in the Starlog\Schemes
folder as name.U##. This is a binary file that can only be interpreted by
the Scheme Reports. A Scheme may have many Reports to display and
save the data in a variety of ways.
Select "Display a Data File". Select the data plot report. Review the
logged data for the full period. Look for any unusual data the may
indicate a problem with the site or instruments. Zoom the plots for
details.
3.
Check the general water level record to confirm the timing and level of
the resets.
4.
Check the detailed shape of the latest daily water level record for unusual
periods that may indicate water leaks to or from the pan, or the float
system sticking or not functioning correctly.
5.
Check that the derived evaporation is sensible, with the expected diurnal
variations.
SITE VISITS AND MAINTENANCE 43
7.1.6
Carry Out Tests And Maintenance
Your data has now been recovered and secured. You can now carry out any
checks, tests and maintenance required. This data will be logged, however it
will be erased when you reset the logger before you leave. Note on your visit
report details of work you have done and maintenance required at the next
visit.
See Section 8 for maintenance details.
7.1.7
Resetting the Logger
This is essential if the memory will not last until the next scheduled visit, or if
you have disconnected the logger power for any reason. The reset "erases" all
previous data and restarts logging. You will have to process the data you have
unloaded.
You can choose not to reset the logger. Data logging will continue
uninterrupted, and you have secured a back-up copy of the data. When you
unload data at your next site inspection you will retrieve all the previous data
again, plus the latest data, all a one continuous file. The previous back up can
be discarded.
To reset the logger, select Program Logger with Scheme to reset the logger.
The reset process is automatic and permanent.
7.1.8
Final Site Check
Use Scheme Test Mode to confirm that logging is underway and that the time
and values are correct. Note the information on your visit report. Disconnect
the computer and pack away your equipment.
44 SITE VISITS AND MAINTENANCE
Automatic Evaporation System
Take a final look at the instruments and site. Confirm that all is operational,
clean and in good condition, with sufficient water, battery power and logger
memory to last until the next scheduled visit. Close up the instrument cabinet
and secure the site. Pick up any rubbish and tidy the area.
7.2
Data Processing And Management
This is an essential but sometimes overlooked part of the site operation.
Valuable recorded data may be lost or misplaced unless a data processing
system is established, documented and used routinely after each site visit.
Some sites are operated for many years, and ownership and operators may
change. A complete and documented data history is typically kept on a "data
processing" file for the site.
The appropriate system will depend on the project. It is possible to manage
data from a small number of sites as spreadsheets provided the system is well
organised and managed. Larger networks require specialised systems and
support.
The only copy of the data is the ASCII file on your computer hard drive. This
is why the backup copy has been left at the field site. The original ASCII file
should be archived as read-only in a system that is regularly backed up. This
should be done immediately you return from the site visit.
This original file may contain anomalies that have to be edited out, and
periods of lost or faulty data. Changes are made to a copy of the data (never
the original) and comments about what was changed and why, should be
appended. Blank periods, or estimates if possible, should be inserted if data
has been lost. These changes should be done by, or in consultation with, the
site operator.
This edited data should then be appended to previous data to maintain a
complete and continuous archive file of all data from the station. Review this
file to confirm that the latest data forms a sensible extension to previous data,
and that daily and seasonal evaporation and rainfall are sensible.
If apparent data problems are identified during data processing a note should
be added to the station visit file, to remind the site operator to attend to the
matter at the next site visit. The interaction between site operation, data
processing, reporting and review allows for continuous improvement in the
quality of the data produced.
SITE VISITS AND MAINTENANCE 45
UNIDATA
7.3
Site Maintenance
7.3.1
Overview
All evaporation pans need regular maintenance. It is recommended that sites
with pans be serviced at least once a month. Dust and debris will accumulate
in the pan and algae can grow in some conditions. Leaks can develop and
water supplies may need regular maintenance. The recorded data will be
effected.
At sites in dry areas a bird guard will prevent water loss from birds and
animals drinking from the pan. The guards also reduce the amount of wind
borne leaves and debris that lodge in the pan.
The water in the pan should be reasonably clear and clean. If algae growth is
excessive a commercial algaecide such as used for swimming pools, may be
added to the pan and supply tank
7.3.2
Site Surrounds
At fenced sites the vegetation and ground conditions inside the compound
should be similar to those outside. Keep any bushes and grass around the pan
trimmed to a level below the pan rim. Bushes further away should not be
higher than 25% of the distance from the pan. Any fence should be of an open
design with minimum wind resistance.
7.3.3
Evaporation Pan and Level Monitoring System
The evaporation pan will require regular cleaning. The colour of the interior
surface, the water clarity and the amount of surface litter, all affect the
recorded evaporation. The frequency of cleaning will depend on site and
seasonal conditions. The objective is to keep the pan reasonable clean
throughout the year.
Floating material and debris may be scooped out with a small swimming pool
net. Clean any dust and debris from inside the pan. The walls and bottom of
the pan can be brushed and the water swirled into a "whirlpool". Loose
material will accumulate in the centre of the pan and can be vacuumed off
with a siphon hose. If there is plenty of water at the site it may be simpler to
drain, clean and refill the pan.
46 SITE VISITS AND MAINTENANCE
Automatic Evaporation System
UNIDATA
Inspect all hoses and fittings, and the stillwell assembly, for signs of leaks.
Repair any problems.
7.3.4
Input Water Supply
There is a water filter between the solenoid and the input water supply hose.
This is to intercept any fine debris that may prevent the solenoid from
closing. The filter should be checked regularly. It may be removed, washed
and replaced. How often this will be required will depend on the quality of
the water supply.
To clean or change the filter:
1.
Open the enclosure and grasp the body of the filter.
2.
Unscrew the filter cap located on the outside of the enclosure.
3.
Remove, clean and replace the filter element.
4.
Reassemble the system and check for leaks.
7.3.5
Solenoid/Pump
Regularly check the operation of the solenoid and pump. To check the
condition and serviceability of the solenoid and/or pump:
1.
Connect each device to the TEST position of the control module. It
should turn on and operate continuously.
2.
Measure the water flow from each device by timing the flow into the
volumetric flask.
3.
Compare the flow test results with previous checks. A significant
reduction in the flow rate will indicate the need for cleaning, or
replacement.
4.
Check that the solenoid does not leak in the off position.
This page intentionally left blank.
Service kits for solenoids are available from Goyen Valves or UNIDATA.
Spare pumps can be obtained from UNIDATA. A spare solenoid and pump,
or service kits, should be kept at the site ready for use.
SITE VISITS AND MAINTENANCE 47
48 SITE VISITS AND MAINTENANCE