1
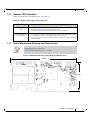
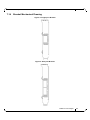
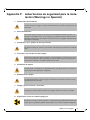
ConnectX-4 Ethernet Single and Dual Port QSFP28 Adapter Card User Manual
Rev 1.3
To replace the bracket you will need the following parts:
3.4.1
•
The new bracket of the proper height
•
The 2 screws saved from the removal of the bracket
•
The 2 fiber washers saved from the removal of the bracket
Removing the Existing Bracket
1. Remove the two screws holding the bracket in place. The bracket comes loose from the card.
Be careful not to put stress on the LEDs.
2. Save the two screws and the two fiber washers.
3.4.2
Installing the New Bracket
1. Place the bracket onto the card until the screw holes line up.
Do not force the bracket onto the card. You may have to gently push the LEDs using a
small screwdriver to align the LEDs with the holes in the bracket.
2. Screw on the bracket using the screws and washers saved from the bracket removal procedure
above.
3. Make sure that the LEDs are aligned onto the bracket holes.
4. Use a torque driver to apply up to 2 lbs-in torque on the screws.
3.5
Card Installation Instructions
1. Before installing the card, make sure that the system is off and the power cord is not connected to the server. Please follow proper electrical grounding procedures.
2. Open the system case.
3. Place the adapter in an available PCI Express slot.
A lesser width adapter can be seated into a greater width slot (x8 in a x16), but a
greater width adapter cannot be seated into a lesser width slot (x16 in a x8). Align the
adapter connector edge with the PCI Express connector slot.
4. Applying even pressure at both corners of the card, insert the adapter card into the slot until it
is firmly seated. When the adapter is properly seated, the adapter port connectors are aligned
with the slot opening, and the adapter faceplate is visible against the system chassis.
Do not use excessive force when seating the card, as this may damage the system or
the adapter.
Mellanox Technologies
17