1
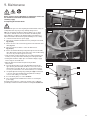
9. Maintenance - Cont.
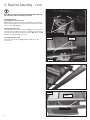
Fig. 9.4
CAUTION!
Before carrying out any adjustments or maintenance ensure
that the machine is isolated and disconnected from the
electricity supply.
i
i
Kg
Kg
9.2 Replacing the drive belt
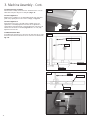
To replace the drive belt first remove the lower bandwheel by undoing
the 13 mm bolt on the hub. Then simply loosen the tension on the belt
using the tension handwheel, remove the old belt and fit the new one
Fig. 9.4. Once the drive belt is in place re-fit the lower bandwheel
and tighten the bolt. Now tension the drive belt using the tension
handwheel. For further information on tensioning the drive belt please
see section 6.
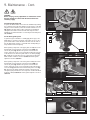
9.3 The blade guide system
In general usage it is advisable to carefully apply silicon spray to the
blade guides to ensure free movement of the rollers, do not use oil or
grease for lubrication as this will attract dust and cause the rollers to
jam. The blade guide system is a consumable item and depending on
usage will wear and need replacing.
When replacing components on the upper guide assembly first ensure
that the blade is removed. Undo socket head screws A & B then
remove the guard, Fig. 9.5. Once the guard is removed then the
various components can be accessed and replaced. Undo the relevant
socket head screw for either the guide rollers or rear thrust pad, Fig.
9.6. and fit the new parts. Once the new components are fitted. The
blade should be re-fitted as shown in section 9.1 and the guides
adjusted as shown in section 6.
13 mm hub bolt
Belt tension handwheel
Drive belt
Fig. 9.5
A
B
Guard
Fig. 9.6
Thrust roller socket head screw
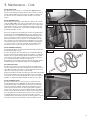
When replacing components on the lower guide assembly first ensure
that the blade is removed. Undo socket head screws C & D and
remove the guard, Fig. 9.7. Once the guard is removed then the
various components can be accessed and replaced. The roller bearing
are shown in Fig. 9.7 and the thrust roller bearing at the rear in Fig.
9.8. This is done by simply undoing the relevant socket head screw
and replacing the part. Once the new components are fitted. The blade
should be re-fitted, Section 9.1 and the guides adjusted as shown in
section 6.
Guide roller socket head screw
Fig. 9.7
Side roller socket head screws
C
Guards
Roller bearing
D
Fig. 9.8
Thrust roller hex screw
24