1
Wordbee Beebox
Developing CMS connectors
Developer Guide
February 28, 2015
http://www.wordbee.com
http://www.beeboxlinks.com
© Wordbee SA
© 2014 Wordbee
1
1 Table of contents
1
Table of contents ............................................................................................................................. 2
2
Introduction ..................................................................................................................................... 4
3
Overall architecture......................................................................................................................... 5
4
Beebox configuration ...................................................................................................................... 7
5
6
4.1
Introduction ............................................................................................................................. 7
4.2
Installation ............................................................................................................................... 7
4.3
The Beebox user interface....................................................................................................... 8
4.4
Create a project ....................................................................................................................... 8
4.5
The project dashboard ............................................................................................................ 9
4.6
Configure the project ............................................................................................................ 11
4.7
Translate sample files ............................................................................................................ 13
4.8
Machine translation .............................................................................................................. 15
4.9
Monitoring ............................................................................................................................. 16
4.10
Administration ....................................................................................................................... 17
Beebox API..................................................................................................................................... 19
5.1
Introduction ........................................................................................................................... 19
5.2
API credentials ....................................................................................................................... 21
5.3
Connect ................................................................................................................................. 22
5.4
Disconnect ............................................................................................................................. 23
5.5
Send original files .................................................................................................................. 23
5.6
Send original files with instructions ...................................................................................... 24
5.7
Send translated files .............................................................................................................. 26
5.8
Check translation status ........................................................................................................ 27
5.9
Get translated files ................................................................................................................ 29
5.10
Obtain quotation ................................................................................................................... 29
5.11
Beebox availability check ...................................................................................................... 34
5.12
Error handling ........................................................................................................................ 35
5.13
Date formats.......................................................................................................................... 36
5.14
Languages .............................................................................................................................. 36
5.15
Including meta-information with segments .......................................................................... 37
Connector development................................................................................................................ 40
6.1
Introduction ........................................................................................................................... 40
6.2
Key principles......................................................................................................................... 40
© 2014 Wordbee
2
6.3
Connector development – Job centric .................................................................................. 46
6.4
Connector development – Content centric ........................................................................... 48
6.5
Connector configuration ....................................................................................................... 50
6.6
Text extraction rules .............................................................................................................. 51
6.7
Questions & Answers ............................................................................................................ 53
© 2014 Wordbee
3
2 Introduction
This document describes how to develop a CMS connector that helps to maintain multi-lingual
websites with ease. It automates and assists with localizing CMS contents. For the actual translation
processes the plugin interfaces with the Wordbee Beebox software.
For example, our Kentico connector tracks any new or changed source content and, upon
confirmation, sends the content to the Beebox. It then simply waits for the translations to be done.
When ready, the translations are retrieved from the Beebox and inserted into the CMS. This is a
highly automated process which frees the CMS content manager from a lot of hassles.
You will be surprised that developing a connector is not rocket science. It involves these steps:
-
Install and configure the Beebox for development and testing. Basically, during development
you setup a workflow that is limited to pseudo- or machine translation of contents. That
makes it easy and low/zero cost to test. Switching to human workflows later on does not
change anything in terms of your integration. The Beebox can be installed to any PC or
server. Ask us for a developer license.
-
Learn how the Beebox web API is used to send content, obtain cost quotations, check
translation status and retrieve translated content. Also learn how the Beebox can be used to
push information to the CMS, an optional mechanism.
-
Build your connector and make sure it naturally integrates with the target CMS and existing
workflows. This truly is the toughest part! An ideal implementation keeps track of content
changes and makes maintaining a multilingual site easy for the content manager. The ideal
implementation is capable of handling huge sites as well as small sites and reduces the
number of clicks to a minimum. Your user interfaces should respect CMS design guidelines
and fit into places where it makes most sense. Your implementation should also leverage
existing mechanisms such as for multi-lingual content organization, content storage, and
workflow integration...
-
Bring to market: Installer software or package, installation manual, user manual. Register
your connector with marketplaces, etc.
We will discuss these items in the following chapters. But let’s first look at what your connector is
supposed to do and how it fits together with the CMS and the Beebox.
© 2014 Wordbee
4
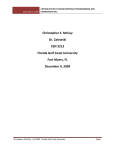
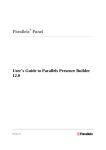
3 Overall architecture
The following diagram shows how the CMS, your connector and the Beebox work together.
Typically at customer
Typically at LSP
UltraCars.com
UltraCars.com
UltraCars.com
Web site
Plugin settings
Beebox project
Config UI
CMS
Instance
Your Plugin
For Content
Localization
Beebox
Manage UI
Business Logic
HTTPS
Interact with Beebox project
The different elements are:
The CMS
On the left hand side, we see the CMS which contains a web site named “UltraCars.com”. This is the
site that the customer wants to be multilingual. Some CMS permit to host multiple web sites in one
instance. The CMS itself typically is installed at the customer or a hosting service provider.
The Beebox
On the right hand side, we see the Beebox. In most cases, the Beebox license belongs to the
customer’s language service provider and is installed there. However, major corporations may prefer
to license and host the Beebox themselves. You do not need to care about this.
In the Beebox, we need to create a Beebox project for “Ultracars.com”. It is this project that takes
care of translating this web site. Rule of thumb: Each web site must link to its own private Beebox
project. Kind of alter ego!
Please read the following document. It explains important Beebox key concepts.
http://beeboxlinks.com/sites/default/files/Wordbee%20Beebox%20-%20Whitepaper%20%20Add%20translations%20to%20your%20software.pdf
The connector
So far so good, but how is UltraCars.com going to be translated? The missing link is your “connector”
or, if you prefer, your “Multilingual tool” plugin to be installed to the CMS. With most CMS systems,
the connector is installed separately per each CMS web site. In other words, each connector instance
is aware of just one site - easy. In some other CMS systems this is not the case and your connector
must be able to manage multiple sites and multiple configurations at the same time – less easy.
Your connector itself consists of some user interfaces and business logic:
© 2014 Wordbee
5
1. Configuration page. The site manager fills in parameters needed to connect to the Beebox
or, more specifically, a Beebox project. First create a Beebox project, copy & paste
connection parameters and send to the web site owner or content manager. The latter fills
that information into the configuration page. The main parameters are the IP address or
domain name of the Beebox, a login, a password, the Beebox project ID. Your code needs all
this to successfully connect to the Beebox API.
2. Management pages. These pages will tell whether the site manager loves your connector or
hates it! It is here that the site manager filters and selects the content to be sent for
translation (“create new translation jobs”). It is here that the site manager sees status and
details of running and past jobs. It is here that the site manager gets a clear picture of
translation in general. Translation costs money so make users feel comfortable: Ease of use,
few clicks, cost previews, etc.
3. Business logic and API. This is the code to shift CMS content to and from the Beebox. Use the
Beebox web API to send translatable content to the Beebox. Optionally, get quotations from
the Beebox first. Check translation status. Download translations and store to the CMS.
Properly check for any errors in the communication.
© 2014 Wordbee
6
4 Beebox configuration
IMPORTANT:
Do you really need to install and configure a Beebox yourself for development? You can and we
generally recommend doing so. However, if you prefer, you can also access a test Beebox installed at
Wordbee. In this case we simply give you the API url and connection parameters and you can start
developing (you can skip this chapter entirely then). Please talk to us.
4.1 Introduction
Before we go into API details and the CMS integration, we suggest that you get acquainted with the
Beebox. It is good to get a “feeling” how it works and how it is configured.
In this chapter we will guide you step by step:
-
How to install the Beebox
How to create a test Beebox project
How to translate files with the Beebox using file copy
How to enable machine translation
How to enable human workflows (this is not needed during development though)
When you reach the end of this chapter you are ready to dive into the Beebox API.
4.2 Installation
Download and run the Beebox setup program. Please ask Wordbee for the download page. The
Beebox is installed to a Microsoft Windows PC or server.
At the end of the installation the Beebox web user interface opens and asks you to register for a 30
days trial. Feel free to contact Wordbee for trial extensions or a developer license if needed.
Beebox components
The Beebox installation consists of:
A Windows service named “Wordbee Beebox Service”. The service starts automatically. You
can stop or restart the service in Windows from “Administrative Tools” > “Services”.
An IIS (Internet Information Services) web site which listens at port 8089. This web site
consists of the user interface (http://localhost:8089) and the API (such as
http://localhost:8089/api/whois). You can manage this site in the IIS administration console.
A directory with all your Beebox projects and data. The location is selected at the end of the
installation and is, by default: “c:\Beebox”. Uninstalling or re-installing the Beebox does NOT
remove this directory.
© 2014 Wordbee
7
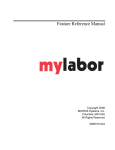
4.3 The Beebox user interface
During registration you are asked to choose an administrator login and password. Go to the Beebox
user interface at http://localhost:8089 and login (if accessed from the local machine):
Once logged in, the system shows all your Beebox projects:
In the left hand menu you have further access to your account and license details as well as Beebox
administration tools. We will discuss these later.
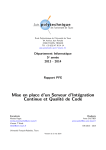
4.4 Create a project
Let’s create a new project for your first tests or developments. The idea here is that the project will
neither involve cost incurring human nor machine translation. Instead we will simply “simulate” a
translation workflow whereby all the texts you put into the Beebox are “translated” through
conversion to uppercase. This is quite useful to learn how the system is used and to avoid any cost.
Actually, adding machine or human translation workflows does not change anything from a
developer point of view.
Click the “New project” link in the top of the projects page. The project creation wizard opens:
© 2014 Wordbee
8
Give the project a name and choose your source language, the language in which the original content
is written. Then select one or more languages into which the content is to be translated. You can add
more target languages anytime later. Now submit the page by clicking the “Create project and
continue…” button.
4.5 The project dashboard
The project is now created and the system shows the project details page:
We are now looking at the dashboard of our new project. Note: The “Projects” link in the top
navigation menu (right hand top corner) brings you back to the list of all your Beebox projects.
The left navigation menu for our project is worth a few words:
Dashboard: Since this is a new project so there is not much to see yet.
© 2014 Wordbee
9
Source files: Shows all source files that were added to the project for translation. Basically
what you see here are the files inside the c:\Beebox\in directory.
Translation: Shows all text segments from the source files that we need to translate together
with the translation work progress. You can also view texts of individual files or all files. If
human translation workflows are enabled, you can manage translation jobs from here.
Target files: These are the fully translated files. Translated files are created only once all the
texts (segments) were translated. These files are stored to c:\Beebox\out. The page tells you
which files are delivered and which are not because translations are not yet done.
Quick search: A tool to find, filter, batch process or change text segments and their
translations.
Resources: The page to add optional translation memories to your project.
Settings: This page is very important. You customize workflows, text extraction rules,
expected translation quality and more.
© 2014 Wordbee
10
4.6 Configure the project
Let us now configure the project for fully automated workflows and pseudo-translation. This means
that when you add files to the project, the content is first pseudo-translated and then the translated
files are built.
Click the “Settings” button in the left navigation menu:
© 2014 Wordbee
11
Click the “Automation” tab and configure all options exactly as shown in the screenshots below. Read
the various help texts if you would like to understand the meaning of each option.
Continued on next page…
© 2014 Wordbee
12
4.7 Translate sample files
Please read this chapter carefully as we explain a couple of important notions.
Our project is now ready to translate files and we will do some tests. The test is simple: We will start
by copying a few source files (html pages) to the c:\Beebox\{projectkey}\in directory, wait a few
seconds and recover the translated files in c:\Beebox\{projectkey}\out. We will look at how to use the
API instead of moving files later.
The first thing is to find the “in” and “out” directories of your project. Go to the “Project details” tab
in the “Settings” page:
Let’s go:
© 2014 Wordbee
13
1. Copy a few .html or .html files to the input directory:
2. Click the small “Autorun” link below the left navigation menu. Await completion.
3. View the contents of the output directory:
We see one subdirectory per target language. Let’s look at the Spanish files:
Open the files and verify that all contents was well converted to uppercase according to our
earlier configuration (we opted for pseudo-translation since it is so simple and does not cost
anything).
Why do we need to click the “Start Autorun” link in the first place? Isn’t the Beebox supposed to run
automatically and unattended? You are absolutely right!
The Beebox would have done everything automatically if you had logged out of the user interface. As
long as someone is logged in, the automated operations are put on hold. Repeat the following steps
to see how it works:
1. Click the “Logout” link in the top right corner of the page. Closing the browser Window is not
a logout! The system will log you out automatically after 15 minutes but well this is a long
time to wait.
2. Copy two more files to the project’s input directory.
© 2014 Wordbee
14
3. Go to the output directory and wait until the newly translated files show up there. In our
configuration we specified that automatic operations are run every 10 seconds. So you may
have to wait about that long.
Please make sure that you are able to replicate the little tests above before you proceed with the
next sections.
4.8 Machine translation
In the example above, we configured pseudo-translation. If you have signed up, for example, with
Google Translate or Microsoft Translator you can add true machine translation.
Go to the “Settings” page of the project, click “Edit” and locate the machine translation section:
Fill in the requested information. Do not forget to click “Ok” in the settings page to save the changes.
Finally, click the “Automation” tab and choose the machine translation mode:
© 2014 Wordbee
15
4.9 Monitoring
As you can see, the translation workflow is automatic. You will likely not need to dig further down
into the many screens of your Beebox project. However, it is worth listing a few pages that you may
need if something goes wrong or you want to validate that the content you exchange with the
Beebox actually is in there!
View source files
Click “Source files” in the left navigation menu. It shows useful information on all source files that
were added to the project:
View translations
Click “Translation” in the left navigation menu. From our tests we can see that all files were
translated into all the target languages:
From the “Files” tab you can see the individual files and their translation status.
© 2014 Wordbee
16
Now, click the “View” link to the right of a language. It will show all the text segments and the
translations.
Target files
Click “Target files” in the left navigation menu and then the “Files” tab. We can see the translated
files that we expect to be created in the output directory. In our tests, all the files are already created
(indicated by the green “Ready” text) and saved to the output directory.
4.10 Administration
You can view all events and operations that occurred for all or a given project.
To view project events, click the small “Recent events” link below the left navigation menu:
To view events of all the projects in your Beebox, click the “Account” link in the top navigation menu.
Then click “Administration” in the left navigation menu:
© 2014 Wordbee
17
In this administration section you can also reset the server, e.g. in order to forcefully logout any
users. It is further here that you can enable an email server if you would like to send out
notifications. All this is not really necessary when building a connector though.
© 2014 Wordbee
18
5 Beebox API
5.1 Introduction
The purpose of the API is to send “files” to the Beebox you want to get translated. Then you check
back about the translation status to know when files are translated. Finally, you download the
translated files.
What exactly do you mean with “file”?
We use the term “file” to designate a piece of content you need to get translated. This may be xml,
html, xliff, Word or any other format.
When saying: “Send a file to the Beebox”, we do not actually mean that you have to create physical
files somewhere in your CMS. No, you simply send the binary contents (xml, Word…) and give it a
name (which we call “filename” throughout this document). Your binary content ultimately ends up
as a physical file deep inside the Beebox and this is the sole reason we use the word “file”.
For example, let’s say you have 3 content items to translate and each has a unique identifier inside
your CMS.
In that case you might name the three items like this:
“content\item-1000.xml” (Example for binary content: UTF-8 encoded xml)
“metatags\tags-201.html” (Example for binary content: UTF-16 encoded web page)
“content\doc-364.doc” (Example for binary content: Microsoft Word file)
You can optionally use “subdirectories” in your file name if it can help you to distinguish different
content types. Whatever the format you use, the file names should be set to uniquely map to
content items or translation jobs in your CMS.
The important thing here is that you include a “file extension” that reflects the exact format of each
content item. The Beebox needs the extension to know how to process the binary content.
What are the API methods?
The first method is for establishing a connection to the Beebox:
(GET) http://localhost:8089/api/connect?project=...&login=myname&password=whatever
Sending a file for translation:
(PUT) /api/files/file?token={token}&locale=en-US&filename=products\product1.xml
Check which files are fully translated and ready for download:
(GET) /api/workprogress/translatedfiles?token={token}&filter=&skip=&count=
Download a translated file:
(GET) /api/files/file?token={token}&locale=fr&filename=products\product1.xml
© 2014 Wordbee
19
Disconnect (important to do this always):
(GET) http://localhost:8089/api/disconnect?token=
In addition, your connector may request a cost estimate prior to truly submit work.
Upload files to cost:
(PUT) /api/files/file?token=&locale=sandbox&filename=
Request cost estimate and wait until the quote is ready:
(PUT) /api/files/operations/sandbox/count?token=&getcost=true
(GET) /api/async/operation/status?token=&opid=
Finally, submit the files for translation if the user accepts the quote:
(POST) /api/files/copy?token=...&locale1=sandbox&locale2={project source language}
Finally, the Beebox is capable of receiving translated files together with the source files. This serves
two purposes: (a) A connector can extract the translated content in the CMS in case a CMS user
made changes to translations inside the CMS and you need to persist those in the Beebox memories
or send to the human translation team for validation; (b) Some content is already translated in the
CMS before the Beebox was put in place. In this case you can include the translations so as to feed
the Beebox memories on the fly (and not lose the translations!). The common but time-consuming
alternative is to extract all multilingual content in advance, use an alignment tool to create
translation memories and upload memories to the Beebox project.
With the source file, further send the translated file(s):
(PUT) /api/files/file?token={token}&locale={target locale}&filename=products\product1.xml
Send an “instruction file” to tell the Beebox that alignment needs to be done. This is explained later
on.
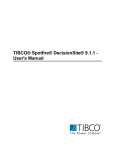
How can I test API methods?
The Beebox API is web based. Therefore, you can type API calls directly in a browser’s url field, at
least when the http method is “GET”.
If you have Google Chrome, there are free plugins to very easily test APIs. One of them is called
“Postman” and it supports all http methods the Beebox uses: “GET”, “PUT”, “POST” and “DELETE”:
© 2014 Wordbee
20
Online help
In this chapter we will discuss the API methods required to develop the typical CMS connector. If you
are interested in more advanced API methods (though likely not required) please go to the online
documentation at: http://wordbee.helpserver.be/servlet/t4st.helpserver.ws.pm.TPgm?ALIAS=BEEBOX2.API
5.2 API credentials
In order to use any of the API methods, you first need to create an API login and password. The
credentials are assigned individually per Beebox project.
Go to the “Settings” page of your project and click the “Connectors & API” tab:
Click “Edit” and switch on the toggle button:
© 2014 Wordbee
21
Fill in a login and a password. Leave the “API access level” at “Standard connector”. Advanced
connectors have access to a wider range of API methods but you will not need this.
Click “Ok” to save changes. Your Beebox project is now ready to accept API calls.
Side note: The “API callback url” will be discussed later. It permits to implement a push mechanism whereby
the Beebox notifies a CMS when newly translated files have been created.
5.3 Connect
You start by connecting to a Beebox project:
(GET) http://localhost:8089/api/connect?project=
&login=&pwd=&waitsecs=&connector=&version=
Parameters are:
project
The identifier of the project to connect to. You can find this id in the project settings
page:
login
See chapter 5.2.
password
See chapter 5.2.
© 2014 Wordbee
22
waitsecs
Optional number. Default is 10.
Indicates the timeout in seconds for this call. Purpose: Whenever the Beebox
executes automated operations, it blocks login attempts. This parameter indicates
how long the login method waits before it returns an error.
connector
Free text that identifies your connector. For example “Drupal by xy” or “Magento”.
Keep it a short product name.
version
Free text containing the version number of your connector.
If authentication succeeds, the method returns http code 200 (success) and a session “token” which
you include with all subsequent API calls. It is essential that you always and systematically verify the
result status of API calls (success vs error). See chapter 5.12 for details.
If the server is busy due to a running server operation, the method will wait for the amount of
seconds specified in the “waitsecs” parameter. If the server is still busy after this period, the method
fails with an error id “BUSY” (see chapter 5.12). In that case please wait a few seconds and retry.
Once you have a token call the methods you need to call and disconnect when finished.
5.4 Disconnect
A typical API session starts with a connect and ends with a disconnect. You should always explicitly
disconnect from the API. Failing to do so, makes the Beebox believe that you are still logged on (at
least until the session expires after 15 minutes of inactivity). As long as a session is active, the
Beebox will not execute any automatic operations.
To close a session use:
(GET) http://localhost:8089/api/disconnect?token=
Parameters are:
token
The session token obtained when connecting.
The method returns no result even when the token is not or no longer valid.
5.5 Send original files
The purpose of this method is to send original files to translate to the project input directory. The call
can send one file at a time:
(PUT) /api/files/file?token=&locale= &filename=
Please note that this is an http PUT call. Using GET will not work.
© 2014 Wordbee
23
Parameters are:
token
The session token obtained when connecting.
locale
The source language.
This must correspond to the project source language code.
Language codes are ISO 2 letter codes such as “en”, “fr”, “en-GB”, “en-US”, etc.
See chapter 5.14 for details.
filename
The relative path of the file to send including directories.
This can be a simple file name like “myfile.xml”. Or, it can include directories such as
“folder1\folder2\myfile.xml”. Note the use of backslash separators as it is common
on Windows systems.
The file will be saved to the project input directory with the specified subdirectories.
Subdirectories are created if these do not yet exist.
MESSAGE BODY
Using subdirectories is useful if you would like to organize files.
Add the binary content of the file to the message body.
Do not use multi-part MIME contents as this is not supported by the Beebox.
The file will be saved to the project input directory and then picked up from there by the Beebox.
Always make sure to verify the http result status to make sure that your operation succeeded.
Example: If you specify filename “folder1\myfile.xml”, the file will be saved to “c:\beebox\{project
id}\in\folder1\myfile.xml”.
There are many more API file operations such as for removing files, creating directories and so on.
You normally will not need those but, if you are interested, please check out the API online
documentation.
5.6 Send original files with instructions
When you upload a file, the Beebox will proceed to translate it according to the configured workflow
and automation. Translation will be into all the project target languages.
From our experience, connectors often send files for just a single target language. In fact, many
CMSes use the concept of bilingual jobs, whereby a job is content to be translated into a single target
language.
For example, the CMS content manager may filter a set of pages and choose a single target language.
This would create a translation job in the CMS. In this case you need to send the job content and
include the chosen target language. Without the latter, the Beebox would translate the job content
into all project languages.
© 2014 Wordbee
24
Instructions file
The solution are “instructions files”. Instructions are stored as a Json file. Let us suppose the file to
translate is folder\myfile.xml. In that case the instructions file must be named
folder\myfile.xml.beebox (append “.beebox” to the original file name).
To instruct the system to translate into French only, use this json:
{ "locales": [ "fr" ] }
To translate into two target languages:
{ "locales": [ "fr", “es-ES” ] }
To translate into ALL project languages you do not need the json instructions.
Sending instructions to the Beebox
Suppose the original filename is “folder1\myfile.docx”. Then your connector would proceed like this:
Create the json with the instructions
First send the json to the Beebox using method 5.5 and filename folder1\myfile.docx.beebox
Second, send the original file using method in chapter 5.5 and filename: folder1\myfile.docx
In order words: First send the instructions file and then the actual file to translate.
Advanced options
The instructions are mostly used to delimit the target languages for translation. However, it also lets
you:
Include a deadline for translation (see 5.13 for date format)
{ “deadline”: [ISO 8601 date format] }
Request alignment of source content and translated content
{ “align”: { “locales”: [“fr”, “es”] } }
Attach custom information, such as the page URL or references, with the segments. These
details are included with translation jobs both in Xliff jobs or when linking to Wordbee
Translator. See 5.15 for a detailed discussion.
{ “metadata”: [ “id”: “url”, “value”: “http://mine.com/page199.htm”, “type”: “segment” ] }
Explicitly exclude file from machine translation. Generally, this should not be used as
workflows are configured in the Beebox and not the CMS.
{ “disableMT”: true }
Explicitly exclude file from human translation. Generally, this should not be used as
workflows are configured in the Beebox and not the CMS.
© 2014 Wordbee
25
{ “disableJobs”: true }
Options can be combined in the Json instructions.
5.7 Send translated files
This is an optional but step. Why would you send translated files? Generally you do not need to do
this unless you want to build a truly outstanding connector:
-
Enable corrections inside CMS: By sending translated content you can enable CMS users to
proofread or fix translations directly in the CMS and transmit those changes to the Beebox to
update its memories and to have the human team approve the changes in the translations.
-
Enable CMS users to comment translations: For example, a procedure could be: “If you see a
problem put a comment inside the translations such as “[This text should be shortened]”.
The comment will then show up in the Beebox and the human translation team can make the
requested change.
-
Incorporate legacy translations: Maybe a CMS is already partially translated before the
Beebox is put in place. In order to not lose these translations, your connector can send them
with the source content. The Beebox will align source/target texts and build memories on the
fly. The result: None of the existing (legacy) translations are lost. And, there is no need to
align all content with a 3rd party tool in advance.
These are the steps to send translated files:
1. Use this method and include the translated content in the request body:
(PUT) /api/files/file?token=&locale= &filename=
Method and parameters are the same as for sending source files (see 5.5). The only
parameter to adapt is “locale” which must be set to the target language code.
2. Enable alignment by adding an “align” parameter to the instructions file (see 5.6):
{ “align”: { “locales”: [“fr”, “es”] }
This tells the Beebox that translated files exist for French and Spanish and that the content
shall be extracted. The “locales” parameter is an array with at least one language code.
Please send files and instructions in this order:
-
First send the instructions file
Second send the translated file or files. Always indicate the “locale” parameter, see above.
Third send the original file
© 2014 Wordbee
26
5.8 Check translation status
Once source files are sent to the Beebox, the automatic operations will kick in after some time and
start processing the files. Note that you cannot know when exactly this happens and it also depends
on the configuration of the Beebox project. With pure machine translation workflows, the
translations may be ready in seconds but with human workflows it may take hours or days.
To know when the sent files are translated and ready to be downloaded by your connector, you need
to check the translation status. Either poll the Beebox in regular intervals or check the status when a
user connects to a specific CMS page (e.g. a translation control panel).
To obtain, the translation status, use the following method:
(GET) /api/workprogress/translatedfiles?token={token}&filter=&skip=&count=
Or:
(PUT) /api/workprogress/translatedfiles
With the parameters as a json object in the request body, e.g. {“token”:…, “filter”:{}}. Make
sure to add http header “Content-Type” to “application/json”. Use this version if your filter
contains a lot of conditions and the resulting URL would be too long.
Parameters are:
token
The session token obtained when connecting.
filter
An optional Json string. Typical filters:
No filter
Omit this parameter and it will enumerate all translated files with their status.
Enumerate translated files for specific target language
Use { “targetLocale”: “es” }
Enumerate specific files by regular expression:
Use { patterns: [ { "fpath": "\.docx?" }, { "fpath": "^marketing\" } ] }
Enumerate specific files by name:
Use [ { “Item1”: “”, “Item2”: “myfile.docx” }, { “Item1”: “”, “Item2”:
“subfolder\\myfile2.html” } ]
This retrieves the status of two files (“Item2”) by their name. “Item1” must be set to
an empty string, always.
More filters
You can combine the different filter properties into a single Json. There are many
more filter options and these are described in the online documentation.
© 2014 Wordbee
27
Comments:
Do you need filters? Likely you do not. However, it may be useful if your connector
UI is very powerful and lets users do things like: Get status of a specific file. Get
status of a specific target language, etc.
skip
count
Optional number, default is 0. Used for pagination. The files to skip.
Optional number, default is 100. Used for pagination and indicates the total number
of files to return from this call. Make sure to specify a limit corresponding to your
page size (e.g. 100).
The method returns the work progress as a Json object with these properties:
skip
count
total
items
Total items skipped (see URL parameter).
Total items returned by the method.
Grand total items. "total" will be identical to "count" if no pagination takes place. If
this number is bigger than “count”, you need to issue the API method again to get
more results (with the “skip” parameter set in order to show the second page etc).
Json array containing the summary totals individually per language. Each array
element is a Json object with the structure described in table below.
Item Json object, one per translated file:
folder
file
locale
localename
segments
words
uptodate
readyToBuild
notReadyToBuild
status
sfdate
sfdatemin
tfdate
tdate
Folder name. Always an empty string.
Relative file path.
The target language code.
The target language name.
Total segments.
Total words.
Boolean. True if the translated file is created, up to date and ready for download. The
deliverable can be considered final.
Boolean. True if deliverable is ready to be created physically because all text contents
have been translated. Usually, the physical creation is done by a Beebox automatic
operation (if enabled) but it can also be triggered through the API or the
administrator UI.
A connector typically does not need to look at this number.
Boolean. True if the translated file is not ready because not all texts are yet translated
or validated.
Numeric value: 1 = translated file ready for download, 2 = translated file ready to be
created, 3 = translations not ready. Same as the three booleans above.
Source file copy date.
Minutes since the source file was copied to the Beebox.
Deliverable file date. The date when the deliverable (translated file) was created.
Minutes since the deliverable file date.
Interpreting and displaying results
Navigate to the “items” node in the Json. This is an array with one record per translated file.
Per each record, read the “file” property which is the original file name (including subdirectories).
Per each record, read the “locale” property which is the target language of this translated file.
© 2014 Wordbee
28
Per each record, read the “status” property. If the value is 1, then the file is fully translated and can
be downloaded.
Always check the “total” and “count” properties. If “total” is greater than “count”, then there are
more files. You then need to call the method again with the “skip” property set (to go to the second
page of results).
All the other properties in the Json result are generally not required.
5.9 Get translated files
Once you know that a file was translated, you can download it from the Beebox and insert back the
translated content in the CMS.
(GET) /api/files/file?token=&locale=&filename=
Parameters are:
token
The session token obtained when connecting.
locale
The target language.
filename
The relative path of the translated file to download. This must be the exact same
path as that of the uploaded original file. Example: “myfolder\myfile.xml”
The method returns the translated file as a binary stream.
5.10 Obtain quotation
All the methods described until now are sufficient to send files for translation. However, in some
scenarios the end user might want to preview word counts and cost prior to actually submitting
content for translation. This chapter describes how to develop such a cost and word count preview
feature.
The basic idea is simple. Instead of sending the original files straight to Beebox input directory for
processing, you send them instead to an intermediary location, the “sandbox”.
The steps are:
5.10.1 Empty the sandbox
Always start by emptying the sandbox from any earlier uploaded files.
(DELETE) /api/files/directory?token=&locale=sandbox&directoryname=
Parameters are:
token
The session token obtained when connecting.
locale
Put “sandbox”.
© 2014 Wordbee
29
directoryname
Optional parameter. To delete a specific subfolder in the sandbox. Drop parameter
to delete entire sandbox.
5.10.2 Upload files to sandbox
Upload original files and optional instructions files as described in chapters 5.5 and 5.6.
The difference is that you would set the “locale” parameter to “sandbox” such as in:
(PUT) /api/files/file?token=&locale=sandbox&filename=
5.10.3 Obtain word count and cost
Call the following method:
(PUT) /api/files/operations/sandbox/count?token=&getcost=true
Parameters are:
token
The session token obtained when connecting.
getcost
“true”: Get word counts and cost
“false”: Get word count only without cost
This method returns a Json object with property “opid” and which identifies the asynchronous
operation:
{ “opid”: “78hdh7878” }
This means the method does not return the results immediately. Instead you need to poll the Beebox
until the count/cost details are available (this may take from a few seconds to a few minutes
depending on the text volume).
Repeatedly call the following method in a loop and wait a few seconds in between calls:
(GET) /api/async/operation/status?token=&opid=
Parameters are:
token
The session token obtained when connecting.
opid
The asynchronous operation id.
The method returns a Json object with these properties. There may be more properties but we only
list the relevant ones:
running
© 2014 Wordbee
Boolean. If true then the operation is still running. Continue to poll until this
property is false.
30
failed
Upon termination this boolean indicates if the operation failed.
cancelled
Upon termination this Boolean indicates if the operation had been canceled by the
Beebox administrator. Currently not implemented.
workprogress
A user friendly text with the current operation work progress.
results
The result of the operation. See table below for details.
This json object is set when the operation completed with success only: "running" is
false and neither "failed" or "canceled" are true.
log
Provides an incremental log of all operations the system is carrying out. Mainly for
the eyes of developers. Useful for debugging.
failedmessage
End user friendly message if "failed" is true.
opid
The ID of the current asynchronous operation.
Upon successful completion of the operation ("running" = false, "canceled" = false and "failed" =
false), the "results" property contains the following json object:
errors
A json array with user friendly error messages if problems were found in one or
more files. For example:
A file is corrupt and could not be processed.
The cost could not be calculated. The Beebox is not configured for human
translation and is not linked to a translation vendor.
reception
Json object with statistical information on Sandbox files. Total number of segments
and words, Total files per file type, Total files added per each calendar day, etc.
You do not need this information.
failedFiles
A json array with any files that could not be processed because the file is corrupt. If
this list is not empty, you need to show this to the end user. All counts contained in
other properties exclude counts of failed files.
The array contains one record per failed file:
languages
© 2014 Wordbee
"folder": Disregard. Always empty.
"file": File relative path
"locale": The source language code
"errors": Json array with error messages
A json array with details for each target language. Whereas the "reception" property
focuses on the source text counts, this property provides full information per target
language on:
31
Amount of contents that could be pre-translated
Amount of contents that still needs to be translated
Contents to be translated but which is already in translation at the vendor no need to send again
Cost of contents that still needs to be translated
Each array element is a Json object. The details are described in the table below.
Each item of the "languages" property is a json object, see description below.
locale
Target language code
localeName
Language name
jobsummary
Can be disregarded for connector development. Details described in the online API
documentation.
jobcontents
Can be disregarded for connector development. Details described in the online API
documentation.
cost
Set only if cost calculation was requested. Null if cost calculation was requested but
could not be obtained from the vendor (e.g. if no human translation vendor is linked
to the Beebox project).
This json object has these properties:
© 2014 Wordbee
“costed”: Boolean indicating if cost calculation was requested and the cost
could be calculated. This requires that the TMS is configured (process, etc.),
the vendor could be contacted, etc.
“problems”: Json array of error messages. If cost could not be calculated
you will find user friendly error descriptions here
“currency”: Currency of quotation as 3-letter ISO code
“decimalPlaces”: Positions after decimal point for rounding purposes
“vatRate”: Applicable VAT rate. Numeric value.
“vatRateText”: VAT rate ready to render, such as “20,00%”
“totalExVat”: Total amount excluding VAT
“totalVat”: Total monetary amount of VAT
“totalIncVat”: Total amount including VAT
“applicableMinimumAmount”: If there is a minimum amount defined by
the vendor, then this is the corresponding value.
32
"applicableGroupMinimumAmounts": An additional applicable minimum
amount for the specific job language couple. The smaller one of these two
minima will apply.
“documents”: Json array of documents. Usually you will see here a single
document. However, a vendor can decide to split a job into multiple pieces.
Each piece would then show up here as an individual record.
"name": Name assigned by the vendor to the document. You can disregard
this.
“segments”, “words”, “chars”: Word counts for this document
“costExVAT”: Amount ex Vat
"costDetails": A json array with cost details lines. There may be lines for
different work items (translation, revision, etc.), different discounts that
apply, minimum amounts that apply, etc. Similar to the details lines of an
invoice. The sum of all lines is the cost grand total for the document. Each
line has these properties:
o
"amount": Sub total ex Vat
o
"description": Details line text
Remarks
The method returns a vast amount of information and you likely do not need all of it.
You may want to start here:
First make sure that you wait for the operation to complete: "running" = false
While you wait for completion in a loop, you may want to display work progress contained in
"workprogress". In between calls, pause for a few seconds.
Check if the operation terminated successfully: Verify "canceled" = false and "failed" = false.
If the operation failed, show "failedmessage" to the user.
Look for "errors". If there is anything in there, something went wrong: A file is invalid, A file
does not contain any contents, Cost could not be calculated, etc. Generally, the volumetric or
cost details may be compromised in such cases. Also then look for "failedfiles" to see if any
file is corrupt. If a file is corrupt you need to inform the user because cost information does
not cover such files and the grand totals thus may not be reliable.
© 2014 Wordbee
33
Show total contents volume: "reception.total.segments", "reception.total.words" and
"reception.total.files".
Loop through all "languages" array elements. You will find at least one element per target
language. Per item "languages[{index}]", display:
o
The total segments and words that require translation:
languages[index].segmentsBatch, languages[index].wordsBatch
o
Get total cost for language: languages[index].cost.totalExVat, totalIncVat, totalVat as
total excluding vat, total including vat and vat amount.
o
Make sure data is costed and no errors occurred: languages[index].costed (boolean)
and languages[index].errors. You may request cost details but these can only be
obtained if the vendor provides such information. The "errors" property will tell if
vendor did not enable costing.
Sum all individual cost amounts to obtain a grand total
5.10.4 Let user accept counts & cost
Now that you display counts & cost to the user, the user may decide to accept the cost or cancel the
operation altogether.
If the user does not want to go further, you are set and there is nothing more to do.
If the user accepts the quote, you now need to “move” the original files and instructions from the
sandbox to the Beebox input directory. Instead of uploading the files once again, you can use a single
operation:
(POST) /api/files/copy?token=...&locale1=sandbox&locale2={project source language}
Parameters are:
token
The session token obtained when connecting.
locale1
locale2
The source location. Put “sandbox”
The copy destination. Put the project source language code.
5.11 Beebox availability check
The easiest way to check if connection parameters and Beebox url are configured properly is to use
the “connect” API method. Do not forget to disconnect right after!
To simply check if the Beebox server itself is accessible (whether or not API credentials are fine) you
may want to use this method:
© 2014 Wordbee
34
(PUT) /api/whois
Results:
If the Beebox exists at the url, it will return a Json object containing the text “Beebox API”.
If the Beebox is not reachable you obtain an error code and description (see 5.12).
This method can be used as a Beebox health check mechanism by your connector.
5.12 Error handling
With each API call you must verify the http status code. Codes 200 and 204 indicate successful calls.
Any other codes signify a failed call.
Errors handled by or originating from the Beebox include a json object with a detailed error
description. The description is meant to be "user friendly" and can be shown to the end user.
List for status codes and their interpretation:
Http status code
Description
200
SUCCESS
The API call was successful and includes a json formatted result according to the API
documentation.
204
SUCCESS
The API call was successful. The method does not return any results.
400
FAILED
The API call failed. The http call returns a json which describes the error. The json
document has these properties:
{
"type": Error category. You usually do not need to read this.
"message": A user friendly error message. Designed to be readable by end
users. It is recommended to show these errors to the end user (if applicable).
"id": Some errors include an error identifier. Where used, ids are described
with the API methods. For example, upon login you may see “BUSY” if
automatic operations are running and a login is currently not possible.
"inner": In some cases includes a more technical error description. You would
not show this to the end users.
"failed": Always set to "false".
© 2014 Wordbee
35
}
Other codes
FAILED
There may be other http error codes returned. Other error codes that do not return a
json object are low level errors likely due to the web server configuration and not the
Beebox API itself. For example, a 404 error points to an inexistent API method.
5.13 Date formats
All dates are ISO 8601 formatted. The Beebox API always returns dates with a zero time zone offset
(i.e. UTC). When you render dates in Javascript, the date will either be converted to the user local
time or you may do so yourself using a library such as moment.js.
Example: 2008-09-22T14:01:54.9571247Z
Note that UTC based dates disregard daylight saving offsets!
5.14 Languages
Languages are encoded with their ISO two letter codes, sometimes three letters. You can use the
Beebox API to obtain a complete list of language codes together with their English names. Language
are expressed in their neutral form (“en” for English) or with a region indicator (“en-GB” UK English,
“en-US” US English). Both are commonly. See http://en.wikipedia.org/wiki/List_of_ISO_639-2_codes
Language codes
To get the list of all Beebox languages with language code and English name, use:
(GET) /api/languages?token=
If you just want to obtain source and target languages of the Beebox project you connect to then use
this method:
(GET) /api/details?token=
Next to the languages it includes some further information on the project.
Adding project languages
The project you talk to is configured for one source language and a set of target languages. Your
connector can work with those configured languages only. If a customer requests additional
languages, these must first be added to the Beebox project.
© 2014 Wordbee
36
Typically, this would be done offline: The LSP managing the Beebox will add the language using the
Beebox user interface. However, you can also do so using the API as long as you connect with the
Beebox administrator credentials (API for project management). Please check back with Wordbee if
you want to go this way.
5.15 Including meta-information with segments
5.15.1 Introduction
It is sometimes useful to include contextual information with text segments in order to help
translators better understand context or purpose of a text to translate.
Example: Let’s say, you send a CMS page to the Beebox and you include the URL to the original page
in the instructions file. A translator can then navigate to the URL and view the full page to see where
the different texts are placed and how they are formatted.
Meta-information works with Xliff jobs and Wordbee Translator jobs alike.
How do you include meta-information? There are two approaches and you can even combine both:
Instructions file: The easy way. Fields are defined for the entire file and stored with each
single segment. Use this approach if fields refer to the entire file: A url, a product name, a file
ID, etc.
Text extraction rules: The more advanced way. Fields can be specific for each segment in the
file. Example: Your file contains 100 text segments and each segment has its own reference
(contained in the file). This approach works with XML and JSON files only.
5.15.2 Using the instructions file
In chapter 5.6 we described that whenever you send a file to translate to the Beebox you can send an
additional JSON formatted file with instructions on how to process that file.
To add a “url” and a “product” field, your instructions file would include a “metadata” node:
{
…
“metadata”: [
{ “id”: “url”, “value”: “http://mine.com/page199.htm”, “type”: “segment” },
{ “id”: “product”, “value”: “Heat pump”, “type”: “segment”}
]
}
Format:
© 2014 Wordbee
37
metadata: An array of one or more fields
id: An alphanumeric identifier of your choice. Use letters and digits only. If you intend to
send fields to Wordbee Translator, the ids must be named in a specific way. This is explained
in 5.15.4.
value: The string value.
type: Must be “segments”. Other values are not permitted.
The url and product name is then added to each segment of the file. You can add any number of
fields. The fields are also shown when you view file contents in the Beebox admin UI.
5.15.3 Using text extraction rules
XML and JSON formats can be configured to extract meta-information individually per segment.
Example: Your XML contains translatable text nodes and each node has a “reference” attribute. You
would now like to include the reference attribute value with each individual text node.
To create a text extraction rule, you need to log into a Wordbee Translator platform and create a
new text extraction rule (“Settings” > “XML files” > “Add new rule”. You will see the possibility to fill
in xpath expression for Wordbee custom fields. These xpath expressions must be relative to the text
node xpath expression.
Please contact Wordbee if you need help.
5.15.4 Meta-information in Wordbee Translator
If your Beebox project is connected to Wordbee Translator, translators can view the metainformation if you follow some rules. Meta-information maps to “custom fields” in Wordbee
Translator.
If you are administering the Wordbee Translator platform, then you now need to define custom
fields in the Wordbee Translator platform:
Log in as administrator, click the “Settings” top navigation link and choose “Custom fields”.
In the page click the “Segments” tab to configure segment level fields.
Add your custom fields, such as a URL, a product name or anything else. For URLs make sure
to choose the “Hyperlink” field type. This ensures that your hyperlinks are clickable.
Note down the custom field ids (these are shown in the popup when editing a custom field).
The ids are always formatted like: CustomStr1, CustomStr2….
Place the ids into your instructions files, as described further up.
If you are not administering the Wordbee Translator yourself:
Provide the owner of the platform with the list of meta-information fields. Indicate which
fields are strings or hyperlinks, and indicate the maximum length (between 100 to 300
characters).
© 2014 Wordbee
38
Receive from the owner the ids of the custom fields. For example: CustomStr2,
CustomStr15…
Place the ids into your instruction files, as described further up.
Translators can now see all your meta-information in the “Segment information” panel. Please note
that the Wordbee Translator administrator can hide all or certain fields for selected user profiles.
5.15.5 Meta-information in Xliff jobs
Xliff jobs will include all your meta-information. For example, if you use field ids “url” and “product”,
then the fields are inserted with a namespace prefix like below:
<trans-unit id="0" translate="yes" approved="no" wb:url=”http://mycompany.com/1123”
wb:product=”Steam pump 1”>
<source xml:space="preserve">…..
</trans-unit>
© 2014 Wordbee
39
6 Connector development
6.1 Introduction
This chapter explains how to develop a CMS plugin that connects with the Beebox. How this is best
done entirely depends on the target CMS. It can be very simple or it can be a highly complex
endeavor.
6.2 Key principles
First off, we need to understand to what extent your CMS supports multilingual content and
translation workflows out of the box. We also need to know how content is stored and organized.
After having read this chapter you are ready to design and build the Beebox connector.
Topics are:
-
6.2.1
What content requires translation?
How is content formatted? Html, php, xml…
Does the CMS support multilingual content natively?
How are multilingual web sites stored? Content cloning or multilingual content items?
How can you identify content to translate? Automatically or manually?
How can you identify when translations are outdated?
Translatable contents
Objective is to understand the different content types that make up a web site and which need
translation.
Content types
Content requiring localization typically englobes:
-
Static web content such as Home page, About Us, Customer Testimonials, etc. A CMS renders
a web page by combining layout and one or more content elements. Content elements are
thus often dissociated from a specific web page (url), stored as independent entities in the
database, and, can be reused throughout a web site.
-
Dynamic web content such as lists of articles, products or a blog. In CMS systems this
information may be handled and stored differently from the more static web content.
-
Footer, Header, Navigation buttons, Form fields, Page titles, Meta tags
-
Url fragments. For example the English url “mysite.com/products” should say “mysite.com
/Produkte” in German. Translation of fragments is necessary.
© 2014 Wordbee
40
-
Downloadable documents such as PDFs or Word files.
PDF or other downloadable files are usually not to be included in a Beebox translation workflow. In
fact, a Beebox independent workflow can be proposed to customers if your CMS has a workflow
designer feature. This workflow requires that the original Microsoft Word, Framemaker or Indesign
file, and not the PDF, must be sent to a language service provider. Do not attempt to send PDF files
to the Beebox, it won’t work.
Format
A CMS generally stores translatable content in a relational database and more rarely in the file
system. The format in which content is encoded varies from one CMS to the next:
-
Html fragments, sometimes containing server side code such as PHP
Xml containing strings or html fragments
Csv files
Flat text
PDF
…
We have seen examples, where text content was hard coded in CMS plugins or layout files. This is,
well, not so nice and may be hard to make multilingual. As the CMS expert you will have to find
solutions for such hard coded content: Replace text by dynamically loaded content, toggle layout
templates with the selected user interface language, etc.
Unique identifiers
Last not least, each piece of content is uniquely identified. This may be an alphanumeric ID, a
numeric row ID in the database or a file path. Examples:
-
Welcome text: Stored as html content node in database, Node id = 2002
Navigation link title: Stored as string in database, Field id = 99
Product description: Stored as html in a product table, Table = Products, Id = “product673”
Urls: Stored as database columns in table “Urls”. The id is the original url itself.
Content element ids may be formatted in various ways.
Please make sure to have the right answers to these questions:
What are the content categories that we need to localize? Static, Dynamic, Urls, …
Where is the content stored? Database? File system?
How is content formatted? Xml? Html?
How are content elements identified, uniquely?
© 2014 Wordbee
41
6.2.2
Multilingual framework
Does the CMS support multilingual content out of the box? Most commercial CMS systems permit
users to create content in multiple languages. Those CMSes typically expose user interfaces to fill in
the translations individually per content element. CQ5, SiteCore, Sitefinity, EpiServer, Kentico all
come with native multilingual support.
The situation may be different with some open source systems. Wordpress is not natively
multilingual and most users install the commercial plugin “WPML” to add this missing brick. Drupal
comes with an optional module, however, this module is not easy to put in place to say the least.
You will also need to find out if all the different content types mentioned in the previous chapter are
multi language enabled. Specifically look at URL fragment localization support.
If your CMS requires a module to add multilingual support, then consider making this module a prerequisite for your own developments. It may substantially reduce your development efforts.
Verify that the CMS can store and handle multilingual versions of your contents. If not, look for third
party modules. In the worst case you need to develop this layer by yourself. How to add such a layer is
beyond the scope of this document.
6.2.3
Multilingual site structure
There are basically two approaches:
-
A CMS may require creating clones of the original language site, one clone per target
languages. This is the “Language Copy” approach. The link between content elements in the
different languages is then typically “informal”. When translating a piece of content in the
original language, you need to know to which location the translated content was cloned (in
order to update the translation).
-
A CMS may keep a single site structure and each content element simply exists in multiple
language versions with an explicit link between versions (e.g. in the database). This is simpler
to implement.
Some CMS propose both approaches and your plugin may have to support both.
6.2.4
Translation management
Some CMS systems do it all! They include user interfaces to select contents for translation, compile
them into a “translation job” and either send the job to a translator (email) or let the user download
the job as an “Xliff” file. Xliff is an industry standard to exchange translation work, see Wikipedia.
A translation job management component provides this functionality:
1. It lets the user select content to translate. This works much like when you buy books at
Amazon. The user filters content, adds them to the shopping cart and then does a check out.
2. The system then creates a job. Basically a job regroups all the selected content elements. It
also specifies the original language, one target language, a deadline, a status, comments etc.
© 2014 Wordbee
42
3. The system lets users send a job by email or export to Xliff.
4. The system lets users upload translated Xliff files.
5. Once a job is done, the translations are inserted into the right places in the CMS.
If your CMS does have such a component, your work is to “hook” into it. For example, you may
create a “virtual translator” that the user can choose. Instead of a simple email, this virtual translator
sends the job (the content elements) to the Beebox. Our own Drupal and Wordpress connectors
where implemented in exactly this way.
If your CMS does not have built-in translation management, you need to develop something by
yourself! There are two options:
1) Job based translation management
This is the approach described above. Development includes: A new database table (or list) to
store jobs. A user interface to filter and select items to translate. A user interface to view all jobs,
to get cost quotations from the Beebox, to send jobs to the Beebox, to see translation status, to
fetch results and to approve results.
2) Content centric translation mechanism
This mechanism potentially simplifies development and enhances overall user experience. Each
translatable content element is sent individually for translation and we do not group many items
into a “job” (or shopping cart). If a page was changed or added, we simply send this one page to
the Beebox, independently of other content items. Each content item tracks its own translation
status. The unique id of each item is sent to the Beebox with the actual content.
A basic notion of a “job” is still required. Indeed, it may be that the user selects a batch of
content items in one go and clicks “translate” or “quote”. However, the job is more something
like a list of links to all the content items. It shows translation status by compiling the individual
items’ translation status into a single value (e.g. 40% of all items are translated). And it serves to
store cost quotation data.
We will discuss both options later on and highlight the + and -.
6.2.5
Selecting content for translation
Understand the different use cases for translation! Unless your CMS has all the job management
tools ready, you have the freedom and opportunity to build a tool to truly simplify all translation
related tasks.
Your plugin must help users with selecting the contents to send for translation. Let us look at a few
common use cases and discuss what your plugin can or should do to make the user’s life easier:
© 2014 Wordbee
43
Scenario 1: Let’s imagine a web site with 1000 pages in English, French and German. The content manager
decides to add a fourth language, Chinese. The manager will start with enabling Chinese in the CMS admin
tools. Next step: How is the user using your plugin to send all the contents for translation into Chinese? You will
need to add user interfaces to make such tasks a breeze.
Scenario 2: The site is already translated into French. Now, an author modifies or adds a few sentences in two
pages. The content manager goes to your plugin UI to send changes for translation. Does your UI automatically
identify which pages were updated? Or do you expect the content manager to manually track down the two
pages? Obviously, the former solution is better.
Scenario 3: The web site is available in English, French and German but one of the sections is further translated
into Japanese. An author now adds a sentence in a page. Ideally, your plugin is able to find the updated page,
and it knows whether the page needs translation into French and German only or include Japanese. In other
words, if the CMS supports configuring target languages per section or content items out of the box, then your
plugin should leverage this information. In its simplest (and rather bad) implementation, the user has to
manually select content elements and the target languages.
Scenario 4: The CMS supports content authoring workflows out of the box. Your plugin documentation explains
how to add a translation step to the workflow. Whenever, an author now adds or modifies a content element,
the translation workflow kicks in and you send the content to the Beebox. Generally speaking, try to leverage
existing mechanisms of your CMS so as to integrate translation smoothly into existing user workflows. Respect
common practices.
Scenario 5: The plugin just sent a page for translation. When an author selects the page is there a flag saying
“Translation in progress”? Do you let authors still edit the page (the Beebox fully supports the resending of new
version of the page even if translation is in progress)? Is there a page where the manager can see all contents
currently sent for translation + the target languages?
The friendliness of your user interfaces and the alignment with preexisting mechanisms or common
CMS practices and workflows are essential. Do not ask users for 20 mouse clicks just to send a few
texts to translation. Make your plugin as supportive as possible.
Content selection user interfaces typically propose:
-
A page to select content for translation. The plugin automatically proposes or preselects the
items that are not yet translated into one or more target languages. If done right, the user
simply confirms the pre-selection. In addition, your UI should also enable the user to
manually select pages or content items plus one or more target languages.
Add more colors or icons to show whether a translation currently is in progress.
Add filters to drill down on information per site section, per language, update dates or other
commonly used fields.
-
A page to view translation status. The page may tell that 40% of all translations to be done
are finished. Or, 20 pages were updated and the translations need to be updated as well. Or,
show the list of all content items or pages with flags per languages: Green = translation ok,
Blue = translation outdated since source text is changed, Red = translation missing.
Add more colors or icons to show whether a translation currently is in progress.
© 2014 Wordbee
44
Add filters to drill down on information per site section, per language, update dates or other
commonly used fields.
Keep it bilingual
The result of content selection is a list of tuples:
(1) Content element + (2) Source language + (3) Target language
It is very strongly recommended to keep tuples bilingual. If an item is selected for two target
languages, do create two tuples, not one. Although the Beebox support multiple target languages
when you send work for translation, sticking to a bilingual approach simplifies overall processes.
Reuse interfaces
If the CMS has nice filtering and selection tools, consider reusing those. Add a button to the existing
screens, such as “Add for translation”.
Before you start developing content selection logic and UI, try to find answers to:
-
Does the CMS have authoring workflows that you can integrate with?
Does the CMS store the list of target languages for the entire site, site sections or individual
content elements?
Does the CMS save last update dates for both source content and translations?
Can you know which content is currently in translation (translation in progress)?
Can you know which content must be translated due to a change and into which languages
(automatically)?
With some CMS you may be required to extend core functionality. For example, Prestashop does not
store the last update date of product descriptions. This makes it difficult to preselect products that
were updated in an automatic manner. It is thus advisable to extend Prestashop with some date flags
(in a dedicated plugin table).
The ideal plugin “finds out by itself” which content items are to be translated into which languages
and which translations are missing or up to date. User interfaces require only a few clicks to get
translation work done.
6.2.6
Content selection aid
Help the user to select the content that actually needs to be translated. This is very important and we
have seen CMS connectors that do NOT aid at all in this respect.
Do not expect the content manager to remember which of the thousands of content elements are
not yet translated. Do not expect the manager to find out which content was maybe modified by
authors!
© 2014 Wordbee
45
-
The change date of the original content helps to know if content was changed after a given
date. The date should be filterable.
The publication date of original content tells when content was last updated and published.
Check if the translations of an original content item exist or not.
Compare the publication date of the original content with the change or publication date of
the translations. If the latter are earlier then the translation potentially is outdated.
You should know which items are currently queued for translation in the Beebox. Avoid
letting the user send such content for translation.
Always use the configured target languages of the web site, site branches or individual
elements (if the CMS permits such specification with this granularity)
Consider adding new fields to content elements: Date of translation, etc. This can be
displayed to the user.
Show the translation status when a user views a content element. Add a button to send just
this one item for translation or to add to the “shopping cart”.
The more selection and filtering intelligence you can add the better.
6.3 Connector development – Job centric
This chapter discusses screens and business logic of a connector that uses the notion of jobs.
6.3.1
Development tasks
You need to develop or extend the CMS with:
-
6.3.2
A user interface to select contents and add to a “shopping cart”. Batch selection.
Optional buttons next to each content element to add them individually to the “cart”. One by
one selection.
A check-out mechanism that creates draft jobs (one per target language)
An optional button to request a cost quotation. The details are saved with the job.
A button to send the job to the Beebox.
A page to view all jobs together with their translation status.
A button to download results of completed jobs.
Finally, a connector configuration page added to the CMS administration pages: The
configuration includes the Beebox connection parameters.
Beebox data exchange
Each job needs to contain all the selected content items. Please always create jobs with a single
target language.
Compile all selected content items into a single “file”. For example, create an XML or XLIFF file with
one node per selected content element. Since the Beebox can handle XML files which contain html
code, this works fine.
© 2014 Wordbee
46
Currently, the Beebox does not permit to include existing translations. This is a feature we will add in
the future in order to handle legacy translations.
The job xml could look like this:
<job>
<item cmsid=”1001” type=”pageelement”>
Look & feel. This is an <strong>example</strong>!
</item>
<item cmsid=”222” type=”productdescription”>
This great product….
</item>
<item cmsid=”/home” type=”urlfragment”>/home</item>
<item cmsid=”/products/overview” type=”urlfragment”> /products/overview</item>
</job>
Send this xml to the Beebox and assign it an id (“file name”). The recommended id would be
something like “job-1200.xml”.
You can see that some elements are html encoded. The Beebox needs to be configured to extract the
“item” elements and interpret node contents as html. It is possible to setup extraction rules where
some nodes are interpreted as html and others are not. Instead of storing encoded html, you may
also produce an xml with CDATA sections.
Please talk to Wordbee support for help with setting up the extraction rules.
It should be noted, that you cannot embed CSV or Word files inside XML. You will have to send such
files separately to the Beebox:
Job #1200:
6.3.3
Send “job-1200-1.xml”: Contains all selected xml, html, php… items
Send “job-1200-2.doc”: A word document
Send “job-1200-3.csv”: A csv content element
Send “job-1200-4.xml”: Another xml
Beebox API
The Beebox API would be used at different stages:
-
Use the API to get a cost quotation for job files. Save quotation to the job.
Use the API to send job files
Use the API to check translation status of previously sent files. You would this either
automatically in regular intervals or whenever the user goes to the job page or when the
user clicks a “Check status” button. The fewer clicks a user needs to do the better. Do not ask
the Beebox every 10 seconds though! Automatic polling should be done only when jobs are
in progress and once every 1 hour.
© 2014 Wordbee
47
6.3.4
Use the API to download translated job files
Notifications
The Beebox can be configured to send email notifications to the customer whenever translations are
ready for download. This would be configured not by you but the customer language service
provider.
The Beebox can push information to your connector by calling any url of your CMS. You can use this
mechanism to trigger an alert or an automatic result download. The callback url is configured in the
Beebox project configuration pages. Only use if you are sure that customer firewalls will not block
such calls.
6.4 Connector development – Content centric
This chapter discusses screens and business logic of a connector that handles translation of content
elements as completely independent workflows. Wow that sounds complicate but it is actually
simpler than job oriented implementations.
The basic idea is this:
-
Each content item that is selected for translation is sent individually to the Beebox
As soon as a content item is translated it can be downloaded and updated
Adding the notion of a job or, better, a translation request is an option. A job is basically a list
of references to the items that were sent for translation at the same time and which may
carry a date and a cost quotation.
The main advantages are:
-
-
More granular and potentially faster workflows: No need to wait until the entire big job is
completed. Individual items can be updated as soon as the Beebox has translated them.
If a content item is modified, you simply resend this one item to the Beebox. No need to
create a job, etc.
Easier data exchange with the Beebox: Simply send content items in the format you store
them. No need to compile or squeeze them into single xml or xliff files. You can send xml,
html, php, Word, Excel, Javascript, etc.
The developer can verify, in the Beebox UI, that text of each item is extracted according to
text extraction rules. Unit testing is simplified.
The translator will be able to preview items in the translation editor (currently this is a
planned feature)
Easier to give global site translation status. Instead of saying “You have 3 jobs in progress”,
you can say “There are 6000 content items. 500 are in translation. 5500 are translated”.
© 2014 Wordbee
48
6.4.1
Development tasks
You need to develop or extend the CMS with:
-
6.4.2
A user interface to select contents and add to a “shopping cart”. Batch selection.
Optional buttons next to each content element to add them individually to the “cart”. One by
one selection.
A check-out mechanism that sends items to the Beebox. Include a cost quotation option.
A page to view queued content items together with their translation status.
A button to download results.
Finally, a connector configuration page added to the CMS administration pages: The
configuration includes the Beebox connection parameters.
Jobs / Translation requests
It is perfectly possible to drop jobs and job management entirely. Our own Kentico CMS connector
does it that way.
If dropped then your UI might look like:
-
A page that lists all content items sent for translation: Translated, In progress, Not yet sent,
etc. Add useful filters!
Totals information
The possibility to filter all “unsent” items. Buttons to sent them all to the Beebox in one go.
Buttons to request cost quotation. Whether you save the cost quotation somewhere is your
decision. It may be useful though, e.g. to save a document with the list of items + the cost for
future reference.
If you want to maintain jobs, then you need to add a UI similar as that discussed in chapter 6.3.1.
6.4.3
Beebox data exchange
With each item you must build a unique identifier which you share with the Beebox. The unique
identifier must be a Windows compatible file name. Examples:
-
-
Page element, Html fragment, CMS ID = 1001. Assign a unique identifier such as “pageelement\1001.htm”. The subdirectory is for clarity and may simplify locating elements in the
Beebox UI.
Product description, Html fragment, CMS ID = 222. Assign unique identifier
“product\description\222.htm”
Product title, plain text, CMS ID = 222. Assign unique identifier “product\title\222.txt”
List of URL fragments, xml. Assign identifier “urls.xml”
The Beebox ids are Windows compatible relative paths. The names include an extension that defines
the content format.
© 2014 Wordbee
49
6.4.4
Beebox API
The Beebox API would be used at different stages:
-
6.4.5
Use the API to get a cost quotation for content items. Save quotation for future reference.
Use the API to send individual content items
Use the API to check translation status of previously sent files. You would this either
automatically in regular intervals or whenever the user goes to the connector UI or when the
user clicks a “Check status” button. The fewer clicks a user needs to do the better. Do not ask
the Beebox every 10 seconds though! Automatic polling should be done only when item
translation is in progress and once every 1 hour.
Use the API to download translated files
Notifications
The Beebox can be configured to send email notifications to the customer whenever translations are
ready for download. This would be configured not by you but the customer language service
provider.
The Beebox can push information to your connector by calling any url of your CMS. You can use this
mechanism to trigger an alert or an automatic result download. The callback url is configured in the
Beebox project configuration pages. Only use if you are sure that customer firewalls will not block
such calls.
6.5 Connector configuration
Your connector must include a setup page to fill in Beebox connection parameters:
-
The Beebox url
The Beebox project key
The login
The password
© 2014 Wordbee
50
Example of the Wordpress admin page:
6.6 Text extraction rules
When you send “files” to the Beebox, the Beebox uses text extraction rules to extract all pieces of
translatable text.
With most formats you will need to tune or adjust the rules to fit your exact requirements such as:
-
Xml formats: It is mandatory to specify xpath expressions to select text nodes
Html based formats: There are various options to include/exclude tags and attributes.
All formats have a multitude of options
To customize rules, you have two choices:
-
RECOMMENDED: Ask Wordbee support to build rules for you! Do not lose your time, ask us!
Use the Wordbee Translator (www.wordbee-translator.com) platform to visually customize
rules. You can request a 30 day trial.
Select prefabricated rules from the “Wordbee rule library”. Each format rule is an xml
document which you can then adjust.
To download or upload rule definitions, go to the Beebox project settings:
© 2014 Wordbee
51
To add rules, click the “Edit” link in the page.
Rules are xml encoded but can be visually edited in Wordbee Translator.
© 2014 Wordbee
52
6.7 Questions & Answers
6.7.1
How and when do I send content updates?
I have sent content to the Beebox. Can I send an updated version (author made some changes) even
when the previous version is still in progress?
Yes you can. The Beebox is designed to handle updates in all circumstances. In our little example, the
Beebox may have sent the previous version to a human translator. It will now find the one or two
changed sentences and only and exclusively send those to the human translator. Cost quotation is
also for the changes or additions only.
6.7.2
What if I send too much content?
What we mean with this question is this: Let’s imagine a web site is entirely translated and now an
author makes a change in a single page (out of 500). What happens, if the user sends the entire site
for translation to the Beebox? Will this cost a fortune? Will someone translate the site a second
time?
No. The first step when the Beebox receives content is to pre-translate from earlier translations. The
Beebox will identify and isolate the single changed page and send back the translations of all the
other 499 pages immediately (perfectly translated). Then it isolates the segments (phrases or
sentences) that were changed in the page. In the end only the truly updated/added pieces of text will
be processed and quoted.
NOTE: Please think about this once again! Even when your content selection mechanism is not
perfect or the user selects too much, the user will not pay translations twice. The Beebox acts like a
filter!
6.7.3
What if new languages are added to the site
When a user adds new languages to the site, these languages must be added in the Beebox as well.
In addition, the customer will need to agree upon translation prices with the LSP.
Globally, this is not really a process you can automate.
If possible, your connector documentation should explain the steps. Consider adding another field in
the connector admin page: The language service provider contact details, such as email and name.
Place a “Contact my LSP” button in your UIs.
6.7.4
How can I test human translation workflows with the Beebox
Go to the Beebox project settings and select the Automation tab. Enable the automated human
translation workflow options.
The Beebox proposes two human translation workflow flavors. Either directly link to a Wordbee
Translator platform (the web based translation management platform of Wordbee), or use Xliff
exchange. Only the former implements a fully automatic workflow.
© 2014 Wordbee
53
To explain all aspects of human workflows goes beyond the scope of this document. Please contact
Wordbee for a demo or more explanations.
© 2014 Wordbee
54