1
IGEL Zero RFX
Manual
IGEL Technology GmbH
IGEL Zero RFX
21.02.2014
About this Manual
All illustrations and descriptions in this manual relate to Version 5.02.100 of the IGEL Linux firmware.
This manual is divided into the following sections:
Introduction (page 7)
General information about the product
Quick installation (page 8)
Setting up the thin client for the first time
Boot procedure (page 11)
Boot menu, network integration, X-Server
Application Launcher (page
14)
Important system data such as the firmware version, list of
applications, licensed services, system tools
Setup application (page 19)
Setting up sessions and system configuration
System settings (page 24)
System setting options
User interface (page 29)
Language, screen, entry options, font services
Network (page 39)
Interfaces, protocols, authentication, drives
Sessions (page 51)
Creating and configuring application sessions
Accessories (page 67)
Session accessories, card readers, sound control, Java Manager,
network diagnostics
Devices (page 76)
Hardware, printers, storage devices, interfaces
Security (page 82)
Password, logging in, AD/Kerberos configuration
IGEL smartcard (page 83)
Company keys, saving a user/password/session, testing a card
Firmware configuration
(page 88)
Customer-specific partition, applications, commands, start screen,
environment variables, features
The following formatting is used in the document:
Hyperlink
Internal or external links
Proper names
Proper names of products, firms etc.
GUI text
Items of text from the user interface
Menu → Path
(Context) menu paths in systems and programs
Entry
Program code or system entries
Keyboard
Commands that are entered using the keyboard
Note regarding operation
Warning: Important note which must be observed
2
IGEL Technology GmbH
IGEL Zero RFX
5.02.100
Important Information
Please note some important information before reading this documentation.
Copyright
This publication is protected under international copyright laws. All rights reserved. With the exception of
documentation kept by the purchaser for backup purposes, no part of this manual – including the products
and software described in it – may be reproduced, manipulated, transmitted, transcribed, copied, stored in
a data retrieval system or translated in any form or by any means without the express written permission of
IGEL Technology GmbH.
Copyright © 2013 IGEL Technology GmbH. All rights reserved.
Trademarks
IGEL is a registered trademark of IGEL Technology GmbH.
Any other names or products mentioned in this manual may be registered trademarks of the associated
companies or protected by copyright through these companies. They are mentioned solely for explanatory
or identification purposes, and to the advantage of the owner.
Disclaimer
The specifications and information contained in this manual are intended for information use only, are
subject to change at any time without notice and should not be construed as constituting a commitment or
obligation on the part of IGEL Technology GmbH. IGEL Technology GmbH assumes no responsibility or
liability for any errors or inaccuracies that may appear in this manual, including any pertaining to the
products and software described in it. IGEL Technology GmbH makes no representations or warranties
with respect to the contents thereof and specifically disclaims any implied warranties of merchantability or
fitness for any particular purpose.
IGEL Support and Knowledge Base
If you have any questions regarding an IGEL product and are already an IGEL customer, please contact
your dedicated sales partner first.
If you are currently testing IGEL products or your sales partner is unable to provide the help you need,
please fill in the support form after logging on at the IGEL Support Portal
https://www.igel.com/en/members-area/login-logout.html.
We will then contact you as soon as possible. It will make things easier for our support staff if you provide
us with all the information that is available. Please see also our notes regarding support and service
information.
Please visit our IGEL Knowledge Base http://edocs.igel.com to find additional Best Practice and Howto
documentation as well as the IGEL Support FAQ
http://faq.igel.com/otrs-igel/public.pl?Action=PublicFAQExplorer;CategoryID=3.
3
IGEL Technology GmbH
IGEL Zero RFX
5.02.100
Contents
1.
Quick Installation ...............................................................................................................................................8
1.1.
2.
Boot Procedure ................................................................................................................................................11
2.1.
2.2.
2.3.
3.
Time and Date ..............................................................................................................................24
Update..........................................................................................................................................25
Remote Management ..................................................................................................................26
VNC (Shadowing) .........................................................................................................................26
Remote Access (SSH / RSH) ..........................................................................................................27
Energy ..........................................................................................................................................27
Firmware Customization ..............................................................................................................27
IGEL System Registry ....................................................................................................................28
User Interface ..................................................................................................................................................29
6.1.
6.2.
6.3.
6.4.
6.5.
7.
Starting the Setup ........................................................................................................................19
Completing the Setup ..................................................................................................................19
Setup Areas ..................................................................................................................................20
Setup Search ................................................................................................................................23
System Settings ..............................................................................................................................................24
5.1.
5.2.
5.3.
5.4.
5.5.
5.6.
5.7.
5.8.
6.
General System Information ........................................................................................................15
Sessions ........................................................................................................................................15
System Tools ................................................................................................................................16
License..........................................................................................................................................17
Network Information ...................................................................................................................17
Shutdown and Restart .................................................................................................................18
Setup Application ............................................................................................................................................19
4.1.
4.2.
4.3.
4.4.
5.
Boot Menu ...................................................................................................................................11
Network Integration ....................................................................................................................13
X-Server ........................................................................................................................................13
Application Launcher .......................................................................................................................................14
3.1.
3.2.
3.3.
3.4.
3.5.
3.6.
4.
The IGEL Linux Desktop .................................................................................................................. 9
General Display Settings ..............................................................................................................29
Language ......................................................................................................................................33
Input .............................................................................................................................................34
Keyboard Commands - Hotkeys ...................................................................................................37
Font Services ................................................................................................................................37
Network ..........................................................................................................................................................39
7.1.
7.2.
7.3.
7.4.
7.5.
LAN Interfaces ..............................................................................................................................39
Wireless (WiFi) .............................................................................................................................42
DHCP Options ...............................................................................................................................43
Virtual Private Network - VPN .....................................................................................................43
Simple Certificate Enrollment Protocol - SCEP ............................................................................46
4
IGEL Technology GmbH
IGEL Zero RFX
5.02.100
7.6.
7.7.
7.8.
7.9.
8.
Sessions..........................................................................................................................................................51
8.1.
8.2.
8.3.
8.4.
8.5.
8.6.
8.7.
8.8.
8.9.
9.
ICA Connection Center .................................................................................................................67
Local Terminal ..............................................................................................................................67
Change Smartcard Password .......................................................................................................67
Smartcard Personalization ...........................................................................................................67
Setup Session ...............................................................................................................................67
Quick Settings Session..................................................................................................................67
Application Launcher ...................................................................................................................68
Sound Control ..............................................................................................................................68
System Log Viewer .......................................................................................................................69
UMS Registration .........................................................................................................................69
Touchscreen Calibration ..............................................................................................................70
Soft Keyboard (On-screen Keyboard) ..........................................................................................70
Java Control Panel ........................................................................................................................70
Calibration Pattern .......................................................................................................................70
Commands ...................................................................................................................................70
Network Diagnostics ....................................................................................................................71
System Information......................................................................................................................73
Drive Management ......................................................................................................................74
Firmware Update .........................................................................................................................74
Identify Monitors .........................................................................................................................75
Upgrade License ...........................................................................................................................75
Devices ...........................................................................................................................................................76
10.1.
10.2.
10.3.
10.4.
11.
RDP - global settings ....................................................................................................................51
RDP session ..................................................................................................................................58
Web Access for Remote Desktop.................................................................................................60
SSH Session ..................................................................................................................................60
Firefox Browser ............................................................................................................................61
Media Player ................................................................................................................................63
Java Web Start Session ................................................................................................................65
VoIP client ....................................................................................................................................65
VNC Viewer ..................................................................................................................................66
Accessories .....................................................................................................................................................67
9.1.
9.2.
9.3.
9.4.
9.5.
9.6.
9.7.
9.8.
9.9.
9.10.
9.11.
9.12.
9.13.
9.14.
9.15.
9.16.
9.17.
9.18.
9.19.
9.20.
9.21.
10.
Routing .........................................................................................................................................48
Hosts ............................................................................................................................................48
Network Drives ............................................................................................................................48
Proxy ............................................................................................................................................50
Printers .........................................................................................................................................76
USB Storage Devices ....................................................................................................................79
USB Access Control ......................................................................................................................80
PC/SC Interface ............................................................................................................................81
Security ...........................................................................................................................................................82
11.1. Password ......................................................................................................................................82
11.2. Logon Options ..............................................................................................................................82
5
IGEL Technology GmbH
IGEL Zero RFX
5.02.100
11.3. AD/Kerberos Configuration..........................................................................................................86
12.
Firmware Customization ..................................................................................................................................88
12.1.
12.2.
12.3.
12.4.
12.5.
13.
Custom Application ......................................................................................................................88
Custom Commands ......................................................................................................................88
Custom Bootsplash ......................................................................................................................89
Environment Variables .................................................................................................................90
Features .......................................................................................................................................90
Index ...............................................................................................................................................................91
6
IGEL Technology GmbH
IGEL Zero RFX
5.02.100
Introduction
IGEL Thin Clients comprise the very latest hardware and an embedded operating system. Depending on the
product concerned, this operating system may be based on IGEL Linux or Microsoft Windows Embedded
Standard®. We have done our utmost to provide you with an excellent overall solution and promise to
provide the very same level of quality service and support.
The IGEL Linux Firmware
The new IGEL zero clients for Citrix HDX, Microsoft RDS/ RemoteFX or VMware Horizon provide a
genuine zero client experience at a low price yet avoid the restrictions that are typical of zero clients from
other manufacturers, e.g. the lack of an update facility, management and support.
IGEL supplies specialized zero clients without compromises, i.e. optimized for one of the three leading
virtualization solutions and with free support. Thanks to the Appliance Mode, the zero clients boot quickly
and directly into the relevant VDI session such as Citrix XenDesktop or VMware Horizon View.
Experience "zero touch deployment" thanks to rule-based configuration during rollout. Reduce your
management outlay to virtually zero thanks to profile-based, automatic remote-management of all
settings. This means "zero" local management for you.
The structure of the IGEL setup is virtually identical on all zero clients and in the Universal Management
Suite (UMS) management software. As a result, the configuration parameters in the local device setup can
be found in the same location in the tree structure as a profile used in the management software for
example. The IGEL Universal Management Suite is available to all customers on the IGEL download site. It
allows management of an unlimited number of IGEL thin clients.
IGEL zero clients are future-proof. Free updates allow access to new functions if necessary. And if you
decide to change the VDI solution later on, this is no problem either. With an IGEL Universal Desktop
upgrade license, you can get your existing IGEL zero client hardware ready for access to other VDI
solutions.
7
IGEL Technology GmbH
IGEL Zero RFX
5.02.100
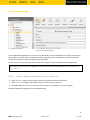
1.
Quick Installation
If you follow the procedure below, you can install the thin client within your network environment in just a
few minutes:
1. Connect the thin client to a monitor (VGA, DVI, DisplayPort), an AT-compatible keyboard with a PS/2 or
USB connection, a USB mouse and the LAN using an RJ45 connector.
2. Connect the thin client to the power supply.
3. Start the thin client and wait until the graphical user interface has loaded.
4. Click on the Setup symbol in the taskbar, or launch the IGEL Setup using the key combination Ctrl + Alt + s .
5. Select the system language and keyboard layout under User Interface → Language.
6. Select the display resolution under User Interface → Display.
7. Enter a local IP address in the Network section of the setup
or retain the default DHCP mode for automatic network configuration.
8. Click on OK to save and apply your changes.
The device will now restart if necessary and will use the new settings thereafter.
A handy tool tip is available for virtually every setting. If you would like to know more about a setting or
option, move your mouse pointer over it and wait for a moment. You can configure the tool tips under
User Interface → Screen → Desktop.
8
IGEL Technology GmbH
IGEL Zero RFX
5.02.100
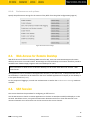
1.1. The IGEL Linux Desktop
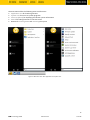
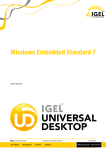
After the system starts, you will see the IGEL Linux desktop.
Figure 1: IGEL Linux desktop
The following components can be found in the taskbar at the bottom edge of the screen:
•
•
•
Start menu (also IGEL menu)
Quick launch bar with symbols for the Application Launcher, setup and sessions
Info area with symbols for the volume, network, time and desktop (show/hide window)
9
IGEL Technology GmbH
IGEL Zero RFX
5.02.100
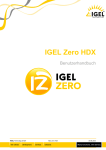
The Start menu offers the following areas and functions:
•
•
•
•
•
Application area for launching sessions
System area for access to system programs
Info area (About) for displaying all relevant system information
Search for finding functions in the Start menu
Buttons for shutting down and restarting the system
Figure 2: IGEL Start menu with application and system area
10
IGEL Technology GmbH
IGEL Zero RFX
5.02.100
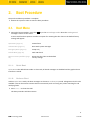
2.
Boot Procedure
The quick installation procedure is complete.
Restart the system in order to start the boot procedure.
2.1. Boot Menu
During the boot procedure, press the ESC key in the Secondstage Loader when the Loading Kernel
message is shown on the screen.
A menu with four boot options as well as an option for resetting the thin client to the default factory
settings will appear:
Quiet Boot (page 11)
Normal boot
Verbose Boot (page 11)
Boot with system messages
Emergency Boot (page 11)
Setup only
Failsafe Boot (page 12)
With CRC check
Reset to Factory Defaults (page
12)
Resets the thin client to the default
factory settings
2.1.1.
Quiet Boot
Quiet Boot is the default boot mode. In this mode, all kernel messages are disabled and the graphical user
interface is started.
2.1.2.
Verbose Boot
Unlike in Quiet Boot mode, the boot messages are shown in Verbose Boot mode. A diagnostics shell is also
available. This can be used to execute common commands (such as ifconfig etc.) when searching for and
rectifying faults.
Enter init 3 to close this shell.
The boot procedure will then resume.
11
IGEL Technology GmbH
IGEL Zero RFX
5.02.100
2.1.3.
Emergency Boot
Emergency Boot is a setup with default parameters.
If you select Emergency Boot, the Secondstage Loader looks for a bootable system in the flash memory and
then resumes the boot procedure as in the other boot modes.
Essentially speaking, the X-Server is started without network drivers and with a resolution of 1024 x 768 60 Hz during an Emergency Boot. The Setup menu is then opened directly.
This option is useful if, for example, you have selected an excessively high screen resolution or a wrong
mouse type and these settings can no longer be changed in the normal setup.
2.1.4.
Failsafe Boot - CRC check
During a Failsafe Boot, a check of the file system is carried out first. The thin client then starts in Verbose
Mode.
2.1.5.
Reset to Factory Defaults
If you select Reset to Factory Defaults, all personal settings on the thin client (including your password and
the sessions you have configured) will be lost.
A warning message will appear on the screen before the procedure is carried out.
You must then confirm your decision.
If the device is protected by an administrator password, you will be prompted to enter this password. You
have three attempts to do so.
Do you not know the password?
1. When you are prompted to enter the password, press the Enter key three times.
2. Press c to bring up the Terminal Key, the individual key for the thin client.
3. Contact us using an RMA form:
https://www.igel.com/en/service-support/rma-request.html
(https://www.igel.com/en/service-support/rma-request.html)
4. Enter the Terminal Key shown, the firmware version and your contact details.
Our service department will send you a so-called Reset to Factory Defaults Key specially for your device.
To ensure that the process is as straightforward and yet as secure as possible, each key is valid for just one
device.
12
IGEL Technology GmbH
IGEL Zero RFX
5.02.100
2.2. Network Integration
Is the kernel loaded?
If it is, the next step is the network configuration.
There are three possible ways of integrating the terminal into the network environment. Depending on the
terminal's settings, you can choose between DHCP, BOOTP or a manually configured IP address.
2.3. X-Server
The final step in the boot procedure involves starting the X-Server and the local window manager.
13
IGEL Technology GmbH
IGEL Zero RFX
5.02.100
3.
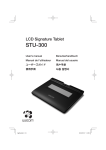
Application Launcher
To launch the tool, click on the Application Launcher symbol in the quick launch bar or in the Start
menu.
The various Launcher sub-areas allow access to configured sessions/system programs or show information
relating to licenses, the system and network connections.
Figure 3: Application Launcher
Because the setup program is the central configuration tool for all thin client settings, a setup session is
already pre-defined under Sessions and System.
Sessions (page 51)
System (page 16)
License (page 17)
About (page 15)
Network information (page 17)
Shutting down and restarting a device (page 18)
14
IGEL Technology GmbH
IGEL Zero RFX
5.02.100
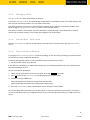
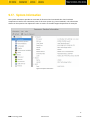
3.1. General System Information
Within the Application Launcher you will find the Information page with important system data such as the
firmware version, licensed services and hardware specifications.
Figure 4: Application Launcher - system information
Details of the current network configuration with the IP address and device name are also given here.
3.2. Sessions
All sessions created are shown in a list of applications if they are enabled for the main session page.
To open an application, double-click on it or click on Run.
Alternatively, you can launch sessions via icons on the desktop, in the quick launch bar or from the Start
menu and context menu.
Applications can also be launched automatically and a key combination (hotkey) can be defined.
The available options for launching a session can be defined under Desktop Integration in the session
configuration.
15
IGEL Technology GmbH
IGEL Zero RFX
5.02.100
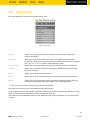
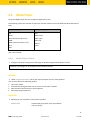
3.3. System Tools
On the System page, you can run various tools including the firmware updating tool with the pre-set
update information.
Figure 5: Application Launcher - system tools
16
IGEL Technology GmbH
IGEL Zero RFX
5.02.100
The following tools are available:
Identify monitors
Shows the screen's number and manufacturer details.
Firmware update
Carries out the update with the settings made during the setup.
Disk utility
Shows information regarding connected USB drives.
Upgrade license
Reads a new license file from the USB stick and modifies the functions of the
firmware accordingly.
Network tools
Provides detailed information on the network connection and offers a number
of problem analysis tools such as Ping or Traceroute.
Setup
Launches the IGEL Setup.
Smart Card personalization
Allows access data and sessions which are to be available to a smartcard user
to be written to an IGEL smartcard.
System information
Shows information regarding hardware, the network and connected devices.
System log viewer
Shows system log files "live" and allows you to add your own logs.
Touchscreen calibration
Allows a connected touchscreen monitor to be calibrated.
UMS registering
Logs the thin client on to a UMS server (access data for the server are
required).
3.4. License
You will find the following here:
•
•
The licenses for the components used in the UD system
Information on the provision of source code, e.g. under GPL
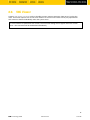
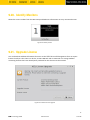
3.5. Network Information
The Network information tool allows you to read out data from your local network connections and check
the availability of a UMS server:
Figure 6: Network information
17
IGEL Technology GmbH
IGEL Zero RFX
5.02.100
3.6. Shutdown and Restart
Within the Application Launcher you will find two buttons for starting or shutting down the device. Both
actions can be disabled for the user and will then be available to the administrator only.
You can change the standard action when shutting down the device using the button on the screen or the
on/off button on the device itself in the setup under System → Energy → Shut Down.
18
IGEL Technology GmbH
IGEL Zero RFX
5.02.100
4.
Setup Application
With the help of the setup, you can change the system configuration and session settings.
Any changes you have made in the UMS take precedence and may no longer be able to be changed. A lock
symbol before a setting indicates that it cannot be changed.
Starting the setup (page 19)
Completing the setup (page 19)
Setup areas (page 19)
Setup search (page 22)
4.1. Starting the Setup
You can open the setup in the following ways:
Double-click on Setup in the Application Launcher
or click on Run.
Double-click on Setup on the desktop (if available based on the settings).
Select Setup in the context menu on the desktop (if available based on the settings).
Select System→Setup in the Start menu.
Click on Setup in the quick launch bar.
Launch the setup using the keyboard command Ctrl + Alt + s , or
in the Appliance mode using Ctrl + Alt + F2 .
You can configure how the setup can be launched under Accessories. The options described above as well
as combinations thereof are available.
4.2. Completing the Setup
The buttons OK, Cancel and Apply are usually available on every individual setup page.
Click on Apply if you have finished configuring a setup area and would like to save your settings without
closing the setup program.
Click on Cancel if you have not made any changes and would like to abort the setup.
Click on OK to save your changes and exit the setup.
19
IGEL Technology GmbH
IGEL Zero RFX
5.02.100
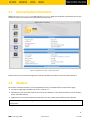
4.3. Setup Areas
The setup application comprises the following main areas:
Figure 7: Setup areas
Sessions
Allows you to configure application sessions such as ICA, RDP, PowerTerm,
browser and others
Accessories
Allows you to configure various local tools - setup pages for the local shell
(Terminal), sound mixer, screen keyboard (for touchscreen monitors), options for
the Application Launcher and the setup application itself.
User interface
Allows you to configure display settings, entry devices, hotkey commands etc.
Network
Allows you to configure all network settings for LAN/WLAN interfaces and the
dial-up connections
Devices
Allows you to configure various devices
Security
Allows you to set the administrator/user passwords and user authorizations etc.
System
Allows you to set various basic system parameters including the date and time,
information regarding the firmware update, remote management etc.
Click on one of the areas to open up the relevant sub-structure.
The tree structure allows you to switch between the setup options.
Three navigation buttons are available. The buttons allow you to move back and forth between the setup
pages you have visited or reach the next level up within the structure.
You will find a more detailed description of the individual setup options elsewhere. This is merely a brief
overview.
20
IGEL Technology GmbH
IGEL Zero RFX
5.02.100
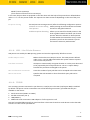
4.3.1.
Enable Setup Pages for Users
If a password was set up for the administrator, the IGEL Setup can only be opened with administrator
rights, i.e. after entering the password (see Password (page 82)). However, individual areas of the setup can
be enabled for the user, e.g. to allow them to change the system language or configure a left-handed
mouse.
1. Under Security → Password, enable the password for the administrator and the setup user.
2. Under Accessories → Setup Session → User Page Permissions, enable those areas to which the user is
to have access.
-
A check in the checkbox indicates that the node is visible in the setup.
A green symbol indicates that the user can edit the parameters on this setup page.
Figure 8: Restricted access to the setup
If you enable a setup page on the lower levels, the node points required for access will automatically be
marked as visible (but blocked for editing purposes).
21
IGEL Technology GmbH
IGEL Zero RFX
5.02.100
4.3.2.
Quick Settings
If a password was set up for the administrator, the IGEL Setup can only be opened with administrator
rights, i.e. after entering the password (see Password (page 82)). However, individual areas of the setup can
be enabled for the user, e.g. to allow them to change the system language or configure a left-handed
mouse.
1. Under Security → Password, enable the password for the administrator.
If users are to be allowed to edit parts of the setup only with a password, enable the password for the
setup user too.
2. Under Accessories → Quick Settings, define the name and the options for bringing up the quick setup.
3. Under Accessories → Quick Settings→ Page Authorizations, enable those areas to which the user is to
have access.
-
A check in the checkbox indicates that the node is visible in the setup.
A green symbol (open lock) indicates that the user is able to edit the parameters on this setup page.
Figure 9: Restricted access to the setup
If you enable a setup page on the lower levels, the node points required for access will automatically
be marked as visible (but blocked for editing purposes).
22
IGEL Technology GmbH
IGEL Zero RFX
5.02.100
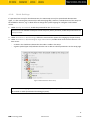
4.4. Setup Search
The Search function enables you to find parameter fields or values within the setup.
1. To start a search, click on the button below the tree structure.
2. Enter the text you wish to search for.
3. Specify the details for your search – narrow it down to field headers for example.
4. Select one of the hits.
5. Click on Show Result and you will be taken to the relevant setup page.
The parameter or value found will be highlighted as shown below.
Figure 10: Setup search
23
IGEL Technology GmbH
IGEL Zero RFX
5.02.100
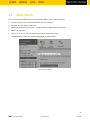
5.
System Settings
As previously explained under Quick installation (page 8), various basic system settings can be configured in
the sub-structure.
Date and time (page 24)
Update (page 25)
Remote management (page 25)
VNC (mirroring) (page 26)
Remote access (SSH / RSH) (page 27)
Energy (page 27)
Firmware configuration (page 27)
IGEL System Registry (page 28)
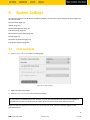
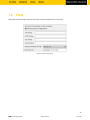
5.1. Time and Date
1. Click on Time and Date to open this dialog page.
Figure 11: Set time and date
2. Make the required changes.
3. Click on Save Time and Date to confirm the changes.
If a time server is available within your network, you can also use the Network Time Protocol (NTP) to
automatically retrieve the current time and date when the system starts and at defined intervals.
Make sure that the time zone is set correctly. To set the time zone, select the relevant region via the
drop-down boxes.
24
IGEL Technology GmbH
IGEL Zero RFX
5.02.100
5.2. Update
On the Update page, a simple dialog for updating your thin client firmware is displayed. The normal
procedure for updating your thin client is as follows:
1. Go to www.myigel.biz and download the desired firmware image from the IGEL server.
2. Unzip the ZIP file (the usual format in which updates are provided).
3. Save all files in the directory provided either on your local FTP/HTTP server or on a drive which is
accessible from the client (e.g. a USB stick, NFS share etc.).
4. Configure the necessary settings (see below).
5. Save your changes and click on Update Firmware.
The update process will now proceed automatically.
The update procedure cannot be carried out via PPP/ISDN connections. In this case, you should use a local
storage medium (USB stick) to provide the update.
The following information must be given before the update can start (the details required vary depending
on the protocol chosen):
Protocol
Allows you to select the protocol to be used (FTP, HTTP, HTTPS etc.) from the
drop-down list.
Server name and port
Details of the name or IP address of the server used as well as the port that is
to be used
Path name on the server
Details of the directory in which you have saved the update files - starting from
the root directory
User name
The user account name
Password
The password for this user/this account
5.2.1.
Buddy Update
Under Buddy Update, you can specify your thin client as an update server for other IGEL thin clients. If you
use a thin client as an update server, only the FTP protocol can be used to update the firmware. A number
of thin clients can be set up as buddy update servers within the network.
Thin clients without a specified update server search for available servers during the update. The first
update server found then provides the update.
25
IGEL Technology GmbH
IGEL Zero RFX
5.02.100
5.3. Remote Management
If the thin client is registered by an IGEL UMS server, the server address and the port number will be shown
under Remote Management. You can also enter these data manually if the client is to be managed by a
specific server.
Uncheck the Allow Remote Management check box in order to disable the remote management
service.
Click on Transfer the setup.ini Configuration File to load the configuration needed for the thin client
directly via DHCP.
The setup.ini will then be administered manually without the graphical setup, e.g. of the IGEL UMS.
Two transfer protocols are available – TFTP and FTP. The corresponding DHCP tags are:
TFTP (disabled by default)
ID 66
Name or IP of the server
ID 67
File path on the server The setup.ini file will be searched for in <File
path>/.
FTP (enabled by default)
ID 161
Name or IP of the server
ID 162
File path on the server The setup.ini file will be searched for in <File
path>/igel/ud/.
ID 184
User name
ID 185
Password
It is recommended that you set the option Disable When Updating at the same time. This will ensure that
the setup.ini and the update data are transferred separately.
5.4. VNC (Shadowing)
For helpdesk purposes, you can observe the client through shadowing. This is possible via the IGEL Remote
Manager or another VNC client (e.g. TightVNC) . The options for the VNC functions are as follows:
Ask user for permission
In a number of countries, unannounced mirroring is prohibited by law.
Do not disable this option if you are in one of these countries!
Allow entries from remote
computer
If this option is enabled, the remote user may make keyboard and
mouse entries as if they were the local user.
Use password
Enable this option to set up a password which the remote user must
enter before they can begin mirroring.
26
IGEL Technology GmbH
IGEL Zero RFX
5.02.100
5.5. Remote Access (SSH / RSH)
In order to allow central administration, the thin client can be configured in such a way that it can be
accessed via the WAN.
Remote access to the local setup is permitted by default. However, you can restrict remote access to a
specific user from a specific host. To enable restriction, give the full name of the host (e.g.
xterm.igel.de) and the permitted user.
5.6. Energy
Shutdown / Power Management
Here you can allow or prevent the user from shutting down the
terminal or placing it in standby mode and configure the
time-controlled standby mode. The standard action when the
on/off button is pressed can also be pre-configured.
DPMS
If your screen supports Display Power Management Signaling,
other energy saving functions are available. Three different
modes are offered: Standby, Suspend and Off. Each mode is
activated after a configurable time period (in minutes).
Naturally, all stages are gone through only if the X-Server does not receive any new entries during this
period.
5.7. Firmware Customization
Various parts of the firmware can be adjusted or expanded. The individual functions are described in the
chapter entitled Firmware customization (page 88). An overview is given below:
Custom partition
Allows you to dump your files
Custom application
Allows you to define the options for launching your own applications from
the customer partition
Custom commands
Allows you to mount your own system commands and call up applications
at specific times (rc.custom)
Custom bootsplash
Allows you to replace the IGEL start logos with your own graphics
Environment variables
Allows you to use dynamic parameters when configuring a number of
session types
Features
Allows you to disable system components, e.g. session types that are not
needed
27
IGEL Technology GmbH
IGEL Zero RFX
5.02.100
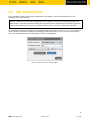
5.8. IGEL System Registry
You can change virtually every firmware parameter in the Registry. You will find information on the
individual items in the tool tips.
However, changes to the thin client configuration via the Registry should only be made by experienced
administrators. Incorrect parameter settings can easily destroy the configuration and cause the system to
crash. In cases like these, the only way to restore the thin client is to reset it to the factory defaults!
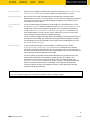
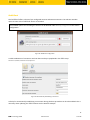
You can search for setup parameters within the IGEL Registry by clicking on the Parameter Search button. If
you would like to find the FTP settings for updating the Linux firmware, you can search for the parameter
name ftp. The parameter found in the Registry structure is highlighted:
Figure 12: Parameter search in the IGEL Registry
28
IGEL Technology GmbH
IGEL Zero RFX
5.02.100
6.
User Interface
Configure the user interface exactly as you want it:
•
•
•
Set the system language (page 33).
Define your entry options (page 34).
Expand the character sets (page 37).
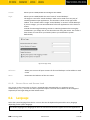
6.1. General Display Settings
Figure 13: Screen settings
Color depth
Allows you to select the desktop color depth. The following options are
available:
•
•
16 bits per pixel (High Color / 65,000 colors)
24 bits per pixel (True Color / 16.7 million colors)
Make sure that all screens connected to the thin client support the color setting.
29
IGEL Technology GmbH
IGEL Zero RFX
5.02.100
DDC
Allows you to activate the Display Data Channel in order to share information
between the system and the screen. If screen problems should occur, enable
and disable the DDC setting in the Options by way of a test. DDC is enabled by
default and the native resolution supported by the screen is determined
automatically.
Screen configuration
Every screen connected to the IGEL UD device can be configured independently.
The position of the individual screens can be determined in relation to Screen
1. Click on the Identify button to show the screen identifier on each device.
You will find the maximum supported resolutions on the data sheet of your device.
6.1.1.
DPMS
If your screen supports Display Power Management Signaling, other energy saving functions are available.
Three different modes are offered:
•
•
•
Standby
Suspend
Off .
Each mode is activated after a configurable time period (in minutes).
Naturally, all stages are gone through only if the X-Server does not receive any new entries during this
period.
6.1.2.
XDMCP
Enable the XDMCP function for the screen in order to be able to select the appropriate connection type.
Please note that the local setup can then be accessed only using the hotkey Ctrl + Alt + s . This should
therefore not be disabled for the setup application (Accessories→Setup).
30
IGEL Technology GmbH
IGEL Zero RFX
5.02.100
Connection type
Allows you to select the appropriate connection type. If you select
broadcast, the graphical login from the first XDMCP server that responds to
a broadcast query will be provided. If you choose the connection type
indirect via local host, a list of XDMCP hosts will be shown during the
startup procedure. Select from this list the host that provides the graphical
login.
Name or IP of the server
This field is enabled if you select the connection type direct or indirect.
Give the name or the IP address of the XDMCP server you wish to use. In
the direct mode, you are provided with the graphical login mask straight
from the XDCMP server which you specified in the entry field. If you chose
the indirect mode, a list of available XDMCP servers will be shown by the
server you specified.
Make sure the Display Manager daemon (XDM, KMD, GDM ...) is running and that access authorization is
available on the remote host.
6.1.3.
Access Control
Thin client access control is enabled by default. If you disable access control, it will be possible to access
your terminal screen from any UNIX host.
Fixed X-Key
You can grant specific users permanent remote access to your thin client.
To do this, you will need to enable this option, click on the Calculate button
and enter the 32-character key you have received into the Xauthority file on
the user's computer.
List of permitted X hosts
Click on the Add button to open the entry mask. Give the name of the
remote host (not the IP address) you would like to add and confirm this by
clicking on OK.
6.1.4.
Desktop
With the help of the following five dialog fields, you can configure the look and behavior of the desktop,
windows, taskbar, pagers (virtual screens) and start menu.
Only the pager mask is described in detail. You should therefore refer to the tool tips for all other masks.
31
IGEL Technology GmbH
IGEL Zero RFX
5.02.100
General settings
Allows you to configure the look of the desktop by changing desktop themes, fonts
or the size of desktop symbols and the display and delay time for tool tips.
Background image
Here you can set up the desktop background image with pre-defined IGEL
backgrounds, a fill color or a color gradient. You can also use a background image of
your own. You can set up a separate background image for each monitor that is
connected to the thin client.
Own background
image
A user-specific background image can be provided on a download server. In the
Desktop→Background window, enable the option Enable Own Background Image
and give the name of the background image file. You can specify the download
server in the Desktop→Background→Background Image Server window. If you
have already defined a server for the system update files, you can use the same
server setting for downloading the background image.
The user-specific background image will be downloaded from the specified server if
the function was enabled and if requested manually (Update Background Image).
The download can also be launched from the IGEL Universal Management Suite
via Update Desktop Changes.
Own bootsplash
A user-specific boot image can be provided on a download server. Under
System→Firmware Configuration→Own Bootsplash, enable the user-defined
bootsplash and specify a download server along with the name of the image file. If
you have already defined a server for the system update files, you can use the same
server settings for downloading the boot image.
The user-specific bootsplash will be downloaded from the specified server if the
function was enabled and if requested manually (Update bootsplash). The
download can also be launched from the IGEL Universal Management Suite
(Update Desktop Changes command or update request). The image is 800 x 600
pixels in size (aspect ratio remains unchanged). The image can be positioned
vertically and horizontally by changing the position values (between 0 and 100,
standard setting 50 (centered)).
The file types BMP, JPG, GIF, TIF, PNG and SVG are supported for an own background image and
bootsplash. A total storage area of 25 MB is available for all user-specific images.
32
IGEL Technology GmbH
IGEL Zero RFX
5.02.100
Taskbar
Allows you to enable/disable and configure the taskbar
Pager
Allows you to enable/disable the use of several "virtual desktops"
The Pager is a tool with "virtual desktops" which can be used as an easy way of
switching between open applications. This window is shown at the right of the
taskbar. It can contain either a single "virtual desktop" or several "virtual desktops".
If you use a Pager, you can switch between full-screen applications at the click of a
mouse.
Instead of minimizing/maximizing sessions or switching between them using key
combinations, you simply click on the desired screen using the mouse. The screen is
then shown as it was when you closed it (unless you restarted the system
beforehand).
Figure 14: Pager setup
Reference
Allows you to access all open sessions of all virtual desktops via the taskbar on each
screen
Menu
Determines the behavior of the start menu
6.1.5.
Screen Saver and Screen Lock
You can set up the screen saver so that it is activated either automatically or in response to a key
combination (hotkey). You can also select a password option. The look of the taskbar can be configured
separately for the login dialog and the locked screen.
6.2. Language
Select the system language from the list. You can also set the keyboard layout and the entry language
depending on the system language.
The chosen language is the language for the user interface and therefore applies for all local applications.
33
IGEL Technology GmbH
IGEL Zero RFX
5.02.100
6.3. Input
These setup pages allow you to set the keyboard layout and other entry options.
The following parameters can be configured:
•
•
•
Keyboard (page 34)
Mouse (page 35)
Touchscreen (page 35)
6.3.1.
Keyboard and additional Keyboard
Keyboard layout
Determines the keyboard layout. The selected layout applies for all parts of the
system including emulations, window sessions and X applications.
Keyboard type
Determines the keyboard type.
Key repeat
Determines the automatic repeat behavior for the keyboard:
•
Initial key repeat delay – Determines the delay (in milliseconds) before
automatic repetition begins.
•
Key repeat rate – Determines how often a character repeats per second.
Enable dead keys – Enable this function if the keyboard used supports dead
keys for special characters.
•
Boot with NumLock
enabled
Stipulates that NumLock is to be automatically enabled during the boot
procedure.
You can define additional keyboard layouts which can be selected by the user. The layout can be
selected in the taskbar.
34
IGEL Technology GmbH
IGEL Zero RFX
5.02.100
6.3.2.
Mouse
Mouse type and mouse
connection
Determines the type of mouse used and how it is connected
Left-handed mode
Changes the orientation of the mouse by switching the mouse buttons to
left-handed mode.
3-button mouse emulation (no
support for serial mouse)
Enables/disables emulation of the third (middle) mouse button for mice
with only two physical buttons. This third button is emulated by pressing
both buttons at the same time. If 3-button emulation was enabled, the
emulation time limit determines how long (in milliseconds) the driver
waits before deciding whether two buttons were pressed at the same
time.
Mouse speed
Determines the mouse resolution in counts per inch
Mouse double-click interval
Changes the maximum interval (in milliseconds) between two consecutive
mouse clicks which are to be recognized as a double-click.
6.3.3.
Touchscreen
To ensure that you can open the setup and navigate within it, the initial configuration should take place
with a mouse and keyboard connected. The setup procedure with a screen keyboard is described below.
A list of the touchscreens currently supported by IGEL Universal Desktop Linux can be found in the IGEL 3rd
party hardware database
https://www.igel.com/en/service-support/linux-3rd-party-hardware-database.html.
35
IGEL Technology GmbH
IGEL Zero RFX
5.02.100
Touchscreen is already calibrated
If you enable the touchscreen function, the touchscreen must be
calibrated first. If this option was not enabled, calibration will begin
automatically after each system boot.
Swap X and Y values
Enable this option if the mouse pointer moves vertically when you
move your finger in a horizontal direction.
Minimum/maximum X value/Y value
These values are determined by the calibration tool. However, you
can also change them manually.
Let-go limit
The maximum permitted time (in milliseconds) between two
instances of contact in order to still be registered a single touch.
When moving windows by drag-and-drop, for example, your contact
with the screen may inadvertently be interrupted. Increasing this
value prevents the thin client from recognizing two individual
contacts if you let go in this way.
Contact limit
Determines how long (in milliseconds) the screen needs to be
touched in order for the contact to be recognized.
Baud rate (for serial touchscreens only) Determines the speed of communication via the selected connection.
(If in doubt, read the monitor manual.)
Touchscreen connection
You can connect the touchscreen either to COM1 or COM2. Select
your preferred connection here.
Set driver-specific default settings
Click on this button once after changing the touchscreen type or to
restore the default settings.
Enable the screen keyboard for touchscreen use in the setup under Accessories → Screen Keyboard.
The layout for the normal keyboard will also be used for the screen keyboard.
Calibrate the touchscreen for optimum contact recognition. The touchscreen calibration application can be
found in the Application Launcher → System.
After launching the calibration program, you will see a pattern with calibration points which must be
touched one after another.
6.3.4.
SCIM (Input Methods)
The Smart Common Input Method (SCIM) platform offers entry methods for over 30 languages under Linux.
You can enable one of the methods provided by the IGEL system for Chinese character sets (Simplified
Chinese, Traditional Chinese) or manage generic tables for describing the entry method.
36
IGEL Technology GmbH
IGEL Zero RFX
5.02.100
6.3.5.
Signature Pad
Enable use of the SOFTPRO Virtual Serial SignPad (VSSP) signature pad in sessions (COM port mapping).
USB signature pads are made available in the sessions via COM port mapping.
1. To do this, enable support under User Interface → Entry → Signature Pad.
2. Apply this change by selecting Apply or OK.
3. Enable COM port mapping for the device /dev/ttyVSSP0 in the session configuration.
6.4. Keyboard Commands - Hotkeys
You will find a list of existing keyboard commands for window management here. A keyboard combination
can be defined for each function.
Figure 15: Keyboard commands
6.5. Font Services
You can import further font sets in addition to the ones provided by IGEL:
•
•
XC font service (page 37)
NFS font service (page 38)
6.5.1.
XC Font Service
If you need other fonts in addition to the ones offered by the thin client, you can use the XC font service.
This service must be installed on the server and fully configured there.
The advantage of using the XC font service rather than NFS is its better performance.
37
IGEL Technology GmbH
IGEL Zero RFX
5.02.100
Click on Enable XC Font Service in order to enable the following entry fields.
XC font server
Give the name of the server on which the XC font service operates.
Port number
Give the number of the port used by the font service for reception purposes
- the default setting is port number 710.
Favor local fonts
Enable this option if local fonts are to be used before a request is sent to the
font server.
6.5.2.
NFS Font Service
Using the NFS font service is another way to import additional fonts. The NFS font service also offers the
advantage that the mount point for the fonts can be configured. This is necessary for a number of remote
applications that search for your fonts in a specific directory.
Define and enable an NFS font path entry in order to use the NFS font service.
This will be added to the list of NFS mounted font directories.
Click on Add to open the dialog window:
Local directory
Defines the local directory for the mount point
NFS server
Name or IP address of the server that makes available the font directories via
NFS.
Server path
Path on the server under which the fonts are available.
Favor local fonts
If this option is enabled, local fonts are to be used before a request is sent to the
font server.
Click on Enable to enable the entry.
Export the font directory to the server via NFS read-only for the thin client.
38
IGEL Technology GmbH
IGEL Zero RFX
5.02.100
7.
Network
LAN interfaces (page 39)
DHCP options (page 43)
VPN (page 43)
SCEP (page 46)
Routing (page 47)
Hosts (page 48)
Network drives (page 48)
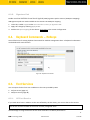
7.1. LAN Interfaces
Click on Network → LAN Interfaces in the client setup.
Choose between automatic network setup with the protocols DHCP and BOOTP or manual network
configuration in order to set the thin client for each network interface.
Figure 16: LAN Interfaces
39
IGEL Technology GmbH
IGEL Zero RFX
5.02.100
DHCP
Via the Dynamic Host Configuration Protocol, the thin client receives its IP address,
network mask, DNS, gateway and other network configurations from a DHCP server.
DHCP is enabled by default for LAN 1 (internal). DHCP options can be enabled in the
DHCP Client menu. A list of standard options is available. However, you can also
define your own options.
BOOTP
Via the BOOTP, the thin client receives its IP address, network mask, DNS, gateway
and other network configurations from a BOOTP server database.
The transferring of a setup.ini file or a boot script is not supported. BOOTP is not used to call up a
boot image from a server and boot this image, in spite of what the term may imply.
Specify IP address
manually
Configures the network settings manually instead of searching for a DHCP server.
Ensure that the fixed IP address that you enter is not used by another computer in
your network.
If you have to use a gateway to forward the data packages to and from the target
network, click on Enable and enter the gateway IP address.
Terminal name
Give the local name of the thin client. Otherwise, the standard name IGEL-<MAC
address> will be generated.
Enable DNS
Configures the DNS - Specify the standard domain in which the device will work as
well as the IP address of up to two name servers which will be queried one after the
other.
7.1.1.
Authentication
Enables IEEE 802.1x authentication
(Wired 802.1x only)
Enables network port authentication in accordance with the 802.1x
standard. The following authentication methods are currently
supported:
•
EAP-PEAP/MSCHAPv2
•
EAP-PEAP/TLS
•
EAP-TLS
The entry options in the Authentication menu vary depending on the authentication method chosen. If
the fields User Name and Password are not already populated, an entry mask for authentication purposes
will be shown.
40
IGEL Technology GmbH
IGEL Zero RFX
5.02.100
EAP type
Selects the authentication method:
•
PEAP for EAP-PEAP/MSCHAPv2 and EAP-PEAP/TLS
•
TLS for EAP-TLS
Check server certificate
Checks the authentication server
CA root certificate
Path name of the file with root certificate(s) for server authentication.
The file may be in PEM or DER format.
PEAP/Auth method
Select the Phase 2 authentication method
•
MSCHAPv2 for EAP-PEAP/MSCHAPv2
•
TLS for EAP-PEAP/TLS.
EAP-PEAP/MSCHAPv2/User name
Retains the user name for logging in for MSCHAPv2 authentication.
EAP-PEAP/MSCHAPv2/Password
Retains the password for MSCHAPv2 authentication.
EAP-PEAP/TLS/Client certificate
Path name of the file with the certificate for client authentication in
the PEM (base64) or DER format. Leave empty if a private key in the
PKCS12 format is used.
EAP-PEAP/TLS/Private key
Allows you to enter the path name of the file with the private key for
the client certificate in the PEM (base64), DER or PFX format
EAP-PEAP/TLS/User name
User name for logging in for TLS authentication
EAP-PEAP/TLS/Password for private
key
Password for accessing the encrypted private key in the private key
file
EAP-TLS/Client certificate
Path name of the file with the certificate for client authentication in
the PEM (base64) or DER format; leave empty if a private key in the
PKCS12 format is used.
EAP-TLS/Private key
Path name of the file with the private key for the client certificate in
the PEM (base64), DER or PFX format
EAP-TLS/User name
User name for logging in for TLS authentication
EAP-TLS/Password for private key
Password for accessing the encrypted private key in the private key
file.
For IEEE 802.1x authentication purposes, the client certificate can also be requested and administered via
SCEP. See Network/SCEP (page 46).
41
IGEL Technology GmbH
IGEL Zero RFX
5.02.100
7.1.2.
Wake-on-LAN
Select the packages or messages with which the thin client can be started via the network.
Figure 17: Wake-on-LAN options
7.2. Wireless (WiFi)
If you use the optional IGEL WLAN modules or have installed a wireless LAN card (USB, PCI) of your own,
you can configure the Wireless LAN interface in this dialog field.
In the Wireless sub-section of the Authentication page, you can change the encryption settings. Various
parameters are available depending on your preferred encryption type.
Figure 18: Changing encryption settings
For WPA(2) Enterprise encryption, the client certificate can also be requested and administered via SCEP.
See Network/SCEP (page 46).
42
IGEL Technology GmbH
IGEL Zero RFX
5.02.100
7.3. DHCP Options
Configure the client's use of DHCP options - a number of standard options are already set out in a list and
can be enabled. User-defined options can be set up in a list of your own and managed there.
7.4. Virtual Private Network - VPN
Remote users securely access company networks via virtual private network protocols (VPN). You can set
up your client accordingly for this purpose.
7.4.1.
PPTP
PPTP (point-to-point tunneling protocol) is one of the most common virtual private network (VPN)
protocols allowing remote users to securely access company networks.
Automatically establishing a connection during the boot procedure
In order to set up a client which is fully configured to automatically establish a connection, you may need to
dial up first.
1. Enable this option before the desktop is launched.
The client connects to the host.
2. Click on Add to set up new connections.
3. Configure the necessary settings in order to dial up the RAS server on the desired remote station.
4. Select the network device and specify whether a dial-up connection is to be used.
5. Specify on the Options tab the name service and the IP configuration for the PPTP connection.
These data will normally be transferred from the remote station's RAS server. This means that both
DNS and IP address will be set to automatic by default.
You can set up additional network routes on the next three setup pages (Routing).
7.4.2.
3rd Party VPN-Clients
IGEL Universal Desktop Linux v5 includes two clients from other manufacturers for access to a VPN:
Cisco (page 43)
GeNUCard (page 44)
Cisco
You will find the configuration parameters for the Cisco Client in the IGEL setup.
To use the software, please read the VPN Client Administrator Guide and the User Guide from Cisco:
http://www.cisco.com/en/US/products/sw/secursw/ps2308/prod_maintenance_guides_list.html
http://www.cisco.com/en/US/products/sw/secursw/ps2308/products_user_guide_list.html
43
IGEL Technology GmbH
IGEL Zero RFX
5.02.100
GeNUCard
The GeNUCard offers a choice of pre-configured Internet and VPN connections. The selection window
opens as soon as the GeNUCard session is launched.
The available options for launching the session can be defined under Desktop Integration in the session
configuration.
Figure 19: GeNUCard configuration
A valid combination of connection and user data can be pre-populated in the IGEL setup:
Network→VPN→GeNUCard→Options.
Figure 20: Automatically establishing connections
A facility for automatically establishing a connection during the boot procedure can also be enabled. This is
necessary when updating the IGEL firmware via the VPN for example.
44
IGEL Technology GmbH
IGEL Zero RFX
5.02.100
The GeNUCard is configured and administered centrally via the genucenter management station. Further
information is available from www.genua.de.
Optionally, an administrator session allowing the GeNUCard Internet connection to be configured can be
set up:
1. Click on Add Instance under System→Registry→genucard%.
The GeNUCard icon will appear on the desktop.
2. Click on the GeNUCard icon.
The GeNUCard login window will open.
3. Enter a user name and password.
4. Click on Login.
The Internet/VPN window will open.
Figure 21: Internet/VPN window
5. In the Internet area, configure the connection with the help of the Create, Edit, Delete buttons.
45
IGEL Technology GmbH
IGEL Zero RFX
5.02.100
7.5. Simple Certificate Enrollment Protocol - SCEP
The SCEP allows the automatic provision of client certificates via an SCEP server and a certification
authority. This type of certificate is automatically renewed before it expires and can be used for purposes
such as network authentication (e.g. IEEE 802.1x).
A Microsoft Windows 2008 Server (MSCEP, NDES) for example can serve as a queried counterpart (SCEP
server and certification authority). More information can be found at Microsoft, e.g. in the white paper.
http://download.microsoft.com/download/a/d/f/adf2dba9-92db-4765-bf2d-34b1c8df9ca3/Microsoft%20S
CEP%20implementation%20whitepaper.doc
Enable certificate management via SCEP client (NDES) and then make the necessary configuration
settings.
7.5.1.
Certificate
Under Certificate, specify the basic date for the certificate to be issued by the certification authority.
Type of CommonName
If the client automatically obtains its network name, DNS Name (auto) is a good
type of thin client certificate.
Organizational unit
Stipulated by the certification authority.
Organization
A freely definable designation for the organization to which the client belongs.
City, state, country
Enter the location of the client here.
RSA key length
Select a key length (one able to be used by the certification authority) for the
certificate that is to be issued.
7.5.2.
Certification Authority
Enter the name of the certification authority (CA) and the hash value of the root certificate.
You will receive both of these from the certification authority.
7.5.3.
SCEP
In addition to a certification authority, an SCEP server must also be defined.
Enter the address and query password for the SCEP server here.
The SCEP server generates the password as a one-time password. It is needed when a certificate is
requested for the first time. New certificates will be requested before the old ones expire. In this case,
the still-valid certificate will serve as a means of authentication.
For the purpose of checking validity, define an interval (checking frequency) and a period of time in
which certificate renewal must occur.
46
IGEL Technology GmbH
IGEL Zero RFX
5.02.100
Example:
A certificate is valid until 31.12 in any one year. The period for renewal is 10 days. This means that a
new certificate will first be requested on 21.12 of the same year.
Because of the need to enter a fingerprint (root certificate of the certification authority) and the query
password (SCEP server), the configuration process is somewhat awkward. Ideally, it should be set up in the
UMS as a profile and distributed to the clients. At the same time, the certificate still cannot be used for
communication purposes.
7.5.4.
Checking the Client Certificate
If a certificate from the certification authority has been forwarded from the SCEP server to the client, it is
then stored there in the /wfs/scep_certificates folder.
The data for the certificate (e.g. its validity, creation date and hash value) can be displayed by using the
shell command cert_show_status.
7.5.5.
Example
Certificates issued and managed via SCEP can be used for purposes such as network authentication.
Relevant options can be found when configuring IEEE 802.1x authentication
Network → LAN Interfaces → Interface 1 → Authentication
or when setting up the wireless network
Network → LAN Interfaces → Wireless → Authentication, WPA Enterprise Encryption, EAP Type TLS.
One problem when the client certificate is distributed via the network is that the same certificate is needed
for communication. The use of the SCEP in conjunction with 802.1x authentication presents no problems to
the extent that the initial request for the certificate should also be possible without a certificate.
Enable the 802.1x authentication method after the SCEP has been configured.
When requesting the certificate, the client will attempt to establish a connection to the SCEP server
without using any authentication. It will use the authentication only after having received the
certificate.
For WLAN connections, a method of certificate-less PSK encryption must first be set up. The client will then
use this connection to obtain the certificate. After this, the WLAN connection can be reconfigured once
again.
While the above-mentioned method for Ethernet connections will also function via the UMS, the initial
configuration of the WLAN can only be performed on the client as the WLAN is disabled by default.
47
IGEL Technology GmbH
IGEL Zero RFX
5.02.100
7.6. Routing
This setup page allows you to specify additional network routes if necessary.
In the Interface field, specify "eth0", "eth1" or "wlan0", i.e. Interface 1+2 or Wireless LAN.
You can specify up to five additional network routes.
7.7. Hosts
If no DNS (Domain Name Service) is used, you can specify a list with hosts in order to allow translation
between your IP address, the full qualified host name and the short host name.
Click on Add to open the dialog window.
1. Enter the IP address of the host you would like to add.
2. Give the full qualified host name (e.g. <mailserver.igel.de>).
3. Give the short host name of the host (e.g. <mailserver>).
4. Confirm the details you have entered by clicking on OK.
The specified host will now be added to the computer list.
7.8. Network Drives
Drives shared within the network can be linked to the thin client via NFS or SMB - depending on the
protocol offered by the server.
7.8.1.
NFS
With NFS (Network File System), you can share files via the network. The NFS server exports a system file,
and the NFS client (your thin client) links this file to a mount point within its own file system. The exported
file system then becomes a logical part of the thin client file system although, in physical terms, it remains
on the server.
In order to set up an NFS mount, the server must first be configured. You will find detailed information on
NFS on the relevant pages of the manual for your server operating system.
The procedure for sharing files via the NFS server is as follows:
Click on Add to open the dialog window for NFS.
You can then enter the following:
48
IGEL Technology GmbH
IGEL Zero RFX
5.02.100
Enabled
The NFS mount is enabled by default and is mounted each time the system
boots.
Disable this entry if the shared file system is not universally needed.
Local directory
Details of the local directory onto which the shared items are to be mounted
on the local thin client file system.
Server
The name or IP address of the NFS server which provides the shared files.
Path name
Details of the path name as exported by the NFS server.
7.8.2.
Windows Drive - SMB
SMB is used by Microsoft Windows NT, Windows 95/98, Windows 2000 and Windows XP etc. to share hard
drives and printers. As Unix (including Linux) can process this protocol with Samba Suite tools, hard drives
and printers can be used along with Windows hosts. Consequently, items shared via SMB can be integrated
into the thin client by Windows or Unix Samba hosts.
The SMB protocol is used only to share files via the network (not for printers). Shared items which are to
be mounted must first be created on the Windows or Unix host.
Local directory
Details of the local directory onto which the shared items are to be mounted on
the local thin client file system.
Server
For a Windows host, the Net BIOS name must be entered here. For a Unix Samba
host, the host name or the IP address must be used.
Share path name
Path name as exported by the Windows or Unix Samba host.
User name/password
Details of the user name and password for your user account on the Windows or
Unix Samba host.
Enabled
The SMB mount is enabled by default and is mounted each time the system boots.
Writable for users
If this option is enabled, the user who is logged on can write data. Otherwise, this
is only possible via root.
49
IGEL Technology GmbH
IGEL Zero RFX
5.02.100
7.9. Proxy
Select the communication protocols for which a system-wide proxy is to be used.
Figure 22: System-wide proxy
50
IGEL Technology GmbH
IGEL Zero RFX
5.02.100
8.
Sessions
Application sessions can be created and configured in the Sessions sub-structure of the IGEL setup
application. The Session Overview provides an overview of all available session types and existing sessions.
Figure 23: Session overview
Click on Add to create a new session.
Disabled services are not shown in the drop-down list.
For each session there is a configuration page entitled Desktop Integration on which the following actions
can be performed:
•
•
Determining the look of the session on the local desktop
Setting up the name of the session
Note: None of these characters can be used in the session name: \ / : * ? “ < > | [ ] { } (
)
•
•
Selecting the session start options (autostart, restart)
Enabling hotkey use
8.1. RDP - global settings
This section describes the procedure for configuring the global RDP settings. This configuration applies for
all RDP sessions. The protocol version can no longer be configured manually, while the version used by the
server is automatically recognized and used.
8.1.1.
Local Logon - RDP
Local login allows user data pre-population, e.g. with data from the domain login, when establishing the
connection to the terminal server. This can save you having to enter the same login data on a number of
occasions.
51
IGEL Technology GmbH
IGEL Zero RFX
5.02.100
You can also use Local login to freely select the server in the login window of an RDP session.
Enable Use local login window to
•
•
Pre-populate user data
Freely select the server in the login window of an RDP session.
If the user data, e.g. the data from the domain login, are pre-populated, this can save you having to enter
the same login data on a number of occasions.
Use local login window
If this option is enabled, you will need to enter the password in the
RDP login window on the terminal side when logging in.
Pre-populate login information
The login window is pre-populated with the user name and domain.
Type
Here, you can pre-populate the user name and domain in the login
window and choose between the settings from the last login and the
session setup.
Show domain
Shows the domain entry in the login window.
Set client name as user name
This setting may help to resolve reconnection problems during load
balancing.
Restart mode
The RDP login window is displayed in restart mode and cannot be
closed.
Enable network authentication
Enables network authentication via NTLM. Smartcards are not
supported here.
Domains
Allows you to add domains which are to be available. If you enter a
number of domains, these will be shown in the Domains drop-down
area in the login module.
52
IGEL Technology GmbH
IGEL Zero RFX
5.02.100
8.1.2.
Window
The following settings are configured under Window:
Standard number of colors
Specifies the standard color depth - the default setting is a color depth of 256
colors.
Approximate colors
Given the differences between the color palettes used by the ICA client and the
"thin client" desktop, the screen may flash annoyingly if you switch between
windows on a pseudo-color screen. The ICA client's color adaptation scheme
prevents this flashing as it uses the colors from the local desktop palette in order
to display the ICA window session. If Approximate Colors is enabled, flashing
when switching between windows is avoided.
Window size
Specifies the width and height of the window.
Embed systray icons in
window manager taskbar
Inserts an application icon into the local taskbar
Font smoothing
Enables font smoothing - in the event of performance problems, font smoothing
should be switched off as it requires additional computing power.
Multi Monitor
Stipulates whether the full-screen mode is to be extended to all monitors.
8.1.3.
Mapping
Locally connected devices such as printers or USB storage devices can be made available in RDP sessions.
Drive Mapping
Through drive mapping, connected mass storage devices can be made available to the user. Specify which
folders or drives are mapped during the login.
Via Enable drive mapping, you can temporarily enable/disable drive mapping. This offers the advantage
that stored settings can be enabled or disabled without being lost.
Local (USB) devices which are to be used for drive mapping purposes must first be set up as devices.
The procedure for setting up drive mappings is as follows:
1. Click on Add to bring up the mapping window.
2. Select a target drive from the list under which the local device or the folder is to be mapped.
If the drive letter you have selected is no longer available on the server, the specified directory or local
drive will be given the next free letter during the login.
3. Give the path name of the local directory to which the mapping is to refer.
53
IGEL Technology GmbH
IGEL Zero RFX
5.02.100
If you map a locally connected device, use the pre-defined path names available in the drop-down
field. The directories in question are those on which the devices are mounted by default during the
boot procedure (e.g. /autofs/floppy for an integrated disk drive).
Serial (COM) Ports
Enable Enable COM Port Mapping in order to perform bidirectional mapping between serial devices
connected to the thin client (e.g. scanners, serial printers) and the serial ports of the Citrix server.
As a result, programs running on the server can exchange data with the local devices.
Click on Add under Serial Devices.
From the drop-down list, select the serial connector to which a device is connected or click on Search
Devices... to select an available device.
/dev/ttyS0
Denotes the local serial connection COM1
/dev/ttyS1
Denotes the local serial connection COM2
COM3 and COM4
Denote possible expansion cards installed in the
PCI/ISA slot, e.g. an internal modem
USB COM1 to USB
COM4
Denote serial connections to USB-to-serial adapters.
Your selection will be mapped to the virtual COM1 connection. A second device will be mapped to the
virtual COM2 connection and so on.
Printers
You can set up a printer for RDP sessions here.
With the Enable Client Printer Mapping function, the locally connected thin client printer is made available
for your RDP sessions, provided that it was not disabled on the server side.
The printers must be set up on the Devices→Printers→CUPS→Printers page and must be enabled there for
mapping in RDP sessions.
Because the thin client merely places incoming printer jobs in a queue, you need to install the printer on
the server.
54
IGEL Technology GmbH
IGEL Zero RFX
5.02.100
Device Support / Virtual Communication Channels
Enable virtual RDP channels for communicating with various devices connected to the thin client. These can
be card readers (smartcards), dictation machines or even USB storage devices. Channels of this type allow
the device to communicate with the relevant server application.
DriveLock
The virtual DriveLock channel (RDP) is included in the UDLX from Version 5.01.100 and must be installed
on the RDP server.
DriveLock can read hardware data from local USB devices and transfer these data to the server with the
help of the Virtual RDP Channel Extension. When using whitelists, rules based on the hardware properties
of the connected drive (e.g. manufacturer details, model and serial number) are taken into account.
The following steps are important in order to be able to define the access rights for drives via the
DriveLock server configuration:
Enable the USB devices via drive mapping so that they are available as drives within your terminal
session.
Check the settings under Sessions→RDP→RDP Global→Mapping→Drive Mapping, they should
correspond to the DriveLock settings.
Disable RDP-USB redirection, because this will otherwise prevent drives being recognized by
DriveLock.
Check the device settings under Devices→Storage Devices→USB Storage Hotplug, as they can
influence the USB devices during the RDP session.
Install and enable the DriveLock channel in the Universal Desktop setup under Sessions→RDP→RDP
Global→Mapping→Device Support.
In the Centertools download area, you will find a document which describes in greater detail the
procedure for configuring DriveLock on the server side: How to use Centertools DriveLock with IGEL Thin
Clients
55
IGEL Technology GmbH
IGEL Zero RFX
5.02.100
Audio
Allows you to enable local audio transmission.
8.1.4.
Performance
In the event of performance-related problems, disable graphics functions which are not absolutely
necessary. In low-bandwidth environments, you should use compression in order to reduce the network
traffic.
Please note that this uses additional CPU power.
RemoteFX Support
With the Service Pack 1 for Windows Server 2008 R2, local system functions such as Windows Aero or 3D
display can be made available in RDP sessions too. In order to do this, the RemoteFX extension for RDP
must be enabled. You can configure the relevant settings under RDP Global → Performance or on the
corresponding session settings.
Figure 24: Windows Aero
Globally enabling Remote FX is not recommended as conventional RDP sessions may also be affected by
this. With RemoteFX, all graphics effects available under Performance are enabled. This may slow down the
session as a result. It is better to enable the function only for individual sessions which establish a
connection to appropriately equipped servers.
Further information on Remote FX and the server-related requirements is available from Microsoft at
http://technet.microsoft.com/en-us/library/dd736539%28WS.10%29.aspx.
In the IGEL Registry, you can configure the number of frames sent by the server without confirmation under
the key rdp.winconnect.remotefx-ack. The standard value is 1. A value of 2 or 3 can lead to
improved performance in networks with high latency times.
56
IGEL Technology GmbH
IGEL Zero RFX
5.02.100
8.1.5.
Options
Disable mouse events
Instructs the client not to show "unnecessary" cursor movements in order
to conserve power.
Reset license
If you have to remove the MS license from the device, enable this option
and restart the device.
Client name
Give a client name for terminal service identification - the standard
setting is the host name of the computer.
TLS (SSL from Version 3.1)
encrypted connections
Permits TLS-encrypted connections only / verifies server certificates /
deletes certificates that are no longer needed
RDP Legacy Mode
Switches to prior (IGEL Linux v4.x) RDP client version - see note below!
Before using RDP Legacy Mode to solve any occurring problem with the current RDP client (IGEL Linux
v5) please contact IGEL support to address your issue. RDP Legacy Mode may be removed with any later
version of IGEL LInux.
8.1.6.
USB Redirection
USB devices can be permitted or prohibited during an RDP session on the basis of rules. Sub-rules for
specific devices or device classes are also possible.
Use either Native USB Redirection or Fabulatech USB Redirection.
For Fabulatech USB Redirection, a special Fabulatech server component must be installed on the server
(USB for Remote Desktop Igel Edition).
More detailed information on the function can be found on the Fabulatech partner site:
http://www.usb-over-network.com/partners/igel/ (http://www.usb-over-network.com/partners/igel/).
Enable either native or Fabulatech USB redirection – not both together.
Disable USB redirection if you use Centertools DriveLock.
8.1.7.
Multimedia (Video) Redirection
To improve video playback on the remote desktop, follow the procedure below:
1. To take advantage of improved playback, ensure that the necessary codecs are installed on the remote
desktop page.
2. Enable multimedia redirection on the thin client.
3. Create the session.
4. Begin playback on the remote desktop.
57
IGEL Technology GmbH
IGEL Zero RFX
5.02.100
8.2. RDP session
The following configuration pages offer you detailed setup options for the session:
Server and logon
Allows you to specify a server and a start application for the terminal server
session. The necessary logon information is configured here. Otherwise, the
terminal server logon window for entering the user and the password will be
displayed.
Window
Allows you to specify the size of the session window and the color mode. The
local taskbar can be configured so that it remains visible during a full-screen
session.
Performance
Allows you to disable non-essential graphical functions such as skin styles,
window animation etc. This is useful in the event of performance problems.
Mapping
Allows you to specify the audio output device (local/remote) and determine
how key strokes and clipboard content are handled. The mapping of serial
connections and local drives can be enabled for a session.
You can make connected mass storage devices available to the user using the
appropriate mapping: Select Enable, choose the drive letter and the device to
be mapped.
Options
Determines the start application and the work directory for use during the
session (how authentication errors are handled during the logon procedure).
If, when connecting to the server, a terminal server gateway is to be used, you
can configure the relevant settings here (No Gateway is pre-set).
8.2.1.
Server / logon
If a session is created or edited, you can change the RDP session settings if they differ from the global
settings:
1. Specify a server and, where appropriate, a start-up application for the terminal server session.
2. Configure the necessary logon information.
Otherwise, the terminal server logon window will be displayed for you to enter a user name and
password. If the local logon is used (see above), this window is the thin client's logon window.
The option for freely entering the server can also be enabled under Server →Variable Server
Connection for Local Logon.
If the Pass-Through Authentication option is enabled, the session with the local logon data for the terminal
user, e.g. from the domain logon, is used. However, this setting will be overridden by the Local Logon
global parameter. You should therefore not use both options at the same time.
58
IGEL Technology GmbH
IGEL Zero RFX
5.02.100
Microsoft RemoteApp
Figure 25: RemoteApp settings
Like the published applications of a Citrix server, MS Windows Server 2008 offers the option of passing on
RemoteApps to the thin client. Detailed instructions regarding server configuration can also be found on
the Microsoft website: TS RemoteApp Step-by-Step Guide.
On the client side, only a few parameters need to be configured after enabling the RemoteApp mode.
Please note that the name of the application to be launched must be preceded by two vertical bars (||),
e.g. ||Excel.
8.2.2.
Display, keyboard and allocation of resources
Under Window, specify the color depth, window size and the multiscreen behavior.
Under Keyboard, configure the keyboard layout and the hotkey properties.
Enable/disable the allocation of resources for the client, e.g. COM port or printer mapping.
The global parameters (page 51) are the default setting.
59
IGEL Technology GmbH
IGEL Zero RFX
5.02.100
8.2.3.
Performance and options
Specify the performance settings for the session if they differ from the global configuration (page 51).
Figure 26: Performance settings
8.3. Web Access for Remote Desktop
With Web Access for Remote Desktop (Web Access for RD), users can access RemoteApps and remote
desktop connections via a web browser. RemoteApps and remote desktop connections therefore provide a
modified view of RemoteApp programs and virtual desktops for users.
More information on Web Access for Remote Desktop can be found under Microsoft Technet - Web
Access for RD
The applications can be provided in the Application Launcher, in the Start menu, in the quick launch bar or
on the desktop. A selection can be made from the list of available applications for display on the desktop or
in the quick launch bar (Look).
For the purposes of logging in, normal user authentication as well as the Kerberos-Pass-Through mode are
available.
8.4. SSH Session
This section describes the procedure for configuring an SSH session.
Use the SSH session to launch a remote application on the host via SSH (Secure Shell) and display it on the
terminal. SSH allows secure, encrypted communication between two hosts or host and terminal via an
unsecured network. X11 connections can also be routed via this secure channel.
60
IGEL Technology GmbH
IGEL Zero RFX
5.02.100
Command
All necessary entries for creating an executable command to
remotely launch the application via SSH
User name (remote)
Name of the remote user - The selected user must have a user
account on the remote host.
Computer (remote)
Name or IP address of the remote host from which the remote
application is launched.
Command line
Allows you to enter the name of the application program which
is to be launched.
Forward X11 connection
X11 connections are automatically forwarded to the remote
computer so that each X11 program launched from the shell or
the command passes through the encrypted SSH channel. The
authentication data are also defined automatically. This option
is enabled by default.
Enable compression
Reduces the amount of data transmitted via the data channel This option is disabled by default.
Get protocol version
You must prove your identity to the remote host using one of
the various identification methods. These depend on the
protocol version used. In this area, you can obtain details of the
protocol version after opting for a particular identification
method.
Options
You will find detailed information on SSH and the various authentication methods on the relevant pages of
the manual for your server operating system.
8.5. Firefox Browser
In order to allow central configuration via the IGEL UMS, the original configuration parameters for the
Firefox web browser are assigned to the IGEL setup. These global settings can be changed for each
browser session.
8.5.1.
Firefox Browser Session
The original Firefox parameters are pre-set under Settings. The standard settings are carried over from the
Browser Global setup.
The following settings for the browser session can also be configured:
61
IGEL Technology GmbH
IGEL Zero RFX
5.02.100
Window
Allows you to specify the full-screen mode and multi-monitor options as well as the
Firefox language / prevent users making changes to the browser / hide the
configuration page (about:config) and the printer dialog
Symbol bars and
toolbar
Allows you to hide/show toolbar items or complete toolbars in a session / configure a
kiosk mode (browser in full-screen mode, restricted access to toolbars and
autostart/restart configuration)
Hotkeys
Allows you to enable/disable hotkeys used in the Firefox browser.
Context menu
Allows you to enable/disable items in the browser context menu.
8.5.2.
Browser Plug-ins
Various plug-ins such as a PDF viewer, Adobe Flash Player or Red Hat Spice are available. However, they
may need to be licensed by the user first. Integration of the SecMacer security solution Net iD can also be
configured here.
Flash Player
Before you can download and install Adobe Flash Player, you need to confirm that the software is licensed
- IGEL Universal Desktop Linux does not contain a license to use the Flash Player.
The external link for downloading the Flash Player is up to date at the time of release of this software.
However, it may change over time.
In addition to the official download source, you can specify your own source in the company network or the
pre-configured firmware update source.
If the Flash Player fails to download via the external link, check the current path and file name in the
browser as these may have changed in the meantime.
62
IGEL Technology GmbH
IGEL Zero RFX
5.02.100
8.6. Media Player
Set up the Media Player for your multimedia applications here.
The following codecs are licensed via either the Fluendo Codec Pack or the MPEG LA Advanced Feature
Pack:
Supported formats:
Supported codecs:
AVI
MPEG
ASF (restricted under Linux)
WMA
WMV (restricted under Linux)
MP3
OGG
MP3
WMA stereo
WMV 7/8/9
MPEG 1/2
MPEG4
H.264
AC3 is not licensed.
8.6.1.
Media Player Global
Configure universal settings which will apply by default during all Media Player sessions.
If need be, the settings can be changed in the individual sessions.
Window
Under Image Aspect Ratio, specify the required aspect ratio for video playback.
You can also choose the following options:
•
•
•
•
Full-screen mode
Automatically change window size as soon as a new video is loaded
Main window should remain in the foreground
Show operating components
Playback
Specify how you would like to play back media files:
Endless loop
Automatically plays back a play list endlessly
until you stop it.
63
IGEL Technology GmbH
IGEL Zero RFX
5.02.100
Random mode
Plays back the files in a play list in a random
order.
If you wish, choose the visual effects to be used during audio playback.
Visualization type
Determines the visualization plug-in.
Visualization size
Determines the visualization size.
Video
Video output
GConf:
System-wide configuration
Auto:
Automatically selects the output
XVideo:
Hardware-accelerated, uses shared memory to write images to the
graphics card memory
X11:
Not hardware-accelerated, playback via the X Window System
display protocol
Specify the brightness, saturation, contrast and color settings for videos.
Audio
Audio output
Audio output type
GConf:
System-wide configuration
Auto:
Automatically selects the output
ALSA:
Direct output via kernel driver for sound cards
Select Stereo if you are working with an IGEL thin client.
Options
Specify whether you would like to disable the screen saver during audio playback.
Specify the network connection speed in order to influence media file playback.
Specify the necessary buffer size for your network in order to ensure smooth audio and video playback.
Specify whether you would like to automatically load subtitles as soon as a video begins. Currently, the
coding for subtitles is always UTF-8.
Specify the font and text size for the subtitles.
Browser Plug-in
If you would like to use the Media Player as a browser plug-in, you can change the configuration values
here.
This will affect manually configured Media Player sessions.
64
IGEL Technology GmbH
IGEL Zero RFX
5.02.100
8.6.2.
Media Player Sessions
You can set up your own personal Media Player sessions here.
1. Click on Add to create a new session.
2. Specify a session name.
3. Specify which possible ways of launching the session you would like. You may choose a number of
options here.
4. You may like to select the option of using hotkeys and define them.
5. You can also specify whether autostart (following a system start) and/or restart (after a connection is
established) are to be used.
6. For the autostart option, you can also specify by how many seconds the session start is to be delayed.
As soon as you have set up a Media Player session of your own, it will appear in the structure tree under
the Media Player Sessions directory. Your own session in turn contains three folders: Playback, Options
and Desktop Integration.
Playback
Under Medium / File, give the path of the file which is to be played back when the session is launched.
Use the following formats:
/directory/filename
or
http://servername/filename.
For the window settings, you can choose whether you would like to carry over the global settings or use
your own settings for this special session.
Options
If necessary, you can change the pre-configured settings for the operating components here.
8.7. Java Web Start Session
In order to be able to access Java web applications, you must enter the address of the necessary JNLP file.
For example, this may be an IGEL UMS console which can also be run as a Java Web Start application.
8.8. VoIP client
This section describes the procedure for setting up voice-over IP telephony (VoIP). The IGEL Universal
Desktop Linux firmware includes the Ekiga voice-over IP client (http://ekiga.org). This client allows you to
use the SIP (Session Initiation Protocol) and H.323. In addition to the local contact list, the telephone book
can also search the LDAP address books. You will find a detailed description of all Ekiga options under
http://wiki.ekiga.org/index.php/Documentation.
65
IGEL Technology GmbH
IGEL Zero RFX
5.02.100
8.9. VNC Viewer
Create a VNC Viewer session in order to be able to access remote computers (VNC server) via the thin
client. Connection options such as the server address or the full-screen mode can be pre-populated for
each session or defined individually when the system starts.
If a server address is specified for the session, the connection dialog will not appear when the session
starts – the connection will be established immediately.
66
IGEL Technology GmbH
IGEL Zero RFX
5.02.100
9.
Accessories
Information on other accessories provided by the Universal Desktop can be found here.
9.1. ICA Connection Center
The Citrix ICA Connection Center provides an overview of existing connections to Citrix servers. It also
allows the server connection to be terminated/canceled and the connection properties to be displayed, e.g.
for support purposes.
9.2. Local Terminal
With a terminal session, you can execute local commands via a shell. In this case, the shell is similar to the
Windows DOS command prompt.
It is also possible to access a local shell without a terminal session: You can switch to the virtual terminals
tty11 and tty12 by pressing Ctrl + Alt + F11 / Ctrl + Alt + F12 .
9.3. Change Smartcard Password
Set up a session in order to change your IGEL smartcard password. Details of the setup procedure for your
IGEL smartcard can be found under Security → Login → Smartcard.
9.4. Smartcard Personalization
Configure the options to start the Smart Card Personalization (page 83).
9.5. Setup Session
Specific areas of the setup can be made available to the user, even if the overall setup can only be accessed
by the administrator. This is useful for example for keyboard and mouse settings or for screen
configuration.
9.6. Quick Settings Session
Specific areas of the setup can be made available to the user, even if the overall setup can only be accessed
by the administrator. This is useful for example for keyboard and mouse settings or for screen
configuration. See Quick Setup (page 21).
67
IGEL Technology GmbH
IGEL Zero RFX
5.02.100
9.7. Application Launcher
Show the Setup and Application Launcher on the local desktop or in the start menu, or define hotkeys
and the autostart option.
You can hide various items, e.g. buttons for shutting down or restarting the device, from the user.
9.8. Sound Control
Use the sound control to adjust the output volume and the input level as well as the balance between the
input and output.
Figure 27: Sound control
68
IGEL Technology GmbH
IGEL Zero RFX
5.02.100
9.9. System Log Viewer
All available system logs are updated and displayed. You can add your own log files in the options. The
contents of the selected log can be searched in the viewer and also copied (e.g. for support purposes).
Figure 28: System logs
9.10. UMS Registration
Registration of the thin client in the IGEL Universal Management Suite can also be performed locally. To
do this, enter the server address (with port) and the necessary access data. Directories already on the
server can be selected directly.
Figure 29: Register thin client on the UMS Server
69
IGEL Technology GmbH
IGEL Zero RFX
5.02.100
9.11. Touchscreen Calibration
After launching the calibration program, you will see a pattern with calibration points which must be
touched one after another.
9.12. Soft Keyboard (On-screen Keyboard)
Enable the soft keyboard (on-screen keyboard) for use with a touchscreen, e.g. IGEL UD9.
9.13. Java Control Panel
The Java Control Panel is an operating console which is used for various purposes.
Specify how Java runs on your computer on the basis of various parameters.
Manage temporary files used for the Java plug-in.
By doing this, you allow your web browser to use Sun Java to run applets and Java Web Start. As a
result, you can launch Java applications via the network.
Check certificates via the operating console. This gives you the security you need to use applets and
applications via the network.
Define runtime parameters for applets executed with Java plug-in and applications run with Java Web
Start.
Further information can be found at
http://java.sun.com/j2se/1.5.0/docs/guide/deployment/deployment-guide/jcp.html.
9.14. Calibration Pattern
When calibrating your monitor (auto adjust), please use this special pattern. Generally speaking, you will
achieve better results than if you calibrate the monitor with a conventional desktop and windows. Clicking
on the pattern with the mouse closes the application again.
9.15. Commands
The following system commands can be made accessible to the user:
•
•
•
•
•
Log off
Sort symbols
Switch off terminal
Restart terminal
Restart window manager
70
IGEL Technology GmbH
IGEL Zero RFX
5.02.100
9.16. Network Diagnostics
The IGEL Universal Desktop Linux firmware features a number of tools for network analysis. These
include:
•
•
•
•
•
Device information (page 71)
Ping (page 71)
Netstat (page 72)
Traceroute (page 72)
Look-up (page 72)
9.16.1. Device Information
This tool provides information regarding the status of the network device used. This includes:
•
•
•
MAC and IP address
Link speed
Various interface statistics (bytes transferred, errors etc.)
9.16.2. Ping
The Ping tool allows you to send contact queries to a network address. You can specify the exact number of
queries to be sent. Alternatively, you can enable Unlimited Requests which means that the echo requests
will be sent until you stop the process.
The Ping result is shown below, and the Ping duration of the last five Pings is illustrated in a bar chart.
Figure 30: Ping network tools
71
IGEL Technology GmbH
IGEL Zero RFX
5.02.100
Enable Program → Signal Tone for Ping to configure the thin client to output an audible signal each
time a Ping is sent.
9.16.3. Netstat
Netstat provides information on active network services with protocol and port information as well as a
routing table and multicast information for your network devices.
9.16.4. Traceroute
With Traceroute, you can trace the route to a network address.
9.16.5. Look-up
The Look-up tool shows various information regarding your network address. The available information
types are shown in this screenshot.
Figure 31: Information types for network address
72
IGEL Technology GmbH
IGEL Zero RFX
5.02.100
9.17. System Information
The system information provides an overview of all internal and connected thin client hardware
components as well as the constituent parts of the Linux system (e.g. kernel modules). The information
shown can be copied to the clipboard in order to send it to the IGEL Support department for example.
Figure 32: System information
73
IGEL Technology GmbH
IGEL Zero RFX
5.02.100
9.18. Drive Management
Drive management shows all recognized USB drives along with their respective properties (device name,
mount point etc.).
Figure 33: Drive management
9.19. Firmware Update
This session updates the firmware with the settings saved in System → Update → Firmware Update.
74
IGEL Technology GmbH
IGEL Zero RFX
5.02.100
9.20. Identify Monitors
Shows the screen number from the IGEL setup and hardware information on every connected screen.
Figure 34: Identify screens
9.21. Upgrade License
You can distribute additional firmware functions via the IGEL Universal Management Suite or import
licenses locally to a thin client. To do this, an IGEL USB stick with a smartcard or a storage medium
containing licenses that have already been produced for this device must be inserted.
Figure 35: Firmware license upgrade
75
IGEL Technology GmbH
IGEL Zero RFX
5.02.100
10. Devices
Click on Hardware Information for an overview of your IGEL thin client device.
10.1. Printers
Various printing systems can be used with the thin client.
10.1.1. CUPS - Common UNIX Printing System
The Common UNIX Printing SystemTM (or CUPS) is the software which allows you to print from within
applications, e.g. from this web browser.
CUPS converts the page descriptions produced by the application, e.g. "Insert Paragraph", "Draw Line" etc.,
into data which can be read by the printer, and then sends this information to the printer.
With the appropriate configuration, CUPS can use printing devices via the following connections:
•
•
•
•
Parallel (LPT 1, LPT 2)
Serial (COM1, COM2, USB COM1, USB COM2 – with USB serial adapter)
USB (1st and 2nd USB printer)
Network (TCP/IP, LPD, IPP)
Printers
Printers can be created and edited here.
In the edit dialog, specify a printer name which begins with a letter.
General
Under Printer Connection, select the interface type for locally connected
printers or the network protocol for network printers.
Enter the relevant configuration data for the interface or network printer.
Select the local printer driver under Manufacturer and Printer Name.
Mapping in sessions
Map printer in NX sessions: Makes the printer available in NX sessions.
Map printer in ICA sessions: Makes the printer available in ICA sessions.
Map printer in RDP
sessions:
Makes the printer available in RDP sessions.
The remaining parameters are used to select the printer driver in ICA and RDP sessions on Windows
servers.
Give the name of the driver under Windows which is to be used.
If it does not feature in the list, it can be specified under Use User-Defined Windows Driver Name.
When printing in ICA and RDP sessions, the print data are normally prepared for the printer model by the
Windows printer driver and are passed unchanged from the thin client to the printer. An exception is
encountered when using the Windows driver in ICA sessions:
Manufacturer: Generic,
76
IGEL Technology GmbH
IGEL Zero RFX
5.02.100
Model: Generic PostScript
(Citrix Universal Printer Driver Postscript)
In this case, the print data are prepared on the thin client with the help of the printer driver defined above
under Printers for the printer model. This requires thin client resources depending on the size of the print
job.
IPP printer sharing
The IPP (Internet Printing Protocol) offers the following configuration options:
Network or host for sharing Allows printing on the local device from either
local printers
the local or the global network.
Enable IPP printer browsing Allows you to search for shared printers in the
local or global network and show your shared
printers within the network. A shared printer
is visible within the network but it may not be
possible to print from the network if you do
not have the necessary authorization.
10.1.2. LPD - Line Printer Daemon
LPD printers are used by the BSD printing system and are also supported by Windows servers.
Enable LPD print server
Makes the thin client an LPD print server. The CUPS printers defined
under 11.2.1.1 can be addressed under their printer name as a queue
name via the LPD protocol.
Print data conversion
Attempts to automatically recognize whether or not the print data need
to be prepared by the local printer driver. The None option always
forwards the print data unchanged to the printer.
Max. simultaneous connections
Limits the number of print jobs that can be accepted at the same time.
Restrict LPD access
Specifies the sub-networks or hosts from which print jobs can be
accepted.
10.1.3. TCP/IP
You can assign printers connected to your device to a TCP/IP port. The LPT1 (TCP/IP port 3003) is enabled
by default. The printer can be connected to one of the following connections, provided that they are
available on the device:
•
•
•
•
Serial connection (COM 1 or COM 2)
Parallel connection (LPT 1)
USB (USBLP 1)
Additional serial connections: USB adapter or Perle expansion card
Data are forwarded bidirectionally at serial interfaces. This means that other serial devices such as barcode
scanners or scales can be operated too.
77
IGEL Technology GmbH
IGEL Zero RFX
5.02.100
10.1.4. ThinPrint
ThinPrint allows the bandwidth provided for the transfer of print jobs to be reduced depending on the
resources available. The ThinPrint client prints either on printers connected to a local interface (serial,
parallel or USB), on an LPD network printer or on a CUPS printer defined on the thin client.
The following parameters can be found on the ThinPrint setup page:
Port number
Specify the port number via which the ThinPrint daemon is to communicate. Make
sure that the port number on the ThinPrint client and the ThinPrint server is the
same (communication will otherwise not be possible).
Bandwidth
Enter a bandwidth value (in bits per second) which is lower than or equal to the
value specified on the ThinPrint server. A higher value, the disabling of client
control or no entry at all means that the ThinPrint server values will be used.
Waiting time between
print attempts
Maximum waiting time (in seconds) if a printer is unavailable
Number of print
attempts
Number of attempts to contact a printer in order to start a print job.
The list of ThinPrint printers is shown on the Printers page.
Here you can manage printer configurations by adding, editing or deleting printers.
The page provides an overview of pre-configured ThinPrint printers:
Active
Indicates whether or not the printer is visible.
Name of the printer
Name under which the printer can be addressed.
Printer class
Name of the printer class - optional, max. 7 characters without spaces
Device
The following options are available here:
•
•
+ /dev/ttyS0, /dev/ttyS1, ... serial interface
+ /dev/lp0, /dev/lp1, ... parallel interface
•
+ /dev/usblp0, /dev/usblp1, ... USB printer
•
+ Name of a CUPS printer with LPD network printer connection: ThinPrint client
prints via the network to the LPD network printer.
+ Name of another CUPS printer: ThinPrint client forwards print jobs to the
appropriate printer in the CUPS printing system.
•
Standard
Defines the selected device as the standard printer.
78
IGEL Technology GmbH
IGEL Zero RFX
5.02.100
10.2. USB Storage Devices
USB storage devices can be configured here.
10.2.1. Storage Device Hotplug
Specify how USB devices are set up here.
The most important details are
•
•
•
the number of possible devices,
the allocation of drive letters,
the access type available to users in ICA sessions (read and/or write access).
Newly connected devices are automatically recognized by default. The terminal gives an audible signal and
a pop-up window informing you that a new device has been found and will be started appears.
Figure 36: USB storage hotplug
10.2.2. Automount Devices
Here you can define the devices which are to be mounted automatically when accessed:
79
IGEL Technology GmbH
IGEL Zero RFX
5.02.100
List of automount devices
Overview of the automount devices - The most commonly used devices
such as the disk drive, CD-ROM etc. are pre-configured.
Edit
Opens and enables one of the pre-defined devices
Add
Manual configuration of devices not pre-defined in the automount device
list .
Name
Name given to a device - This name is also used for the sub-directory
created in /autofs/.
Device
Allows you to select a suitable device synonym - This can also be entered
manually.
File system type
Definition of the file system - The auto option should normally be used. If,
however, you use ext2 or a problem occurs, you should clearly indicate the
file system that you use.
Automount time-out
Regulates the time-out period - Specify in seconds how long the system
should wait before the devices accessed are unmounted. The time period
ranges from 0 to 600 seconds (10 minutes).
Do not set the time-out period to zero! This may result in data loss.
10.3. USB Access Control
USB devices can be permitted or prohibited for use on the thin client on the basis of rules. Sub-rules for
specific devices or device classes are also possible.
1. Enable USB access control under Devices → USB Access Control.
2. Select a set rule (default behavior) which will either allow or prohibit the use of USB devices.
3. Expand the general rule by adding class rules and device rules where you specify the procedure for
handling specific classes or devices.
Device classes can be for example entry devices, printers or mass storage devices, while device rules
relate to the manufacturer, the product or the actual device (identified via its Universally Unique
Identifier UUID).
80
IGEL Technology GmbH
IGEL Zero RFX
5.02.100
Example:
•
•
•
The set rule prohibits the use of USB devices on the thin client.
However, the use of all Human Interface Devices (HID) is permitted.
The USB storage device with the UUID 67FC-FDC6 is also permitted.
Figure 37: USB access control
Other USB storage devices, printers etc. cannot be used on the thin client with this setting.
10.4. PC/SC Interface
PC/SC is a service which makes smartcard readers and inserted smartcards available to application
programs. RDP and ICA connections make it possible to provide server-side applications with client-side
smartcard readers and smartcards. Local applications, e.g. browsers, can also use smartcards in the
readers. For these functions to work, the PC/SC daemon must be enabled.
Click on Enable PC/SC Daemon to use the PC/SC interface on the thin client.
The PC/SC Devices Currently Active window shows the smartcard readers which are currently available.
Optional internal readers and a variety of USB smartcard readers are also supported.
81
IGEL Technology GmbH
IGEL Zero RFX
5.02.100
11. Security
In order to prevent unauthorized access to the thin client setup which could allow deeper penetration into
your network, it is essential that you set up an administrator password following the initial configuration.
You can also use an additional user password which offers variable options for permitting restricted
configuration by users.
11.1. Password
Under Password, set up an administrator password and a user password.
Administrator and user password
Sets passwords for the administrator and user accounts. The
setup will be protected by the administrator password unless
the user has been granted access to specific areas.
By enabling this password, the IGEL setup, shell access to Xterm and access to the console will be
restricted to the administrator. The Reset to Factory Defaults option may only be used with this
password.
Remote user password
Sets a password for the remote session user (SSH).
Setup user
Allows the user to access the local setup.
When you enter a password, ensure that the correct keyboard layout is enabled. After all, you will only
see stars instead of characters when entering the password and will not be able to see why the password
was not accepted.
11.2. Logon Options
Here you can configure the local login procedure for the thin client. You can login via the IGEL
smartcard or via the Kerberos protocol, e.g. in a Windows domain.
82
IGEL Technology GmbH
IGEL Zero RFX
5.02.100
11.2.1. IGEL Smartcard
Logging in with IGEL smartcard
Enables local login to the thin client with the IGEL smartcard. Sessions
stored on the smartcard become available. The thin client is locked
without the smartcard and optional password.
Enable IGEL smartcard without
locking the desktop
Enables sessions stored on the smartcard after entering an optional
password. The thin client is not locked – even without a smartcard.
Company key
Shared key for smartcards and thin clients. For details of smartcard
personalization, see IGEL smartcard (page 83).
You can use the optional IGEL smartcard for local authentication and personalized session configuration
("Flying Doctor Scenario").
Figure 38: IGEL Smartcard
The procedure when using the IGEL smartcard with the internal card reader or an external reading device
(USB) is as follows:
1. Enable the IGEL smartcard solution under Security→ Login→ Smartcard in the setup application.
2. Enter a company key to describe your IGEL smartcard.
3. Save your settings before you start personalizing the card.
4. In the Personalization window, you can set a login password and add sessions to the card.
83
IGEL Technology GmbH
IGEL Zero RFX
5.02.100
Session configurations are stored on the card's IC (integrated circuit) and the session can be used on
any IGEL thin client which reads the card.
Figure 39: Smartcard personalization
Company Key
The IGEL smartcard solution also contains a company key. This is an additional code which is written to the
card and which must match the code of the terminal used. If the two codes do not match, the smartcard
cannot be used on that particular terminal. This additional security feature ensures that your terminals
cannot be accessed from outside your company. It can also be used within the company in order to restrict
employees' access to specific terminals.
Save User and Password
The procedure for saving users and passwords for authentication is as follows:
Enter the first name and surname of the user.
You will then be prompted to enter the password for this name.
If the Demand Password option is enabled, a pop-up window will always open when a smartcard is
inserted. If the wrong password is entered, access to the terminal will be denied.
84
IGEL Technology GmbH
IGEL Zero RFX
5.02.100
If the smartcard is merely used to control access to the terminal, the procedure is as follows:
1. Insert a suitable smartcard.
2. Click on Write to Card in order to write the data to the card.
3. Remove the smartcard once the writing operation is complete.
You can now program the next smartcard.
Save Sessions
Saving sessions on the smartcard
If an employee uses a number of different terminals or the terminals are used by many different
employees, it may be a good idea to save the sessions used by an employee on their smartcard instead of
on the terminal. In this way, the user only needs to call up the applications they require in order to perform
their duties.
The procedure for saving sessions on the smartcard is as follows:
1. Insert the employee's smartcard into the terminal.
The applications used by the employee are shown on the terminal.
2. Create the sessions you would like to add to the smartcard on the terminal (including an autostart
option and personalization of login information).
In addition to the first name/surname of the card user and an optional password, you can also add to
the smartcard the sessions shown in the Available Sessions area.
3. Once you have added all the required sessions, click on Write to Card in order to save the data on the
smartcard.
Test Smartcard
Test the card you have created.
After performing a warm start and inserting the smartcard, the sessions will be shown immediately on the
desktop. Every session which is set to start automatically when you insert the smartcard will be launched.
11.2.2. AD/Kerberos
Logging in with Kerberos
Enables local login to the thin client via the Kerberos protocol.
AD/Kerberos must also be configured (page 86) for this purpose. The
login can be used for single sign-on in a number of session types
(ICA, RDP).
Link for logging off
Allows you to configure the way(s) in which the user can log off.
85
IGEL Technology GmbH
IGEL Zero RFX
5.02.100
11.2.3. Auto logout
Define an Auto Logout action which is carried out when you end the last instance of a session type:
1. Bring up the Security → Login → Auto Logout setup page.
2. Choose a Session Type.
3. Choose a command (Auto Logout Command).
4. Save your settings by clicking on Apply or OK.
If the last session instance of the selected type is ended, the system will carry out the set action.
The Shutdown command carries out the set action. You can check this under System → Energy →
Shutdown.
The Logout command has no effect if you have not defined a login method under Security → Login
(smartcard, active directory/Kerberos or IGEL Shared Workplace). The Logout command cannot be used
together with an appliance - in this case, only the Shutdown/Suspend and Reboot commands will work
correctly.
If you use Auto Logout commands in an appliance, ensure that the appropriate session type was selected e.g. Horizon View when using the VMware Horizon View Appliance.
11.3. AD/Kerberos Configuration
Enable and configure Kerberos on these setup pages in order to use this service for login and single
sign-on purposes.
Standard realm
Specifies the standard Kerberos realm for the client. Set this value so that it
corresponds to your Kerberos realm (Windows domain).
DNS look-up KDC
Specifies whether DNS SRV records should be used to find key distribution centers
(KDCs, domain controllers) and other servers for a realm if they are not indicated.
DNS look-up realm
Specifies whether DNS TXT records should be used to determine the Kerberos realm of
a host.
No addresses
If this option is set, the first Kerberos ticket is addressless. This may be necessary if the
client is located behind an NAT device (Network Address Translation).
11.3.1. Realm 1-4
Up to 4 realms where a login is possible can be configured here.
86
IGEL Technology GmbH
IGEL Zero RFX
5.02.100
Realm
The name of the realm/the domains where you would like to authenticate yourself.
KDC list
IP or FQDN list of the key distribution centers (domain controllers) for this realm. An
optional port number preceded by a colon can be attached to the host name.
11.3.2. Domain-Realm Mapping
Domain-realm mapping offers translation of a host name into the Kerberos realm name for the services
provided by this host.
Standard domain-realm mapping
This should be enabled if the DNS and realm names match.
Otherwise, you will need to create user-specific entries in the list.
DNS host or domain name
The entry can be a host name or a domain name. Domain names
are indicated by a preceding dot. Host names and domain names
should be entered in lower-case letters.
Realm
Kerberos realm name for this host or this domain
87
IGEL Technology GmbH
IGEL Zero RFX
5.02.100
12. Firmware Customization
Configure the firmware to create your own personal workstation.
12.1. Custom Application
Applications which were loaded onto a customer partition for example can be launched via the Application
Launcher or an icon on the desktop once they have been defined as own applications. In order for this to
be possible, a command to call up the application must be entered under Settings.
12.2. Custom Commands
Custom commands can be mounted at various points in time during the system start.
Basic commands run once during the boot procedure.
The commands are executed at the following times:
Initialization
Not all drivers loaded, not all devices available
Network scripts not started, network not available
Partitions available except firefox profile, scim data, ncp data,
custom partition
Session Early
Not all driver loaded, not all device available
Network scripts started, network not available
Partitions available except firefox profile, scim data, ncp data,
custom partition
Sessions not configured
Session Final
All drivers loaded, all devices available
Network available
Partitions available except custom partition
System daemons not started (CUPS, ThinPrint etc.)
UMS-configuration loaded but not effective
Final
All partitions available
All system daemons started
UMS-configuration effective
Network commands run each time the relevant interface starts (standard eth0). The interface can be
defined by using the environment variable $INTERFACE (eth0, eth1, wlan0).
The commands are executed at the following times:
88
IGEL Technology GmbH
IGEL Zero RFX
5.02.100
Network Initialization
Network authentication successful (802.1x, WPA)
No other network settings effective
Network DNS
Executed after change of IP address or hostname
IP address / Nameserver settings effective (e.g. via DHCP)
Network Early
IP address / Nameserver settings effective (e.g. via DHCP)
VPN connected if VPN autostart option is enabled
Network / Host routing configuration not effective
Network Final
Network / Host routing configuration effective
NFS and SMB mounts available
System time synchronized with time server
UMS-configuration loaded but not effective
Desktop commands run each time the X Server starts.
The commands are executed at the following times:
Desktop Initialization
Executed once during the boot procedure
Desktop environment configured but not started
User not logged in (Kerberos, Smartcard etc.)
Desktop Early
Executed once during the boot procedure
Desktop environment started
Message service started
Session D-Bus started
User not logged in (Kerberos, Smartcard etc.)
Desktop Final
Executed after login procedure or desktop restart
User logged in (Kerberos, Smartcard etc.)
User desktop started
Reconfiguration commands run when settings are changed via the local setup or the UMS. The commands
are executed at the following times:
Reconfiguration
Executed after effective change of Thin Client configuration (local
setup, UMS)
12.3. Custom Bootsplash
See the description in the chapter User Interface (page 29).
89
IGEL Technology GmbH
IGEL Zero RFX
5.02.100
12.4. Environment Variables
Environment variables allow you to use dynamic parameter content for a number of session types, e.g. so
as not to have to enter ICA or RDP servers for every session. Within the IGEL Setup, the variables can be
found under: System → Firmware Configuration → Environment Variables
Pre-defined variables can also be supplied and distributed via the IGEL UMS. Additional defined variables
can only be used locally and may be overwritten by a UMS configuration.
The following session parameters can be configured though variables:
•
•
•
•
•
ICA - User name (ICA sessions→ [Session name] → Login)
ICA - Citrix Server or Published Application (ICA sessions → [Session name] -> Server)
XenApp - User name (Citrix XenApp/Program Neighborhood → Login)
RDP - User name (RDP sessions → [Session name] → Login)
RDP - Server (RDP sessions → [Session name] → Server)
How to use environment variables
1. Enable environment variables under Allow Variable Substitution in Sessions.
2. Specify the variable name and content (e.g. Variable Name = SERVER NAME | Value = test server)
3. Enter the variable name in the session parameter field. The name is preceded by a $ sign (e.g.
$SERVERNAME for the server for an RDP session)
In the case of RDP and ICA sessions, the setting is implemented after being saved and is entered into the
session file. With XenApp, the setting is not implemented until a session starts and is running.
12.5. Features
Using this list of available services, you can quickly enable or disable firmware components such as
Powerterm, Mplayer etc. If a service was disabled, the associated session type will no longer be available
when the system is restarted. Existing sessions will not be shown but will not be deleted either. A disabled
session type will not be updated during a firmware update. You should therefore disable unused services in
order to speed up update processes.
90
IGEL Technology GmbH
IGEL Zero RFX
5.02.100
D
Desktop .............................................................. 31
13. Index
Device Information ............................................ 71
3
3rd Party VPN-Clients .........................................43
Device Support / Virtual Communication
Channels ............................................................ 55
A
About this Manual ................................................ 2
Devices ............................................................... 76
Access Control ....................................................31
Display, keyboard and allocation of resources .. 59
Accessories .........................................................67
Domain-Realm Mapping .................................... 87
AD/Kerberos .......................................................85
DPMS ................................................................. 30
AD/Kerberos Configuration ................................86
Drive Management ............................................ 74
Application Launcher .................................... 14, 68
Drive Mapping ................................................... 53
Audio ............................................................ 56, 64
DriveLock ........................................................... 55
Authentication ....................................................40
Auto logout .........................................................86
E
Emergency Boot................................................. 12
Automount Devices ............................................79
Enable Setup Pages for Users ............................ 21
B
Boot Menu ..........................................................11
Energy ................................................................ 27
Boot Procedure...................................................11
Example ............................................................. 47
Browser Plug-in ..................................................64
Browser Plug-ins .................................................62
F
Failsafe Boot - CRC check ................................... 12
Buddy Update .....................................................25
Features ............................................................. 90
C
Calibration Pattern .............................................70
Firefox Browser.................................................. 61
Certificate ...........................................................46
Firmware Customization...............................27, 88
Certification Authority ........................................46
Firmware Update ............................................... 74
Change Smartcard Password ..............................67
Flash Player ........................................................ 62
Checking the Client Certificate ...........................47
Font Services ...................................................... 37
Cisco....................................................................43
Commands ..........................................................70
G
General Display Settings .................................... 29
Company Key ......................................................84
General System Information.............................. 15
Completing the Setup .........................................19
GeNUCard .......................................................... 44
CUPS - Common UNIX Printing System ..............76
Custom Application ............................................88
Custom Bootsplash .............................................89
Custom Commands ............................................88
DHCP Options .................................................... 43
Environment Variables ...................................... 90
Firefox Browser Session ..................................... 61
H
Hosts .................................................................. 48
I
ICA Connection Center ...................................... 67
Identify Monitors ............................................... 75
91
IGEL Technology GmbH
IGEL Zero RFX
5.02.100
IGEL Smartcard ...................................................83
NFS Font Service ................................................ 38
IGEL System Registry ..........................................28
O
Options ...................................................57, 64, 65
Important Information ......................................... 3
Input ...................................................................34
Introduction .......................................................... 7
P
Password............................................................ 82
J
Java Control Panel ..............................................70
PC/SC Interface .................................................. 81
Java Web Start Session .......................................65
Performance and options .................................. 60
K
Keyboard and additional Keyboard ....................34
Ping .................................................................... 71
Keyboard Commands - Hotkeys .........................37
PPTP ................................................................... 43
L
LAN Interfaces ....................................................39
Printers .........................................................54, 76
Language.............................................................33
License ................................................................17
Q
Quick Installation ..................................................8
Local Logon - RDP ...............................................51
Quick Settings .................................................... 22
Local Terminal ....................................................67
Quick Settings Session ....................................... 67
Logon Options.....................................................82
Quiet Boot.......................................................... 11
Look-up ...............................................................72
R
RDP - global settings .......................................... 51
LPD - Line Printer Daemon .................................77
Performance ...................................................... 56
Playback ........................................................63, 65
Proxy .................................................................. 50
M
Mapping..............................................................53
RDP session ........................................................ 58
Media Player .......................................................63
Remote Access (SSH / RSH) ............................... 27
Media Player Global ...........................................63
Remote Management ........................................ 26
Media Player Sessions ........................................65
RemoteFX Support............................................. 56
Microsoft RemoteApp ........................................59
Reset to Factory Defaults .................................. 12
Mouse .................................................................35
Routing............................................................... 48
Multimedia (Video) Redirection .........................57
S
Save Sessions ..................................................... 85
N
Netstat ................................................................72
Realm 1-4 ........................................................... 86
Save User and Password .................................... 84
Network ..............................................................39
SCEP ................................................................... 46
Network Diagnostics...........................................71
SCIM (Input Methods) ....................................... 36
Network Drives ...................................................48
Screen Saver and Screen Lock ........................... 33
Network Information ..........................................17
Security .............................................................. 82
Network Integration ...........................................13
Serial (COM) Ports ............................................. 54
NFS ......................................................................48
Server / logon .................................................... 58
92
IGEL Technology GmbH
IGEL Zero RFX
5.02.100
Setup Application ...............................................19
V
Verbose Boot ..................................................... 11
Setup Areas.........................................................20
Video .................................................................. 64
Setup Search .......................................................23
Virtual Private Network - VPN ........................... 43
Setup Session ......................................................67
VNC (Shadowing) ............................................... 26
Shutdown and Restart ........................................18
VNC Viewer ........................................................ 66
Signature Pad......................................................37
VoIP client .......................................................... 65
Simple Certificate Enrollment Protocol - SCEP ...46
Smartcard Personalization..................................67
W
Wake-on-LAN..................................................... 42
Soft Keyboard (On-screen Keyboard) .................70
Web Access for Remote Desktop ...................... 60
Sound Control .....................................................68
Window.........................................................53, 63
SSH Session .........................................................60
Windows Drive - SMB ........................................ 49
Starting the Setup ...............................................19
Wireless (WiFi) ................................................... 42
Storage Device Hotplug ......................................79
System Information ............................................73
X
XC Font Service .................................................. 37
System Log Viewer .............................................69
XDMCP ............................................................... 30
System Settings ..................................................24
X-Server ............................................................. 13
Sessions ........................................................ 15, 51
System Tools .......................................................16
T
TCP/IP .................................................................77
Test Smartcard....................................................85
The IGEL Linux Desktop ........................................ 9
The IGEL Linux Firmware ...................................... 7
ThinPrint .............................................................78
Time and Date ....................................................24
Touchscreen .......................................................35
Touchscreen Calibration .....................................70
Traceroute ..........................................................72
U
UMS Registration ................................................69
Update ................................................................25
Upgrade License .................................................75
USB Access Control .............................................80
USB Redirection ..................................................57
USB Storage Devices ...........................................79
User Interface .....................................................29
93
IGEL Technology GmbH
IGEL Zero RFX
5.02.100