1
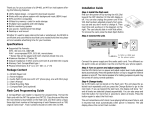
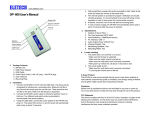
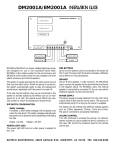
Recording Tips
There are two audio sources to record from: the internal microphone
(located right above the MESSAGE switch) and the EXT input. The internal microphone is enabled when no plug is inserted into the EXT jack,
otherwise it is disabled. The internal microphone is provided mainly for
testing purpose.
The recording quality is much better with the EXT input which should be
connected to the headphone/line output of an external audio player
such as a CD player or an MP3 player.
The recording level greatly affects the sound quality. If the level is too
low, background noise will increase. If the level is too high, distortions
start to appear. Try recording at several different levels to obtain the
best sound quality.
Trouble Shooting Guide
1. There is no sound.
Press down the Speaker button and adjust the VOL dial. If sound can be
heard from the internal speaker, but not through the phone system,
make sure the audio patch cord is properly connected. If sound can not
be heard from the internal speaker, then the MESSAGE switch may have
been set incorrectly.
If the POWER light is blinking red, it means the unit has finished recording but the RECORD button is still pressed down. Pop out the RECORD
button to return the unit to normal operation.
2. It plays the wrong message.
The MESSAGE switch is set incorrectly.
3. The sound quality is poor.
a. Wrong output impedance, change it by pushing in or popping
out the O/P button.
b. The message was recorded at an improper level - usually a level
that’s too high. Try recording the message at a different level.
c. The internal microphone is provided mainly for testing purpose.
You should not expect good sound quality from it. Always use
the EXT input for best sound quality.
Hold-n-Tell
TM
DP-300 On-Hold System
User’s Manual
Revision 1.0
(c) 2004 Eletech Elnterprise Co. Ltd.
All rights reserved
* Hold-n-Tell is a trademark of Eletech Enterprise Co. Ltd..
Congratulations on your purchase of DP-300, the versatile digital recorder
for your on hold messages. The key features are:
? 100% digital design - no moving parts to wear and tear
? 4 (DP-300/4) or 8 (DP-300/8) minutes of audio storage
? Non-volatile flash memory - no battery backup required
? Records one long or two short messages
? No special equipment required to record
? Selectable output impedance for best sound quality
? Built-in speaker for testing/monitoring purpose
? Attractive and compact case (6.6” x 4.5” x 1.1”)
DP-300 allows the user to record his/her own messages by simply speaking into the internal microphone, or by transferring the audio from an
external player such as a CD player or an MP3 player.
Whether it’s used to keep callers informed or entertained, your DP-300 is
an efficient and cost effective tool that turns wasted hold time into pleasant and valuable advertising time for your business.
Package Content
1x
1x
2x
1x
1x
DP-300 Player Unit
Power Adaptor
Audio Patch Cords (one with 1/8” phone plug, one with RCA jack)
User’s Manual
Metal Mounting Plate
Installation Guide
POWER Jack
Plug the supplied power adaptor into an AC outlet of proper voltage (specified on the adaptor’s label).
O/P Jack & Button
Connect DP-300 to your phone system with the audio patch cord and
select the proper impedance - push the button in for 600 Ohm or pop it
out for 8 Ohm. If you are not sure, try both and select the one with the
better sound quality.
MESSAGE Switch
DP-300 can be configured to store a single message (message #0) or
two separate messages (message #1 & #2). In the single-message configuration, the entire audio storage is dedicated to message #0. In the
two-message configuration, the audio storage is divided equally. Use the
MESSAGE switch to select which message to record or play. Please note
that if you record message #0, both message #1 and #2 will be erased
automatically. If you record message #1 or #2, message #0 will be erased.
EXT Jack
Connect an external audio source (e.g. a CD player) to this 1/8” stereo
phone jack for recording. The internal microphone will be disabled when
a plug is inserted. Stereo signal will be converted to monaural automatically by DP-300.
REC Button
Push in this button to start recording. The POWER light will turn red to
indicate that the unit is recording. Pop out the button at any time to stop
recording. The recording process will be terminated automatically if the
button is not popped out before the maximum length is reached. When
this happens, the POWER light will blink red and you must pop the button out to continue.
VOL Dial
Use this dial to turn power on/off and set output volume. The message
automatically starts when power is turned on.
Power Light (on case top)
The power light indicates whether power is on or off. It is normally green,
but turns red when the unit is recording. It blinks red when the maximum recording length is exceeded.
Speaker Button (on case top)
Press this button once to monitor the message through the internal
speaker. Press it again to turn off the speaker. Note that the MOH output is always on whether the speaker is turned on or not.