1
microwriterD
D
NEW
USERS
GUIDE
Your local Microwriting Centre
MICROWRITER HEAD OFFICE:
31 Southampton Row, London WC IB 5HJ
Telephone: 01-8316801/2/3
BOOK I
THE NEW USER'S
GUIDE TO THE
NOW -YOU'RE GOING TO LEARN THE
microwriterD
D
microwriterD
LIST OF WHAT'S WHERE IN THIS GUIDE
What
General introduction
Explanation of the Microwriter
How to write the ALPHABET
How to give COMMANDS
. . . and how to CORRECT MISTAKES
More alphabet
More commands:
- CAPITAL LETTERS
;
- READING FORWARDS & BACKWARDS
Second SETTING:
- NUMBERS
- PUNCTUATION
TV. DISPLAY SYSTEM
CARRIAGE-RETURNS
DOCUMENT SEPARATORS
TEXT ACCESS ("Zip", "Jump", "Hop", etc.)
PRINTING
EDITING:
- Insert
- Deletion and wiping
FORMATTING:
- The Pre-Set Format System
- Tabulation
- Margin Commands
- Margin Invert
- Position Heading
CHARGING THE BATTERIES and switching ON and OFF
DISPLAY SYMBOLS and what they mean
LETTER MARKER
EXTRA SETTINGS and shift inversion
CASSETTE STORAGE
EPILOGUE
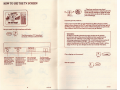
In line with its
policy of continual
product development
Microwriter Ltd
reserves the right to
alter specifications
without notice.
Whoiu
1
3
7
11
II
13
Hi
Hi
111
1!)
'M
aa
u
','.(')
21
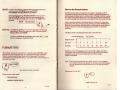
Can you remember how long it took you to learn to write? Weeks?
Probably months. Maybe a year or more: that's not unusual.
Have you ever tried learning to type (proper "touch typing", that is,
using more than one or two fingers)? Then you know how long it takes
people to get as fast on a typewriter as they can handwrite. Months of
slog usually.
The Microwriter is refreshingly different.
You'll find that you have learned to "touch write" on the Microwriter in
only a short time. Learning to do EVERYTHING the Microwriter can do
(which is a very great deal more than you may ever actually need) then
takes only a little more time.
26
Then all you need to do is practice your new skill until it becomes
something as automatic to you as handwriting, and as fast.
30
Concentrated use over several days should see you well on the way to
this stage, quite possibly well beyond it.
30
31
3fl
33
34
37
10
10
11
12
15
16
17
52
; copyright: not to be
reproduced without the
consent of Microwriter Ltd
May 1982
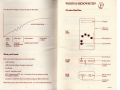
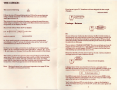
Your progress as you practice WON'T be a nice
steady progression: people just don't learn that
way. You'll have good days and bad days:
everyone does. DON'T get downhearted when
your fingers decide to behave as nimbly as an
elephant's feet: they'll get over it.
After this second period, you'll continue to get faster on your
Microwriter for several weeks until you finally find that, without thinking
about it at all, you can use it about one and a half times as fast as your
handwriting, maybe faster after a few months.
continued
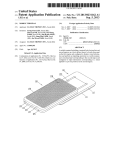
WHAT'S A MICROWRITER?
You can see the stages you'll go through on this chart:
It Looks Like This:
-Display
Memory
(internal)
TOP
VIEW
• Main Keyboard
fast
early
learning
irregular
progress with
practice
steady improvement
-Command Key
What you'll need:
<-ni/uu ^wuen
Before you start, make sure you've got available:
- a Microwriter
FRONT
VIEW
^>-o^=^
4
I
- a Microwriter battery charger/mains lead
Cassette Lead
Socket
- this Guide
- a set of "reminder cards"
- aT.V. Interface and TV. set-or monitor (if you're going to use the
T.V. Display system)
- a printer or whatever else you intend to plug your Microwriter into
(Don't worry about the last two items just yet: you won't need them at first).
BACK
VIEW
Mams Charger
Socket
Auxiliary
Socket
continued
.. And The Different Bits axe:
... THERE ARE A FEW THINGS YOU NEED TO KNOW ABOUT FIRST
Firstly, things like these: o U j ^ H l N l / l j P
the DISPLAY
shows you what you have written.
the MEMORY
holds everything (well, up to 8,000
characters worth = about 5 pages)
you write, and keeps it stored even
when you switch the Microwriter off.
~
When you do start, you'll see signs like these pop up from time to time
in different places on the display.
Sometimes they shift about; sometimes they stay put.
AT THIS STAGE, IGNORE THEM.
the MAIN KEYBOARD
is what you write with.
the COMMAND KEY
is very important, but don't worry
about it yet.
You don't need to know about them yet, unless you get stuck. If so look it
up on page 42 to see what's happened and what to do.
the ON/OFF SWITCH
is what you turn your Microwriter
on and off with.
... YOU NEED TO KNOW A FEW THINGS
ABOUT THE MICROWRITER KEYBOARD:
the OUTPUT SOCKET
to connect the Microwriter to all
sorts of other gadgets (TV. s,
printers, etc).
It's not like a conventional keyboard.
the CASSETTE LEAD SOCKET
for connecting to Cassette
Recorders.
the MAINS CHARGER SOCKET
for feeding your Microwriter with
electricity.
the AUXILLIARY SOCKET
This is for Microwriter's use, so
ignore it for the moment.
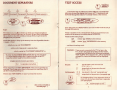
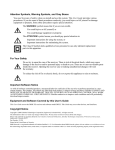
There are only 5 keys on the MAIN KEYBOARD,
plus the "COMMAND" key (which we needn't
worry about yet: try to ignore it).
Here's a picture of it, showing where each finger on your right hand is
supposed to go:
MIDDLE finger
here
. RING finger key
this one's for
your INDEX.
finger
-LITTLE finger
on this one
-THUMB usually here
continued
-COMMAND key
(pretend it's not
there for now)
continued
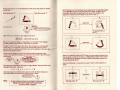
HOW TO WRITE THE ALPHABET:
. and there's a VERY IMPORTANT RULE.
RHUfc?
DON'T wave your fingers about on the keys or use them on any
key other than the one they're supposed to use (as shown in the
chart on the left).
It's all based on this chart:
Learning
Chart
Microwriting is using one OR MORE keys together at the same time to
produce each one letter, number, punctuation mark etc.The important
thing to remember at this stage is that using the wrong finger on the
wrong key will slow down your learning and lead to lots of mistakes.
Also, once you start, you'll notice that the keys are very touchsensitive, much lighter than on a typewriter for instance. This helps you
to get very fast, but does mean that you'll make mistakes to begin with.
Just ignore them. (We'll come on to corrections later).
Index I Ring
Finger
Finger'.
Thumb 1
t
t
Little
••• m^ Finger
1 "
Actual
Keyboard
.
• (command key)
... and the SHAPES of the letters:
Example:
This is how you
handwrite the
letter "I".
yes.
Here's What To Do:
Pick up your Microwriter but don't switch it on just yet.
Spend a few minutes getting used to the finger positions. Get into the
habit straight away of each finger on its own key and your thumb
normally on the UPPER of the 2 thumb keys (the one we call the "space'
key because, used on its own, it writes a space).
YouMICROWRITE the letter
"I" like this, creating the
shapes with your finger tips.
Memorise how its SHAPE
relates to the keys.
rO
O
O
Practice doing the "I" on the keyboard a few times (but still don't switch
on just yet).
Now Handwrite "L"
ThenMicrowrite "L"
You'll find that a lot of the letters form natural pairs of opposites based
on the SHAPES, which can be thought of as "mirror images". Try to
remember the letters as these pairs: it's easier. For instance, the
opposites of the two youVe done so far are "G" and "J":
I
O
0
Gottheidoa'?
CAM I SWITCH 0VIOOU) ?
$ °
opposites
the downstroke of
the"G"
YES -When you switch on, the display will show:
MW 4/10
- (this code may vary)
Hit any key and you'll see a b sign appear on the right of the display.
You don't need to know about U signs yet, so ignore it.
opposites
Try the "I" and "L" for real a few times. Try the space as well (just the
thumb key). It is important to put in the occasional space here and
there in between practicing all the letters of the alphabet otherwise the
Microwriter doesn't like it!
See how each thing you write (including mistakes) appears in turn
close to the right of the display, and then moves across to the left as you
write more.
That space is reserved for all sorts of "signal letters" they shouldn't have
appeared there yet. Like this:
u U n N p P a A I f F M
If you have got one of these in that space, you'll get funny things you
don't know about on the display when you try to write.
RULE:
To get rid of most signs on the right you don't want,
PRESS THE TWO THUMB KEYS TOGETHER.
otherwise refer to page 42
Have you noticed yet that it's NOT when you first press the keys down
that the letter is written: it's when you RELEASE the keys? This means
you needn't try to get them all down at exactly the same moment, as
long as they all go down.
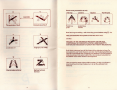
Here's a useful pair to remember as a pair: they're used together so
often:
T
^o^
oTj o
The Top of the "T"
H
T
n00Qn
I
ff^fl
opposites
Horizontal for "H"
Made any
mistakes yet?
. and these are written using only ONE key:
Don't worry: correcting is easy
but first you must learn about
COMMANDS.
in the middle: looks
like a target
U
A "COMMAND" is anything you do on your
Microwriter other than merely write a
letter of the alphabet, number, punctuation
mark, etc.
It is instead an INSTRUCTION to the Microwriter to DO something.
Remember the TWO thumb keys?
Here's how..
Signet ring finger
for "S"
A
A®*
Little finger:
very "U"
^
opposites
cx\e to
/
Apex of
"A"
' V
dowN liNe
of'N"
^
R
-O
^£^•(4)
g>
O
Shape of small R
Remember K
carefully:
it'll be
very useful
soon . . .
/1®T
N
space key
O
O J
a
COMMAND key
To give a command just use the COMMAND key with your thumb
INSTEAD OF the normal thumb key (or IN ADDITION to the key press
for the letter), when you write a letter of the alphabet.
K
Rs
Upstroke of the K
What you write this way is now NOT, in fact, a letter: it's a COMMAND.
BUT, we still refer to the letter it would have been as a convenient way
of referring to each key-combination appropriate for each command.
Like an example?
EXAMPLE:
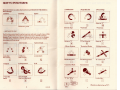
So far, you've covered over half the alphabet. Here's the rest:
Normal
Letter "K"
"Command K'
M
opposites
O
In this Guide (and in all other printed material about the Microwriter, like
the "reminder cards"), each command is written like this:
As it Would Be Spoken:
N
7
First Four Fingers For "F"
Most Fingers Make M
In Writing:
command K
[K]
command N
[fj]
opposites
command F
[T|
Dome of "D"
command key (on its own)
| |
Back of "B"
both thumb keys together
Each different command tells the Microwriter to do something
different
IMPORTANT EXAMPLE:
(K ] tells it to backspace by one position
... so you can overwrite a letter
opposites
... to make a CORRECTION
See?
0
Curl round for C
Make tail from
the central O
Try using [K] a few times
Try writing this from memory, correcting your mistakes as you make
them:
SHE SELLS SEASHELLS ON THE SEA SHORE.
...and this:
THE TALL GIRL JUST LOST HER LOOSE TOOTH IN THE HOUSE.
complete Press for P
Here's some punctuation as well:
. Full stop
, Comma
K
o
-Hyphen
' Apostrophe
opposites
LO
O
O
D
The upstroke of the K
Downstroke of the V
Points to a
point
Looks like a
comma
Now have a go at writing - and correcting your mistakes using [K] - this:
THE QUICK BROWN FOX JUMPS OVER THE LAZY DOG.
and this:
THE ZEAL OF THE ARCHITECT WAS BEING EXCERCISED
CONTINUALLY IN CONJUNCTION WITH A KEEN QUANTITY
SURVEYOR IN THE DESIGN OF QUAINT BUT PRETTY MAISONETTES
O
Looks like a Y
All Xcept your indeX
Both these sentences have all the letters of the alphabet in them. For
more practice, just write whatever you like. Use the Alphabet Reminder
Card as a convenient way of jogging your memory if you've forgotten a
letter, but always first spend a second or two trying to remember how
the SHAPE of the letter relates to the keyboard.
W
(You can practice even without a Microwriter: just tap your fingers on
your knee. See how long it takes you to do all the alphabet from
memory).
The two sides of the W
ZigZag between
the keys
AND NOW SOME MORE COMMANDS:
CAPITAL LETTERS. (Sometimes called "Uppercase").
To write just one capital letter, FIRST press the COMMAND KEY ON ITS
OWN (D) ONCE ONLY ("u" will appear on the right to indicate that the
next letter you write will be in "upper case"). Then write the letter. After
that the "u" disappears and everything your write will automatically be
in small letters again.
If you want to write lots of capitals ("BLOCK CAPITALS" LIKE THIS)
then press the command key TWICE (DD) to "lock" into upper case.
Whenever locked into this mode you'll see "U" in the window where
"u" was which indicates "Upper case lock".
Remember that whenever you want to go back to small letters, just
press the two thumb keys together(3).
READING FORWARDS AND BACKWARDS.
|K] goes back one letter (as you already know)
[F] goes FORWARD one letter (If nothing happens see the note below
marked*).
[F] for Forward.
Remember though, Fl is NOT the sane as a space. When you turn on
your machine read forwards with [F: and DO NOT hit the' space key' this will only overwrite your text!
To command a CONTINUOUS read-out, just hit the command
key once (D) before using [F] or [K].
The result is a continous automatic read-out, word by word, forwards
or backwards, through the text in the memory.
BUT BEFORE, YOU TRY IT...
... you'd better know how to stop it once it's going.
To STOP any continuous process on the Microwriter, such as a
continuous read-out, just hit the COMMAND KEY, and release
it.
,
D to Stop.
You can also SPEED UP the speed of the read-out at any time by hitting
any key on the MAIN keyboard. To SLOW DOWN again, just hit any key
on the MAIN keyboard again.
Have fun: practise reading backwards and forwards, fast and slow,
stopping and starting when you want.
N01HIN6 HAPP&J6 WUfU I «« F,
If you want to read through lots of writing in the memory you'd get fed
up having to use F| or [K; for every single letter. Instead, you can use the
CONTINUOUS read-out:
That's because [F] andLJjF] will only read ahead as far as there is text in
the memory: they won't take you into blank memory. If the display does
not move when you use either of these commands, it means youre
already at the end of the text in memory.
Likewise, [K] and [HE can only take you back as far as the beginning of
the memory.
Both continuous read-outs will stop automatically when they've gone
as far as they can.
continued
HOW TO WRITE NUMBERS:
First, lock into second setting. (If you've already forgotten how, just
look at the last page. And try and remember it this time).
Got an "N" on the right of the display?
Good: practice doing the numbers like this:
You need to change SETTING.
\I
//
The Microwriter keyboard writes all characters you find on a
conventional keyboard - and more besides - mainly out of the main
two different SETTINGS:
Alphabet
Setting
- all the
letters
- some
punctuation
Second
Setting
(or Numerics)
<e=J %
^^
- numbers
- all punctuation
To CHANGE over to second setting, use [N; ONCE ONLY if you
want only the next character to be a number or punctuation
mark, or TWICE ([N] |Nl) if you want to "lock" into second
setting.
When you do iN; for one numeric character "n" will appear on the right,
and when you 'lock' into numerics ([N] [N]) "N" will appear to indicate
the setting and only disappears when you unlock back to lower case
alphabet.
Remember that to go back to lower case alphabet, usej
It is!
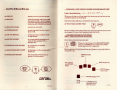
HOW TO PUNCTUATE:
Because they're so useful, the first three are EXACTLY THE SAME in
both settings:
, Comma
Full Stop
Space
(Left Bracket
) Right Bracket
o°o
£ Pound Sign
O
n o
Looks like "C"
HI
Points to a point
$ Dollar Sign
Same as "L"
* Asterisk
+ Plus Sign
... and here's the rest.
You'll notice some helpful verbal memory aids and, in each case, a little
picture of what the punctuation mark looks like on the Microwriter
display. This is because it doesn't always look the same on the display
as it will when printed out. Try to get to know the punctuation marks
you think you'll use most.
; Semi-Colon
% percentage
: Colon
MI
o
O I0
Same as "S"
o°o
= Equals
A little lesi,
than a colon
& Ampersand
[••••1
Looks like Z
@At
Same as "T"
" Quotation Marks
X Multiplication
m
B
- Minus, Hyphen
looks like
two colons
"A" for Asterisk
o
Horizontal of H
"N" Notes Quotes
"X "same as X
? Question Mark
! Exclamation
/ Oblique
O
O
J = Just the
same
Only straight
line on ampersand
'Y" for "Why"
m
Looks like/
m
Would you like to be on T.V?.
20
continued
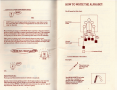
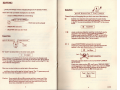
HOW TO USE THE TV SCREEN
.. .Then buy one from your local
MicrowritingCentre or skip this bit of the
Guide and go straight to page 25 (unless
you want to know about all the goodies
you're missing!).
If youVe got one, read on...
Once you're connected up and switched on (Microwriter and T.Y),
select a free channel on the T.V. and tune it till you find the best spot for
the Microwriter display. Don't worry if the first display you get looks
like rubbish: that'll all sort itself out once you get started.
But you need the right interface and leads.
(WMH?^J
WARNING:
As the TV Interface shares the same socket as the printer
(you'll learn about this soon) the Microwriter needs to know
which one it is "talking" to. To select one or the other the
following sequence is neededQtP] - it will then show a series of
numbers. Ignore these, just hit Q to carry on writing. If you
cannot immediately write to the TV, use this select code - at this
stage we won't go too deeply into this as it is dealt with later.
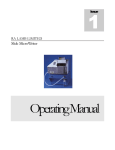
The Microwriter "TV Interface",
the front of which looks like this:
UHF/TV
©
MONITOR
C
DATA IN
oooooooooo
\o /
/
>
C
Got a display on the screen?
Use this socket for
Domestic Televisions. The other
end of the lead fits
into the aerial
socket of the TV.
Use this socket for The connecting
professional or
lead for this fits
industrial monitors, into the front of the
The other end of
Microwriter.
the lead fits into
the aerial socket of
the monitor.
22
The Microwriter
charger is plugged
into this to provide
power to make it
work.
continued
See the cursor?
23
continued
THE CURSOR:
The cursor is this thing:
here
If you haven't got a T. V. Interface and have skipped the last couple
of pages...
.. welcome back!
If ills on its own, it'll keep blinking at you. If it's in the same place as a
letter, it'll flash alternately with the letter. This is so you can always
easily spot where it is.
The cursor is a sort of marker showing you where the next thing you
write will go. It relates to the words in the Microwriter memory, and to
the position of the display, like this:
Carriage - Returns
Microwriter letters which show on display
own fox j u m p s
words in memory
cursor position
So, if you read forwards or backwards, the cursor will shift about
accordingly on the TV screen. It will also obey all the "text access"
commands that you don't know about yet.
So if you want to make a correction to anything you've written all you
need to do is to send the cursor to the right place - using [Fj, |K],[ JFJor
[ 1 [Ki and make your change. You'll see the result instantly on the screen.
The screen can show you up to 16 Unes of your writing at a time. At the
same time it'll show you what your text would look like if you printed it
out straight away (unless, although unlikely at this stage, you write
more than 64 characters on one line, in which case the screen will flash
the last two of the 64 and put the rest on the next line down).
Note: Moving forward over a document separator (see page 26) has
the effect of cleaning the screen.
No!
As you write your words into the memory, the Microwriter works out
automatically how much will fit on each line of the page on which it will
eventually be printed by looking for a suitable space. When actually
doing the printing, the Microwriter tells the printer when to go down to
the next line on the page.
This is called a "CARRIAGE RETURN". You can see where each one will
happen as you write since a n sign appears on the display where the
carriage return would happen. On the TV. screen, you see the lines of
text building up automatically as you write.
Notice that the Microwriter doesn't split up words: it always makes the
carriage-return at a space between words.
Yes, but it's not telepathic.
It doesn't know when you would want it to do a carriage-return
BEFORE the normal end of a line, e.g. as in the address of a letter. In this
case, you have to tell it to do a carriage-return. The command is [C]:
for Carriage-return.
Each [C] you use winds the paper up by one line, so use [C](C] to leave
one clear line between paragraphs. Or use lots of (C]s to make a bigger
gap in the text (as for the signature on a letter).
You'll notice that each [CJ you use shows a J sign on the display to
show you where you've put it. On the TV. screen, the cursor goes to the
next line.
24
25
DOCUMENT SEPARATORS
A
^
A
\k
memory)
1 START Document 1 Document 2 Document 3
\
memory
A
... a convenient way of referring to all the different commands that
allow you to send the display (and cursor on TV.) backwards and
forwards through the stuff you've already written in the memory.
&AT I AU&AWKMOU)
P(H>UvpQ|F]WP
THAT'S wwr TUWAU. DO!!
/
\T ACCESS
True:
they give you a READ-OUT so you can see the words as you go
through the memory.
Right:
The memory in your Microwriter can hold up to 5 typical pages of
typescript or more. Which is a lot. So much, in fact, that it would often
be too much to deal with usefully at one go when you get around to
plugging into your printer.
There is another set of commands that allow you to move from one
position in the memory to another almost INSTANTLY.
There are two main groups:
ZIP
means "Zip" AHEAD in the memory
You'll often prefer to chop up the memory into nice digestible chunks •
or pages - of text
. . . which you can call 'DOCUMENTS"
JUMP
means "Jump" BACKWARDS in the memory
. . . and here's how they work:
. . . with a sort of sign-post to separate them
. . which is what the "DOCUMENT SEPARATOR" is.
To enter the DOCUMENT SEPARATOR, KEY [0.This will show
a I/ on the display (which doesn't print out), and, on the T.V.,
clears the screen ready for the new document.
WARNING: If you are not connected to the TV. but are in the
T.V. "mode" (See page 23) the Microwriter will be
confused and will execute the following commands
VERY SLOWLY.If this happens hit[ ][P](as explained
on page 23) a series of numbers will be displayed,
hitn.
imagine your documents are letters:
L]
to separate your Letters. I
These separators are VERY IMPORTANT when you are printing out
your text: if you forget to put them in the places you want them, you'll
get the wrong bits printing out.
They're also VERY USEFUL for quick and easy text access.
26
(All will be revealed on
the next page ...)
By Line:
'.Z
[J]
By Paragraph:
[R (Z.
zips forward to the next line end
(to a a o r a j )
jumps back to the previous line end
(to a a or a _j )
zips ahead to the next "paragraph gap"
jumps back to the previous "paragraph gap"
A "Paragraph Gap" is any sequence of two or
more .C.'s, such as you would use to separate
your paragraphs.
___—
—_
Jor Paragraph access.
27
continued
By Document:
The Big Hop:
zips ahead to the next separator at the end of
the current document.
3. Plug the printer's connection lead into the "output socket" in front of
the Microwriter. (It'll only go in one way, so you can't get it wrong).
jumps back to the last separator at the
beginning of the current document.
4. Switch on the Microwriter.
zips forward to the very last bit you've got
written in the memory, so only blank memory
follows. (Can be stopped withQ) see note
below.
5. Find the document you want to print. (This simply means making
sure that the beginning of the relevant document appears in the
right-hand position of the display).
jumps all the way back to the beginning of the
memory (to "MW 4/10").
6. Command the Microwriter to print with 52.
m
forXecute
for the big Hop.
iH][Z' and [HJ[J] can both be stopped by [II.
This is useful when linked to the TV system to stop at a
specific place, or when not linked to the TV and you
find the Microwriter is "Hopping" too slowly.
Your Microwriter 'talks' or 'interfaces' with a large number of different
printers, word-processors, etc., with a number of different 'settings'. If
you cannot immediately print successfully with your Microwriter either
ask for advice at your local Microwriting Centre or if you are brave and
technically minded look up what to do in Book II. Once set, as long as
you don't change printer, nothing need be done again.
The printer will now print the document. It'll stop itself when it reaches
the end of the document OR when it's printed out the maximum number
of lines it's set for per page (usually 60, though this can be varied. Bit
too advanced for you at this stage, though).
O.K., let's do some Printing
Note: If, instead of plugging your Microwriter into an independent
printer, you're going to connect to some kind of computer or
word-processor, then assume that the word "printer" in this
section refers to these.
You can also stop the printing yourself by using! j. How long it takes the
printer to stop varies according to what sort of printer it is. If you do so,
you can re-start printing from where it stopped by hitting; | again - OR
ANY COMMAND. If you hit any keys other than it will disengage the
Microwriter from the printer and allow you to go back into the text - but
this means that if you wish to print again it will start from the last
document separator and not where you left off.
Here's what to do:
1. Write something to print, making sure you put a document separator
between each document.
2. Put paper in the printer and make it ready to receive text.
28
continued
29
EDITING
... purely and simply means changing things you've already written.
Deletion
There are only 3 possible changes you can make:
- simple CORRECTIONS by overwriting
... which you can do already
quick brown fox
jumps
There's 5 ways of chopping bits you don't want out of the memory:
El
deletes one character only each time it's used. It's the
character furthest on the right of the display, or if connected
to the TV the one immediately ON THE LEFT of the cursor
on TV.
- INSERTING extra bits
for Delete
- DELETING bits you don't want
CjEl
Insertion
q u i c k b r o wnj^
fh
starts continuous deletion word by word which can be
stopped at any time by keying AND RELEASING O
This process works from RIGHT to LEFT, so start at the
END of the text you want to get rid of. You will find it all
happens rather fast at first - so be careful.
j u m p s o v er
^^
fox
wipes EVERYTHING between two document
separators. (The beginning of the relevant text should
appear in the right-hand position of the display).
for Wipe
To "insert" an extra letter or word or more, used].
for Insert
This makes a sort of hole in the memory at the place the display (and
cursor on TV.) is positioned so you can put in the new bits. You'll see an
"I" on the right of the display where you're in insert, and on the TV, the
rest of the text disappears.
Now you can just write your extra text in the usual way
... and then close up the gap by hitting: I 'again. The "I" goes away, and
the rest of the text re-appears on the TV. Job done!
but:
BE VERY CAREFUL
This one is instant death to a document AND CANNOT
BE STOPPED.
That's why when you key [WJ, you'll see a "SINGLE WIPE?"
warningappear on the display and TV. It's only if you NEXT
key thelD) that the document is wiped off the memory.
If you key anything else, the (Wj will be ignored.
Text V Text V Text
C aution: If you switch off your Microwriter whilst in insert, you'll be
leaving the hole in the memory where it was, and won't be
able to read or zip past it next time you switch on. If you've
done this, remember to cancel with; I ] .
30
continued
] OS is even more drastic: it wipes off the document you're in
when you do it (like [W] [D) does) and EVERY
DOCUMENT ON THE MEMORY AFTER IT.
You'll get the warning "MULTIPLE WIPE?" when you've
keyed the [Mjjwj, and the wipe will only happen ifyou
then key the [Df: anything else will cause the El [W| to be
ignored.
Multiple Wipe
[Kj is TOTALLY LETHAL!! It will wipe absolutely everything
relentlessly. Hence the obscure code! (This also shows
Multiple Wipe after |0 |W|).
It will show MEMORY CLEARED afterwards. Hit Q to get
back to writing on the Microwriter.
The Pre-Set Format System
The Microwriter has in its mind (its "program": the built-in set of
instructions which control the way it works) a standard picture of a
printed page divided up into columns. Each of these columns is usually
the width of 5 printed characters (= 5 character positions), but this can
be varied (though not until you're more expert than you are at this stage.
Across each line of print, therefore, there is a sequence of pre-set
positions at the start of each column. These are called "TAB SLOTS".
Each slot has a number, and its position on the page is measured as: its
distance from the normal left margin by the number of character
positions.
The Microwriter's standard picture, then, looks like this:
normal left margin
top of page
}•
T
edge of paper —•
tab "slot"
position
FORMATTING
"Formatting" means the various com: lands that affect WHERE on the
page the printer will put the text. If n j format command is used, the
result is a solid chunk of text running down the page. The format
commands let you break the text up - up, down and across the page, in
the order you want.
Position 0 is thus the normal position of the left margin, and each
successive slot across the page marks the various fixed positions
available for use with both the tabulation and the margin
indent commands.
Note: This Guide assumes that your Microwriter is set to behave
according to the pre-set system. If, in practice, you find things
are not happening as described look up Tab Adjustments in
Book II.
Yes, that's a format command.
Understand it all so far?
There are two other types'
- TABULATIONS
- MARGIN INDENTATION
continued
continued
32
33
Tabulation
O.K.: Example
Write this:
"Tabulation" simply means the printing of information in the form of a
"table" or "schedule", e.g. statements of account, catalogue lists, etc.
In practice, the tab system is also a convenient way of achieving a
"one-off" indentation to the right.
The tab command is [Tj which shows a T sign on the display each time
it is used. On the TV. screen, the use of [Tj is visible in that the cursor is
re-positioned appropriately.
Item(T][T]Code[T][HQuantiry[U[f]Price[
plug[Tj[T]b2[T][T]5[T]|Tl£6lTl[T]£30 [C]
socketfflffldBfflfflsmmcilQOCBSSa [C]
fuse[H[I]h2[T][T]20[T][T]£0.5[T][T]£10
I iT]= Tabulation
... and then print it out. It should look like this:
Each time [Tj is keyed, it has the effect of advancing the printer to the
next slot to the right before the next batch of text is printed. If it is
keyed twice in sequence, it will advance by 2 slots, [TjfTjiTj will
advance by 3 slots, and so on.
It is important to understand where the printer starts from when the[T]
is keyed:
Item
Code
Quantity
Price
Total
plug
socket
switch
fuse
b2
d8
r47
h2
5
3
6
20
£6
£11
£4
£0.5
£30
£33
£24
£10
- if it is the first time ^Ti has been used in the line, the printer will
advance to slot 1 before printing.
- if it is not the first [Tj in the line, [T will cause the printer to advance
to the next slot to the right of the one to which it was sent by the
previous [Tj. Thus, if the printer has just printed text at slot 6, [T] will
now advance it to slot 7.
Like an example?
34
continued
In the example, each use of [T)[T] was sufficient to advance the printer to
a slot BEYOND the text which had just been printed on the line. IF [T] IS
NOT used enough to advance the printer to a "clear" slot, it does not
overprint the next batch of text on the previous batch: instead it merely
prints it continuously on from the previous batch, but the neat format is
still lost. It is therefore important to ensure that [T] is used sufficiently to
allow for the amount of information to be printed in each column.
35
continued
Example:
Margin Indent Commands
In the previous example, the "item" column is 10 positions wide since
(II [T] was used to advance the printer to the "code" column. If one of the
item names was LONGER than 10 characters, then that line would be out
of format:
Item
Code
plug
b2
socket
d8
edge-connectorx!4
switch
r47
'——~^-
. ———-^ ^~
Quantity
Price
Total
5
3
1
6
£6
£11
£2
£4
£30
£33
£2
£24
^^^^ -~~—"-^-^^/"^-^—'~^-^_/
In this case, the "code" column should have been positioned 15
positions from the margin to allow for "edge-connector", i.e. PTJ0
should have been used:
socket
d8
edge-connector x!4
switch
r7
3
1
o
£11
£2
£4
£33
£2
£24
The easiest way to ensure that your columns are wide enough for the
information to be printed in them is to build up the format on a T.V.
screen. The result is then instantly visible.
36
The command isQ.
... it's "Command-Apostrophe".
Each time you use it, it shows a -> sign on the display.
The margin control command also uses the pre-set "tab-slots" held in
the Microwriter's program.
If no use of Q] is made, each time a carriage return is made (either an
automatic one or as a result of [C]), the printer will automatically start
printing the next line from tab slot 0.
When Q is keyed, it has the affect of instructing the printer to return to
tab slot 1 at the next AND ALL SUBSEQUENT carriage returns, i.e. the
subsequent text printed is indented by 5 character positions. If QQ is
keyed, the "new" margin is now at tab slot 2, i.e. 10 characters from the
usual margin. 3[jls puts the margin to slot 3-15 positions from the left,
and so on. EachLJused also has the affect of reducing the maximum
number of characters to be printed on each line by 5.
The next paragraph is an example of the use of Q before a |C|:
It is important to remember thatQonly takes affect AT THE NEXT
CARRIAGE RETURN. To indent this paragraph, therefore, theQ
was keyed BEFORE the [Cl|C] which produced the clear line
separating the paragraphs.
37
continued
To cancel single or multiple margin indentations, 13Q is used to 'reset'
the margin to tab slot 0 (no matter how many[;] s had been used up to
that point). This will show g on the display.
Offset Side Numbers
To 'step' back one slot at a time,! ]| ' ]is used. Each[ ] [ ' jsteps back one
slot, and shows a < sign on the display. BE VERY CAREFUL not to use.
moredecrements (| |[' |) than the number of ["*] you previously
used as this can cause quite a few formatting problems.
Another frequent requirement is to print paragraph numbers to the left
of a sequence of indented paragraphs. The example below is also the
explanation of how this is easily done:
1. Having made the "paragraph gap" by keying [C](£], the paragraph
number is written.
2. In order that the text ON THE SAME LINE (i.e. the first line of the
paragraph) is intended, the tab command,[J], is used.
STEPPED PARAGRAPHS
Sometimes, you might want successive paragraphs to step in from the
left and then, by stages, step out to the right again. (This is typical of a
lot of business reports).
3. In order to ensure that ALL SUBSEQUENT text in the same
paragraph is also indented, Q] is keyed IMMEDIATELY AFTER the
|T] has been keyed.
4. After each indented paragraph has been written, |M] Q is used to
reset the margin.
5. The process is repeated.
Ml ' ] - Margin Re-set
1. In order to describe easily the process of successively indenting
paragraphs and then "stepping back out again", each paragraph is
numbered. This paragraph is printed from the normal left margin,
i.e. tab slot 0.
2 O n e ' ' has now been keyed to bring paragraph 2 in by 5
character positions. Paragraph 3 shows how a heading for
an indented paragraph can easily be written.
3. This is paragr. ph 3.
All that is necessary is to remember to key the
required number of ' ns BEFORE each "paragraph
gap". (|C; [C]) is keyed. Once this has been done,
subsequent carriage returns automatically go to the
indented margin.
4. To bring this paragraph back again by only 5 positions,
[J'' was keyed ONCE ONLY before iCj[Cj. If a return to the
main, "normal" margin at tab slot 0 was required,L][l]
would have been keyed twice. Paragraph 5 will be
repositioned at slot 0.
5. Here's where we started from! The; ]['.] keyed before writing this
paragraph effectively cancelled the indentation achieved by using
r 'n before writing paragraph 2.
Here's a Summary:
page
normal margin
and shows -» on the display
M; !
page
indented margin
,i '/
... and shows 3 on the display
continued
39
CHARGING THE BATTERIES
Two other types of "Formatting" commands are:
- MARGIN INVERT
When fully charged your Micro writer should give you 30 hours of
continuous use (enough usually for one week of normal use).
Your Microwriter will let you know when it's getting hungry ...
- POSITION HEADING
Margin Invert command is [M] [Ijand shows ^ on the display.
If this command is used before a short piece of text, typically a date,
AND FOLLOWED BY A[C]then that piece of text will be shifted to line up
from the RIGHT HAND margin instead of the left. Thus it has inverted
the margin BUT only for that line.
... by showing you an underline mark on the LEFT of the display when
it's beginning to run down. This indicates that one hour of charge
remains, and you ought to start using it off the mains until you can give
it a good charge.
Example: I JT]1 January [cj - will print against the Right Hand margin
like this:
1 January
To charge it up again, use only the "mains adaptor" supplied with your
Microwriter. Stick the big end into a convenient set of 3 holes in a
nearby wall that look like this:
Note: Since the TV. enables you to actually see the layout of your text
this command is not usually used in the TV. mode. As a result it does
not show up on the TV. screen if used. However, it will cause the piece
of text to which it applies to print against an inverted margin.
[I_i- Margin Invert
Position Heading is another comr and which is useful in the "portable"
mode. The command isiP! [H] and shows i on the display. This
command can ONLY function when used immediately after a Carriage
Return and also followed by another Carriage Return. When used
before a short piece of text, typically a short heading, the effect is to
automatically centre the heading when printing.
Example: [Cj i Pj [Hi Main Title [C] - will print like this:
Main Title
Note: This command will also not show up on the TV, but will position
the heading centrally when you come to print.
iP.'Hj -PositionHeading
. . . and the little end into the little round hole at the back of the
Microwriter (the only one it'll fit). Charging up from completely flat
lakes 24 hours. You can leave it charging overnight if you like or you
can use the Microwriter whilst it's on charge if you want to.
(You might notice that the adaptor and the botton corner of the
Microwriter warm up a bit whilst all this is going on. DON'T PANIC.
This is quite normal: neither of them will melt, burn or explode, etc.).
There are three ways of switching your Microwriter on and off!!
I
The most obvious is with the ON /OFF switch. This will always
return you to the start of the memory.
?.. If you leave your Microwriter on and unused for 8 minutes, it will
switch itself off to preserve the power. To switch on use the ON/
OFF switch, and the Microwriter will return to where you left off in
the text.
i If you deliberately want to switch off so that you can return to the
place you left off, use the commands [H] [Pj to 'Halt Power'. It will
switch off and when you switch on with the ON/OFF switch will
return to where you left off.
IP]- Halt Power
40
DISPLAY SYMBOLS
Symbols On The Right (Slot No. 1)
. . . And What They Mean
All sorts of different symbols appear from time to time on the display.
They can appear either fixed on the extreme right of the display, or
they can move backwards and forwards along with the text as you read
through.
These are WARNINGS and INDICATORS.
M
Menu engaged
means you have locked into the Menu Access. At this stage you
need not worry about this. See Book II.
f
Full Memory Warning
means you've nearly filled the memory, and only have enough
room for another 256 characters (= a shortish paragraph).
F
Full Memory Indicator
means you've filled up the memory and will have to wipe
something off to make space to carry on.
I
Insert Indicator
tells you you're in "Insert". Look it up on page 30 if you don't
already know about it. (This is a high priority indicator and will
overwrite any of the above alternative indicators).
Whenever you see one you don't recognise, look it up in this section to
find out what your Microwriter is saying to you.
Symbols Fixed On The Right (Slot No. 2)
I
t
These are the Setting indicators. (Remember you can always get back
to lower case alphabet at any time by keying t ).
Single
Shot
u
Lock Upper Case Alphabet Indicator
U
For capital letters. See page 16
n
N
2nd Setting Indicate;
For numbers and punctuation. See page 18
p
P
3 r dJ5 ettin g Indicator
For other printable characters. See Book II
a
A
4th Setting Indicator
For'ASCII Control Characters". (These get used once
you're playing about with various computers, etc., but
normally you needn't worry about them. They're dealt
with in "The Microwriter User's Handbook - Book II").
When the extreme right position of the display is blank, you're in
normal, lower case alphabet.
Symbols That Move About
These ones behave on the display just as if they're an ordinary letter,
number, punctuation mark, etc. But they're not. They don't result in a
printed character. Instead, they mean something:
Document Separator
See page 26
Letter Marker
See page 45
-Return
Often called a "hard" carriage-return. See page 25
Automatic Carriage-Return
Sometimes called a "soft" carriage-return. See page 25
Automatic Carriage-Return Suppression
Delete or overwrite if you get it by accident. If you want to know
more, though, see Book II.
42
43
continued
THE LETTER MARKER
Tab
= "tabulation": see page 34
This is a neat way of getting instantly to exactly the right spot in the
memory.
Tab Adjustment
Delete or overwrite if you get it by accident. If you want to
know all about it look in Book II.
As you prepare a document, you can enter at any point a "marker" to
which you can later zip the display (and cursor on T. V.) precisely and
easily by using a special command.
Margin Indent
See page 37
The marker is entered by keying CUE], which shows aT~ on the display.
Margin Decrement
See page 38
Margin Reset
See page 38
Underline Start/Stop
Book II.
Position Heading
See page 40
Margin Inveit
See page 40
Form Feed to Next Page
Book II.
Exception I
See Book II.
Exception II
See Book II.
Low Charge Indicator
Always occurs on the left of the display. See page 41
I - Letter Marker
The special access command is (Y] [Z]. Keying this zips the display/
cursor straight to the next "marker", ignoring all line endings and
paragraph gaps which may be present beforehand. If there is no
marker on memory after the point at which [TJ [Z] was keyed, it will act
as [J [Z]and 'zip' directly to the end of the document.
[ Y11 ]] works jumping back in precisely the same way, searching for the
nearest preceding letter marker
W hen preparing standard text which will be used more than once, with
variable text being entered each time (e.g. quotation letters, contracts,
etc.), a marker can be entered at each successive point in the text at
w Inch variable text will be inserted. A s each "issue" of the standard
l< 'xt is prepared, it is then necessary only to use [Y] [Z] or [Yl[~J"|to shift
directly from one variable item to the next. The marker itself does not
I >i nit, so it is not necessary to delete it from the text prior to printing however, be careful not to overwrite it as you may need it next time
iiiound.
ASCII Control Character Indicator
Always happens before a letter when locked in ASCII
setting. Refer to Book II.
45
CASSETTE STORAGE
EXTRA SETTINGS
In addition to the main two settings described so far, there are two
additional settings which are dealt with in full detail in Book II.
THE THIRD
SETTING
THE FOURTH
SETTING
SHIFT INVERSION
This gives the remainder of the (normally)
printable ASCII characters
The command to switch to 3rd setting is[P).
- [Pi Switches to 3rd setting for the next
character only and shows "p" on the display.
- [PI[ P] Locks into the 3rd setting and shows "P" on
the display.
The characters are dealt with in Book II.
This gives the "ASCII Control Characters" and are
accessed using JH1, as usual once and twice off as
suitable (though only when the relevant "menu"
setting permits!). Keying [H[ or [H] [Hi shows "a" or
"A" (for ASCII) in the setting window.
For use in code numbers, etc:
i.e. post codes: EC4Y 2ZX
When locked into any setting (lower case, upper
case, numerics, 3rd or 4th setting) you can lock
directly into any other setting WITHOUT going
back into lower case alphabet by using double
commands as per normal.
Equally, a cnce off command will also work
(e.g. will give one upper case alphabet while
locked into numerics, and will then revert to
numerics automatically). A once off shot into
lower case alphabet will not register - it will
always unlock permanently into lower case
alphabet.
46
Introduction.
This system provides a facility for storing part or all of the text on the
Microwriter memory for use at a later date.
The quality of cassette recorders varies, and it is important to observe
our 'housekeeping' rules on page 51. Several "mini-cassette"
recorders do not have an output socket, and cannot therefore be used.
When using a recorder for the first time, it may be necessary to
experiment with the volume level when going through the "read from
tape" routine (see point 4, page 49).
Note: Thoughout these notes "WRITE" means the Microwriter writing
ON TO the tape and "READ" means the Microwriter reading the
information back FROM the tape. (Writing merely copies the
Microwriter memory and doesn't erase it).
To WRITE On To Cassette:
1 Decide which document or sequence of documents you want to
record on to cassette. Place TWO CONSECUTIVE document
separators at the end of the last document to be recorded.
2. Locate the FIRST document to be recorded in the same way as for
printing/transmitting.
;(. Load a cassette in the recorder and wind forward or backward to
the part of the tape on which you want to record the information preferably a blank section.
4 Dictate a title on to the tape so you can easily identify the
information later. (This is not essential, but is strongly
recommended).
'.'> Plug the cassette connection lead into the "cassette socket" on the
front of the Microwriter, and into the "microphone" or "input"
socket on the recorder.
47
continued
6.
Switch the recorder to "RECORD" and THEN command the
Microwriter to write on to cassette by keying OJW].
to Write on to tape.
The information will now be written on to tape. The Microwriter
shows 'ON TO TAPE' on the display and a slow pulsing line
as transmission occurs.
How long it takes to write all the information depends on its length.
A full memory takes just under three minutes to be written on to
tape.
7.
When the process has been completed, the Microwriter display
reverts to text to show the last 14 characters of the information
recorded.
Should you wish to halt the write process prior to the end of
transmission, hit \ (It will have a delayed reaction to this).
The Information On Cassette
Having completed the process of writing on to tape, the cassette now
contains the following sequence of information:
1. Your dictated "title" (if you recorded one)
2. A cleai, high-pitched tone lasting about 2 seconds which is
automatically recorded to denote the start of the text.
3. The text itself, which makes a buzzing noise.
Note:
(A) Depending on the length of tape.cassette you use, it is possible to
record the equivalent of many full memories on one tape. Some
microcassettes, for instance, can store up to about 100 A4 pages of
text. We do not recommend 'cramming' in too many pages.
(B) If recording high volumes of information on tape, your dictated
"titles" become very important in subsequently locating a particular
item.
(C) It is also wise to make a list of the titles. If your recorder has a
counter, then the reading at the start of each recording should be
noted.
48
continued
To "READ" Back Into Microwriter Memory.
1. Load the appropriate cassette into the recorder
2. Find the clear tone at the START of the particular information you
want to read back into your Microwriter, and stop the recorder at
this position (and NOT before or beyond the tone).
3. Plug the cassette connection lead into the "cassette socket" on the
front of the Microwriter, and into the "earphone", "play-back" or
"output" socket on the recorder.
4. Turn the volume control on the recorder to its optimal level. (For
most micro-cassette recorders recommended, this level is usually
close to maximum volume, though as noted previously some
experimentation might be necessary first time around.
5. You must have clear memory to write into otherwise it won't work
and will read out TAPE ERROR when you try to read. If at the
beginning of the memory MAKE SURE you step past the V by
key ing [F].
6. Key| 1 [Rj on the Microwriter so it is ready to Read, and THEN switch
the recorder to "play" (being careful not to switch it to "record" by
mistake).
[R|to Read from tape.
The Microwriter will now read the information from the tape. During
the process, the display will show a plus (+) sign on the left and
right of the display and read 'FROM TAPE' in the centre. This may
take a few seconds to appear.
The + indicates the optimum volume level of the Cassette
Recorder. If it shows as a minus (-) sign this means the volume is too
low. Turn it up until the + is becoming defined. Then halt the
process and try re-reading. (Equally if it shows a vertical dash (|)
the volume has been set too high).
Similarly, should the memory be filled up because there was
insufficient memory space to accept all the text from tape, the
process will stop as if it was the end of transmission.
49
continued
IMPORTANT FOR CASSETTE USERS
8. Once the process is complete, the Microwriter display shows
'TAPE ERROR = 000'. This shows how many errors have occurred in
the transmission and, of course, ideally the readout should be 000.
If it shows a figure it does not mean that 007 (for example) equals 7
errors. The readout is based on a complicated formula relating to
the number of corrected errors. The maximum number of
uncorrected errors that can occur is one error. After this it will
show POOR TAPE. If 'POOR TAPE' shows on the display you will
need to re-read it.
Once the transfer has happened successfully the recorder can be
switched off and the information now in the Microwriter memory
handled in the usual way. The tape is NOT erased during the read
process and may be re-used as many times as needed. It is wise,
however, to store tapes away from sources of dust, heat or
magnetic fields (e.g. NOT on top of a television set).
Note: In electronic terms, the read process is very sensitive to
interference and it may be necessary to attempt to read a tape more
than once to achieve an accurate transfer to memory. If the information
shows a high degree of error once in memory, or partially or totally
fails to be read, the volume level should be checked. If difficulty
persists, fresh batteries should be used in the recorder. Low charge in
the Microwriter may also interfere with the process.
The quality of cassette recorders and tapes varies considerably,
though it has improved considerably in the last few years. We therefore
recommend the use of a 'newer' recorder wherever possible.
Whilst Microwriter's hardware and software has been designed to give
users reasonable reliability, the Microwriter cannot remove all sources
of error and users will achieve better results if the following
safeguards are observed:
Ensure tape is in good condition.
Correct tape for recorder should be selected (i.e. FEO2, CRO ).
If speed on recorder is variable, the same tape speed should be
selected for reading and writing.
Do not 'overwrite' tape too often.
After long periods of use the tape heads in cassette recorders tend
to get 'magnetised'. Occasional de-magnetising is recommended.
Equally, cleaning tape heads every so often is recommended.
Normally tone control will have little effect on playback although
maximum treble response is normally preferred.
On playback ensure optimum volume is set.
Ensure no large items of electrical equipment are switched on and
off in the vicinity.
"Inserting"Text from Cassette
Text on tape can be read into memory with the Microwriter switched to
Insert Mode. All that is necessary is to keyi I 'immediately prior to
keying j_ j R as above, and then again when the read is complete.
11 JUTs who require higher levels of accuracy should use digital
cassettes withRS232C input/output or a suitable micro-computer
with discs.
W In -ther using cassettes or other media for storage of texts and data it
iii important to keep a printed copy of any texts so that in the event of
l . n l u t r s texts can be reconstituted.
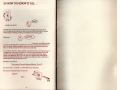
SO NOW YOU KNOW IT ALL .
.. except you don't!
It's true that, if you've learned all the basic stuff in this Guide, then
you've learned enough to be able to use your Microwriter for a very
wide range of writing, editing, formatting and printing uses.
However..
. . . however, your Microwriter
is a very powerful and versatile little device. Don't be deceived by its
size: it's really a little computer in its own right, and there's lots more
that can be done than we've covered in this Guide.
For instance, there's a thing called a "program menu" that allows you to
change lots of the ways in which th 3 Microwriter behaves which this
Guide treats as unchangeable (such as standard line length, page
length, line spacing, etc.). You car, also do a whole load of technical
things through the keyboard to enable your Microwriter to link into a
tremendous range of other devices.
All this is covered in:
Microwriter General Systems Manual - Book II
So, if you want - or need - to, then that's your next step.
If you don't, then just carry on as now.
Enjoy it!
Bye!
52