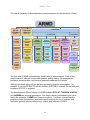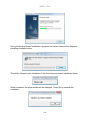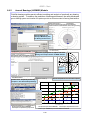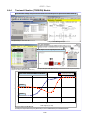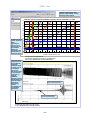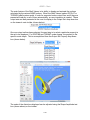
1
Advanced Rotating Machinery Dynamics ARMD Version 5.8 TM THE COMPLETE SOFTWARE PACKAGE FOR RBTS, Inc. Rotor Bearing Technology & Software 1041 West Bridge Street Phoenixville, PA 19460, USA Rotor Dynamics Torsional Vibration Fluid-Film Bearings Rolling-Element Bearings Lubricant Analysis Tel: Fax: Email: Web: 610-415-0412 610-415-0413 [email protected] rbts.com RBTS, Inc. ©Copyright ARMD TM Advanced Rotating Machinery Dynamics User’s Manual TM ARMD TM ROTLAT TM TORSION TM JURNBR TM HYBCBR TM TILTBR TM THRSBR TM COBRA TM VISCOS Introduction, Set-up, Installation and Operation Brochure Manual Rotor Dynamics Lateral Vibration Overview Manual Samples Torsional Vibration Overview Manual Samples Cylindrical Fluid-Film Fixed Geometry Journal Bearings Overview Manual Samples Conical Fluid-Film Fixed Geometry Journal Bearings Overview Manual Samples Fluid-Film Tilting-Pad Geometry Journal Bearings Overview Manual Samples Fluid-Film Fixed & Tilting-Pad Geometry Journal Bearings Overview Manual Samples Rolling-Element Bearings Overview Manual Samples Lubricant Temperature Dependent Properties Overview Manual Samples version 5.8 documentation is provided on the ARMD CD and it is F ARMD installed during ARMD installation. After ARMD installation, the on-line documentation can be accessed from any of the ARMD modules Help menu (Help>ARMD User’s Manual or Help>Module Manual) . This printed document contains only the “Introduction, Set-up, Installation and Operation” section of the manual. V5.8-02/13 ARMD – Main TABLE OF CONTENTS 1.0 INTRODUCTION AND HISTORICAL BRIEF..................................................... 1-1 2.0 TECHNICAL SUPPORT AND SEMINARS ........................................................ 2-1 2.1 Technical Support .......................................................................................... 2-1 2.2 2.3 Seminars ........................................................................................................ 2-1 Maintenance and Updates ............................................................................. 2-1 3.0 ARMD OVERVIEW ............................................................................................ 3-1 4.0 MANUAL ORGANIZATION AND TERMINOLOGY/NOTATION ........................ 4-1 5.0 INSTALLATION ................................................................................................. 5-1 5.1 Hardware and Software Requirements .......................................................... 5-1 5.2 CD Content .................................................................................................... 5-2 5.3 Installation ...................................................................................................... 5-3 5.4 System Set-Up And Configuration ............................................................... 5-13 5.4.1 License Key (Dongle)............................................................................ 5-13 5.5 Read-me.txt and Relnote5.txt ...................................................................... 5-13 5.6 Uninstall ....................................................................................................... 5-13 6.0 OPERATION ..................................................................................................... 6-1 6.1 General Operation ......................................................................................... 6-1 6.2 Typical Session .............................................................................................. 6-4 6.3 On Line Tutorial and Sample Session ............................................................ 6-8 6.4 SELECTED SCREENS ................................................................................ 6-10 6.4.1 Rotor Dynamics (ROTLAT) Module ...................................................... 6-14 6.4.2 Journal Bearings (JURNBR) Module .................................................... 6-18 6.4.3 Lubricant Analysis (VISCOS) Module ................................................... 6-21 6.4.4 Torsional Vibration (TORSION) Module................................................ 6-22 7.0 UTILITIES .......................................................................................................... 7-1 i ARMD – Main 7.1 RBTSTYPE .................................................................................................... 7-1 7.2 RBTSGRAF ................................................................................................... 7-4 7.2.1 Introduction ............................................................................................. 7-4 7.2.2 Installed Files .......................................................................................... 7-4 7.2.3 Main Menu .............................................................................................. 7-4 7.2.4 Plot Arrangement ................................................................................... 7-7 7.2.5 Templates, User Options, and Macro Strings ......................................... 7-7 7.2.6 Graphics File Extensions ........................................................................ 7-8 7.3 ARMDGraph ................................................................................................ 7-11 7.3.1 Introduction ........................................................................................... 7-11 7.3.2 Workspace ............................................................................................ 7-12 7.4 3-D Bearing Viewer ...................................................................................... 7-13 7.4.1 Introduction ........................................................................................... 7-13 7.4.2 Main Menu ............................................................................................ 7-13 7.4.3 View Settings ........................................................................................ 7-16 7.4.4 3-D File Extensions ............................................................................... 7-16 7.5 3-D Shaft Viewer .......................................................................................... 7-17 7.5.1 Introduction ........................................................................................... 7-17 7.5.2 Sample Session .................................................................................... 7-19 7.6 Projects. ....................................................................................................... 7-25 8.0 ARMD MESSAGES ........................................................................................... 8-1 9.0 USER FEEDBACK REPORT ............................................................................ 9-1 ii ARMD – Main 1.0 INTRODUCTION AND HISTORICAL BRIEF ARMD (Advanced Rotating Machinery Dynamics) is a new generation software package developed by RBTS to bring you the most advanced and complete rotor/bearing analysis capabilities for evaluating practically any bearing, rotor/bearing system, or mechanical drive train. ARMD is developed for performing: Rotor Dynamics Torsional Vibration Fluid-film Bearings Rolling-element Bearings Lubricant Temperature-dependent Properties ARMD is an integrated analysis package that incorporates state-of-the-art numerical and modeling features giving the ability to evaluate the physical system accurately and efficiently. ARMD is user-friendly with options and features that include: Context-sensitive help Menu and windowing environment Inter-module communication and data exchange Graphical and text capabilities Data range checking Advanced file management system Advanced mouse support features ARMD was developed in-house by RBTS' principals who, prior to 1986, were employed at The Franklin Institute Research Laboratory (FIRL). FIRL was an internationally known scientific and engineering organization dating back to 1824. Since 1950, FIRL was a leader in the field of tribology and rotating machinery dynamics. RBTS' principals since the early 50's were, and still are, involved in the area of tribology and machinery dynamics. They have provided industry with engineering technical support and software for the design, development, fabrication, and application of fluid film/rolling element bearings and seals. RBTS has been at the forefront in the development of advanced software for the evaluation of bearings, bearing systems, and vibration associated with rotating machinery and drive trains. 1-1 ARMD – Main 2.0 TECHNICAL SUPPORT AND SEMINARS 2.1 Technical Support Technical support for ARMD can be received from either your local authorized distributor or through RBTS, Incorporated: RBTS, Inc. 1041 West Bridge Street Phoenixville, PA 19460, USA 2.2 Tel: Fax: 610.415.0412 610.415.0413 Web: e-mail: http://www.rbts.com [email protected] Seminars RBTS offers seminars in the area of bearings and machinery dynamics annually. The seminar, "FLUID-FILM/ROLLING-ELEMENT BEARING TECHNOLOGIES & ROTORDYNAMICS INTERACTION", is typically offered in the spring. An optional on-site tutorial and orientation session is also available to RBTS customers. The tutorial and orientation session covers software theory and application, bearings and rotor/bearing systems design, and interpretation of the results generated by ARMD software. The session can be tailored to address client-specific equipment and needs. 2.3 Maintenance and Updates Maintenance and updates of RBTS' software is provided free of charge for the first year after initial purchase. All modifications and improvements implemented during this year are automatically sent to users. This coverage can be extended thereafter for a nominal fee each year. 2-1 ARMD – Main 3.0 ARMD OVERVIEW The ARMD software package is constructed from several modules (preprocessors, processors, and utilities) that interact with each other in a seamless fashion under one environment. The top-level menu of ARMD (shown below) consists of the following preprocessors: ROTLAT Rotor dynamics lateral vibration. TORSION Torsional vibration. VISCOS Lubricant temperature dependent properties. JURNBR Fixed geometry fluid-film journal bearings. HYBCBR Fixed geometry fluid-film conical bearings. THRSBR Fixed & tilting-pad geometry fluid-film thrust bearings. TILTBR Tilting-pad geometry fluid-film journal bearings. COBRA Rolling element bearings. ArmdWear Wearing rings tool. ArmdAeroCC Compressor wheels aerodynamic cross-coupling effects. 3-1 ARMD – Main The overall hierarchy of the preprocessors and processors can be viewed as follows: ROTOR DYNAMICS TORSIONAL VIBRATION (ROTLAT) (TORSION) Stability Analysis (ROSTAB) Natural Frequencies & Mode Shapes BEARINGS FLUID-FILM ROLLING Fixed & Tilting-Pad Geometries Thrust Fixed Geometry Journal Fixed Geometry Conical Tilting-Pad Geometry Journal Ball & Roller JURNBR Solver HYBCBR Solver TILTBR Solver THRSBR Solver Single Case Single Case Single Case Single Case Wear-Rings Tool (ArmdWear) Multiple Case Processor Multiple Case Processor Multiple Case Processor Multiple Case Processor Aero Dynamic Tool (ArmdAeroCC) (TORNAT) Unbalance Response (ROSYNC) Steady State Response (TORHRM) Time Transient Response (RORESP) Time Transient Response (TORRSP) Critical Speed & Stability Maps COBRA LUBRICANT PROPERTIES (VISCOS) The front end of ARMD communicates directly with all preprocessors. Each of the preprocessors is utilized for input data creation, editing, saving, file management, processor communication, and text and graphical presentation of results. With any purchase option, all pre and post processing modules are supplied. For example, if only the STABILITY solution module (ROSTAB) is ordered, the pre and post processor ROTLAT is supplied. The demonstration (Demo) version of ARMD includes ROTLAT, TORSION, VISCOS and JURNBR pre and post processors. This Demo version is intended to give you a feel to the operation of ARMD and its various options. The Demo includes sample problems of real life machinery and their support bearings for you to examine and familiarize yourself with the various input, output, and features of ARMD. 3-2 ARMD – Main 4.0 MANUAL ORGANIZATION AND TERMINOLOGY/NOTATION The ARMD user's manual is divided into nine (9) sections: 1. ARMD ARMD introduction, set-up, installation and operation (this section). 2. ROTLAT Rotor dynamics lateral vibration. 3. TORSION Torsional vibration. 4. JURNBR Cylindrical fluid-film fixed geometry journal bearings. 5. HYBCBR Conical fluid-film fixed geometry journal bearings. 6. TILTBR Fluid-film tilting-pad geometry journal bearings. 7. THRSBR Fluid-film fixed and tilting-pad geometry thrust bearings. 8. COBRA Rolling-element bearings. 9. VISCOS Lubricant temperature dependent properties. Each section has a detailed description of the module operation, system modeling, input data file construction, and processor output. It also includes several practical sample problems. The following terms are used throughout manual ARMDMENU Front end program for ARMD. Filename.xxx User specified file name with defaulted extension set by the preprocessor. HYBCBR Conical bearing analysis module. input file ASCII file which is the source of data for a processor (i.e. MOTOR-1.ROI is a ROTLAT input file). JURNBR module output file Journal bearing analysis module. Computer program. File produced by a processor. This includes graphics and text files. (i.e. MOTOR-1.SYG and MOTOR-1.SYO are graphics and text output files respectively produced by ROSYNC processor). 4-1 ARMD – Main postprocessor Module used to perform post processing on an output file. The post processor eliminates the need to run a full analysis (processor) again when certain parameters are changed. preprocessor Module used to control the contents of an input file. This includes editing, printing and modeling. Processor or Solver Program or module used to generate results. RORESP Rotor dynamic time transient response analysis solver. ROSTAB Rotor dynamic stability analysis solver. ROSTAT Rotor dynamic static deflection analysis solver. ROSYNC Rotor dynamic unbalance response analysis solver. ROTLAT Rotor dynamic analysis module. ROTLAT controls ROSTAB, ROSTAT, ROTORMAP, ROSYNC and RORESP. ROTORMAP Rotor dynamic analysis solver for generating critical-speed and stability maps. THRSBR Thrust bearing analysis module. TILTBR Tilting-pad bearing analysis module. TORNAT Torsional stability and natural frequency analysis solver. TORHRM Torsional steady state response analysis solver. TORRSP Torsional time transient response analysis solver. TORSION Torsional analysis module. TORSION controls TORNAT, TORHRM and TORRSP. VISCOS Lubricant viscosity analysis module. Preprocessor functions invoked from a menu will be represented in the form MainMenu>SubMenu>Function. For example, View>Graph>by Template displays list of graph templates for current graphics data. File>Print prints the contents of the current file to printer. 4-2 ARMD – Main 5.0 INSTALLATION 5.1 Hardware and Software Requirements Hardware Requirements The ARMD software package requires the following hardware: - Personal computer with Pentium CPU or better 600 MByte of disk space (approximately for full installation) Printer (optional) USB or parallel port dongle supplied by RBTS, Inc. for purchased modules. 512 Mbyte (XP) minimum VGA or SVGA graphics board with monitor (256 colors or better, 800x600 resolution or better) - For the 3 D Shaft Viewer, a modern GPU assisted graphics card supporting Microsoft DirectX 9.0c with on-board antialiasing. NVidia: Geforce2 or higher required, Geforce 4(non-mx) or higher recommended. ATI: Radeon 7500 or higher required, Radeon 9600 or higher recommended. SiS, Intel and S3 cards might or might not be supported. In general, if after installing the latest driver for your graphics adaptor you cannot open the 3 D Shaft Viewer, the graphics adaptor may not be supported, please contact RBTS for further assistance. - Mouse - CDROM drive Software Requirements - Microsoft Windows XP, Vista, Windows 7, Windows 8 or higher. 5-1 ARMD – Main 5.2 CD Content ARMD is supplied on a CD-ROM containing the following folders and files: Folder/File Name Description ARMD58Setup.EXE file Installation program. Includes ARMD utilities and configuration files. SoftwareLicenseKey Installation.pdf file DirectXRuntime folder Installation instructions document for installing network concurrent access license key or a standalone software license key. DirectX run time library files. DotNET folder Key_Software folder Contains files for field update of memory key (dongle). PROCSSRS folder Contains all ARMD user interface modules and associated help utilities. These modules are included in subfolders having the software modules name. SENTINEL folder Contains the Sentinel drivers required for ARMD operation. The latest Sentinel drivers can be downloaded from: http://www.safenetinc.com/support/tech/sentinel.asp SOLVERS folder Contains all ARMD solvers and associated input data files, templates, and sample problems. SYSTEM folder Install programs for ARMD support files. 5-2 ARMD – Main 5.3 Installation To install ARMD, insert the ARMD CD-ROM into the drive. If the computer system does not automatically detect and start the installation, from the Start menu, choose the menu item Run… and click the Browse button to locate ARMD58Setup.EXE in the root directory of the supplied CD. Click OK to run the installation. For downloaded copies of ARMD V5.8, uncompress the “armd58.zip” file to a folder of your choice and run setup by double clicking the “armd58setup.exe” file. The install program prompts the user for required information. The installation may be aborted at any time by clicking the Cancel button. ***** Installation Privileges ***** Note 1: Windows operating systems, such as XP, VISTA and Windows 7, will need to have “administrative” privileges in order to properly install/uninstall ARMD. Also, if ARMD is being installed for group access, the administrator for the group should be performing the installation. Note 2: Notebook computers with docking station should be disconnected from the docking station and booted standalone prior to installing ARMD and the Sentinel memory key driver. Note 3: For installation on VISTA or higher operating system, if ARMD installation is to include COBRA, “ARMD58Setup.exe“ must run as an administrator, which is accomplished with a right mouse click after selecting the setup file as shown. The following screen begins the installation. Press the Next button to start the installation. 5-3 ARMD – Main A list of ARMD options will be displayed as shown below. Check those items that you purchased and wish to be installed, or uncheck the items you did not purchase or do not wish to install. Note: Ensure that the new Memory Key driver is installed. The driver is automatically installed during the ARMD installation unless users uncheck the Sentinel Drivers check box during the ARMD installation. 5-4 ARMD – Main A screen will then appear (shown below) informing the user that a Sentinel Driver will be installed. If the ARMD installation is being installed on a portable computer that is connected to a docking station, the computer should be undocked prior to continuing the installation. This will ensure that the Sentinel Driver will be installed and operate correctly. Check the box and press the Next button to continue the installation process. A screen will then appear asking for customer and company names. Fill in these fields with your information and press the Next button to continue the installation process. 5-5 ARMD – Main After selecting components to be installed and pressing the Next button, the destination directory will then be requested. If the default path is not appropriate, check the “Change” box(s) then press the Next button to continue the installation program. Note: ARMD V5.8 installation, by default, will install the user interface programs, solvers, help files, manuals, DLL’s and system files in the Program Files folder (protected area on VISTA, Windows 7 and 8 operating systems) under the folder name “ARMDW58”. All other files including Templates, Samples, Lubricant & Material Properties, User files, etc. will be installed in the shared documents folders under the folder name “ARMD58”. For Windows XP operating systems the default folders for installation are: C:\Program Files\ARMDW58 for user interface programs, solvers, help files, manuals, DLL’s and system files. C:\Documents and Settings\All Users\Documents\ARMD58 for all other files including Templates, Samples, Lubricant & Material Properties, User files, etc. For Windows VISTA, 7 and 8 operating systems the default folders for installation are: C:\Program Files\ARMDW58 for user interface programs, solvers, help files, manuals, DLL’s and system files. C:\Users\Public\Documents\ARMD58 for all other files including Templates, Samples, Lubricant & Material Properties, User files, etc. 5-6 ARMD – Main Replaced files (e.g. DLL’s) can be backed up to a subdirectory within the main ARMDW58 directory (e.g. C:\Program Files\ARMDW58\BACKUP). Answer Yes to perform this function, else select No to skip making backups. If the default folder and path are not appropriate, click the Browse button and select a new path. Then press the Next button to continue the installation program. The installation program is now ready to copy files to your disk. Press Next to begin installation or Cancel to abort installation. 5-7 ARMD – Main A progress bar will appear on the screen showing what file is being copied to your disk. A number is also displayed showing the percentage of the installation that is complete. When the ARMD installation process is completed, the following screen (or similar) will appear indicating that the installation of the Sentinel drivers of the memory key will be installed next. Press OK to install the memory key drivers. After pressing the OK or Run button on the above message, a screen similar to the one below will be displayed indicating the Sentinel drivers are being installed. 5-8 ARMD – Main During the Sentinel drivers installation a progress bar (shown below) will be displayed indicating installation status. This will be followed by the installation of the Run-time environment installer as shown. When completed, the below window will be displayed. Press OK to complete the installation. 5-9 ARMD – Main After the installation of the memory key drivers, if DirectX run time library was selected for installation, the following window will be displayed. Accept their agreement and press Next or Cancel to abort installation. This will be followed with the below window to install DirectX. To begin installation, press Next. During the DirectX installation a progress bar (shown below) will be displayed indicating installation status. 5-10 ARMD – Main When completed, the below window will be displayed. Press Finish to complete the installation. 5-11 ARMD – Main When the ARMD installation process is completed, the following screen will appear. Press the Finish button to exit the install program. After successful installation the below message (or similar) will be displayed. 5-12 ARMD – Main 5.4 5.4.1 System Set-Up And Configuration License Key (Dongle) ARMD solvers require an active license for operation. Licensing is accomplished by either a physical USB hardware license key also known as “dongle” or a software license key. For purchased packages with hardware license key, just plug the key into an available USB port on your computer, no further installation is required since the key is preconfigured for operation prior to shipment. For purchased packages with software license key, there are two different types. The first is a network concurrent access license key (for single or multiple users on a network), while the other is a standalone software license key. For either option of the software license key, please read the “Software License Key Installation Instructions” supplied separately in a printed form or available in a PDF file “SoftwareLicenseKeyInstallation.pdf” in the downloaded or physically supplied ARMD CD. An easy-to-use link is provided to this file during ARMD installation, located in the ARMD 5.8 folder in the Windows Start > All Programs menu. 5.5 Read-me.txt and Relnote5.txt For additional information on ARMD, check the read me (READ-ME.TXT) and release notes (RELNOTE58.TXT) files, which will be installed in the main ARMD58 directory/folder if supplied. Information may be also found on RBTS’ website at www.rbts.com 5.6 Uninstall The ARMD software can be automatically uninstalled. To uninstall ARMD, from the Start Menu, select the Control Panel menu item. Double click the icon labeled Add/Remove Programs or Programs and Features (depending on your operating system), highlight the item ARMD V5.8 and press the Add/Remove button or select Uninstall/Change. ***** Privileges ***** Remember, “administrative” privileges are required to uninstall ARMD software. . 5-13 ARMD – Main 6.0 OPERATION 6.1 General Operation When the ARMD package is installed, the installation, by default, will install the user interface programs, solvers, help files, manuals, DLL’s and system files in the Program Files folder under the folder name “ARMDW58”. All other files including Templates, Samples, Lubricant & Material Properties, User files, etc. will be installed in the shared or public (depending on your operating system) documents folders under the folder name “ARMD58”. As an example, for Windows XP operating systems the user interface programs, solvers, help files, manuals, DLL’s and system files will be installed in the default folder “C:\Program Files\ARMDW58”, and all other files including Templates, Samples, Lubricant & Material Properties, User files, etc. will be installed in the shared documents folder “C:\Documents and Settings\All Users\Documents\ARMD58”. For Windows 7 operating system, user interface programs, solvers, help files, manuals, DLL’s and system files will be installed in the default folder “C:\Program Files\ARMDW58”, while all other files will be installed in the shared documents folder “C:\Users\Public\Documents\ARMD58”. After installation/setup as described in Section 5, you can run the ARMD software from the Windows Start menu. The first screen of ARMD will be displayed as shown below. 6-1 ARMD – Main At this point, you are at the top level/menu of the software package. From this main menu, you can activate any of the preprocessor modules for bearings, bearing systems, rotor dynamics, torsional vibration, or lubricant properties calculation. Once a preprocessor module has been selected, from the main ARMD menu, the program will activate the selected preprocessor. Details for each of the preprocessors and their operation is described in the corresponding section of this manual or can be accessed from the preprocessor help menu. The ARMD package is fully user-friendly with context-sensitive help. Function keys commonly used include the following (multiple key combinations are in the form [key1+key2]): [Tab] Moving to next field. [Shift+Tab] Moving to previous field. [Home], [End], [Page Up], [Page Down], and Arrow Keys For moving around the screen and data fields. [F1] On-line help. [F2] Display list of choices for field (if available). [F7] Execute post processing programs in the bearing routines. [Ctrl+P] Print text or graphics screen to printer. OK button Save edits and close form. [Esc]/Cancel button Cancel/abort. ARMD’s built in capabilities permits the usage of the right mouse button that incorporates all function key operations and more. This capability eliminate the need of using the above function keys and give the user built-in edit capabilities by simply pressing a button. 6-2 ARMD – Main Briefly, a typical session with ARMD may be as follows; 1- Select a module from ARMD main menu “front end” (for example, TORSION). 2- Place a problem in memory. To use an existing file, use the File>Open command and select an existing one. To create a new file, use the File>New command. 3- Edit the contents of the input file. If you need help at any time, press the F1 key (Help button) to display context-sensitive help or go to the help menu. 4- Save the file under a filename. Variations of an input file can be stored using the File>Save As command. 5- If you want to examine the input file, you can look at it on the screen with the View>Input File command or print it using the File>Print command. 6- Once the input file is setup with parameters and saved, execute the appropriate processor/solver from the Run menu. 7- After the processor executes, examine the text and graphic output files generated by the processor using the Text Output (RBTSTYPE) and Graphics output (ARMDGraph or RBTSGRAF) utilities from the View menu. 8- When you are finished with this preprocessor, run the command File>Exit to return to the top-level of ARMD menu. 9- From the ARMD main menu “front end”, close the window to quit ARMD. 6-3 ARMD – Main 6.2 Typical Session The following procedure describes a typical session using ARMD. A. Select the desired module from the main menu. For example, ROTLAT for performing rotor dynamic analyses. B. Place an input file in memory. To use an existing file, use the File>Open command and select an existing one. To create a new file, use the File>New command. With a new file, the program will prompt for the system of units (SI/Metric or US/English) to be used. C. Edit content of input file. System model data can be edited from the module main menu under SYSTEM. If you need help at any time, press the F1 key to display context-sensitive help. 6-4 ARMD – Main OPTIONS in the main menu allows the user to define various output control options such as number of modes to be plotted, gravitational loading, continuation run information, etc. D. View graphical model to verify geometry. For graphical representation of rotor/bearing model, you can view the model on the screen with the View>System Model command or pressing the model icon on the tool bar. The graphical model can also be printed after viewing by pressing printer icon or form the File menu. E. View saved input file. To view the input data file, which contains all rotor/bearing geometry and operating conditions, use the View>Input file command. The input data file can also be printed after viewing by pressing printer icon on the tool bar. The File>Print or File>Report commands can also be used to print the input data file. 6-5 ARMD – Main F. Execute the appropriate processor from the Run menu. The RUN option will execute the selected solution module. For example, if the critical speed map for the constructed rotor/bearing system (COMPRES) is to be generated, then, the Run>Critical Speed Map option is activated and the solver executes, creating the results in both text and graphics format. G. View results in text format. The VIEW option of the main menu is used to examine the analysis results in either text or graphics form. When View>Text Output is selected, RBTSTYPE utility is launched and the file list is presented for file selection and viewing. RBTSTYPE utility allows the user to scroll through the entire text output. RBTSTYPE can also send the contents of the file to the printer with the key command [Ctrl+P].. H. View results in graphics format. When View>Graphics Output is selected, the ARMDGraph or the RBTSGRAF utility is launched for graphics file loading and viewing. Graphics and text output files generated with various processors have different file name extensions (i.e. .STG, .SYG,.CMG, SMO, etc.). For extension name definitions please view the processors help windows. These help windows are accessed from each of the modules HELP option in the main menu The FILE>OPEN option from the menu will list all graphics files in the current module. Once a file is selected (i.e. COMPCSMP.CMG) the file is loaded to memory for viewing. 6-6 ARMD – Main Pre-configured graphics file settings for the purposes of illustration have been provided. To access these settings, for RBTSGRAF utility (shown here) select the RESTORE option and a window with file names having the extension .USR will be displayed. Select the file with the same (i.e. COMPCSMP.USR) or similar name as the graphics output file being viewed. Once the file is selected activate the OK button or [F10] function key and the critical speed map of the compressor will be displayed. Users are encouraged to exercise the various options of RBTSGRAF or ARMDGraph utilities by selecting a plot (1 to 4) and activating its various settings, scales, legend, heading, etc. The graphics output file can be viewed by View>Graph>By Option or View>Graph>By Template commands. If View>Graph>By Option is selected, the graph setting window will be displayed. At this stage the user can select 1 to 4 graphs per screen and for each graph as many as 15 curves. From the graph options window, user configured graph settings can be saved to or restored from the disk. I. Exit module return to ARMD front end. J. Close window of front end to exit ARMD. 6-7 ARMD – Main 6.3 On Line Tutorial and Sample Session The ARMD modules such as ROTLAT, TORSION, JURNBR, etc. are supplied with on line help. When the package is installed for the first time, the tutorial session for the modules is turned on by default. Thus, when a module is selected from ARMD main menu, the tutorial session is activated automatically. Once the module is closed, the user is prompted to automatically activate the tutorial session, or not, when the module is selected again. As an example, if the ROTLAT module for rotor dynamic is selected from the ARMD main menu, the ROTLAT module is activated and the tutorial session is launched automatically as shown below. The tutorial session is designed to quickly familiarize the user with the basic steps for the operation of the selected module. Clicking the mouse key in various areas of the session flow chart will give more information for the selected area. The ARMD modules tutorial sessions can also be activated from the selected module Help menu. Additionally, Contents from the help menu (shown below for ROTLAT module), presents detailed information about the module and also includes a detailed step by step sample session for the creation of models, analysis and viewing the results. 6-8 ARMD – Main 6-9 ARMD – Main 6.4 SELECTED SCREENS Supplied with the ARMD software package are various sample rotor dynamics, torsional vibration, bearings, and lubricants input and output files. For purposes of exercising ARMD and for viewing the various data forms and graphic plots presented on the following pages, each of the screens shown has the required steps/commands for viewing as illustrated below. DATA FORMS File>Open>Samples>COMPRES.ROI Description: From the File menu, select the item labeled Open then select the input file COMPRES.ROI from the samples folder. 6-10 ARMD – Main File>Open>Samples>COMPRES.ROI System>Elements (Right mouse button for options) Description: From the File menu, select Open, then select the COMPRES.ROI from the Samples folder. From the System menu, select Elements to display the element information data form. The right mouse button can be used to access options and to edit the form. File>Open>Samples>COMPRES.ROI View>System>Model (Right mouse button for options) Description: From the File menu, select Open then select the COMPRES.ROI from the Samples folder. From the View menu, select System Model to graphically view the model. With the right mouse button, various options can be accessed to display node numbers, mode shapes, etc. 6-11 ARMD – Main GRAPHICS PLOTS Graphic plots are displayed with the ARMD graphics utility RBTSGRAF which is activated automatically from the view menus of any of the ARMD modules (ROTLAT, JURNBR, etc.). When the Graphics Output item of the View menu is selected, various analyses results (previously performed for the currently loaded input file) are accessed from a list box. Once an item is selected from the list box, the graphics utility is launched and the graphics file is loaded to memory for displaying the results graphically with the use of existing templates or user specified options. Right Mouse Click for Options File>Open>Samples>MOTOR.ROI View>Graphics Output>Unbalance Response>Amplitude Restore>ROTLAT>Samples> MOT-UNBAL-RSP1.USR>OK Description: From the File menu, select the Open, then select the input file MOTOR.ROI from the Samples folder. From the View menu, select the Graphics Output to graphically view the Unbalance Response analysis results of the MOTOR.ROI system. The graphics utility will launch and load the analysis results file. Then, the utility will display the Graphics Options window. From the options window, press the 6-12 ARMD – Main Restore button to display Select Options Files To Restore window which will list all user generated graphics settings files (files with the extension .USR). From the file list, select the ROTLAT folder and the MOT-RSP1.USR file. Once the settings file has been selected, press the OK button to display the above graphics screen. 6-13 ARMD – Main 6.4.1 Rotor Dynamics (ROTLAT) Module File>Open File>Open>Samples>MOTOR.ROI (right mouse button for pop up menu) 5000 HP Electric Motor Rotor Dynamic Analysis File>Open>Samples>MOTOR.ROI>View>System Model (right mouse button for mode shapes & options) Bearings Applied Load and/or Dynamic Coefficients are Manually Specified or Internally Computed File>Open>Samples>MOTOR.ROI>System>Bearings (right mouse button for bearing types and options) File>Open>Samples>MOTOR.ROI>System>Bearing Loads 6-14 ARMD – Main Motor Critical Speed Map With bearing stiffness & operating speed superimposed File>Open>Samples>MOTOR.ROI View>Graphics Output>Critical Speed Map, Restore>ROTLAT>Samples>MOT-CSMP.USR>OK G:\ARMDWIN56G1\ROTLAT\Sam ples\MOTOR.STG Motor Modes of Vibration at 1800 rpm . MODE NUMBER 3 1 REL. AMP. REL. AMP. M 3-X 2.97951E+03 M 3-Y 0.034 R M 1-X 1.82905E+03 M 1-Y 0.118 F 2 1 0 0 Motor Static Deflection & Bearing Reactions -1 -1 -2 0.0 0.1 0.2 0.3 0.4 0.5 0.6 0.7 0.8 0.9 1.0 1.1 0.0 1.2 0.1 0.2 0.3 Motor & Mode Shapes MODE NUMBERStability 2 0.6 0.7 0.8 0.9 1.0 1.1 1.2 M 4-X 6.56495E+03 M 4-Y 0.218 F 2 REL. AMP. 1 REL. AMP. 0.5 MODE NUMBER 4 M 2-X 2.64547E+03 M 2-Y 0.584 F 0 1 0 -1 -1 0.0 0.4 SHAFT LENGTH (Inch) (x 10^2) SHAFT LENGTH (Inch) (x 10^2) 0.1 0.2 0.3 0.4 0.5 0.6 0.7 0.8 0.9 1.0 1.1 1.2 -2 0.0 0.1 0.2 SHAFT LENGTH (Inch) (x 10^2) 0.3 0.4 0.5 0.6 0.7 0.8 0.9 1.0 1.1 1.2 SHAFT LENGTH (Inch) (x 10^2) File>Open>Samples>MOTOR.ROI View>Graphics Output>Mode Shapes Restore>ROTLAT>Samples>MOT-MOD1.USR>OK File>Open>Samples>MOTOR.ROI View>Graphics Output>Deflection Calculations Restore>ROTLAT>Samples>MOT-DEFL.USR>OK Unbalance Response Unbalance Non-Synchronous Response with Gravity Loading File>Open>Samples>MOTOR.ROI View>Graphics Output>Unbalance Response>Amplitude Restore>ROTLAT>Samples>MOT-RSP1.USR>OK File>Open>Samples>MOTOR2.ROI View>Graphics Output>Time Transient Response Restore>ROTLAT>Samples>MOT-ORBT.USR>OK 6-15 ARMD – Main Pump Response to Shock Load Six Stage Boiler Feed Pump Rotor Model File>Open>Samples>PUMP.ROI, View>System Model NATURAL FREQUENCY VS. OPERATING SPEED Boiler BoilerFeed FeedPump PumpSTABILITY STABILITYMAP MAP File>Open>Samples>PUMP2.ROI View>Graphics Output>Time Transient Response Restore>ROTLAT>Samples>PUMP2.USR>OK 5 Mode Mode Mode Mode NATURAL FREQUENCY VS. SPEED # # # # 1 2 3 4 Frequency (CPM) (x 10^3) 4 Coupling-End Coupling-EndBearing BearingOrbit Orbit Below BelowInstability InstabilityThreshold ThresholdSpeed Speed 3 2 1 0 C/Cc=CRITICAL WHEN NEGATIVE) VS. 1 DAMPING 2 RATIO (UNSTABEL 3 4 C/Cc IS 5 6 SPEED 7 8 Coupling-End Coupling-EndBearing BearingOrbit OrbitAt At The TheInstability InstabilityThreshold ThresholdSpeed Speed Speed (RPM) (x 10^3) 0.8 Mode 1 2 Mode 3 Mode 4 Mode CRITICAL DAMPING RATIO or LOG DEC. VS. SPEED 0.7 Critical Critical Critical Critical Damp. Damp. Damp. Damp. Ratio Ratio Ratio Ratio 0.6 C/Cc Damping 0.5 0.4 Coupling-End Coupling-EndBearing BearingOrbit OrbitAbove Above The Instability Threshold The Instability ThresholdSpeed Speed 0.3 0.2 STABLE 0.1 0.0 UNSTABLE -0.1 1 2 3 Instability Threshold 4 5 6 7 Speed (RPM) (x 10^3) File>Open>Samples>PUMP.ROI View>Graphics Output>Stability Map Restore>ROTLAT>Samples>PUMPSMAP.USR>OK 6-16 8 ARMD – Main G:\ARMDWIN56G1\ROTLAT\Sam ples\COMPRES.SYG COMPRESSOR UNBALANCE RESPONSE AT BOTH BEARING LOCATIONS (STATIONS 5 & 10) Amplitude mils (Pk-Pk) 8 Compressor Rotor Model with Superimposed Mode Shape Ampl.-N # 005 Ampl.-N # 010 6 4 2 0 0.2 0.3 0.4 0.5 0.6 0.7 0.8 0.9 1.0 1.1 1.2 1.3 1.4 Rotor Speed (RPM) (x 10^4) TRANSMITTED DYNA M I C L OAD TO BEARINGS. 7 Brg-Force@005 Brg-Force@010 Force (lbs) (x 10^3) 6 5 4 3 2 1 0 0.2 0.3 0.4 0.5 0.6 0.7 0.8 0.9 1.0 1.1 1.2 1.3 1.4 Rotor Speed (RPM) (x 10^4) File>Open>Samples>COMPRES.ROI View>Graphics Output>Unbalance Response>Amplitude (User to select plot options) File>Open>Samples>COMPRES.ROI View>System Model (right mouse button for mode shapes and options) Transmitted dynamic loads to bearings and supports due to imbalance loads or any other load conditions are computed. Shaft static Deflection and bearing reactions can be considered with any gravitational or externally-applied loads. File>Open>Samples>COMPRES.ROI View>Text Output>Stability Analysis Variations in bearing elevations, which impact bearing loads, can be specified at any bearing location. File>Open>Samples>COMPRES.ROI View>Text Output>Unbalance Response G:\ARMDWIN56G1\ROTLAT\Sam ples\COMPRES.RSG COMPRESSOR ROTOR RESPONSE TO RUB AND HUB LOOSNESS AT STEADY STATE. Amp. Inch (x 10^-2) 0.3 Multiple Modes Placed on Same Plot Amp@ 5; X-Dir Amp@ 5; Y -Dir 0.2 0.1 0.0 -0.1 -0.2 -0.3 0.0 0.1 0.2 0.3 0.4 TIME (Seconds) COMPRESSOR ORBIT RESPONSE AT COUPLING-END BEARING. Amp. Inch (x 10^-2) 0.3 0.2 0.1 0.0 -0.1 -0.2 -0.3 -0.2 -0.1 0.0 0.1 Amp. Inch (x 10^-2) File>Open>Samples>COMPRES.ROI View>Graphics Output>Mode Shapes Restore>ROTLAT>Samples>COMPMODE.USR>OK File>Open>Samples>COMPRES.ROI View>Graphics Output>Time Transient Response Restore>ROTLAT>Samples>COMPRESP.USR>OK 6-17 0.2 0.3 ARMD – Main 6.4.2 Journal Bearings (JURNBR) Module Fluid-film bearing modules permits efficient modeling and analysis of practically any bearing or bearing system. To enhance the prediction of bearing performance, the newly-developed groove feeding system and chamfer flow options provide an accurate model of bearing heat balance. Pad # 1 Bearing Modeling and Viewing is Made Easy with the Bearing Pre-Processor. W=Load Pad # 2 G:\ARMDWIN56G1\JURNBR\Samples\Demo\Demo.GRF 07/06/05File>Open>Samples>Demo>DEMO.INP 18:06:02 View>Model>Bearing File>Open>Samples>Demo>DEMO.INP Hydrostatic, Hydrodynamic or Hybrid Lubricated 120 Bearings are a Unique Feature of ARMD Software. 90 1.0 Ecc. Angle 60 0.8 0.6 150 30 0.4 0.2 180 Recess # 1 0 0.0 210 Journal Equilibrium Locus 240 Recess # 2 330 300 270 File>Open>Samples>Sample5-Hydrostatic-Bearing>JURNBR-5.INP View>Model>Pad Grid G:\ARMDWIN56G1\JURNBR\Samples\Demo\Demo.psg Lubricant Temperatures As A Function of Speed Results can be Graphically Plotted ByBearing Applied Load = 1000 (lbs) Template or User Defined Graph Settings 16 Supply Temperature Film Temperature Groov e Temperature Max. Temperature 15 . Max Degree F (x 10^1) 14 p. T em . e mp 13 T Film 12 e T em Groov p. 11 Supply Temp. 10 9 0 1 2 3 4 5 Speed (RPM) (x 10^3) File>Open>Samples>Demo>DEMO.INP View>Graphics Output>Bearing Analysis>2D File>Open>Samples>Demo>DEMO.INP, View>Graphics Output>Post P rocessor Restore>open JURNBR>Samples>Demo>DEMO-PSG.USR>OK 6-18 ARMD – Main Computer ComputerDisk DiskDrive DriveSpindle SpindleHerringbone Herringbone Configuration Journal Bearing Clearance & Pressure Configuration Journal Bearing Clearance & Pressure Distribution For Concentric Operation @ 10,000 Rpm. Distribution For Concentric Operation @ 10,000 Rpm. User User Specified Specified Operating Operating Conditions Conditions and and Lubricant Lubricant Properties Properties 3-D 3-D Viewer Viewer Button Button Generate Generate dd text text Output Output after after Run Run Button Button Pressed Pressed File>Open>Samples>Demo>DEMO.INP Run>Post Processor>Single Case File>Open>Samples>Herringbone>HERRBONE.INP View>Graphics Output>Bearing Analysis>3D (Contours=Pressure, Deformation=Pressure, Display>Output>Eccentricity Ratio=1) 4-Pad Canted Lobe Journal Bearing Pressure Distribution For Concentric Operation @ 6,000 Rpm Y File>Open>Samples>Demo>DEMO.INP, View>Text Output>Post Processo r>Multiple Case Y W PAD #1 PADANG 70 PAD #2 ORTANG=210 (NCG) Circumferential Direction o 70 (NAG) Axial Direction TRUNNION N PAD #1 BDIA X 42 10 5 RECESS #2 2.25" PADANG=120 X JOURNAL 19" RECESS #1 2.50" 10 N 1 BC RECESS #2 RECESS #1 ORTANG 120 W 28" 9 13 o 2.5 1 5 8 4.5 9 17 21 25 PAD #3 PAD #4 COAL PULVERIZER, FEED END TRUNNION BEARING GRID NETWORK Flow Suply Pipes 90” Diameter Trunnion Bearing For Coal Pulverizer. Hybrid Pressure Distribution @ 12 Rpm. Counter Clock Wise Rotation With Load Vertically Down (-Y Direction) File>Open>Samples>Sample4-Hydrostatic-Bearing>JURNB-4.INP View>Graphics Output>Bearing Analysis>3D (Contours=Pressure, Deformation=Pressure, Display>Output>Eccentricity Ratio=1 or 2) 6-19 File>Open>Samples>Canted>CANTED.INP View>Graphics Output>Bearing Analysis>3D (Contours=Pressure, Deformation=Pressure, Display>Output>Eccentricity Ratio=1) ARMD – Main 14 Pad Tapered Pocket Thrust Bearing After Optimized Design For Load, Temperature And Stiffness. GR VANG PA D A N G PA D #1 PA D #2 Ro Ri FLM A N G O R TA N G N FC STP N SC STP 4-Step-Pad Operation Y 4-Step-PadConical ConicalGeometry GeometryJournal JournalBearing BearingFor ForTool ToolSpindle SpindleApplication Application Operation@ @3,600 3,600Rpm. Rpm. Y Ro PAD #1 W Step PADANG o 70 PAD #2 ORTANG Ri BDIA2 BDIA Z CONEA o 10 N X BDIA1 JOURNAL BC T-Length PAD #4 PAD #3 A-Length 3 Pad Tilting Pad 5”x2.5” Journal Bearing. Load Between pads Unloaded Upper Pad Speed=1800 Rpm Load=3500 lbs. 6-20 ARMD – Main 6.4.3 Lubricant Analysis (VISCOS) Module File>Open>Samples>VISCOS-1.VSI When VISCOS is launched for the first time, Tutorial is activate d by Default. Tutorial can be accessed from the Help menu. The Lubricant Temperature Dependent Properties calculation module VISCOS supplied with the ARMD Demo is fully operational version. VISCOS has build-in lubricant data-base that can be accessed to retrieve lubricant properties. The data-base is user-friendly with capabilities for users to add and delete records as they wish. File>Open>Samples>VISCOS-1.VSI, Library LUBRICANT ABSOLUTE VISCOSITY VS. TEMPERATURE LB-SEC/IN^2 (x 10^-4) 1 File>Open>Samples>VISCOS-1.VSI View>Text Output Abs. Vis. (Rens) 0.1 0.01 0.001 0.6 0.7 0.8 0.9 1.0 1.1 1.2 1.3 1.4 1.5 1.6 1.7 1.8 1.9 2.0 2.1 2.2 2.3 Lubricant Temperature (Degrees F) (x 10^2) Abs. Vis. (C-P) 10 Centipoise (x 10^1) 8 6 4 2 File>Open>Samples>VISCOS-1.VSI View>Graphics Output 0 0.6 0.7 0.8 0.9 1.0 1.1 1.2 1.3 1.4 1.5 1.6 1.7 1.8 1.9 2.0 2.1 2.2 2.3 Lubricant Temperature (Degrees F) (x 10^2) Results are viewed in Text or Graphics. Built-in Template are used for quick graphic viewing. Users can creat e their own templates. 6-21 ARMD – Main 6.4.4 Torsional Vibration (TORSION) Module Motor-Gearbox-2-Stage Compressor Drive Train Torsional Response to Synchronous Motor Start-up File>Open>Samples>SYNC-MOT.TOI Help>Content>Modeling Concepts Mode shapes can be superimposed on model G:\ARMDWIN56G1\TORSION\SYNC-MOT.TNG DRIVE TRAIN TORSIONAL MODES OF VIBRATION File>Open>Samples>SYNC-MOT.TOI (Right mouse button in Element Information Form) File>Open>Samples>SYNC-MOT.TOI (Right mouse button for mode shapes and options) Mode 1, Cpm= 1495.2 0.0878 Mode 2, Cpm= 4209.5 0.2570 Drive Train Torsional Modes of Vibration REL. AMP. 1 Mode # 2 0 Mode # 1 -1 0 1 2 3 Shaft Length (in) (x 10^2) File>Open>Samples>SYNC-MOT.TOI View>Graphics Output>Natural Frequency>Mode Shapes, Restore>TORS ION>Samples>SYNC-MOD.USR>OK 6-22 4 ARMD – Main Graphics utility permits user defined graph settings, scaling, and many other options. 0.7 0.6 0.5 Graphics screens can be copied to 0.4 other 0.3 applications such as word processors and 0.2 presentation 0.1 utilities for preparation and 0.0 presentation of 0.0 technical reports. COMPRESSOR SPEED = 10800 RPM 0.8 Ha rm on ic 1.0 ic on rm a tH 1s 2n d 0.9 Ha rm on ic 1.1 5th 4th 3r d 1.0 10^4) Frequency (Cycles/Min) (x n ic 1.1 MOTOR SPEED =1.2 1800 RPM 6th Harm o Frequency (Cycles/Min) (x 10^4) G:\ARMDWIN56G1\TORSION\Samples\SYNC-MOT.TNC TORSIONAL CRITICAL SPEED MAP (CAMPBELL DIAGRAM) - NATURAL FREQUENCY VS. SPEED G:\ARMDWIN56G1\TORSION\Samples\SYNC-MOT.TNC TORSIONAL CRITICAL SPEED MAP (CAMPBELL DIAGRAM) - NATURAL FREQUENCY VS. SPEED 1.2 0.9 0.8 0.7 0.6 Mode # 2 0.5 0.4 0.3 Mode # 1 0.2 0.1 0.1 0.2 0.0 0.0 0.3 0.1 0.4 0.2 0.5 0.6 0.7 0.8 Rotational Speed 0.3 0.4 (RPM) 0.5(x 10^4) 0.6 0.9 0.7 File>Open>Samples>SYNC-MOT.TOI Rotational Speed (RPM) (x 10^4) View>Graphics Output>Natural Frequency>Campbell Diagram Restore>open TORSION>Samples>SYNC-CSM.USR>OK Torsional natural frequencies can be dynamically excited by rotational speed or other sources of excitation such as the pulsating torques in synchronous motor during start-up. TORSION predicts dynamic amplification and performs fatigue analysis for determining system acceptability for its intended application. Drive train passing through 1 st torsional natural frequency. Drive train passing through 2 nd torsional natural frequency. File>Open>Samples>SYNC-MOT.TOI View>Graphics Output>Time Transient response Restore>TORSION>Samples>SYNC-MOT.USR>OK 6-23 1.0 0.8 1.1 0.9 1.2 1.0 1.1 1.2 ARMD – Main 7.0 UTILITIES 7.1 RBTSTYPE RBTSTYPE is a stand-alone utility used by all preprocessors for viewing and printing the text output files created by ARMD processors. Cursor keys may be used to scroll through the file. Mouse clicks in the scroll bars can also be used to move through the file. The RBTSTYPE utility can be activated from the ARMD front end (RBTSTYPE) or from each module when the View>Text Output option is selected. When RBTSTYPE is activated, a top level menu for opening and viewing files is displayed. When File>Open is selected from the main menu, a file dialog box is displayed for file selection. Once a file is selected, the file is loaded to memory for viewing and printing with RBTSTYPE. The following list presents the text output file extensions generated with the various processors and their associated modules along with a brief description: 7-1 ARMD – Main No. 1 2 3 4 Module ROTLAT TORSION JURNBR HYBCBR Menu Selection/Solver Text Output File Extension Run>Static Deflection / ROSTAT .DFO Run>Stability Analysis / ROSTAB .STO Run>Unbalance Response / ROSYNC .SYO Run>Time Transient Response / RORESP .RSO Run>Critical Speed Map / ROTORMAP Run>Stability Map / ROTORMAP .CMO Run>Natural Frequency / TORNAT .TNO Run>Steady State Response / TORHRM .TSO Run>Time Transient Response / TORRSP .TRO Run>Bearing Analysis / JURNBR .OUT Run>Post Processor / POSTMC (multiple case) .PSO Run>Bearing Analysis / HYBCBR .HCO .SMO 7-2 Description Static deflection analysis results that includes slope, shear and moment diagrams, rotating system weight distribution and bearing loads. Natural frequency, mode shape, stability and damping parameter analysis results. Synchronous unbalance response vibratory amplitudes, phase angles, and dynamic forces and moments. Non-synchronous time transient response amplitudes, dynamic stresses, and dynamic forces. Natural frequencies as a function of bearing/support stiffness. Natural frequencies, stability and damping parameters, and orbit direction as a function of rotational speed. Torsional natural frequencies, mode shapes, damping parameters and torsional critical speed map (Campbell diagram). Torsional steady state response results including torques, stresses, angular displacement, velocity and acceleration. Torsional response time history results including torques, stresses and fatigue life. Fixed geometry journal bearing analysis results including loads, power-loss, flow requirements, film thicknesses, pressures, stiffness and damping coefficients, stability parameters, recess flows and pressures, etc. as a function of journal eccentricities. Fixed geometry journal bearing analysis results similar to above as well as heat balance results as a function of user specified range of operating conditions. Conical geometry journal bearing analysis results including loads, power-loss, flow requirements, film thicknesses, pressures, stiffness and ARMD – Main No. Module Menu Selection/Solver Text Output File Extension HYBCBR 5 TILTBR damping coefficients, stability parameters, recess flows and pressures, etc. as a function of journal eccentricities.. Run>Post Processor / HYBPSTMC (multiple case) .HPO Conical geometry journal bearing analysis results similar to above as well as heat balance results as a function of user specified range of operating conditions. Run>Single / SINGLE .SNO Run>Assembly / ASSEMBLY .ASO Run> Post Processor / .TPO Tilting-pad geometry journal bearing analysis results of a single pad as a function of pivot film thickness. Tilting-pad geometry journal bearing analysis results including load, powerloss, flow requirements, film thicknesses, pressures, stiffness and damping coefficients, etc. as a function of journal eccentricities or applied loads.. Tilting-pad geometry journal bearing analysis results similar to above as well as heat balance results as a function of user specified range of operating conditions. TILPSTMC (multiple case) 6 THRSBR Description Run>Bearing Analysis / THRSBR .TOT Run>Post Processor / THRPSTMC (multiple case) .RPO Thrust bearing analysis results including load, power-loss, flow requirements, film thicknesses, pressures, stiffnessand damping coefficients, etc. as a function of bearing axial clearance.. Thrust bearing analysis results similar to above as well as lubricant heat balance results as a function of user specified range of operating conditions.. 7 BEARINGS Run>Post Processor / Single Case .TMO Text output from run of bearing solver within single case post processor for purpose of viewing 3-D graphical output. ( JURNBR = INTER.TMO HYBCBR = CINTER.TMO, THRSBR = THRPOST.TMO, TILTBR = TILPOST.TMO ). 8 VISCOS Run>Viscosity / VISCOS .VSO Lubricant temperature dependent properties.). 7-3 ARMD – Main 7.2 RBTSGRAF 7.2.1 Introduction RBTSGRAF software package is a general-purpose program used to view the graphics output of ARMD processors (JURNBR, ROSYNC, TORNAT, etc.). RBTSGRAF is supplied with each software package purchased from RBTS. With the ARMD software package, RBTSGRAF is copied to the computer when the Utilities item is selected from the Select Components dialog of the ARMD installation program. 7.2.2 Installed Files The following files are needed to run RBTSGRAF: RBTSGRAF.EXE RBTSGRAF.CHM RBTSFILE.CFG RBTSGRAF.INI *.USR - 7.2.3 Main program Help file Data file containing information about graphics file extensions Initialization file containing RBTSGRAF templates Sample user options files (optional user created files) Main Menu The main menu of RBTSGRAF is divided into six menus: File, Edit, View, Project, Window, and Help. File Menu Open opens a graphics file and loads its data into memory. Save writes the current graphics file to disk. Combine combines multiple graphics files of same dimensions (rows, columns and same extension into one logical unit. 7-4 ARMD – Main Save As prompts for a file name and saves the current graphics file to that file name. Print prints the current graphics file in ASCII form to the printer. Printer Setup allows the current printer settings to be modified. Exit exits RBTSGRAF. Edit Menu Copy copies selected text to system clipboard Select All selects all text in the current window Find prompts for string to search for in window Find Next find next occurrence of previous search string View Menu Input File displays the current input file in a readonly window. The file may then be scrolled through or printed. Graph activates a sub-menu in which a graph may be viewed by template or by options. Here, a JURNBR graphics file is viewed by template. Template entries for files with the .GRF extension include Eccentricity Ratio, Power Loss, etc. The selection can be changed with the arrow keys or mouse. Pressing the OK button will display the graph options for that particular template entry. These options may be temporarily changed by accessing the sub-forms under the Graph Options form. 7-5 ARMD – Main Summary displays information including the name of the current options file, the graphics file name, file date, file size and name of processor that created the graphics file (e.g. JURNBR, RORESP). Project Menu See Section 6.3 below for details Window Menu Close All Closes any open windows Cascade Overlaps open windows Tile>Vertically Tiles open windows in vertical direction Tile>Horizontally Tiles open windows in horizontal direction Arrange Icons Arranges icons for minimized windows Help Menu Contents displays table of contents for RBTSGRAF help file. Tutorial displays tutorial for RBTSGRAF. How to Use Help displays help on how to use help system. 7-6 ARMD – Main RBTS, Inc. displays information about Rotor Bearing Technology & Software, Incorporated. ARMD displays general information about ARMD. RBTSGRAF displays general information about RBTSGRAF. ARMD Users Manual displays ARMD on-line users manual. Settings displays a window for graph settings. About displays the program name, date, version and copyright notice and current open project. 7.2.4 Plot Arrangement RBTSGRAF arranges plots on the screen depending on the number to be drawn as follows: 1 2 1 3 7.2.5 1 1 3 2 2 4 Templates, User Options, and Macro Strings Templates are only available for graphics files with a fixed number of variables for output such as data files generated by processors like JURNBR, HYBCBR, TILTBR, THRSBR, and VISCOS modules which produce graphics output files independent of user specified parameters. Processors for the ROTLAT and TORSION modules which produce variable amount of graphics output (depending on input file), do not have template entries. Users may want to create option files for these graphics files as a type of "mini-template". 7-7 ARMD – Main User option files may be created from the View>Graph>by Option command. The settings for the plots in a graph window may be saved to or restored from user option files. User option files have the .USR file extension. With either templates or user options plots, plot titles can be assigned explicit strings (e.g. "Sample Compressor Problem" ) or macro strings. Macro strings, when plotted, are replaced with their equivalent value. The following macro strings are available: @FILE.NAME name of graphics file (e.g. C:\Program file\ARMDW\JURNBR\Samples\Demo.GRF) @FILE.DATE date that graphics file was created (e.g. 10/01/08 15:04:46) @TITLE.n title of the n-th column of data (e.g. the third title would be referred to as @TITLE.3) @FILE.TIME time that graphics file was created (e.g. 15:04:47) @FILE.BASENAME name of graphics file without drive or path (e.g. DEMO.GRF) @PROJECT.NAME name of currently open project or zero-length string if none is open. 7.2.6 Graphics File Extensions The following list present the various graphics output file extensions generated with the various processors and their associated modules along with a brief description: 7-8 ARMD – Main No. 1 2 3 Module ROTLAT TORSION JURNBR Menu Selection/Solver Graphics Output File Extension Run>Static Deflection / ROSTAT .DFG Run>Stability Analysis / ROSTAB .STG Run>Unbalance Response / ROSYNC .SYG Run>Unbalance Response / ROSYNC .SPG Run>Unbalance Response / ROSYNC .SBG Run>Time Transient Response / RORESP Run>Critical Speed Map / ROTORMAP Run>Stability Map / ROTORMAP .RSG .CMG .SMG Run>Natural Frequency / TORNAT Run>Natural Frequency / TORNAT Run>Steady State Response / TORHRM .TNG Run>Steady State Response / TORHRM .TSG Run>Steady State Response / TORHRM .TTG Run>Time Transient Response / TORRSP .TRG Run>Bearing Analysis / JURNBR .GRF .TNC .TEG 7-9 Description Static deflection analysis results that includes slope, shear and moment diagrams, rotating system weight distribution and bearing loads. Mode shapes with their natural frequency, stability and damping parameters. Synchronous unbalance response vibratory amplitudes, phase angles, and dynamic forces and moments. Synchronous unbalance response vibratory amplitudes at ±45 degrees from vertical Y-axis. Synchronous unbalance response orbits at bearing stations and for user selected initial, intermediate, and final operating speeds. Non-synchronous time transient response amplitudes. Natural frequencies as a function of bearing/support stiffness. Natural frequencies, stability and damping parameters as a function of rotational speed. Torsional mode shapes, their natural frequencies and damping parameters. Torsional critical speed map (Campbell diagram). Torsional steady state response containing element element torque/stress output results. Torsional steady state response containing station vibration output results. Torsional steady state response containing element thermal output results. Torsional response time history results. Fixed geometry journal bearing analysis results including loads, power-loss, flow requirements, film thicknesses, pressures, stiffness and damping coefficients, stability parameters, recess flows and pressures, etc. as a function of journal eccentricities. ARMD – Main No. 4 5 Module Menu Selection/Solver Graphics Output File Extension JURNBR Run>Post Processor / POSTMC (multiple case) .PSG HYBCBR Run>Bearing Analysis / HYBCBR .HCG Run>Post Processor / HYBPSTMC (multiple case) .HPG Run>Single / SINGLE .SNG Run>Assembly / ASSEMBLY .ASG Run> Post Processor / .TPG TILTBR TILPSTMC (multiple case) 6 7 THRSBR VISCOS Run>Bearing Analysis / THRSBR .THG Run>Post Processor / THRPSTMC (multiple case) .RPG Run>Viscosity / VISCOS .VSG 7-10 Description Fixed geometry journal bearing analysis results similar to above as well as heat balance results as a function of user specified range of operating conditions. Conical geometry journal bearing analysis results including loads, power-loss, flow requirements, film thicknesses, pressures, stiffness and damping coefficients, stability parameters, recess flows and pressures, etc. as a function of journal eccentricities. Conical geometry journal bearing analysis results similar to above as well as heat balance results as a function of user specified range of operating conditions. Tilting-pad geometry journal bearing analysis results of a single pad as a function of pivot film thickness. Tilting-pad geometry journal bearing analysis results including load, powerloss, flow requirements, film thicknesses, pressures, stiffness and damping coefficients, etc. as a function of journal eccentricities or applied loads.. Tilting-pad geometry journal bearing analysis results similar to above as well as heat balance results as a function of user specified range of operating conditions. Thrust bearing analysis results including load, power-loss, flow requirements, film thicknesses, pressures, stiffnessand damping coefficients, etc. as a function of bearing axial clearance.. Thrust bearing analysis results similar to above as well as lubricant heat balance results as a function of user specified range of operating conditions.. Lubricant temperature dependent properties.). ARMD – Main 7.3 7.3.1 ARMDGraph Introduction ARMDGraph is a newly developed general-purpose program to replace RBTSGRAF (section 7.2), with more user features and capabilities, that is used to view graphics output of ARMD processors (JURNBR, ROSYNC, TORNAT, etc.). Similar to RBTSGRAF, ARMDGraph is supplied with each software package purchased from RBTS and it is installed during ARMD installation. ARMDGraph features include: New workspace concept. New graphical user interface to access and customize graphs. New output file format (*.usrx) allows more customization of graphics data files than the previous .usr format. Ability to create multiple graphs each of which may contain multiple charts. Ability to plot lines in a chart from different graphics data files. Backwards compatible with .usr files generated with RBTSGRAF graphing utility. Customizable annotations and line markers. Automatic detection of graphics data file changes/updates. Clipboard support including: - Copy graph to clipboard as bitmap (.BMP) - Copy input file to clipboard as text file (.TXT) Utilizes GUI help system. Accelerator keys for accessing menu items. Project menu for convenient access to project functions. ARMDGraph features include the following: Multiple plots per window (1, 2, 3 or 4). Line, polar and FFT plots. Templates for automatic configuration of graphs. Save/restore user options (*.USRX), for custom graphs, including: - log, semilog or linear axis scaling. - automatic or manual axis scaling. - log, semilog or linear axis scaling. - automatic or manual axis scaling. - grid lines (ON or OFF). - legend position (hidden, inside or outside right). - draw curves with lines, symbols or both. - macro strings for flexible title assignment. 7-11 ARMD – Main 7.3.2 Workspace ARMDGraph employs a Workspace concept to manage multiple graphs with associations to single or multiple graphics output files. The workspace can be viewed to be a user settings form that contains user defined plot/chart configurations for graphics output files generated by ARMD solvers. The workspace consists of two basic left/right panels. The left panel contains the graphs, charts, and graphic output files, while the right panel contains chart/graph settings. A typical session/tutorial with is graphically shown below. Further details and help are available after ARMD/ARMDGraph installation from within the help menu. 2- Files with templates. 1- Open graphics data file. 3- Configure Workspace. Double click an entry. 2- Files with no templates. 4- Press “Show/Update Graphs” button to display the chart/graph window. 7-12 ARMD – Main 7.4 7.4.1 3-D Bearing Viewer Introduction BRGVU is a general purpose program used to view the 3-D graphical output of ARMD fluid-film bearing solvers (JURNBR, HYBCBR, THRSBR, TILTBR). Output includes clearance, pressure and shear-stress distributions as well as structural deformation (if applicable). BRGVU is copied to your computer when the Utilities item and any fluid-film bearing package are selected from the Select Components dialog of the installation program. 7.4.2 Main Menu The main menu of BRGVU is divided into the following menus: File, Edit, View, Contours, Deformation, Display, Zoom, Rotate, Colors, Window and Help. File Menu Open opens a 3-D graphics file and loads its data into memory. A window with a default view will then be displayed. Close closes the currently open graphics file and any view windows associated with it. Print print the contents of the current view window. Print Preview preview printer output for the current view window. Print Setup configure the printer settings. Exit exits BRGVU. Edit Menu Undo undo last undoable command. Cut cut selected object and paste to clipboard. Copy copy selected object to clipboard (e.g. model view) Paste paste clipboard contents to current context. 7-13 ARMD – Main View Menu New create and display new view window based on currently active view. Save save window settings to last restored .VUE file Save As save window settings to a .VUE file Restore restore window settings from a .VUE file Contours Menu None checked if no contouring done. Clearance checked if contouring by clearance. Pressure checked if contouring by pressure. Shear-Stress checked if contouring by shear-stress. Shading checked if light shading is used. Automatic range checked if program determines contour limits. User-specified range checked if user specified contour limits are used. Deformation Menu None checked if no deformation done. Clearance checked if deformation by clearance. Pressure checked if deformation by pressure. Shear-Stress checked if deformation by shear-stress. Automatic scale factor checked if program determines deformation scale factor. User-specified scale factor checked if user-specified scale factor is used for deformation. Display Menu Pads display dialog for controlling which pads are displayed. 7-14 ARMD – Main (Default=set 0) Output Set display dialog for selecting output set for the current view window. Mesh checked if mesh is drawn on model. (Default=ON). Hidden Elements checked if hidden elements are removed. (Default=removed) Animate checked if animation if ON (default=OFF). Zoom Menu Previous restore previous zoom Enclose Model display model to fit within view window. Zoom Out 1:1 restore default zoom level. Zoom In N:1 zoom out (factor of N). Rotate Menu Isometric display isometric view. User specified… display with user-specified rotation, translation, and zoom. XY Front XY Back XZ Front XZ Back YZ Front YZ Back display model with 2-D perspective Colors Menu Contours select colors for contouring Shading select color for light shading. Mesh select color for mesh grid. Text select foreground color for text. 7-15 ARMD – Main Background select background color for model and text. Window Menu New create new view window with default settings Cascade cascade current view windows Tile Horizontally tile current view windows horizontally Tile Vertically tile current view windows vertically Arrange Icons arrange icons for minimized view windows Help Menu Help Topics displays table of contents for help file About 7.4.3 displays the program name, data, version and copyright notice for BRGVU. View Settings View settings may be saved to and restored from disk via the View menu. View setting files have the .VUE file extension. 7.4.4 No. 3-D File Extensions Module Processor/Solver File Extension Description 1 JURNBR JURNBR .JUV Clearance and pressure distributions and structural deformation. 2 HYBCBR HYBCBR .HYV Clearance and pressure distributions and structural deformation. 3 THRSBR THRSBR .THV Clearance and pressure distributions and structural deformation. 4 TILTBR SINGLE .TIV Clearance and pressure distributions. 7-16 ARMD – Main 7.5 7.5.1 3-D Shaft Viewer Introduction ARMD Shaft Viewer is an integrated graphics utility in the ARMD suite. It uses modern 3 D graphic rendering technology to provide a highly realistic view of model shaft systems which can be rotated, zoomed and moved to provide the user with a clear viewpoint of features of interest in the shaft system. Shaft systems designed in ROTLAT or TORSION can be loaded into the Shaft Viewer, which then automatically loads any model solution results of torsional natural frequency mode shapes, rotor stability mode shapes, and unbalanced response orbits. These model distortions/vibrations can be selected, scaled, and animated, showing a unique visual representation of the rotor/bearing system or mechanical drive train vibration characteristics from the ARMD Shaft Viewer WORKSPACE (shown below). Bearing Disk The Shaft Viewer can be run as a stand-alone display utility either from the ARMD main menu or from the computer’s Start menu. It is also fully integrated into the ROTLAT Rotor Dynamics and TORSION Torsional Vibration modules, where it can be accessed via the View menu as shown below (if run from ROTLAT or TORSION, it will start with the model in use fully loaded). 7-17 ARMD – Main ARMD Shaft Viewer is supplied with the Rotor Dynamics and Torsional Vibration modules purchased and it is automatically installed during ARMD installation. 7-18 ARMD – Main 7.5.2 Sample Session Rotor models can be opened directly from the Shaft Viewer main File menu. Shaft models can be loaded into the Shaft Viewer from the File > Open or File > Recent Files main menu selections. When using the File > Open menu selection, a Windows Open File dialog is displayed, starting either in the current ARMD project folder, or the most recently used folder if no ARMD project is open. Files displayed in the dialog are filtered by default to *.roi and *.toi files which contain ROTLAT and TORSION shaft system file specifications, respectively. After loading a shaft system model, the viewer will render it on the screen. Shown below is the display of the sample COMPRES.ROI model, where annotation has been added in italics for this screen shot. By default, the display opens in the ISO view, with the axes rotated to show detail along all three axes. The viewpoint of the display can be modified by using the buttons on the left side of the display. By pressing the + and – buttons, the display can be zoomed or rotated (shown below) about any of the three axes. The arrow buttons in the middle of the Viewpoint group move the display left, right up and down. 7-19 ARMD – Main Bearing Disk Continuous motion can be achieved by holding any of the arrow buttons down. The display can be reset at any time to one of 4 standard viewpoints, the default ISO view, or projections on the YZ, XZ, or XY planes. If by any chance the viewpoint is modified to the point where the model is no longer visible, clicking on either a standard viewpoint or the Enclose button will re-center the model in the display. The enclose button will recenter the model without changing its orientation. The various elements of the model can be selected for display using the check boxes in the Visibility control group. When the Solid and Mesh items are selected, the viewer performs an automatic level-of-detail (LOD) calculation considering the distance to the shaft system to determine when the mesh would be sufficiently dense to hide the solid display, and then suppresses the mesh display if needed. In the first screen shot above, the LOD has suppressed the mesh on the entire model. Shown below are snapshots of how this display appears as we zoom in. 7-20 ARMD – Main Note that the LOD calculation is performed on an element by element basis, so that more distant elements will have their mesh suppressed while closer ones are shown. If the solid display is not selected but the mesh is, then the LOD calculation is not performed, and the mesh is shown for all elements. 7-21 ARMD – Main Information about the shaft’s elements can be found in the shaft element display when an element is selected. This display shows the size and length of each element. The element selected can be highlighted by selecting the mesh-only display. As shown below, this highlights element 7 on the display by showing it in black. 7-22 ARMD – Main The main feature of the Shaft Viewer is its ability to display and animate the motions calculated by the various ARMD solvers. When the Shaft Viewer loads a ROTLAT or TORSION shaft system model, it looks for supported solver output files, and if they are present will load any or all of them automatically, no user interaction is needed. These output sets are then presented to the user for display in the Output Set: drop-down box on the viewer’s main toolbar (shown below). Once an output set has been selected, the next step is to select a particular property in the set to be displayed. For ROSTAB and TORNAT mode shapes, the property is the specific mode shape. This is accomplished from the Output Set Property drop-down box (shown below). The scale of the distortions displayed can be adjusted using the Shape Amplitude text box (shown above) on the toolbar. 7-23 ARMD – Main Displayed mode shapes and vibrational amplitudes (orbits) can be animated by pressing the play button. During animation, clicking the Pause button will pause the animation at its current frame. The Single Step button advances from the current to the next frame, while the Stop button resets the animation to frame 0. Animation speed can be increased/decreased with the slider/speed bar shown above. In some cases, it can be easier to see the mode shapes or vibrational amplitudes without looking at the model’s solid or mesh displays. Here’s a snapshot of the COMPRES.ROI sample problem first mode shape without the solid or mesh. The red line represents the location of the center of the shaft at each station in the model. Animating this view can show better detail of the precise motions including relative phases at each station. This is accomplished by using the Visibility check boxes positioned right above the animation controls (also shown below). 7-24 ARMD – Main 7.6 Projects. A project allows related files to be grouped together in a subdirectory. If a project is not open, ARMD software will handle files as it did in older versions (e.g. V4.1G0 or higher). Project functions are available from the Project menu and include: Project>New - prompts for a unique project name (up to eight characters). An ARMD project file (.APF) is then created. The new project is opened/activated. Project>Open - prompts for an .APF and opens/activates the project it represents. Project>Close- closes the current project. ARMD is now out of project mode. Project>Rename- rename an existing project to a new, unique name. Project>Copy - copy the files in a project to a new project. The .APF file is also copied to the new project name (eg. OLD.APF to NEW.APF) Project>Delete Project - deletes a project and all of the files in the project subdirectory. The .APF file is deleted and the subdirectory is removed. *** WARNING *** All files in a project subdirectory will be copied/deleted regardless of whether ARMD or other software (eg. word processor) created them! Project>Add File - copy an existing file to the current project subdirectory. The file does not have to be in a project subdirectory. This is useful for moving older input files (Version 4.x or higher) into projects. Project>Delete File - delete an individual file. The file does not have to be in a project subdirectory. Project>File Report - prompts for an .APF file and then displays a summary report of all files in the project subdirectory. Project>Project Report - displays a summary report of all projects available. Project files (*.APF) are found in the main ARMD directory (eg. C:\Program Files\ARMDW). When ARMD is in project mode, the status line will show the current project name in the third slot from the right. Also, the "About" box in the preprocessors and utilities can be viewed to see what project is currently open. 7-25 8.0 ARMD MESSAGES Message/Reason: Location(s): Can not delete currently open project Project menu A project can not be copied or deleted if it is currently open or "active". Close the project then try the function again. Can not copy project to itself A project can not be copied onto itself. Project menu Can not delete .APF file (use Delete Project) Project menu .APF files represent a link to an existing project directory. Use the Delete Project function to delete the project files, project directory and corresponding .APF file. Can not delete configuration files (CFG,INI) Project menu Configuration files used by ARMD software should not be deleted. This includes .CFG files (RBTSFILE.CFG) as well as initialization files (ARMD.INI and RBTSGRAF.INI). Can not delete executable files (EXE,COM,BAT,386,DLL,PIF) Project menu As a safety feature, programs, batch files and overlays can not be deleted from ARMD. Can not delete lubricant property database Project menu The lubricant property database file, LUBPROP.DAT, should not be deleted because it can be used by the bearing post processors, TILTBR (Assembly) and the bearing editor of ROTLAT. Can not reduce NPAD if pad is referenced JURNBR, HYBCBR The number of pads can not be reduced if other parts of the input data reference the pads bigger than the attempted value of NPAD. For example, if a three pad bearing has a recess on pad 3 then NPAD can not be changed to 2 until the recess on pad 3 is either moved or deleted. COBRA was not found The rolling element bearing portion of ARMD software was not installed. ARMDMENU Different units in .XXX and .YYY files ARMD Different units of measure are used in filename.XXX and filename.YYY. Either convert the .XXX file to the same units as the .YYY file or vice-versa. Error accessing lubricant property database ARMD Error opening LUBPROP.DAT file. This could occur if the file was not installed onto the computer. It may also occur if the Path entry in ARMD.INI is not set properly. Refer to the installation section of the ARMD manual for details. 8-1 Error accessing RBTSFILE.CFG RBTSTYPE Error opening the RBTSFILE.CFG file. This could occur if the file was not installed onto the computer. It may also occur if the Path entry in ARMD.INI is not set properly. Refer to the installation section of the ARMD manual for details. Error copying .HPI file, HYBCBR Error copying .PSI file, JURNBR Error copying .RPI file, THRSBR Error copying .TPI file TILTBR Error encountered when trying to copy the post input file when doing a Save As on the current input file. There may not be enough disk space to complete the operation. Error copying text output file, ARMD Error copying graphics output file, Error copying non-dimensional file, Error copying mode shape file, Error copying continuation file, Error copying MIN file, Error copying MAX file Error copying output file from solver. The solver might have exited prematurely (e.g. error, user cancel) before the output files could be created. If a text output file was created, check it for any error messages. Error creating solver input file ‘filename.ext’ ARMD Each solver requires at least one input file. For example, TORSION solvers require TORSION.TOI as input. This error may occur if the input file is already opened by another application. It might also occur if there is insufficient space on disk to create the entire file. Error creating temporary file ARMD This error may occur if there is insufficient space on disk to create a temporary file. Error deleting file This could occur if the file is read-only or is in use by another program. Project menu Error deleting project Project menu Error encountered while deleting a project. This could occur if a read-only file or subdirectory exist under the project directory. Error importing damping coefficients from BRG.D, Error importing stiffness coefficients from BRG.K Error encountered while reading a bearing matrix file. Error importing ROTLAT file A ROTLAT input file could not be imported into TORSION successfully. 8-2 ROTLAT TORSION Error loading file RBTSGRAF.INI templates RBTSGRAF The initialization file for RBTSGRAF could not be read. Therefore templates will not be available. Error opening INTER.OOO Error opening CINTER.OOO Error opening THR-POST.OOO Error opening TILPOST.OOO Error opening text file created by single case post processor. JURNBR HYBCBR THRSBR TILTBR Error deleting bearing file(s), ROTLAT Error renaming bearing file(s) Internal error when manipulating bearing files of ROTLAT configuration (e.g. insert, delete). Contact RBTS. Error running post processor ROTLAT Error encountered when trying to run a bearing post processor from within the ROTLAT preprocessor. There may not be enough memory available. Error running INTER.EXE JURNBR Error running CINTER.EXE HYBCBR Error running THRPOST.EXE THRSBR Error running TILPOST.EXE TILTBR Error encountered when interpolation routine can not be executed from within a post processor. There may not be enough memory available. Field value ‘#’ is too large or small. Data range from M to N A value was entered that is outside the range of acceptable values. ARMD File does not match bearing DOF ROTLAT Error encountered when attempting to import a bearing matrix file (BRG.D or BRG.K) and the matrix size does not correspond to the degrees-of-freedom for the current bearing. File read error, Error reading input file Error encountered when trying to read an existing file. ARMD File write error, ARMD Error writing file to disk Error encountered when trying to write data to a file. This could occur when the destination disk is full. 8-3 Input data not present ARMD Error encountered when trying to perform a function that requires input data to be present. Try loading an existing file or creating a new file before attempting this function again. Input file exceeds program capacity ARMD The input file contains more data than the module can edit. For example, a 100 node ROTLAT file can not be edited by a 60 node version of ROTLAT software. Insufficient number of pivot clearances in .SND file (NPC < 3) At least 3 pivot clearances should be specified before running ASSEMBLY. TILTBR Insufficient number of points for interpolation ROTLAT There are not enough points in the non-dimensional file to generate bearing coefficients. At least three are needed. For JURNBR and HYBCBR, make sure there are at least 3 eccentricities specified in the original input file and rerun the analysis if needed. In TILTBR, make sure there are at least 3 pivot clearances specified in the original input file. Invalid axial/radial grid BEARINGS An invalid grid network has been specified for the bearing. The axial/radial grid model needs a minimum of two grid locations. Invalid circumferential grid BEARINGS An invalid grid network has been specified for the bearing. The circumferential grid model needs a minimum of two grid locations. Invalid clearance An invalid clearance was specified for the bearing (e.g. negative). BEARINGS Invalid deformation grid (check model) JURNBR, HYBCBR, THRSBR An invalid grid network has been specified for structural deformation. Invalid diameter An invalid diameter was specified for the bearing (e.g. zero). BEARINGS Invalid file format ARMD ARMD software could not recognize the format of the file. If the file was created with an older version of ARMD software, then convert it and save it in the new format. This procedure is necessary when the input file format changes for a solver. In ROTLAT, this error can also occur if a non-dimensional file was created with a version of ARMD software that the current ROTLAT does not recognize. In this case, regenerate the nondimensional file and try again. 8-4 Invalid filename specified ARMD An invalid filename was specified. Check the user's manual of your operating system for correct syntax. Invalid inner radius BEARINGS An invalid inner radius was specified for the bearing (e.g. inner radius larger than outer radius). Invalid groove angle BEARINGS An invalid groove angle was specified (or internally calculated) for the bearing. Invalid length An invalid length was specified for the bearing (e.g. negative). BEARINGS Invalid minimum film angle An invalid minimum film angle was specified for the bearing. BEARINGS Invalid node number An invalid node number was specified. Check input. TORSION Invalid outer radius BEARINGS An invalid outer radius was specified for the bearing (e.g. less than inner radius). Invalid pad angle An invalid pad angle was specified for the bearing. BEARINGS JURNBR was not found The JURNBR portion of ARMD software was not installed. ARMDMENU HYBCBR was not found The HYBCBR portion of ARMD software was not installed. ARMDMENU Lubricant property library file full BEARINGS, VISCOS The lubricant property database contains the maximum number of entries supported by ARMD software. If more must be added, then delete unneeded entries first. Mixed units of measure RBTSGRAF All data columns selected for an axis must have the same units of measure. Model not valid ARMD The model is incorrect because it contains one or more errors. View the error file to see specific errors and warnings. Must have at least 3 speeds ROTLAT ROTLAT files must contain at least three speed conditions. The delete function will not work if there are only three speeds. 8-5 No axial points for deformation grid JURNBR, HYBCBR No radial points for deformation grid THRSBR No grid points have been specified for structural deformation in the axial/radial direction. No axial points for variable grid JURNBR, HYBCBR No radial points for variable grid THRSBR No circumferential points for variable grid BEARINGS No grid points have been specified for the variable grid in the axial/radial direction. No circumferential points for deformation grid JURNBR, HYBCBR, THRSBR No grid points have been specified for structural deformation in the circumferential direction. No data in file RBTSGRAF The input file has no graphics data for plotting. If this is an output graphics file, verify the contents of the original input file that was used by the solver to generate this output. Invalid non-dimensional file specified. ROTLAT If a bearing type is greater than zero, then a valid non-dimensional file must be specified for the bearing. This is needed because the bearing coefficients will be automatically regenerated before running the ROTLAT solver. No printer drivers At least one printer driver must be configured in the system to use printing. ARMD Need at least one vector for ordinate RBTSGRAF Need at least one vector for abscissa RBTSGRAF No columns of data were selected for the ordinate axis. RBTSGRAF requires at least one and at most 15. Not enough branches available TORSION There are not enough unused branches available in the torsional model to import the branch of the rotor dynamics (ROTLAT) input file for append mode. Not enough discs available TORSION There are not enough unused disc entries available in the torsional model to import the discs of the rotor dynamics (ROTLAT) input file. Not enough elements available TORSION There are not enough unused elements available in the torsional model to import the elements of the rotor dynamics (ROTLAT) input file. Not enough materials available TORSION There are not enough unused material entries available in the torsional model to import the materials of the rotor dynamics (ROTLAT) input file. 8-6 Project already exists Project menu This error can occur when trying to create a new project with the name of an existing project. It could also occur when trying to rename a project to the name of a project that already exists. ROTLAT was not found The ROTLAT portion of ARMD software was not installed. ARMDMENU String not found ARMD The specified string could not be found in the text. If case sensitivity was enabled, try doing a case-insensitive search. THRSBR was not found The THRSBR portion of ARMD software was not installed. ARMDMENU TILTBR was not found The TILTBR portion of ARMD software was not installed. ARMDMENU TORSION was not found The TORSION portion of ARMD software was not installed. ARMDMENU VISCOS was not found The VISCOS portion of ARMD software was not installed. ARMDMENU BEARINGS Warning: Too many cases in file (file will be truncated) If a file has more cases than the post processor can handle, the extra cases will not be read. NOTE: These extra cases will be lost if the file is then saved or if the interpolation routine is executed. WARNING: User options meant for different file type RBTSGRAF This warning occurs when the graphics file extension does not match the file extension of the options file. Zero length file RBTSGRAF The input file contains no data (size equals zero bytes). If this is an output graphics file, verify the contents of the original input file that was read by the solver to generate this output. e0914 - Bearing #, Speed #: Invalid stiffness matrix ROTLAT Stiffness matrix for bearing at speed condition is invalid (zeros along diagonal). 8-7 e0908 - Element #: Invalid length, ROTLAT e0908 - Branch #, Element #: Invalid length TORSION Element has length less than or equal to zero. In TORSION, an arbitrary length should be specified for flexible elements (Type 3) to avoid divide-by-zero errors when calculating mode shapes. e0805 - Element #: OD1 <= ID1, ROTLAT e0805 - Element #: OD2 <= ID2, ROTLAT e0805 - Branch #, Element #: OD1 <= ID1, TORSION e0805 - Branch #, Element #: OD2 <= ID2, TORSION Outer diameter of element is less than or equal to inner diameter. Outer diameter should be larger than inner diameter. w0810 - Element #: Uniform element ID1 != ID2, ROTLAT w0810 - Element #: Uniform element OD1 != OD2 Warning given for uniform elements when diameters at either end of element do not match each other. e0806 - Insufficient connectivity in system TORSION Not enough connections were specified for a system. If a system has N branches, then it should have at least N-1 connections. For example, a three branch system will have two connections. e0807 - Branch #: No elements specified TORSION A branch was specified that has no elements. Every branch should contain at least one element. 8-8 9.0 USER FEEDBACK REPORT Instructions Date:____/____/____ Use this form to report problems or recommend enhancements for RBTS products. Please email, mail, or fax the form to: RBTS, Inc. 1041 West Bridge Street Phoenixville, PA 19460, USA Tel: (610) 415-0412 ; Fax: (610) 415-0413 email: [email protected] User Name:___________________________________ Email:________________________ Company:________________________________ Telephone #:___________________ Address: _____________________________________________________ _____________________________________________________ _____________________________________________________ Check: [ ] Software Problem [ ] Software Enhancement [ ] Documentation Problem [ ] Documentation Enhancement [ ] Other (please specify):__________________________________________ Software Name of Software:_______________________ Version of Software:__________________ Name of Operating System and Version:_________________________________________ Hardware Computer Manufacturer/Model Name____________________________________________ Is your computer connected to a network (yes/no)?_________________________________ Is your computer connected to a docking station (yes/no)?____________________________ (OVER) 9-1 Description Please describe the problem/enhancement below. If it is a problem, please include information on reproducing the anomaly: ___________________________________________________________________________ ___________________________________________________________________________ ___________________________________________________________________________ ___________________________________________________________________________ ___________________________________________________________________________ ___________________________________________________________________________ ___________________________________________________________________________ ___________________________________________________________________________ ___________________________________________________________________________ ___________________________________________________________________________ ___________________________________________________________________________ ___________________________________________________________________________ ___________________________________________________________________________ ___________________________________________________________________________ ___________________________________________________________________________ ___________________________________________________________________________ ___________________________________________________________________________ ___________________________________________________________________________ ___________________________________________________________________________ ___________________________________________________________________________ 9-2 Purchasing Options ARMD is constructed from various solution modules. It can be tailored to suit your needs and budget. You may purchase any combination of programs/modules or all if you wish. Licensing is available as a single seat or multi-seat network configuration. With your purchase, the package includes the software (CD or download), quick start manual, electronic user’s manual, technology transfer and training session (optional), updates, maintenance, and support. For further information, please contact us. RBTS, Inc. Rotor Bearing Technology & Software 1041 West Bridge Street Phoenixville, PA 19460 USA System Requirements: Telephone: Facsimile: Web: Email: Personal computer with Microsoft Windows XP, Vista, Windows 7, Windows 8 or higher (32 or 64 bit). Remember, with RBTS, you get more than 610-415-0412 610-415-0413 www.rbts.com [email protected] just the programs, you get the company with more than 50 years of experience in the areas of tribology and machinery dynamics. TM ARMD - The Worldwide Leading Software For Rotating Machinery Analysis Advanced Rotating Machinery Dynamics ARMD is a well established software package used worldwide to perform complete rotating machinery dynamic analysis. ARMD employs a user-friendly interface and window environment with pulldown menus and context-sensitive help. ARMD integrates the most advanced and complete rotor dynamics, torsional vibration, and bearing analysis programs under one environment in a seamless fashion to give you the power to model your rotating machinery with ease, efficiency and above all accuracy. Some applications in which ARMD has been utilized include rotating machinery such as a miniature air turbine for a dental drill, a large turbine generator set for a power plant, a small compressor for an air conditioner, a pump for an artificial heart, a fuel pump for a jet engine, an electric motor and spindle for a miniature computer hard disk, a canned pump for petrochemical processing plant, synchronous motor driven drivetrains, and a gear box for an Uranium enrichment plant. RBTS, Inc. Rotor Bearing Technology & Software 1041 West Bridge Street Phoenixville, PA 19460, USA RBTS' software has gained international reputation for its: s Technical Capabilities s Completeness s User Friendliness s Support & Service