1
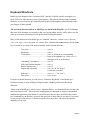
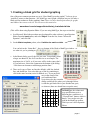
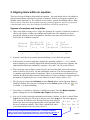
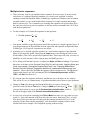
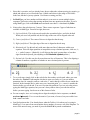
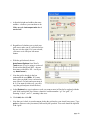
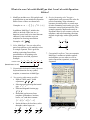
TIPS & TRICKS FOR THE EQUATION EDITOR OR MATHTYPE USER Presented by: Bob Mathews Director of Training Design Science, Inc. E-mail: [email protected] Phone: 830-990-9699 Welcome to Tips & Tricks for the Equation Editor or MathType User. This session is not designed to teach you how to use Microsoft Equation Editor or MathType. We assume you already know how to use these products. In the session, you will learn how to use these products better and more efficiently. We will be using Microsoft Word today, but MathType works very well with other word processors (such as WordPerfect and AppleWorks), presentation software (such as PowerPoint and Corel Presentations), web page-authoring software (such as FrontPage), as well as most other software. I hope many of your needs will be addressed in this session but if you need help in the future, the following sources are available: 9 Equation Editor Tips & Tricks – Even if you’re a MathType user, our Equation Editor Tips & Tricks will likely have several tips you can use. Access the tips from our home page: www.dessci.com. Your email address will be your password to access the page immediately. 9 Help File – MathType and Equation Editor both have extensive help files. 9 User Manual – MathType comes with a comprehensive User Manual, and many questions can be answered by referring to the manual. Chapter 4 of the MathType User Manual includes 18 step-by-step tutorials to get you started. Equation Editor has no printed user documentation. 9 Technical Support – We provide lifetime technical support for MathType and limited technical support for Equation Editor. For technical support: ¾ Phone: 562-432-2920 ¾ Email: [email protected] ¾ Web: www.dessci.com/en/support. There is a collection of support notices and tutorials that will cover most topics. Bob Mathews Director of Training [email protected] th Design Science, Inc. • 140 Pine Avenue 4 Floor • Long Beach • California • 90802 • USA • 562.432.2920 • 562.432.2857 (fax) • [email protected] • www.dessci.com Keyboard Shortcuts MathType was designed with a “point and click” interface. Find the symbol or template you need, click on it, and it becomes part of your equation. The software also has many keyboard shortcuts, so you can access the commonly used symbols and templates without having to take your fingers off the keyboard. The keyboard shortcuts built in to MathType are listed in the Help file. You’ll find though, that most of the shortcuts are so intuitive that you can learn them quickly, and be able to use the software even more efficiently to create professional-looking documents. Many of the shortcuts used in MathType are “standard” shortcuts – such as CTRL+S for save, CTRL+C for copy, CTRL+V for paste, etc. (On the Mac, substitute the COMMAND key for the CTRL key.) Listed here are some of the most commonly used keyboard shortcuts: Text style* ..........................................CTRL+E Math style...........................................CTRL+= Greek letters .......................................CTRL+G, followed by corresponding ............................................................letter of the alphabet (e.g., press CTRL+G, then press a for an α character) “Expanding” parentheses ...................CTRL+9 Full-sized fraction template ...............CTRL+F Radical (square root)..........................CTRL+R Superscript (exponent) .......................CTRL+H (“h” for “high”) .COMMAND+E on Mac Subscript ............................................CTRL+L (“ ” for “low”) Thin space ..........................................CTRL+SPACE For more keyboard shortcuts, you can refer to “Customize Keyboard” in the MathType 5 Preferences menu or in the MathType Help file under “MathType Reference/Keyboard Shortcuts.” * Many users of MathType’s junior version – Equation Editor – are frustrated by the fact that “the space bar doesn’t work.” This is because both programs are designed to comply with standard mathematics typesetting conventions. If you still need to insert a space, hold down the control key (command key on the Mac), and press the space bar as many times as you need. If you need to type several words of text, it’s better to switch to Text style first. The space bar operates normally in Text style. page 3 1. Creating a blank grid for student graphing One of the most common questions we get is “Does MathType make graphs?” I always give a “qualified” answer to that question – No, MathType won’t graph a function, but you can make a blank grid for students to do the graphing. Note: There is a more detailed procedure for graphs and number lines on our web site. You can access this tutorial at www.dessci.com/en/support/tutorials/mt_charts/tutorial.htm (This will be done using Equation Editor. If you are using MathType, the steps are similar.) a. In a Microsoft Word (the procedure may be adapted for other software), open Equation Editor From the Insert menu, and select Object. From the list, choose “Microsoft Equation”, and click OK. b. On the Matrix templates palette, select Variable-size matrix or table. You can look at the “Status Bar” – the very bottom of the Word or MathType window – to see what it is you’re pointing to: c. In the Matrix dialog, specify the size you want. You probably want a larger one than 6×6, but we’ll use this size as an example. The maximum size is 30×30, so if your axes will be in the center, that’s ±15 on both axes. Notice the comment at the bottom of the dialog: “Click between elements to add/change partition lines.” d. There are 4 types of lines: no line (the default), solid line, dashed line, and dotted line. You select the type of line by continuing to click in the same location (twice for dashed, etc.). If you put solid axes in the center of the grid, and dotted lines everywhere else, the screenshot to the left is what the dialog would look like when you’re through. Below is what the grid looks like in your finished test, quiz, or whatever (these are dotted lines except the axes). In MathType, the column and row specifications are in a different place, and there is a “Clear all lines” button, which is handy. You can also save the grid on the MathType toolbar, which you can’t do in Equation Editor. page 4 2. Aligning items within an equation There are all sorts of things to align within an equation – the work shown below a dividend in a long division problem, equations in a system of equations, items in a pictogram, responses in a multiple-choice question, etc. We will look at two of these: systems and multiple-choice. Note: Even if you don’t teach the level of math requiring systems of equations, and even if you never create multiple-choice tests, the techniques learned here will still be useful to you. Systems of equations and inequalities a. There is no right or wrong way to “align” the equations in a system; it’s basically a matter of choice, and a matter of what your students can read the best. (For simplicity, we won’t specifically mention systems of inequalities, but these exact steps will work for those as well.) Here are 4 different scenarios: ⎧5x − 3 y = 6 ⎨ ⎩2 x + 7 y = 2 ⎧ 3 x + 4 y + z = 17 ⎪ ⎨ 2 x + 3 y + 2 z = 15 ⎪ x+ y+ = 4 ⎩ =3 ⎧ x ⎪ =3 ⎨2 x + y ⎪ 3x + 2 y + z = 3 ⎩ ⎧x = 3 ⎪ ⎨2 x + y = 3 ⎪3 x + 2 y + z = 3 ⎩ 1 2 3 4 b. Systems 2 and 3 above present the greatest challenge, so let’s deal with system 2. c. In this system, we want to align the variables, the operation symbols (+, −, or =), and the sums so that they are vertically aligned with similar elements in the previous equation, and right-justified within each column (for example, z & 2z and 15 & 4 in system 2 above). d. There are many ways to align a system, but let’s just cut to the chase and say that using a matrix is the best way to do it. So, that established, what size? The obvious number of rows is a number equal to the number of equations. There are several choices for the number of columns, but the best balance between utility and ease of use is a number of columns equal to the number of equations plus one. So our matrix for system 2 above will be a 3×4. e. The first step is to insert the Left brace from the Fences palette on the Equation Editor or MathType toolbar. The icon you’re looking for on the Fences palette is this one: . (It’s in column 1, 4th from the bottom.) f. Next insert a 3×4 matrix by selecting “Variable-size matrix” from the Matrix templates palette, making sure to select Column align: Right in the Matrix dialog. g. Now you’re ready to insert the equations into the matrix, but how you do it is critical! Enter 3x + in the first cell, press Tab to go to the next cell, enter 4y +, press Tab, enter z =, press Tab, and enter 17 in the last cell. Pressing Tab once more gets you z = 17 down to the next row to begin entering the second equation. Enter ⎧⎪ 3 x + 4 y + the next 2 equations similarly. This is how it should look when ⎨2 x + 3 y + 2 z = 15 ⎪ x+ you’re done (doesn’t look very pretty, does it?): y+ = 4 ⎩ So, how do you get the right amount of space where the “+” should be? In Equation Editor, your only choice is to add spaces. Problem is, 3 isn’t enough and 4 is too many. In MathType, there’s a more elegant (and more exact) way: insert a +, then color it white ! page 5 h. One more step, then we’re done. There’s a simple adjustment that lets us move the columns of the matrix closer together. On the Format menu, select Define Spacing. The third item from the top is what you want to adjust: Matrix column spacing. The normal setting is 100%. Since we want to decrease the spacing, we want a number smaller than 100%. (If the dialog is in the way and you can’t see your equations, place the mouse pointer on the title bar of the Spacing dialog and drag it away from your matrix so that you can see your entire system.) Try a spacing value of 50%, but don’t click OK yet. Watch your system of equations as you click Apply. If you like the results, click OK; if you need to decrease the spacing further, try a smaller number. (It’s easy to see how valuable the Apply button is. It’s a real time saver when compared to repetitively clicking OK each time, because once you click OK the dialog disappears. Also, it’s important that the percent symbol is selected in the dropdown box. You sure don’t want a spacing of 50 points or 50 inches!) i. After you settle on a value (my personal opinion is that 25% works best), either click in your document to close the Equation Editor window and go back to Word, or if you’re using MathType, simply close the MathType window (click the × in the upper right-hand corner). j. In MathType, you have two attractive options you don’t have in Equation Editor: ¾ You can save the matrix spacing to a preference file. This is a good idea, because you won’t want to use this tight matrix column spacing in a “regular” matrix, and this will give you an easy way to change back to your “systems of equations” settings. A MathType preference file holds information on fonts, sizes, and spacing. To save the preference file, go to the Preferences menu, scroll down to Equation Preferences, then choose Save to File. You can name the file anything you want, but here are some suggestions: Systems (if you always use the same font and size for your tests & quizzes); Systems-TNR, Systems-A, etc. (for tests written in Times New Roman, Arial, etc. font); Systems-A-10, Systems-A-12, etc. (for tests written in Arial 10pt, Arial 12pt, etc.). You get the picture. ¾ You can save a blank template for a 2-equation system, one for a 3-equation system, etc. to your MathType toolbar. The easiest way to do this is to delete everything out of the cells of the matrix in the system you just created, then highlight everything and drag it up to the toolbar: page 6 Multiple-choice responses a. There are many ways to type multiple choice responses for a test or quiz. You may create each choice as a separate equation (remember, we use the word “equation” to denote anything created with Equation Editor or MathType, regardless of whether or not it contains an equal symbol), or you could include all the responses in a single equation and arrange them in various ways. Two common ways to arrange the responses are to place them all on the same line of text or to put two responses on one line and two on another line. We’ll deal with the first option here. b. For this example, we’ll create the responses for this question: 1. Find the quotient: 1 32 ÷ 1 21 a. 2 35 b. 2 21 c. 1 91 d. 2 c. One option would be to type the question and all the responses as a single equation, but we’ll type the question text in Word and the division expression and responses in Equation Editor or MathType. We’ll type all 4 responses as one object. d. Assuming you’ve already typed the question, let’s work on the responses. Open Equation Editor as you normally would, either from the Insert menu or by clicking the icon on your Word toolbar. (This will be specifically Equation Editor. These steps will work, of course, in MathType as well, but there will be separate steps for MathType later.) e. We’re using Arial font and 11pt size, so adjust your Style and Size accordingly. If you don’t know how to do that, see the Equation Editor Help file, and look under “Applying Styles and Fonts in an equation | Change an Equation Editor style” and “Changing Mathematical Element Sizes in Equations | Change the definition of a mathematical element size in an equation”. Notice especially the Tip at the bottom of the discussion on size. The Tip doesn’t suggest what sizes to use, but I recommend 75% for Subscript/Superscript, and 50%, 150%, and 100% for the next 3. f. We want to space the responses uniformly, and the best way to do that is to use a matrix. This will be a 1-row, 4-column matrix, so go ahead and insert one of those in your document. g. Change to Text style, then type the letter a followed by two spaces. (Notice the space bar works just fine in Text style.) Change to Math style, then type 2 35 . When you type the fraction, be sure to use the Reduced-size vertical fraction, which is the one in the upper-right of the Fraction and radical templates palette. h. An easy way to keep from switching from Text to Math four times is to copy what you just typed (i.e., select the contents of the first cell with your mouse, then press Ctrl+C to copy). Now press Tab to go to the next cell, and paste the contents into that cell (Ctrl+V is the shortcut). Do the same with the remaining 2 cells, then edit the contents so that it looks similar to the above example. We’ll adjust the spacing in the next step. page 7 i. Since this is a matrix, and you already know how to adjust the column spacing in a matrix, go ahead and adjust it to see what looks best. (I think somewhere in the range of 300-400% looks best, but that’s just my opinion. Use whatever setting you like.) j. In MathType, you have another tool that makes it even easier to create multiple-choice responses, and easier to keep the spacing uniform from one question to the other. If you’re using MathType, click on the View menu and make sure there’s a checkmark by Ruler. k. Notice above the ruler there are 5 arrows. These arrows represent 5 types of tabs that are available in MathType. From left to right, these are: 1) Left-justified tab. This is the one selected in the screenshot below, and is the default. When you use a left-justified tab, the left edge of the text will be aligned at the tab. 2) Center-justified tab. The center of the text is aligned at the tab stop. 3) Right-justified tab. The right edge of the text is aligned at the tab stop. 4) Relational tab. Use this tab only with more than one line of characters within your equation. This will align equations or inequalities at any relational operator, such as ≠, ≥, ≡ , ∝ , and of course =. (Basically, it will align on the equal, greater than, or less than signs from the keyboard, plus anything on the Relational symbols palette.) 5) Decimal tab. Use this one also for more than one line of characters. This is for aligning a column of numbers, regardless of whether or not a decimal point is present. l. To set a tab stop, simply click on the ruler below the number or tick-mark where you want the tab to be. Caution: Each template slot has its own set of tabs, so if you are inside a numerator slot (for example), and set a tab at the 1” mark, that tab will not be set outside the fraction! In the example above, make sure your “insertion point” (i.e., cursor) is outside the fraction before you set the tab. You won’t run into this problem if you set your tabs prior to typing the MathType equation, but you won’t always know where you want the tabs set before you start typing. Just be aware of this feature of tabs. m. For our example, since we’re using tabs to align the multiple-choice responses, we don’t need our 1×4 matrix. You can use the matrix if you want, of course, but you wouldn’t use both a matrix and tabs. n. One final point on tabs. You already know what the Tab key’s for when you’re typing in MathType; it’s to move from one template slot to another, or to move out of the template. To move to the next tab stop, you need to press the Ctrl+Tab keystroke combination. page 8 3. Using Word’s AutoCorrect Feature Some things you create with Equation Editor or MathType are repetitive – the grid discussed earlier, for example. If you’re creating a worksheet on graphing linear functions, you’ll quite likely have 10 or 20 of these, so it’s very useful to be able to insert a grid with just a few keystrokes – and without even opening up MathType! Note: There is a more detailed tutorial on our web site for using Word’s AutoCorrect and AutoText features. You can access this tutorial at www.dessci.com/en/support/tutorials/autocorrect/tutorial.htm (This will be done using Equation Editor. If you are using MathType, the steps are similar. Since most of what we’ve done in this session has been done with Equation Editor, you may wonder what’s so much better about MathType? There’s a page later in the handout that discusses this.) Setting up AutoCorrect to Insert Equation Objects a. For the purpose of this mini-tutorial, we’ll use the grid created earlier. Insert the 6by-6 grid into your document: b. If it doesn’t appear to be perfectly square, you can make it square by clicking on it with your right mouse button, then selecting Format Object from the menu. If Format Object doesn’t appear on the right-click menu, select Object from Word’s Format menu. page 9 c. Adjust the height and width to the same number – whatever you want them to be. Make sure the Lock aspect ratio box is unchecked! d. Regardless of whether you re-sized your grid or not, make sure it’s still selected (as the one is to the right). If it’s not selected, click once on it with your left mouse button. e. With the grid selected, choose AutoCorrect Options from Word’s Tools menu. (If you’re using a version of Word earlier than Word 2002 – the one that comes with Office XP – it will just say AutoCorrect.) f. Note the grid is already in the box underneath the word With:. If it’s not there, then you didn’t have it selected in step d above. Go back and repeat steps d & e. (You must do it this way; you can’t copy the grid and paste it into the box.) g. In the Replace box, type in whatever code you want to enter in Word to be replaced with the grid. More on this later, but I chose a shortcut I could remember: “gr” for “grid”, “6” meaning “6-by-6”, and “a”, meaning it has axes. h. Click Add, then click OK. i. Now that you’re back in your document, delete the grid and try your AutoCorrect entry. Type gr6a (or whatever code you entered, followed by the spacebar. Your code should be replaced with a grid! page 10 Now, a couple of notes about what we just did: 1. I had you hit the spacebar after the code, but there’s nothing magical about the spacebar. The important thing is that you tell Word that you’re through typing that word, and in this case, our word was gr6a. Think about what normally “terminates” a word – a space character, any punctuation character, a Tab, or a new line. In fact, any of these things will replace your code with your grid (or whatever you entered into the AutoCorrect box). 2. The code I chose – gr6a – may seem a little cryptic to you, and you may not think you can remember that one. That’s fine; choose whatever code you’ll remember, but be careful! You don’t want to choose a word that will likely come up in any document. The words “grid” or “graph”, for example, appear often, so you don’t want to choose these. I can guarantee the code I chose will never come up in any document ever – unless I want a 6-by-6 grid. 3. What other uses for AutoCorrect can you think of ? I can think of several: sq2 for 2 2p/3 for 2π 3 1/8 for 18 , etc. limx0 for lim x→0 u238 for 238 92 U −b ± b 2 − 4ac qu or qform for 2a ⎡1 0 0 ⎤ imat3 or simply i3 for ⎢⎢0 1 0 ⎥⎥ ⎢⎣0 0 1 ⎥⎦ gr-th for θ , etc. xbar for x …and so on. 4. You can use AutoCorrect for even more complex objects than the ones we’ve used, but that’s really a subject to deal with elsewhere – like in the tutorial I mentioned that’s available on our web site! page 11 If you have MathType, see if you can duplicate the equations below. If you don’t have MathType, this would be a good opportunity to download the evaluation version from the Design Science web site. Other uses of MathType that go “beyond the basics”… 1. Systems of equations. ⎧ 3 x + 4 y + z = 17 ⎪ ⎨2 x + 3 y + 2 z = 15 ⎪ x+ y+ = 4 ⎩ ⎧5x − 3 y = 6 ⎨ ⎩2 x + 7 y = 2 =3 ⎧ x ⎪ =3 ⎨2 x + y ⎪ 3x + 2 y + z = 3 ⎩ ⎧x = 3 ⎪ ⎨2 x + y = 3 ⎪3 x + 2 y + z = 3 ⎩ 2. Dimensional analysis. 30 mi 5280 ft 1 h 1 min ⋅ ⋅ ⋅ h 1 mi 60 min 60 sec = 44 ft sec V= 3. Step-by-step examples with comments. T f = Tr + (T0 − Tr ) e − rt T f = 160; Tr = 68°; T0 = 212°; and r = 0.21 160 = 68 + ( 212 − 68 ) e −0.21t 92 = 144e −.021t 92 = e −0.21t 212 ln 92 − ln144 = −0.21t ln 92 − ln144 =t −0.21 t = 2.13345106 Isolate the exponential expression. Take the natural logarithm of both sides. Calculation - ready form This is a good use of User 1 and User 2 styles and sizes (MathType only). This lets you use your normal font & size for the problem & solution, and a separate font & size for the notes. 4. Equations for Web pages. 5. Animated graphics for PowerPoint presentations or Web pages. 6. Chemistry notation. Ba(NO3 ) 2 (aq) + 2 NH 4 IO3 (aq) → Ba(IO3 ) 2 (s) + 2 NH 4 NO3 (aq) Solution Solution Pr ecipitate Solution Atomic orbitals 2p 2s ↑↓ ↑↓ ↑↓ ↑ ii :F i ii 1s + iH 2p 2s ↓ ⎯⎯ → ↑↓ Bonding orbital ↑↓ ↑↓ ↑↓ ii :F H ii page 12 What else can I do with MathType that I can’t do with Equation Editor? 1. MathType includes over 200 symbols and templates that are not included in Equation Editor. Some of these are shown here. ∼ ≈ Examples: † In addition, MathType 5 includes the ability to include a tilde, hat, arc, or harpoon (vector barb) over more than one character. It also includes cross-out templates for showing cancellation. Examples: AB inches 2. Color. MathType 5 lets you color all or part of an equation, or use multiple colors in a single equation. This is great for making captivating PowerPoint presentations or for printing color transparencies on an ink jet printer. Example: Find the LCD: 1 5 2 1 5 2 5 7 + = ⋅ + = + = x 2x 2 x 2x 2 x 2 x 2x Denominators in red. 3. Customizable keyboard. Create your own keyboard shortcuts for any symbol, template, or menu item in MathType. 4. New spacing adjustments possible: • Radical “check mark” width adjustment: 2 2 2 • Subscript and superscript horizontal gap: x 2 x2 x 2 • Slash and diagonal fraction gap: 1 1 2 2 1 2 • Horizontal gap between fence templates (parentheses, brackets, braces, etc.) and their contents: ( x2 − 4 ) (x2 − 4) ( x2 − 4 ) • Stroke thickness for box lines, strikethroughs, radical signs, etc: 1 ⋅ 2 2 2 2 1 ⋅ 2 2 2 2 1 ⋅ 2 2 2 2 6. Precise formatting ruler. You get a sophisticated word processor-like ruler for precise formatting. Align columns at operators, decimal points; or set tab stops to make formatting easier and to give your documents a more professional look. This example cannot be duplicated exactly in Equation Editor for two reasons: cross-out templates, and ruler formatting (fractions aligned at right edge with a right-justified tab). 2 6 3 12 ⋅ 22 = 3 2 4 − 34 − 34 2 34 7. Customizable toolbars. You can customize MathType’s toolbars to include symbols and templates you use often, as well as entire expressions, equations, or equation fragments.