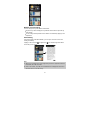
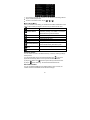
1
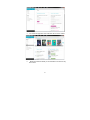
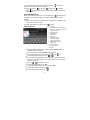
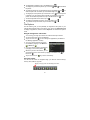
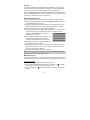
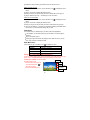
Precautions Do not drop the device or subject it to severe impacts. Do not use the device in extreme hot or cold, dusty or damp conditions. Do not expose it to direct sunlight. Avoid using the device near strong magnetic fields. Normal functioning of the product may be disturbed by ESD. If so, simply reset and restart the device following the instruction manual. During file transmission, please handle with care and operate in a static-free environment. Keep the device away from water and other liquids. In the event that water or other liquids enter the device, power off the product immediately and clean the device. Do not use chemicals to clean the device in order to avoid corrosion. Clean it with a dry cloth. Do not install this equipment in a confined space such as a book case or similar unit. The ventilation should not be impeded by covering the ventilation openings with items such as newspaper, table-cloths, curtains etc. No naked flame sources, such as lighted candles, should be placed on the apparatus. Attention should be drawn to environmental aspects of battery disposal. Use the apparatus in moderate climates. We are not responsible for damage or lost data caused by malfunction, misuse, modification of the device or battery replacement. Do not attempt to disassemble, repair or modify the product. This will invalidate the warranty. If the device will not be used for an extended period of time, please charge the battery at least once per month to maintain battery life. Charge the battery if: a) The battery level icon displays (An empty battery) b) The device powers off automatically when restarted. c) There is no response when pressing keys with keys unlocked and battery full. Do not interrupt the connection when the device is being formatted or transferring files. Otherwise, data may be corrupted or lost. When the device is used as a portable HD, please use only per the instructions. Otherwise, permanent data loss could occur. Please use and install data using the attachments/accessories provided and only according to the manufacturer’s instruction. Please refer to the information on the bottom of the device for electrical and safety information before installing data or operating the device. To reduce the risk of fire or electric shock, do not expose this device to rain or 1 moisture. The device should not be exposed to dripping or splashing. Never place objects filled with liquids, such as vases, on the device. There is danger of explosion if the battery is replaced incorrectly. Replace only with the same or equivalent type. The battery (battery or batteries or battery pack) should not be exposed to excessive heat such as sunlight, fire or the like. Please follow responsible procedures for battery disposal. If the power adaptor disconnected from the device, the device will remain operable as long as the battery has sufficient charge. The power adaptor is a CLASS II apparatus with double insulation, and no external ground is provided. Safety symbol explanation: - - - The lightning flash with arrowhead symbol within an equilateral triangle is intended to alert the user to the presence of non-insulated “dangerous voltage” within the product’s enclosure that may be of sufficient magnitude to constitute a risk of electric shock. To reduce the risk of electric shock, do not remove the cover (or back) as there are no user-serviceable parts inside. Refer servicing to qualified personnel. The exclamation point within an equilateral triangle is intended to alert the user to the presence of important operating and maintenance instructions in the literature accompanying the device. - Correct Disposal of this product. This marking indicates that this product should not be disposed of with other household waste in the EU. To prevent possible harm to the environment or human health from uncontrolled waste disposal, recycle it responsibly to promote the sustainable reuse of material resources. To dispose of your used device, please use the return and collection systems available in your area or contact the retailer where the product was purchased. They can take this product for safe environmental recycling. This equipment should be installed and operated with minimum distance 20cm between the radiator & your body. CE in which countries where the product may be used freely: Germany, UK, Italy, Spain, Belgium, Netherlands, Portugal, Greece, Ireland, Denmark, Luxembourg, Luxembourg, Austria, Finland, Sweden, Norway and Iceland. In France, except the channel 10 through 13, law prohibits the use of other channels. 2 Listening Cautions This product respects the current regulations for limiting the output volume of consumer audio devices to a safe level. By listening to your device with headphones or earbuds at high volumes, you run the risk of permanent damage to your ears. Even if you get used to listening at high volumes and it seems normal to you, you still risk the possibility of damaging your hearing. Reduce the volume of your device to a reasonable level to avoid permanent hearing damage. If you hear ringing in your ears, reduce the volume or shut off your device. This device has been tested with the supplied earphones. In order to preserve your hearing, it is advised that you use only the following headphone models: the earphones supplied with your device, or any other headphones that respect the current regulations. Other types of headphones may produce higher volume levels. At full power ,the prolonged listening of the walkman can damage the ear of the use Maximum output voltage<=150mv Do not use while operating a motorized vehicle. It may create a traffic hazard and is illegal in many areas. You should use extreme caution or temporarily discontinue use in potentially hazardous situations created by obstructed hearing. Even if your headphones or earphones are the open-air type designed to let you hear outside sounds, don’t turn up the volume so high that you can’t hear what’s around you. Sound can be deceiving. Over time your hearing “comfort level” adapts to higher volumes of sound. What sounds “normal” can actually be loud and harmful to your hearing. Guard against this by setting the volume of your device at a safe level BEFORE your hearing adapts. To establish a safe volume level: a. Start your volume control at a low setting. b. Slowly increase the sound until you can hear it comfortably and clearly, and without distortion. Once you have established a comfortable sound level, leave it there. This manual may not reflect your actual device’s operation. All information is subject to change without prior notification. Please follow your actual device’s operational procedures. 3 Table of Content Feature Summary................................................................................................5 Package Content .................................................................................................5 Buttons & Ports....................................................................................................5 Installing Memory card ........................................................................................6 Transferring Files.................................................................................................6 Turning On/Off.....................................................................................................7 Home Screen.......................................................................................................8 Using the Touch Screen ....................................................................................10 Using the Virtual Keyboard................................................................................10 Access Internet..................................................................................................11 Reading E-Books...............................................................................................13 Playing Music ....................................................................................................25 Playing Video.....................................................................................................29 Viewing Photos..................................................................................................31 File Explorer ......................................................................................................32 E-mail ................................................................................................................34 Manage Applications .........................................................................................36 System Settings.................................................................................................37 Troubleshooting.................................................................................................38 Specifications…………………………………………………………………………38 4 Feature Summary Built-in Android Operating System With the built-in Android OS, your Internet Tablet supports most of the popular third-party applications. Applications are available on the Internet or directly in your Internet Tablet. Wi-Fi Connectivity With the latest Wi-Fi technology, your Internet Tablet can connect you to the Internet wherever you are. 7-inch Touch Screen Touch or slide your finger in the screen, the screen responds instantly. Built-in G-sensor Allow the user interface to rotate its orientation to landscape or portrait automatically if the device rotates. Entertainment Allow you to enjoy music, movie or pictures anytime and anywhere. Package Content Main Unit AC Adaptor Stereo earphones User Manual USB cable Warranty Card Buttons & Ports User Manual Top View ab c Front View e d f g h i a. USB Port: connect to computer, USB flash drive, mouse or keyboard through USB cable. b. HDMI interface (optional): connects to LCD or monitor devices with HDMI port. c. Power button: press and hold to turn on or off the device; briefly press to turn on or off the screen. d. LCD Display e. Camera Lens (optional) f. Home: Go to the Home Screen. g. Menu: Display an overlay menu. h. SCROLL button: Roll in all ways to make selection; press to confirm selection. i. ESC: Return 5 Bottom View j j. Micro-SD Card Slot Side View m n k l k. Earphone Jack l. DC-IN Port: connect to any standard electronic outlet through AC adaptor. m. Built-in microphone n. Reset pin hole o. Desktop Stand/ 3G Card Slot (optional) o Charging Battery The device has a built-in rechargeable battery. No extra battery installation is required. Just charge the device when it indicates low battery. To charge the battery, connect the device to any standard wall outlet through the AC adaptor via the DC-IN port. It takes about 5 hours to fully charge the battery. Note: a. You are strongly recommended to charge the battery immediately when the device indicates the battery is lower than 15%! b. You can operate the device even when it is being charged. But for extending the battery life, you are suggested NOT to use the device when it is in charge. c. You are recommended to charge the battery when you use the device for the first time. d. For maximum performance, lithium-ion batteries need to be used often. If you don’t use the device often, be sure to recharge the battery at least once per month. Installing a Memory Card In addition to the built-in memory, your Internet Tablet features a memory card slot to extend its memory space. You can read e-book, music, image or video files from a MicroSD card directly. To install a memory card, find the card slot at the bottom of the machine, and then insert a MicroSD card into the slot with the correct direction. To access the memory card, enter the Explorer mode and then select the “SD Card” directory. Transferring Files Before reading or playing files, make sure your Internet Tablet’s internal memory or the external memory card has media files. If not, transfer files from computer 6 to your Internet Tablet. (1) Connect your Internet Tablet to a computer with the supplied USB cable. (2) Once connected, two removable disk drives appear in your computer. One represents the internal memory of your Internet Tablet, and the other represents the memory card inserted into your Internet Tablet. Now you can copy files from or to these disk drives. (3) Once the data transfer completes, drag from the top bar downwards to display the USB notification message. Choose “Turn off USB Storage” and then tap on “Turn Off” to disconnect the device from computer. Drag downwards (4) Remove the player from the PC safely. a) Left-click the icon at the right bottom corner of the computer desktop. b) Click the pop-up mini-window with message of “Stop the USB Mass Storage Device – Drive (X)”. c) Remove the player from the computer. Turning On/Off To turn on the device, press and hold the Power button on the unit until you see the boot-up screen. It may take a few minutes to start up the system, please wait before you proceed. You should see the following locked screen once the device turns on. Before you start using the device, you need to unlock the screen first. To unlock the screen, drag the lock icon upward. To turn off the device, press and hold the Power button until you see the option “Power Off”, tap on “Power Off” and then tap on “OK”. Tip: Your Internet Tablet will sleep with the screen off if it stays inactive for a few seconds. You can briefly press the Power button to turn on the screen and wake it up. 7 Home Screen Indications a b c de f g h i j l a. Home: Go back to the Home Screen wherever you are in the interface. b. Memory Card: the exclamation mark indicates no available memory card, and it should disappear once a memory card is available. c. Wi-Fi/ 3G Network d. Battery Charge e. Current Time f. Volume Down: Tap briefly or continuously to decrease the volume. g. Volume Up: Tap briefly or continuously to increase the volume. h. Return: Return to the previous directory. i. Menu: Tap to display an overlay setting menu. j. Address Inputting Area. You can input the website address by tapping this field. A virtual keyboard should appear. Use the keyboard to type in letters. Tapping will hide the keyboard. k. Applications Tab: Tap on this icon to reveal all applications installed on your Internet Tablet (alarm clock, calculator, GlobalTime etc.). - You can copy the applications onto the Home screen by pressing and holding on their icons. - You can delete the application from the Home Screen by dragging their icons to the Application Tab. To delete a Home screen item, hold your finger onto it until it is highlighted, then drag it to the Application 8 Tab which has become a trash icon. l. Default shortcuts (“Browser”, “Video Player”, “Audio Player”, etc.) - Tap on an icon to open the corresponding application. - Roll the SCROLL button on the unit to select an item. - You can customize the Home Screen by adding/removing shortcuts and widgets, changing the wallpaper, etc. Customizing the Home screen items - To add a Home screen item (shortcuts, widgets, folders etc.), tap on the Menu icon and then select “Add” , or hold your tap on the Home Screen until a pop-up menu displays. - To move a Home screen item, hold your finger onto it until it is highlighted, then drag it to the desired location, and release it. Changing the wallpaper Tap on the Menu icon , and then tap on “Wallpaper”. Tap on one picture and then tap on “Set Wallpaper” to confirm. Go to the extended Home Screen Slide your finger horizontally on the screen OR roll the SCROLL button to go to the left or right panel of the extended Home Screen. You may see the following extended Home Screen in which you have some useful shortcuts. Tapping on these shortcuts can activate their function. a b c a. Connect to an available Wi-Fi network b. Connect to an available 3G network c. Refresh the media library d. Adjust the screen brightness d Changing the System Settings Tap on the Menu icon , and then tap on “Settings” . Choose a category: “Wireless & Networks”, “Sound & Display”, “Date & Time”, etc. For more 9 information on the different settings, see the System Settings section. Using the Touch Screen Your Internet Tablet is equipped with a touch screen. Below are a few tips on how to use the touch screen. Main Touch Screen Actions In different applications, you can go back one level in the interface by tapping on the Back icon (at the top right corner of the screen). Wherever you are in the interface, you can go back directly to the Home Screen by tapping on the Home icon (in the top left corner of the screen). Other Touch Screen Actions When watching a video or listening to music, you can tap on the progression bar to go directly to a different location in the video or song. You can also use your finger to drag the cursor in the progression bar to another location in the video or song. In the different browsers (File, Music, Video, Photo, etc.), you can drag your finger up and down to scroll the file list up and down. In the Web browser, you can scroll up and down by tapping on the page and dragging it up or down (be careful however not to tap on a link!). Tap on the link to open the page. Using the Virtual Keyboard Tap on any text input field and the virtual keyboard will pop up. With the virtual keyboard, you can enter website address or any text if required. Indications a c d b e a. Caps Lock b. Backspace. c. Number and Characters /Letter keyboard. d. Space e. Enter Selecting Input Method If you have installed more than one input method on your Internet Tablet, you can select one method by a) holding your tap on the button until the Android keyboard settings appear; b) choosing “Input Method” and then choosing your desired 10 one. Access Internet You can surf on the Internet with your slim Internet Tablet. Your Internet Tablet features built-in Wi-Fi technology so that you can access the internet via Wi-Fi network. First of all, you need to configure a Wi-Fi network. For the Wi-Fi configuration procedure to work, you need to be in a Wi-Fi zone that will allow you to connect to it. Every time Your Internet Tablet is in range of a network that you have already configured once, it will attempt to make a connection. Making WIFI Connection (1) Go on the Home screen, tap on the Menu icon and then select “Settings”. (2) In the “Settings” screen, select “Wireless & Networks”. (3) If the WiFi is off, tap on the “Wi-Fi” setting to turn it on. Then select “Wi-Fi settings”. Your Internet Tablet will scan automatically for available WiFi networks and display them. The list of available networks shows all the wireless networks in range of your device. - The list is constantly refreshed automatically. - When the WiFi is enabled, Your Internet Tablet will connect automatically to your configured networks when they are in range. - If Your Internet Tablet finds a network that has never been configured, it will display a notification icon. (4) Tap on the network you want to connect to, enter the required network information (password) and then tap on “Connect”. Your Internet Tablet will now attempt to establish a connection to that WiFi hot spot with the network parameters you entered. If the connection is successful, the message Connected to XXX will appear under the WIFI setting. Note: a) The available network list is constantly refreshed automatically. b) When the Wi-Fi is enabled, Your Internet Tablet will connect automatically to your configured networks when they are in range. c) If Your Internet Tablet finds a network that has never been configured, it will display a notification icon. Advanced Connection To manually scan for available Wi-Fi networks, (1) In the “Wi-Fi settings” screen, tap on the Menu icon “Scan”. 11 , and then tap on (2) If the Wi-Fi network you want to connect to does not appear in the list, scroll down the screen, then tap on “Add a Wi-Fi network”. Enter the required settings, then tap on “Save”. To access the advanced network parameters (“Regulatory domain”, “IP address”, etc), tap on the Menu icon , and then tap on “Advanced”. Other parameters will appear. The required information can be obtained from the person who manages the network. Making 3G Network Connection (optional) (1) Go on the Home screen, tap on the Menu icon and then select “Settings”. (2) In the “Settings” screen, select “Wireless & Networks”. (3) If the 3G network is off, tap on “Mobile Network” to turn it on. Optionally, you can set up the Access Point manually by a) selecting “Mobile network Settings”; b) selecting “Access Point Names”; c) pressing MENU button to edit the APN; d) selecting “New APN”; e) filling in all required parameters. APN, MCC, MNC, Dial-up and APN type are necessary; f) tapping to save your settings. Launching the WEB browser Tap on the “Browser” icon in the Home Screen to launch the WEB browser. If you are already connected to a network, the Web browser will simply open and you can start browsing the Web. Note: Not all wireless networks offer access to the Internet. Some WiFi networks only link several computers together, without any Internet connection. Using WEB Browser You can scroll up and down the screen by tapping on the page and dragging it up or down (be careful however not to tap on a link!). To open a link, simply tap on it. You can open several web pages at a time, view them all at once on the screen, and then tap on one of them to view it in full screen. To go back to the previous page that you browsed, tap on the Back icon . To display the available menu items, tap on the Menu icon . To go back directly to the Home screen, tap on the Home icon . Depending on where you are in the web browser, holding down on an item will give you access to more options. To fill in a text field, tap in the field, then use the virtual keyboard to type in the required text. 12 WEB Browser Menu Items When you are viewing page, you can tap on the menu icon menu items. to display the New window Allows you to open new windows. Bookmarks Will open the “Bookmarks” manager. You will see three tabs: “Bookmarks”, “Most visited”, and “History”. “Bookmarks” show you a list of bookmarks. Just tap on one of them to open it in the current window. Holding down on a bookmark will give you access to several options (you will be able to edit it, rename it, delete it, etc.). You can also use the Menu icon which will allow you to bookmark the last-viewed page. “Most visited” and “History” allow you to access your “Most visited” sites and your “History”. In the “History” tab, the Menu icon allows you to clear the history. indows When you have several windows currently opened, tap on “Windows” to display them all at once on the screen. Just tap on one of the small windows to view it in full screen, or tap on the Close icon in the small window to close the window. efresh/ Stop “Stop” will stop loading the web page, if it is currently loading. “Refresh” will refresh the current web page, if it has stopped loading. orward Will go to the next page that you browsed. ore Will give you access to other options (“Find on page”, “Select text”, “Page info”, “Downloads”, “Settings” etc.). Reading eBooks Transfer eBooks from Computer Before reading, you need to transfer or download eBooks to the device. You can copy eBooks from your computer’s local drive to the device by USB connection (see the “Transferring files” section mentioned before). Note: Make sure your e-books are in format of PDF, EPUB, TXT, FB2, RTF or PDB supported by the device. Download eBooks with Adobe Digital Editions The Adobe Digital Edition application allows you download e-books protected by DRM to your Internet Tablet. 13 (1) Access the website http://www.adobe.com/products/digitaleditions/, and then install the Adobe Digital Editions software following the instructions. (2) Authorize your computer with your Adobe ID and Password. (3) Activate your Internet Tablet. Connect your Internet Tablet to computer with the USB cable and start up the Adobe Digital Editions. Click “Authorize Device” to authorize your Internet Tablet. The Adobe ID can be used only six times. It should expire after authorizing the device 6 times. Later on, you need to delete the expired ID by pressing CTRL+SHIFT+D on the computer keyboard or using the Erase Activation Record setting on the device and then get a new one. The device remembers the ebooks downloaded with the latest Adobe ID only, and will overwrite the eBooks downloaded with the previous Adobe ID. (4) Download DRM-protected PDF files to your computer. Access an online bookstore and search for e-books. Choose your favorite eBooks and download them. If the e-book is protected by DRM, you should be prompted by DRM license information. Click “Open” to start downloading the DRM-protected eBook. (5) Click “Purchase”, and then you should see your downloaded e-book at the right panel of the Adobe Digital Editions user interface. 14 (6) Connect your Internet Tablet to the computer with the USB cable, and the Adobe Digital Editions should recognize your Internet Tablet. (7) Click “Purchase” to see your downloaded e-book and then drag it to your Internet Tablet. Launch the Ebook Reader In the Home Screen, tap on the Application Tab to display all applications, and then tap on the eBook Reader icon to open the eBook reader application. eBook Reader Main Screen a b c a. Go to Home Screen. b. Return: go back to the previous screen or directory c. MENU: display overlay menu d. Weather forecast for worldwide cities (Available Wi-Fi network required) e. Date f. Application Shortcuts g. Enter reading history h. Left Arrow: Scroll left through e-books. i. Right Arrow: Scroll right through e-books. j. Recently read e-books. k. Enter e-book library. l. All of e-books 15 all applications m. Display e d h f j h Weather Forecast Setting You can change the city with weather forecast data. Tap on the city name to display the city selection screen and then input the city name directly. You can change the temperature unit to Celsius or Fahrenheit by tapping on the temperature. Start Reading In the main screen of the eBook Reader, you can tap on a e-book cover to start reading immediately. Tapping on the Left Arrow or Right Arrow can scroll through other eBook covers that you do not see. Note: a. Make sure your eBooks are in format supported by the device. Supported formats are PDF, EPUB, TXT, FB2, RTF, PDB. b. Book covers for PDF, TXT, FB2, RTF and PDB files are all displayed the same since these files have no cover data usually. 16 History and My Library View e-book Information (1) (2) Tap on “History” to enter the reading history or tap on “My Library” to enter the eBook library. In the History or eBook library, you can tap on an eBook to view its information before you start reading. Tap on an eBook, and the book name, author or publication year of the eBook should display at the top screen. Sort eBooks You can sort all eBooks by title, author or file size by tapping on Title, Author or Size in the eBook library. Start Reading To start reading an eBook, tap on “Continue Read”. Page Up/Down When you are reading the eBook, you can slide your finger on the screen left and right to page up or down. You can let the eBook page up and down automatically by: a) tapping the Men Menu icon to display eBook settings; b) Tap “Auto Flip”; c) Selecting a flip interval time. 17 Increase Font Size (1) When you are reading, tap on the Menu icon to display eBook settings. (2) Tap on “Zoom In” to zoom in the page. (3) Tap on a size that you want to zoom to and then tap on “OK” to confirm. Jump to a Page You can directly go to a page that you specify. (1) When you are reading, tap on the Menu icon to display e-book settings. (2) Tap on “Go to”. (3) Tap on the page number input field to display the virtual keyboard. (4) Tap on to switch to the numeric keyboard and then tap on the numbers to input the page number. (5) Once you finish inputting page number, tap on “OK” to jump to the specified page. Use Bookmarks You can add a bookmark on a page to continue reading later. (1) When you are reading, tap on the Menu icon to display eBook settings. (2) Tap on “Bookmarks” to display a bookmark menu, and then you can use the menu to add, delete or display bookmarks. Show Outline of the eBook You can view the outline of the eBook and then choose your desired chapter or section to read. (1) When you are reading, tap on the Menu icon to display e-book settings. (2) Tap on “TOC” to display the outline of the eBook, and then tap the chapter that you want to read. Guide to Purchase and Download eBooks using the Kobo Desktop Application 18 1. 2. Download and install Kobo Desktop Application…. (needs to be updated based on how Ematic preloads it on the device. IE "connect the device and then go to the device in explorer and run the file" then from step 2 on, all will be as written below.) PC users will see the screen below after the setup is completed. MAC users will see a new Kobo icon will appear on the desktop. Click this icon. In the window that appears, drag the Kobo icon to your 19 Applications folder. Double-click the Kobo icon in your Applications folder to get started. You are now ready to shop and sync to your Ematic Device. 3. If this is your first time trying to connect to Kobo store, please click “Sign in or create an account” which will take you to the registration page. 4. Please enter the required registration information and then click “Get Started”. 20 5. You will see the program’s main screen after the account is created. 6. Browse and select the eBook you are interested in and click the “Buy Now” button. 21 7. After clicking “Buy Now”, the browser will take you to the checkout payment page. Please enter your payment information and then click “Buy Now”. Please note, Kobo will keep this information on file for subsequent purchases, you will only need to verify the details. 8. After the order is processed, you will see the checkout-complete screen. 22 9. Please click “update library” to download the book to your library. It is recommended to keep the account logged in so you don’t have to wait for the books to be downloaded from the server every time you start the software. 10. Please connect your Ematic device to your PC or MAC with the USB cable if it is not connected already. Please click on Sync to transfer the eBook from your Library to your device. 23 The desktop software will request that you establish an Adobe ID and password. (This is a one-time setup). Once you have established your Adobe ID and password, switch to the Kobo desktop software window and enter your Adobe ID and password. 24 11. After the transfer is completed, disconnect the USB cable from your eReader. You are now ready to enjoy your new eBook. Playing Music Your Internet Tablet provides two applications for you to play music files: Audio Player and Music. You can choose “Music” or “Audio Player” in the Application Tab to enter the music player mode. Let’s take the Audio Player as example to explain how to play music. Music Library You should enter the music library once you start up the audio player. The Music Library shows your music files sorted by categories (Artist, Album, Genre, etc.) if your music files contain these song information tags. If some of your music files do not contain information tags, they will be classified as (Unknown) in the Music Library. When new music is copied to Your Internet Tablet, the Music Library will be updated automatically. 25 You can drag your finger up and down on the file list to scroll through the list. Tap on a track to play a track. To return to the Home Screen, tap on / / . Music Library Menu Once you enter the music library, you should see the toolbar at the bottom of the screen. Tap and hold your finger on the icon and you should see its name. List all music files. All Music Allows you to search for a specific song on Internet by entering a few letters or a word and Internet Search download the song from the Internet. List music files by artist. Artist Album List music files by album. Genre List music files by genre. Playlist Display playlists. Navigate through music files and folders stored in the internal memory and memory card. Directory Browsing Enter Play Interface Return Go to the Now Playing screen. Return to Home Screen. Search for Tracks You can search for tracks in the internal memory or memory card by inputting a few key words. (1) In the music library, tap on the Directory Browsing icon in the menu. (2) Choose the memory device in which you want to search for tracks. (3) Tap on the Search icon , and then input a few key words of the track. (4) Tap on to start searching. The track should be listed if found. Sort Tracks/Folders You can sort all tracks/folders by their leading leters in order of A to Z, the creation time of the track/folder, the file size or the file type. 26 (1) In the music library, tap on the Directory Browsing icon in the menu. (2) Choose the memory device to be sorted. (3) Tap on the Sort icon (by file size) / (by file type) / (by leading letter)/ (by creation time) to sort the tracks/folders stored in the selected memory device. Set EQ Mode Manually When you are listening to the music, tap on the Menu icon which allows you to customize your equalizer setting. Your Internet Tablet features a 7-band equalizer. (1) Select a band, then drag your finger up/ down on the band to change the gain level for these frequency ranges. (2) Tap on “Save Effect” to confirm or tap on to return. Playback Screen a b c e h i j d f k l g m n o a. Track title b. ID3 Information (artist, album etc.) c. Search for information about the track from Internet. d. Progression bar e. Previous track f. Play/Pause g. Next track h. Change EQ mode i. A-B Section Repeat j. Change repeat mode k. Add the track to playlist l. Display lyric m. Decrease volume n. Increase volume o. Return Slide your finger vertically on the screen or roll the SCROLL button to browse through the music list. Tap on the track or press the SCROLL button to play it. To pause/resume the song, tap on the Pause / Play icon. To play the previous/next song, tap on / . You can tap on the progression bar to go directly to a different location in the song. You can also drag the cursor in the progression bar to another location in the song. Tap on / to adjust the volume. To change the EQ mode, tap on “EQ”. To play the specified section from A to B, tap on “A-B”. To change the repeat mode, tap on . To add current track to playlist, tap on . 27 To display lyric/ID3 information, tap on . To define the equalizer mode manually, tap on . Tapping continuously on the ID3 information tag will search for the information about the track from the Internet. To go back to the music library, tap on . To go back directly to the Home screen, tap on the Home icon or Return icon . Playlist A playlist is a list of audio tracks that the music player will automatically play one after the other. On your Internet Tablet, you can play, create and edit as many playlists as you want. Create a Playlist (1) While you are in the music list, select the Playlist menu item “ panel will open. You can now start modifying the playlist. ”, a playlist (2) Tap on the New Playlist icon to create a new playlist. (3) Tap on the Edit icon beside the playlist name to add songs to the playlist. (4) Tap on the songs you would like to add to your playlist. A check mark “√”should appear before the song if selected. (5) When you are satisfied with your new playlist, tap on the “ ” icon to save the playlist. Edit a Playlist You can add track to or delete track from the playlist. (1) In the Music Library, tap on the Playlist icon to display the playlists. (2) Tap on the icon beside the playlist that you want to edit. You can now add tracks to or delete tracks from the playlist. (3) Tap on the songs you would like to add or delete, a check mark should appear or disappear before the song. The song with check mark will be added to the playlist, while the song without check mark will be deleted from the playlist. (4) When you are satisfied with your playlist, tap on the icon to save the playlist. Delete a Playlist To delete an existing playlist, (1) In the Music Library, tap on the Playlist icon to display the playlists. (2) Tap on the icon beside the playlist that you want to delete, and then the playlist will be deleted. Note: You cannot delete the Recently Played playlist since a track is playing. Playing a Playlist 28 (1) In the Music Library, tap on the Playlist icon to display the playlists. (2) Tap on a playlist to open it. A panel showing the contents of the playlist will open. (3) Tap on the first item in the playlist to start playing from the first track. Playing Video Tap on the Application Tab to display all applications, and then select “Video Player” to enter the video mode. Navigate through Video Files You should see the video list when you enter the video player. You can drag your finger up and down on the video list to scroll the video list up and down. Tap on a video to start playing. You can go back directly to the Home screen by tapping on the Return icon or Home icon . Playback Screen a d c b e f g h i j k a. b. c. d. e. f. g. h. i. j. k. Decrease volume Progression bar Increase volume Bookmark Brightness Previous video Play/Pause icon Next video Change View Mode Return Video settings Tap on the / icon to pause/resume the video, Tap on “ ” to display the menu items. Tap on the progression bar to go directly to a different location in the video. You can also use your finger to drag the cursor in the progression bar to another location in the video. Tap on / to adjust the volume. Tap on “ ” to set a bookmark at the current spot in the video. Please note only one bookmark can be set for one video, and the new bookmark should cover the old one. To resume playing a video from the bookmark, go to the Home Screen, enter the Video Player, and tap on the bookmarked video. 29 You should be prompted to “Play from beginning” and “Play from bookmark”. Select “Play from bookmark”. In default, the video plays from beginning. To remove the bookmark, tap on “ ” to display the menu, and then choose “Delete Bookmark”. Tap on to adjust the brightness of screen. Tap on / to play the previous or next video. Tap on to change the aspect ratio of screen. Tap on to stop playing and return the video list. Video Playback Settings Tap on the icon to display the video settings. Play from beginning(this Delete bookmark and play from beginning. will delete bookmark) Delete Bookmark Delete the video bookmark. HDMI Output video to HDMI display device (TV). Help Play Mode Get instructions on playing video. Single – plays the current video and then stops after playing. Repeat One – Repeat the current video. Repeat All – Repeat all videos. Exit from the menu. Return Output video image to TV screen (optional) The device features an HDMI interface with which you can connect the device to digital audio devices, computer monitors or digital televisions. HDMI connection can deliver high-definition audio and video quality. To use the HDMI function on digital televisions, 30 (1) Make sure the visual device like digital television that the device connects has a HDMI interface also. (2) Turn on the digital television, and switch its mode to HDMI. (3) Connect the HDMI cable to the HDMI interface of the device and the digital television. (4) Turn on the device, and play a video. When the video is playing, tap on the button to display the overlay menu. Choose “HDMI” from the overlay menu, and then choose “Output 720p”. (5) Enjoy the sharpest image quality on the wide screen of the connected visual device. (6) To switch the image display to the device screen, tap on the device screen. Viewing Photos Tap on the Application Tab to display all applications, and then select “Photo Browser” to enter the photo mode. Photo Thumbnails The first screen of the Photo mode shows all the photos and subfolders located in your Internet Tablet or memory card in thumbnails. To view a photo, tap on its thumbnail to open it. If a photo is in a subfolder, open the subfolder, and you will see your photo. Viewing Photo When you are viewing picture, you can tap on the screen to show a floating toolbar at the bottom of the screen. 31 To start/pause a slideshow, tap on the Slideshow icon . To display the previous/next picture, tap on the left / right arrow beside the picture. To rotate the picture 90° counterclockwise, tap on the Rotate Left icon . To rotate the picture 90° clockwise, tap on the Rotate Right icon . To magnify the current picture, tap on the Zoom In icon . When the picture is enlarged, you can drag the picture vertically or horizontally to move the picture. To decrease the picture size, tap on the Zoom Out icon . To set the brightness of the screen, tap on . To display the available menu items, tap on the Setting icon . To go back to the photo browser, tap on the Back icon . File Explorer The file browser gives you the possibility to navigate the file system of your Internet Tablet internal memory and memory card. Tap on the Application Tab to display all applications, and then select “Explorer” to enter the file explorer mode. Navigate through Files and Folders You can drag your finger up and down to scroll the file list up and down. To open a file or folder, tap on the file/folder. Tap on the menu icon , you can manage the applications (see details in the “Manage Application” section). You can go back or forward one level in the interface by tapping on the Back icon or Next icon . You can go back one level in the directory by tapping on the Level Up button . Wherever you are in the interface, you can go back directly to the Home screen by tapping on the Return icon or Home icon . Tap on the Home icon to go to the root directory. Using the Toolbar You can use the toolbar to navigate through your device’s internal memory/ memory card, delete or copy files. Tapping on the grey area can hide/display the toolbar. 32 Home Go to the Home Screen. LevelUp Go back one level in the directory. Multi Select more than one file together. Editor Copy, delete, move, paste or rename the file or folder. Back Go back one level in the interface. Next Go forward one level in the interface. Copy/Move Files and Folders (1) (2) (3) (4) (5) In the file list, scroll up and down by sliding your finger to select the file/folder that you want to copy or move. Hold your tap on the selected file/folder until a pop-up menu appears. Select “Copy” or “Move” from the pop-up menu. Navigate to the location where you wish to copy or move the file/folder to. Select the Editor icon from the toolbar and then choose “Paste”. Delete Files and Folders (1) (2) (3) In the file list, scroll up and down the list by sliding finger to select the file/folder that you want to delete. Hold your tap on the selected file/folder until a pop-up menu appears. Select “Delete” from the pop-up menu, then select “Delete” to confirm or “Cancel” to quit. Rename Files and Folders (1) (2) (3) (4) (5) In the file list, scroll up and down the list by sliding finger to select the file/folder that you want to rename. Hold your tap on the selected file/folder until a pop-up menu appears. Select “Rename” from the pop-up menu. Tap on the inputting field to display the virtual keyboard, and then choose letters from the virtual keyboard to rename the file/folders. Tap on “OK” to confirm the new name. Select Multiple Items You can select more than one file or folder together. (1) In the top toolbar, tap on the Multi icon “ ”. (2) Tap the files/folders you want to choose. The file/folder name turns red when selected. Tapping it again can cancel the selection. Once you finished selection, you can delete, copy or move the selected files together by tapping on the Editor icon . 33 E-mail Your Internet Tablet has pre-installed an E-mail application. You can send or receive e-mails from the Internet at any time with Your Internet Tablet. Make sure you have an internet connection before using the email service. Tap on the Application Tab to display all applications, and then select “Email” to launch the email application. You should enter the inbox if you have set up an email account. Otherwise, set up an account first. Setup an E-mail Account First you need to setup an E-mail account for receiving or sending emails. (1) Start up the email application by tapping the Email application icon and you are prompted to setup an account. (2) Input your email address and login password. You can set the account as default by selecting the option “Send email from this account by default”. (3) Tap “Manual Setup” to set the email server information. (4) Choose the server type from POP3, IMAP or Exchange for incoming emails. To know what type of your email server is, you can consult the service provider, network administrator or search for information in the Internet. (5) Input required information (server, port etc.). You can obtain the information from the service provider, network administrator or the Internet. (6) Choose the server type for outgoing emails, and input required server information. (7) Click “Next” to continue. Your Internet Tablet will check the server settings. When it prompts you that “Your account is set up, and email is on its way”, your account is set up successfully. (8) Input your name and then tap on “Done” to finish. Note: If you have more than one account, every time when you start up the email application, you enter the default email account. Manage Accounts You can setup more than one account and manage these accounts by checking information about the account, adding another account or deleting an account. Add another Account Following these steps to add another account if you want. (1) Launch the email application and then tap on the Menu icon to display the menu item. Choose “Accounts” to display accounts. (2) Tap on the Menu icon to display the menu item, and then choose “Add account”. 34 (3) Follow the steps of setting up a Email Account to add an account. Delete an Email Account (1) When you are in the email box, tap on the Menu icon to display the menu items. (2) Tap on “Accounts” to display all email accounts. (3) Hold your tap on the account that you want to delete until a menu pop up. (4) Tap on “Remove Account”,and then tap on “OK” to confirm. Check the Account Setting (1) When you are in the email box, tap on the Menu icon to display the menu items. (2) Tap on “Accounts” to display all email accounts. (3) Hold your tap on the account that you want to check until a menu pop up. (4) Tap “Account settings”,and then you should see all setting information about the account. You can edit these settings as you want. View Emails You should enter your mailbox when you start up the email application. In the mailbox, you can slide your finger up and down to scroll through the email list. Tap on an email to open it. Holding your tap on the email can display a menu. With the menu, you can open, reply, forward or delete the email. Email Menu Items In the email list, tap on the Menu icon to display the menu. Refresh Refresh the emails. Compose Compose a new email. Folders Accounts Go back to email box. View all email accounts. Account Settings Check your account settings. Using the Camcorder/Camera(optional) The device features built-in video recorder that allows you to make video clips or take photos. Tap on the Application Tab to display applications, and then select “Camcorder”/ “Camera” to enter the Video Viewfinder Recorder/Camera mode. Return To start making video clips, tap Preview on the Start/Stop button to start video recording. Tap on the Start/Stop button VCR/Photography Mode Switch Start/Stop 35 again to stop video recording or photographing. video clip / photo can be previewed in the Preview Window. To play the video clip that you have made, enter the Video Player, and then tap the video. To view the photo that you have taken, enter the Photo Viewer mode, and then tap the photo. The Manage Applications Your Internet Tablet provides support to many useful third-party applications. You can purchase the applications to add more functions to your device. They are available online at the Internet or directly on your product. Pre-installed Applications The device has pre-installed applications when it was manufactured. You can see them by tapping the Application Tab. They are a video player, audio player, photo browser, alarm clock, calculator, calendar etc. Install Applications You can install applications manually following these steps: (1) Download the installation file to your computer. Make sure the file is in format of .apk which is supported by your Internet Tablet system. (2) Connect your Internet Tablet to computer with the USB cable. (3) Copy the installation file to your Internet Tablet. (4) Disconnect your Internet Tablet form the computer. (5) Turn on your Internet Tablet and enter the file explorer mode with the Explorer. (6) Locate the installation file and open it. (7) Follow the on-screen instructions to install the application. (8) Once the application is installed successfully, you can find it in the application tab. Uninstall Applications (1) Display all applications by tapping on the Application Tab. (2) Select “Settings”, and then select “Applications”. (3) Select “Manage Applications”. (4) Tab on the application that you want to uninstall. (5) Tab on “Uninstall” to uninstall the application. Note: You cannot uninstall the pre-installed applications. Some of the applications developed for Android mobile might not run properly in the Internet Tablet. Please consult the respective software developer for further 36 information. System Settings In the Home screen, tap on “Settings” and choose a category: “Networks Controls”, “Sound & Display”, “Date & Time”, etc. When a down arrow appears on the right of a parameter, this means that this setting includes sub-parameters. Tap on it to reveal the list of sub-parameters. When a check box appears on the right of a parameter, tap on it to enable or disable this option. When it is possible, you can use your finger to scroll the screen up and down to reveal settings that you don’t initially see. When you have finished adjusting your settings, tap on the Back icon to go back to the list of settings, or tap on the Home icon to go directly to the Home screen. Your settings are saved instantly. Wireless networks & Sound Display & Location Security & Applications Wi-Fi – tap on this line to enable or disable the Wi-Fi connection. Wi-Fi settings – allows you to set up and manage your Wi-Fi networks. Sound settings: Media volume –Sets the volume for music and videos. You can also adjust the sound by using the Volume buttons, on the top of the device. Notification Ringtone –Set your default notification ringtone. Audible selection –enables/disables the touch screen click sound. SD card notifications –Disable SD card notification sounds. Display settings: Animation –enables/disables the display of animations when opening and closing applications. Brightness –allows you to adjust the brightness of the screen. Screen timeout –allows you to adjust the delay before the screen automatically turns off and locks itself. To turn the screen back on, press the Power button once, and press it again to unlock the screen. This screen gives you the possibility to allow certain Android™ applications to determine your current location. You can also define a screen unlock pattern and other security parameters. This screen allows you to manage your Android™ applications. You can view information about all the applications installed on your device. 37 Privacy SD card & Internet Tablet Storage Language & keyboard Date & Time Touch Panel calibration USB Mode Select Update Media Library Erase activation record About Device This setting allows you back up or restore your system settings or data. This setting allows you un-mount the SD card or check SD card and internal storage space. Set your preferred language and region, and configure text settings for faster and more accurate text input. This setting allows you set up the date, time, time zone and formats. If the touch-screen is not responding properly, use this setting and follow the instructions on the screen. Select this option if you connect to a USB flash drive. Update the media library of your Internet Tablet manually. Clear all Adobe authorization record for downloading eBooks. Display information about Your Internet Tablet system. Troubleshooting Reset your Internet Tablet In the event that your Internet Tablet freezes, you can force the device to shut down by holding the Power button for 15 seconds. Only if the Power button does not reset your device, then should you use the “pinhole reset” button, located on the back the device. Touch-screen Problems If the touch-screen is not responding properly try to go to the “Touch-Screen Calibration” settings screen. Specifications Internet Tablet Configurations CPU Based on ARM926EJ (dual-core) Main CPU frequency:600MHz Auxiliary CPU Frequency(DSP digital command control):560MHz DDR 2X128MB 38 Built-in operating system Android OS 2.1 Hardware IBM PC or compatible PC, Note-book or Macintosh with USB port 4GB( 2.5GB for file storage, 256MB for apps installation, 1.2GB for Internal Memory internal system use) or above MicroSD card: 1GB, 2GB, 4GB (SDHC), 8GB(SDHC), Memory Card type 16GB(SDHC)(optional) System Requirements Operation System Windows2000/XP/Vista/windows 7and MAC OS 10.6.7 or above USB Interface USB2.0 High speed Features Output Port 3.5mm earphone port, built-in speakers MP3(MPEG1/2/2.5 Audio Layer 1/2/3); WMA(Version 4,4.1,7,8,9) WAV(MS-ADPCM,IMA-ADPCM,PCM) APE(Version 3.95,3.97,3.98,3.99,normal and fast except high and extra Audio high) FLAC(FLAC Audio) AAC(ADIF ,ATDS Header AAC-LC and AAC-HE ) (For license) OGG AVI(Xvid, Divx 4/5/6 except GMC&QPEL, Divx for License, Audio Codec: MP3, AC3) RM/RMVB(Real Video Codec 8/9/10 except G2, Audio Codec: Real Video Format Audio) FLV( Sonnati H.263, H.264 except O2 VP6) (For license) MKV(H.264, MPEG4, XVID, DIVX4/5/6) MOV(MPEG4, H.264, Audio Codec:MP3) Photo Format JPEG, BMP, GIF, PNG Language Multinational languages Technical Parameter MP3: 8∼320Kbps Audio Bit Rate WMA: 8∼320Kbps OGG: Q1- Q10 AVI(Max.1280X720);RM/RMVB(Max.1280X720);FLV(Max.1280*720); Video Resolution MKV(Max. 1280X720);MOV(Max. 1280X720) Max. 6Mbps (MPEG4, XVID, DIVX4/5/6); Video Bit rate Max. 2.5Mbps (H.264, Real video 8/9/10); Max. 2Mbps (Sorenson H.263). Photo Resolution JPEG(Baseline)(Max.8000*8000),GIF(Static)(Max.1000*1000) Recording format 3gpp(general quality:6kbps/8kHz) Network WiFi (802.11 b/g) Connection Media Battery Charge About 5 Hours Time Battery Life About10 hours of music playback; About 6 hours of video playback/ web browsing/reading. 39 Display SNR Frequency Response Range Power Supply Physical Parameters Storage Temp. Ambient Temp. Operation Relative Humidity Storage Relative Humidity 7-inch TFT LCD, Touchpad (resistive touch pad), 800X480 pixel. 90dB above 20Hz—20KHz Rechargeable lithium-ion polymer battery; AC Adapter: AC Input 100-240V∼50/60Hz, DC Output 5V/2A -20 ∼ +65 0 ∼ +50 20% ∼ 90%(40 ) 20% ∼ 93%(40 ) Limitations of Liability Statement Links to Third Party Sites The Ematic User Manual may contain links to third-party sites, however, please be aware that Ematic is not responsible for and cannot control these other sites. Ematic makes no representations whatsoever about any other website which you may access through this user manual. When you access a non-Ematic website, even one that may contain an Ematic logo, please understand that is independent from Ematic, and that Ematic may have no control over the content on that website. In addition, a link to a non-Ematic website does not mean Ematic endorses or accepts any responsibility for the content, or the use, of such website. It is up to you to take precautions to ensure that whatever you select for your use is free of such items as viruses, worms, Trojan horses and other items of a destructive nature. Limitation of Liability To the maximum extent permitted by applicable law, Ematic shall not be liable for any damages suffered as a result of using, modifying, contributing, copying, distributing, or downloading the materials. In no event shall Ematic be liable for any indirect, extraordinary, exemplary, punitive, special, incidental, or consequential damages (including loss of data, revenue, profits, use or other economic advantage) however arising, whether for breach or in tort, even if Ematic has been previously advised of the possibility of such damage. You agree that you have sole responsibility for adequate protection and backup of data and/or equipment used in connection with the product and software and will not make a claim of any nature against Ematic for lost data, inaccurate output, work delays or lost profits resulting from the use of the materials. You agree to hold Ematic entirely harmless from and you covenant not to 40 sue Ematic, or its affiliates, successors or assigns, for any claims related to Ematic. Some states do not allow the exclusion or limitation of incidental or consequential damages, so the above limitation or exclusion may not apply to you. Adobe Digital Editions is a registered trademark of Adobe Systems Incorporated. 41