1
OBJ
INKdraw CB
Manual
OBJ INKdraw CB is the software used to control HSAjet printers with the CB. (A PCI-based
controller board). Some features are different from software used with previous hardware – this
documentation will only describe what is valid for the CB board.
!
"#
!
& " $"$ ' !
!'
,
3
"!'
+
!
" !
$ %$
"(
'
) "
$ ' " $ %
$!
%" !
$ %
%$
"!'
"'"" '
"* ".$ % !
.
!
&!
'
/
$ %$
*
"! %
% "
-" "
"
'
!
"$
$ %
$ % !%! " " /"
-"! $
0
"$1 & 1"$2
" $'
0*
+
"$!
"$
$ %
"!
" $
4
HSAut
omat
i
cApS
5
" $ 1 -"50
2 67 8 " -"
29 : 8
; $"4<
= +> ?
3 @4<
= +> ? AAA
!B !
4
HS Automatic ApS
!
http://www.hsautomatic.com
Table of Contents
Section 1 Introduction............................................................................................. 1
WELCOME TO OBJ INKDRAW
INSTALLATION OF OBJ INKDRAW
1
2
2
5
Section 2 The Canvas.............................................................................................. 7
PARTS OF THE SCREEN
CREATING / PRINTING MESSAGES
OBJECT TYPES 5
OBJECT PROPERTIES
3
4
21
6
8
15
24
Section 3 Advanced topics ................................................................................... 58
THE PARAMETER MENU
INK REDUCTION 8
WORKING WITH DATABASES
OBJECT LINKS
7
69
9
10
59
72
85
Section 4 User Interaction .................................................................................... 89
PROMPTS 11
TOUCH SCREEN INTERFACE
90
12
94
Section 5 Remote Control................................................................................... 101
ETHERNET / RS232 13
RUNNING UPDATE
102
14
120
Section 6 Localization ......................................................................................... 122
CHANGING THE INKDRAW LANGUAGE
15
123
Section 7 Reference ............................................................................................ 127
THE MENU STRUCTURE
THE HARDWARE CONFIGURATION
THE PREFERENCES MENU
16
17
18
FEJL! BOGMÆRKE ER IKKE DEFINERET.
128
131
Section 8 Support ................................................................................................ 142
IF YOU FIND A BUG 19
HS Automatic ApS
143
http://www.hsautomatic.com
OBJ INKdraw User Manual
25 08 2005
Page 1
Section 1
Introduction
1: Welcome to OBJ INKdraw
2: Installation
HS Automatic ApS
http://www.hsautomatic.com
OBJ INKdraw User Manual
25 08 2005
Page 2
Welcome to OBJ INKdraw
1
Welcome to OBJ INKdraw, the advanced drawing program for HS Automatic ApS printers and
equipment. With OBJ INKdraw, you can create messages, import data to print from databases, and
control the way the print is done.
OBJ INKdraw is free software. You can download and test the software from our web page,
http://www.hsautomatic.com, and create messages already before you purchase our printing
equipment.
What is the purpose of this manual?
OBJ INKdraw user’s manual will help you understand and use the many different functions
available in the software. It will also explain the way OBJ INKdraw is related to the hardware of the
printers, to help you to learn how to do advanced configurations.
What is contained in this manual?
This manual contains different sections, each describing a part of the software. At the end of the
section, you will find a quick resume of the content.
What you need to know
It is assumed that you are familiar with the basic concepts of inkjet technology. Furthermore, this
manual assumes that you know how to operate and use a standard Windows system.
Conventions used in this manual
When you see this
..it means..
[File|Save as..]
Select the menu “File” then the item “Save as”. You can use Alt and
underlined letters, or the mouse to select from the menus.
F10
A key on your keyboard
Alt+F10
Keys pressed simultaniously. Press and hold Alt then press F10.
A tip that will help you as you work with the program
A note. Something to be aware of.
HS Automatic ApS
http://www.hsautomatic.com
OBJ INKdraw User Manual
25 08 2005
Page 3
About HS Automatic ApS
HS Automatic is the manufacturer of high-quality equipment for coding and marking. Key words for
the products are flexibility, design and a very competitive pricing. Products are based on the Xaar®
Piezo Technology and Hewlett Packard® Inkjet Technology
The software is undergoing continuos development as new features are added.
Key features in OBJ INKdraw
OBJ INKdraw offers many advanced features. Some of the key elements are listed here:
Object orientation
All objects are freely moveable. Once placed, you can change the properties of all objects at any
time.
Unlimited numbers of every object
You can create an unlimited number of any type of object. In other words, 50 counters and 75
dates are no problem in a single drawing. And all objects have live update every second.
Windows truetype fonts
You are not bound by a pre-defined number or type of fonts. OBJ INKdraw is based on Windows
and is able to use any font you have installed, in any font size. Some objects are even freely
stretchable.
Communication
The program is not stand-alone, but enables you to accept input from outside. Use a PC network, a
serial connection or input from the user through prompts or a touch screen.
Many barcodes with advanced features
OBJ INKdraw supports many barcodes, among these the EAN128 and CODE128. You can insert
objects into barcodes, change the human-readable font, an stretch the bar code as you please.
Also 2D barcodes are available, such as PDF-417 and Data Matrix.
Multi-language interface
Use any language you wish through the user-configurable language files. Switch language on the
run. You can even use other character sets such as Japanese, Chinese or Thai.
Connection to databases
OBJ INKdraw can import and use data from delimited text files, Microsoft Access®, Microsoft
Excel® and several professional SQL servers.
HS Automatic ApS
http://www.hsautomatic.com
OBJ INKdraw User Manual
25 08 2005
Page 4
Different interfaces: touch screen and edit mode
OBJ INKdraw now allows you to “remove” the edit screen, and work solely from a touch screen
interface. This effectively allows you to design your own nice industrial environment.
Full remote control
If you prefer to write your own front end, the open and documented protocol allows you to fully
control OBJ INKdraw from outside by ethernet or RS232.
Speaks your language
OBJ INKdraw has been made to fit into the Windows operating system. If you are using a nonwestern version of Windows, OBJ INKdraw will speak your language. Menus can be changed to
your language, and you can type in the fonts you normally use - for example cyrillic, hebrew or
kata-kana.
HS Automatic ApS
http://www.hsautomatic.com
OBJ INKdraw User Manual
25 08 2005
Page 5
Installation of OBJ INKdraw
2
Obtaining OBJ INKdraw
OBJ INKdraw is free software. It is available for download at HS Automatic’s home page,
http://www.hsautomatic.com or available on a CD with purchases of a controller board.
The installation comes in different files that have a maximum size of 1.4 Mb (so that they each fit
on floppy discs). There is an installation file (setup.exe) and typically 3-4 setup-x.bin files (x
being a number).
Typically the installation files will be packed in a .zip archive to keep them together. Unzip the files
using common tools such as Winzip or similar.
Installing the software
To install OBJ INKdraw, place the file unzipped files in a folder on the computer you wish to install
onto. Or simply install from floppy discs.
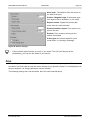
When you run setup.exe you will see this screen, asking
you if you wish to install OBJ INKdraw. Click “Yes” to
continue
Next you will see the setup welcome screen. Here, you
see the version of OBJ INKdraw you are installing.
Click “Next” to continue.
You can specify where you wish to install OBJ INKdraw.
By default, you will be suggested
C:\{program directory}\OBJ INKdraw
where {program directory} depends on your Windows
language. In US Windows, this is Program Files.
You can specify any location you wish, if you are not
happy with the default location.
HS Automatic ApS
http://www.hsautomatic.com
OBJ INKdraw User Manual
25 08 2005
Page 6
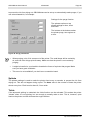
You also specify if you wish to create shortcut icons for
OBJ INKdraw.
Desktop Icons are placed on your windows desktop.
Quick Launch Icons are placed to the right of the “Start”
button.
Click Next to continue
The final setup before installation is a presentation of
where your files will be placed, and the start menu folder
that will be created.
To enable automatic start of OBJ INKdraw when you start windows,
place a shortcut in the startup folder of Windows.
Notice: the automatic setting of this is no longer possible since it
did not work on all Windows installations.
HS Automatic ApS
http://www.hsautomatic.com
OBJ INKdraw User Manual
25 08 2005
Page 7
Section 2
The Canvas
3: Parts of the screen
4: Creating and printing messages
5: Working with objects
6: Modifying object properties
HS Automatic ApS
http://www.hsautomatic.com
OBJ INKdraw User Manual
25 08 2005
Page 8
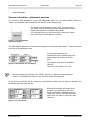
3
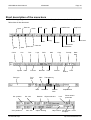
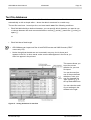
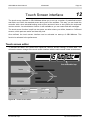
Parts of the screen
OBJ INKdraw contains different areas of the screen that are important to know about, as their
names will be used many times in this manual. The following figure identifies the different areas:
Edit, undo/ redo.
Setup and
print
File
operations
Objects
Font panel
Special object
properties
General object
properties
Template panel
with one object
Head
selector(s).
Second open file,
not active
Object panel,
with selected
object
highligted.
Here you can
also see the
current CB
board or
TCU/CU/SA
mode
Rulers, with
position of active
object
highlighted
Figure 1: The OBJ INKdraw main screen
Canvas. This is
the area that is
printed
HS Automatic ApS
Active open file, with one
object selected. File name
shown in title bar.
http://www.hsautomatic.com
OBJ INKdraw User Manual
25 08 2005
Page 9
Description of the screen items
•
Title bar: Contains the name of the current file, plus information about the size of the file
written as [Width, Height] in pixel.
•
Menu line: Click a word on this line to select from the menu
•
Icon bar: This is where most of the functions in the daily use of the program are selected.
•
Object Properties: Use these 2 bars to adjust the look and function of objects you have
created
•
Head Selectors: This line shows the different heads in the current message. Can contain any
number from 1 to 16 heads. At the same time, the size of the heads (in mm.) is also shown.
•
Rulers: Tells you where you are in the current drawing. Uses the selected unit.
•
Information panel: Gives information about the current position, zoom and current date/time.
•
Object panel: All objects created are present here. This bar can be used to rename objects.
•
Drawing Canvas: This is where the printed message is edited.
•
Split line: visual way to separate heads. Is not printed.
•
Objects: Example of two objects (Text and Barcode).
•
Template panel: can be used to create multiple copies of the same object, with identical
properties.
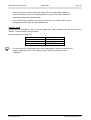
When you click around with the mouse, that clicked part of the screen takes “focus”. Some
actions are only possible when the canvas is in focus – if you experience that something
seems impossible to do, maybe it's because the focus is somewhere else.
HS Automatic ApS
http://www.hsautomatic.com
OBJ INKdraw User Manual
25 08 2005
Page 10
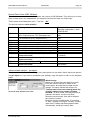
Short description of the menu bars
The following will give an overview of the icons and what they do. A more detailed description will
follow later in the document.
Open
Save As
Close
Undo
Save All
Save
Circle
Line
Square
Font type
Date
Hor. position
Vert. position
HS Automatic ApS
Parameters
Shift
Counter
Barcode
Font
size
Italic
Hor. size
Vert. size
Ink Level
Preview
Logo
Bold
Print
Delete
Close All
Text
Stop Print
Copy
Redo
New
Preferences
Paste
Cut
Mail
Field
Stacker
Prompt
Ink
Reduct
Database
Links
Transparency
Underline
Rotation
Copy
Stretch /
Pitch
Object selectors
Object stacking
Capitalisation
Lock
Show value in
printmode
Object name Ink reduction Invert
for object
http://www.hsautomatic.com
OBJ INKdraw User Manual
25 08 2005
Page 11
Look and feel
OBJ INKdraw offers you different ways to influence the look of the screen. What options you prefer
to have on or off is up to you; remember that your printed image stays the same. Most of these
functions are located under the layout section in preferences (Alt+p)
Enable / disable menu bars
You can remove the menu bars on the screen, to create a more"clean" interface by pressing the
following keys
Tool bar
Shift+Ctrl+1
Object bar
Shift+Ctrl+2
Font panel
Shift+Ctrl+3
Design bar
Shift+Ctrl+4
Object Panel
Ctrl+Alt+O
Template Panel
Ctrl+T
Print Head Panel
Ctrl+H
Rulers
Ctrl+R
Zoom
Use this feature to see more or less detail of your drawing canvas.
The zoom default size is 100%, however the sizing begins at 10% and moves up to 2000%.
Using this function has an effect on the screen only and not when the final print is made.
You can activate a shortcut by using the + or – button (numeric keypad, when drawing canvas
has focus), or from the menu [Layout|Zoom|xxx%]. It is also possible to zoom in and out with the
mouse scroll wheel. The current zoom is shown on the information panel. In all cases, the zoom
will be centered around the position of the cursor.
Units
This is the measurement you work in on the drawing canvas. Select units from the preferences
menu, or when you create a new picture. Notice that you get the same result on the printer no
matter what unit you prefer to work in.
HS Automatic ApS
http://www.hsautomatic.com
OBJ INKdraw User Manual
25 08 2005
•
Pix, for pixels, which is measured by dots on the final printout.
•
Mm, which is the metric system.
•
Inc for inches
•
points (A typographic unit of measure. Usually 72 points to an Inch).
Page 12
Cursor
This changes the shape of the cursor. Change along with the units in preferences.
•
Crosshair is visualized by a horizontal and a vertical line which goes though the entire
drawing.
•
Hand Point is when the cursor is a pointing finger with a small cross at the end.
•
Cross is when the cursor is pictured as a cross.
Grid
The grid is the rows and lines of small dots shown in the message. They will not be printed, but
help you to align the objects with each other. When the grid snap is on, you can not draw outside
the grid points. This is helpful to guarantee absolute precision when drawing.
To set grid properties, use the parameter menu. Grid visibility can be turned on/off by Ctrl+G or
[View|Grid], but the grid will continue to snap.
Rulers
The rulers show where you are in the drawing. Ctrl+R or [View->Rulers] turns the rulers on and
off.
Object Panel
The object panel allows you to see the objects in the current message. You can turn the panel on
and off with Ctrl+Alt+O or [View->Object Panel]
•
You can use the mouse to adjust the width of the object panel by dragging the vertical bar
between the canvas and the object panel.
•
You can also turn off the object panel by clicking the “X” in the top right corner.
•
And, you can collapse the panel by clicking the ">>" in the top left corner.
Template panel
The template panels allows you to quickly re-create many objects with the same properties and
content. By default it is placed opposite to the object panel, in the left-hand side of the screen. Turn
the panel on and off with Ctrl+T or [View->Template].
HS Automatic ApS
http://www.hsautomatic.com
OBJ INKdraw User Manual
25 08 2005
Page 13
The panel can be closed, adjusted in width and collapsed in the same way as the object panel.
The template panel is divided into different sections, by object type. Each object will automatically
appear in the section corresponding to it's type.
Adding objects to the panel
•
Click to select the object you wish to add.
•
Use the right-click menu and choose Copy object to template.
Using objects from the panel
•
Select the object type you wish to add
•
Drag the object from the panel with the left button onto the canvas
Arranging objects in the panel
•
You can arrange objects in the panel by dragging with the right mouse button
•
You can also zoom in and out on the panel by using numeric+ and numeric- keys.
Deleting objects in the panel
•
Select the object with the left mouse button. It will become red.
•
Press del.
Font Panel
The font panel shows the current font family, size and style. It can be turned on/off by Ctrl+F or
[View|Font Panel].
Printer head panel
If activated this shows all the printer heads in use in this file. You can turn the panel on/off with
Ctrl+H or [View|Printer Head Panel].
Click on the print head to jump to that head in the drawing. You will notice that the background
color for that head changes to gray.
Split Lines
The split lines function represents the dividing lines between each printer head. You can turn
these lines on/ off with [View|Split Lines]
•
Split lines will not show the divide between each print engine, only between
heads. Thus, if you have configured your message for a one-head, 4-engine
HS Automatic ApS
http://www.hsautomatic.com
OBJ INKdraw User Manual
25 08 2005
Page 14
printer, no lines will show.
Canvas color
If another color is preferred as background on the canvas, you can choose a different color in the
preference menu. The color of the canvas has no effect of the print. Notice that the active head will
still be shown in gray.
HS Automatic ApS
http://www.hsautomatic.com
OBJ INKdraw User Manual
25 08 2005
Page 15
Creating / Printing messages
4
This chapter will tell you how to create and print a message– the basic commands of OBJ
INKdraw.
Working with files
The file type of OBJ INKdraw is .ink
You will notice that ink files are text files in a special format, and therefore take up almost no
space. Typically an .ink file is less than 10 kb.
OBJ INKdraw allows you to work with multiple files at once. This allows you edit one file while
another file is printing. If you wish to limit the number of files, you can set this in the preferences.
When you first start the program, the open file will depend on the settings in the preferences. You
can choose between the following options:
•
Open the last file edited.
•
Open a new file called "NoName.ink"
•
Open a user-defined message.
•
If the file you try to load does not exist, an empty file called "NoName.ink" with 1
XaarJet 128 engine, 1000 pixel wide, will be created.
•
It is not recommended to use NoName.ink to store information you need, as this
file is overwritten without warning.
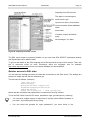
Creating a new file
You can create a new file in any of the following ways: [File|New], by using Ctrl+N or by using
the icon for new file
You will see a dialog box as indicated by the following figure.
HS Automatic ApS
http://www.hsautomatic.com
OBJ INKdraw User Manual
25 08 2005
Page 16
1: Select the CB card that will print
your message. If you have no card in
your computer, simply ignore this.
2: Select the type of head you will be
using
3: If you wish to create CU / TCU / SA
messages, check the box.
Figure 2: Setting the size of the new message
4: Add, insert or delete heads to fit
your needs. You can also change the
size of added heads.
5: Finally, choose the lenght of the
message and the units you wish to
initially use.
•
You select the size for the active head (marked as a “pressed down” button)
•
New heads that are inserted or added will also have this size.
When all these values have been entered, presses OK and the message window will resize itself to
the values you have entered.
If more than one head has been selected, the message window will display each head separated
by a split line, and the selected head marked in gray.
Opening a file
You can open an existing file by using [File|Open], pressing Ctrl+O or by using the icon for
open file:
If changes have been made to the current file since last save, you are prompted if you want to
save. Answer this with Y(es), N(o) or C(ancel).
•
You can modify the behavior of the save routine in the preferences.
•
Choose between normal (if modified), always, or never.
Next, you will see the open file dialog box:
HS Automatic ApS
http://www.hsautomatic.com
OBJ INKdraw User Manual
25 08 2005
Page 17
The open file dialog box is based
on standard windows
components. Thus, it will appear
in the language of the Windows
installation.
Figure 3: The open file dialog box
Saving a file
To save a file, click the icon
, select [File|Save] or press Ctrl+s.
•
Even if the initial file name “NoName.ink” is not a file you created, it is still a valid
file name. If you create objects and save, changes will be saved to this file.
•
But next time a new file is created, the name NoName.ink is used again.
•
In other words, always make sure to give your files a new name, or they will be
overwritten.
Save as a new file
To save an open file under a new name without making changes to the previous name. It can be
saved as an .ink file. You will be promted for a file name to use.
Exit the program
To exit OBJ INKdraw use [File|Exit]or press Alt+x.
HS Automatic ApS
http://www.hsautomatic.com
OBJ INKdraw User Manual
25 08 2005
Page 18
Object Basics
A message (what is written on the canvas) can contain one or more objects. Examples of objects
are bar codes, lines, squares, texts or counters. Basic operations such as creating, moving and
deleting is the same for all objects. This section will give a brief introduction to working with
objects.
Creating new objects
To create a new object, follow this procedure:
•
Click the icon for the object you want to create. (these will be explained later).
•
Place the mouse cursor in desired starting position.
•
Click and hold the left mouse button and drag open the shape.
Deleting objects
To delete an object, select the object with the mouse, and press the Delete key.
•
If the object is transparent, it does not become selected until you hit something
“solid” with the mouse. For objects with thin lines, this can be hard at times.
•
A good idea is to use the object panel or zoom function to help select objects.
•
Notice also that the cursor will change to the name of the object type when you
have the pointer over an object.
Changing object properties
Any object has properties – information about size, look, function, etc. Not all properties apply to all
objects, for example a line does not have any font. You change the property of an object by
selecting it with the mouse, then changing the property.
You can also select the object in the object panel.
•
In dialog boxes in the properties area, you often need to press enter to change
the value.
Copy, Paste
OBJ INKdraw has copy and paste functions much like any other windows program. To use this
function, select the object/ objects, use copy, then use paste. You find these functions in the menu
[Edit], or by using the keys Ctrl+C (Copy) or Ctrl+V (Paste). OBJ INKdraw will automatically
create unique names for the new objects.
HS Automatic ApS
http://www.hsautomatic.com
OBJ INKdraw User Manual
25 08 2005
Page 19
•
You can also paste from the standard Windows® Clipboard. Use this to insert text
from other documents
•
If the pasted text has more than one line, a field object will be created. Use this to
quickly create a field object.
Working with multiple objects
Many functions can be done on several objects at a time. This is especially useful if you want to
move objects that belong together, or apply the same style to all objects.
You select multiple objects in different ways:
•
Dragging a box around the objects to select. Only objects that are completely within the
boundaries of this box will be selected.
•
You can also select multiple objects by holding the Ctrl key and selecting objects on the
object panel.
•
Holding the Ctrl key and clicking on individual objects
Right-click menu
For each object, there is a right-click menu when the object is selected.
From here, you have different options:
•
Add to template: Will add a copy of this object to the template panel
•
Copy, cut, paste, delete: same as the menu functions.
You do not have the "Add to template" if you have selected more than one object.
Printing your finished message
Once your message is finished, you activate the print mode by pressing F10 or by using the print
icon
. The window will change and display the value of objects with "watch option" enabled.
If you are running OBJ INKdraw on a computer that does not have the printing hardware installed,
you will see the text “Could not find controller board!”.
Previewing your work
To see how your print is actually going to look when printed, there is a built-in "preview" mode.
HS Automatic ApS
http://www.hsautomatic.com
OBJ INKdraw User Manual
25 08 2005
Page 20
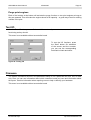
Activating preview
To activate the preview mode, press Shift+F10 or press the preview-print icon . You will notice
that the canvas now appears in black and white and that you now have a preview panel.
Use the "play" buttons if your picture
changes with every print, e.g. if you have a
counter or use a database. You can use
either single step or auto run (at intervals
from 100 ms and up.
Figure 4: Preview toolbar
The “Rewind” button functions as an undo
button. Use this to “play it again”.
Use "Stop" when in auto run.
•
Like print preview in other programs, the “real print” is not affected.
•
Thus, OBJ INKdraw returns to it’s old state after you exit print preview.
•
In short, you will not have moved counters, databases, etc after print preview.
•
The print preview is not 100% true to the output from the printers, it's only meant
to give you an idea about how the finished print will look.
•
For example, you can not see ink reduction and copy objects
HS Automatic ApS
http://www.hsautomatic.com
OBJ INKdraw User Manual
25 08 2005
Page 21
5
Object Types
OBJ INKdraw has different object types that you can use to create your message. This chapter will
describe these objects. Notice that the object properties are all described in the next chapter. The
objects are grouped into 2 groups: geometric and variable objects. The difference is the fact that
“variable” objects are able to do more than the geometric objects. They contain information,
instead of just representing a shape.
•
All objects have a name, by which they are identified. Per default, this name is made by the
object type plus a number, e.g. “Ellipse1” or “Barcode23”
•
You can rename all objects as you please, the program will still function in the same way. If you
have many objects, or if you work with databases, renaming objects might be easier for you – it
is easier to remember the function of object names such as “Address1” instead of “Text1”.
•
You can not have two objects with the same name. OBJ INKdraw will refuse you this.
Geometric Objects
Ellipse / Circle
Click the circle icon
Rectangle / Square
Click the square icon
Line
Click the line icon
•
To ensure that a geometric object – or any other object for that matter – is
horizontal or vertical, or round or square, use the grid. See Grid Setup.. page 12
Variable objects
The variable object contains information that can be changed during printout. This can happen
automatically (for example for date/ time), or by user input, as described later. Some objects can
also contain other objects, which will be described later.
Objects are the key element of this software, hence the name OBJ INKdraw.
HS Automatic ApS
http://www.hsautomatic.com
OBJ INKdraw User Manual
25 08 2005
•
Most objects are created with the properties you last used.
•
You can change the properties before you create the object, or after.
Page 22
Date object
Click the icon
to create the object.
This object is updated live on the canvas.
There are different ways of displaying the date, which is highly flexible. Please refer to the chapter
on object properties for more information.
•
Dates are always relative to the system clock in the computer.
•
Dates contain the same date no matter how the date format is. This means that you can link
two date objects and have the same date / time shown in different ways.
Text object
Click the icon
to create the object.
By default, text is created with the word “Text Line”. This can, however, be changed in the
language file. Please see Localization.
Counter object
Click the icon
to create the object.
The counter is highly flexible, and will allow you to count in 4 different number bases, up and down,
in variable steps etc. More information is available in the chapter on object parameters.
Barcode object
The barcode object has many options, and can even contain other objects (this will be described
separately).
Click the icon
to create the object.
Logo object
The logo object can contain graphic files in the Windows Bitmap (BMP) or JPEG (JPG) formats.
Only 2 colors are shown, if the picture contains more, it is converted to two colors.
Click the icon
to create the object.
By default, the logo is the HS Automatic company logo. If this logo file does not exist in the “Logo”
directory, it will be created.
HS Automatic ApS
http://www.hsautomatic.com
OBJ INKdraw User Manual
25 08 2005
Page 23
Field object
The field object is more an “object container” than an object. It allows you to group other textual
objects (text, date, counter) in one block. This is especially useful if your data in the fields varies,
and you don’t want to have texts that either overlap or are too far apart.
Click the icon
to create the object.
The field object is empty by default, click the properties buttons to add objects.
Schedule Object
The schedule (or shift) object is a text object where you can set the content to vary with the current
time and/or date. This is useful to print for example the name of the current shift at work.
Click the icon
to create the object.
When created, the schedule object will show the text “Empty”. Click the properties icon to add
content.
Copy Object
This object is a little special, as it does not have any content in itself. Instead, it is used to copy a
part of the screen to one or more other parts. This can be done for a smaller area or an entire head
at a time.
Click the icon
to insert the object.
Stacker object
Like the mail object, a stacker object is only available when a database is loaded. This object is
used to give a signal when a certain record of a database is reached, typically to trigger a certain
action. Commonly used in newspaper presses to stack the papers, hence the name.
Click the icon
to create the object.
Line name object
This is a "system variable" object, where you can put the name of the conveyor line that prints this
message. This is done in preferences. If you load the same file on a different computer, this object
content will change accordingly.
Click the icon
HS Automatic ApS
to create the object.
http://www.hsautomatic.com
OBJ INKdraw User Manual
25 08 2005
Page 24
6
Object Properties
This chapter will provide a guide to the many options that are available for different objects. First,
the general properties and concepts will be described, then the properties that are special to each
individual object type.
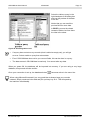
General object properties
Snap point
Any object created has snap points, small handles that are used to define the object’s exact
location. If you click on an object, the snap points will be visible as blue sqares along the edges of
the object.
Picture of snap points. There are 9 different snap
points: along the edges and in the center of the object
(not shown when object is selected).
•
4 corner-points. By dragging these with the
mouse, you can change object width and height
•
4 middle-points. By dragging these, you can only
change either height or width.
•
1 center-point, selectable through the snap-pointselector. If you drag one of the other 8 snap
points, and the center point is selected, the object
will stretch around the center
Figure 5 : Snap points
Which snap point you work with is selected on the
snap point selector. When changing snap point, the
rotation point and the coordinate display will
change. Also, the object will be pin-pointed to the
selected snap point when stretched.
Figure 6: Object snap panel
The snap point selected also has another importance except stretching: the current position for the
object is always shown for the selected snap point.
•
Line objects are an exception. As they don’t have any “height” and “width”, they
don’t have 9 snap points, only 2: beginning and end.
•
When a line object is selected, the coordinates display is different, and the snap
HS Automatic ApS
http://www.hsautomatic.com
OBJ INKdraw User Manual
25 08 2005
Page 25
panel disappears.
Canvas orientation – placement and size
The canvas in OBJ INKdraw is a like a big chalkboard where you can place letters, circles etc.
There is a coordinate system related to the canvas, in the following way:
The arrow lines illustrate the x and y axis. The gray area is
the visible canvas. Everything outside the gray area is where
objects with negative coordinates are placed.
You can place part of or the entire object outside the visible
area, but only the visible parts are printed.
Figure 7: The OBJ INKdraw
coordinate system
You work with the placement on the canvas through the coordinates parameters. These are placed
at the left of the parameter area.
For any object selected, the
coordinates of the selected snap point
and the size of the object is shown
here.
Figure 8: Coordinates and size display
•
This object’s snap point is located at
182,109.
The size of the object is 3 by 352
Barcode objects will, instead of the “Width”, show the module size that shows the
number of multiplications relative to the minimum width of the barcode.
As previously mentioned, the line object is a little different. When the line object is selected, the
coordinate panel will look like this:
Notice that the width and height icons
are gone, and replaced by a second
set of coordinates, indicating start and
end points. The line itself will show one
end in blue, the other in yellow for easy
reference.
Figure 9: Line end points
HS Automatic ApS
http://www.hsautomatic.com
OBJ INKdraw User Manual
25 08 2005
Page 26
Apart from reading out the value of the coordinate, you can also set the coordinate. To do this,
follow this procedure:
•
Select one or more objects
•
Change the value you would like to set
•
Press enter.
•
Setting the coordinate for more objects at a time is a good idea to align object
along the same edge.
•
Even with multiple objects selected, you can see the properties of each individual
object, by clicking on it. Notice, however, that no snap points will appear with
multiple objects selected.
•
Click on a blank part of the canvas to deselect all objects.
Locking objects in place
Many times it is undesired to move an object once it has been placed in the right position. Because
it is quite easy to move objects on selection, the lock will help to make objects stay in place.
To use this property, simple select one or more objects and click the lock symbol
To remove the coordinate lock, click the icon again.
•
The lock button only protects from movement with the mouse. If you want, you
can still use the coordinate box to change object coordinates.
•
Likewise, the lock button does not protect from content alteration of the locked
object.
Stacked objects
The objects are placed on the canvas like papers on a desk: they lie on top of eachother. You can
change the way the objects are stacked by using the Stack up, Stack down icons:
Stack up: moves the selected object / selected objects upwards in the stack.
Stack down: moves the selected object /selected objects downwards in the stack .
•
The object panel is always sorted like the objects are stacked: The object on top
is at the top of the object panel. Use this as a handy reference.
HS Automatic ApS
http://www.hsautomatic.com
OBJ INKdraw User Manual
25 08 2005
Page 27
Object name
As previously mentioned, all objects have a name. This property can only be changed for one
object at a time. There are two ways of changing an object’s name:
1) Select the object, type a new name in the box and press enter
2) Click two times slowly on the object name in the object panel. Now, you can also edit the name
here.
Object rotation
Almost any object can be rotated, except the line object (since it only has 1 dimension). To rotate
an object, use the rotate icon
on one or more objects. At this moment, objects can only be
rotated in 90º intervals: 0,90,180,270; the rotation is always counter-clockwise.
•
The object is rotated around the selected snap point.
•
On more objects, each object is rotated around it’s own snap point, not a common
point.
Monitoring the content of the object during print
To keep an eye on the next value of objects being printed, activate the print monitor for that object.
The print monitor is symbolized by a magnification glass:
be displayed in the print window.
. Once the print starts, the value(s) will
The print monitor has been activated for
some objects
You see the name of the object and next
to that, the value of the next print.
Figure 10: print monitor showing next value
Print in reverse
All objects that are not geometric objects can be reversed. Reversed objects will print like this. To
activate reverse print, click the
HS Automatic ApS
button to the right of the magnification glass.
http://www.hsautomatic.com
OBJ INKdraw User Manual
25 08 2005
Page 28
The reverse button has no affect on geometric objects, as these have their own property bar for
color (background / foreground).
HS Automatic ApS
http://www.hsautomatic.com
OBJ INKdraw User Manual
25 08 2005
Page 29
Individual object properties
This part will describe properties that are only available for one object, or a small group of objects.
All possible values will be described.
Lines, Ellipses and Rectangles
The geometric shapes all have a set of properties that they share.
For all geometric shapes, line thickness,
transparency and color can be set.
Color can be black or white.
For lines, notice that transparency and fill
color are not present.
Line thickness is measured in the currently
selected units
Figure 11: Properties for geometric objects
A note about fonts and text
Some (or in fact most) of the objects in OBJ INKdraw contain text. Although the objects are created
with a standard font, it is possible to set any available font and font size –fonts are based on the
fonts from Windows. This means that you can get fonts from elsewhere, install these in Windows,
and use them in OBJ INKdraw.
The font bar is placed right under the menu bar:
The font, font size and font
appearances work just like any
other office program.
Figure 12: Font panel
•
Stretch applies to only date and
text objects, plus counters when
space is lead-in character, and
causes the text to always fit
inside the frame, no matter how
long it is.
Transparency does not apply to the bar code object. If you want to put some text
close to the bar codes, change stacking and make the text objects transparent
instead of the bar code.
HS Automatic ApS
http://www.hsautomatic.com
OBJ INKdraw User Manual
25 08 2005
Page 30
•
When you stretch an object using the snap points, the height/width relation no
longer matches the font size. Pressing enter in the font size field will reset the
relationship between height and width.
•
If you need to input character sets other than the latin, you might need to select
the appropriate character set under preferences.
Capital Letters
Sometimes it is desirable to print any text as upper case. This is simple to do with the Text case
selector. This is located in the font panel.
Choose between the following:
Normal
Capitalize
lower case
upper case
•
The red fox
The Red Fox
the red fox
THE RED FOX
You can use this to create dates with mixed capitalization. Since the date code for
"August" [Mmm] does not exist, simply choose "august" [mmm] and select
"Capitalize".
HS Automatic ApS
http://www.hsautomatic.com
OBJ INKdraw User Manual
25 08 2005
Page 31
Date objects
The date object is able to show date and time in almost any format. The basis of the date is the
internal clock in the PC, so make sure that one is set correctly to the local time.
The basis of the date properties is the date
properties bar. When you change the
properties, the next date object will default to
the same format.
Figure 13: The date property area
Setting date shift
The date shift is the difference between the current system date and the date in the date object.
This is very useful for expire dates when either the length of the period or the exact date of
expiration is known. The value can be either positive or negative, 0 is for no difference (today's
date).
The value can be set in two different ways:
Input a number and press enter in the Date shift fields (day, hour, minute, second), or
select a date in the Current Date field:
When you select today’s date, you are prompted with a
box similar to this. The current day is marked in a red
circle, the selected date in a blue spot.
You can select months with the gray arrows on top.
Figure 14: selecting a date
Date shift by year, month, day
Normal operation is to set the difference in days only. But in preferences, you can select an option
to set the difference in Year, Month, Days. In that case you will have 3 separate boxes where you
normally have the days input.
HS Automatic ApS
http://www.hsautomatic.com
OBJ INKdraw User Manual
25 08 2005
Page 32
Time offset in months follow this logical rule: Take the same date in the following / previous
month and add as many days as needed to make the date legal.
In other words: OBJ INKdraw does not take "the last day" of next month if the date can't be legal.
As example:
30 jan 2005
plus one month
30 jan 2005
30 mar 2005
plus two months
minus one month
28 feb 2005
plus one month
2 march 2005
(28 feb + 2 days)
30 march 2005
2 march 2005
(28 feb + 2 days)
28 march 2005
•
When selecting a date, the Current date and the Date shift will overwrite each
other, as it is really the same setting you change.
•
The box shown above will appear in the language of the Windows you have
installed. The strings that change are “Today is” and month names.
•
Of course, you can also directly enter a date and not use the drop-down menu.
•
By using links on dates, the destination offset will be based on the source date.
This is useful in prompts.
Setting time shift
As you set date shift, you can also set time shift. This is useful if you want for example the midnight
change of date to be different.
You have 3 fields that equal to hh:mm:ss. Select any of these, and use the arrows up/down, or
enter a number with the keypad. Changes will not take effect until you press enter.
You can use any number as the difference from the current date, minutes and seconds will
perhaps be converted to entire hours.
The date format
The date format is a string of characters, where some characters are interpreted as placeholders
and format string for the following elements in a time/date – for example : second, minute, hour,
day, month, year, weekday.
If a character does not interpret as a placeholder, it is simply written in the date object as it is.
•
Date formats depend on the settings in the local Windows® installation. It is quite
likely that some strings below are different in different versions of Windows.
•
Date “words” (day and month names) will always be written in the language of the
Windows installations. To change this language, change the regional settings
(sometimes labeled “International”) in your Windows® control panel.
HS Automatic ApS
http://www.hsautomatic.com
OBJ INKdraw User Manual
25 08 2005
Page 33
The following list gives all the options for the date. You can either choose from the pre-defined
formats, or compose your own by writing in the box.
If you want to use letters from below in a string, use quotes. Example: “Date is “ yy-mm-dd will
output Date is 01-09-01 for the example below. You can combine several strings and codes like
this:
“Date is “ yyyy-mm-dd “ and time is “ hh:nn:dd
Many places, upper case strings will return upper case output. Example:
mmm = aug
MMM = AUG
(but they can't be combined. Mmm returns "808" since it's interpreted as 2 times month numbers,
one without zero in front). In that case, use capitalized as option for the object.
Some of the codes are not standard windows, but unique to OBJ INKdraw. These should always
be put in “” like this: “#J”
HS Automatic ApS
http://www.hsautomatic.com
OBJ INKdraw User Manual
25 08 2005
Page 34
Examples will be shown for the date Saturday, September 1, 2001 05:02:03:008
Standard date codes (Windows)
Format
element
d
dd
ddd
dddd
ddddd
dddddd
m
mm
mmm
mmmm
yy
yyyy
h
hh
n
nn
s
ss
t
tt
z
zzz
a/p
am/pm
ANSEC
Meaning
Example
day as a number with the needed figures only.
day as a number with two figures always.
day as a string in short format, Example:mo-so
day as a string,
date, month and year as figures:
date, month and year.
month as a number with the needed figures only.
month as a number with two figures always.
month as a string in short format:
month as a string.
year as a number with two figures only.
year with four figures.
hours with needed figures only.
hours with two figures always.
minutes with needed figures only.
minutes with two figures always.
seconds with needed figures only.
seconds with two figures always.
time as a clock with hours and minutes.
time as a clock with hours, minutes and seconds.
1/1000 seconds with needed figures only
1/1000 seconds with 3 figures
time as am/pm using one letter only.
Capital letters will give capital letter in output.
time as am/pm using two letters
Capital letters will give capital letter in output.
animated clock with seconds.
This is a unique feature of OBJ INKdraw, and is not
related to Windows.
1
01
Sa
Saturday
01-09-01
1
9
09
Sep
September
01
2001
5
05
2
02
3
03
05:02
05:02:03
8
008
a
Am
Clock at 11:23:04
ANMIN
animated clock with minutes
This is a unique feature of OBJ INKdraw, and is not
related to Windows.
Clock at 11:23:04
HS Automatic ApS
http://www.hsautomatic.com
OBJ INKdraw User Manual
25 08 2005
Page 35
Special Date Codes (OBJ INKdraw)
The codes below are not standard windows, but unique to OBJ INKdraw. They allow you to show
dates in ways that is not standardized, for example to encode the date in a unique way.
These codes should always be put in “” like this: “#J”
The special codes are case sensitive
Code
Meaning
“#j”
day number in the current year, without leading
zero (75 will show as “75”). Remember the “ “
day number in the current year, with leading zero.
(75 will show as “075”) Remember the “ “
Week number, without leading zero (1-9)
Week number, with leading zero (01-09)
Week day number, start Monday without leading 0
Week day number, start Monday with leading 0
Week day number, start Sunday without leading 0
Week day number, start Sunday with leading 0
Week day letter. (Monday = A.. Sunday = G)
Week day name, specified per object.
Please see below
Month name, specified per object.
Please see below
Year using 1 digit (last). 2001
Use specified date file
Please see below
“#J”
“#w”
“#W”
“#d1”
“#D1”
“#d0”
“#D0”
“#G”
“#WN”
“#MN”
“#Y”
“#F”
Example for
Saturday, September 1, 2001
05:02:03:008
258
258
35
35
6
06
7
07
F
F (default)
1
(no default)
Advanced date options – per object
Select the "Advanced" button to change less used options for the dates. Notice that these options
are per object, so if you wish to remember your settings, copy the object or add it to the template
panel.
Firure 15: keep the date for a week
HS Automatic ApS
Week Change
Allows you to keep the same date for a week.
Enter the relative number of weeks to the
current week, and what day the date should
change This option follows this simple rule:
"Take the date of the next coming [week day
change] relative to the number of weeks
selected". In other words: if the day selected is
passed in this week, use the next week,
otherwise use this week, then add or subtract
the number of weeks.
Example: if today is Wednesday 10, selecting
"0" and "Tuesday" would give Tuesday 16 (next
week since Tuesday has been passed) while
"Wednesday" would give today's date.
http://www.hsautomatic.com
OBJ INKdraw User Manual
25 08 2005
Page 36
Week Names
With this option you can change the names of
the days. Simply enter a string next to the day
name and press OK.
This setting is per-object, so other date objects
may have different names for weekdays.
Use format code “#WN” to use this.
Figure 16: Weekday Names
Month Names
Similar to week names, you can also rename the
months. By default, they are 3-letter codes used
in English.
Use format code “#MN” to use this.
Figure 17: Month Names
Aakusta
Aaren
Aarika
Aaron
A date file hasAbachum
exactly 366 lines,
Abagail
1 for each dayAbaght
including Feb 29.
Abaigail
Useful for special
codes, day
Abaigeal
names, etc. Abarena
Abbe
Abbey
Abbi
Date File
If you wish to define completely different ways of
how they dates should display, for example to
print Name Days, you can use a Date File. This
is a text file with 1 line for each day – including
Feb 29. So exactly 366 lines.
Go to preferences, special functions and mark
[x] Use Date File. Then select your date file with
the […] browse button. OBJ INKdraw will tell you
if the file has less than 366 lines.
Use format code “#F” to read from the date file.
Tip: It is easy to make the list with a spread
sheet program like Excel, then export to a text
file.
HS Automatic ApS
http://www.hsautomatic.com
OBJ INKdraw User Manual
25 08 2005
Page 37
Text object
The text object is quite simple, and only has one special property to modify: content.
Located right of the lock icon, the text
content appears.
Figure 18: Text object content
Enter any new text and press enter to
change.
If you wish to enter information in a different (i.e. non-western) character set, you should select this
character set under preferences. This allows you to enter text in f.ex. hebrew or cyrillic letters.
HS Automatic ApS
http://www.hsautomatic.com
OBJ INKdraw User Manual
25 08 2005
Page 38
Counter object
The counter object is a number that is changed every time a print has been made. The change
happens before the print sensor is activated.
The properties for the counter object has two leves: simple and advanced.
Simple setup for counters
The simple setup appears to the right of the
lock icon. You can change the currently set
value of the counter.
Enter the new number and press enter.
Figure 19: Simple counter setup
To the right of the value box is the button for
advanced setup.
Advanced setup for counters
The advanced setup for counters allows you to set the look and behaviour of the counter.
Options are grouped by their behavious, as
follows:
Counter selects direction
Leadin selects what happens if the value
does not fill the number of digits. If space is
selected, stretch can be used to fill the box.
Start chooses the initial setting on print
Values chooses the content of the counter,
the look and the behavior.
Counter step is the in/decrease of the counter.
Always a positive integer.
Repeat number is the number of times the
same counter value should be printed before
changing.
Figure 20: Advanced setup for counter
Format is the number base to use. Four
different bases are available:
Decimal, Binary, Hexadecimal and Octal.
Stop on maximum / minimum
Reset repeat on print stop
HS Automatic ApS
http://www.hsautomatic.com
OBJ INKdraw User Manual
25 08 2005
Page 39
•
By default, all input boxes follow the selected number base. Thus, a maximum of
“15” turns into a maximum of “F” if the hexadecimal base is selected.
•
Checking the "Decimal" next to the format box can change this behavior.
HS Automatic ApS
http://www.hsautomatic.com
OBJ INKdraw User Manual
25 08 2005
Page 40
Barcode objects
Barcode objects can operate in two different ways.
•
In a simple way is as a normal object, with a value.
•
Or, in an advanced way is as a container for other objects.
The objects contained in a bar code must produce textual output, and can only be text, counter
or date/time. There is no limit on the objects contained in a barcode, as long as the total value for
the barcode is still legal.
An example will help to illustrate the idea and the difference:
A standard EAN-13 containing the value
010812333344
with the checksum 6 automatically added.
Figure 21: Simple barcode
An EAN-13 containing 3 objects: 1 date and 2 counters.
Date1:
010812
Counter1:
3333
Counter2:
44
.. which still results in 010812333344 like before.
When any of the objects are changed, the barcode will
change.
Figure 22: Advanced barcode
Although the two barcodes shown are identical, the
content certainly is not.
Sometimes contained objects can produce output that makes the barcodes invalid. This is
typically the case with date objects, where you have separators. Some bar codes allow
these, others do not.
It is your own responsibility to make sure this does not happen.
HS Automatic ApS
http://www.hsautomatic.com
OBJ INKdraw User Manual
25 08 2005
Page 41
Changing properties for simple barcodes
The properties for changing barcodes in the simple way are located to the right of the lock symbol.
Type: You can choose between many
different kinds of barcode symbologies.
Content: After changing the value,
press enter to update. This field
becomes read-only if the barcode
contains other objects.
Advanced setup: Use this button to
enter the advanced setup.
Figure 23: Properties for barcodes
Original / expanded barcodes: see
note below
•
The module type for the barcode is an option between two types of barcode
modules:
•
The orinial INKdraw module
•
A module that allows stretchable barcodes plus 2D codes.
•
OBJ INKdraw gives you many options with the barcodes. Some of these may
cause the bar codes to be outside the specifications when printed.
•
You are responsible for the proper creation and validation of the barcodes.
•
Where the standard barcodes will compensate for content out of the specification,
the extended barcodes will display an error message, for example "Wrong number
of characters".
The following tables show the different bar code types in the two modules
Symbologies in the standard INKdraw module
Name on list
BCD
CODABAR
CODE39
CODE128
COMPRESSED
DATALOGIC
EAN8
EAN13
HS Automatic ApS
Information
Code 39. Can contain letters
http://www.hsautomatic.com
OBJ INKdraw User Manual
25 08 2005
EAN128
FEMBAR
INDU
ITF
MATRIX
UPC
JAN (EAN)
NW7
Page 42
Interleaved 2 of 5
Japanese Article Number, OCR-affixed standard version.
Symbologies in the Expanded module
Name on list
Bar Code Name
Code11
2OF5
2OF5IL
2OF5IATA
2OF5M
2OF5DL
2OF5IND
3OF9
3OF9A
EAN8
EAN8P2
EAN8P5
EAN13
EAN13P2
EAN13P5
EAN128
UPC12
CodaBar2
Code128
DPLeit
DPIdent
9OF3
UPCA
UPCAP2
UPCAP5
UPCE
UPCEP2
UPCEP5
PostNet5
PostNet6
PostNet8
PostNet10
PostNet11
PostNet12
Plessey
MSI
LOGMARS
PDF417
PDF417Trunc
Code 11
Code 2 of 5 (Standard)
Interleaved 2 of 5 Standard
Code 2 of 5 IATA
Code 2 of 5 Matrix
Code 2 of 5 Data Logic
Code 2 of 5 Industrial
Code 3 of 9 (Code 39)
Code 3 of 9 (Code 39) Ascii
EAN8
EAN8 - 2 digits add on
EAN8 - 5 digits add on
EAN13
EAN13 - 2 digits add on
EAN13 - 5 digits add on
EAN128
UPC 12 Digits
CodaBar (2 width)
Code128
Deutsche Post Leitcode
Deutsche Post Identcode
Code 93
UPC A
UPC A – 2 digit add on
UPC A – 5 digit add on
UPC E
UPC E – 2 digit add on
UPC E – 5 digit add on
PostNet ZIP (5d.)
PostNet ZIP (5d.+CD)
PostNet ZIP (8d.)
PostNet ZIP+4 (5d.+4d.+CD)
PostNet DPBC (5d.+4d.+2d.)
PostNet DPBC (5d.+4d.+2d.+CD)
Plessey Code
MSI Code
LOGMARS
PDF417 … 2D Barcode
PDF417 Truncated … 2D Barcode
HS Automatic ApS
Print Ratio Default
(see description
below)
1:2.24:3.48:1:2.24
1:3:4.5:1:3
1:3:1:3
1:3:1
1:3:4.5:1:3
1:3:1:3
1:3:1
1:3:1:3
1:3:1:3
1:2:3:4:1:2:3:4
1:2:3:4:1:2:3:4
1:2:3:4:1:2:3:4
1:2:3:4:1:2:3:4
1:2:3:4:1:2:3:4
1:2:3:4:1:2:3:4
1:2:3:4:1:2:3:4
1:2:3:4:1:2:3:4
1:3:1:3
1:2:3:4:1:2:3:4
1:3:1:3
1:3:1:3
1:2:3:4:1:2:3:4
1:2:3:4:1:2:3:4
1:2:3:4:1:2:3:4
1:2:3:4:1:2:3:4
1:2:3:4:1:2:3:4
1:2:3:4:1:2:3:4
1:2:3:4:1:2:3:4
1:1
1:1
1:1
1:1
1:1
1:1
1:2:1:2
1:2:1:2
1:3:1:3
1:2:3:4:5:6:7:8:
1:2:3:4:5:6:7:8:
http://www.hsautomatic.com
OBJ INKdraw User Manual
MAXICODE
QRCODE
Code128A
Code128B
Code128C
9OF3A
AusPostCustom
AusPostCustom2
AusPostCustom3
AusPostReplyPaid
AusPostRouting
AusPostRedirect
ISBN
RM4SCC
DataMatrix
25 08 2005
MaxiCode … 2D-Barcode
QR-Code
Code128 (CharSet A)
Code128 (CharSet B)
Code128 (CharSet C)
Code 93 Ascii
Australian Post Standard Customer
Australian Post Customer 2
Australian Post Customer 3
Australian Post Reply Paid
Australian Post Routing
Australian Post Redirection
ISBN Code (=EAN13P5)
Royal Mail 4 State (RM4SCC)
Data Matrix
Page 43
------------1:2:3:4:1:2:3:4
1:2:3:4:1:2:3:4
1:2:3:4:1:2:3:4
1:2:3:4:1:2:3:4
1:1
1:1
1:1
1:1
1:1
1:1
1:2:3:4:1:2:3:4
1:1
-------
Ink space / print ratio
When printing on porous surfaces, a saturation of the ink might occur which makes it difficult to
read the barcode. This can be compensated for using the following
•
For the standard barcodes: Ink Space. This reduces the width of the black bars compared to
the white bars
•
For the extended barcodes: Print Ratio. Using this, you can define the "weight" of the bars and
the spaces compared to each other.
•
Example: 1:1 (Bar:space) is default. 2:1 will now make the bar double width of the space.
•
Example2: 1:3:1:3 (Bar:triple bar:space:triple space) is default. 1:3:2:3 will now make the
single space double width.
Advanced setup of barcodes
By pressing the button for advanced setup on barcodes, you are presented with a pop-up menu,
for further preferences of the barcode. Below, each part of the advanced settings will be described:
HS Automatic ApS
http://www.hsautomatic.com
OBJ INKdraw User Manual
25 08 2005
Page 44
Change frame on
the top / sides
Compensate for ink
saturation
Toggle readable
characters
Module count:
reserved for
scaleable barcodes
to lock them to
integer sizes
Figure 24: Visual settings of barcode
•
When the human-readable text is on, you can change the font as with the text
object. On some bar code formats, you can also change the font size.
•
The font size will not change if you stretch the barcode.
The checksum
dialog for a barcode.
Only barcodes with
optional checksums
allow these values
to be changed.
Otherwise, they will
be grayed out.
Figure 25: Checksum settings for barcode
The EAN 128 is able to do even more than described here, which will be explained separately.
HS Automatic ApS
http://www.hsautomatic.com
OBJ INKdraw User Manual
25 08 2005
Page 45
The advanced setup for
barcodes work in quite a
similar way to the object
panel:
Select an object type or an
object
Then use add, insert or
delete to modify the list
The barcode will be built up
from left to right with the
objects from top to bottom.
Figure 26: Barcode content setup
You can rename objects
using the “object name”
box. Remember to press
enter.
You can also change the
order of object using the
stacking buttons.
Once objects have been added, you must add value to the objects. This happens by doubleclicking the object name. A small box will appear with the default options for that object type
(please refer to previous description earlier in this chapter).
•
You will notice that barcodes that contain objects appear as a fold-out-list on the
object panel. You can rename objects within the barcode from here also
•
Example: showing an unfolded barcode object (EAN128).
Figure 27: Object list showing Barcode Object
HS Automatic ApS
http://www.hsautomatic.com
OBJ INKdraw User Manual
25 08 2005
Page 46
EAN 128
The EAN128 barcode is special because it contains Application Identifiers. This is a special
object you must add to the barcode that divides the barcode into several sub-sections. The
identifier decides about the properties of the next section.
•
It is MANDATORY to use the application identifiers. The barcode will not show
output without them. Also, any object must always be below an identifier.
Properties for an EAN 128, with the
Application Identifier object marked.
Notice the order: [identifier][object(s)]…
or ligned up:
App1
Text6
App2
Time/Date2
Time/Date3
Figure 28: Advanced properties for EAN128
The way to change the application identifier is the same as to add content to the object: double
click on the names. A small window will appear where you can choose the identifier, and at the
same time see it’s properties:
Selecting an EAN128 identifier.
You can use the arrows, or enter the number if
you know it.
At the same time, you can see the properties:
Fixed length: this part of the barcode will
always have the same length
Figure 29: Application Identifier for EAN128
Max length: the length of this part of the
barcode
Check digit: Is a check number calculated for
this part of the bar code.
Only numbers: If on, alpha-numeric input is
not accepted.
HS Automatic ApS
http://www.hsautomatic.com
OBJ INKdraw User Manual
Figure 30: EAN128 with two identifiers
25 08 2005
Page 47
The application identifiers are
shown as two-digit numbers
inside [ ] in the readable text of
the barcode. Here, the identifiers
are marked with red, the data
fields with blue.
This example shows an EAN128
with two identifiers, each having
the same date/time object. The
difference between identifier [11]
and [06] is clear.
If you need to alter the allowed content within each application identifier,
OBJ INKdraw allows you to do so.
In the preferences, there's an options which allows you to select built-in or external
definitions of application identifiers.
HS Automatic ApS
http://www.hsautomatic.com
OBJ INKdraw User Manual
25 08 2005
Page 48
LOGO Objects
The logo object is external, and can not really be modified from within the OBJ INKdraw program.
The options for the logo object are located to the right of the lock icon:
Figure 31: Logo properties
By default, the HS Automatic
logo is used (the file is created if
necessary).
To get another picture, use “Load
Logo”. To resize the picture to
the correct size, use “Original
size”.
Finally, you can choose to
enable transparency for the white
color.
When loading a new logo, the file open dialog offers you a preview of the picture, both as
thumbnail and in full size:
The open logo dialog
box.
Here, the full preview
has been selected. The
full preview is adjusted
to the size of the
bitmap.
The size of the picture
is also shown.
Figure 32: Opening a logo file
•
You can use files in the Windows Bitmap (BMP) or JPG format. If your picture is in
more than 2 colors, it will be converted to a 2-color picture.
•
You might benefit from a conversion by a real graphics program that will dither
and convert the picture – such as Adobe PhotoShop® or JASC PaintShop Pro®.
HS Automatic ApS
http://www.hsautomatic.com
OBJ INKdraw User Manual
25 08 2005
Page 49
•
Logos are not embedded into the .ink file. Instead, there is a link to the logo
placed in the ink file. This means that if you move the ink file, the logo must be
placed in the same relative position
•
The shortcut “ filename.bmp” (notice the dot) is for the OBJ INKdraw “logo”
.
directory.
HS Automatic ApS
http://www.hsautomatic.com
OBJ INKdraw User Manual
25 08 2005
Page 50
Field objects
Field objects are used to group the objects that can contain text (text, date, counter), so that you
don’t have problems with variations in field lenght. This is especially useful for database
connections. An example will help to allustrate the difference:
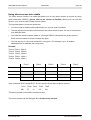
Without field object
ABCD
Sep/20/2000
ABCDEFTERJEKJRKJERKJ /20/2000
Text field is too short
Text field is too long
With field object
ABCD Sep/20/2000
Neatly ligned up…
ABCDEFTERJEKJRKJERKJ Sep/20/2000
..regardsless of lenght
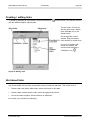
The properties of the Field Object are located to the right of the lock icon:
Properties for the field object.
The text align function works on
the entire field; individual
adjustment of content is not
possible.
Figure 33 : Field object properties
When created the field object is empty; it will show the text “Empty” (this text will be printed if the
option "Print if empty" is ON).
Editing the field object content
To edit the field object, press the “Edit Content” button, as show above. A menu very similar to the
barcode content menu will be shown:
HS Automatic ApS
http://www.hsautomatic.com
OBJ INKdraw User Manual
25 08 2005
Page 51
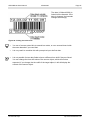
To edit the content of the
field, select the object
type and use Add or
Insert.
Inserted object appear on
the object panel.
You can move objects or
delete objects at any time.
To fill content into the
inserted objects, doubleclick on the object name.
Figure 34: Field Object content
Content is placed in the field object from the top, from left to right.
There is one difference from a bar code object: the “Separator”. A separator consists of one or
more spaces (when double-clicking, you can select the number of spaces). It is used between the
objects, to separate their content.
A separator can be set to allow carriage returns, and to force carriage return. In the last case, the
objects on either side of the separator will never be on the same line.
•
When word wrap is on, two objects are split only when
• 1) There is a separator between them
• 2) Allow Carriage Return” has been selected for this separator
•
Font size, Font style and text alignment functions on the entire object.
•
If word wrap is off, two object never split, even if forced return is on.
HS Automatic ApS
http://www.hsautomatic.com
OBJ INKdraw User Manual
25 08 2005
Page 52
Schedule Objects
Schedule objects are used to vary the content of a text box based on the date / time. Rules are set
up with the date/ time and the content, and when the criteria is met, the content will change.
The rules are strictly logical: the entire list of rules is evalutated before the content changes. If any
rules overwrite other rules, the last defined rule is given priority.
Example:
Sunday
7:00 am
“Sunday morning”
Sunday
1:00 pm
“Sunday Noon”
All days
7:00 am
“Morning”
Sunday at 8:00 the result of the above rules would be “Morning” because All Days overrules the
Sunday. However, Sunday at 1:00 pm the text would change to “Sunday Noon”. In other words:
The order of the rules is important.
When created, the object is displaying the word “Empty”. To add rules, use the properties bar :
The properties for the schedule object.
You can not enter the current value
directly – only through the “edit
content” button.
Figure 35 : Schedule Object properties
HS Automatic ApS
http://www.hsautomatic.com
OBJ INKdraw User Manual
25 08 2005
Page 53
To enter the rulesets
of the schedule
object, first add as
many rules as you
need (one for each
time your content
changes)
Then click on each
rule and define the
date/ time. If you don’t
specify a day, you can
use “All”.
Figure 36: Editing Schedule object rulesets
•
When created, each rule will have a description of “Shift” and a number, and the
content “None”. Both can be changed.
•
It is what you write in Content that is shown on the canvas. The description is not
important.
•
Remember to press enter when you change a field. Otherwise, your entry will
not be stored.
HS Automatic ApS
http://www.hsautomatic.com
OBJ INKdraw User Manual
25 08 2005
Page 54
Copy object
The copy object is special because it does not have any content by itself. Instead, it can be seen
as a window that gets its content from what is below. This content appears in the copy. The copy
object is an easy way to create content and make sure the exact same information is printed
elsewhere on your canvas. Any number of copies can be made, and you can have multiple copy
objects.
A copy object always consists of minimum 1 source and 1 copy. The handles will always be on the
source, and the size of the copy will always be the same as the source.
The idea behind the copy object is illustrated below:
Here, there is one source (over
the full barcode) and one copy.
The red frames are for illustration
only.
Figure 37: idea behind copy object
The copy object works directly with the canvas bitmap. That way, the copy object can include any
part of the screen – entire objects or part of them only. You can even use the result of one copy
object as the source for another, if that is what you want.
To create a copy object, use the icon
. When created, the copy object looks as follows:
The copy object just created. The
handles are on the source object,
the copy / destination is on top.
Source / Destination will be
written on each.
Figure 38: Copy object after creation
•
You can only move the destination / Copy if you click outside the handles.
The properties for the copy object allows you to adjust the number of copies, how the object is
displayed and allows you to expand the object to fill an entire head:
HS Automatic ApS
http://www.hsautomatic.com
OBJ INKdraw User Manual
25 08 2005
Page 55
To adjust the properties of the
copy object, click the object and
make adjustments.
Notice that if you make the object
transparent, you can’t select it
from the canvas, only from the
object bar.
Figure 39: Properties for copy object
There are 5 different ways to display the copy object. These will only affect the look on the canvas
as you are working. The output from the copy object is not affected.
Show as...
Don’t show
Clear
Grayed
From/To
Full copy
HS Automatic ApS
Note
Completely invisible. You have to select the object from the object bar. In this
mode, the object can not be dragged around.
Show as a thin red frame. In this mode, the object can not be dragged
around.
Show as a gray box. This is the default.
Will show as a gray box, but will write Source and Destination on the
source/copy. This is the default behavior.
Show a live update of what will be copied. NOTICE: This will significantly slow
down your work with the canvas and objects.
http://www.hsautomatic.com
OBJ INKdraw User Manual
25 08 2005
Page 56
The stacker object
This object is used to give an external signal based on a certain character (user-defined) in the
database. Like the mail object, this object will not work without a database connection.
After creation, you will see the property bar
The stacker object properties.
Figure 40: Stacker object
For pinout and connections, please refer to the hardware manual.
HS Automatic ApS
http://www.hsautomatic.com
OBJ INKdraw User Manual
Section
25 08 2005
Page 57
2
sum m ary
•
OBJ INKdraw is based on a chalk-board-like screen called the Canvas. On this, you
can place any number of the different objects.
•
All objects are freely editable after you have placed them on the canvas. You can
move, stretch, stack, edit and delete objects as you please.
•
All objects are referred to by a name. You can change the default name as you please,
but two objects can not have the same name.
•
To create objects, select the object type, then click with the mouse button and drag the
shape of the object.
•
All objects have properties that decide the way the objects look or behave. Some of
these properties are common (like rotation or font), some are unique to each object.
•
Some objects (for example, barcodes and fields) can contain other objects. To edit the
content of the contained objects, double-click on their names in the object list of the
properties window for the container object.
HS Automatic ApS
http://www.hsautomatic.com
OBJ INKdraw User Manual
25 08 2005
Page 58
Section 3
Advanced
topics
7: The parameter menu
8: Ink reduction
9: Working with databases
10: Object Links
HS Automatic ApS
http://www.hsautomatic.com
OBJ INKdraw User Manual
25 08 2005
Page 59
7
The parameter menu
When loading OBJ INKdraw, the settings will be default settings that probably won’t match your
hardware. To get a correct printout, an important part is setting the parameters correctly. Some
parameters are quite easy to understand, others involve a bit of math and knowledge about the
equipment that will be connected to the printer – typically start sensor and encoder.
These settings all take place in the OBJ INKdraw “Command Center”, the parameter menu.
To open this menu, use [Functions|Parameters], F9 or the icon
. You will see a menu with
different pages. In the following, each of these “pages” will be described. It might be wise to refer to
the chapter on the relation between hardware and OBJ INKdraw, and to the general hardware
guides.
Print modes
The folder in setup for
printmodes.
Notice the parameter
group selection (“page”).
(in the following screen
shots, the page headers
are not included).
Choose between velocity
or encoder, and adjust the
function parameters
accordingly.
This screen shows the
encoder options.
Figure 41: Setting the print mode
•
Default values of encoder and velocity settings can be set in the preferences.
When you switch from one to the other, default setting will be applied.
HS Automatic ApS
http://www.hsautomatic.com
OBJ INKdraw User Manual
25 08 2005
Page 60
Velocity
Velocity mode is a print mode that functions without measurement of the exact speed of the feeder.
To avoid a printed picture that is either stretched (speed too fast), or compressed (speed too slow)
it is important to keep a precise control of the feeder speed.
When velocity is selected, the
encoder option changes into a
velocity option.
Input the speed of the feeder.
This is always in meter/ minute.
1 m/min = 0.05468 ft/sec
Figure 42: Velocity Options
Encoder
An encoder is an instrument that gives impulses by the rotation of a small wheel. When mounted
on the feeder, OBJ INKdraw can be adjusted to follow the pulses, thus giving a very precise print,
even if the speed of the feeder varies, or even stops at times.
This manual will briefly describe the settings of the encoder and the difference between them. For
a more technical explanation of the encoder settings and the background behind them, please
refer to the hardware manual.
HS Automatic ApS
http://www.hsautomatic.com
OBJ INKdraw User Manual
25 08 2005
Page 61
Settings of the encoder.
You can enter the mm/pulse
factor or calculate it if you know
the diameter and number of
pulses.
Choose between position mode
and modular mode - select
quadrature (briefly explained
below) if you need it.
Figure 43: Encoder settings
A few words on the encoder
The job of the encoder is to accurately measure the speed of the conveyor. Light from an LED or
other light source is passed through a stationary patterned mask onto a rotating code disk that
contains code patterns. The disk is the heart of the device. Photodetectors scan the disk and an
electronic circuit processes the information into digital form as output to counters and controllers.
Some encoders have more than one disk - this if referred to as a "multi-channel" encoder.
When setting the parameters, it is important to know two different numbers, in order for you to
calculate the mm/pulse number, which is how far the feeder moves for every pulse
•
The number of pulses in one full revolution of the wheel.
•
The diameter or the circumference of the wheel
By default, the encoder "triggers" once on each signal. You can improve the resolution by using a
second channel and by using quadrature. The figure below will illustrate:
By default, the encoder triggers
once in channel A per cycle.
Figure 44: Encoders, picture of 2 channels
•
You can also use channel B
which is offset 90 degrees, and
you can use quadrature, where
you also get a signal on the
"back side" - thereby you get 4
times the pulses.
The standard encoder supplied by HS Automatic ApS has 5000 pulses /
revolution. With a wheel of 200 mm circumference, you have 0,04 mm/pulse.
HS Automatic ApS
http://www.hsautomatic.com
OBJ INKdraw User Manual
25 08 2005
Page 62
Position mode
In position mode, the time of the fire is calculated based on the position. Each time a signal comes
from the encoder, that number is added to a counter. A fire signal is given every time a certain
distance has been met.
•
HS Automatic ApS recommends that the "mm / pulse" is less than 0,03 to get the
best result.
•
Using the standard encoder supplied from HS Automatic ApS, the recommended
settings are position mode and Quadrature ON. This will give you 0,01 mm/pulse.
Modular mode
Compared to position mode, the modular mode counts the number of pulses from the encoder and
fires every time a certain number of pulses has been met. The "module" (pulses / fire) refers to the
number of pulses that must be met before a fire.
If you want to mention the same resolution of the printers your mm/pulse must be a certain number
of a fraction of it. For your reference please find the table below:
Print head type
XaarJet 128
XaarJet 500
Resolution
185 DPI
180 DPI
Distance mm/pulse
0,13714 mm.
0,141 mm.
Table 1: Print heads and resolution
Sensor
The sensor is what gives the signal to start the print. It is not possible to start the print without the
sensor. There are many different kinds of sensors, which one you use is not important, as long as
the signals that come from the sensor are compatible with the controller.
The settings for the sensor are shown in the second part of the setup parameters:
HS Automatic ApS
http://www.hsautomatic.com
OBJ INKdraw User Manual
25 08 2005
Page 63
Start (mm) : The distance from the sensor to
the start of the print.
Positive / Negative edge: If the sensor goes
from high to low on activation, or vice versa.
Repeat number: Repeat the printout this
many times for each activation
Distance between repeat: From end on one
print to the next
Endless: Print continues as long as the
sensor is activated.
Print signal: An external signal for "print
mode active" or "printing a message".
Figure 45: Sensor settings
•
Find out which type of sensor you have. If you select “Test I/O” (the last part of the
parameters), you can see the status of your sensor.
Print
The “print” part of the parameters is where you decide the look of your printout. For this to be
successful, you first need to have the correct setting of your speed/ encoder. For the adjustment of
the print engines, it is strongly advised to use an encoder.
The following settings can, and should be, done for each head that prints:
HS Automatic ApS
http://www.hsautomatic.com
OBJ INKdraw User Manual
25 08 2005
Page 64
Settings for each
head:
Invert text on/off
Orientation
Head shift
Relative adjustment of
engines
Global settings:
Use double ink on/off
Figure 46: Print parameters, for each head
Direction of feeder
Global ink reduction
Speed adjust
Inverted text
For this print head, everything will be printed with a black background in white.
Orientation
Each printhead can be adjusted to match the orientation of the printed matter. Printed messages
can be turned in two different ways:
•
Upside-down, where the text is mirrored horizontally
•
Other side, where the text is printed in reverse. This is especially useful for printing on both
sides of a box, to make sure the text is readable on both sides.
Double ink
Will make the output more black by using the double amount of ink
Ink reduction
Like the per-object setting on ink reduction, but applied globally for the whole canvas. This will
enable barcodes ink reduction.
Feeder direction
This is relative to the head. Imagine looking at the feeder from behind the head. Then select here
the direction of the feeder.
HS Automatic ApS
http://www.hsautomatic.com
OBJ INKdraw User Manual
25 08 2005
Page 65
Adjustment of the head
In order to adjust the heads, it is important to understand the concept of the print heads. Please
refer to the section on the concept.
For now, it is enough to understand that there is an imaginary "fix point" from which all heads are
adjusted accordingly. Within each head, the engines are adjusted according to engine 1.
The figure below will help to illustrate:
INKdraw operates with 2
distances:
A is the distance from the sensor
to a fix point. This value is
adjusted under the "Sensor"
section.
B is the distance from the fix
point to each print head. This
value is adjusted under "Head
shift" for each print head.
Figure 47: distances in setup
Distance "B" may be 0.
Engine adjust:
If the head has more than 1 print
engine, you need to adjust the
distance beween the engines.
The distances are relative to
engine 1, as indicated here.
Figure 48: Adjustment of print engines
•
When you change the print direction of a head with more than one engine, you will
notice that the "numbering" of the engines change direction.
•
This is due to the fact that the "first engine" in term of distances is the first engine
in the print direction.
Purge
A purge is when all the nozzles of a print engine shoots continously. It is useful for testing the
engine for missing nozzles – this is noticed as white lines in the black area. A purge is also useful
HS Automatic ApS
http://www.hsautomatic.com
OBJ INKdraw User Manual
25 08 2005
Page 66
to prevent the ink from drying out. OBJ INKdraw can be set up to automatically make purges, if you
use solvent-based ink, for example.
Settings for the purge function.
The spitrate section on top
allows settings for time, burst
and tickle.
The buttons at the bottom makes
the printer purge, two engines at
a time.
Figure 49: Purge parameters
•
When purging, a lot of ink comes out of the printer. The small drops will be carried by
air, and can color things quite far away. Make sure that the printer is not constantly
purging.
•
It might be harmful to your health to breathe the fumes of a printer that purges. Make
sure you have good ventilation.
•
This menu is not available if you don't have a controller board.
Spitrate
The spitrate settings is used to make the printer shoot every n seconds, to prevent the ink from
drying out. This will not happen during a print. The burst value is the number of times the printer
shoots every time. Each burst is about 0,13 mm wide.
Tickle
If the automatic spitting is undesired, the tickle function can be activated. This makes the printer
“vibrate” when it is not printing, but not enough to actually make a shot. This is, however, quite
hard on the printer and will decrease the engine lifetime.
HS Automatic ApS
http://www.hsautomatic.com
OBJ INKdraw User Manual
25 08 2005
Page 67
Purge print engines
Each of the buttons at the bottom will activate the purge function on two print engines as long as
they are pressed. This will make the engines shoot at full capacity – a good way to test for missing
nozzles in the print.
Test I/O
On the Test I/O tab, you can find out if the externally connected sensor and encoder are
functioning as they should.
This menu is not available without a controller board.
To test the I/O functions, press
the “Start” button. On activation
of the sensor and the encoder,
you can see the corresponding
field flash in black and white.
Figure 50: Testing I/O
Firmware
The system information section in the parameters setup is not a parameter as such, as it is readonly. Here you can see information about which controller board you have and information about
the eprom. Use this information when reporting errors to help us identify your hardware.
This menu is not available without a controller board.
HS Automatic ApS
http://www.hsautomatic.com
OBJ INKdraw User Manual
25 08 2005
Page 68
System information.
(these boxes will be filled on
computers with an controller)
Figure 51: system information
HS Automatic ApS
http://www.hsautomatic.com
OBJ INKdraw User Manual
25 08 2005
Page 69
8
Ink Reduction
Ink reduction is a way to save on ink use by removing a percentage of the drops in the message.
Use this feature to save costs for prints, or to compensate for inks flowing out in porous materials.
OBJ INKdraw allows you to set ink reduction completely individually for either all objects, groups of
objects, or single objects. Alternatively, you can set global ink reduction, as described in previous
chapter.
Activation of ink reduction can happen in two different ways. For individual objects, you can use the
drop-down menu placed just below the “lock” icon, or use the dialog box to select ink reduction for
groups of objects.
Selecting a method of ink reduction
There are two different methods of ink reduction available: Masked and random.
•
Masked arranges the remaining dots in nice rows and columns, and the messages end being
built like a newspaper picture.
•
Random removes dots at random, creating a spray-paint like picture.
For each of the methods, there are 5 different levels of reduction to choose from. From 0% (no
reduction), to 100% (nothing is printed).
Using the drop-down menu
The drop-down menu provides a quick way of applying ink reduction to either selected objects or
groups of objects.
Choose one or more objects
Select one of the available styles of ink reduction
Figure 52 : Ink reduction dropdown
HS Automatic ApS
http://www.hsautomatic.com
OBJ INKdraw User Manual
•
25 08 2005
Page 70
The objects that have ink reduction applied to them (anything else than “0%”) will
show a little icon in the corner:
Figure 53: Ink reduction indicator
•
This tells you that ink reduction is activated for that object, and what style it is
•
This icon will not be printed, it is only visible on the monitor.
The ink reduction object panel
Another way to use ink reduction is to use the icon
box as follows:
in the icon bar. This will bring up a dialog
Figure 54: Ink Reduction.
The selection of which objects that have ink reduction takes place through the object panel. You
can choose the ink reduction on different levels:
HS Automatic ApS
http://www.hsautomatic.com
OBJ INKdraw User Manual
•
All objects (the entire message)
•
All objects of a certain type
•
Individual objects
25 08 2005
Page 71
To adjust the reduction, simply select either a group or an object, choose the method and set the
level slider. To “open” the tree, use the small “+” symbol next to the group name.
•
Always adjust the levels from the top down.
•
If you adjust a group, every setting in that group will be the same, and you will
lose any previous settings.
•
This, of course, can be used to completely turn off ink reduction.
•
You should not use ink reduction on barcodes, especially the “masked” type. This
will make the barcode non-approvable, as an entire line might be deleted.
HS Automatic ApS
http://www.hsautomatic.com
OBJ INKdraw User Manual
25 08 2005
Page 72
Working with databases
9
When printing, it is often desireable to be able to print variable information for each product. As we
will see later, this can be done in several different ways. One way is to extract the data from a
database.
OBJ INKdraw is able to read data from Microsoft Access databases and Microsoft Excel files, text
files and directly from SQL servers.
At this moment, OBJ INKdraw can only talk directly with mySQL (© mySQL AB) and
MS SQL (© Microsoft Corp.) database servers. At a later point, more servers will be
added.
For more information on mySQL, see http://www.mysql.com
For more information on MS SQL, see http://www.microsoft.com
•
You can only have one database open at any time.
•
If a database is already open and you try to open another, you will be prompted to
close the current database or cancel the operation.
Some important terms
As this chapter deals with databases, it is important to know the concept of databases. A database
is an organized collection of information. Think of it as a box of little cards with information.
Each database can have one or more tables, that each has one or more fields. A collection of
different fields in a table form a row. This is also referred to as a record.
A query in the database is a part of one or more tables, based on a question. For example, for a
table of addresses, a query could show only addresses with one specific postal code. Related to
queries is the term SQL, Structured Query Language. OBJ INKdraw supports direct input of SQL
code to select certain records from a database.
Microsoft Access® / Microsoft Excel® databases
Setting up a database connection
Before you are able to extract data from a database, you have to make a connection to that
database. Connections to databases are always made to a table or a query.
HS Automatic ApS
http://www.hsautomatic.com
OBJ INKdraw User Manual
25 08 2005
Page 73
From OBJ INKdraw, this happens by choosing [Database|load database] You will be prompted
for a filename:
Selecting the database you want
to connect to. For now, it is
possible to connect to Access
and Excel files. Select file type
according to your needs.
Figure 55: Selecting a database to open
•
You are probably prompted for a username and a password. This is a thing that is
built into the database reader.
•
Unless you have set a password on your database, simply press enter here and
leave the fields empty.
•
You can set OBJ INKdraw to not prompt when you open a database, do this in the
preferences menu (Alt+P).
•
If you get an error about drivers when trying to open the database, it might be
because you don't have the correct version of Microsofts JET drivers.
•
Download the latest version of MDAC (Microsoft Data Access Components) from
the website http://www.microsoft.com/data/
If the connection to the database is succesful, you now have to select a table or query you want to
work with.
HS Automatic ApS
http://www.hsautomatic.com
OBJ INKdraw User Manual
25 08 2005
Page 74
Select the table or query in the
right-hand part of the dialog box
and see the preview of the data
to the left.
Notice that you can scroll the
preview field for more data.
In EXCEL you see the sheets
instead of tables, but from there
the idea is the same.
Figure 56: Selecting table to use
•
If a query does not return any records (what is called an empty set), you will get
an error. Select a table or query that returns data.
•
Even if OBJ INKdraw does not let you connect fields, this can be done in a query.
•
The data access in OBJ INKdraw is read-only. You cannot alter any data.
When you press OK, the database will be imported into memory. If you are using a very large
database, this process will take a while.
Once your connection is set up, the database button
becomes active in the menu line.
When using Microsoft Access® it is a very good idea to always keep your records
indexed. Simply create an index field and put a primary key on it. This will speed up
the load time considerably.
HS Automatic ApS
http://www.hsautomatic.com
OBJ INKdraw User Manual
25 08 2005
Page 75
Text file databases
A text file database is also called a flat-file database. It is a text file that can be created
automatically or with a simple editor – where the data is structured in a certain way.
The text file must have 1 record per line, and must match one of the following conditions:
•
Each field delimited by a destinct character; you can specify which character you want to use
or choose between the most common delimiters: comma [,], period [.], semicolon [;], colon[:] or
space [ ].
or
•
Each field has a fixed length
•
OBJ INKdraw can import text files in both DOS formats and UNIX formats (CR/LF
versus only CR).
•
Notice though that the data are not converted in any way, but is shown as it
appears in the file. In other words: make sure the data appears in the file as you
want it to appear in the printout.
This screen allows you
to set the correct
delimiter for your text
file import.
You can choose from
one of the pre-defined
delimiters, enter your
own (for example the
“pipe” symbol [ | ]), or
set up fixed-width lines.
You can view the result
of your settings in the
window to the right.
Figure 57 : setting delimiters for text files
HS Automatic ApS
http://www.hsautomatic.com
OBJ INKdraw User Manual
25 08 2005
Page 76
SQL servers
OBJ INKdraw also allows you to retrieve data from SQL servers. Using the SQL query language,
you can create very advanced queries to select exactly the data you want to print.
•
The SQL language also allows you to modify and delete in the database server.
•
Preferably you should set the rights on the database server to not allow the print
controller do use these functions
•
OBJ INKdraw contains a default "Ban list" of dangerous command. This list can
also be extended by creating a text file called sqlblock.txt in the OBJ INKdraw
database directory with the commands listed. Without this file, the following
commands are allowed and can destroy your data
DELETE INSERT ALTER UPDATE
DESCRIBE LOCK COMMIT ROLLBACK
DROP
CREATE
REPLACE
USE
At the moment, OBJ INKdraw supports two of the most popular SQL servers: MySQL, which is an
open-source product, and MS SQL from Microsoft®.
•
When talking about SQL database servers, it is important not to confuse the
terms:
•
The database server is the machine you connect to
•
The database is one of the several possible collections of data on this machine.
•
Each database may contain several tables.
Connecting to an SQL server
The process of connecting to an SQL server consists of 4 steps:
•
Select a server type to connect to.
•
Input the server name - this is an ethernet name either as a machine name or an IP number
(example: databaseserver.mycompany.com or 192.168.4.99 )
•
Input the database name on the server
•
Input the table from the database
Once these items have been selected, you can save them as an "SQL Quick Connect File" to allow
simpler access next time.
To connect to an SQL server, use [Database->Connect to SQL server] or Alt+L.
HS Automatic ApS
http://www.hsautomatic.com
OBJ INKdraw User Manual
25 08 2005
Page 77
Importing from SQL servers.
The steps in connecting are:
select server type
input server name, click connect
once connected, select database
name
select table
if needed, modify the default
query
save settings if you want
Figure 58: Importing from SQL servers
The SQL server import is extremely flexible, as you can enter SQL SELECT statements directly
and dynamically return different data.
To go into the details of the SQL language would be beyond the scope of this manual. There are
lots of resources online for more information about the language. Use for example
http://www.sqlcourse.com/ that has a live demo database for demonstration.
Quicker access to SQL data
You can save the settings you have set under the connections to the SQL server. The settings are
stored in a simple text file with the extension sqs.
The file looks as follows: (example)
[SQL Settings]
Server=mySQL
Host=servername.company.dk
Database=CompanyProductList
Table=products
Query string=select * from (products)
Notice that the username and password are not stored for security reasons.
To use an SQL Quick Connect File select [Database->SQL QuickConnect] or Alt+Q.
•
You can save multiple copies of these files to quickly select different subsets of
your data - by modifying the Query String.
•
You can avoid the prompts for login/ password if you store these in the
HS Automatic ApS
http://www.hsautomatic.com
OBJ INKdraw User Manual
25 08 2005
Page 78
preferences. Uncheck the "prompt for username.." checkbox and fill in the values,
and you will connect instantly.
Using databases after import
Connecting data fields with objects
Your next step is to connect the data fields with the objects in OBJ INKdraw. You can only connect
data fields to objects that are variable.
You should have objects on the canvas before opening the database management, otherwise you
have nothing to drag the fields onto.
To start the definition, press the
with a list of the fields:
button. You see a dialogue showing the selected table/ query
Database
management
window.
Consists of 3
main parts:
loop options
row content
field list
You also have
the option of
destroying the
connection to
this database.
Figure 59 : Database Management
HS Automatic ApS
http://www.hsautomatic.com
OBJ INKdraw User Manual
25 08 2005
Page 79
In order to connect a database field to an object, you must drag the field onto the object in the
object panel. Do this by clicking and holding the mouse over the field name, then move the mouse
over to the object name, until it turns blue.
Illustration of assigning a field to
an object.
In this example, the field name
“CompanyName” is assigned to
the object “Text1”.
Text1 will now change to
Text1 <CompanyName> to
show the connection.
Notice the way the cursor
changes from a “blocked” sign to
a square. This is a sign that you
have selected an object that
accepts field input.
Figure 60: Dragging a field to an object
Notice the special “Drag to
delete!” field name used to delete
references.
•
It is also possible to drag directly onto the canvas from the header list. A text
object linked to the field is automatically created.
•
Notice the difference between dragging from the left column (where the field
content is) and the right column (where the field name is). If you drag from the left
column, you will assign the object that specific value. So, the object will not
change with every print.
•
You can disable this possibility in the preferences menu.
Removing the connection to a field
If you chose that one of your objects should no longer be connected to a field, use the special field
name Drag to delete! to delete all references to that object.
OBJ INKdraw offers you full control of what happens when, sooner or later, you reach the end of
your dataset. This feature is called looping. Looping is controlled at the left side of the database
management dialog box.
Loop / Don’t loop
If you select Don’t restart, OBJ INKdraw will go through the data, and will stop the printing when
the end is reached.
Otherwise, select an entry to start from.
HS Automatic ApS
http://www.hsautomatic.com
OBJ INKdraw User Manual
25 08 2005
Page 80
Start / loop at entry
The row numbers for start and loop (end). If a start entry higher than 1 (one) is selected, the entry
where the looping starts from can be either 1 (one) or the selected start entry. For example, you
can set the start to 5, the end to 10 and the loop start to 1. This will print
5, 6, 7, 8, 9, 10, 1, 2, 3, 4, 5, 6, 7, 8, 9, 10, 1….
and is useful if you need to start in the middle of a production.
You can search the first field of the database for a value, to quickly find the start entry.
Step
Set the number of rows / entries that OBJ INKdraw should jump with each print. For example, to
print only every second or third row, set this number to 2 or 3.
•
If you wish to select your file content from a database, but wish to print the same
information all the time, simply choose a step value of 0
Offsets
Sometimes, it is necessary to print more than one dataset per message. For example, this is the
case when printing labels, tickets etc, where there are two or more columns per row.An illustration
of this is below:
Figure 61: example of 3 datasets
This shows an example of 3
datasets printed in the same
message – the boxes could
illustrate for example labels or
tickets. The left-most is database
record number 7, the middle
number 8 and the right-most
number 9.
OBJ INKdraw has the ability to use offsets on objects that contain a field. The field with offset will
get the data from the current record number plus the offset.
As an example, here’s how to do the example illustrated above:
HS Automatic ApS
http://www.hsautomatic.com
OBJ INKdraw User Manual
25 08 2005
Page 81
•
you would create 3 text objects for “Name”, 3 text objects for “Address” and 3 text objects for
“City”.
•
In the database management window (see above), drag the same data field to different object.
Here, you’d drag the “Name” data field to all text objects for the “Name” data.
•
Click the button “Offsets and Fields” in the lower right corner
•
Fill in the necessary object offsets; typically like this. Notice how the offset is based on “0”.
•
To avoid the same data printing multiple times, choose a step value equal to the number of
identical fields. In this example, 3.
•
Press OK.
Figure 62: Database offset
HS Automatic ApS
http://www.hsautomatic.com
OBJ INKdraw User Manual
25 08 2005
Page 82
Working with the advanced database module (list print)
If you wish to have more fine control of the records that should be printed, you can use the DB
Management window. Basically this will allow you to select / deselect records from being printed,
based on different criteria.
You can do the following:
General
Add / remove all from the list
Search
Add to or remove from list based on search criteria
Sort
Sort the data that has been added to the list
Delete
Delete all / individual items
Print
Select which records from the list to print.
Remember to select "x" use list for print
Dublets
Check for dublets on the list. Very useful for mailing applications
Assign
Here you can also assign fields to objects. This works in the same way as with
the normal database window
HS Automatic ApS
http://www.hsautomatic.com
OBJ INKdraw User Manual
25 08 2005
Page 83
Using direct access into a table
The Direct access function is a mode that allows you to have direct access to records by using
serial commands (RS232). (please refer to the section on RS/232). Before you can use this
function, you must set up the fields and the offsets.
The important parts in the direct access are:
•
You don't have to read the table sequentially, but you can read it randomly
•
The text objects with the same offset will print the same record number, but can of course print
from different fields.
•
You send the record numbers (starts at 1) through RS/232 commands, the printer will print
these record numbers until new numbers are given.
•
You can send up to 10 record numbers for every print. (For example, up to 10 random
addresses from a database with every print).
Example:
Text1
Text2
Text3
Field 1, offset 0
Field 2, offset 0
Field 3, offset 0
Text4
Text5
Field 1, offset 1
Field 4, offset 1
Field 1
Field 2
Field 3
Field 4
Field 5
Record 1
AA
EE
II
MM
QQ
Record 2
BB
FF
JJ
NN
RR
Record 3
CC
GG
KK
OO
SS
Record 4
DD
HH
LL
PP
TT
If the command <ESC>A2;4#<EOT> is sent, then the 5 text objects above will print
Text1
Text2 Text3
Text4
Text5
BB
FF
CC
OO
JJ
This will be printed until another command is sent.
The record number can be changed about 2 times every second.
HS Automatic ApS
http://www.hsautomatic.com
OBJ INKdraw User Manual
25 08 2005
Page 84
Removing the database connection
When you are done with this database, or wish to select another database / table / query, you must
first discard the current connection. Do this by using the “trash can” icon in the database
management dialog.
Notice that nothing is actually deleted or removed; remember that your connection is read-only.
If you try to open a new database with another database open, you will be warned that you have a
connection, and will be asked if you want to discard it.
HS Automatic ApS
http://www.hsautomatic.com
OBJ INKdraw User Manual
25 08 2005
Page 85
10
Object Links
Object links allows you to copy the content from one object to one or more other objects. This way,
and by the help of prompts, you can enter information in more than one place at the same time, for
example in a barcode and in a readable string separate from the barcode.
•
In relation with object links, it is important to know that content and display are two
different things.
•
In dates, two objects that are linked will have the same content, even if one
displays for example DD-MM-YYYY and the other HH:MM:SS.
Example: All 3 dates below have the same content but are displayed differently.
Date1
20 Dec 2005
•
Date2
05-12-20 05:43
Date3
20-12-05 05:43:22
Likewise, in counters, two objects that are linked will have the same content even
they are in different number bases. For example, one could display 1000
(decimal) while the other would display 3F8 (hex).
The idea of links
The links will copy the content of an object to one other object, or several other objects. You can
only link to/from things that makes sense, in other words: The receiving object ("target")
must be able to contain the source type of content. For example, linking a picture to a date or
vice-versa does not make sense, since the content types are not compatible.
Other link types are only one-way: you can link a date to a text field, but not a text field to a date.
(again, it would not make sense).
Links work in and out of object containers also, with no problems - although some object
containers will only allow you to link one way.
HS Automatic ApS
http://www.hsautomatic.com
OBJ INKdraw User Manual
25 08 2005
Page 86
Creating / editing links
To create or edit links in your picture, click on the link icon
with the different objects represented.
in the icon bar. You will see a menu
The link menu. On the left
are the active links - delete
them with del key or the
delete button.
On the right the current
objects. Drag one object
onto another to create a link
If you try to create a link
that is not allowed, the
mouse cursor displays a
"forbidden" icon:
.
Figure 63: Editing links
Hint about links
A common thing to do with links is to use them in connection with a bar code, to display the date in
one format inside the bar code, and another format outside the barcode. This is how to do it:
•
Create a bar code with a date inside, select the format for this date
•
Create a date outside the bar code, select the appropriate format.
•
Link to two dates together. Which direction is indifferent.
As a result, you will have the following:
HS Automatic ApS
http://www.hsautomatic.com
OBJ INKdraw User Manual
25 08 2005
Page 87
The date (12 March 2002) is
linked into the barcode. If the
date is changed, the barcode
changes accordingly.
Figure 64: Linking into a barcode
•
You can of course extend this to several bar codes, or even several times inside
the same barcode if you need that.
•
It is very useful to combine this with prompts to input the first date.
•
It is not possible for two date fields to have a different time shift if they are linked.
You can change the time shift value of the source object, which will work as
expected. If you change the time shift of the target object, it will still display the
content of the source object.
HS Automatic ApS
http://www.hsautomatic.com
OBJ INKdraw User Manual
Section
25 08 2005
Page 88
3
sum m ary
•
The Parameter Menu is where you control the output of your message, and the
physical surroundings of your software. This is where you can adjust individual print
engines to eachother, and set options for encoder, speed, resolutions etc.
•
If your ink is spreading out into your material, you can reduce the effect by activating
the ink reduction function. This can be done one a global or object-based level, in 5
steps from black to white. Two different mathematical models are available: random
and masked.
•
For variable information, you can open databases and connect data fields to individual
objects. OBJ INKdraw can move through a database table either in it’s entirety or a
block of entries in the table.
•
You can connect to a variety of different data sources: Microsoft Access® and Excel®,
plain text files and SQL servers.
•
With SQL servers you have the power of the flexible SQL query language. Commands
that are not allowed can be blocked by the software.
•
Most objects can link their content into other objects, where this would make sense.
Where an object can be shown with different formats, for example dates, the source
and destination object will always have the same content, but can have different
formats.
HS Automatic ApS
http://www.hsautomatic.com
OBJ INKdraw User Manual
25 08 2005
Page 89
Section 4
User
Interaction
11: Prompts
12: Touch Screen
HS Automatic ApS
http://www.hsautomatic.com
OBJ INKdraw User Manual
25 08 2005
Page 90
11
Prompts
Prompts are questions of the content of objects asked to the user when the printing starts. This is
useful, if the content of the object is not known when the message is designed – for example, if the
content depends on a human decision.
Activating prompts
Prompts are activated from the icon panel with the question mark icon
prompt menu to appear.
. This will cause the
Prompt menu with
different objects.
One of the objects (Text1)
already has a prompt.
Figure 65 : Prompt menu
Setting a prompt for an object
To be prompted for input before print, follow these steps:
HS Automatic ApS
http://www.hsautomatic.com
OBJ INKdraw User Manual
25 08 2005
Page 91
•
Select the object you want to set prompt for
•
Select a prompt type
•
Use the “Add” button
•
Expand the tree under the object, including the branch under the question mark
•
Click on the type of prompt .
•
Input the prompt text and the default value
Prompt text and default value
The prompt text is the text that is used to ask for the input. For example, the prompt text could be
“Enter type of fruit”. If a default value is entered, it will be there when the question is asked.
The input of prompt text and default happen in the two boxes that appear after Add is pressed:
Setting the prompt text
and default value.
There can be more than
one prompt under the
question mark -–and thus,
more questions for one
object.
Figure 66: prompt and default value
•
You will still get prompted even if the prompt field and/ or the default is empty
Deleting a prompt for an object
You can delete the prompt(s) for an object in two different ways: individually or all.
•
To delete individual prompts, click on the promp type under the object, and press the delete
button (as seen above)
•
To delete all prompts for the current object, click the question mark just below the object, and
use the delete button.
In both cases, the prompt will be deleted without confirmation or warning.
HS Automatic ApS
http://www.hsautomatic.com
OBJ INKdraw User Manual
25 08 2005
Page 92
Different objects have different prompts
As the different objects have different properties, they also have different prompt types. This is a
list of the different prompt types:
Object
type
Date/Time
Text
Counter
Bar Code
Database
Prompt type
Notes
(Date format)
Absolute dates, entered in a user-definable format. You
can select (and change) this format any time in the
preferences menu
Add/ Subtract this number of days to the date
Same strings as the date format described earlier
The content of the text object. No limitations
A number, the maximum of the counter
A number, start value
A number, minimum value
The number format of the counter. Any of the values
“Dec”, “Bin”, “Hex”, “Oct”. NOTICE: Case sensitive.
The text of the plain bar code.
Will search for a record number and lock to that record
for every print
Will start from that record and move on
Will loop at that record
Will search the first field of the database and start printing
from there. The search is CaSe SeNsItVe.
The path/filename of the logo file. Can either be a
complete path, a network path, or simpler written
.\filename.bmp (notice the [dot][slash] in front !) if the file
is located in the “logo” folder of OBJ INKdraw.
Expire Date (Number)
Date Format
Text
Maximum
Current
Minimum
Format
Bar Text
LOCK
START
LOOP
FIND
Logo
Path
Using the prompt before print
When the print is started, the prompt menu appears if one or more objects have prompts.
HS Automatic ApS
http://www.hsautomatic.com
OBJ INKdraw User Manual
25 08 2005
Page 93
The prompt menu that
appears before print.
Notice that the prompt
question appears behind
the object name, the two
separated by a space.
Figure 67: Prompted for input
To change a default value or, if there is no default, to enter a value, follow these steps:
•
Use the arrows up/down to change between the fields
•
Enter content as needed
•
When done, press OK to print or Cancel to stop.
HS Automatic ApS
http://www.hsautomatic.com
OBJ INKdraw User Manual
25 08 2005
Touch Screen interface
Page 94
12
The touch screen interface in OBJ INKdraw allows you to set up a number of predefined buttons
and fields, and "hide" the standard screen during use of the software. This way, you can install the
controller with a nice industrial-looking touch screen and don't have to worry about the keyboard/
monitor solution. An administrator function is still available so you can create and edit messages.
The touch screen function is split into two parts: an editor where you define, based on 5 different
screens, which parts are active and how they look.
Once defined, the touch screen interface can be activated on start-up of OBJ INKdraw. This
function is activated in the preferences.
Touch screen editor
To activate the editor, use [functions->Special->Touch Screen->Setup] or Ctrl-F12. You
will see the screen change to the touch screen interface with the edit controls visible at the bottom:
Figure 68 : Touch screen editor
HS Automatic ApS
http://www.hsautomatic.com
OBJ INKdraw User Manual
25 08 2005
Page 95
The elements of the touch screen interface
The touch screen interface has 5 different screens. The following will briefly describe these
screens and the components available on each.
Within each screen, the components can be activated/ deactivated and placed freely. You can also
change the text on buttons and labels plus the color of the screen.
Use the Visibility button to switch objects on/ off, and use right-click to change the properties
on objects and load logos. You can also drag objects directly around on the screen.
Login screen
This is the screen where the operator / administrator identify themselves. It is optional to show this
screen on activation of the touch screen.
Administrator button
Administrator input
Administrator label
Logo
Operator button
Operator input
Operator label
Shutdown button
Click this to go back to the edit function of OBJ INKdraw.
Allows for input of the optional password for the administrator
Label that by default shows "Password"
User-defineable logo, BMP format.
Click this to start using the other touch screen functions
Allows for input of the optional password for the operator
Label that by default shows "operator name"
Click this to shutdown the machine. Prompts before shutting
down to confirm.
Main screen
This is the main screen that allows to load messages and databases and to start print.
Print button
Log out button
Load message button
Logo
Shutdown button
Use this to start print. Activates the prompt screen.
Click to go back to the login screen
Click to load a message. Activates the load file screen
User-defineable logo
Click this to shutdown the machine. Prompts before shutting
down to confirm.
Load database button Used to load a database with the same structure as the current
database. Use to renew the data printed.
Database label
Label above the database view
Database view
The data in the current database
Database next button Go to next record
Database prev. button Go to previous record
Goto record button
Go to a certain record given in the input box
Seach database btn
Search the first field of the database for a record value
Input box
Place to input things to search for and record number.
Prompt screen
This screen is displayed then the order the start print has been given. If there are any objects with
prompts in the message, you can input values on this screen.
Confirm button
HS Automatic ApS
Click to accept all values and start print
http://www.hsautomatic.com
OBJ INKdraw User Manual
Cancel button
Logo
Prompts display
25 08 2005
Page 96
Don't start print, go back to main screen
User-defineable logo
The box where the promts appear. Can be hidden if there are no
prompts.
Print screen
The print screen is active during the print process.
Stop button
Logo
Print data
Print data label
Database list
Record number label
Stops the print
User-definable logo
Displays the list of objects with a "watch".
Label for the print data window
Shows the data for the current loaded database.
The label above the database list
Load screen
This screen is displayed when the load file function is activated.
Browse button
Confirm button
Cancel button
File list
File name
File name label
Logo
Preview
Displays the standard Windows® file open dialogue.
Opens the selected file
Do not load a file
A list of files in the "Files" directory where OBJ INKdraw is
installed.
The selected file name
The label next to the file name
User-defineable logo
A small preview of the message
The touch screen controls
The touch screen controls are used for all screens.
Figure 69 : Touch screen controls
The controls let you choose between each of the different screens. After editing that screen, you
can save the changes by pressing the save button below the controls. Each screen is stored in it's
own .ini file which you can also edit by a text editor. The ini files are by default located in the
[obj inkdraw installation]/touchscreen/
directory.
HS Automatic ApS
http://www.hsautomatic.com
OBJ INKdraw User Manual
25 08 2005
Page 97
The fonts, passwords and colors are global settings that affect all screens. You can not use
individual fonts for the buttons.
The controls can be minimized to allow you to place buttons where the controls are. Click the "up
arrow" symbol to bring it back.
The touch screen keyboard
For inputs the touch screen has a small keyboard. It contains 48 standard keys that each have up
to 3 symbols (standard, shift and alt), plus some special keys like enter, space and back space.
The keyboard can be configured to use up to 5 different languages, giving you a total of 720
different symbols available for input. Each key has exactly 1 character.
Figure 70: touch screen keyboard
Numbering of the keys
The standard keys are numbered from top left to bottom right. One key, number 48, is not visible
by default - when activated it's located next to the "a" key.
•
The shift key and the (optional) AltGr key are only active once.
•
To get a string like f.ex.ABC you need to press
shift-A-shift-B-shift-C.
•
Of course, you can define the "inverse" keyboard to use upper case all the time if
that is what you need.
Defining the keyboard languages
To change the definition of the keyboard, you need to manually modify the text files in the
"Touchscreen" directory under the OBJ INKdraw installation directory.
The main file to edit is called keyboard.ini and defines the different language buttons. As always,
do not change the section names in [ ].
[Languages]
1=english.ini
2=dansk.ini
HS Automatic ApS
http://www.hsautomatic.com
OBJ INKdraw User Manual
25 08 2005
Page 98
Define up to 5 different languages, identified by a number. After the equal sign, put a file name
where that keyboard is defined.
[Language buttons]
1=0
2=0
For each of the numbers defined in the [Languages] section, define here if they are active or not.
Put "=1" to activate, "=0" to deactivate.
[Flags]
1=uk.bmp
2=dk.bmp
For each of the up to 5 languages, you can assign a little flag to the button. Notice that the file must
exist. No check for file size is done.
Defining the keyboard layout
This will explain how you define your own keyboard layout.
•
Each key will only display one character. Even if you put a longer string, only the
first character will be displayed.
For each of the 5 languages you defines, create an .ini file as follows:
[Extra keys]
48=1
alt=1
The [extra keys] section defines if the 48th key and / or the AltGr key should be visible. If they are
not visible, definitions in that section has no importance.
[Unshifted]
1=
2=
...
48=
Unshifted is used to define the standard meaning of the key. Write the symbol behind the equal
sign.
[Shifted]
1=
2=
...
48=
Shifted is activated when the "SHIFT" button is pressed.
[Alternated]
1=
2=
...
48=
Alternated symbols are activated when the AltGr key is pressed.
HS Automatic ApS
http://www.hsautomatic.com
OBJ INKdraw User Manual
25 08 2005
Page 99
Touch screen user interface
To use the touch screen interface, use [Functions->Special->Touch screen->Touchscreen]
or F12. It is also possible to activate the touch screen interface when OBJ INKdraw starts. You
will see either the main screen or the login screen, depending on the setting in the touch screen
control panel.
If the password fields were filled in, you will need to enter a password for either operator or
administrator.
•
If the "Administrator" button has been deactivated, you can not exit the touch
screen mode.
•
In an emergency case, connect the keyboard and kill the INKdraw process. Then
edit the login.ini file and change the
[Administrator button]
section, to have the parameter "Visible=1".
HS Automatic ApS
http://www.hsautomatic.com
OBJ INKdraw User Manual
25 08 2005
Page 100
Section 4
sum m ary
•
Prompts are used to ask the user for input of content of an object before the print
starts.
•
The entered values can be empty if desired. Illegal values, for example for dates, will
be ignored.
•
For each prompt, you can enter a prompt text and a default value
•
The way dates are entered is user-defined and can be changed on the run
•
You can also use the prompts to search for database content.
•
There is a touch screen function in the software, where you can define the layout of
each screen.
•
In the touch screen, the keyboard for input is completely user-defineable, allowing up to
5 languages with each 144 symbols.
HS Automatic ApS
http://www.hsautomatic.com
OBJ INKdraw User Manual
25 08 2005
Page 101
Section 5
Remote
Control
13: Ethernet / RS232
14: Running update
HS Automatic ApS
http://www.hsautomatic.com
OBJ INKdraw User Manual
25 08 2005
Ethernet / RS232
Page 102
13
Through the use of a normal PC network, or an RS232 connection, it is possible to remote control
OBJ INKdraw. The principle and the protocol is described in the following. HS Automatic has
developed sample applications that demonstrate this communication, you can download these
from our home page.
Although the protocol (language) is practically the same, there are some small differences between
the two methods of communicating. These will be introduced, followed by the complete language
specification.
TCP/IP (Ethernet)
From the server, you can connect arbituary many computers in a PC network, and address each
one through either an IP address or a DNS name. Each of the printer controllers has from 1 to 16
print heads connected to it. These must be of the same type per controller, but can be of a different
type in the same network. (i.e. below, ipc1 and ipc2 can have different head types)
In order to issue commands for objects, you must be connected to a message, which is defined as
an open file in OBJ INKdraw.
You can address all open messages, even the non-active messages.
ALL communication must end with ”#” (pound sign), or a different used-defined character. But you
must use the same all the time.
Example: To update content of text object T1 you send:
OBJECT:T1;TEX;This is the new text#
Allowing the communication
Before you can communicate to OBJ INKdraw, you must allow the communication. Do this for each
PC under File->Preferences->Network; select a port and "Allow connection".
The connection to the IPC happens by TCP/IP on a user-defined port, using either the IP number
or the DNS address to reach the machine. You can change the parameters for the connection for
each IPC, the possible settings are:
•
Port to connect to (default is port 2000)
•
Password for connection (default blank)
HS Automatic ApS
http://www.hsautomatic.com
OBJ INKdraw User Manual
25 08 2005
Page 103
Connecting to OBJ and a message
As mentioned, it is vital that you connect to a message after connecting to OBJ INKdraw, otherwise
you can’t send commands. Below is a complete example of a communication, which enables you
start updating objects.
SERVER
OBJ INKdraw answer
(connection to ipc1.abc.net)
TEXT:OBJ INKdraw 2.00#
TEXT:by HS Automatic ApS#
TEXT:http://www.hsautomatic.com#
REQUEST:password#
*********# (transmits the
password), terminated by #
RESULT:Password OK (10)#
REQUEST:messages#
DATA:c:\x.ink#
RESULT:Transmission OK (0)#
REQUEST:connect;c:\x.ink#
RESULT:Transmission OK (0)#
REQUEST:object list#
DATA:Text;Text1#
RESULT:Transmission OK (0)#
HS Automatic ApS
http://www.hsautomatic.com
OBJ INKdraw User Manual
25 08 2005
Page 104
RS232 Serial connection
In serial communication, you are addressing the message that is designed for the board you
connect to. (Board is selected in ”canvas size” or ”new” menu). If two open messages are designed
for the same board, you address the active message (i.e. the message on top). Files are loaded in
the active window.
ALL communication must start with <ESC> (ASCII 27) and end with #<EOT> (ASCII 04)
(The # can be defined to a different character. But you must use the same all the time.)
Example: To update content of text object T1 you send:
<ESC>OBJ:T1;TEX;This is the new text#<EOT>
OBJ INKdraw will respond with ACK or NAK before the data
It is possible to concatenate several commands, like
<ESC>OBJ:T1;TEX;This is the new text#OBJ:T2;TEX;This
is the other text#<EOT>
Notice that there are some commands that do not apply to the serial communication, especially
those that deal with multiple messages
HS Automatic ApS
http://www.hsautomatic.com
OBJ INKdraw User Manual
25 08 2005
Page 105
Language / Protocol introduction
Before the introduction to the language, a few words on the syntax used in this documentation:
•
Everything in < > symbolizes a placeholder… for example <username> means that you should
replace everything including the brackets with a username.
•
Everything in () is optional, and often depends on the preceeding command.
•
You shuold include : and ; in the command line. There is no ; before #.
•
You must terminal all commands by ”#”, likewise OBJ INKdraw will terminate all replies with the
"#" character.
•
Line feeds are not used, they are only shown in this guide for visualization and readability.
The communication works by sending a string to OBJ INKdraw, which is then interpreted and
replied to. You have a number of different basic statements you can send to the IPC:
Type of statement
DESCRIPTION
COMMAND:<string>#
Basic commands for the IPC, for example
for stopping, starting, loading a message,
and shutting down the machine
OBJECT:<object name>;<command>;<data>#
Manipulation of an object on the canvas.
REQUEST:<variable>(;<other data>)#
Makes OBJ INKdraw return information to
you
PARAMETER:<type>;<value>#
Change parameters in OBJ INKdraw.
HS Automatic ApS
http://www.hsautomatic.com
OBJ INKdraw User Manual
25 08 2005
Page 106
Answers and results returned by OBJ INKdraw
When you have sent a command to OBJ INKdraw, you will get a result back. In order for you to
correctly interpret the answer from OBJ INKdraw, these answers always follow a set of rules.
General rules for the answers
•
All answers are proceeded by a word, and a colon [:]
•
All answers are terminated by the hash symbol [#]
•
All actions are terminated by a result with a result code.
Types of answers from OBJ INKdraw
There are 4 types of reply from OBJ INKdraw. The table below shows an overview of the
possibilities; with the text to scan for marked in bold:
Reply from OBJ
Description
TEXT:text text text text#
Text information that is not directly data
from the program, for example the start-up
message with the HS Automatic ApS
company name and program version.
REQUEST:type of request#
OBJ INKdraw is asking you to enter
Information, terminated by the # character,
for example a password.
DATA:value of data#
OBJ INKdraw is returning data to you.
More DATA replies may follow each other,
for example in case of a file listing. Each
DATA reply will have one value. For items
that return more than one piece of data,
OR
DATA:field;value#
there is a descriptive name before the value
RESULT:Result description (code)#
HS Automatic ApS
The result of the command. This will
always be the last reply, to indicate that
OBJ INKdraw is ready for new commands.
The result text is also followed by a code
for easy identification.
http://www.hsautomatic.com
OBJ INKdraw User Manual
25 08 2005
Page 107
Language Reference
Commands
CMD is accepted instead of COMMAND
Stop print
COMMAND:S#
COMMAND:stop#
The stop print command stops the printer. If a layout is currently printing, the current print will
finish.
Start print
COMMAND:R#
COMMAND:start#
Works on: Both versions, only in editmode. The command starts the printer.
Disconnect
COMMAND:D#
COMMAND:disconnect#
Works on: Both versions Disconnects the client program from Obj INKDraw. Does not work on
seriel
Shutdown
COMMAND:Q#
COMMAND:shut down#
Works on: Both versions Shuts down the entire computer immedeately.
Load file
COMMAND:F;<file name>#
COMMAND:load file;<file name>#
Works on: Both versions. In multitask Inkdraw this command will work if connected to an open
layout, else only if less than two layouts are currently open.
Loads the file specified by <file name>. If no path is given Inkdraw will load the file from the
(inkdraw)\files folder, and the .ink extension is optional.
Goto record
COMMAND:G;<record number>#
COMMAND:goto;<record number>#
Works on: Both versions, but only in layouts where a database is loaded. The command points the
database to the specified record.
Print go
COMMAND:P#
COMMAND:print#
COMMAND:go#
Works on: Both versions, only in printmode, and only with the fast load option activated. The print
go command loads one print to the printhead. Use this command with the user-managed buffer.
HS Automatic ApS
http://www.hsautomatic.com
OBJ INKdraw User Manual
25 08 2005
Page 108
Direct access of database
COMMAND:A;<record 1>[;<record 2>;<record 3>…]#
Works on: Both versions, but only if the direct access feature is enabled and a database loaded.
The command loads the record numbers used for the direct access feature.
HS Automatic ApS
http://www.hsautomatic.com
OBJ INKdraw User Manual
25 08 2005
Page 109
Requests
REQ is accepted instead of REQUEST
Connect to message
REQUEST:connect;<message name>#
Works on: Multitask Inkdraw only. Connects to the specified message. File type (.ink) is
mandatory. If just file name is given, file is loaded from ”files directory”. Does not work on seriel.
List of open layouts
REQUEST:messages#
REQUEST:file list#
Works on: Multitask Inkdraw only. Returns a list of open layouts. Format is DATA:<layout name>#.
Does not work on seriel.
Request list of objects
REQUEST:object list#
Works on: Both versions, in multitask Inkdraw you need to be connected to a layout
Inkdraw returns a list of objects from the current layout all having the format DATA:<object
type>;<object name>#
Contents of files directory
REQUEST:dir#
REQUEST:directory#
Works on: Both versions
Inkdraw returns a list of .ink files found in the (inkdraw)\files folder with the format
DATA:<filename>#
Request data of an object
REQUEST:object data;<object name>#
Works on: Both versions. Inkdraw returns all data available for the object. The format of these data
is DATA:<field>;<value>#
Request parameter data
REQUEST:parameters#
Works on: Both versions
Inkdraw returns all available parameters. The format is DATA:<field>;<value>#
Printer status
REQUEST:status#
Works on: Both versions
Inkdraw returns status of the printer (online/offline/printing) as well as hardware status (fuses,
inklow). Return format is DATA:<field>;<value>#
Available fonts
REQUEST:font list#
Works on: Both versions
HS Automatic ApS
http://www.hsautomatic.com
OBJ INKdraw User Manual
25 08 2005
Page 110
Inkdraw returns a list of all available fonts. Format is DATA:<font name>#
HS Automatic ApS
http://www.hsautomatic.com
OBJ INKdraw User Manual
25 08 2005
Page 111
Object commands
OBJ will be accepted instead of OBJECT
Create object
OBJECT:<object name>;create;<object type>#
Works on: Both versions. The object name must not be equal to an existing object
Creates a new object with the specified name and type.
Valid object types are:
OTText (text object)
OTCounter (counter object)
OTBarcode (barcode)
OTDateTime (date/time object)
OTLogo (logo)( not able to create at the moment )
OTField (field)
OTMail (mail field)
OTLine (line)
OTRectangle (rectangle)
OTEllipse (ellipse)
Delete object
OBJECT:<object name>;delete#
Works on: Both versions
Deletes the specified object and all sub-objects it might contain.
Rename object
OBJECT:<object name>;rename;<new object name>#
Works on: Both versions
Renames the object.
Monitoring
OBJECT:<object name>;monitor;<+/->#
Works on: Both versions
Adds (”+”) or removes (”-”) an object from the monitor list.
Transperancy
OBJECT:<object name>;trans;<+/->#
Works on: Both versions
Turns object transparency on (”+”) or off (”-”).
Invert
OBJECT:<object name>;invert;<+/->#
Works on: Both versions
Inverts the object (”+”) or returns the object to normal (”-”).
Color
HS Automatic ApS
http://www.hsautomatic.com
OBJ INKdraw User Manual
25 08 2005
Page 112
OBJECT:<object name>;COL;<color 1>[<color 2>]#
Works on: Both versions. The object must be either a rectangle, line or ellipse
Changes color on the specified object. If the object is a line there can be no <color 2>. Formats for
colors are ”w”, ”W”, or ”-” for white and ”b”, ”B”, ”+” for black.
Font
OBJECT:<object name>;FON;<font name>[;<font
size>;<font style>]#
Works on: Both versions. All objects containing a font (fields, schedules, barcodes, texts, counters,
and dates)
Changes the font for the specified object. Font size and font style does not need to be present.
Font style values are: 1=bold, 2=italic, 4=underline, 8=strikeout (cummulative).
Position
OBJECT:<object name>;POS;<x>;<y>#
Works on: Both versions. All objects except lines
Changes the position of the object. Positions are measured as the upper left corner.
Rotation
OBJECT:<object name>;ROT;<rotation>#
Works on: Both versions. All objects except lines
Rotates the object. Valid values for <rotation> are 0, 90, 180, or 270 (degrees).
Size
OBJECT:<object name>;SIZ;<width>;<height>#
Works on: Both versions. All objects except lines
Changes the size of the object. Any font will be automatically resized to fit in the new size.
Line position
OBJECT:<object
OBJECT:<object
OBJECT:<object
OBJECT:<object
name>;X-1;<start x>#
name>;X-2;<end x>#
name>;Y-1;<start y>#
name>;Y-2;<end y>#
Works on: Both versions, only line objects
Changes the position/size of the line. The start point of the line is (<start x>, <start y>) and the end
point is (<end x>, <end y>).
Line width
OBJECT:<object name>;WID;<width>#
Works on: Both versions, only graphic objects (lines, rectangles and ellipses) Changes the line
width.
Text
OBJECT:<object name>;TEX;<new text>#
Works on: Both versions, text objects only
Writes a new text in the object. The object will be automatically resized to fit the size of the new
text.
HS Automatic ApS
http://www.hsautomatic.com
OBJ INKdraw User Manual
Counter values
OBJECT:<object
OBJECT:<object
OBJECT:<object
OBJECT:<object
OBJECT:<object
OBJECT:<object
OBJECT:<object
25 08 2005
Page 113
name>;MIN;<minimum value>#
name>;CUR;<current value>#
name>;MAX;<maximum value>#
name>;DIG;<number of digits>#
name>;DIR;<+/->#
name>;LDN;<lead in>#
name>;REP;<repeat number>#
Works on: Both versions, counters only
Changes the minimum, maximum, or current (displayed) values of the counter.
DIG sets the number of digits in the counter.
DIR sets the direction of the counter, ”+” for counting up, ”-” for counting down.
<lead in> is either space (” ”, ”space”), zero (”0”, ”zero”), or none (”none”).
REP sets the repeat number of the counter.
Expiry date/set date
OBJECT:<object name>;EXP;<expiry date>#
OBJECT:<object name>;DAT;<date>#
Works on: Both versions, date/time objects only
Sets the date of a date/time object. If sending a date it has to be of the format year/month/day
(2003/3/19). Note that the DAT command is different from the DAT command used with fields.
Date format
OBJECT:<object name>;FOR;<format>#
Works on: Both versions, date/time objects only
Sets the format for the date objects. Available formats are all Windows formats as well as all
special Inkdraw date format features.
Load logo
OBJECT:<object name>;PAT;<path to new logo>#
Works on: Both versions, logos only
Loads a new logo specified by the name and path given.
Barcode contents
OBJECT:<object name>;CON;<contents>#
Works on: Both versions, barcode only
Changes the contents of a barcode. This will only work if no objects have been inserted into the
barcode.
Barcode type
OBJECT:<object name>;TYP;<barcode type>#
Works on: Both versions, barcodes only
Sets the type of the barcode (EAN13, Codabar, etc). The type must be equal to the type given in
Obj INKDraw (EAN13 will work, EAN-13 will not).
Barcode module
HS Automatic ApS
http://www.hsautomatic.com
OBJ INKdraw User Manual
25 08 2005
Page 114
OBJECT:<object name>;MOD;<module>#
Works on: Both versions, barcodes only
Selects between the original Obj INKDraw barcodes and the expanded (Tec-It) barcodes. Allowed
values for <module> are ”Tec-It”, ”expanded” or ”1” for the expanded module (everything else will
set the original module). It is important to resend the barcode type after changing modules.
Number of field lines
OBJECT:<object name>;LIN;<amount of lines>#
Works on: Both versions, empty fields only (in Obj INKdraw 2.02 this command also works on mail
objects)
Sets the number of lines in the field object. The command will not work unless the field is empty.
Alignment
OBJECT:<object name>;ALN;<alignment>#
Works on: Both versions, field objects only (in Obj INKdraw 2.02 this command also works on mail
objects)
Changes the alignment of the field object. Allowed values are ”left”, ”center”, or ”right”.
Field data
OBJECT:<object name>;DAT;<line 1>;[<line 2>;<line
3>;…;]#
Works on: Both versions, field objects only (in Obj INKdraw 2.02 this command also works on mail
objects)
The command enters data to multiple (text only) lines in a field object. Note that the DAT command
is different from the DAT command used with date/times.
HS Automatic ApS
http://www.hsautomatic.com
OBJ INKdraw User Manual
25 08 2005
Page 115
Parameters
PAR will be accepted instead of PARAMETER
Start distance
PARAMETER:start;<start distance>#
Works on: Both versions
The command changes the ”start mm” parameter. The given value must be in mms. If using the
20_XJxxx EPROMs or later it will change during printmode, else it will change only in edit mode.
Set edge
PARAMETER:edge;<edge>#
Works on: Both versions, edit mode only
The command will change the sensor trigger to either positive (”pos”, ”positive”, or ”+”) edge, or
negative (”neg”, ”negative”, ”-”) edge. The command will be accepted in print mode, but the change
will not work before exiting and re-entering print mode.
Print signal
PARAMETER:signal;<type>#
Works on: Both versions
The command will set the signal type to either print signal (”print”, or ”+”) or message signal
(”message”, or ”-”).
Endless
PARAMETER:endless;+#
PARAMETER;endless;-#
Works on: Both versions, edit mode only
The command will turn on/off endless mode. It will be accepted in print mode, but will not change
before exiting printmode.
Print mode
PARAMETER;mode;<print mode>#
Works on: Both versions, edit mode only
Changes between position encoder (”pos”, ”position”, or ”P”), modular encoder (”mod”, ”modular”,
or ”M”), and velocity (”vel”, ”velocity”, ”V”) modes. Changes will be accepted in print mode, but will
not take effect before exiting print mode.
Print speed
PARAMETER:encoder;<value>#
PARAMETER:velocity;<value>#
Works on: Both versions
Changes the encoder/velocity parameter. With EPROMs version 20_XJxxx and on this change will
take immidiate effect in print mode. With older EPROMs exiting printmode is needed.
HS Automatic ApS
http://www.hsautomatic.com
OBJ INKdraw User Manual
25 08 2005
Page 116
Return data from OBJ INkdraw
All objects
DATA:sub;<true/false>#
DATA:rotation;<rotation>#
DATA:transparent;<+/->#
DATA:invert;<+/->#
DATA:monitor;<+/->#
Result from: Both versions when requesting data on any object
This is always the first line sent from Inkdraw when requesting object data. If sub sends ”true” the
object is stored inside another object (barcode/field) and will have less properties,
<rotation> is the rotation of the object (in degrees). Other data descripe if the object is transparent,
inverted and monitored during print.
Lines
DATA:x1;<start x>#
DATA:x2;<end x>#
DATA:y1;<start y>#
DATA:y2;<end y>#
DATA;size;<line width>#
DATA:color;<color>#
Result from: Both versions when requesting data from a line
The format for <color> is ”+” (black) or ”-” (white).
Rectangles/ellipses
DATA:x;<x position>#
DATA:y;<y position>#
DATA:width;<width>#
DATA:height;<height>#
DATA:size;<line width>#
DATA:color;<color 1>;<color 2>#
Result from: Both versions when requesting data from a rectangle or an ellipse
The format for <color 1> and <color 2> is ”+” (black) or ”-” (white). Color 1 is the lineout and color 2
is the body of the object.
Text objects
DATA:text;<text>#
[DATA:x;<x position>#]
[DATA:y;<y position>#]
[DATA:width;<width>#]
[DATA:height;<height>#]
DATA:font;<font name>#
Result from: Both versions when requesting data from a text object
<text> is the contents of the object. Font, position and size are not send with texts inside barcodes
or fields.
Logos
DATA:path;<path to logo>#
HS Automatic ApS
http://www.hsautomatic.com
OBJ INKdraw User Manual
25 08 2005
Page 117
DATA:x;<x position>#
DATA:y;<y position>#
DATA:width;<width>#
DATA:height;<height>#
Result from: Both versions when requesting data from a logo
<path to logo> will be the full path, except if the logo is stored in the (inkdraw)\logos folder, then it
will be .<filename> (notice the dot).
Counters
DATA:minimum;<minimum value>#
DATA:current;<current value>#
DATA:maximum;<maximum value>#
[DATA:x;<x position>#]
[DATA:y;<y position>#]
[DATA:width;<width>#]
[DATA:height;<height>#]
DATA:direction;<+/->#
DATA:leadin;<lead in>#
Result from: Both versions when requesting data of a counter.
Note that the current value might change quite fast during print. Position and size are not send with
counters inside barcodes or fields.
<lead in> is either ” ” (space), ”0” (zero), or ”-” (none).
Barcodes
DATA:contents;<contents>#
DATA:x;<x position>#
DATA:y;<y position>#
DATA:width;<width>#
DATA:height;<height>#
DATA:module;<module>#
DATA:type;<barcode type>#
Result from: Both versions when requesting data from a barcode
<module> will be either ”HSA” (original module) or ”Tec-It” (expanded module).
Fields
DATA:x;<x position>#
DATA:y;<y position>#
DATA:width;<width>#
DATA:height;<height>#
DATA:data;<line 1>#
[DATA:data;<line 2>#]
…
Result from: Both versions when requesting data of a field object
The number of data lines will equal the number of text objects in the field.
Schedules
DATA:x;<x position>#
DATA:y;<y position>#
DATA:width;<width>#
DATA:height;<height>#
HS Automatic ApS
http://www.hsautomatic.com
OBJ INKdraw User Manual
25 08 2005
Page 118
Result from: Both versions when requesting data of a schedule.
Dates
DATA:date;<expiry date>#
DATA:format;<date format>#
[DATA:x;<x position>#]
[DATA:y;<y position>#]
[DATA:width;<width>#]
[DATA:height;<height>#]
Result from: Both versions when requesting data from a date/time.
Note that it sends the expiry date – not the current date. Position and size are not send with dates
inside barcodes or fields.
Parameters
DATA:start;<start distance>#
DATA:edge;<+/->#
DATA:signal;<+/->#
DATA:endless;<+/->#
DATA:mode;<print mode>
Result from: both versions when requesting parameters
<print mode> is ”M” (modular), ”P” (position), or ”V” (velocity).
Status
DATA:printmode;<+/->#
DATA:printing;<+/->#
DATA:status;<status>#
Result from: Both versions when requesting printer status
<status> will be a text describing errors on the system, for example ”[5V fuse burned, low ink]”.
All replies
RESULT:<error code>
Returns from: Both versions after all commands send
This will always be the last command send from Inkdraw and indicates the end of transmission.
HS Automatic ApS
http://www.hsautomatic.com
OBJ INKdraw User Manual
25 08 2005
Page 119
User-managed buffer mode
When you are using the CB board, the normal process of printing is as follows:
User
CB board
PC
input
controller
Printer
64Mb buffer
memory
INKdraw
Start sensor
Notice that OBJ INKdraw is controlling when messages (prints) are stored on the CB board in the
64 Mb buffer memory.
This way is normally preferred when you print, as the internal buffer enables you to have a
constant high print speed.
But sometimes it is necessary to control the buffering manually. Typically this is when you use
updates by RS232 or ethernet, and want to make sure that your updated information is actually
what is printed next time.
To manage the buffer yourself, do the following:
•
Activate "User-managed buffer" in preferences
•
Each time you wish to buffer a picture, send
CMD:P#
by ethernet
or
<esc>CMD:P#<eot>
by RS232
•
Next time the start sensor is triggered the buffered picture is printed
You can buffer multiple pictures if you wish, until the 64Mb memory is used.
Notice that if you print and there is no picture buffered, the printer will print whatever is in memory.
This can look like "noise", or be leftovers from other pictures.
HS Automatic ApS
http://www.hsautomatic.com
OBJ INKdraw User Manual
25 08 2005
Page 120
14
Running update
Running update allows you to change a logo during print, without doing any programming. This
happens through special directory "Update", for example c:\Program Files\OBJ INKdraw\update\
Commonly, you would use shared network drives to copy files directly from one (windows)
computer to another, but the function works just as well by using for example an ftp server (not
included with OBJ INKdraw).
The important factor is the object name of the logo. If a BMP file is copied to the update directory
with the same name as the logo object name, the new BMP file will be used.
Example: Your logo is called pallet. (object name). Now, if you copy a BMP file to pallet.bmp in the
update directory, this file will be loaded instead.
Update logo function works similarly to the "buffer picture" function.
•
Notice that OBJ INKdraw does not scale the logo based on the file. Instead, the
object dimensions are used. All logos used this way should be same size (x,y)
Ideas for "Update function"
•
Generate things from other programs that OBJ INKdraw can't do - example: special barcodes,
special text (like mirror, special fonts, non-western text,…)
•
Import from other programs such as acrobat, Codesoft, etc.
•
Scanning applications - where you "load" a strip of an image with every print.
HS Automatic ApS
http://www.hsautomatic.com
OBJ INKdraw User Manual
Section
25 08 2005
Page 121
5
sum m ary
•
You can control the printer remotely by RS/232 either from another PC or from a PLC
(Programmable Logic Controller).
•
This happens by sending a string of commands with possible parameters
•
Another way to remotely control the printer is by utilizing the “update” directory. This
allows you to change a picture, while in print mode.
•
Remote connection allows you to fully control OBJ INKdraw - for example if you wish to
write your own front end.
Example programs are available for free.
HS Automatic ApS
http://www.hsautomatic.com
OBJ INKdraw User Manual
25 08 2005
Page 122
Section 6
Localization
15: Changing the INKdraw language
HS Automatic ApS
http://www.hsautomatic.com
OBJ INKdraw User Manual
25 08 2005
Page 123
Changing the INKdraw language15
OBJ INKdraw is easy to configure for different languages. This chapter will explain how to change
the language of the main program, and how to create / change your own language files, in case
you don’t like the way some things have been translated.
All language definitions are stored in a normal plain text-file. All you need to change the translation
of the menus is a text editor.
The language files are stored in a subdirectory called “Language” under the installation directory of
OBJ INKdraw. They must have the extension .lan.
Selecting a pre-defined language
OBJ INKdraw comes with different languages when installed. If you did a translation and would like
to donate it for OBJ INKdraw, we will be happy to include your file as well.
To select a language that has been defined, use the preferences menu. You will be presented with
a file dialog showing the available files. Select one and press OK. You will see that the language
changes immediately.
What is translated ?
In the language files, everything on the monitor (main OBJ INKdraw program) is translated: menus,
dialog boxes, buttons,...
Defining your own language file
Chances are that you speak a different language than the ones installed with OBJ INKdraw. In that
case, you can create a language file to suit you. Using the imaginary language “Narnian”, the
steps to create a language are:
•
Copy the file english.lan to someting different; here narnian.lan.
•
Edit the content of the newly copied file narnian.lan.
•
When done, select the file narnian.lan as described above.
HS Automatic ApS
http://www.hsautomatic.com
OBJ INKdraw User Manual
25 08 2005
Page 124
The structure of the language file
It is important to follow a few simple rules when editing the language file. The structure of the
language file is as follows:
•
There is a number of different sections, identified by [ ]. These should not be touched in any
way.
•
Under each section, the original text is written, then an equal sign, and the translation. In the
English file, both sides are in most cases identical.
You should translate the Right-hand side from the equal sign only !
•
The menus have an amphersand (&) in the translation. If you use the amphersand in front of a
character, this character can be used with the Alt key to activate that menu.
If you do something wrong...
.. it is not really a big problem. If you change anything that you should not change (a section name,
or anything to the left of the equal sign), the OBJ INKdraw program will simply ignore any change
to that section or line.
Example of a language file:
Below is the start of the result of a correctly changed language file. All parts have were “translated”
have been prefixed and suffixed with xxxx.
[Status panel]
Origin= xxxx Origin: xxxx
Current= xxxx Current: xxxx
View= xxxx View: xxxx
Absolutte= xxxx A:. xxxx
Realtive= xxxx R:. xxxx
[Main menu]
File= xxxx &File xxxx
File->New= xxxx &New... xxxx
File->Open= xxxx &Open... xxxx
File->Save= xxxx &Save xxxx
File->Save as= xxxx Save &as... xxxx
File->Exit= xxxx E&xit xxxx
What you do as OBJ INKdraw evolves...
As OBJ INKdraw evolves, new functions are added, others are changed. This of course affects the
language file. But there is no need for you to rewrite everything from scratch. OBJ INKdraw can
look through the current language file for you and insert all new lines, optionally marking them with
a tag you define.
HS Automatic ApS
http://www.hsautomatic.com
OBJ INKdraw User Manual
25 08 2005
Page 125
Upgrading your language file:
•
Install the new OBJ INKdraw
•
Copy your translated language file to the language subdirectory of the installation directory.
•
Select that language
•
Use the preferences to update the language.
•
Enter a tag if you want. What you enter is not important, the tag will be inserted next to the new
text in your language file – but a good idea is to enter something that is easy to find. You can
use your own name, for example.
•
If your file is already up-to-date you will be told that there is no need to update the file.
Otherwise, the new lines will be added for translation.
HS Automatic ApS
http://www.hsautomatic.com
OBJ INKdraw User Manual
Section
25 08 2005
Page 126
6
sum m ary
•
OBJ INKdraw offers you total freedom regarding the language you and your customers
will see on the screen. Any text string in the menus, dialog boxes and the buttons can
be translated to what you want.
•
Or, if you just don’t like the way the translations are currently done, you can simply
change them to something different.
•
You have to follow certain rules when editing the language files. You can’t destroy
anything, but if you change the wrong parts, the program will ignore your changes.
HS Automatic ApS
http://www.hsautomatic.com
OBJ INKdraw User Manual
25 08 2005
Page 127
Section 7
Reference
16: Hardware configuration
17: The preferences menu
HS Automatic ApS
http://www.hsautomatic.com
OBJ INKdraw User Manual
25 08 2005
Page 128
The Hardware Configuration
16
This chapter will briefly summarize the hardware concept and how to connect it in order to get a
print. For a more detailed description, please refer to the hardware manual.
Understanding the hardware concept
In order to work effectively with OBJ INKdraw, it is important to understand the concept of the
system.
The printers are built around either the XaarJet 128, XaarJet 500 print engines - or HP.
You can use one type of printer only on one controller, but both types have in common that you
can combine the different types of print heads to a maximum of 280 mm print height (Xaar) or 50.8
mm print height (HP) - per controller
The configurations of the print heads is as follows:
Print engine type
XaarJet 128
Print height in each head
17.5 mm (1 engine)
35 mm (2 engines)
52.5 mm (3 engines)
70 mm (4 engines)
XaarJet 500
XaarJet 500CM
HP
70 mm (1 engine)
12.7 mm
25.4 mm (2 pens)
38.1 mm (3 pens)
50.8 mm (4 pens)
If you follow the general rule about a maximum of 280 mm print height, you can combine the heads
as you please, for example one on each side and one on top of a box… or two on one side and
one on the other side…
Physical print heads related to OBJ INKdraw.
On the controller for the printers, there are 2 or 4 plugs for data. Each of these can run either 1 to 4
XaarJet 128 engines or 1 XaarJet 500 engine. In other words, each of these plugs have 70 mm ( or
4 times 17.5 mm ) print data. Each of the 17.5 mm lines is also referred to as a band.
This concept is used in OBJ INKdraw. Take a look at the canvas again, where the different data
areas are indicated.
HS Automatic ApS
http://www.hsautomatic.com
OBJ INKdraw User Manual
25 08 2005
Page 129
The top left part of the canvas.
Notice how the different sections
of 70 mm has been marked, as
they go to different outputs. This
pattern of course continues to
output 9-12 and output "13-16".
(numbers indicating the number
of total heads)
The active print head, marked in
gray, indicates one band.
Figure 71: Canvas with rulers
From above part of the canvas, you can see that if you know where a print head is connected, you
will know where to put data for that head.
•
As OBJ INKdraw allows drawing anywhere on the canvas, there is no problem in
using several different heads to draw your objects - in other words, you don't have
to respect the "limits of one head / output"
Connecting things
In order to connect the printer and the controller, this chapter will briefly describe how to connect
the parts to get the system going.
Connectors on the print controller, printer
The printers are connected to the controller with 25-pin cables. You can daisy-chain the printers
that receive data from the same output, as long as you remember that the total maximum print
height per output is 70 mm.
A simple drawing will illustrate the idea:
HS Automatic ApS
http://www.hsautomatic.com
OBJ INKdraw User Manual
25 08 2005
Page 130
In this example, 4 x 35 mm
printers are connected to the
controller.
There will be two printers per
output, and the printers have
been daisy-chained, two on each
output.
Finally, a start switch is
connected to activate the print.
Figure 72 : connecting the printers
•
The order in which you daisy-chain the printer is indifferent, as the printer
internally has configured which data lines it will print. (please see the hardware
manual for more on this).
Other options
Apart from the printers and the controller, you can connect other things to your system: Please ask
or consult the hardware documentation for more information about these options.
•
Encoder, to accurately measure the speed of your conveyor
•
External signal for print active
•
External signal for low ink level
HS Automatic ApS
http://www.hsautomatic.com
OBJ INKdraw User Manual
25 08 2005
Page 131
17
The Preferences menu
The preferences menu is where a number of options affecting the behavior of OBJ INKdraw can be
set. This chapter will describe all the different options and what they do.
Entering the preferences menu
To enter the preferences menu, use [File->Preferences] or press Alt+p.
You will see a screen similar to this:
Preferences Window
The window has two panes:
The option group, where the
options for a certain part of
the program are selected,
and the settings, where the
actual changes are made.
Figure 73: Preferences Window
To change something, select the group, make the changes and press “OK”.
HS Automatic ApS
http://www.hsautomatic.com
OBJ INKdraw User Manual
25 08 2005
Page 132
Description of the preferences
Save/Exit and update
Save Options
How OBJ INKdraw should behave when you close a file.
Normal is to ask if the file should be saved if it is modified
Never ask and Ask Always will overrule this behavior.
Automatic save after print will save the message when you stop printing. This can be useful if you
wish to save the status of counters and databases, when you change files automatically.
•
A document (your .ink file) is sometimes modified even if you do not personally
change anything
•
For example, simply selecting an object on the drawing canvas will make your file
appear changed to OBJ INKdraw.
Machine Parameters
Causes OBJ INKdraw to ignore parameters (hardware settings) in the files that are loaded.
Show cost while printing
When in print mode, the object view window will appear with a cost meter showing at the bottom.
The cost is calculated from the price of ink entered under Cost Calculation.
The print monitor showing costs,
based on the value entered in the
Cost Calculation menu. The cost
is in no special currency.
If the serial connection is enabled
you will see the data transfered
below the print costs.
Figure 74: print monitor showing costs
Regional settings
The regional settings is where you modify OBJ INKdraw to work under your local settings. The two
main aspects of this adjustment are font and date input format.
HS Automatic ApS
http://www.hsautomatic.com
OBJ INKdraw User Manual
25 08 2005
Page 133
Main Font
The font to use for menus in OBJ INKdraw. This is mostly useful in cases where a different font is
needed, typically where the latin fonts are not used (asia, middle east…). In line with the font, you
must also choose a character set, to be able to display international characters properly.
Main character set
Change your character set here if you operate OBJ INKdraw in a non-English windows.
Language
Select new language
The settings panel will show a list of available language files. To change the language, simply
select one of the files and click OK.
Update a language
To make sure that the language file is up-to-date, use the “update language” button. This allows
you to re-create the language file, and optionally insert a marker string where new items are
added. That way, you can easily find the new strings when you later edit the language file.
Layout
The layout section affects the look of your canvas. Notice that the changes you make here will only
have cosmetic effects. The changes will not affect the final print.
Global settings
Apply global settings to the measurements / grid setup. If on, they will not change even after a new
message is loaded.
Grid
Change settings for the grid.
X / Y Interval determine how close the grid points should be.
X / Y offset Shifts the grid this number of units from (0,0)
Visual Should the grid be visible or not
Snap to grid Only move on grid points ?
Units
Change the units used in OBJ INKdraw
Pix Pixels, the smallest number of dots available with the printer hardware
Cm Centimeters, based on the metric system
Inc Inches, based on the US system
HS Automatic ApS
http://www.hsautomatic.com
OBJ INKdraw User Manual
25 08 2005
Page 134
Point Points, based on font sizes.
Cursors
Crosshair Use a big cross as cursor
Hand Use a small hand with a pointing finger as cursor
Cross Use a small cross as cursor
Keep objects inside message
With this option on, you can not move any object outside the boundaries of the canvas. With this
option off, objects can be placed anywhere, even in not visible areas of the canvas.
Allow canvas resizing from editor window
Setting that will allow you to drag the length of the canvas directly from within the editor.
Automatic popup of object menus
When you create objects inside object, select this to automatically open the properties menu when
you add counters, dates or texts inside other objects. If off, you need to double click the object to
edit.
Startup Message
Startup message
OBJ INKdraw must always have a message loaded. This option chooses what message is active
when the program is loaded:
Last edited message The file you last had open
Default INKdraw message The NoName.ink message
User-defined message Always open a certain file, defineable through the file selector in the same
window.
Start up mode
Use this option to define how OBJ INKdraw starts. You can choose between normal mode (edit)
touch screen mode or print mode. The last is beneficial if you wish to use the software unattended
as a print controller only.
•
Do not forget to include an "Administrator" button in the touch screen interface if
you select this mode as start-up mode.
•
If you "lock yourself out" delete the inkdraw.ini file and you'll be back to a default
environment.
HS Automatic ApS
http://www.hsautomatic.com
OBJ INKdraw User Manual
25 08 2005
Page 135
File database
SECTION TO BE DONE. TDJ!
Lock Tool
The Lock Tool allows you to prevent the user from accessing functions in the OBJ INKdraw
software. Any function can be locked out.
There are 2 levels of protection, each with their individual password.
Where
Preferences / Lock Tool
Printer Parameters
Covered
The lock tool menu itself, where you can enable/disable
icons and menus.
The menu for print parameters
•
The preferences password is the most important. If you know this password, you
can disable the other two
•
Remember the passwords; the functions will not work if you forget the password.
•
The passwords are case sensitive (“PaSsWoRd” is different from “password”)
•
You can disable the print function / print parameters without setting a password.
This menu can also be used to set the password for the CU file. If you enter a password here, it will
be stored in the CU next time you transfer files.
How to disable a function
To disable a function, click the button or check the box. Once disabled, the button or the menu will
appear as greyed out:
Disabled functions in OBJ INKdraw will appear
as greyed out, as the examples below illustrate:
Figure 75: Locking Buttons
Figure 76: Disabled menus
Figure 78: Locking Functions
Figure 77: Disabled icons
HS Automatic ApS
http://www.hsautomatic.com
OBJ INKdraw User Manual
25 08 2005
Page 136
How to set the passwords:
Preferences menu password: Use the button “Preferences (Password)” under “Files”
Print password / Parameters password : Use the two buttons under “Parameters/Print” where the
text indicates “Press button to enable password”.
Logfile
The logfile will tell you what OBJ INKdraw is doing. The information is stored in the file
{OBJ INKdraw installation directory}\LogFile\LogFile.txt
There are 5 levels of logging: from None (No log) to Maximum (log all). The change of log level will
not take effect until the program is restarted.
Error messages
Since OBJ INKdraw is targeted also at remoted control, it is sometimes necessary to have error
messages on the screen (that require user intervention) disabled. This is possible by selecting a
different value here. Choose between the following:
Disabled
Message
Network
Serial
Errors appear only in log files
You will get a message box on the screen
Most error messages are output on the
TCP/IP connection
If possible, errors are output on the serial
connection
Database
The database group contains different options related to the database functions.
Database functions
Keep references when reloading: If this option is on, the program will connect the currently open
database to objects with the same name when you open another file. Example: you have attached
field1 to "Name" object. Now, when you open another file, field1 is still attached to "Name" object.
This is great for using templates, because you can use the same data with different layouts.
You must however take great care that the objects you have connected with fields exist in the files
you open. Otherwise, unexpected results might occur.
Reload database just before printing: If you have an application that modifies the database "online" this function ensures that you have the most up-to-date data before you start the print
function.
Prompt for username and password: When a database is opened, a box will appear where you
must enter username and password. With this option, you can choose if the program should use
default username/password, and/or prompt you.
HS Automatic ApS
http://www.hsautomatic.com
OBJ INKdraw User Manual
25 08 2005
Page 137
Visual
Always display header in design mode: If this is activated, objects on the canvas will not display
the value of the current record, but will display the field name. (example: "Field1" instead of "ACME
corporation")
Prompt
Lock database to found record: If activated, the record that is found during a search (see section
on Prompts) will be printed all the time. Otherwise, the printing will start from the found record.
Drag and drop
Enable drag/drop from entry list: This option must be on for the program to allow dragging from the
entry list to the object panel. If off, you can only drag field names.
SQL server settings
Save local version: When connected to an SQL server, the retrieved database will be saved
locally, in case of network problems.
Barcodes
EAN128 limits
As mentioned previously, the EAN 128 barcodes have application identifiers. These are by default
configured by OBJ INKdraw. However, you can choose if you wish to be able to re-configure the
allowed identifiers and their content.
You have two options:
•
Use the default identifiers as setup in OBJ INKdraw
•
Use the configuration file [installation directory]/init/ean128.ini
The file must be a standard text file with 4 fields per line, each line terminated by a ; and each field
separated by a ;
Fields are:
•
1 : App. identifier number (0..9999)
•
2 : Only numbers allowed ("TRUE" or "FALSE")
•
3 : max length allowed (0=(no limit)..99999)
•
4 : Check Digit ("TRUE" or "FALSE")
Example from this file:
;
; semicolons in pos. 1 starts a comment
;
0;TRUE;TRUE;17;TRUE;
1;TRUE;TRUE;13;TRUE;
HS Automatic ApS
http://www.hsautomatic.com
OBJ INKdraw User Manual
25 08 2005
Page 138
2;TRUE;TRUE;13;TRUE;
3;FALSE;TRUE;14;FALSE;
4;FALSE;TRUE;16;FALSE;
•
There is NO check of the validity of this file. OBJ INKdraw may crash if you don't
keep the correct format of the file.
•
If you choose to use this file, you are responsible for the result.
Validation
An important part of printing barcodes is the ability to validate that what you printed is actually
readable. If enabled, the controller will expect to receive the printed barcode on the serial port. If
there is no barcode read, you can choose what string the scanner sends.
Additionally you can set a signal on an output if there is a no-read, error, or either of them.
The barcode data is logged into a text file, and statistics will be added when print mode is
deactivated.
DETAILS TO BE SPECIFIED. TDJ.
Multiple messages
It is possible to open two messages in OBJ INKdraw, but if you wish to revert to only one message,
this group of options allows you to control multiple messages
One message can be opened…
Select here what should happen when you try to open the same message again.
If printing is started while another job is running…
Set here what should happen when you activate print from the window that is not printing. This
option has no effect if multiple messages is disabled.
Max number of windows
Allows you to set how many open windows OBJ INKdraw will allow. Set to 1 to disable multiple
messages. Obviously you can't set to a lower number than the current number of open windows.
Network
If you wish to use network communication, you can activate the communication here.
OBJ INKdraw will show you the machine's current IP address and name (read only, these are read
automatically on startup).
Port
The port you wish to use to connect to OBJ INKdraw. It is not important which port you use, but it
should probably be above 1000.
HS Automatic ApS
http://www.hsautomatic.com
OBJ INKdraw User Manual
25 08 2005
Page 139
Allow connections
Select both of these if you want OBJ INKdraw to accept connections on startup. Optionally you can
set a password here, to prevent unauthorized access.
Command Separators
In the communication protocol, there are two types of separator. They must be different, and you
can not use a separator in a string. By default, they are defined as "#" (end of command string) and
";" (item separator) - but should you need hash and/or semicolon in a string, feel free to redefine to
f.ex. "§" and "~".
Special functions
Use date file
Specify here a date file that contains exactly 366 lines, each with a date format for that specific day
of the year. Please see dates for an explanation.
Use day/month/year offset
Normally date offsets are specified as number of days. But if this option is on, you can specify
number of years, months and days. This is explained under dates.
Short date format
Selects the input date format for prompts
Date encryption
For each date object, you can set the names of week days and month names. Here, you can
further encrypt your date, by replacing individual digits with a different string. Notice that this setting
is global and affects all date objects.
Scan and print
TO DO. TDJ.
Printing
The printing section is where the special preferences for printing are placed. The print modes you
will find here are commonly "special" meaning that you need special instructions for these. Please
ask for more information.
2-sided print
If this is on, the controller will automatically assume that 1/2 of your heads are on the opposite side
printing the same information as the first one or two heads.
HS Automatic ApS
http://www.hsautomatic.com
OBJ INKdraw User Manual
25 08 2005
Page 140
Print buffer mode
DOCUMENT THIS. TDJ!
Directories
Normally when you ask OBJ INKdraw to load a file or an image by use of remote commands, you
need to enter the specific path and file names. But an option allows you to manually add "search
directories". It is a good idea to add your logo directory here, as it allows you to stop worrying
about the path on the creator's machine. Now you can store your graphics on one central
computer.
Select the location for inkfiles, logos and databases by clicking the "…" button.
When you add search directories, you can
change their order by using the stack
up/down buttons. Directories are searched
in the order they appear here.
System
The final option is a "system variable" that you can use to identify the production line running
OBJ INKdraw. The content you enter here is used in the "System object", please see objects
description for more.
HS Automatic ApS
http://www.hsautomatic.com
OBJ INKdraw User Manual
Section
25 08 2005
Page 141
7
sum m ary
•
OBJ INKdraw allows you to change all the menu titles, but the function of the menus
are not changed in any way. You change the menus in the language files.
•
Many things in the program can be changed in the preferences menu, available
through Ctrl+Alt+p.
•
It is possible to prevent the use of the functions and/or menus by using the lock tool.
You can put a password on the preferences menu and print function / parameter
menu..
•
If you have a problem, the log function can tell you what the last successful operation
was. HS Automatic might ask you to send you files from the “logfile” directory, as they
will help to identify your problem.
HS Automatic ApS
http://www.hsautomatic.com
OBJ INKdraw User Manual
25 08 2005
Page 142
Section 8
Support
18: If you find a bug
HS Automatic ApS
http://www.hsautomatic.com
OBJ INKdraw User Manual
25 08 2005
If you find a bug
Page 143
18
HS Automatic would like to make it easy for you to report a bug if you think you found one in our
software. To make it easy for us to identify the problem, please take a moment to fill out some
information about your setup before contacting us:
Information about your hardware
Controller
•
Controller type, Operating system
Printing equipment
•
Type and quantity of printers
•
Description of your setup at the conveyor (equipment, measures,..)
How you tried to print
Your desired settings
•
Line speed
•
Number of prints per minute
•
Distance between prints
•
Print size
•
Do you use encoder or velocity
Actual settings
•
(send us the ink file that you used)
HS Automatic ApS
http://www.hsautomatic.com
OBJ INKdraw User Manual
25 08 2005
Page 144
Your Problem
The result of the problem
•
Please provide a good description of the problem, preferably fax us copies of the result if you
can – or simply drawings that clearly illustrate the problem.
•
What happens ? Crash, or just an undesired result ?
Consistensy
•
Can you reproduce the problem many times ? For example also when creating a new file ?
•
Does the problem appear on all printers that you connect to the controller (check for relation to
hardware vs. software). ?
•
Does the problem appear on all controllers you try ? (if possible).
When you have all the information:
Please send a full bug report to
[email protected]
or to the fax number mentioned at the beginning of this manual.
Please attach in a zipped file:
•
Your .ink file
•
Your database (if you use one) – or sample data in a similar database
•
The file [installation directory] / init/Inkdraw.ini
•
The file [installation directory] /logfile/logfile.txt
•
The file [installation directory] /logfile/report.txt (generated with [file->report] )
HS Automatic ApS
http://www.hsautomatic.com
To Do
The following has not yet been updated in the CB manual:
•
Firmware settings for CB board
•
File database
•
Scan and print
•
Double speed
•
Barcode validation