1
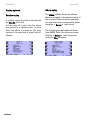
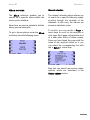
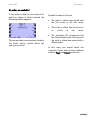
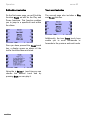
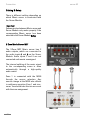
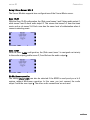
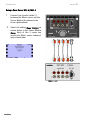
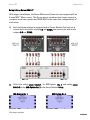
server 02 Introduction server 02 Introduction Welcome .................................................... 1 Cabling & Setup ....................................... 18 Talents ........................................................... 1 Important for Multiroom ............................. 1 Server Setup .............................................. 19 Auto Play function ..................................... 19 Starting Server .......................................... 2 Server module installation ..................... 20 Server menu............................................... 3 M217/ M218 operation ................................ 3 M217 ..........................................................3 M218 ..........................................................3 Server operation .......................................... 4 Artist selection ............................................. 5 Manual selection.....................................5 Alphabetic selection ...............................6 Replay options .............................................. 7 Random replay .........................................7 Album replay ............................................7 Album selection ........................................... 8 Manual selection.....................................8 Alphabetic selection ...............................9 Selection not available?.......................10 Genre selection .......................................... 11 Select Genre ..........................................11 Shuffle mode ..........................................12 Play mode ...............................................12 Playlist selection ........................................ 13 Select Playlist ........................................13 Replay mode ............................................... 14 Defined track selection ........................15 Track scroll selection ...........................15 Repeat .....................................................16 Shuffle .....................................................16 Cue ...........................................................17 M100 basis installation versions ............. 20 Installation steps 1/2 ................................. 21 Installation steps 3/4 ................................. 22 Turning the front glass .............................. 23 Connection server module 02 ............... 24 RS232 connection .................................24 Audio connections ................................24 Cabling & Setup ......................................... 25 2-Zone Music Server M37 ...................25 Setup 2-Zone Server M37-2 ...............26 Setup 4-Zone Server M37-4 / M57-4 ...27 Setup 8-Zone Server M57-8* ..............28 Appendix ................................................... 29 Guarantee ................................................... 29 Technical data ........................................... 29 Scope of delivery ....................................... 29 * No longer available Introduction server 02 Welcome Talents This Server Module enables you to manage your complete CD collection like the professionals in the radio studios. In a matter of seconds, you can access any album, any artist, any genre and any of your customised playlists. The Server Module is a universal audio interface with a serial Server port, which can serve up to 4 zones independently with music in Multiroom operation. The Server Module delegates your musical wishes to the Music server and keeps you constantly up-to-date both at the M100 and at each side room in Multiroom operation. manual. Using this software, it can support the M37 Music server as a 2- or 4zone version as well as its predecessor, the M57 as a 4- or 8-zone version. The Communicate module with the Server2 software is described in this Important for Multiroom You will need to make a change in the Remote menu if you are using your Music server in Multiroom operation and want to have access to the music database from each side room. You will find more information about this on page 18. 1 server 02 Operation Starting Server The Server module can be started in 3 different ways: c By touching the front panel Touch the glass front panel of the Server module, as shown in the picture on the right. If the M100 is switched off, the M100 basis now starts up and selects the source, Server. If, on the other hand, the M100 basis is already switched on, it switches over to the source, Server. d M100 basis Welcome menu The M100 basis has a proximity sensor. As soon as the M100's proximity sensor recognises that a hand or another object is approaching, it increases the background lighting and the Welcome menu appears. Now you have 5 seconds to select the source you want, in this case Server, by touching the corresponding sensor field. If no selection is made, the M100 basis returns to standby mode. e M100 basis Source menu If the M100 basis is already operating, the source Server can be called through the M100 basis Source menu To do this, press the touch key on the M100 basis. The following menu field appears: The MMM module is activated by pressing the Server touch key. 2 Operation server 02 Server menu M217/ M218 operation Once all the required settings have been made in the Server module Setup, the Server can be called in the M100 Source menu and/or through the keys that were assigned through the Remote menu. Thanks to the sophisticated Revox Multiroom concept, it is possible to operate the Music server from each side room that is connected to the Multiroom system. M217 The manual always shows the M100 display view to illustrate working with the Server module. In terms of content, this display view is identical to that of the M217 wall display. The only difference is the resolution and/or modified structure for the selection of menupoints. The most important control options available for operating the Server module through an M217/M218 display combination are shown on the righthand side. M218 Call the Music sever Main menu though the source keys on the M218 keyboard (grey keys) that you assigned in the Remote setup of the source Server. In the same way you use the M218 keyboard to control the volume [Vol ±] as well as changing track [<>], assuming that the selection menu supports these chequered keys. Further operation of the Server is done through the touch keys on the M217 display (black keys). 3 server 02 Operation Server operation Music selection The first time you use the server function, the following display appears briefly after activating the Server from the menu: The communicate module offers you 4 different search options when selecting music from the music server database. These options are: At this time, the communicate module attempts to set up a connection to the music server. This is shown through the text: Connecting... in the middle of the display. If the text does not appear after a few seconds, there can be a number of reasons: ¾ Artist ¾ Album ¾ Genre ¾ Playlist L To avoid any confusion and to help you better understand the operation of this module, it should be stated at this stage that the server module accesses and plays the CDs stored in the music server. It is not designed to be able to edit, sort or delete CDs from the music server database. All these functions are carried out directly at the music server. 1. The music server is in standby mode or is completely switched off. ⇒ Switch the server on 2. The RS232 Server cable from the Server module to the music server is interrupted somewhere. ⇒ Check the RS232 connection L The 6 large touch keys on the front of the M100 are shown as follows in the following chapters: 4 Operation server 02 Artist selection Manual selection Using the Artist menu option, you can search through the database for specific artists by name. This includes all the names of singers, bands, orchestras, ensembles, etc. Select the artist touch key from the following main menu display. With the manual selection, you can scroll through the contents to find the artist you are looking for. To do this, you can use the Page touch keys to scroll to the previous or next page. Each page indicates the start of a new letter block of artist names. Once you have found the page with the name of the required artist on it, you can select the corresponding line with the Select touch keys. The display will now show the name of the last selection that was made. With the following example, it was Marilyn Monroe as shown by the small arrow head (). Now you can select from various replay options, which are described in the Replay options section. 5 server 02 Alphabetic selection The alphabetic selection option allows you to make a targeted search, based on the artist’s name. In this case, the first letter of the name will be used from the music server list, irrespective of whether that is the first name or the last name. To start the alphabetic search, press the ABC... touch keys. Then, using the touch slider, you select the first letter. As well as showing the text Artist, the top line of the display also shows the letter currently being used for the listing. Operation Character sequence: As you slide your finger over the M100 touch slider, first you go through the alphabet with uppercase followed by lowercase letters, followed by numbers from 0 to 9 and then special characters. You can also go through this sequence in reverse. L If you can make an input through the touch slider in any of the following chapters, this is indicated by the following symbol: In the following example, the letter F has been selected. The server module now lists all the stored artists’ names, which start with the letter F. The first name in the list is shown with the (). Now, using the Select touch keys, you select the desired artist and then decide whether to opt for a random replay with the Shuffle touch keys or whether to select a specific album. Please refer to the Replay options section. 6 Operation server 02 Replay options Album replay Random replay The Album softkey shows the albums that are assigned to the selected artist. If there is more than one album available, you can select the corresponding album using the Select touch keys. A random replay function is started with the Shuffle touch key. In this case, all tracks from the album are played in a random order. If more than one album is stored for the artist selected, the selection is made from all albums. 7 The following example shows albums from ABBA. Select the album you want with the Select touch keys and press the Play touch key. server 02 Operation Album selection Manual selection The Album selection enables you to search for a specific album within the music server database. The manual selection option allows you to search for a specific album by simply scrolling through the contents of the database. In this case, the albums are shown in alphabetic order. Here there are various options to find the album you are looking for. To go to these options, press the Album touch key from the following menu: To do this, you can use the Page touch keys to scroll to the previous or next page. Each page indicates the start of a new letter block of album names. Once you have found the page with the name of the required album on it, you can select the corresponding line with the Select touch keys. Now you can select from various replay options, which are described in the Replay options section. 8 Operation server 02 Alphabetic selection The alphabetic selection option allows you to make a targeted search, based on the album’s name. In this case, the first letter of the name from the music server list will be used as the search criterion. In the following example, the letter F has been selected. The server module now lists all the stored albums, which start with the letter F. The first name in the list is shown with the (). To start the alphabetic search, press the ABC... touch key. In the following example, this was the album Face Value. As well as showing the text ALBUM, the top line of the display also shows the letter currently being used for the listing. Select the album you want with the Select touch keys (in this case Fleetwood Mac, and press the Play touch key. Please also refer to the Replay options section. 9 server 02 Operation Selection not available? If you select a letter for your search for which no album or artist is stored, the following display appears: Possible causes for this are: The artist or album was stored with the first name or the last name. The artist or album has an article or no article in the name. This means that no entries were found in the music server, which match the selection criterion. The automatic CD recognition from the Internet didn’t work correctly and the artist or album was stored with a default name. In this case, you should check the contents of your music server database with the Page and Select touch keys. 10 Operation server 02 Genre selection Select Genre As well as storing the CD in the music server database by the name of the artist and the album, it is also stored according to the type of music on the CD, the so called music genre. To select a genre, you simply scroll backwards or forwards through the genre index, where the index is listed in alphabetical order as shown below: Through this genre assignment, you now have the option to search according to a particular music type, such as Rock or Classical... Genre selection is made using the Genre touch key in the main menu. To do this, you can use the Pagetouch keys to scroll to the previous or next page. Once you have found the page with the name of the required album on it, you can select the corresponding line with the Selecttouch keys, e.g. the Folk genre as shown below: Now you can select from various replay options. 11 server 02 Operation Shuffle mode Play mode A random replay function is started with the Shuffle touch key. If you want to select a specific album from the specified genre, just press the Album touch key. In this case, all tracks all albums from the selected genre are played in a random order. Now, all albums are displayed in alphabetical order and you can select your preferred album with the Page and Select touch keys. The selected album is started with the Play touch key. You will find further information about play control, in the Playback functions section. 12 Operation server 02 Playlist selection Select Playlist The Playlist selection allows you to choose between self-created playlists. The advantage of a playlist is that you can combine music together to match a particular occasion or to create a particular mood. You can then select the one that meets your current requirements. After pressing the Playlist touch key, all user-defined playlists are displayed in alphabetical order, e.g.: A playlist contains tracks or complete albums selected by you, the user. You can also decide on the order they should be played in unlike other selections, which sort the content in alphabetical order. These playlists are created either directly at the PC or simply through the music server itself. M57 & M37 MK1 with SN<2000: Æ XIVA Producer M37 MK2 with SN>2000: Æ Web browser e.g. Microsoft Internet Explorer The playlist selection functions are accessed through the Playlist touch key in the main menu. 13 The above display shows 5 examples of playlists, entitled: Blues my favourites, Bon Jovi my favourites, Children, Party, Romantic If you have created more than 9 playlists, you can scroll forwards or backwards with the Page softkeys. Once you have found the page with the name of the required album on it, you can select the corresponding line with the Selectsoftkeys, e.g. the Party playlist as shown below: Press Play to listen to your playlist. server 02 Operation Replay mode Once you have selected an album, various playback functions are available to you, similar to those with a CD. Start playback Playback is started with the Play touch key. Pause playback When you start playback with the Start touch key, the following display appears: If you want to pause the replay for a short time, simply press the Pause touch key. To cancel the pause and restart the playback from the same position, press the Play touch key. The following information is shown in the centre of the display: Status + Playing time Artist Track 14 Operation server 02 Defined track selection Track scroll selection On the first menu page, you will find the function Track, as well as the Play and Pause functions. This function enables you to jump to a specified track within the album. The second page also includes a Play and Pause function. Once you have pressed the Track touch key, a display opens up where all the tracks from the album are listed. Using the Select touch key you can choose the desired track and by pressing Start you can play it. 15 Additionally, the two Track touch keys enable you to scroll backwards or forwards to the previous and next tracks. server 02 Operation Repeat Shuffle Press the Repeat touch key, if a selected album should be repeated permanently. This is particularly useful during a party or a function where you can play music from Playlists, for example, for hours at a stretch, without any manual intervention. You can activate the random playing order function with the Shuffle touch key. If this function is deactivated (OFF), you can’t play the tracks in a random order, irrespective of your music choice, in terms of Album, Genre, etc. You can use the Repeat touch key to toggle the Repeat function ON and OFF. You can use the Shuffle touch key to toggle the random play order function ON and OFF. 16 Operation Cue The Cue touch key offers you the chance to move to a particular timepoint within a track. When you press Cue, the playing time appears in square brackets. Now, using the touch slider, you can select the required timepoint, where the playback continues to follow the defined time. Once you have found the required position, pressing the Cue or Play touch keys returns you to normal playback mode and the square brackets disappear. 17 server 02 server 02 Configuration Cabling & Setup Setup offers you the option of configuring the Server Module individually. If you want to operate the Music Server in a Multiroom system, the correct assignment of the Server must be made in the Remote menu. The Server Setup is called by starting the Server source and then pressing and holding the touch key on the M100 basis for approximately 2 seconds. Select the settings as shown above by assigning the Server source to the Aux/Server Remote button, confirming your selection through the Store touch key. The slot specification can vary and is dependent on the position of the Server module on the module carrier. Theoretically, you could also select a different Remote button then Aux / Server. Using this setting however, you can access the Music server directly through the Server button on the M218 wall-mounted keypad. This makes the button label identical to the called source. TU NE R CD S E RV ER AU X 2 LO C AL VOL + O FF You will find further information on the topic of the Remote menu in the M100 basis Operating manual in the chapter Remote menu. 18 Configuratio on server 02 Server Setu up Auto Play function unction is called byy selecting The Setup fu the Server source s and then preessing the button on the front of the M100 A this, basis for about 2 seconds. After select the Source touch key. Throough the Auto Playy function, you cann seleect whether the S Server should startt playying immediately if it is selected from m the source menu [Auttoplay On] or onlyy oncee there has beenn an explicit startt com mmand [Autoplay Offf]. You make your selectioon through the Autoo Playy softkey. By repeated pressing of thee key,, you can toggle bettween On and Off. Zone assignment The audio outputs of the (side room) zones are assigned through the Zone assignment.. In Multiroom operration, this assignment defines whether a zone has cess to the Music server or its own acc whether several s zones haave joint access. gn which zonnes the You assig Communicatte Module should serve s with the Zone tou uch key. L d an exact descripttion of the You will find cabling and the Setup settings in chapter Appendix. 19 Activating the Auto Play function inn Multtiroom operation is particularlyy advaantageous, as you ccan start the serverr playying with a single key press on a wall-mouunted remote controol. server 02 Installation Server module installation For installation, the Server module needs a 2-way or 4-way module carrier that it is located in. This module carrier is mounted on the left, right or underneath the M100 basis. The pictures here show an M100 basis with a 2-way and a 4-way module carrier installed. The installation of the module carrier is fully explained in the M100 basis User manual. M100 basis installation versions The M100 system gives you a lot of freedom when installing your modules. The pictures below show the version options for a Server module with a 2-way module carrier. You have the same version options of course with a 4-way module carrier. Only two rules have to be followed: Rule 1 The number of modules is limited to 4, both horizontally and vertically. Rule 2 Horizontally, up to 2 module carriers can be added (left or right). Vertically on the other hand, only one module carrier can be added. A combination of vertical and horizontal module carriers is not allowed. 20 Installation server 02 Installation steps 1/2 Loosen the locking screw on the back of the module in a counter-clockwise direction in the direction of the symbol until you feel a resistance. The two locking hooks located on the underneath of the module are now brought to a position so that you can attach the module. Continue with point 2. Side view: Server module with module carrier Position the module on the module carrier making sure that the locking hooks are located over the corresponding cut-outs in the module carrier. Shortly before the plug-in card is seated flat on the module carrier, you will feel a mechanical resistance, caused by the bus board contact strip. Rear view: Server module with locking screw 21 server 02 Installation Installation steps 3/4 In the third step, the module is now locked onto the module carrier. This is done by turning the locking screw in a clockwise direction towards the symbol until a clear, mechanical resistance is felt. The module is now securely fixed to the module carrier. In the last step, the magnetic cover is installed on the module carrier. Please take note of the safety advice printed on it. Side view: Magnetic cover, before and after installation. 22 Installation server 02 Turning the front glass Depending on the installed configuration, (see picture on the right), it can be necessary to turn the front glass so that the printing is not upside down. The Server module front glass is held in place by four concealed magnets and accordingly, can be removed for this purpose. Lift the glass front off the front of the module by levering it gently at the bottom edge, using a fingernail. Turn the front glass Carefully reposition the front glass on the front of the module. 23 Important advice During the modification, two gold contact springs are exposed, which should not be touched. Otherwise, the proximity processor that carries out the touch function when the unit is in operation could be damaged. server 02 Connection Connection server module 02 RS232 connection The RS232 Server interface is connected to the Music server with a 9-pin, 1:1, Sub-D cable in all Server configurations. Audio connections The Communicate Module is designed for a 4 zone Multiroom system and has therefore, 4 independent audio inputs, one for each zone. IN 1 IN 2 IN 3 IN 4 for Zone c for Zone d for Zone e for Zone f In Multiroom operation, all 4 audio inputs have to be connected to the Music server with the M37 4 and/or M57 4-zone music servers. With the M37 2-zone version, the first two audio inputs IN 1 and IN 2 have to be connected. You will find information about the corresponding cabling in the next chapter. 24 Connection Cabling & Setup There is different cabling depending on which Music server is connected with the Server Module. Important Communication between Music server and Server Module only works properly if the corresponding Music server has been selected in the Server Module Setup. 2-Zone Music Server M37 The 2-Zone M37 Music server has 2 audio outputs, which are connected to the audio inputs 1 and 2 on the Server Module. Audio inputs 3 and 4 are not connected and remain unassigned. The internal splitting of the music signal to the corresponding zones is done automatically through a high-quality audio matrix. Zone 1 is connected with the M100 through the source selection. Any source change at the M100 also affects in multiroom operation Zone 1 and viceversa. You should take this into acccount with the zone assignment. 25 server 02 server 02 Connection Setup 2-Zone Server M37-2 The Server Module supports two configurations of the 2-zone Music server. Zone 12+34 With the Zone 12+34 configuration, the (Side room) zones 1 and 2 share audio output 1, while zones 3 and 4 share audio output 2. This means that zones 1+2 hear the same music and so do zones 3+4. Each zone has the same level of authorisation when it comes to selecting music. Zone 1+234 With the Zone 1+234 configuration, the (Side room) zone 1 is assigned exclusively to the audio output 1, while zones 2, 3 and 4 share the audio output 2. No Multiroom operation The setting Zone 1+234 can also be selected if the M100 is used purely as a hi-fi system, without Multiroom operation. In this case, you just connect the audio output 1 with the zone input 1. The other audio connections are not used 26 Connection Setup 4-Zone Server M37-4 / M57-4 1. Connect the 4 audio cables 1:1 between the Music server and the Server Module like shown in the firure righthandside. 2. Select the setting Zone 1+2+3+4 as shown below in the Server Module Setup. Each of the 4 zones can access the Music server independently of each other. 27 server 02 server 02 Connection Setup 8-Zone Server M57-8* With bigger installations, the Revox Multiroom System can be equipped with an 8-zone M57* Music server. This 8-zone server combines two 4-zone servers in one device and can operate two M100/ M10 at the same time, independently of each other. 1. Each multiroom system is equipped with a Server Module.The first one is connected to the audio outputs 1-4 and COM1, the second one with audio outputs 5-8 and COM2. 2. Select the setting Zone 1+2+3+4 for MR-System No. 1 and setting Zone 5+6+7+8 for the MR-System No. 2 in the Server Module Setup. MR-System No. 1 MR-System No. 2 * No longer available 28 Appendix server 02 Appendix Guarantee Scope of delivery The guarantee period is 24 months from the date of purchase. M100 server 02 Sub-D9 cable Your dealer should be your first contact if you need service. If he can't give you the help you need, send the Server module carriage free and without any accessories to your national Sales Office. Please supply a complete description of the problem and a full return postal address. Technical data Audio connections : Zone 1 / Main room Zone 2 Zone 3 Zone 4 Max. cable length IN1 IN2 IN3 IN4 10 m Cinch Stereo input Cinch Stereo input Cinch Stereo input Cinch Stereo input (dependant on cable quality and environment) Digital data connections RS 232 SUB-D 9-pin, 1:1 cable Max. cable length 10 m 29 server 02 Anhang User manual M100 server module 02 / Part no.: 10.30.3251 30