1
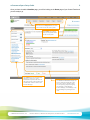
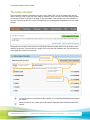
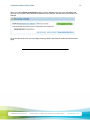
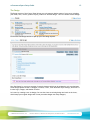
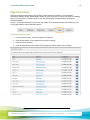
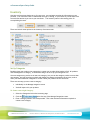
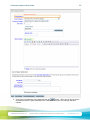
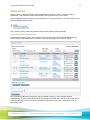
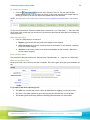
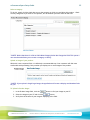
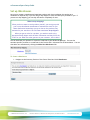
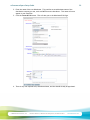
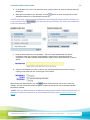
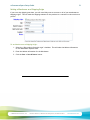
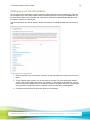
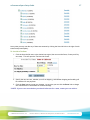
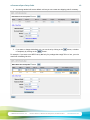
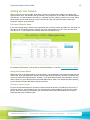
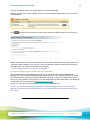
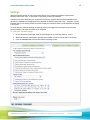
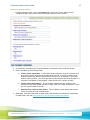
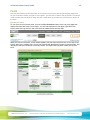
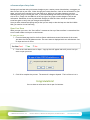
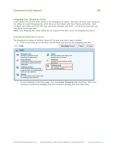
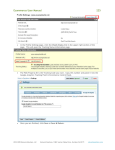
`
nsCommerce Space Setup Guide
10/27/09
nsCommerceSpace Setup Guide
2
(This page intentionally left blank)
© 2009 Network Solutions, LLC
Network Solutions, 13861 Sunrise Valley Drive, Herndon VA 20171
networksolutions.com
nsCommerceSpace Setup Guide
3
Table of Contents
INTRODUCTION ............................................................................................................................................................ 5
GETTING STARTED ...................................................................................................................................................... 6
THE SETUP CHECKLIST .............................................................................................................................................. 9
DESIGN AND LAYOUT................................................................................................................................................ 11
Your Site Design................................................................................................................................................. 11
THE DESIGN ................................................................................................................................................................ 12
CREATE A NEW SITE DESIGN & PICK A TEMPLATE........................................................................................................... 13
COLUMNS .................................................................................................................................................................... 14
To add a module to your storefront: ............................................................................................................. 16
UPLOAD A LOGO .......................................................................................................................................................... 17
Other Options Available in Design & Layout ................................................................................................ 17
PAGE INFORMATION ................................................................................................................................................. 18
To Edit the Page Information:......................................................................................................................... 18
INVENTORY................................................................................................................................................................. 19
SET UP CATEGORIES .................................................................................................................................................... 19
To Create a new single Category: .................................................................................................................. 19
Creating Category Depth.................................................................................................................................. 21
Deleting Categories........................................................................................................................................... 21
For Bulk import of categories follow these steps: ...................................................................................... 22
ADD PRODUCTS ......................................................................................................................................................... 23
Create a New Product (one at a time)........................................................................................................... 23
To create a new product .................................................................................................................................. 24
Select a Product Type ....................................................................................................................................... 24
Enter a Product Name....................................................................................................................................... 24
Select a category ............................................................................................................................................... 25
Upload an image of your product................................................................................................................... 25
To Upload a Product Image: ............................................................................................................................ 25
Add Short and Full Descriptions...................................................................................................................... 26
Create products in bulk (Premium Only) ...................................................................................................... 27
SET UP WAREHOUSES............................................................................................................................................... 28
To Create a Warehouse:................................................................................................................................... 28
SETTING A WAREHOUSE AS A SHIPPING ORIGIN .............................................................................................................. 31
To set Warehouse as a Shipping Origin: ........................................................................................................ 31
OPERATIONS............................................................................................................................................................... 32
ADDING PAYMENT INFORMATION ................................................................................................................................... 33
Credit Card Payments ....................................................................................................................................... 33
To select a Payment Gateway: ........................................................................................................................ 34
Alternative Payments......................................................................................................................................... 34
SETTING UP YOUR TAX INFORMATION ................................................................................................................. 36
To set up your tax information: ..................................................................................................................... 36
To Override a Tax Rate: ................................................................................................................................... 37
CHOOSE SHIPPING OPTIONS.................................................................................................................................... 38
To Setup your Shipping: ................................................................................................................................... 39
CREATING RULES (OPTIONS) FOR YOUR SHIPPING METHOD(S)........................................................................................... 39
© 2009 Network Solutions, LLC
Network Solutions, 13861 Sunrise Valley Drive, Herndon VA 20171
networksolutions.com
nsCommerceSpace Setup Guide
4
To Edit an existing Shipping method:............................................................................................................ 39
To Add a New Shipping Method:..................................................................................................................... 41
SETTING UP YOUR DOMAIN..................................................................................................................................... 42
PURCHASE A DOMAIN NAME .......................................................................................................................................... 42
ASSIGN THE DOMAIN NAME ........................................................................................................................................... 42
Purchase an Additional Secure Socket Layer (SSL) Certificate................................................................. 44
SETTINGS .................................................................................................................................................................... 45
To verify your checkout settings:................................................................................................................... 45
To change selections:........................................................................................................................................ 46
Check your General settings: .......................................................................................................................... 47
Conduct a test run on your checkout process .............................................................................................. 48
FINISH .......................................................................................................................................................................... 49
Preview your store ............................................................................................................................................ 49
OPEN YOUR STORE ...................................................................................................................................................... 50
To open your store:........................................................................................................................................... 50
CONGRATULATIONS! ................................................................................................................................................ 50
ADDITIONAL INFORMATION..................................................................................................................................... 51
© 2009 Network Solutions, LLC
Network Solutions, 13861 Sunrise Valley Drive, Herndon VA 20171
networksolutions.com
nsCommerceSpace Setup Guide
5
Introduction
You have made the decision to take your business online. Thank you for choosing Network Solutions for
your E-commerce Web site. Now you need to set up your storefront. To make the set up process more
efficient, we recommend you do the following before building your online store:
•
•
•
•
•
Take pictures of each of your products
Write names and simple descriptions for each of your products
Determine the prices you will charge
Decide on your shipping carrier (USPS, UPS, FedEx)
Get a merchant account, with an online payment gateway, to accept credit cards
This Setup Guide walks you through the basic setup checklist tasks on the nsCommerceSpace Control
Panel that you need, at a minimum, to make your store operational. It will help you understand how to
setup minimum required information in your store from design, to adding products, and taking payments
from your customers.
© 2009 Network Solutions, LLC
Network Solutions, 13861 Sunrise Valley Drive, Herndon VA 20171
networksolutions.com
nsCommerceSpace Setup Guide
6
Getting Started
To begin setting up your e-commerce site, you will need to log in to your Control Panel. You can access
this from your Network Solutions Account Manager.
Log in to Account Manager at: http://www.networksolutions.com. If you've forgotten your log-in
information, please visit: https://www.networksolutions.com/manageit/forget-login.jsp.
Click on the nsCommerceSpace(Ecommerce) link in the left navigation panel.
This will open the Ecommerce Details Section.
1. If you have more than one E-Commerce package in your account,
please click on a package name to view the details.
2. Click Go under Launch E-commerce Control Panel
© 2009 Network Solutions, LLC
Network Solutions, 13861 Sunrise Valley Drive, Herndon VA 20171
networksolutions.com
nsCommerceSpace Setup Guide
7
**NOTE: The Go button is present only if you are a primary owner or have been assigned permission by
the primary owner. If you do not see the Go button, contact the primary owner, who can add you as an
Admin contact or a Technical contact in the Account Administrator page under Profiles & Accounts.
When this process is complete, you will be looking at the initial Headline page.
The first time you log into your control panel, the Headline page appears with a Welcome message for
you. This message tells you about the Setup Checklist, which can help guide you through your basic
setup, and also explains how to find other helpful resources when you run into problems, including our
toll-free support line, available 24 hours a day, 7 days a week.
There are two links at the top of this screen. You can make this page go away after reviewing it by
clicking Dismiss page, or save it and come back to it later by clicking Skip and review later. If you
choose to skip the page, it will re-appear the next time you log into your control panel and will continue
to appear until you dismiss it.
© 2009 Network Solutions, LLC
Network Solutions, 13861 Sunrise Valley Drive, Herndon VA 20171
networksolutions.com
nsCommerceSpace Setup Guide
8
Once you have closed the Headline page, you will be looking at the Home page of your Control Panel and
you are ready to go.
Each tab in the Navigation bar will take
you to that area of the control panel
The Taskbar can quickly
take you to popular areas
of the control panel
The Sidebar lets you perform quick
searches on your site, create
bookmarks to specific task areas in
the control panel, and contains links
to additional resources such as the
Account Manager.
© 2009 Network Solutions, LLC
The Storefront Overview displays all
activity that has transpired in your
store for a specific period of time.
You can quickly jump the shopping
cart manager, Order Manager,
Product Manager, Feed Manager, and
Search Manager by clinking on the
links.
Network Solutions, 13861 Sunrise Valley Drive, Herndon VA 20171
networksolutions.com
nsCommerceSpace Setup Guide
9
The Setup Checklist
The Store Setup Checklist is available from your Control Panel. This is a list of features that you will
need to set up in order to get your store ready for business. There is a link to the Store Setup Checklist
on the Control Panel at the top of the page, in the new taskbar, that will take you to the checklist at
any time. You can use this list to check off features as you go through and complete them in your setup
process.
This guide covers several of the points from the Setup Checklist in more detail. You can return to this
checklist at any time. To access the list, simply click on the View Full Checklist link. This will take you
to the page that contains the checklist.
Print a copy of the
checklist from here
Click here to expand or
collapse a section
Click here display
checklist information on
your Home page
See how many items you’ve
checked off as completed
To view the items in each section of the checklist, click on the Expand/Collapse arrow next to
the section.
When you click on one of these arrows the section expands to show all the items within the
section.
© 2009 Network Solutions, LLC
Network Solutions, 13861 Sunrise Valley Drive, Herndon VA 20171
networksolutions.com
nsCommerceSpace Setup Guide
10
When you click the Show on Homepage button, a section appears at the top of your Homepage that
gives you an overview of what has been completed on your checklist. See the screen shot below for an
example.
To remove this section from your Homepage, simply go back to the Setup Checklist and click the button
again.
© 2009 Network Solutions, LLC
Network Solutions, 13861 Sunrise Valley Drive, Herndon VA 20171
networksolutions.com
nsCommerceSpace Setup Guide
11
Design and Layout
This section is where you will set up the overall look and feel of your store. A visually attractive design
is very important to any website, but especially to the e-commerce site, since you are hoping that it will
generate money for you. This section includes Site design and general page layout information.
Generally speaking, you have three (3) options regarding the design of your storefront:
•
Choose one of our professionally designed templates and tweak it to suit your needs
•
Create your own design. Use your own application, such as Dreamweaver or FrontPage.
•
Hire a professional team, such as our Do It For Me (DIFM) E-commerce Design group, to create
the perfect storefront for you.
The Quick Start Setup guide assumes you will be starting from scratch and selecting one of our predesigned templates.
Your Site Design
To access the Design pages in the Control Panel, click on the Site Design link in the Checklist screen.
Note: You can also click the Design tab at the top of the home page, as seen below, then select
Site Design from the list displayed.
There are six design areas available that you can use to edit your template, plus a Preview link to see
what your store looks like while you are still offline. You can switch back and forth between these two
views as often as you need. You can also click on the View Storefront button (to the right of the tabs at
the top of the screen) at any time to view your store as a whole.
**NOTE: When you select one of the View storefront options, your preview page will open in a
separate screen. Simply close the screen when you are finished to return to your Control Panel.
© 2009 Network Solutions, LLC
Network Solutions, 13861 Sunrise Valley Drive, Herndon VA 20171
networksolutions.com
nsCommerceSpace Setup Guide
12
The Design
The Design section of the Control Panel allows you to change any design aspect of your store, including
your email, form, invoice, product layout, product list and site design. Let’s first tackle the Site Design.
Click on the Site Design section to open up your Site Design Options.
Your Site Design for your store consists of several elements which can be adjusted to suit your business.
These design options include a Template, Columns, Colors, Fonts & General Style Settings, Storefront &
Invoice Logos, Images, and Header & Footer.
Let’s start by creating a new sit design (You can also clone an existing design and work on the clone,
which keeps your original design safe in case you make changes too many changes.)
© 2009 Network Solutions, LLC
Network Solutions, 13861 Sunrise Valley Drive, Herndon VA 20171
networksolutions.com
nsCommerceSpace Setup Guide
13
Create A New Site Design & pick a Template
If you do not already have a template for your
store, you can pick from the pre-defined
templates available for use. First though, you
need to create a name for your new site
design.
1. Scroll to the bottom of the page and
click in the Name field to enter a new
design name.
2. Click the Add New Design button. The
new design name appears in your list
with a link to each of the six areas in
which you can edit your site.
3. Click the Template link. You will
need to start by selecting a template,
unless you plan to create your own. A
template determines the look and feel
of your storefront, but you can modify
any of these layouts to suit your
individual needs.
4. Select a template from a variety of
choices on the Storefront Theme
Templates screen.
You can click the view link to see a larger
version of the thumbnail.
5. Click the select link to choose a
template.
© 2009 Network Solutions, LLC
Network Solutions, 13861 Sunrise Valley Drive, Herndon VA 20171
networksolutions.com
nsCommerceSpace Setup Guide
14
Columns
Your site design consists of three columns, a header and a footer. While the middle column generally
contains most of your store’s content, you can add Modules to the left and right column to enhance your
customer’s shopping experience.
What is a module?
A module is a piece of information that you can include on your storefront. The following table gives you
a little more detail on these modules and how they can help your customers find what they need on
your storefront:
Browse by Category – lists all categories and allow your customer
to click on a category and see what is included in that category.
Browse by Price – allows customer to select a price link (a range
of prices, such as $0.00 to $25.00) and see the products that fall
within that price range. You control the price ranges and can
change them as needed.
Browse Manufacturers – displays your manufacturers and allows
the customer to select a manufacturer, and view all products on
your storefront by that manufacturer.
Custom HTML – allows you to display a special message to your
customer in the column, using the custom HTML feature.
You control the message and can change it at any time.
Featured Products – displays the list of featured products that you
have set up.
You control the products that display and can change to suit your
needs.
Links – allows to you provide the customer with links to other Web
pages or sites that you have added.
For example, link to your manufacturer’s Web site for additional
information on a product.
© 2009 Network Solutions, LLC
Network Solutions, 13861 Sunrise Valley Drive, Herndon VA 20171
networksolutions.com
nsCommerceSpace Setup Guide
15
Login – provides the login fields on the storefront.
Your customer may log in or create an account immediately, if
they choose.
Search Shopping Lists – when added, allows a customer to search
for shopping lists that have been marked “public”, such as a
wedding gift list or a Christmas wish list.
Search Site – when added, allows customer to search the entire
site for a term they have entered into the Search field.
Shopping Cart – when added, displays brief information on the
shopping cart, such as items placed into the cart and current
subtotal.
© 2009 Network Solutions, LLC
Network Solutions, 13861 Sunrise Valley Drive, Herndon VA 20171
networksolutions.com
nsCommerceSpace Setup Guide
16
To add a module to your storefront:
1. Click in the checkbox to choose a module.
or
to move the module to the left or right column. Modules will appear in columns
2. Click
on your storefront in the order they are placed here.
3. To change the order of modules within a column, simply click and drag them up or down until
you are satisfied with the order.
When you are finished, scroll to the bottom of the page and click the Return button. This action saves
your changes and returns you to the list of Design options. To see how your choices appear in the
columns on your storefront, click the View Storefront button in the upper right corner of the screen.
Your choices will display as you selected in the right or left column of your storefront.
© 2009 Network Solutions, LLC
Network Solutions, 13861 Sunrise Valley Drive, Herndon VA 20171
networksolutions.com
nsCommerceSpace Setup Guide
17
Upload a Logo
When you select the Storefront/Invoice Logos link, you can upload your logo design or create a simple
one using our Logo Generator. This generator will take your name/slogan and generate a logo that fits
with the template you have selected.
1. Click the Browse button.
2. A Windows file menu will open; select the logo image file from your computer.
3. Click the Open button.
4. The path to your file will appear in the "Upload an image" box.
5. Click the Upload button.
6. Your logo will now display in the "Storefront Logo Preview" screen.
Other Options Available in Design & Layout
Other features you can change under the Design & Layout tab are:
•
Colors, Fonts, and Style Settings – change border and background colors, font styles and sizes,
column widths, etc.
•
Images – upload your own button images to use in place of the template buttons
•
Header & Footer – Manage your header and/or footer information, for a more complete
customization using your own HTML code.
© 2009 Network Solutions, LLC
Network Solutions, 13861 Sunrise Valley Drive, Herndon VA 20171
networksolutions.com
nsCommerceSpace Setup Guide
18
Page Information
Now that you have a basic design you will need to have some basic content for your customers’
information. Review the pre-worded pages created for your store such as Contact Us, About Us, Shipping
Policy, and much more. To make it easy for you, we have already included default text based on
industry standards.
You can, of course customize this text to suit your needs. Pro E-commerce allows you to edit any or all
of the pages listed in the Pre-defined Page list.
To Edit the Page Information:
1. From the Control Panel, select the Pages tab at the top.
2. Click the Edit button for any pages that you wish to change.
3. Edit content as necessary.
4. Click the Save button at the bottom of each page you edit to preserve your changes.
© 2009 Network Solutions, LLC
Network Solutions, 13861 Sunrise Valley Drive, Herndon VA 20171
networksolutions.com
nsCommerceSpace Setup Guide
19
Inventory
Now that you have some basics set up for your store, you can begin entering the information on your
products. Your customers want to understand what you’re selling, so you’ll want to provide them with
as much information as you can on your storefront. The Inventory menu is the starting point for
accomplishing this task.
There are several menu options in the Inventory Overview screen.
Set Up Categories
Breaking down your products into categories is a great way to make things easier to find. All products
must be assigned to a category, so the easiest thing to do is set up your categories first.
You must assign every product to at least one category, but you can also assign a product to more than
one category, and you can always go back and change the category assignments at any time, such as
when you create additional categories to further refine your products on the storefront.
There are two ways you can create a category:
•
Individually in the Manage categories screen
•
Via bulk import with your products
To Create a new single Category:
1. Select the Categories link on the Inventory page.
2. Click the
link at the top of the Manage Categories screen.
3. Enter a Category Name in the field provided. This is the minimum information required to
create a new category.
© 2009 Network Solutions, LLC
Network Solutions, 13861 Sunrise Valley Drive, Herndon VA 20171
networksolutions.com
nsCommerceSpace Setup Guide
20
4. Scroll down to the bottom of the page and click the
button. When you do this the screen
refreshes and shows a green checkmark with a statement that your new category has been
created.
© 2009 Network Solutions, LLC
Network Solutions, 13861 Sunrise Valley Drive, Herndon VA 20171
networksolutions.com
nsCommerceSpace Setup Guide
21
5. Click the Categories link in the path at the top of the screen to return to the Manage Categories
main screen.
The screen will refresh and your new category will be displayed in the Category list.
You can repeat this for as many categories as you want or need. For example, if you have jewelry and
you sell necklaces, bracelets, and earrings, you might want to set up a category for each of these.
Maybe you’d rather break it down by Gold jewelry and Silver jewelry. Perhaps you want to categorize
Women’s jewelry and Men’s jewelry. What you do with categories is entirely up to you.
Creating Category Depth
Categories can have sub-categories associated with them which can, in turn, have more associated subcategories. In all, you can create up to a 5-level category depth.
For Example:
You could Create a category depth as follows:
Clothing > Accessories > Jewelry > Men’s Jewelry > Watches
Where each item is a category.
To create a sub-category, simply designate the parent category in the Edit Category page.
Deleting Categories
To delete a category you are not using, simply click on the category name in the Manage Categories
screen to open the Edit page for that category, then scroll to the bottom and click the Delete button in
the screen. If there are products in a category you wish to delete, move or delete the products first
before deleting the category.
**NOTE: To see how your categories are displaying in your storefront, click the View Storefront
button at the top right of the screen at any time.
For more information on other fields you can use to create categories, see the nsCommerceSpace Help
Manual.
© 2009 Network Solutions, LLC
Network Solutions, 13861 Sunrise Valley Drive, Herndon VA 20171
networksolutions.com
nsCommerceSpace Setup Guide
22
You can also upload categories via a spreadsheet (Premium users only), which will not be discussed in
detail in this document. For additional detailed information on how bulk upload works, see the
nsCommerceSpace Help Manual.
For Bulk import of categories follow these steps:
1. Click on the Import/Export utility link in the taskbar the top of the screen.
2. In your import CSV file, add a category name in the Category field of the spreadsheet for each
product you wish to include in this category.
3. Repeat for each new category you wish to import with your new products.
4. Follow the steps in the screen to import your file.
© 2009 Network Solutions, LLC
Network Solutions, 13861 Sunrise Valley Drive, Herndon VA 20171
networksolutions.com
nsCommerceSpace Setup Guide
23
Add Products
You will want to make sure that all information about each product is clear, concise, and easy to
understand. Your customers need to know exactly what you are trying to sell to them.
From the Manage Products screen you have the ability to create new products. Click the Products link to
open the Manage Products screen.
This is where you will create your products when you are entering them individually.
Create a New Product (one at a time)
On the Manage Products screen, once you get a set of products entered, they will be displayed here,
similar to the screen example below. However, when you first begin, this list will be empty.
As you add new products and save them, they will appear in this list, which displays products
alphabetically. You can change the sort order by clicking on the drop-down button in one of the Sort by
fields and selecting a new sort order. For example, could choose to sort your list based on Price, in
Descending order.
© 2009 Network Solutions, LLC
Network Solutions, 13861 Sunrise Valley Drive, Herndon VA 20171
networksolutions.com
nsCommerceSpace Setup Guide
24
To create a new product:
•
Click the
link at the top or bottom of the list. This will open the Edit
Product Details screen. You will notice at the top of the screen that there are several tabs for
setting up products. We will only discuss the General tab in this document.
NOTE: The other tabs in this screen are not active until you complete the required fields in the General
tab.
Fill out the required fields. These are marked with a red asterisk ( ex. Field Name: * ). There are many
other fields in the screen that you can also use, but these are the minimum fields that are necessary to
create a product.
Select a Product Type
•
Click on a radio button to choose one:
1. Regular: physical item that will need to be shipped to the customer
2. eGift Certificate: an electronic certificate that will be emailed to the customer, therefore
it will not require shipping.
3. eProduct: an electronic product that will be downloadable by the customer, therefore it
will not require shipping.
Enter a Product Name
This should be a descriptive name like “Sterling Silver Charm Bracelet” or “Large (14 oz) Coffee Mug”
Enter the Customer’s Price
Of the price fields, this is the only one that is required. This is the regular price that your customers will
pay.
If you want to add other (optional) prices:
•
The MSRP field contains the price at which the manufacturer suggests you sell the product
•
The Store’s Cost field contains the price that you paid the manufacturer for the product.
•
The Handling field contains any additional handling fees associated with this product.
© 2009 Network Solutions, LLC
Network Solutions, 13861 Sunrise Valley Drive, Herndon VA 20171
networksolutions.com
nsCommerceSpace Setup Guide
25
Select a category
To do this, simply click the check box next to the category to which you are linking this product. Check
as many categories as you want for this product, but at minimum you must check at least one.
**NOTE: Notice that there is a link to Add a New Category below the Categories field. This opens a
new section and allows you to create a category on the fly.
Upload an image of your product.
While this is not a required field, it is definitely a recommended step. Your customers will feel more
comfortable with purchasing from you when you display one or more images of the product.
**NOTE: If you upload a single large image, the application will create a display and thumbnail size
for you.
To Upload a Product Image:
1. In the Product Image field, click the
2. Select the image on your PC and click the
button to find your image on your PC.
button.
3. Verify that the location of your image is displaying in the field.
© 2009 Network Solutions, LLC
Network Solutions, 13861 Sunrise Valley Drive, Herndon VA 20171
networksolutions.com
nsCommerceSpace Setup Guide
26
Add Short and Full Descriptions
Again, these are not technically required fields; nonetheless, they are quite important for your sales.
When writing up a description, give your customers benefits to which they can relate. Your description
should work together with your high-quality image to draw attention to a product so that your
customers will want to buy it.
The Short Description
This description is limited to 255 characters (no HTML) and should be an attention-grabbing title. For
example, if you are selling headphones, don’t just say “In-ear headphones”. Say “Comfortable and
colorful in-ear headphones”.
This description will appear below the product thumbnail image on the storefront in the product list
page.
The Full Description
This description should give additional details about the product. It appears on the product details page
below the display image when the customer clicks on a More Info ( or similar) button.
**NOTE: You can use HTML in the Full Description field by clicking the View HTML button.
Click the
button to retain all your data.
**NOTE: To see how your products are displaying in your storefront, click the View Storefront
button at the top right of the screen at any time and navigate to your product pages.
© 2009 Network Solutions, LLC
Network Solutions, 13861 Sunrise Valley Drive, Herndon VA 20171
networksolutions.com
nsCommerceSpace Setup Guide
27
Create products in bulk (Premium Only)
There is also an option to upload your products via a spreadsheet, which will not be discussed in this
document. For detailed information on bulk upload of products, see the Import/Export section of the
nsCommerceSpace User Manual.
To Bulk import products using the Import/Export fuction:
1. Click the Import/Export utility link in the taskbar at the top of the screen.
2. In your import CSV file, add a category name in the Product name field of the spreadsheet for
each product you wish to add.
3. Repeat for each new product you wish to import.
4. Follow the steps to import your file.
© 2009 Network Solutions, LLC
Network Solutions, 13861 Sunrise Valley Drive, Herndon VA 20171
networksolutions.com
nsCommerceSpace Setup Guide
28
Set up Warehouses
Any one can create a warehouse and associate products with that warehouse, but setting up a
warehouse is required only if you are using a drop-shipper to store and send your products for you. If
you are not drop-shipping, you can skip this section completely for now.
What is drop-shipping?
When you do not want to stock products yourself, you can sign up with
one or more distribution warehouses to maintain the stock for you.
These distribution houses keep you up to date on the products they
maintain for your storefront. We call these warehouses drop-shippers.
When you get an order for a product, you send an email to the
appropriate drop-shipper with the order information and they fulfill the
order for you. When the order goes out to your customer, this is called
You can associate your products to a specific warehouse in the Warehouse Manager. You can also
associate specific products to a warehouse in the Product Edit > Advanced Tab as shown below. You can
also add a new warehouse by clicking the Add a New Warehouse link.
To Create a Warehouse:
1. Navigate to the Inventory Section of the Control Panel and click Warehouses.
© 2009 Network Solutions, LLC
Network Solutions, 13861 Sunrise Valley Drive, Herndon VA 20171
networksolutions.com
nsCommerceSpace Setup Guide
29
2. Enter the name of the new Warehouse. This could be an actual business name of the
distribution company you use, such as ACME Electronics distributor. This name will never
appear in your storefront.
3. Click the Create & Edit button. This will take you to the Warehouse Edit Page.
4. There is only one required field, Warehouse Name, and that should already be populated.
© 2009 Network Solutions, LLC
Network Solutions, 13861 Sunrise Valley Drive, Herndon VA 20171
networksolutions.com
nsCommerceSpace Setup Guide
30
5. In the Products list, click in the check box next to each product you want to associate with this
warehouse.
6. When you have made all your selections click the
Available Products list to the Selected Products list.
button to move the selection from the
**NOTE: If you move a product from the Available list to the Selected list, simply click the check box next
to the product and click
. This removes it from your Selected list, back to the Available list;
it does NOT delete the product.
7. Enter an email address for the warehouse. This is the email address that will receive
notification when your customer has purchased a product that is associated with this
warehouse. If you have multiple email addresses, separate them with semicolons (;) and no
spaces.
8. Select the information you want to send in your warehouse notification emails. Do this by
clicking in the check box next to each type of information.
When you have all data entered, click the
button at the bottom of the screen to save your
changes. This will refresh the screen and display a notice at the top that your warehouse has been
successfully updated.
**NOTE: There are additional fields in the Warehouse editing page that have not been discussed here. For
information on fields not mentioned here, see the Warehouse section of the nsCommerceSpace User
Manual.
© 2009 Network Solutions, LLC
Network Solutions, 13861 Sunrise Valley Drive, Herndon VA 20171
networksolutions.com
nsCommerceSpace Setup Guide
31
Setting a Warehouse as a Shipping Origin
If you are a drop-shipping merchant, you will most likely want to set some or all of your warehouses as
shipping origins. This will make the shipping estimate for the products in a customer’s order much more
precise.
To set Warehouse as a Shipping Origin:
1. Select the “Ship products from this origin” checkbox. This will make the Address information
for the Warehouse required fields.
2. Enter the Address information for the Warehouse.
3. Click the Save or Save & Return button.
© 2009 Network Solutions, LLC
Network Solutions, 13861 Sunrise Valley Drive, Herndon VA 20171
networksolutions.com
nsCommerceSpace Setup Guide
32
Operations
The Operations area of your e-commerce Control Panel contains all of the administrative functions for
your storefront. This is the area you will use to make your storefront functional, like setting up your
payment gateway so you can accept online credit card payments, selecting the region(s) where you will
need to collect sales taxes, and choosing the shipping options you want to offer your customers.
There are several different options in the Operations section of the Control Panel. In this guide we will
focus on Adding Payment Information, Setting up Taxes, Setting up Shipping, Domain Registration, and
Settings.
© 2009 Network Solutions, LLC
Network Solutions, 13861 Sunrise Valley Drive, Herndon VA 20171
networksolutions.com
nsCommerceSpace Setup Guide
33
Adding Payment Information
When it comes to determining how you accept payment, you have two basic options: online (real-time)
processing or offline processing. To accept payments for online processing you have two additional
options: credit card payments, and alternative payments. At a minimum you will need to choose one
payment method that you will accept.
Click on the Payments link to set up your payment information.
Credit Card Payments
You can accept payment from as many or as few credit cards as you choose. To accept credit cards
payments, you need to first get a merchant account, such as Network Solutions Merchant Account
and a compatible payment gateway. You can also sign up with an external merchant service, such as
QuickBooks Merchant Services or US Bankcard Services. You can refer to your welcome letter for
additional information on getting a merchant account.
So what is the difference between a Merchant account
and a Payment gateway?
Merchant account:
A specialized account issued by a bank that allows a business to accept credit
cards, such as Visa and MasterCard, debit cards, gift cards, and other types of
payment cards. It connects your bank account to the credit card issuer and the
payment gateway. Merchant accounts are generally affiliated with one or more
payment gateways if they do not provide one themselves.
Payment gateway:
An e-commerce service that allows you to process real-time credit card payments.
It is the online equivalent of a physical POS terminal (computerized cash register),
usually located in retail establishments. Information is instantly verified in most
cases, and the card can be charged at the time the customer places the order.
© 2009 Network Solutions, LLC
Network Solutions, 13861 Sunrise Valley Drive, Herndon VA 20171
networksolutions.com
nsCommerceSpace Setup Guide
34
To see a list of supported payment gateways go to the Payments screen on the Operations tab and click
the drop-down button in the field under Credit Card Payments. Once you have signed up for a merchant
account, you can set it up in the Payments screen. More information about specific payment gateways
is located in the nsCommerceSpace User Manual.
To select a Payment Gateway:
1. Click the drop-down button.
2. Choose a payment gateway to use.
3. Click the Add button.
4. Enter the information in the Edit Payment Method screen for your gateway. (Information needed
in this screen may vary, based on the type of payment gateway you are setting up.)
5. Choose the credit cards that you will accept.
6. Click the
button.
Alternative Payments
You can accept payment through third-party organizations, as well as offline methods of payment. We
support these alternative forms of payment:
•
PayPal Express
•
Google Checkout
•
Check
•
Money Order
•
Customer Account
•
Cash On Delivery (COD)
•
In Store
This will allow your customers who do not wish to use a credit card the option to pay in real time.
Customers learn to appreciate the convenience of not having to enter credit card or bank information
every time; they simply enter their PayPal or Google Checkout information.
© 2009 Network Solutions, LLC
Network Solutions, 13861 Sunrise Valley Drive, Herndon VA 20171
networksolutions.com
nsCommerceSpace Setup Guide
35
To accept Alternative payment, simply click the checkbox next to your selection(s).
As you add payment types and enter information into the Payment Method screen, they will display in
the list of methods that you have selected.
to keep your changes or
to go
When you are finished in the Payments screen, click
back to the Operations screen without saving changes. You will find these buttons at the bottom of the
page.
For more information about Payment Gateways, view the Payments section of the nsCommerceSpace
User Manual.
© 2009 Network Solutions, LLC
Network Solutions, 13861 Sunrise Valley Drive, Herndon VA 20171
networksolutions.com
nsCommerceSpace Setup Guide
36
Setting up your Tax Information
You will need to select the states in which you must collect sales tax when you make a sale. Typically,
tax is charged only in the state(s) where you have a physical presence, such as your headquarters or a
brick and mortar store. Once you make your selection(s), taxes will be calculated automatically in real
time when a customer is checking out.
You can also set new tax rates for states, counties, and cities by overriding the default tax rate with your
own.
To set up your tax information:
1. Click the checkbox next to the states, counties, and/or municipalities in which you will collect
taxes.
2. To see counties within a state, click on the name of the state. To see municipalities within a
county, click on the name of the county. For example, if you charge tax in California, you can
click on California to expand the list of counties, as seen in the partial list below. You may find
that you have to charge more tax for purchases in some counties and/or municipalities
3. Click Return at the bottom of the screen when you are finished.
© 2009 Network Solutions, LLC
Network Solutions, 13861 Sunrise Valley Drive, Herndon VA 20171
networksolutions.com
nsCommerceSpace Setup Guide
37
At any time you may override any of these tax amounts by clicking the Override link to the right of each
state/county/municipality.
To Override a Tax Rate:
1. Click the Override link next to the desired tax region (You can override State, Country and City
tax rates). This will open the Tax Override Screen.
2. Specify the new tax rate, whether you will tax shipping, and whether shipping and handling will
be combined for tax purposes.
3. Click the Save button to save your changes. At any time you can click the Reset link to change
the override back to the default tax rate and settings.
**NOTE: If you are not sure whether you should collect tax for a state, contact your tax advisor.
© 2009 Network Solutions, LLC
Network Solutions, 13861 Sunrise Valley Drive, Herndon VA 20171
networksolutions.com
nsCommerceSpace Setup Guide
38
Choose Shipping Options
To get your merchandise from your storage location to your customers, you will need to select at least
one shipping option for your customers. You can get rates for each order in real time to ensure
accuracy. Each shipper has different options and different pricing, so choose the one that works best for
you and your customers.
For more information on Shipping please see the Shipping section of the nsCommerceSpace User
Manual.
When you are deciding, keep in mind that some shippers, like FedEx and UPS, require you to register
with them to get their shipping rates and display them to your customers. In order to set up FedEx or
UPS shipping, you will need to provide your account information. The checkboxes for these two options
in the Enable column will be grayed out until your account information has been added.
© 2009 Network Solutions, LLC
Network Solutions, 13861 Sunrise Valley Drive, Herndon VA 20171
networksolutions.com
nsCommerceSpace Setup Guide
39
To Setup your Shipping:
1. Enter the Shipping Origin information on the right side of the screen. This is the location from
which your products will be shipped.
2. Assign a Global Handling charge if desired and specify whether shipping and handling will be
combined on customer displays.
3. Click an Enabled checkbox to choose a shipping carrier. When you do this, the next section
displays the available shipping options from that carrier. For example, when selecting USPS as
your carrier, the following options appear as below.
Click in the Enable checkbox to select the method(s) from this carrier that you wish to display to your
customers.
Creating rules (options) for your shipping method(s)
Now that you have selected the shipping carrier(s) and the methods for each carrier, you will need to
set up rules, or options, so that when a customer selects the option, the correct shipping charges will be
displayed. For each shipping method, you can set up multiple rules that are determined by shipping
weight or size and can also include an additional markup, if necessary.
To Edit an existing Shipping method:
button for the shipping method you want to update with a new rule. This will
1. Click the
open the Shipping Method Edit Page.
NOTE: You can also create a new shipping method by entering the method name in the New
Method Name textbox and clicking the Create & Edit button.
© 2009 Network Solutions, LLC
Network Solutions, 13861 Sunrise Valley Drive, Herndon VA 20171
networksolutions.com
nsCommerceSpace Setup Guide
40
2. An existing method will have a default rule but you can create new shipping rules if necessary.
3. If you want to change this default rule, you can do so by clicking on the
it completely by clicking on the
button, or delete
button.
For example, if you want to use USPS Priority Mail only for packages that weigh 70 lbs or less, your rule
would look something like this:
© 2009 Network Solutions, LLC
Network Solutions, 13861 Sunrise Valley Drive, Herndon VA 20171
networksolutions.com
nsCommerceSpace Setup Guide
41
To Add a New Shipping Method:
1. Verify that you are on the carrier’s tab and not the Custom tab.
2. Click the drop-down button on the New Method Name field to select a shipping method from the
menu. The options available on this menu will depend upon the carrier you have chosen.
3. Click
to continue.
4. Add one or more rules for using this option (see instructions for editing rules above).
5. Click
to go back to the Shipping Manager page.
6. Repeat as necessary until you have all shipping methods set up for this carrier.
© 2009 Network Solutions, LLC
Network Solutions, 13861 Sunrise Valley Drive, Herndon VA 20171
networksolutions.com
nsCommerceSpace Setup Guide
42
Setting Up Your Domain
There is more to it than you might think when it comes to a domain name. When you’re planning to
open an online store, the domain name you choose is very important. On the Web, your domain name is
your identity. It’s how customers will find you, remember you and, ideally, return to you to buy. While
these actions are not taken directly in your Control Panel, they are important steps to make your
storefront visible to your customers.
Purchase a Domain Name
If you don’t already have a domain (www.yourname.com), you may want to purchase one. This gives you
the right to use this domain name to identify your store, and registers it in your name so that no one
else can use it. If you already have a domain name you can skip this step.
For additional information, click the link in the Setup Checklist, or visit the Network Solutions website.
Assign the Domain Name
While this action is not taken directly in the storefront, it is nonetheless a very important step that you
cannot skip. If you purchased your domain name through Network Solutions, this step is automatic and
you do not have to do anything further. However, if you purchased a domain name elsewhere, you will
need to point it to your Network Solutions Domain Name Server (DNS). Your domain should be pointing
to your Network Solutions DNS before you go any further.
Pointing an external domain
To point an external domain you will need to know the Internet Protocol (IP) address of your store. If
you do not know it, you will need to get it by contacting the technical support group for your hosting
service. Once you have this information, you will need to access your DNS hosting service’s Control
Panel and enter your IP address there.
© 2009 Network Solutions, LLC
Network Solutions, 13861 Sunrise Valley Drive, Herndon VA 20171
networksolutions.com
nsCommerceSpace Setup Guide
43
Here is an example of how a Control Panel may look:
You will need to enter the following information:
(where this document says yourdomain.com, substitute your domain name)
Under A (Host)
– Host Name: yourdomain.com ------ Points to IP Address:000.000.000.000 (use your IP Address)
– Host Name: www ------ Points to IP Address: 000.000.000.000 (use your IP Address)
Under CNAME (Aliases)
– Cname: mail ------ should point to mail.yourdomaim.com.netsolmail.net
– Cname: smtp ------ should point to smtp.yourdomain.com.netsolmail.net
MX (Mail Exchange)
**NOTE: If there are any records in this section, remove these unless you are aware of where they are
currently forwarding your mail. It is not a good idea to edit an MX record. We recommend that you delete
any current record(s) and add a new one.
– MX /host name: yourdomain.com ------ should point to inbound.yourdomain.com.netsolmail.net
**NOTE: with these records you may have an option called Time to Live (TTL) to select. You can use any
time frame given here; however keeping it near one (1) hour is the normal selection.
© 2009 Network Solutions, LLC
Network Solutions, 13861 Sunrise Valley Drive, Herndon VA 20171
networksolutions.com
nsCommerceSpace Setup Guide
44
Now you are ready to assign your domain name in your Account Manager.
When you log into your account manager and do not have an assigned domain name, you will see the
following notice:
Click
and follow the instructions on the screen to assign your domain name to your new store.
Make sure you select this as your Primary Domain. This is where customers will enter your online store,
it will allow search engines to find your site, and if you purchase a Network Solutions SSL Certificate,
this is where we will automatically install your certificate.
**NOTE: Changes can take up to 72 hours to propagate.
Purchase an Additional Secure Socket Layer (SSL) Certificate.
As a Network Solutions nsCommerceSpace owner you do not need to purchase an additional SSL
package. All of our nsCommerceSpace packages include a level of Secure Socket Layering that passes
CISP certification for securing your online transactions. However, if you wish to add an extra layer of
security for your customers, you may do so. For more information on how to determine if you should get
an additional SSL certificate see the Network Solutions SSL page.
(at this url: http://www.networksolutions.com/SSL-certificates/index.jsp)
**NOTE: For a Network Solutions SSL Certificate, the domain assigned to the nsCommerceSpace
package must be marked as the primary domain, and must be the same as the domain assigned to the
SSL service.
© 2009 Network Solutions, LLC
Network Solutions, 13861 Sunrise Valley Drive, Herndon VA 20171
networksolutions.com
nsCommerceSpace Setup Guide
45
Settings
While the Settings section of the Control Panel allows you to change a multitude of options and
behaviors about your store, in this guide we will focus primarily on Checkout.
Checkout is the set of steps that your customers will follow to complete their purchase transaction once
they have completed their shopping and have selected the products they wish to buy. Therefore it is very
important that your checkout process is smooth so that your customers have a good experience shopping
in your store.
To verify that your checkout settings are working properly we suggest a run through of your checkout
process to test it and make sure there are no surprises.
To verify your checkout settings:
1. On the Operations main page, click on the Settings link to access the Settings screen.
2. When the Setting screen appears you will see a number of tabs across the top of the screen.
3. Click the Checkout tab to access the Checkout settings screen.
© 2009 Network Solutions, LLC
Network Solutions, 13861 Sunrise Valley Drive, Herndon VA 20171
networksolutions.com
nsCommerceSpace Setup Guide
46
4. Review the checkout options by looking through the selections and change any if necessary.
To change selections:
1. Click the drop-down button for User registration and membership to see the options available
for this field.
For example, if you want to give your customers the option to register on your storefront at any time,
you would select Registration enabled. If you want to require your customers to login before they can
check out, you would select Login required to check out.
2. Select the check boxes from the list of additional options that you wish to include. Also deselect
any that you do not want to include. You may also include an error message (up to 259 that will
display when the gateway encounters an error.
3. When you are satisfied with the selections on this page, click the
button. The page will
refresh with a statement at the top that says your changes have been saved.
4. Click Return to exit this screen and go back to the main Operations screen.
© 2009 Network Solutions, LLC
Network Solutions, 13861 Sunrise Valley Drive, Herndon VA 20171
networksolutions.com
nsCommerceSpace Setup Guide
47
Check your General settings:
1. From the Settings screen, click on the General tab. This is the screen in which you will
configure the basic way in which email notifications display to your customer.
2. At a minimum, you must enter the email address from which all order emails will be sent.
3. Enter information in the following fields:
a. Primary sender email name – If you want a name to display in front of the email, such
as your store name, enter that in the field above this one. If you do not want a name
displayed, delete any default data entered in the field. So, for example, if your store
name is Jewelry by Gina, you could type that into this field and any email you sent to a
customer would display in the customer’s inbox as sent from “Jewelry by Gina”.
b. Primary sender email address – This is the email address that will display to your
customers on any order emails you send to them, such as the order confirmation. This is
the only required field on this tab.
c. Administrative recipient email address – This is a specific email address that you can
choose to receive all order-related emails.
4. Once again, there are other fields in these screens that we have not covered. For information
on these fields, view the Settings section of the nsCommerceSpace User Manual.
© 2009 Network Solutions, LLC
Network Solutions, 13861 Sunrise Valley Drive, Herndon VA 20171
networksolutions.com
nsCommerceSpace Setup Guide
48
Conduct a test run on your checkout process
The best way to do this is to place an order on your site using your own credit card. This will help you to
identify if there is something in checkout that you need to change. It will also verify that your payment
gateway is set up and working properly, whether email notifications are being sent properly, etc.
© 2009 Network Solutions, LLC
Network Solutions, 13861 Sunrise Valley Drive, Herndon VA 20171
networksolutions.com
nsCommerceSpace Setup Guide
49
Finish
Now you have finished all the basic tasks to set up your store to be a good online shopping experience
for your customers. Before you open it to the public, you will want to take a look at the store in Preview
mode to make sure everything is ready and that it looks the way you want it to look before you show it to
the world.
Preview your store
To view your store in Preview mode, click on the View Storefront button at the top of any page that
displays the main tabs in the Control Panel. You will find this button in the upper right side of the
screen, below the Log Out link, and in line with the taskbar below the main tabs.
When you click on this button, a new window appears with your new storefront view. At the top of the
screen, above your company logo, you will see a notice that identifies this screen as preview mode, and
reminds you that your storefront is currently Offline. This means that the public cannot yet see your
store.
© 2009 Network Solutions, LLC
Network Solutions, 13861 Sunrise Valley Drive, Herndon VA 20171
networksolutions.com
nsCommerceSpace Setup Guide
50
Perhaps you have been using this button throughout your creation process. Nevertheless, we suggest you
take one last look at your store, follow through your browse functions, check all the information on your
pages, and verify that everything is set and ready to go. While you can make changes at any time,
including after you go live with your store, if you find something that needs to be changed, now is the
time to do it. Simply click the Edit link at the top right of any page to make changes to the current
information. Remember to save any additional changes you make and then refresh the previewed
storefront again to verify that your changes are acceptable.
Once you have reviewed everything and you feel you are ready to take the leap onto the World Wide
Web, you need to do one final thing.
Open Your Store
When you open your store, the “Store offline” comment at the top of the storefront is removed and the
store is made visible to everyone on the Internet.
To open your store:
1. From the Home page look for the Store Status radio buttons toward the bottom of the screen,
just above the New & Updates section. The store status is displayed with two radio buttons: one
for Open and one for Close.
2. Click on the radio button next to Open. A pop-up box will appear and ask if you are sure you
want to open your store.
3. Click OK to complete the process. The status will change to Opened. That’s all there is to it.
Congratulations!
You now have an online store that is open for business.
© 2009 Network Solutions, LLC
Network Solutions, 13861 Sunrise Valley Drive, Herndon VA 20171
networksolutions.com
nsCommerceSpace Setup Guide
51
Additional Information
While this Setup guide is geared towards getting your store up and online quickly, it is by no means
exhaustive. Fortunately there are several resources available to you to help you continue building and
managing your online store.
•
nsCommerceSpace Manual - The nsCommerceSpace User Manual is your complete guide to your
store. You will find information on every feature in the v7.x software.
•
Intro to Ecommerce Video Series - An in-depth walkthrough video series that follows closely
the Setup Checklist. This is a great way to familiarize yourself with the layout and operations of
the nsCommerceSpace software.
•
Network Solutions Forums – The Forums are where other store owners and merchants come to
discuss the latest tips, tricks and information about the software, online stores, and more.
© 2009 Network Solutions, LLC
Network Solutions, 13861 Sunrise Valley Drive, Herndon VA 20171
networksolutions.com
nsCommerceSpace Setup Guide
52
(This page intentionally left blank)
© 2009 Network Solutions, LLC
Network Solutions, 13861 Sunrise Valley Drive, Herndon VA 20171
networksolutions.com