1
Ecommerce User Manual
105
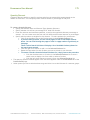
Shopping Lists (Premium Only)
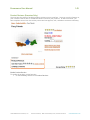
A new feature for our Pro-Store clients is the Shopping List option. Now you can offer your customers
the ability to create Shopping Lists which they can then share with their friends and family. Each
customer can create up to ten lists they can name, manage, and share. As the store owner you can
view these lists at any time.
NOTE: Only shopping lists made visible by the customer will show up on the shopping list search.
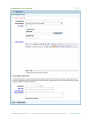
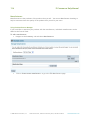
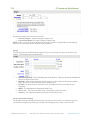
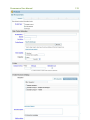
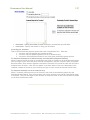
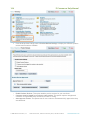
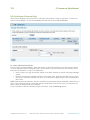
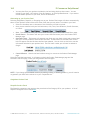
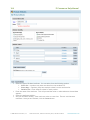
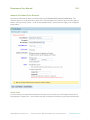
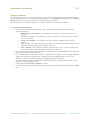
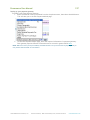
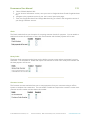
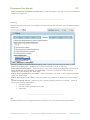
Enabling the Shopping List feature:
The Shopping List option is initially turned off for new sites but is easy to enable.
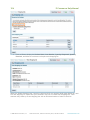
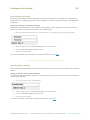
• Click on the Sales tab of the Main Control Panel and click on the Shopping Lists link.
•
On the Shopping List Settings page, click the Enable Shopping Lists check box. When your
customers create their shopping lists you can search through and view them here.
105© 2009 Network Solutions, LLC
Network Solutions, 13861 Sunrise Valley Drive, Herndon VA 20171
networksolutions.com
106
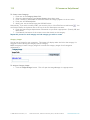
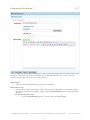
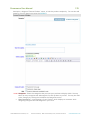
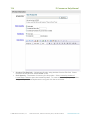
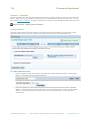
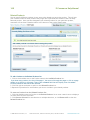
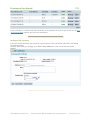
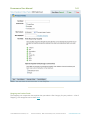
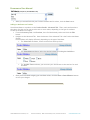
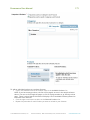
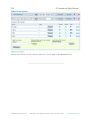
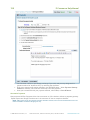
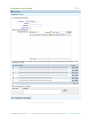
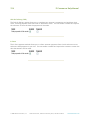
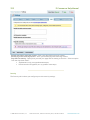
•
E-Commerce Help Manual
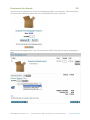
Click on View to display the Product Name, Item Number, Quantity Requested, Quantity
Received, and Price of each item on the particular shopping list.
When the “Enable Shopping Lists” function is selected all of your product detail pages display an “Add
to a new shopping list” option that your customers may click to create their shopping lists. Each
customer may create up to ten shopping lists with an unlimited number of items in each list.
© 2009 Network Solutions, LLC
Network Solutions, 13861 Sunrise Valley Drive, Herndon VA 20171
Networksolutions.com
Ecommerce User Manual
107
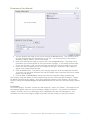
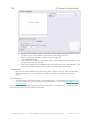
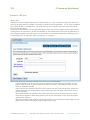
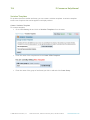
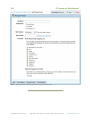
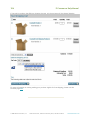
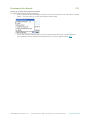
Customers can manage their shopping lists from their account management page. If they haven’t yet
registered with the site, they must do so in order to create and share their shopping lists.
107© 2009 Network Solutions, LLC
Network Solutions, 13861 Sunrise Valley Drive, Herndon VA 20171
networksolutions.com
108
E-Commerce Help Manual
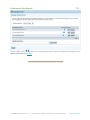
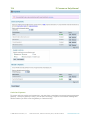
Inventory
Inventory Overview
From the Inventory page you can create categories and products, create manufacturers, and create
variation templates to apply to products.
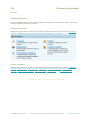
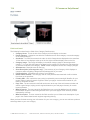
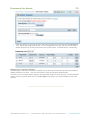
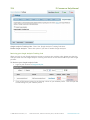
Standard E-Commmerce
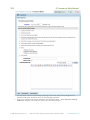
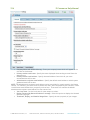
Shown below is the Inventory tab for the Standard Ecommerce software which includes: Categories,
Products, Manufacturers, Variation Templates, and Personalization Templates.
Premium Ecommerce
Shown below is the Inventory tab for the Premium Ecommerce software which includes: Categories,
Products, Manufacturers, Gift Certificates, Warehouses, Variation Templates, Personalization
Templates, Bulk Price Adjustments, Products Reviews, Product Feeds, and Product Attributes.
© 2009 Network Solutions, LLC
Network Solutions, 13861 Sunrise Valley Drive, Herndon VA 20171
Networksolutions.com
Ecommerce User Manual
109
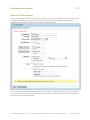
Categories
The Category Manager menu creates and manages categories, subcategories and category wide
markups. Categories appear, by default, in the left hand navigation bar.
You can have up to 2500 categories with up to five (5) levels of depth.
When categories and subcategories have been created, they display in the Category Manager according
to sort order. The same order applies to the Browse by Category module on the storefront. The number
of products assigned to each category is indicated in parentheses after the name.
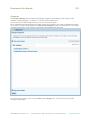
To create a new category, click on the Create a new category link. The link will open the Edit
Category Details page.
109© 2009 Network Solutions, LLC
Network Solutions, 13861 Sunrise Valley Drive, Herndon VA 20171
networksolutions.com
110
E-Commerce Help Manual
Category Details Page
Click Create a new category and enter the Category Details Page. Enter detailed information in this page
on each category you create.
© 2009 Network Solutions, LLC
Network Solutions, 13861 Sunrise Valley Drive, Herndon VA 20171
Networksolutions.com
Ecommerce User Manual
111© 2009 Network Solutions, LLC
Network Solutions, 13861 Sunrise Valley Drive, Herndon VA 20171
111
networksolutions.com
112
E-Commerce Help Manual
To Create a new Category:
1. Enter text in the Category Name field.
2. Select the desired option from Parent Category drop-down menu.
3. Enter a number in Sort Order to determine where the category appears in the sort order.
4. Enter text in Full Description.
5. Modify your text as desired using the WYSIWYG editor.
. You
Alternatively, if you wish to modify HTML, you can also click on View/Edit Source code button
can find this button in the button bar at the top of the Full Description text area.
6. Enter the Search Engine Optimization information as you think is appropriate. (Friendly URL and
Meta fields).
7. Click Save at the bottom of the screen to save the details on this category.
Repeat this process for each category and sub-category you wish to create.
Category Images
You can use an image for your categories. This image will display under the link to the category it's
assigned to when viewing the category's parent category.
NOTE: Assigning a Parent Category image will override the category images for all categories
underneath it.
To Assign a Category Image:
1. Click the Image Manager button. This will open the Image Manager in a popup screen.
© 2009 Network Solutions, LLC
Network Solutions, 13861 Sunrise Valley Drive, Herndon VA 20171
Networksolutions.com
Ecommerce User Manual
113
2. You can upload a new image to your site by clicking the Browse button. This will allow you to
find your desired image file and upload it to your site. You can also specify if this will be a
thumbnail, display, detail or custom sized image.
3. Once you've selected the image you wish to use, click the Upload button. The image will be
uploaded to your site and appear on the right column of images. If you already have an image
on your site you wish to use, you can select the drop-down and find your image on your site.
4. Select your desired image from the list of images on the right. A preview of your image will
appear in the Image Preview window.
5. Click the Select button. The path for your category image will be in the image path text box.
If you wish, you can enter Alternate Text that will appear when a customer hovers their mouse
pointer over the image.
6. Click the Save or Save & Return button at the bottom of the Edit Category Details page.
The category image will appear for sub-categories when you are viewing the parent category. Images
for Master Categories do not appear. Once you've saved the changes to your category, you can view
them by clicking the Preview Category on the Storefront button at the top of the Edit Category Details
page.
For Example:
The master category "Furniture" contains two sub-categories; "Chairs" and "Tables". The images for the
subcategories appear when you look at the Master Category "Furniture". Any products in the master
category "Furniture" that is in a subcategory will be displayed below the two subcategories. Your
customers can click on the category images to be taken into that category to view your products.
113© 2009 Network Solutions, LLC
Network Solutions, 13861 Sunrise Valley Drive, Herndon VA 20171
networksolutions.com
114
E-Commerce Help Manual
Field Level Detail
The following list describes the fields of the Category Details screen.
• Category Name: This is the title of the Category as it will display on the store
• Parent Category: Categories can either be created as a main level category or as a subcategory
of an existing category.
• Sort Order: A number that controls the order in which Categories are displayed on the storefront.
A Sort Order of zero displays at the top of the list, higher numbers display lower on the list.
• Category Image: This image will display in the master category page for the assigned subcategory. You can click this image to be taken into the category to see either the sub-categories
or products contained in the category. NOTE: Master Categories cannot have category images.
• Alternate text: Descriptive text for the logo.
• Short Description (subcategories only): Text summary of your Category, which displays to
customers while navigating Categories and Subcategories in your store.
• Full Description: Informative text review of your Category.
• Hidden When enabled: This category and all of the products associated with it will be hidden
from view on the storefront.
• Friendly URL: URL in which the query string is replaced by some meaningful identifier for your
pages; makes it easier for search engines to index your pages. It also makes it easier for your
users to remember the URL.
• Page Title: The text entered in this field can be seen at the top of the web browser window and
search engine listings, helping search engines determine your web page relevancy for certain
keyword phrases.
• Meta Keywords: The text entered in this field allows you to provide additional text for crawlerbased search engines to index along with the text of your store pages. Enter words or phrases
separated by commas.
• Meta Description: The text entered in this field can allow you to influence the description of your
page in the crawler-based search engines supporting this tag.
When you have finished entering your information for your new category, you can now add new products
and assign them to your new category.
© 2009 Network Solutions, LLC
Network Solutions, 13861 Sunrise Valley Drive, Herndon VA 20171
Networksolutions.com
Ecommerce User Manual
115© 2009 Network Solutions, LLC
Network Solutions, 13861 Sunrise Valley Drive, Herndon VA 20171
115
networksolutions.com
116
E-Commerce Help Manual
Manufacturers
Manufacturers are the producers of the products that you sell. You can use Manufacturer branding to
help let customers know the quality of the products that you sell in your store.
Using the Manufacturer Manager
If you would like to associate your products with the manufacturer, individual manufacturers can be
added to the Control Panel.
To add a manufacturer:
• Navigate to the Inventory tab and select Manufacturers.
•
Click on Create a new manufacturer to go to the Edit Manufacturer page.
© 2009 Network Solutions, LLC
Network Solutions, 13861 Sunrise Valley Drive, Herndon VA 20171
Networksolutions.com
Ecommerce User Manual
117
From this page you can name the Manufacturer, add an image associated with that manufacturer, and a
description. Alternate text can be entered specific to that Manufacturer's logo, which is visible in
certain browsers when you hover over it with a mouse.
Manufacturer
• Enter the name of the Manufacturer (up to 150 characters).
Manufacturer Logo
• Use this field to add a manufacturer's logo. This logo will be displayed on the detailed product
description page above the product image. Click the Image Manager button to open the Image
Manager.
To add a Manufacturer Logo:
•
Click the Image Manager button. This will open the Image Manager.
117© 2009 Network Solutions, LLC
Network Solutions, 13861 Sunrise Valley Drive, Herndon VA 20171
networksolutions.com
118
E-Commerce Help Manual
•
•
•
•
•
•
Navigate to the desired image on the left by clicking the Browse button.
The path to your file will appear in the "Upload a New Image" text box.
Select the desired image size or specify a custom image size.
Click the Upload button.
Your Image will now appear on the right column, which displays all of the images in your
/images/logos folder on your site.
Select your image and click the Select button at the bottom of the Image Manager. This
will close the Image Manager and return you to the Manufacturer Edit page.
Alternate Text
• Use this to include explanatory text that will be seen in place of the logo when the logo image
cannot be displayed (i.e. the customer has images turned off to make page loading time
quicker).
Full Description
• Use this text box to add a description of the manufacturer. This description will display to your
customers when they look at a product by this manufacturer. You can also add images to your
full description.
Once you have completed entering all manufacturer information, click Save, which returns you to the
Manufacturers menu with the manufacturers listed.
© 2009 Network Solutions, LLC
Network Solutions, 13861 Sunrise Valley Drive, Herndon VA 20171
Networksolutions.com
Ecommerce User Manual
119
allow you to rearrange the order in which the manufacturers display in the
The Sort Order arrows
Search by Manufacturer module.
119© 2009 Network Solutions, LLC
Network Solutions, 13861 Sunrise Valley Drive, Herndon VA 20171
networksolutions.com
120
E-Commerce Help Manual
Products
The Products page is where you enter, edit, and manage your store's various products.
You can have up to 100,000 products (not including variations) and up to 500 variation options per
product.
From the product list, you can see the most important details for each of your products, including the
price, quantity, part number, manufacturer and manufacturer number and the options on the product.
You can change some of these options without going to the product detail list (such as price, Category,
and Homepage Specials) while clicking on other aspects of the product will take you to that section of
the Edit Product Page (such as images, variations, personalizations, or related products.
You can search any products already listed within the Product Manager based on your Product Names.
Enter at least one character within the Products name in the text field marked "Search Products" and
click on the "Search" button. All products with that letter/word/phrase will display on the screen.
Click on the any of the links below to be taken to the specific page section.
• How to Add a Product
• Product Types
• Basic Product Information
• Weight
• Pricing
• Product Placement
• Product Tabs
• Free Shipping
© 2009 Network Solutions, LLC
Network Solutions, 13861 Sunrise Valley Drive, Herndon VA 20171
Networksolutions.com
Ecommerce User Manual
121
How to Add a Product
To add a new product to your store:
• Click the Inventory tab at the top of the Control Panel
•
•
•
On the Inventory Page, click the Products link. This will open the Product Manager.
Click Create a new product to enter the Edit Product Details page. Note that you must fill out
the required fields (denoted by the red asterisk) in order to save your new product.
Fill out the details of your product. Note that you must fill in the required fields in order to
save your new product.
Adding your Product Details
The Edit Product Details page consists of several different tabs, the first of which is General, referring
to the general information about your product. Once you have entered the required information for
your product, you may then click on the other tabs to further detail your product.
Product Types
There are three different types of products you can create in the Product Manager; Regular Products,
eGift Certificates, and eProducts.
• Regular Product - A regular product is purchased by customers from your store via payment
method and is normally shipped to the customer utilize a shipping method. Regular products
usually have weight and can have variations.
• eGift Certificate - An eGift Certificate is a gift certificate you create for your customers to
purchase for use with your store. eGift Certificates can have variations. NOTE: eGift
certificates are not the same as Gift Certificates (Inventory > Gift Certificates). An eGift
certificate is purchased by the customer while a Gift Certificate is issued by the store
owner.
• eProducts - An eProduct is a purchased by customers from your store but is not shipped. Once
the customer has successfully completed the transaction, they receive download instructions to
retrieve their product.
The Edit Product Details (General) tab is split into three sections; Basic Product Information, Weight,
Pricing, and Product Placement & Display. These sections are explained below.
The Edit Product Page (Click here to see the image)
121© 2009 Network Solutions, LLC
Network Solutions, 13861 Sunrise Valley Drive, Herndon VA 20171
networksolutions.com
122
© 2009 Network Solutions, LLC
E-Commerce Help Manual
Network Solutions, 13861 Sunrise Valley Drive, Herndon VA 20171
Networksolutions.com
Ecommerce User Manual
123
Basic Product Information
In this section you enter the most basic information about your product. Listed below are the
details you can add to your product.
•
•
•
•
•
•
•
Product Name (Req) - The title of the product as it will display on the store.
Item No. - The "stock" number that you will associate with the product.
Sort Order - A number that controls the order in which Product listings are displayed. A Sort
Order of zero displays at the top of the list, higher numbers display lower on the list.
Product Image - When you upload an image, a thumbnail image is automatically created.
Stock Quantity - The total amount of the product that you have on hand. You can also
specify a quantity for a Low Inventory Alert.
Manufacturer - Assign a Manufacturer who supplies this product to you. You can add a
Manufacturer by clicking on the Add a New Manufacturer link underneath the drop-down
list.
Mfr. Part No - Assign a part number associated with the manufacturer.
Weight
Enter the weight for your product, either as pounds and ounces, or as a dimensional weight.
Dimensional weights may arrive at a different weight than the actual weight that you have entered
for your product. Companies will charge for whichever method arrives at the highest weight.
123© 2009 Network Solutions, LLC
Network Solutions, 13861 Sunrise Valley Drive, Herndon VA 20171
networksolutions.com
124
E-Commerce Help Manual
Dimensional weights are calculated as follows:
• Domestic Weight = (Length x Weight x Height)/194
• International Weight = (Length x Weight x Height)/166
NOTE: There is no need to enter decimals in the length, weight, or height fields as the shipping
methods will round up to whole numbers when calculated.
Pricing
The Pricing section of the Edit Product Page allows you to set pricing at a variety of levels for your
product. The included terms are listed below.
•
•
•
•
•
•
General Price (Req) - This is the basic price of the product. This price is used to calculate the
savings of different price levels.
Message - Show a short message instead of a price on the product list and product details
page. The price will show when the item is added to cart.
For Sale - De-select this box if the item is only for display and not for purchase by your
customers.
MSRP - The Manufacturer's Suggested Retail Price.
Store's Cost - The cost to the store owner of keeping the product in stock.
Handling - The additional handling costs specific with this product.
Product Placement & Display
The Product Placement & Display section lets you assign your new product to categories (you can
also add new categories by clicking on the Add a New Category link), create a short and full
© 2009 Network Solutions, LLC
Network Solutions, 13861 Sunrise Valley Drive, Herndon VA 20171
Networksolutions.com
Ecommerce User Manual
125
description, designate "Featured Product" status, or hide the product completely. You can also add
images to your full description using the WYSIWYG.
•
•
Categories - Select the categories that you want your products to display within. You may
select as many categories and subcategories for each product as you like. You may also Add
a New Category by clicking the link below the Categories section.
Short Description - A text summary of your Product, which displays to customers while
navigating Categories and Subcategories in your store.
125© 2009 Network Solutions, LLC
Network Solutions, 13861 Sunrise Valley Drive, Herndon VA 20171
networksolutions.com
126
E-Commerce Help Manual
•
Full Description - Informative text review of your Product, which provides customers with
all of the details about your Products.
• Featured Product - The product can be featured on the home page or the category landing
page. Designating a product as a Category special will move this project to the front of any
sort order you may have setup for your products. After your products with this designation are
displayed, the rest of your products will be shown according to the sort order of your products.
• Hide? - Select the Hide option if you wish your product to be hidden and unavailable for sale
to your customers.
After you are satisfied with your new product, click Save or Save & Return to add the product to
your Inventory. You can also preview your product on your storefront by clicking the Preview
Product on Storefront button on the top (this image only appears when you have entered the
required fields for your product and saved the product to your inventory).
If you do not wish to save your product, click Cancel & Return.
Product Tabs
The Product Edit page contains several different tabs. These tabs become accessible after the required
fields in the General Tab have been entered and the product has been saved.
Each tab corresponds to a specific section your product to which you can add additional detail.
These tabs are explained below.
• General - The General tab contains the basic information needed to initially create your
product. This tab is explained in detail above.
• Advanced - This tab contains a variety details including:
• Tax - Select this option if you wish your product to be Tax Free.
• Special Shipping - Select this option if you wish your product to be Shippable,
Eligible for Free Shipping, or Shipping not Required. An explanation of the Free
Shipping option follows below.
• Dimensions - Specify the dimensions of your product (in inches).
• Order Quantity - Specify a minimum and maximum order quantity for you product.
• In Stock Message - Specify a message to display when this item is in stock.
• Out of Stock Message - Specify a message to display when this item is out of stock.
• Page Layout - Set the active page layout for your product.
• Notes - Add product notes to your product.
• Product Attributes - Select your custom fields for internal use or to display to your
customer. Learn more about Product Attributes here.
• Discounts Applied to this product - Shows the Discounts applied to the product.
• Warehouses/Drop Shipping - Select your Warehouse or Drop-shipper for the product
or add a new warehouse.
• Product Reviews - See the average review rating for the product.
• Remote Add to Cart - Copy this HTML code to create a Remote Add to Cart button
for this product on another website such as ImageCafe or Facebook. See more
Below.
• Image - This tab lets you assign images to your product. Options include:
© 2009 Network Solutions, LLC
Network Solutions, 13861 Sunrise Valley Drive, Herndon VA 20171
Networksolutions.com
Ecommerce User Manual
127
•
•
•
Add a Product Image - Upload an image for use with your product. If you do not
wish the store to create your display and thumbnail images for you, click the Upload
Product Images Individually link.
• Edit Image - Assign an image caption or alternate text for your image.
• Thumbnail, Display, and Detail Image Path - Use these paths to specify the images
for your thumbnail, display, and detail images, respectively.
Variations - The Variations Tab allows you to assign variations to your products. Please
note, that once a product has variations, certain product-specific items (weight, customer
price, etc) will be grayed-out on the General tab as you will now manage those details in
the Variations tab. For a detailed explanation on creating variation groups and options,
click here.
SEO Info - The SEO Info tab lets you set the information necessary for Search Engine
Optimization. For more information on this tab, please click here.
Remote Add to Cart
The Remote Add to Cart feature allows you to take an HTML snippit for your product and place it on
another website's HTML. This will generate a button which will automatically add this product to a
shopping cart when clicked.
You can edit the HTML code to produce a different quantity of products when clicked.
Pro-Ecommerce Tabs
The Pro-Ecommerce software contains extra tabs that provide more versatility in creating your
products. These include:
• Gallery - This tab takes the place of the Image tab in the Ecommerce Standard Package.
This tab allows you to setup an image gallery for your product. By default your additional
images will be displayed in a popup window linked from the products detail page. For more
information, click here.
• Personalization - The Personalization tab lets you add specific personalization questions to
your product. For more information, click here.
• Related Products - This tab lets you set a number of products that will be randomly
displayed as your Related Products. For more information, click here.
Free Shipping
To make a product eligible for free shipping, you must select the eligible for free shipping option in the
Advanced tab of the Edit Product page.
127© 2009 Network Solutions, LLC
Network Solutions, 13861 Sunrise Valley Drive, Herndon VA 20171
networksolutions.com
128
E-Commerce Help Manual
NOTE: For Free Shipping to function, you must setup a shipping method that honors free shipping.
This is explained in the Shipping section of the manual.
© 2009 Network Solutions, LLC
Network Solutions, 13861 Sunrise Valley Drive, Herndon VA 20171
Networksolutions.com
Ecommerce User Manual
129
Low Inventory Alerts
Low inventory alerts warn you when you are nearing certain amount of stock or inventory.
To setup a Low Inventory Alert
• On the General Tab of the Product Edit page, specify the Stock Quantity and Reorder Alert
quantity.
•
Once your inventory for this product has reached the alert level, you will be notified on the
Control Panel home page as well as the Product Manager.
129© 2009 Network Solutions, LLC
Network Solutions, 13861 Sunrise Valley Drive, Herndon VA 20171
networksolutions.com
130
E-Commerce Help Manual
You can view a printable list of all your low inventory alerts by clicking the View a Printable List link in
the Inventory Alert Message bar.
© 2009 Network Solutions, LLC
Network Solutions, 13861 Sunrise Valley Drive, Herndon VA 20171
Networksolutions.com
Ecommerce User Manual
131
Gift Certificate Product
Your Shopping Cart allows you to create Gift Certificates for customers to purchase, using the fields
displayed in the sample screen section below.
131© 2009 Network Solutions, LLC
Network Solutions, 13861 Sunrise Valley Drive, Herndon VA 20171
networksolutions.com
132
© 2009 Network Solutions, LLC
E-Commerce Help Manual
Network Solutions, 13861 Sunrise Valley Drive, Herndon VA 20171
Networksolutions.com
Ecommerce User Manual
133© 2009 Network Solutions, LLC
Network Solutions, 13861 Sunrise Valley Drive, Herndon VA 20171
133
networksolutions.com
134
E-Commerce Help Manual
To create an eGift Certificate
From the Product Editor, select the eGift Certificate radio button. When the screen refreshes it displays
fields pertinent to creating a Gift Certificate Product.
When a gift certificate has been purchased, the customer will receive the gift certificate code in an
email once the order has been moved to the Payment Received status. The gift certificate will be listed
in Gift Certificate Manager with the corresponding order number.
For more information on Gift Certificate Manager, please see the page on Gift Certificates.
© 2009 Network Solutions, LLC
Network Solutions, 13861 Sunrise Valley Drive, Herndon VA 20171
Networksolutions.com
Ecommerce User Manual
135
eProducts (Premium Only)
The Pro-Ecommerce store allows you to offer eProducts to your customers.
Setting up your eProduct
For our Premium clients, creating eProducts is quick and easy. A new Product Type field allows you to
specify your new product as an eProduct.
Once you have selected eProduct for your Product Type, a new section of the Edit Product Details
screen appears. This section allows you to upload your eProduct and specify the basic information
about your product. The various fields and options are explained below as well as a list of supported
file types.
135© 2009 Network Solutions, LLC
Network Solutions, 13861 Sunrise Valley Drive, Herndon VA 20171
networksolutions.com
136
•
•
E-Commerce Help Manual
eProduct File (Required) - Upload your eProduct using the New eProduct File field. Please
note that the file must not exceed 500MB in size.
Stock Quantity - The amount of inventory for this product. Select Limited by Number of
License Keys Created to open the License Key Menu. To create a license key for your eproduct,
simply enter your desired alphanumeric string and click the arrow button.
© 2009 Network Solutions, LLC
Network Solutions, 13861 Sunrise Valley Drive, Herndon VA 20171
Networksolutions.com
Ecommerce User Manual
•
•
137
Downloads - Specify the number of times a customer can download your eProduct.
Instructions - Specify instructions for using your eProducts.
Accessing your eProducts
There are three different payment options that work with eProduct files. These are:
1. You use a real time gateway set to Authorize Only.
2. You use a real time payment gateway not set to Authorize Only
3. You use an offline payment method or one of the other additional payment options
For Payment Gateways Set to Authorize Only (Including Offline Payment Methods)
When a customer places an order for an eProduct their order is placed into the Order Received status.
Once you login to your store and verify the order and payment, you then move the order to Payment
Received status. Once moved to payment received the customer will receive an email with the link to
download their eProduct. A link will also appear in the order editor of the mcp. Additionally if the
customer created an account on your site they can login to their account and access the file there
For Payment Gateways not set to Authorize Only
When a customer places an order for an eProduct, their order is automatically placed into the
Payment Received status. They will then see a link to their eProduct on the Order Confirmation page
of checkout. They can also login to their account to access the order (a link to the eProduct is placed
on the Order Information screen.
137© 2009 Network Solutions, LLC
Network Solutions, 13861 Sunrise Valley Drive, Herndon VA 20171
networksolutions.com
138
E-Commerce Help Manual
Products - Variations
Variations allow you to add new options and selections to your basic inventory that your customers can
select. Using one of your products as the base, you can add attributes such as size and color. You can
also use a Variation Template to apply a common set of options across multiple products and save time.
Watch the Video - Adding Product Variations
Creating Variations
Once the product that will be the basis for you variations has been created (you have filled out the
required fields in the General tab, and have saved the product) click on the Variations tab.
To Create a Variation Group:
• Enter the name of your New Group in the Add a New Group field and click the Create Group
Button. This opens the Group Options section.
•
Enter the options for your group in the Add a New Group Option field and click the Create
Option. Your options are listed in the Group. You can change the sort order, edit the option
name or delete the option by clicking on the blue arrows, Edit button, or Delete button,
respectively.
© 2009 Network Solutions, LLC
Network Solutions, 13861 Sunrise Valley Drive, Herndon VA 20171
Networksolutions.com
Ecommerce User Manual
139
Managing your Variation Inventory
Once the groups and options have been created they will appear under the Manage your Variation
Inventory expandable menu. You can enter prices and stock quantity and enable or disable variations
from here. Click the Edit button to Edit the Variation Option Details.
Edit Variation
In the Edit Variation page, you can specify the details of your variation product. Each Variation may
have its own image which will display when a storefront customer selects that variation on the product
detail page. Enter the path for the image to be displayed for the Thumbnail and Display images.
139© 2009 Network Solutions, LLC
Network Solutions, 13861 Sunrise Valley Drive, Herndon VA 20171
networksolutions.com
140
E-Commerce Help Manual
Once you are satisfied with your Variation edits, click the Save or Save & Return buttons. If not, click
Cancel & Return
© 2009 Network Solutions, LLC
Network Solutions, 13861 Sunrise Valley Drive, Herndon VA 20171
Networksolutions.com
Ecommerce User Manual
141
Warehouses
Using the Warehouse Manager
If you would like to associate your products with a warehouse, the individual warehouses can be added
to the MCP. To add a warehouse, go to the Inventory tab and select Warehouses.
Click on Create & Edit to go to the Edit Warehouse Details page.
From this page you can
• Name the Warehouse
• Enable/Disable the Warehouse - If you want order notification emails sent to your warehouse,
you must enable the warehouse in the MCP. An enabled warehouse will receive an order when
the payment status of the order is moved to "Payment Received".
• Select applicable products
** Note: A product can only be assigned to one Warehouse
Follow these steps to select products to assign to your warehouse
•
•
•
1. Click in the checkbox next to the Product name in the Available Products list.
If you have many products, the list will be paged, as seen in the sample selector above. You
can scroll through the pages or click on a page number to go directly to that page.
There is also a Search field that will display a list of Available Product(s) based on the search
term entered.
2. Click the right arrow button to add it to the Selected Products list.
3. Repeat this procedure for each Product you want to include in your discount.
To remove a Product from the Selected Products list, simply reverse the procedure.
1. Click the checkbox next to a Product in the Selected Products list or enter a search term to
display a list from which to select a Product.
2. Click the left arrow button to remove it from the Selected Products list.
.Enter the warehouse email address for notification purposes, and select the product
information that is sent with an order notification.
1. The warehouse must be marked as Enabled before you can send notification emails.
2. In the case where an order includes products from multiple warehouses, multiple notification
emails are sent,which are warehousespecific.
Create a custom email header.
Enter admin-viewable notes about the Warehouse.
These notes are not viewable by anyone other than your admin users.
Once you have created a Warehouse, it displays in the list under Manage Warehouses.
141© 2009 Network Solutions, LLC
Network Solutions, 13861 Sunrise Valley Drive, Herndon VA 20171
networksolutions.com
142
© 2009 Network Solutions, LLC
E-Commerce Help Manual
Network Solutions, 13861 Sunrise Valley Drive, Herndon VA 20171
Networksolutions.com
Ecommerce User Manual
143
Personalization Templates (Premium Only)
With Personalization Templates, you may add questions or options to products without affecting
inventory, such as custom text for their individual product. To create a set of these options to apply to
more than one product, you can create a template.
You may have up to 15 personalization questions with up to 50 answers for each question.
Create a Personalization Template
To create a personalization Template:
• Enter the name of your template in the New Template Name field, and click Create & Edit
Template. This will open the Edit Template page.
•
•
Enter the question and select your answer type. The following answer types are available:
• Radio Button or Drop Down - The customer can select one attribute from a list of
options.
• Check box - Single - The customer can select the option. This can be used for simple
Yes or No answers.
• Check box - Multiple - The customer can select multiple attributes from a list of
options.
• Text - Single - The customer can enter one line of text. The store owner may set a max
character and line length and charge per character.
• Text - Multiple - The Customer can enter multiple lines of text. The store owner may
set a max character and line length and charge per character.
Set the answer as required, enabled, or both. Then click Create Question. This will open the
Answers section for your new Personalization Question.
143© 2009 Network Solutions, LLC
Network Solutions, 13861 Sunrise Valley Drive, Herndon VA 20171
networksolutions.com
144
E-Commerce Help Manual
•
Each answer can have it's own surcharge and thumbnail associated with it. You can also enable
or disable certain answers if you wish them to be hidden from your customers and set certain
answers as the default selection.
Once you are satisfied with your Personalization questions and answers, click Save or Save & Return.
© 2009 Network Solutions, LLC
Network Solutions, 13861 Sunrise Valley Drive, Herndon VA 20171
Networksolutions.com
Ecommerce User Manual
145
Product Reviews (Premium Only)
You now have the option of enabling product reviews on your storefront. Once you turn this feature on,
your customers will be able to create and submit reviews of your products. As the store owner, you
have complete control over the review process and can approve, edit, and delete reviews as necessary.
Enable Product Review
To enable the product review function:
• Go the Inventory tab and click Product Reviews.
145© 2009 Network Solutions, LLC
Network Solutions, 13861 Sunrise Valley Drive, Herndon VA 20171
networksolutions.com
146
E-Commerce Help Manual
•
Click the drop-down triangle next to Product Review Settings to display the different product
review settings options available.
o
o
Enable Product Reviews: This option enables product reviews for your storefront.
Customer must be logged in to review or rate product: This option requires unregistered
customers to login before they can submit a review or rating.
Auto-approve reviews: This option sets all new reviews to be automatically approved as they
are submitted.
o
© 2009 Network Solutions, LLC
Network Solutions, 13861 Sunrise Valley Drive, Herndon VA 20171
Networksolutions.com
Ecommerce User Manual
147
NOTE: You can change the title of the review label that appears on the storefront by entering a new
label tag in the Review Label Box
147© 2009 Network Solutions, LLC
Network Solutions, 13861 Sunrise Valley Drive, Herndon VA 20171
networksolutions.com
148
E-Commerce Help Manual
Related Products
You can specify different products in your store to be related to a particular product. This will give
your customers views of other products they might like to purchase that related to their currently
selected product. Once you have designated your related products for your particular product,
customers will see these related products at the bottom of the product details page.
To add a Product to the Related Products list:
1. Click in the checkbox next to the Product name in the Available Products list.
If you have many products, the list will be paged. You can scroll through the pages or click on a page
number to go directly to that page. There is also a Search field that will display a list of Available
Product(s) based on the search term entered.
2. Click the right arrow button to add it to the Related Products list.
3. Repeat this procedure for each Product you want to include in your related products.
To remove a Product from the Related Products list:
1. Click the checkbox next to a Product in the Related Products list or enter a search term to display a
list from which to select a Product.
2. Click Remove Selected for one selection or multiple selections, or click Remove All to clear the
Related Products list.
© 2009 Network Solutions, LLC
Network Solutions, 13861 Sunrise Valley Drive, Herndon VA 20171
Networksolutions.com
Ecommerce User Manual
149© 2009 Network Solutions, LLC
Network Solutions, 13861 Sunrise Valley Drive, Herndon VA 20171
149
networksolutions.com
150
E-Commerce Help Manual
Products - SEO info
What is SEO?
SEO stands for Search Engine Optimization. Simply stated, it's a way to make sure that your Web site is
found by as many people as possible. According to research recently published, 71% of online consumers
use a search engine to find Web sites. So, to be found by new customers your Web site must first be
found by search engines!
A site that is optimized for search engines will appear in the top of search engine results pages instead
of being buried in the middle or at the end somewhere. And studies have proven that top placement in
search engines generally provide a more favorable return on investment compared to traditional forms
of advertising, such as snail mail, radio commercials, or television.
Select a link below for information on the fields in the screen sample above
Friendly URLURL in which the query string is replaced by some meaningful identifier for your
pages; makes it easier for search engines to index your pages. It also makes it easier for your
users to remember the URL.
Page TitleThe text entered in this field can be seen at the top of the web browser window and
search engine listings, helping search engines determine your web page relevancy for certain
keyword phrases.
Meta KeywordsThe text entered in this field allows you to provide additional text for crawlerbased search engines to index along with the text of your store pages. Enter words or phrases
separated by commas.
Meta DescriptionThe text entered in this field can allow you to influence the description of your
page in the crawler-based search engines supporting this tag.
© 2009 Network Solutions, LLC
Network Solutions, 13861 Sunrise Valley Drive, Herndon VA 20171
Networksolutions.com
Ecommerce User Manual
151
Find more information on SEO strategies that can help you be successful.
151© 2009 Network Solutions, LLC
Network Solutions, 13861 Sunrise Valley Drive, Herndon VA 20171
networksolutions.com
152
E-Commerce Help Manual
Gift Certificates (Premium Only)
The Premium Shopping Cart allows you to create Gift Certificates to issue to customers. To enter the
Gift Certificate Manger, click on the Inventory Tab and then click on Gift Certificates.
To Create a New Gift Certificate:
From the Gift Certificate Manager, enter the amount of the Gift Certificate. You then have the option
to set an expiration date of a specified year, month, week or day from the day it was created, set an
exact date of expiration, or opt for no expiration.
• Once created, your gift certificates display in the order created on the Gift Certificate Manager
screen.
• Each gift certificate is assigned a unique 17-character code, beginning with GC. You may issue
this code to customers and they can enter it at checkout to apply the gift certificate amount to
their order.
NOTE: When entered at checkout, the cart will deduct the maximum amount available towards the cart
total. If the amount of the gift certificate does not completely cover the cart total, the customer will
need to enter an additional form of payment.
If you would like to alter the amount of a gift certificate, click the Recharge button.
© 2009 Network Solutions, LLC
Network Solutions, 13861 Sunrise Valley Drive, Herndon VA 20171
Networksolutions.com
Ecommerce User Manual
153
If you would like to create an eGift Certificate that your customers can by from your storefront, the Gift
Certificate Product page will give you more information.
Recharge a Gift Certificate
In the Gift Certificate editor you can add or remove value to a Gift Certificate, add notes, and change
the expiration date.
Once you have made your changes, click Save or Save & Return to return to the Gift Certificate
Manager.
153© 2009 Network Solutions, LLC
Network Solutions, 13861 Sunrise Valley Drive, Herndon VA 20171
networksolutions.com
154
E-Commerce Help Manual
Variation Templates
For products that have similar attributes, you can create a variation template. A variation template
stores a set of options that can be applied to multiple products.
Create a Variation Template
To create a template;
• Go to the Inventory tab and click on Variation Templates from the menu.
•
Enter the name of the template and click Create & Edit Template.
•
Enter the name of the group of attributes you wish to add and click Create Group.
© 2009 Network Solutions, LLC
Network Solutions, 13861 Sunrise Valley Drive, Herndon VA 20171
Networksolutions.com
Ecommerce User Manual
•
155
Enter the options for your group in the Add a New Group Option field and click Create Option.
Your options are listed in the Group. You can change the sort order, edit the option name or
delete the option by clicking on the blue arrows, Edit button, or Delete button, respectively.
Managing your Variation Templates
Once the groups and options have been created you can enter prices and stock quantity and enable or
disable variations from here. Click the Edit button to Edit the Variation Option Details.
From here, you can create another group or add individual options to the first group. To add individual
options, enter the option name and click Create Option. By default, the options display in the order
created.
155© 2009 Network Solutions, LLC
Network Solutions, 13861 Sunrise Valley Drive, Herndon VA 20171
networksolutions.com
156
E-Commerce Help Manual
Bulk Price Adjustments (Premium Only)
As a Premium Ecommerce user, you can now adjust the price of a group of products via the Bulk Price
Adjustment function.
NOTE: Before you make any Bulk Price Adjustments, BACKUP your current pricing by exporting your
products to an .csv file. For more information on exporting a .csv file, click here.
To use the Bulk Price Adjustments function:
• Go to the Inventory tab and click Bulk Price Adjustments.
Select the desired group you wish to adjust (All Products, Categories, Manufacturers, Warehouses,
© 2009 Network Solutions, LLC
Network Solutions, 13861 Sunrise Valley Drive, Herndon VA 20171
Networksolutions.com
Ecommerce User Manual
157
or Specific Products). The sub-groups within each group are hidden until the group’s button is
selected.
To select a sub-group, click in the box next to the sub-group name. In the example, the client
selected Categories > Men’s Apparel.
•
Select the desired adjustment. You can choose to adjust Cost, Customer Price, or MSRP for the
group of products selected.
• Next, choose the type and amount of the change. You can choose between making a dollar ($)
or percentage (%) adjustment. Enter the amount, then select Above or Below from the dropdown menu (Example; 50% above or $10 below)
• Select the price type from which the adjustment will be taken.
Once you are satisfied with your pricing adjustments, click Adjust Prices to complete your price
adjustment.
157© 2009 Network Solutions, LLC
Network Solutions, 13861 Sunrise Valley Drive, Herndon VA 20171
networksolutions.com
158
E-Commerce Help Manual
Product Feeds
The product feeds tool allows clients to easily create product feeds for comparison sites (i.e. Google,
Shopzilla, Shopping.com, etc.) Your product feeds will be shown on the Storefront Overview.
Creating a Product Feed
You can create multiple product feeds for each comparison engine, as well as product feeds for specific
manufacturers or specific categories. You also have the option of sending hidden products in your
product feeds.
© 2009 Network Solutions, LLC
Network Solutions, 13861 Sunrise Valley Drive, Herndon VA 20171
Networksolutions.com
Ecommerce User Manual
159
To Create a Product Feed:
•
Go to the Operations Tab of the Control Panel and click the Product Feeds Icon. This will open
the Products Feed manager.
•
The Product Feed Manager is where you will create, edit, and generate your product feeds for
submission to your comparison sites. Click
th
Feed button to open the Product Feed Editor.
•
e Create a New Product
Once you have named your feed, you must select which comparison site you would like this feed
be submitted to. Each comparison site has it’s own set of required, recommended, optional,
and custom fields your feed must include. Selecting the Product Feed will automatically switch
the Product Feed editor to the relevant Fields.
159© 2009 Network Solutions, LLC
Network Solutions, 13861 Sunrise Valley Drive, Herndon VA 20171
networksolutions.com
160
E-Commerce Help Manual
•
You may also filter your products included in the feed using the drop down menu. You can
include in your feed: All Products, filter By Category, or filter By Manufacturer. If you wish to
include hidden products in your feed, select the check box.
Generating up your Product Feed
Selecting Googlebase, Shopzilla, or Shopping.com as your Product Feed target will select automatically
select certain product fields but there are other fields that you may select to include in your feed.
• Select the checkbox next to the name of the field that you wish to include.
• Once you are satisfied with your field selections, click, Save, Save & Return, Save & Generate,
or Cancel.
•
•
•
Save – This button will save your current feed and keep you on the Product Feed Editor page.
Save & Return – This button will save your current feed and return you to the Product Feed
Manager page.
Generate & Save – This button will generate your feed (use your feed criteria and create a feed
with your current products) and then save the feed. At the bottom of the feed editor a feed
link will appear with the last date the feed was updated. You can click on this link to see the
information included in your product feed. The link itself is what you will need to submit to
Google.
•
Cancel & Return – Cancels the feed without saving it a returns to the Product Feed Manager
page
Once your feed has been saved, it will appear on both the Product Feed Manager page and the
Storefront Overview page, where you can generate the feed again.
NOTE: If you change your available inventory by adding, editing, or deleting products, you will need to
re-generate your feed and re-submit it to your comparison site.
Googlebase Product Feed
Shopzilla Product Feeds
The Shopzilla comparison site requires that you submit a Site Category ID for your products. A list of
ShopZilla categories can be found here.
© 2009 Network Solutions, LLC
Network Solutions, 13861 Sunrise Valley Drive, Herndon VA 20171
Networksolutions.com
Ecommerce User Manual
161
NOTE: You must have an active account to use ShopZilla.
Shopping.com Product Feeds
The Shopping.com comparison site requires that you submit a Site Category for your products. A list of
Shopping,.com categories can be found here.
161© 2009 Network Solutions, LLC
Network Solutions, 13861 Sunrise Valley Drive, Herndon VA 20171
networksolutions.com
162
E-Commerce Help Manual
NOTE: You must have an active account to use Shopping.com.
© 2009 Network Solutions, LLC
Network Solutions, 13861 Sunrise Valley Drive, Herndon VA 20171
Networksolutions.com
Ecommerce User Manual
163
Product Attributes
Product attributes allow you to create custom fields for your products that you can use internally or
show to your customers. You can use these fields to create new search and filter options for your
products that can display on the storefront and on invoices. You create values for each attribute and
these values are then assigned to your products. You can specify whether an attribute can only have
one value, or contains many values.
Creating a new Product Attribute
To create an Attribute:
• Enter your New Attribute name and click the Create & Edit button. This will open the Product
Attribute editor.
163© 2009 Network Solutions, LLC
Network Solutions, 13861 Sunrise Valley Drive, Herndon VA 20171
networksolutions.com
164
•
•
•
•
E-Commerce Help Manual
Select the type of Product Attribute. You can select from the following options:
• Select One - A product may have one value from the attribute list.
• Select Many - A product many have multiple values from the attribute list.
• Variable Text - Enter different values for each product.
Enter the name of the Attribute. This will proceed the value or values wherever the attribute
appears.
Select the attribute visibility.
Add your attribute Value(s). Enter each new value as a new line. There is a 64 character
maximum. Once you are finished, click the Create button.
© 2009 Network Solutions, LLC
Network Solutions, 13861 Sunrise Valley Drive, Herndon VA 20171
Networksolutions.com
Ecommerce User Manual
•
165
When you are satisfied with your Product Attribute and its values, click the Save button.
Adding an Attribute to a Product
You add attributes to a product on the Product Details - Advanced Tab. There, each attribute has a
drop-down list that you can use to select one or more values, depending on the type of attribute.
To add an attribute to a Product.
• From the Inventory Tab, click Products, then find the desired product and click the Edit
button.
• Navigate to the Advanced Tab. Near the bottom of the Advanced Tab is the Product Attributes
Section
Each attribute will display differently depending on the type of Attribute.
• For Select One attributes, choose a value from the drop-down.
•
•
For Select Many attributes, select the desired values by clicking the checkboxes.
•
For Variable Text attributes, you can enter your desired text in the text box for each
attribute.
Once you are finished assigning your attribute values, click the Save or Save & Return buttons
to save your changes.
165© 2009 Network Solutions, LLC
Network Solutions, 13861 Sunrise Valley Drive, Herndon VA 20171
networksolutions.com
166
E-Commerce Help Manual
Operations
Operations
The Operations area of your Control Panel contains all of the administrative functions for your
storefront. Each section is discussed in detail in their relevant manual page.
Pro-Only Operations
The Premium version has other menu options for Discounts, Import//Export, and Checkout Questions.
© 2009 Network Solutions, LLC
Network Solutions, 13861 Sunrise Valley Drive, Herndon VA 20171
Networksolutions.com
Ecommerce User Manual
167
Discounts
The Premium Ecommerce cart offers several ways to offer customers discounts on products and
shipping. Some examples are shown in the screen sample below.
Create a New Discount
To create a discount, Click on Add a Discount. The Edit Discounts & Coupons screen appears. Enter a
name for the discount in Discount Name.
Add a description of the discount in Description, and then select the type of discount you want to
create from the Discount Type drop-down list.
There are 5 types of discounts available.
167© 2009 Network Solutions, LLC
Network Solutions, 13861 Sunrise Valley Drive, Herndon VA 20171
networksolutions.com
168
E-Commerce Help Manual
For instructions and information on creating and using each of these discounts, please see the following
pages:
•
•
•
•
•
Amount Off Product Price
Amount Off Order
Quantity Discount
Customer Group Discount
Free Shipping Discount
© 2009 Network Solutions, LLC
Network Solutions, 13861 Sunrise Valley Drive, Herndon VA 20171
Networksolutions.com
Ecommerce User Manual
169
Amount off Product Price Discount
You may put individual products on sale by selecting the Amount off Product Price Discount. The
discount may be for a certain dollar amount off or a percentage of the products' price and can apply to
some or all of your Price Levels.. In the screen example below, the discount will apply to all categories
and products.
Coupon Codes
If you do not wish to make this an Automatic Discount you can create your own Coupon Code that will
also generate a Coupon Link. You can share this link with specific customers to give them the discount.
169© 2009 Network Solutions, LLC
Network Solutions, 13861 Sunrise Valley Drive, Herndon VA 20171
networksolutions.com
170
E-Commerce Help Manual
NOTE: Product coupon codes are NOT reflected until products are added to the cart.
Category and Product specific Discounts
When using Apply Discount to specific Categories and Products, a selector, like the one below, will
open. From this section you can choose the categories and/or products you would like to include in your
discount.
To select a Category, click the checkbox next to the Category name. When you select a category, all
products in that category will be included in the discount.
© 2009 Network Solutions, LLC
Network Solutions, 13861 Sunrise Valley Drive, Herndon VA 20171
Networksolutions.com
Ecommerce User Manual
171
To add an individual product to a product discount:
• Click in the checkbox next to the Product name in the Available Products list.
NOTE: If you have many products, the list will be paged, as seen in the sample selector
above. You can scroll through the pages or click on a page number to go directly to that
page. There is also a Search field that will display a list of Available Product(s) based on
the search term entered.
• Click the right arrow button to add it to the Selected Products list.
• Repeat this procedure for each Product you want to include in your discount.
171© 2009 Network Solutions, LLC
Network Solutions, 13861 Sunrise Valley Drive, Herndon VA 20171
networksolutions.com
172
E-Commerce Help Manual
To remove a Product from the Selected Products list:
• Click the checkbox next to a Product in the Selected Products list or enter a search term to
display a list from which to select a Product.
• Click the left arrow button to remove it from the Selected Products list.
When you have selected all the products, click Save at the bottom of the screen, and your discount will
appear in a list on the Discounts home page.
© 2009 Network Solutions, LLC
Network Solutions, 13861 Sunrise Valley Drive, Herndon VA 20171
Networksolutions.com
Ecommerce User Manual
173
Amount Off Order Discount
To give a percentage or dollar amount off of an order's total, you can use the 'Amount Off Order' option.
In addition to assigning the Price Difference, this discount can also be assigned minimum and/or
maximum purchase requirements and can include a valid date range.
If you do not want the discount amount taken off as products are being added to the cart, you may opt
to use a Coupon Code that is entered during checkout. A Coupon link is also created and can be given to
customers for promotional purposes.
173© 2009 Network Solutions, LLC
Network Solutions, 13861 Sunrise Valley Drive, Herndon VA 20171
networksolutions.com
174
© 2009 Network Solutions, LLC
E-Commerce Help Manual
Network Solutions, 13861 Sunrise Valley Drive, Herndon VA 20171
Networksolutions.com
Ecommerce User Manual
175
Quantity Discount
A Quantity Discount applies to specific products and allows incremental discounting based on the
number of items sold. You can specify either a dollar amount or percentage off the price.
To create a Quantity Discount
• Specify the Discount Name and Discount Type (Quantity Discount).
• Specify whether this will be a percentage-off or dollar-off discount.
• Enter the minimum and maximum quantities, as well as the applicable discount percentage or
amount. You can create more than one rule with different discounted amounts or percentages.
• Specify which products are eligible for this discount. To select products for you discount:
• Click in the checkbox next to the Product name in the Available Products list.
• If you have many products, the list will be paged, as seen in the sample selector
above. You can scroll through the pages or click on a page number to go directly to
that page.
There is also a Search field that will display a list of Available Product(s) based on
the search term entered.
• Click the right arrow button to add it to the Selected Products list.
• Repeat this procedure for each Product you want to include in your discount.
• To remove a Product from the Selected Products list, simply reverse the procedure.
• Click the checkbox next to a Product in the Selected Products list or enter a
search term to display a list from which to select a Product.
• Click the left arrow button to remove it from the Selected Products list.
• The quantity discounts created appear in the "Discounts Applied" table on the Advanced tab of the
Product Detail page.
• Other options you can set include a date range and allow it as a valid discount for customer groups.
175© 2009 Network Solutions, LLC
Network Solutions, 13861 Sunrise Valley Drive, Herndon VA 20171
networksolutions.com
176
E-Commerce Help Manual
Free Shipping Discount
The Free Shipping Discount allows you to select one of your active shipping methods and offer it at no
charge as a benefit to customers. The Free Shipping Discount is applied either via a code entered at
checkout or by a customer entering the site with a Coupon Link. The selected discounted shipping
method is available in Checkout, but will display a price of $0.00.
Other optional restrictions you can include are:
•
Minimum Purchase amount - free shipping applies when a customer purchases the minimum
amount entered in this field
•
Maximum Purchase amounts - free shipping applies when a customer spends no more than the
maximum amount entered in this field.
• Valid Date range - free shipping applies only during the dates specified in these fields.
The example screen below shows a Free shipping discount to your customers via USPS Express Mail when
they enter the coupon code freeusxpress.
© 2009 Network Solutions, LLC
Network Solutions, 13861 Sunrise Valley Drive, Herndon VA 20171
Networksolutions.com
Ecommerce User Manual
177
Shipping (Premium and Standard Ecommerce)
In the Shipping Manager you can select your shipping carrier and methods. Listed below are the
shipping options for both the Standard and Premium Ecommerce cart. You will also find instructions for
setting up Free Shipping on your site.
Premium Ecommerce Shipping
In the Premium cart, you can offer your customers multiple shipping options, including your own custom
shipping options that you create. You can also create your own custom shipping label that will appear
on your customer's display during checkout, assign a global handling charge, and specify whether that
charge combined with shipping on customer displays.
Specify your Shipping Origin
For rates to return correctly, you must specify your shipping origin. If you have a real-time carrier
selected, your methods will display below. For International Shipping, you can specify your country of
origin from the provided list.
177© 2009 Network Solutions, LLC
Network Solutions, 13861 Sunrise Valley Drive, Herndon VA 20171
networksolutions.com
178
E-Commerce Help Manual
To Enable a Shipping Carrier:
• Register with the carrier (if you are going to use FedEx or UPS). You can register with either of the
carriers by clicking on the link which will take you to their respective sites.
• Click in the checkbox next to Enable to make one or more shipping carriers active on your site.
• Use the blue up and down arrows to change the order in which the carriers will display to your
customers in the shipping options list.
Editing your Shipping Methods
You can edit any of your active shipping methods and create new rules for reach method. Select the
desired Shipping Method tab then click Edit to open a set of options for the selected method.
© 2009 Network Solutions, LLC
Network Solutions, 13861 Sunrise Valley Drive, Herndon VA 20171
Networksolutions.com
Ecommerce User Manual
179
Each shipping method is made up of rules that you can create, edit, and delete as necessary. For
example, you could create a shipping method that honors free shipping from 0 to 10 lbs, charges as
normal for 11 to 30 lbs, and charges and additional markup for anything over 30 lbs. Each of those rules
are created separately for your shipping method.
To Create a New Rule:
• Specify the minimum and maximum weight limits for your new rule.
• If you wish to have a markup for your shipping rule, specify whether the markup dollar or
percentage based, and then add the markup in the subsequent field. This markup is
automatically added into the shipping rates displayed at checkout.
• If you wish your rule to honor Free shipping for any products that have the free shipping
designation, select the "Honors Free Shipping" checkbox.
• Once you are satisfied with your rule, click the Add Shipping Rule button.
• Once you've finished adding your rules to your shipping method, click the Save button at the
top.
• To return to the Shipping Manager, click the Return button at the bottom.
Free Shipping
For Free shipping to correctly register for your customers on checkout, you must complete two steps:
1. Select the "Eligible for Free Shipping" checkbox for the products you wish to have free shipping.
This option is located in Inventory > Products > Edit Products under the Advanced tab. You
can find out more about this step here.
2. Create a shipping method that includes a rule with the "Honors Free Shipping" checkbox
selected. Setting up a free shipping method is covered in detail here.
Custom Shipping
With the Premium and Standard ecommerce carts, you have the ability to create completely custom
shipping methods that you can offer to your customers. Custom shipping methods are discussed at
length here.
179© 2009 Network Solutions, LLC
Network Solutions, 13861 Sunrise Valley Drive, Herndon VA 20171
networksolutions.com
180
© 2009 Network Solutions, LLC
E-Commerce Help Manual
Network Solutions, 13861 Sunrise Valley Drive, Herndon VA 20171
Networksolutions.com
Ecommerce User Manual
181
Custom Shipping
Custom shipping is available in both Standard and Premium versions as Flat Rate or Free Shipping.
However, when using the Premium version of the cart, custom shipping methods are extended to
include creating a custom shipping method based on total cart weight or total cart price.
Custom Shipping Name
You can specify a name for your custom shipping options. This name displays during the checkout phase
for your customers when they are presented with their choices for shipping. The default name is
"Custom".
Enter your new name in the Display Label and click the Save or Save & Return button at the bottom of
the shipping manager. Your customer will then see your new label when they checkout. Clicking
underneath that label for rates will show all of your custom shipping methods.
181© 2009 Network Solutions, LLC
Network Solutions, 13861 Sunrise Valley Drive, Herndon VA 20171
networksolutions.com
182
E-Commerce Help Manual
Creating a Custom Shipping Method
You can create a custom shipping method by entering your new custom method name, selecting your
shipping standard, and clicking the Create & Edit button. If you wish to create or edit the USPS
shipping methods, click on the USPS tab.
Custom Shipping By Weight
A Custom shipping rule based on weight means that a customer's shipping prices are based on the total
weight of the order. You create rules based on weight ranges for your shipping method to follow. For
example, you could create a shipping method that honors free shipping from 0 to 10 lbs, charges as
normal for 11 to 30 lbs, and charges and additional markup for anything over 30 lbs. Each of those rules
are created separately for your shipping method.
To Create a New Weight Rule:
© 2009 Network Solutions, LLC
Network Solutions, 13861 Sunrise Valley Drive, Herndon VA 20171
Networksolutions.com
Ecommerce User Manual
•
•
•
•
•
•
183
Specify the minimum and maximum weight limits for your new rule.
If you wish to have a markup for your shipping rule, specify whether the markup dollar or
percentage based, and then add the markup in the subsequent field. This markup is
automatically added into the shipping rates displayed at checkout.
If you wish your rule to honor Free shipping for any products that have the free shipping
designation, select the "Honors Free Shipping" checkbox.
Once you are satisfied with your rule, click the Add Shipping Rule button.
Once you've finished adding your rules to your shipping method, click the Save button at the
top.
To return to the Shipping Manager, click the Return button at the bottom.
Custom Shipping By Price
A Custom shipping rule based on price means that a customer's shipping prices are based on the total
cost of the order. You create rules based on price ranges for your shipping method to follow. For
example, you could create a shipping method that follows normal shipping from $0.00 to $100.00,
charges $5.00 shipping for orders between $100.00 to $200.00, and honors free shipping for any orders
over $200.00. Each of those rules are created separately for your shipping method.
To Create a New Price Rule:
• Specify the minimum and maximum price limits for your new rule.
• If you wish to have a markup for your shipping rule, specify the markup amount in the Price
field. This markup is automatically added into the shipping rates displayed at checkout.
• Select the region that this rule will apply to. For more info on setting up shipping regions, click
here.
• If you wish your rule to honor Free shipping for any products that have the free shipping
designation, select the "Free Shipping" checkbox.
• Once you are satisfied with your rule, click the Add Shipping Rule button.
• Once you've finished adding your rules to your shipping method, select the Enable checkbox, to
enable your shipping method. Click the Save button at the top to save your shipping method.
• To return to the Shipping Manager, click the Return button at the bottom.
183© 2009 Network Solutions, LLC
Network Solutions, 13861 Sunrise Valley Drive, Herndon VA 20171
networksolutions.com
184
E-Commerce Help Manual
Free Shipping
For Free shipping to correctly register for your customers on checkout, you must:
1. Select the "Eligible for Free Shipping" checkbox for the products you wish to have free shipping.
This option is located in Inventory > Products > Edit Products under the Advanced tab.
2. Create a shipping method that includes a rule with the "Honors Free Shipping" checkbox selected
or take one of your existing shipping methods (or USPS shippjng methods) and edit their rules to
"Honor Free Shipping"..
For Example:
You might want to give your customers the option of using USPS Ground for their Free shipping options.
To setup free shipping you would:
• Go to Operations > Shipping in the Control tab and navigate to the Custom Shipping Options.
• Select the USPS tab
• Click the Edit button next to the USPS Priority Mail shipping Method.
• In the Shipping method, click the Edit button next to the main rule (If you've added new rules to
this shipping method, you will need to edit all rules under the method).
• Select the "Free Shipping" option and click the Update button.
• Your shipping option should say TRUE under the Free Shipping Column.
•
•
Click the Save button to save your shipping option, then click the Return button at the
bottom to return to the Shipping Manager.
On the Shipping Manager page, click the Save or Save & Return button.
© 2009 Network Solutions, LLC
Network Solutions, 13861 Sunrise Valley Drive, Herndon VA 20171
Networksolutions.com
Ecommerce User Manual
185
Once you've set any products you wish to be free shipping eligible, your customers, when checking out,
will see your Free Shipping products with the Free Shipping icon on your storefront.
When they pick a shipping option, they will see that your USPS Priority ship will charge no shipping for
them.
185© 2009 Network Solutions, LLC
Network Solutions, 13861 Sunrise Valley Drive, Herndon VA 20171
networksolutions.com
186
E-Commerce Help Manual
If they add in products that DO incur shipping charges, only those items will be charged shipping.
For more information on setting making your products eligible for free shipping, please visit the
Products page here.
© 2009 Network Solutions, LLC
Network Solutions, 13861 Sunrise Valley Drive, Herndon VA 20171
Networksolutions.com
Ecommerce User Manual
187
Regions (Premium Only)
When creating custom shipping methods in the Premium Cart, you can control your shipping destinations
by creating regions. A shipping region is a collection of cities, states, provinces, territories, or countries
that you can ship your products to via a custom shipping method.
There are four default regions:
• United States
• Canada
• US and Canada
• Global
If you would like to ship elsewhere or restrict your shipping, you can edit any of the regions by selecting
it from the Region drop-down in the Add A New Rule section (Create or Edit a Custom Shipping Method
to be taken to the Custom Shipping Options page). You can also create your own region set by selecting
the Create New Region Set option at the bottom.
To create a new region:
• Select Create New Region Set from the drop-down.
• Enter a name for the Region set and expand the list of regions and countries with the [+].
• After they have been expanded, you can select any countries for the new set by placing a check
in the checkbox.
•
Once complete, click save.
187© 2009 Network Solutions, LLC
Network Solutions, 13861 Sunrise Valley Drive, Herndon VA 20171
networksolutions.com
188
© 2009 Network Solutions, LLC
E-Commerce Help Manual
Network Solutions, 13861 Sunrise Valley Drive, Herndon VA 20171
Networksolutions.com
Ecommerce User Manual
189
Users
For security purposes, any individual who will need to access your Control Panel should have a unique
user identity (username and password). The Manage Control Panel Users screen allows you to create
new users and modify the permission levels of existing users. The store owner and any user designated
as a Super Admin may delegate administrative tasks to other users.
To create a new user, go to the Operations Tab and click on Users. Enter the information required and
click Create User.
Once the user has been created, you control what this users sees and does not see. You may assign
permissions to some or all areas of the Control Panel. Simply click in a checkbox next to a section of
your store that your new userwill need to access.
If you click the checkbox for Super Admin, the user will have access to all areas of your store.
When you are finished, click Save Permissions at the bottom of the page.
189© 2009 Network Solutions, LLC
Network Solutions, 13861 Sunrise Valley Drive, Herndon VA 20171
networksolutions.com
190
E-Commerce Help Manual
Deleting Permissions/Users
© 2009 Network Solutions, LLC
Network Solutions, 13861 Sunrise Valley Drive, Herndon VA 20171
Networksolutions.com
Ecommerce User Manual
191
To delete one or more permissions for a user, go to your user list, select the user you wish to change,
and click Edit to open the Permissions section. Then simply un-check the box next to the permission(s)
to be removed, and the click Save Permissions at the bottom of the page.
To delete a user completely, simply click the corresponding Delete button for that user in your user list.
191© 2009 Network Solutions, LLC
Network Solutions, 13861 Sunrise Valley Drive, Herndon VA 20171
networksolutions.com
192
E-Commerce Help Manual
MonsterMarketPlace (MMP)
'What is the Monster Market Place?
The MonsterMarketplace is shopping directory that all Network Solutions e-commerce clients are given
the opportunity to submit their storefront for FREE.
• Your store will need to meet the MonsterMarketplace submission guidelines before being
accepted.
• Once accepted, you will receive an approval email with a link to your store landing page within
MonsterMarketplace.com.
• You will have the ability to edit and add information to enhance your store's listing.
How do I sign up for the MonsterMarketplace?
From the left side of your Control Panel, click on the "Manage Your Listings" link under the
MonsterMarketplace heading. This will take you to the main MonsterMarketplace Menu screen in your
Control Panel. Once you click on the "Sign Up" link a new window will open; this window contains the
Submission form for the MonsterMarketplace. Complete all of the information on the form to the best of
your ability and click Submit My Store at the bottom.
How do I manage my listings?
From the left side of your Control Panel, click on the "Manage Your Listings" link under the
MonsterMarketplace heading. This will take you to the main MonsterMarketplace Menu screen in your
Control Panel. When you click on the "Manage My Listing" link a new window will open. The new window
will direct you to your store listing on the MonsterMarketplace. Read the MonsterMarketplace Guide for
more information on how to manage and enhance your listings.
© 2009 Network Solutions, LLC
Network Solutions, 13861 Sunrise Valley Drive, Herndon VA 20171
Networksolutions.com
Ecommerce User Manual
193
Checkout Question
With Checkout Questions, you have the option of some more information about your customer before
they complete their order. To create a checkout questions, go to Operations tab and click on Checkout
Questions. The screen shot below shows an example checkout question.
You can have up to 15 checkout questions with up to 50 options or answers per question.
To create a Checkout Question
• Enter the question and select the input type. The following input types can be used for
checkout questions:
• Radio Button or Drop Down - The customer can select one attribute from a list of
options.
• Check box - Single - The customer can select the option. This can be used for simple
Yes or No answers.
• Check box - Multiple - The customer can select multiple attributes from a list of
options.
• Text - Single - The customer can enter one line of text. The store owner may set a max
character and line length and charge per character.
• Text - Multiple - The Customer can enter multiple lines of text. The store owner may
set a max character and line length and charge per character.
• Enter the answers for you checkout question. Individual answers can be hidden from customers
by un-checking the Enabled checkbox.
• For the Radio Button, Drop Down, and Text - Multiple answer options, you can specify a default
answer that is selected automatically. Simple enter in the default answer (for the Text Multiple) or specify your default option (for Radio Button and Drop Down).
• You can change the order of the answers in each question by clicking the blue arrows on the
right side of the individual answer.
• Set the question as Required, Enabled, or both.
• You can preview your checkout questions at any time by clicking the Preview in a new window
link.
193© 2009 Network Solutions, LLC
Network Solutions, 13861 Sunrise Valley Drive, Herndon VA 20171
networksolutions.com
194
E-Commerce Help Manual
Once you are satisfied with your checkout questions, click the Save or Save & Return button.
© 2009 Network Solutions, LLC
Network Solutions, 13861 Sunrise Valley Drive, Herndon VA 20171
Networksolutions.com
Ecommerce User Manual
195
Payment Manager
The Payment Manager is where you will create and manage your payment gateways which allow you to
accept real time credit card payments, and payment methods for manually processed transactions. If
you wish to use one of the payment methods supported by Network Solutions, you will need to have a
separate merchant account with the company or service using the gateway.
Setting up your Payment Methods
195© 2009 Network Solutions, LLC
Network Solutions, 13861 Sunrise Valley Drive, Herndon VA 20171
networksolutions.com
196
E-Commerce Help Manual
Credit Card Payments
To accept real-time credit card transactions, you must have a merchant account and setup up payment
gateway. Once your gateway is setup, you can add a surcharge, a specific confirmation message and
decide whether you wish to set the gateway to "Authorize Only".
© 2009 Network Solutions, LLC
Network Solutions, 13861 Sunrise Valley Drive, Herndon VA 20171
Networksolutions.com
Ecommerce User Manual
197
Setting up your payment gateway
To enable a real-time payment gateway:
• Select the desired credit card method from the drop-down menu, then select the Add button.
This will take you to the Edit Payment Method page.
•
On the Edit Payment Method page, enter the required information for payment gateway.
Each gateway requires different information and is covered in greater detail here.
NOTE: Make sure to enter your Payment Gateway information EXACTLY how you received from the payment gateway as
many of these values and fields are case-sensitive.
197© 2009 Network Solutions, LLC
Network Solutions, 13861 Sunrise Valley Drive, Herndon VA 20171
networksolutions.com
198
E-Commerce Help Manual
•
•
•
You can enter a dollar or percentage surcharge if you wish, and you may designate this
payment method as "Authorize Only" by selecting the checkbox.
Enter your custom confirmation message in the WYSIWYG editor. When Payment Gateway
Enabled is checked, the storefront can accept real-time payment.
Once you are satisfied with your payment method, select Save, or Save & Return.
Alternative Payments
Alternative and Offline Payments allow the store owner to offer checkout without a payment gateway.
PayPal Express and Google Checkout send the customer off-site to complete checkout.
NOTE: Offline payments may store payment information collected at checkout, but no funds are transferred at the time. This
feature is available in the Premium Shopping Cart only.
© 2009 Network Solutions, LLC
Network Solutions, 13861 Sunrise Valley Drive, Herndon VA 20171
Networksolutions.com
Ecommerce User Manual
199
Setting up an Alternative Payment Method
To create an Alternative Payment Method:
• Select the desired alternate payment method from the drop-down menu, then select the Add
button. This will take you to the Edit Payment Method page.
•
On the Edit Payment Method page, enter the required information for payment gateway.
Each gateway requires different information and is covered in greater detail here.
199© 2009 Network Solutions, LLC
Network Solutions, 13861 Sunrise Valley Drive, Herndon VA 20171
networksolutions.com
200
E-Commerce Help Manual
•
•
You can enter a dollar or percentage surcharge if you wish, and you may designate this
payment method as "Authorize Only" by selecting the checkbox.
Enter your custom confirmation message in the WYSIWYG editor. When Payment Gateway
Enabled is checked, the storefront can accept real-time payment.
© 2009 Network Solutions, LLC
Network Solutions, 13861 Sunrise Valley Drive, Herndon VA 20171
Networksolutions.com
Ecommerce User Manual
•
201
Once you are satisfied with your payment method, select Save, or Save & Return.
Note: This is not to be confused with Offline Credit Cards. Offline Credit Cards store cardholder information for the store owner
to manually process later.
201© 2009 Network Solutions, LLC
Network Solutions, 13861 Sunrise Valley Drive, Herndon VA 20171
networksolutions.com
202
E-Commerce Help Manual
Payment Processing
Listed below are the various options you have when processing payments. Many of these payment
processing options are available when you have your payment method set to "Authorize Only".
Authorize Only
"Authorize Only" allows the payment gateway to check the submitted credit card for address verification
and account standing but does not actually charge the card. You will have to go the individual order and
complete the charge yourself.
Charge
If your payment gateways credit card processing is set to Authorize-only you must charge orders using
the Charge button to collect the payment. Authorize-only approves or denies a transaction allowing you
to Charge when ready, typically when the order is ready to be shipped.
Void
If your payment gateway's credit card processing is set to Authorize-only you can Void orders when
needed to cancel the authorization. If you have already charged the order then you will need to Refund
the payment to cancel the transaction. Once the order is voided you can manually change the order
status to Cancelled.
Refund
You can use the Refund button if you have already charged an order and need to Refund the payment. If
you are refunding the full order amount please ensure that the correct amount to be refunded is in the
Refund Amount field and click the Refund Button. Once the order has been refunded you can manually
change the order status to Cancelled.
Partial Refund
You can refund part of an order amount using the Refund button if you have already charged an order
and need to Refund part of the payment . Simply enter the amount to be refunded in the Refund
Amount field and click the Refund Button.
© 2009 Network Solutions, LLC
Network Solutions, 13861 Sunrise Valley Drive, Herndon VA 20171
Networksolutions.com
Ecommerce User Manual
203
Required Fields for Payment Gateways
The following is a list of payment gateways and their associated required fields. At a minimum you must
fill in these fields to set up your payment gateway. Click on the gateway name below, which expands
text on the topic, gives some instructions for registering with the payment gateway, and contains a link
to the gateway's web-site.
NOTE: Make sure to enter your Payment Gateway information EXACTLY how you received from the
payment gateway as many of these values and fields are case-sensitive.
Payment Gateway Errors
You can specify the messages that your customers receive when they encounter an error using the
payment gateway you have setup.
To enter a new Payment error message:
• Enter the Error Code for the new message.
• Enter the Message text.
• Click the Create button.
203© 2009 Network Solutions, LLC
Network Solutions, 13861 Sunrise Valley Drive, Herndon VA 20171
networksolutions.com
204
E-Commerce Help Manual
Listed below are specific instructions for the supported payment gateways.
Network Solutions Merchant Account
The Network Solutions Merchant account services, in partnership with Global Payments, is a high
quality, comprehensive electronic payment solution with online processing, 24/7 customer support,
Point-Of-Sale equipment and support, reporting capabilities, and seamless, easy setup and activation.
Setting up a Network Solutions Merchant Account
1.
Click here to open a new window and apply for a Network Solutions Merchant Account.
o
2.
Once your merchant account is approved, you will receive instructions to generate a transaction key for the
payment gateway.
Enter the transaction key in the Transaction Key field.
3.
Add any desired text for your Confirmation Message in the confirmation field.
4.
Check the Activate this payment method.
5.
Click the "Save" button below.
For more information on the Network Solutions Merchant Account, click here.
Authorize.net Payment Gateway
Authorize.Net, A CyberSource Solution is a leading provider of payment gateway services and offers a
high trustworthy reputation, ease of integration, free customer support, scalability, and business
partnerships that help merchants minimize risk, reduce costs and increase revenue.
Setting up an Authorize.net Merchant Account
The Authorize.net Merchant account requires an API Login ID, and Transaction key, both of which are
given to you when you purchase an account with Authorize.net.
1.
Enter the API Login ID and Transaction Key in the requisite fields.
2.
Add any desired text for your Confirmation Message in the confirmation field.
3.
Check the Activate this payment method checkbox.
4.
Click the "Save" button below.
For more information on the Authorize.net Payment Gateway, click here.
© 2009 Network Solutions, LLC
Network Solutions, 13861 Sunrise Valley Drive, Herndon VA 20171
Networksolutions.com
Ecommerce User Manual
205
Chase Paymentech Payment Gateway
The Chase Paymentech Merchant Account utilizes the Orbital Virtual Terminal, which offers, a full suite
of payment options, all inclusive service, XML based API, and a host of other features and benefits.
Setting up a Chase Paymentech Merchant Account
The Chase Paymentech account requires a Merchant ID, Terminal ID and Routing Definition, all of which
are given to you when you purchase an account.
1.
Enter the Merchant ID, Terminal ID, and Routing Definition in the requisite fields.
2.
Add any desired text for your Confirmation Message in the confirmation field.
3.
Check the Activate this payment method checkbox.
4.
Click the "Save" button below.
Within the gateway settings for Chase Paymentech, the "Merchant ID”, "Terminal ID", and "Routing
Definition" and are all required fields.
• The Merchant ID is the same as the group number, is either 9 or 12 digits long and is given to
you by Chase Paymentech when you sign up.
• The Routing Definition is the same as the bin number so it will be either be 000001 or 000002,
dependent on the Group Number. Usually if the Merchant ID is 9 digits then the Routing
Definition # will be 000001. If the Merchant ID is 12 digits then the Routing Definition will
usually be 000002.
• The Terminal ID will always be 001.
Note: The server IP for your Ecommerce site is 205.178.191.180
For more information on the Chase Paymentech Gateway click here.
Cybersource Payment Gateway
The CyberSource is a leading provider of payment gateway services and offers a high trustworthy
reputation, ease of integration, free customer support, scalability, and business partnerships that help
merchants minimize risk, reduce costs and increase revenue.
205© 2009 Network Solutions, LLC
Network Solutions, 13861 Sunrise Valley Drive, Herndon VA 20171
networksolutions.com
206
E-Commerce Help Manual
Setting up a Cybersource Merchant Account
The Cybersource Merchant account requires a Merchant ID, which is given to you when you purchase an
account with Cybersource.
1.
Enter the Merchant ID in the requisite field.
2.
Enter your Cybersource Certificate image that you received so that it can be displayed on your store.
2.
Add any desired text for your Confirmation Message in the confirmation field.
3.
Check the Activate this payment method checkbox.
4.
Click the "Save" button below.
For more information on the Cybersource Payment Gateway, click here.
Linkpoint API Payment Gateway
The Linkpoint API offers comprehensive payment processing software which gives complete control to
the merchants over how payments are processed. It offers the ability to calculate tax and shipping,
sales, returns, real-time authorizations, purchasing cards, and real time reports.
Setting up a Linkpoint API Merchant Account
1.
Once your merchant account is approved, you will receive a Store Number that you use to connect with the Linkpoint
Payment center.
2.
Enter the Store Number in the requisite field.
3.
Enter your Linkpoint Certificate image that you received so that it can be displayed on your store.
3.
Add any desired text for your Confirmation Message in the confirmation field.
4.
Check the Activate this payment method.
5.
Click the "Save" button below.
For more information on the Linkpoint API, click here.
© 2009 Network Solutions, LLC
Network Solutions, 13861 Sunrise Valley Drive, Herndon VA 20171
Networksolutions.com
Ecommerce User Manual
207
Payflow Premium Payment Gateway
Payflow Payment Gateway is a fully customizable service that allows customer to complete transactions
securely on your website. Payflow Payment gateway allows you to accept credit and debit cards with
128-bit SSL encryption and is easy to setup.
Setting up a Payflow Payment Gateway
1.
Log in to your PayPal PayFlow Premium account manager. You must have a Paypal Manager Account. Click here to
begin creating your own Paypal Merchant Account.
2.
Navigate to Service Settings > PayFlowPro > Allowed IP Addresses.
3.
Enter the following IP address and click Update.
o
IP: 205.178.191.180
4.
Enter your Account ID, Password, and Partner ID in the requisite fields.
3.
Add any desired text for your Confirmation Message in the confirmation field.
4.
Check the Activate this payment method.
5.
Click the "Save" button below.
For more information on the Payflow Premium Payment Gateway click here.
Paypal Website Payments Premium Payment Gateway
PayPal Website Payments Premium is an advanced yet easy to use payment gateway that allows you to
control your customer experience from start to finish, with a fast checkout process, and a recognized
business standard.
Setting up a Payment Premium Payment Gateway
The Paypal Website Payments Premium requires that you have a Paypal Business account and setup both
Paypal Express Checkout and Paypal Direct Payments. Once you have setup your Paypal Express
methods, add the Paypal Website Payments Premium Payment method and enter your email address
associated with your Paypal Business Account.
207© 2009 Network Solutions, LLC
Network Solutions, 13861 Sunrise Valley Drive, Herndon VA 20171
networksolutions.com
208
E-Commerce Help Manual
Setting up Paypal Express Checkout
1.
Log into your PayPal account.
2.
Click My Account Tab.
3.
Click on the Profile Tab (on the right).
4.
Under the Account Information column, you should see the API Access link, click on that link (if you do not see it then your
account is not Premier or Business).
5.
In the API Access page, click on the first link, "Grant API Access Authorization".
6.
Click on the link below, "Custom API Authorization".
7.
Partner API username needs to be "billing_api1.monstercommerce.com".
8.
Select:
9.
o
o
o
o
SetExpressCheckout
GetExpressCheckoutDetails
DoExpressCheckoutPayment
DoDirectPayment
Click "Submit"
Setting up Paypal Direct Payment
The following steps assume that the PayPal account has already been set up for PayPal Express Checkout
by following the steps in the section above.
1. Log into your PayPal account
2. Click on the Profile section under the My Account Tab
3. Under the Account Information column, you should see the API Access link, click on that link (if
you do not see it then your account is not Premier or Business)
4. In the API Access page, click on the first link, “API Access Authorization”
5. Make sure API Account Name “billing_api1.monstercommerce.com” is selected
6. Click the Edit button
7. Makes sure that the following checkboxes are selected:
• RefundTransaction
• SetExpressCheckout
• GetExpressCheckoutDetails
• DoExpressCheckoutPayment
• DoVoid
• DoDirectPayment
• DoCapture
8. Click Submit.
Note: PayPal Express Checkout must be enabled in order for PayPal Direct Payment to be
enabled.
For more information on the Paypal Website Payments Premium Payment Method, click here.
© 2009 Network Solutions, LLC
Network Solutions, 13861 Sunrise Valley Drive, Herndon VA 20171
Networksolutions.com
Ecommerce User Manual
209
Plug'n Pay Payment Gateway
The Plug'n Pay WebXpress Payment Gateway offers seamless "plug-in" technology with automatically
generated code, transparent upgrades, easy integration, real-time transaction reports, and Quickbooks
Integration.
Setting up an Plug'n Pay Payment Gateway
The Authorize.net Merchant account requires an API Login ID, and Transaction key, both of which are
given to you when you purchase an account with Authorize.net.
1.
Enter your Username and Password, which you received when you purchased your Plug'n Pay payment gateway.
2.
Add any desired text for your Confirmation Message in the confirmation field.
3.
Check the Activate this payment method checkbox.
4.
Click the "Save" button below.
For more information on the Authorize.net Payment Gateway, click here.
USA ePay Payment Gateway
The Usa ePay Payment Gateway offers high functionality with an ease of use and solidity that customers
expect.
Setting up the USA ePay Payment Gateway
The USA ePay payment method requires a Transaction key which is given to you when you purchase an
account with USA ePay.
1.
Enter your Transaction Key in the requisite field..
2.
Add any desired text for your Confirmation Message in the confirmation field.
3.
Check the Activate this payment method checkbox.
4.
Click the "Save" button below.
For more information on the USA ePay Payment Gateway, click here.
209© 2009 Network Solutions, LLC
Network Solutions, 13861 Sunrise Valley Drive, Herndon VA 20171
networksolutions.com
210
E-Commerce Help Manual
eSELECTplus Canada
Moneris provides a powerful payment gateway that accepts major credit cards in both Canadian and U.S
Dollars, offers enhanced security and has several eFraud tools such as the Verified by Visa service,
Mastercard SecureCode®, Address Verification Service (AVS) and Card Validation Value (CVV)
Setting up an eSELECTplus Canada Payment Gateway
The eSELECTplus Canada Payment Gateway requires a Store ID and API token that you get from Moneris
when you sign up. Once you've entered this information, specify whether you wish to set the payment
gateway to Authorize Only and whether you will enable the AVS and CVV verifications.
Once finished, activate the payment method.
© 2009 Network Solutions, LLC
Network Solutions, 13861 Sunrise Valley Drive, Herndon VA 20171
Networksolutions.com
Ecommerce User Manual
211© 2009 Network Solutions, LLC
Network Solutions, 13861 Sunrise Valley Drive, Herndon VA 20171
211
networksolutions.com
212
E-Commerce Help Manual
Alternative Payment Methods
The following is a list of alternative payment methods and their associated required fields. At a
minimum you must fill in these fields to set up your payment gateway. Click on the method below
which expands text on the topic, gives some instructions for setting up the method, and, when
necessary, contains a link to the method's web-site.
Paypal Express
In order to sign up for PayPal Express Checkout you must have a Premier or Business PayPal Account.
To setup PayPal Express
• Log into your PayPal account.
• Click My Account Tab.
• Click on the Profile Tab (on the right).
• Under the Account Information column, you should see the API Access link, click on that link (if
you do not see it then your account is not Premier or Business).
• In the API Access page, click on the first link, "Grant API Access Authorization".
• Click on the link below, "Custom API Authorization".
• Partner API username needs to be "billing_api1.monstercommerce.com".
• Select:
• SetExpressCheckout
• GetExpressCheckoutDetails
NOTE: If you are setting up Paypal Express as a component of the Paypal Website Payments Premium
payment method, you will need to select DoDirectPayment as well.
• Click "Submit"
Google Checkout
Google Checkout allows you to use Google as a payment method that accepts Google Checkout
payments from your customer's Google Checkout accounts and charges no fees.
How To
1.
2.
3.
Set Up Google Checkout
Sign Up for Google Checkout.
Navigate to Settings >> Integration.
Enter API Callback URL: https://ecompayments.monstercommerce.com/Google.aspx
© 2009 Network Solutions, LLC
Network Solutions, 13861 Sunrise Valley Drive, Herndon VA 20171
Networksolutions.com
Ecommerce User Manual
213
4.
5.
Select Callback Method: XML.
In the 'Account Information' section, note your store's: Google Merchant ID and Google Merchant
Key.
6. Navigate to the payments section of your site’s control panel (this page).
7. Enter the Google Merchant ID and Google Merchant Key you noted in the Integration section of
your Google Checkout account.
Check
The Check method allows you the option of accepting customer checks for payment. You can enable or
enable and require the customer to enter their check number and the date payment will be sent.
Money Order
The Money Order payment method gives you the ability to accept money orders as payment from your
customers. You can enable or enable and require the customer to enter their money order number and
the date payment will be sent.
Customer Account
The Customer Account method allows you to accept payments from your customers using an offline
system to complete the transactions. You can enable or enable and require the customer to enter their
customer account number and purchase order number.
213© 2009 Network Solutions, LLC
Network Solutions, 13861 Sunrise Valley Drive, Herndon VA 20171
networksolutions.com
214
E-Commerce Help Manual
Cash On Delivery (COD)
The Cash On Delivery option allows you to complete your customer's transaction and send them their
order, receiving payment when their order is delivered to them. You can enable or enable and require
the customer to enter the date the payment will be made.
In Store
The In Store payment method allows you to collect customer payments from a brick and mortar store
and enter those payments in your site. You can enable or enable and require the customer to enter the
date the payment will be made.
© 2009 Network Solutions, LLC
Network Solutions, 13861 Sunrise Valley Drive, Herndon VA 20171
Networksolutions.com
Ecommerce User Manual
215
Settings
Settings offers administrative and cosmetic control over many site aspects. The settings menu is divided
into 7 tabs and the functions listed under each are loosely grouped by storefront or control panel
changes.
Within the Settings page, there are eight different tabs with options you can set up or create.
The list below is divided by tab. Each tab has its own set of fields that allow you to further configure
your site to suit your online business. Click on a link below for more information on a field within a tab.
General
The General tab is where you configure the general settings that apply throughout your site.
215© 2009 Network Solutions, LLC
Network Solutions, 13861 Sunrise Valley Drive, Herndon VA 20171
networksolutions.com
216
E-Commerce Help Manual
•
Company Name and default title tag - Enter your company's name which will appear in the
title bar on the browser.
• Primary sender email name - Specify the name displayed when sending an email from the
shopping cart.
• Primary sender email address - Specify the email address from which all your store
communications will be sent.
• Administrative recipient email address - Specify the default email address to which system
generated email will be sent.
NOTE: The Administrative recipient email address can be overridden for certain emails in the Design
section. For Instance, you could create a custom form that, when completed by the customer, is sent
to a different email address that you specify on that form. That email will override the default
administrative recipient email address for that custom form.
• Your local time - Set the local time for time-stamps on orders.
• Display "Powered by Network Solutions" message - Select this option to display the Network
Solutions Copyright
• Thumbnail, Display, and Detailed Image Sizes - Specify the size (in pixels) of your images.
© 2009 Network Solutions, LLC
Network Solutions, 13861 Sunrise Valley Drive, Herndon VA 20171
Networksolutions.com
Ecommerce User Manual
217
Region
The Region tab allows you to specify the time zone, currency and currency details for your store.
Time Zone - Specify the time zone your store will be set in.
Weights and Measures - Specify the
weight and measurement system used
by your store.
Region Preference - Specify the
preferred region from the drop-down
menu.
Site Currency - Specify the currency
used in your store.
Currency Symbol - Specify the symbol
used to denote currency in your store.
Products
The Products tab is where you
configure settings that affect the way
your products are displayed on your
site.
Label for MSRP price - This will
display next to the MSRP on the
storefront. Please note that this
price will only display if it is higher
than the price for your product.
Label for your price - This text
displays on the storefront by the
product's price.
Label for sale price - This text
displays on the storefront by the
product's sale price
Label for product savings - This
label appears next to the amount of
savings for a discounted product.
Display Customer Savings - Select
the following options from the
drop-down menu:
• Do not display product
savings
• Dollar amount ("You save
$30")
• Percentage ("You save 25%)
• Both Dollar amount and
Percentage ("You save
$30(25%)")
Display Links to the next and
previous product in the current
category - Select this option to
display the next and previous
products for the current category.
217© 2009 Network Solutions, LLC
Network Solutions, 13861 Sunrise Valley Drive, Herndon VA 20171
networksolutions.com
218
E-Commerce Help Manual
Display Email a Friend - Displays Email a Friend link on the product detail page. Please See Email a
Friend for more Information.
Display manufacturer in product detail - Displays the manufacturer name on the product detail
page.
Label for manufacturer - Specify a label for Manufacturer.
Label for manufacturer part number - Specify a label for manufacturer part number.
Label for part number - Specify a label for the part number. This will display next to the part
number on the storefront.
Variation Table Label - Specify a label for Product Variations.
Personalizations Label - Specify a label for Personalization Questions.
Variation Price Display - Select the following options from the drop-down menu:
• Display minimum and maximum price
• Display minimum price
• Display price only after a variation is selected
Display a "free shipping" icon with products, when applicable - Free Shipping image displays on
products marked as Free Shipping.
Display a "tax free" icon with products, when applicable - Tax Free image displays on products
marked as Tax Free.
Number of columns in product lists - 1-4 columns available in product lists.
Number of rows in product lists - Enter the number of rows for the product listing page.
Primary sort order for product lists - Specify the first level sorting used for your products.
Products can be sorted by name, price, and sort code.
Secondary sort order for product lists - Specify the second level sorting used for your products.
Products can be sorted by name, price, and sort code.
Show the page results information on product list - Select this option if you wish to display
products x- x of x page results.
Show the page size selector on page results - Select this option if you wish to show a drop down
menu with predefined numbers of products at the top of the product listing.
Show the page sort selector on product list pages - Select this option if you wish to display a drop
down menu with sort options at the top of the product listing.
Product List Purchasing - Select the following options from the drop-down menu:
• Do not allow product list purchasing
• Buy Button Only
• Buy Button and quantity box
Text to display on the homepage specials - Specify the labels for your homepage specials.
Number of columns to display for homepage specials - Specify the number of columns used to
display homepage specials. Up to three (3) columns are available.
Number of rows to display for homepage specials - Enter the number of rows for homepage
specials.
Homepage specials purchase - Homepage specials can be purchased with a buy button, a buy
button and quantity box, or not at all.
Location to redirect after adding products - After adding a product to the cart you may reload the
page, reload the page with a popup, view cart details, enter checkout, or return to the homepage.
Stock Display Message - On the product detail page a product can display an out of stock message,
the quantity in stock, whether it is in or out of stock, or no stock message.
Display products if not in stock - You can hide products out of stock, display products out of stock,
or display out of stock products and allow them to be purchased.
Message when product is in stock - Custom message to display on products in stock
Message when product is out of stock - Custom message to display on products out of stock
Display subcategory listings - Subcategories are listed on category listing pages
Number of columns to display for subcategories - 1-4 columns are available for subcategories.
© 2009 Network Solutions, LLC
Network Solutions, 13861 Sunrise Valley Drive, Herndon VA 20171
Networksolutions.com
Ecommerce User Manual
219
Orders
The Orders tab is where you specify your sites settings in regard to the orders you receive for your
products.
Message to display when the minimum order amount is not reached - This alerts the customer they
have not met the minimum order amount.
Minimum order amount - Customers must purchase a minimum amount before checkout is allowed.
Checkout
The Checkout tab allows you to configure settings that affect a customer's checkout process.
219© 2009 Network Solutions, LLC
Network Solutions, 13861 Sunrise Valley Drive, Herndon VA 20171
networksolutions.com
220
E-Commerce Help Manual
User Registration and Membership
Specify when and how customers can register with your site by selecting on of the drop-down items. Each Drop-Down Item is
explained below.
•
•
•
•
•
•
Enabled - Customers will be able to register on the site at any time where a registration link is provided.
Disabled - Customers will not be able to register on the site, and no links to registration will be provided by the cart
software.
Allowed only after checkout - Customers will be able to register on the site after an order has been completed.
Login required for checkout - Registration is enabled, and customers must login or register prior to placing an order.
Login required to access site (registration enabled) - Customers will be required to login to view the site and a
registration link will be provided on the login page.
Login required to access site (registration disabled) - Customers will be required to login to view the site, however, no
registration link will be provided. With this option enabled, a customer can only login to the site if an account is created for
them in the MCP.
Display customer IP address during checkout process - Select this option if you want to display your
customer's IP address during the checkout process.
Email address is option during checkout process - Select this option is you want to make entering an
email address optional during checkout process.
Check the "Billing address is same as shipping address" option by default - Select this option if you
want to make billing and shipping address the same by default.
Display shopping cart contents during checkout - Select this option if you want the shopping cart
contents to be displayed during checkout.
Display product images in shopping cart during checkout - Select this option if you want the cart
details to display a thumbnail image of the products.
© 2009 Network Solutions, LLC
Network Solutions, 13861 Sunrise Valley Drive, Herndon VA 20171
Networksolutions.com
Ecommerce User Manual
221
Allow international Customers (Premium Only) - Select this option if you want to allows international
customers to check out.
Shopping
The Shopping tab is where you can configure the basic settings that will affect your customer's shopping
experience.
Number of days to keep abandoned shopping carts - Specify how many days you want to retain
abandoned shopping carts. Shopping carts can be retained for 7.30.90, or 180 days.
Show breadcrumb navigation - Select this option if you want to display a breadcrumb trail site-wide.
Show thumbnails in the shopping cart detail page - Select this option if you want to display
thumbnails in the shopping cart detail page.
Display shipping estimates in cart details - Select this option if you want to add a shipping estimator
to the cart details page.
Display taxed states in cart detail - Select this option if you want to list states that will be charged
tax.
Continue shopping redirect - Specify how your continue shopping redirect will function. Select an
option from the drop-down menu:
• Previous Location
• Previous Category/Manufacturer Page
• Homepage
SEO
The SEO tab allows you to configure the basic settings for your site's Search Engine Optimization.
221© 2009 Network Solutions, LLC
Network Solutions, 13861 Sunrise Valley Drive, Herndon VA 20171
networksolutions.com
222
E-Commerce Help Manual
Default description meta tag content - Enter your description meta tag content.
Default keywords meta tag content - Enter your default keywords meta tag content.
Page URL Formatting - Specify how you wish your page URL formatting to function. Select an option
from the drop-down menu:
• Alphanumeric only (ex:myproductname.aspx)
• Delimit words with hyphens (ex: my-product-name.aspx)
Security
The Security tab is where you configure your site's security settings.
© 2009 Network Solutions, LLC
Network Solutions, 13861 Sunrise Valley Drive, Herndon VA 20171
Networksolutions.com
Ecommerce User Manual
223
SSL certificate type - Specify the SSL certificate type for you site. Select an option from the dropdown menu:
• Network Solutions SSL
• Your own SSL
Storefront domain name - Specify your storefront domain name.
Secure URL - Specify your secure path.
Google Analytics
Google Analytics
The Google Analytics tab is where you enable your google analytics tool using your tracking code.
223© 2009 Network Solutions, LLC
Network Solutions, 13861 Sunrise Valley Drive, Herndon VA 20171
networksolutions.com
224
E-Commerce Help Manual
Google Analytics Tracking Code - Enter Your Google Analytics Tracking Code here.
Enable Google Analytics - Select this option if you want to enable Google Analytics.
Retrieving your Google Analytics Tracking Code
When you login to your Google Analytics account to retrieve your tracking code, please note that the
code you enter into the Google Analytics Tracking Code field is not the entire HTML script that Google
provides.
To Retrieve your Google Analytics Code
• Login to your account at Google Analytics.
•
Click on Edit button located in the Settings column of your website profile. This will open the
Profile settings for your website profile.
© 2009 Network Solutions, LLC
Network Solutions, 13861 Sunrise Valley Drive, Herndon VA 20171
Networksolutions.com