1
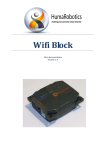
User Manual Pekee Open Robotic Platform Hardware and accessory overview IMPORTANT NOTICES WARNING: IN ORDER TO AVOID ANY RISK OF ELECTROCUTION, DO NOT REMOVE THE HOOD OF THE UNIT. THIS UNIT DOES NOT CONTAIN ANY USER-FIXABLE PARTS. CONTACT A QUALIFIED TECHNICIAN FOR REPAIRS. DANGER: TO REDUCE RISKS OF FIRE AND ELECTRIC SHOCK DO NOT EXPOSE UNIT TO RAIN OR HUMIDITY. WARNING: TO REDUCE RISKS OF FIRE AND ELECTRIC SHOCK, AS WELL AS INTERFERENCE, USE ONLY AUTHORIZED ACCESSORIES. DISCLAIMER WANY S.A. WILL NOT ACCEPT ANY RESPONSIBILITY FOR DAMAGE CAUSED BY INCORRECT USE OR UNAUTHORIZED MODIFICATIONS OF THE PRODUCT OR ACCESSORIES. PRODUCT DESIGNS AND SPECIFICATIONS ARE SUBJECT TO CHANGE WITHOUT NOTICE. THE PEKEE ROBOT AND ITS ACCESSORIES ARE PROTECTED BY PATENTS AND/OR REGISTERED DESIGNS. FCC NOTICE (U.S. ONLY) THIS PRODUCT (PEKEE WP001) HAS BEEN CERTIFIED FOR HOME OR OFFICE USE. ASSEMBLED FROM TESTED COMPONENTS (COMPLETE SYSTEM NOT TESTED). Regulatory notices This device complies with Part 15 of the FCC Rules. Operation is subject to the following two conditions: (1) this device may not cause harmful interference, and (2) this device must accept any interference received, including interference that may cause undesired operation. In accordance with FCC requirements, changes or modifications not expressly approved by Wany S.A. could void the user's authority to operate this product. NOTE: This equipment has been tested and found to comply with the limits for a Class B digital device, pursuant to Part 15 of the FCC Rules. These limits are designed to provide reasonable protection against harmful interference in a residential installation. This equipment generates, uses and can radiate radio frequency energy and, if not installed and used in accordance with the instructions, may cause harmful interference to radio communications. However, there is no guarantee that interference will not occur in a particular installation. If this equipment does cause harmful interference to radio or television reception, which can be determined by turning the equipment off and on, the user is encouraged to try to correct the interference by one or more of the following measures: -Reorient or relocate the receiving antenna. -Increase the separation between the equipment and receiver. -Connect the equipment into an outlet on a circuit different from that to which the receiver is connected. -Consult the dealer or an experienced radio/TV technician for help. CE MARK NOTICE THIS EQUIPMENT COMPLIES WITH THE ESSENTIAL REQUIREMENTS OF THE APPLICABLE EUROPEAN UNION DIRECTIVES. GUARANTEE Wany products are guaranteed for a period of 12 months against defects due to faulty workmanship or materials applicable under the conditions described in this section. The guarantee is void if the defect is due to accidental damage, misuse or neglect on the part of the user, if the damage is caused by usage under abnormal conditions, if the unit has been repaired or modified by unauthorized parties, or if the damage is caused by accidents including but not limited to lightning, water, or fire. Wany is not responsible for accidents or consequential damage resulting from misuse of the product. There are no expressed nor implied guarantees other than those mentioned here. WANY’S LIABILITY IS LIMITED TO THE REPLACEMENT OR REPAIR OF DEFECTIVE PARTS AS COVERED BY THIS GUARANTEE. THE GURANTEE IS APPLICABLE FOR DEFECTS REPORTED WITHIN 12 MONTHS FOLLOWING PRODUCT DELIVERY. The guarantee is valid for the original owner of the product only. If, despite normal use and proper care, something should go wrong with your Wany product under the terms of this guarantee, you should immediately inform your distributor or supplier by mail or electronic mail, describing the defect in detail. You will be asked to provide the purchase contract number or other proof of purchase as well as identification and serial numbers of the defective parts. If it is necessary to return a defective product, the defective product should be sent in its original packaging or in another providing as much protection as the original (shipping and handling at the sender’s expense). Please include a copy of the original invoice. According to these terms and for a period of 12 months, Wany guarantees replacement and/or reparation of the acknowledged defective parts free of labor and return shipping charges. Labor includes dismantling, re-assembling and/or return to factory. Extensions to the standard guarantee are available from Wany Robotics. Copyright 2002 Wany. All rights reserved. No part of this documentation may be reproduced or transmitted in any form by any means, electronic or mechanical, including photocopying or recording on any information storage and retrieval system, without prior written permission from Wany. While every precaution has been taken in the preparation of this documentation, Wany S.A. does not assume any responsibility whatsoever for error or omissions or for damages resulting from the use of the information contained herein. The pictures and technical features described in this documentation are non-contractual and are subject to change without notice. In Europe: Wany Robotics Cap Alpha Avenue de l’Europe, Clapiers 34940 Montpellier Cedex 9 Phone: +33 4 67 59 36 26 Fax: +33 4 67 59 30 10 www.wanyrobotics.com e-mail: [email protected] In Asia: Wany Robotics Pte Ltd. 130A Hillview Ave, #10-02 Singapore 669609 Fax: (65)-68926277 e-mail: [email protected] Pekee, Robotic Software Lab, Wany RSL, OPP, Wany Robotics, and the Wany logo are trademarks of Wany S.A. All other company and product names mentioned in this documentation are trademarks or registered trademarks of their respective holders. (WP001-1.5) CONTENTS 1 Getting started ............................................. 7 Package contents.................................................................................................. 7 Charging your robot............................................................................................... 8 2 Hardware overview .................................... 11 Description .......................................................................................................... 11 Specifications ...................................................................................................... 12 Standard equipment ............................................................................................ 12 Start-up................................................................................................................ 14 General precautions ............................................................................................ 15 Removing the upper body ................................................................................... 15 3 Plug-in cartridges ...................................... 16 Overview ............................................................................................................. 16 Embedded PC cartridge ...................................................................................... 17 Video cartridge .................................................................................................... 20 Wireless cartridge................................................................................................ 22 4 Troubleshooting......................................... 24 Errors................................................................................................................... 24 Power supply specifications ................................................................................ 26 Support policy...................................................................................................... 26 Contacting technical support ............................................................................... 26 Package contents 1 Getting started Package contents Congratulations and thank you for choosing Wany’s Pekee robot. Pekee is a mobile robot capable of autonomous behavior and movement, and that you can customize with your own applications. This open robotic development platform and accompanying software will help you explore robotics at all levels, depending on your goals. As our client, you have become a Wany Partner and privileged customer. Before you start working with your Pekee Robot, please make sure that your package contains all the parts listed below, that they are undamaged, and that they are in good working order. Your Pekee package includes: Pekee robot with Five expansion slots (three of which are directly accessible on the top side of the device; the other two are inside) Foam inserts to cover the unused cartridge holes A three-wheel motor mechanism with two powered front wheels and a rear caster wheel Video cartridge (embedded PC with camera attached) PS/2 connector cable splitter Wi-Fi wireless Ethernet cartridge, user documentation, and software Attachable antenna for Wi-Fi cartridge Robot power supply and cable (24V 8A direct current) This instruction manual Documentation for the Wany Robotic Software Lab (formerly SDK-PR) CD-ROM with the Wany Robotic Software Lab (formerly SDK-PR), documentation, and other software applications help you understand and develop with your Pekee robot. Also includes software, samples, and documentation for the Pekee robot and its accessories. A single-user license of the Wany Robotic Software Lab (formerly SDK-PR). You will find the serial number for installation on the CD Label. Windows® User License Registration card to get access to Wany Partners web site If any of the above listed elements are not included in your package without prior agreement or notice, please contact Wany Robotics directly. Wany Robotics Pekee User Manual 7 Charging your robot Charging your robot Before using the Pekee robot for the first time, or in case of prolonged stoppage (i.e. more than one month), you should completely recharge the unit using the included power supply, shown here: On/off rocker switch Status indicator Power supply plug Pekee plug Figure 1 – Pekee power supply To charge your Pekee 1. Plug the power supply into a grounded electrical socket. 2. Plug the robot’s charging cable into the Pekee socket shown here: Charging socket plug 3. The charger will stop automatically after fully charging the batteries (around 1 hour 20 minutes). 4. Due to the nature of rechargeable batteries, there will be a slight decrease in a “full charge”. If the unit has been in storage for a month or more, or if you are doing demonstrations where you need to be sure that the batteries maintain their maximum charge, wait one minute and start the charger again. Wany Robotics Pekee User Manual 8 Charging your robot Note The charging unit will always shut itself off before harming batteries. For best performance, it is best to use as much of a charge as possible before recharging your unit. After the battery pack is fully charged, your Pekee Robot is ready for use. Status indicators The color of the LED on the charger indicates current flow to your robot. Green: Full or nearly full batteries Orange: Batteries are low and charging normally Red: Batteries are extremely low and charging normally If your Pekee is connected to your PC, you can use the Environment software module to view the actual battery levels in your robot. Hint: if these levels plunge rapidly, it’s because accessory cartridges are pulling on the unit’s main batteries. Robot’s real battery level Wany Robotics Pekee User Manual 9 Charging your robot Notes The Pekee power supply provides the voltage necessary for recharging of the Pekee’s battery packs and those contained in plug-in cartridges. The power supply comes with an output cable equipped with a Pekee-compatible connector, and a power cord (CEE 22). If you need another socket type please contact Wany or your supplier. Make sure that the unit is turned off before you insert or remove any add-on cartridges, with the power supply turned down and in the OFF position. With the power off, you may insert and remove cartridges freely. Figure 2 – The Pekee™ Robot Wany Robotics Pekee User Manual 10 Description 2 Hardware overview This section describes the various components and technical details of your Pekee robot. Description Pekee is driven by two independent motorized wheels, with a free-rotating caster wheel at the back. This layout offers substantial mobility – for example the unit can do an on-the-spot U-turn. Figure 3 – Bottom view The Pekee robot’s movement and obstacle avoidance is automatically controlled by patented Wany Robotics software that uses embedded distance sensors. The unit’s infrared sensors also allow it to communicate with other nearby devices and appliances, such as another robot, a PC, or a docking station. The body Pekee’s body is made of an ABS plastic self-supporting structure built on two rigid parts fixed together, plus a flexible hood. There are three slots directly accessible on the upper portion of the unit – these may be used for accessory or your own custom add-on cartridges. Removing the upper body, you may access two additional Wany proprietary Open Parallel Platform bus (OPP) slots – one in the front and one at the rear of the unit. UNDER NO CIRCUMSTANCES SHOULD YOU PLUG IN NON-OPP BOARDS INTO THE OPP BUS. There are also four sockets intended for small I2C compatible peripherals, and a socket to plug in the Pekee reprogramming module. Wany Robotics Pekee User Manual 11 Specifications Specifications Dimensions Overall length: 40 cm (18.9 in.) Length without tail: 37 cm (13.6 in.) Overall width: 25.5 cm (10 in.) Width between driving wheels: 22.5 cm (8.85 in.) Height without accessories: 21 cm (8.26 in.) Weight 2.9 kg (6.3 lbs) without accessories Autonomy 15 hours maximum (with little movement and no accessories) Approximately 1 hour 30 minutes of continuous movement Maximum speed 1 meter/second (3 feet/second) Rotation 360° in a circle of 70 cm (27.5 in.) in diameter Standard equipment 15 infrared telemeters (up to 10 measurements/second using patented technology) 2 odometers (180 impulses/wheel-turn) 1 shock sensor 2 gyrometers (pan and tilt) 1 light sensor 2 temperature sensors 2 x 12V rechargeable battery packs (NiMH) 1 variable frequency buzzer 1 slow charging light (red LED) 1 operating light (red LED) Infrared link for communication between robots and peripherals Serial infrared link for data transfer between Pekee and docking station or PC 16-Mhz Mitsubishi micro-controller (16-bit), with 256 KB Flash-ROM and 20 KB RAM Wany Robotics Pekee User Manual 12 Standard equipment 4 slots for accessories with I²C bus (Figure 3 (2)) 5 slots for accessories with Wany Open Parallel Platform (OPP), patented technology offering multi-master to multi-slave high-bandwidth data transfer (Figure 3 (1)) Connectors Pekee is equipped with the following connectors: 5 x 120 contact connectors for OPP bus (not compatible with PCI bus) 4 x 10 contact male connectors (HE10 type), for PC accessories 1 x 10 contact female connector, (HE10 type), for reprogramming Pekee micro-controller 1 rectangular connector with 2 male contacts for fast charging 1 coaxial connector with 2 circular male contacts for slow charging 2 metallic contacts on the lower panel for fast charging using an appropriate docking/charging station OPP Slots (1) Programming Slot (3) I2C Slots (2) I2C Slots (2) Figure 4 – Overhead view (with cover off) of Pekee connectors Wany Robotics Pekee User Manual 13 Start-up Start-up The picture below shows useful slots and indicators: Fast charging slot (4) Slow charging slot (5) Slow charging light (6) On/Off light (red blinking LED 8 times/s) Figure 5 – Charging points and indicator lights For best performance the battery pack should be fully charged. To start the Pekee robot, use the on/off switch on the underside of the unit. A short press turns the robot on, confirmed by a beep A long press (more than 4 seconds) turns the robot off Note Once the switch is in the off position, you must wait a few seconds before turning Pekee back on. Infrared module for detecting connection with docking station On /Off switch Charging plates Figure 6 – Underside view Using the main on/off switch turns the robot on and activates all installed modules. Wany Robotics Pekee User Manual 14 General precautions General precautions The Pekee robot is intended for operation in environments where the ambient temperature is between 10° C and 40° C (50° F and 100° F). Maximum humidity should not exceed 80%. Pekee is not waterproof and should not be used in environments where moisture can cause electric shock or damage the unit. In our efforts to optimize the accumulator recharging, we recommend turning the Pekee robot off to charge the unit and its cartridges. Do not plug in two charging systems simultaneously. Use a soft, clean and dry cloth without chemical products to clean your robot. Never plug in standard PCI computer peripherals into the Pekee’s OPP expansion slots, even if they are the same size and format. This can cause irreparable damage to both the Pekee unit as well as on the boards you insert. To avoid electrostatic discharge (ESD), do not touch the 120contact male connectors on Pekee cartridges. Removing the upper body Use a Phillips screwdriver to remove the unit’s upper body cover. Take out the two screws located on each side inside the central expansion card cavity. In order to put a body back on, align the plastic correctly and be careful to put the plastic returns securely inside the central cavity of the upper body. Before placing the cover back on, ensure that the two plate nuts are correctly fastened. Clip the body on to the groove all around Pekee and ensure that it is tucked in around the entire unit. To hold the unit firmly together, place the two cruciform screws back in the plate nuts. It is normal for the plastic to be slightly bent when attached correctly. Wany Robotics Pekee User Manual 15 Overview 3 Plug-in cartridges Overview The Pekee robot is designed to accept expansion cartridges that plug in to the main board’s OPP bus. Pekee comes standard with one or more cartridges, including an embedded PC. You can also create your own cartridges using accessory Wany OPP Prototyping Boards. Expansion cartridges draw power from the OPP bus, and can manage their own battery packs as necessary (if they have one). The cartridges are equipped with an orientation key to ensure proper insertion. To install a cartridge, line up the case with the slot and push it inside until you feel a slight resistance – indicating solid contact of the board’s OPP connectors into the white connector at the bottom of the slot. Press firmly to ensure a proper connection. Figure 7 – Inserting & removing a cartridge To remove a cartridge, grasp it firmly and pull up vertically until it is completely released from the body (use the cartridge’s handle if there is one). Note You can remove the handle by sliding it horizontally and pushing it forward strongly enough for the two safety lugs to come off. To put the handle back on, slide it along the grooves until both lugs are engaged inside their slots. To avoid electric shock and damage the unit, always turn the Pekee off before inserting or removing cartridges. Do not insert cartridges while the robot is being charged. Wany Robotics Pekee User Manual 16 Embedded PC cartridge Expansion cartridges with accumulators are equipped with a jack connector at the bottom, allowing the board to be charged without having to connect it to a Pekee robot. Make sure you follow product-specific instructions for each board and battery pack you use. Ventilation holes Individual power connector OPP connector with orientation key Figure 8 – Cartridge overhead view Note Wany’s cartridges are not intended for use outside a Pekee robot. Wany Robotics is not responsible for any damage resulting from misuse. Embedded PC cartridge Overview The standard Pekee PC cartridge is a completely autonomous embedded computer that can run any Intel® x86 compatible operating system. Based on an Intel® 486 compatible processor, with RAM, a flash hard disk, as well as SVGA, keyboard/mouse and Ethernet 10/100Mbps network connector. Figure 9 – Pekee's embedded PC cartridge Wany Robotics Pekee User Manual 17 Embedded PC cartridge Technical specifications Features 486 micro-processor running at 75 MHz 32MB PC100 SDRAM 128MB compact flash hard disk SVGA controller with 4 MB (shared memory) 10/100 Mbps Ethernet controller (IEEE 802.3) USB V1.1 controller at 12 Mbps PS/2 keyboard/mouse controller OPP® bus compatible Power switch On/Off LED 1 Reset switch Connectors 1 Sub-D 15 point female (SVGA) 1 mini-DIN female connector PS/2 (keyboard/mouse) 1 RJ45 connector (Ethernet) 1 USB double type A connector 1 coaxial male connector for autonomous fast battery charging 1 OPP connector Network connection Switch (reset) Mini-DIN keyboard/mouse socket Green LED (“On” indicator) SVGA connector 2 USB connectors On/Off switch Figure 8: Top view of a cartridge Details The top side of the standard embedded PC cartridge (see picture) offers common PC connectors. You may connect an external display, up to two USB peripherals, and an Ethernet connector. The mini-DIN connector allows you to connect a keyboard and a mouse using the provided splitter. Without the splitter, you can only connect a keyboard. Wany Robotics Pekee User Manual 18 Embedded PC cartridge Use You will see two buttons on this cartridge: The extended push-button is used to switch the cartridge On/Off. When the cartridge is connected to the Pekee, it is switched on and off at the same time as the robot is switched on and off. When the cartridge is used alone, this button lets you switch it on and off the same way you are doing for the Pekee: a short press switches on the cartridge, while a long press (5 seconds) switches it off. These commands can also be used when the cartridge is connected to the Pekee unless blocked by the Pekee. The recessed button resets the cartridge. A green LED shows if the cartridge is switched on or not. When turned on, the cartridge gives off heat, so it is best to let it cool down before recharging it, in order to optimize charge and battery life expectancy. Wany Robotics Pekee User Manual 19 Video cartridge Video cartridge Overview The video cartridge includes the standard embedded PC as described above, as well as a video acquisition card and a camera. It comes with its own power supply and is OPP compatible. The cartridge adds new features to your Pekee and expands the field of applications you can develop. Through the OPP interface the cartridge can communicate with the Pekee platform and with any other connected cartridge. The video cartridge has all the standard connectors you can find on a PC, and so can be used alone, like any desktop PC. The camera is connected via a coaxial connector and a 5V power supply cable. The cartridge comes with its own battery pack that can be charged directly using a specific connector, or using the Pekee charger when it is connected to the OPP bus. Technical specifications Features Same as Standard Embedded PC cartridge as described above Video acquisition card (CVBS signal) Connectors Same as Standard Embedded PC cartridge as described above 1 SMB male coaxial connector for composite input 1 jack mono female connector for camera energy supply Video camera specifications Features Compact size (22 x 22 x 28 mm) Low power consumption Integrated lens with IR filter Automatic exposure control Black levels auto calibration Automatic whites balance Resolution: from 160 x 120 pixels to 640 by 480 1/3” CMOS camera 2:1 interlaced scanner Wany Robotics Pekee User Manual 20 Video cartridge Connectors 1-Vcc composite Video output 5-V power supply connector Details For video applications, there is a composite coaxial connector (CVBS) which is used to input signal from the camera. A female jack connector provides a 5-V, 100-mA power supply for the camera; the connector is contained in the ventilation hole. Use There are several ways to make sure that the camera and video acquisition card are functioning properly. First check that the camera is correctly connected to the cartridge. Then connect keyboard, mouse and display to the cartridge. After cartridge has booted and the Windows® operating system (installed by default) has started up, open an Explorer window and go to the “c:\bin” directory. This directory contains the applications delivered by Wany. Run vidfull.exe, and images captured by the video camera should be displayed in full screen mode. The display should be very smooth because this application uses “overlay” mode (i.e. the acquisition card directly send images to the computer video display memory, by-passing the operating system). Press ENTER to quit this application. For more advanced tasks, run configure.exe, which lets you change resolution, color coding, luminosity, and image contrast (using sliders and check-boxes) in real-time. You can develop your own applications using CodecSAA7111A.dll. The installation directory also contains several source code examples. The Graphic Development Kit (GDK) from ST-Microelectronics is also included. It is a Visual C++ 6.0 project that gives access to the APIs for controlling the processor, in particular the APIs related to the video acquisition card. For more information, please refer to the Help files available on the PC cartridge hard disk and on the accompanying CD-ROM. Wany Robotics Pekee User Manual 21 Wireless cartridge Wireless cartridge Overview This cartridge adds wireless capabilities to your Pekee and greatly expands the field of applications you can develop. The wireless cartridge includes a standard Wi-Fi (802.11) wireless Ethernet bridge from Linksys. It takes power directly from the Pekee’s OPP bus. Technical specifications RJ45 cable External antenna Setup CD-ROM with user guide Up to 11 Mbps high-speed transfer rate Capable of up to 128-Bit WEP Encryption Key features Web-based administration interface No special driver required Does not require use processing power from the host PC cartridge Easy to install Operating Range Indoors: Up to 50 m (164 ft.) @ 11 Mbps Up to 80 m (263 ft.) @ 5.5 Mbps or lower Outdoors: Up to 150 m (492 ft.) @ 11 Mbps Up to 300 m (984 ft.) @ 5.5 Mbps or lower Note Wany Robotics The antenna for the Wi-Fi cartridge is detached for shipping. You will need to screw it in to the cartridge (as shown above) before using it. Pekee User Manual 22 Wireless cartridge Setup Simply plug the cartridge into the OPP bus and connect the included Ethernet cable into the LAN port of the PC cartridge. Default configuration The wireless cartridge comes pre-configured to be used on a wireless network named “pekeew”, without any WEP key encryption. Advanced configuration The Linksys setup utility Setup.exe is installed in the directory C:\ProgramFiles\Linksys directory of your PC cartridge. In case it is not installed you may copy it from the accompanying Linksys CD-ROM. This setup utility will let you configure all the parameters of the wireless cartridge Ethernet bridge. For more information on modifying parameters and special configurations, please refer to the Linksys user manual. Note Wany Robotics You can also configure the wireless cartridge (while it is plugged in the OPP bus) by connecting it directly to the LAN port of your desktop PC. Pekee User Manual 23 Errors 4 Troubleshooting Errors Symptom Probable cause Remedy The robot does not move, nothing happens. The robot is not on. Turn on the robot with the on/off switch – you will hear a beep and the red LED at the rear of the robot will start blinking. The red LED at the rear does not blink. The LED’s auto-start software has been disabled. Stop the robot and turn it back on. The red LED at the rear of the robot does not blink or the beep cannot be heard at the start. The robot’s batteries are empty. Connect a power supply to fully recharge the batteries. The red LED at the rear of the The power level in the motor robot blinks but the robot does batteries is too low. not move. Connect a power supply to fully recharge the batteries. The red LED at the rear of the The initial automatic obstacle robot blinks but the robot does avoidance program has been not move. disabled. Stop the robot and turn it back on. The red LED at the rear of the The batteries or engine connectors robot blinks but the robot does may be disconnected (i.e. after a not move. shock. Contact support services, or open the robot and check the connectors. The robot moves but it turns in An motor connector is defective. circles. Contact support services, or open the robot and check the motor connectors. The robot moves but it turns round and round. A wheel hub may be have come unscrewed. Contact support services, or screw on the wheel hub. The robot avoids some obstacles but runs into others. One or more IR distance sensors may be defective or blocked. Examine the IR sensors (you should be able to see a small, slightly transparent ball at the bottom of each case) or contact support services. The robot does not go straight ahead and runs into obstacles. The rear caster wheel may be blocked. Examine the rear wheel and clean it if necessary. While charging the robot with 24V-power supply the power supply LED is off. The power supply is not correctly plugged in, or the robot’s charging cable is not correctly plugged in, or the power supply switch is in the OFF position. Plug the charging cable to the robot, the power supply to the wall socket, and switch on the power supply. Wany Robotics Pekee User Manual 24 Errors Symptom The robot’s batteries are empty and when you turn on the power supply, it takes a few minutes for the light to turn green. Probable cause Remedy The batteries or another component of the charging control in the robot may be defective. Contact support services. The cartridge case does not fit The cartridge may be inserted in the slot intended to hold it. backwards. Insert the case so the front is oriented towards the robot’s front. The cartridge case fits in the case but it does not seem to be correctly connected. Dust or some other object may be blocking the female connector in the robot. Clean the robot OPP connector. I want to insert a board without a case but it does not work. The board has been inserted backwards. The board should have a notch, which should be inserted facing the OPP connector orientation key. The cartridge does not fit to the connector. The position of the cartridge is incorrect. Use the cartridge’s orientation key to determine the correct direction for insertion. The robot does not move well. The suspension may be unscrewed. Tighten the screws on the metallic suspension located under the robot with a Phillips screwdriver. You tried to reprogram the frame board’s controller but the result is not as expected. Put a block under the suspension to raise the wheels, turn on the robot and connect the PC-serial port interface to reprogram the microcontroller. The robot was not turned on during reprogramming. The cartridge does not fit to The cartridge is probably not the connector even though the completely inserted. insertion position is correct. Press on the top of the cartridge to seat it firmly in the OPP bus. The cartridge is correctly inserted but it does not work. The cartridge is not turned on. Push on the on/off button on the cartridge to turn it on. The cartridge is correctly inserted but it does not work. The robot and/or cartridge’s batteries may be empty. Charge the robot and its cartridges with the charger. The cartridge is correctly inserted but does not work Some electronic components may be damaged on the cartridge or there may be a short-circuit. If it is a custom circuit made using a wrapping card, check the circuit and ensure that each component is in proper working order. If it is a standard board provided by Wany, please contact support services. Wany Robotics Pekee User Manual 25 Power supply specifications Symptom The embedded PC cartridge does not seem to be working. Probable cause The Compact Flash board may not be correctly connected. Remedy Examine Compact Flash board connection on the embedded PC cartridge. Power supply specifications AC input: 2.5A/230v (from 176 to 264VAC) from 47 to 63Hz DC output: 24v 8 A Dimensions: 15 cm x 14 cm x 8.6 cm (6 in. x 5.5 in. x 3.4 in.) Weight: 1.4 Kg (3 lbs) Automatic fan Support policy Technical support for Pekee products is provided via telephone, fax, or e-mail. We provide free support for the 30 days following the date of purchase. In order for us to process your request as quickly as possible, please send your inquiry via e-mail. Contacting technical support EUROPE Wany, S.A. Cap Alpha Avenue de l’Europe, Clapiers 34940 Montpellier Cedex 9 France Tel: +33 467 593 626 Fax: +33 467 593 010 www.wanyrobotics.com [email protected] In other countries please contact your local distributor. Wany Robotics Pekee User Manual 26