1
iEye Captain Manual
version 1.0.6.3
Page 1 of 58
iEye Captain
User’s Manual
Current as of version 1.0.6.3
Last Updated March 2007
1.0.6.3 manual changes:
•
•
•
•
minor corrections
revised System Requirements with Leopard notes
expanded infrared setup instructions
added “Force Video Input” tool notes
THERE ARE A TABLE OF CONTENTS, LIST OF MENUS,
INDEX OF SCREENSHOTS, CONTACT INFO,
AND OTHER HANDY REFERENCES AT THE END OF THIS MANUAL.
iEye Captain character courtesy of Jonny Gorden at Zero Gravity Entertainment.
If you’re in Australia (or anywhere else) and need 3D services, check out his work,
at http://www.zerogravity.com.au , or phone at +61 408 733 375.
Mac and the Mac logo are trademarks of Apple Computer, Inc.,
registered in the U.S. and other countries.
iEye Captain Manual
1.
version 1.0.6.3
Page 2 of 58
INTRODUCTION
Welcome to iEye Captain, the Swiss army knife for your EyeTV. If you own an EyeTV product,
you are already in an elite league--- someone who has invested in the power of a Macintosh, and
who has high standards and expectations for your video media. You won’t be disappointed in
iEye Captain; well on the contrary, you will find it opens doors for you that you won’t be able to
live without! If you’re eager to get started, you may want to jump ahead to section 2. If you
want the “Big Picture,” please read on!
1A.
FOREWORD: The Story of iEye Captain...
I’m a self-confessed taping junkie. I work professionally as a prime-time television
writer/editor, and love recording content for later study or entertainment. I got an EyeTV for
Christmas in 2004, and was hooked from the beginning. I taped a 22 hour Stargate marathon and
a 4-hour Battlestar Galactica miniseries back to back, and when I discovered that I was able to
edit out commercials on one show while another was exporting and yet another was recording...
I was hooked!
But pretty soon I realized that there were many things I wanted to do with the software, that it
couldn’t do. Why couldn’t I control my digital cable box from EyeTV? Use a second hard drive
when the first was full? Export the schedule data to a database to print DVD labels? I sent
several long lists of suggestions to Elgato. They were very helpful, but I couldn’t wait to get
more functionality out of my unit.
So I thought... Why don’t I write an Applescript to export multiple schedules at once? To
export the schedule data to Filemaker, and iCal? To get data on the file sizes so I know what
will fit on a DVD? There must be a way to automate my digital cable box through infrared...
Then it hit me... There were lots of other people who needed this stuff too. Why don’t I put a
handy interface on all of this?
So I put together a list of all the features I had suggested to Elgato and things I had seen other
people post, and got to work! I contacted StudioZee and IRTrans, and they sent me evaluation
units of their infrared devices. Elgato has bent over backwards to help, introducing new
elements under the hood that have greatly enhanced the communication between the
applications.
And the response has been overwhelming. People from all over the world – from Finland to
Australia to my own backyard (Toronto, Canada) have been responding in droves. I hope you
enjoy this program as much as I do! And I hope it gives new life to the already incredible
EyeTV.
iEye Captain Manual
version 1.0.6.3
2.
GETTING STARTED
2A.
SYSTEM REQUIREMENTS
-
Page 3 of 58
G4 with a speed of at least 500 MHz, a G5 Power Macintosh, or any Intel Mac.
Mac OS X v10.3.x or v10.4.x; Mac OS X v10.5 (Leopard) is NOT YET SUPPORTED
-- expect Leopard support a few weeks after it is released to the public.
EyeTV 1.8.5 software or higher, including 2.x (non-EyeTV hardware supported).
Quicktime 6.5.2 or higher (Mpeg-2 Playback Component suggested. Some export
features such as H.264 require Quicktime 7).
iCal 1.5.5 is necessary for full reminder & infrared functionality.
Roxio Toast Titanium 6.1.1 or higher required for DVD burning features.
ZephIR USB with Beta 2.1b13 software or IRTrans with iRed 1.3 for infrared support.
Color display with 800x600 minimum resolution, 1024x768 recommended.
TIP: Some features require EyeTV 2, and I highly recommend the combination of
Roxio’s Toast 8 and EyeTV 2 if you can afford them. For a comparison of what is
improved: http://www.elgato.com/index.php?file=products_eyetvmain_improved
2B.
REGISTRATION
When you first open iEye Captain, a registration reminder will pop up. You have a 30-day fully
unlimited trial in which to make your decision to purchase. At any point you can register right
from within the program, which will:
-
disable the registration reminders,
entitle you to support on the program, and
help fuel future updates.
To do so, select “Purchase…” under the “iEye Captain” menu, and follow the instructions to use
the integrated eSeller (powered by eSellerate). You must have an internet connection to make
this initial purchase. If you are installing on only one computer, you don’t even have to enter a
serial number; iEye Captain will automatically register the trial version once you make your
purchase.
iEye Captain comes as a family/household license – to register iEye Captain on any other Macs
in your home, you will need to wait for a confirmation email from eSellerate, which will contain
your serial number. Please keep this for your records, as you may need it to re-install later on.
You may want to print a copy for safekeeping. Once you receive the email, you simply launch
the software and choose “Enter Serial Number…” under the “iEye Captain” menu. Copying and
pasting may not work, but you may drag and drop the serial number from your confirmation
email.
iEye Captain Manual
2C.
version 1.0.6.3
Page 4 of 58
RELATIONSHIP BETWEEN EYETV AND iEYE CAPTAIN
When you launch iEye Captain, EyeTV opens automatically if it wasn’t already open (also, it
launches a little faster if EyeTV is already open). As a helper application, iEye Captain talks
regularly with EyeTV. For the most part, you can use them interchangeably; most of EyeTV’s
menus and functions are also inside of iEye Captain so you don’t have to jump back and forth.
You may use iEye Captain as a tool box you go to when you need a special tool, or you can use
it full-time as an alternate interface for EyeTV. Even if you leave it in the background, it can be
helpful to leave running, especially if you use it to control your cable box or satellite via infrared.
The things you can ONLY do from inside EyeTV are:
1.
2.
3.
4.
Changing EyeTV’s device settings and preferences;
Viewing recordings (see below);
Using the Editor to edit & compact recordings; and
Accessing program guides such as TitanTV.
All of these may be initiated from iEye Captain, and iEye will automatically switch over to
EyeTV for you.
If you have a dual-monitor setup or a large monitor, you may find it handy to have the EyeTV
viewer play in the background, and use the play controls in iEye Captain or on your remote
control to control playback. You can customize the toolbar to add a full set of play controls if
you wish: simply click on the “Customize” toolbar button and drag desired items onto the
toolbar, or free up space by dragging unneeded items off of the toolbar.
If you make changes to the schedules or recordings from within EyeTV (including new
recordings that have been made since you launched iEye Captain), iEye Captain must re-load the
data. This is done automatically by default, or it can be disabled with the “Auto-Reload”
preference (Tools menu). Leaving this enabled allows iEye Captain to be up to date with
whatever has changed in EyeTV.
When you make changes from within iEye Captain’s “info drawer,” both iEye Captain and
EyeTV automatically update (except when changing record locations – see Simple Method for
Multiple Archives, on page 43). You may wish to use the EPG (program guide) in EyeTV to set
up your schedules, but you may find you hop over to iEye Captain for finer control or more
detailed browsing. Try leaving the Info drawer open and clicking from recording to recording!
Something you may not notice right away is that iEye Captain fixes a bug in EyeTV 1.8’s date
sorting… Before running iEye Captain, sorting by date in EyeTV’s Programs window may
show repeating schedules out of order, because it sorts based on when the schedule was initially
made, not when it will be recording next. iEye Captain changes the dates of the schedules so that
they sort properly based on when they will record NEXT, which is much more helpful
information. You can disable this if you wish (Tools menu>Enable Repeat Date Fixing).
You will notice that occasionally iEye Captain will open other applications automatically, like
iCal or iRed (for IRTrans users). This is normal, so iEye can co-ordinate behind the scenes.
iEye Captain Manual
3.
version 1.0.6.3
Page 5 of 58
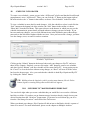
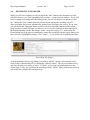
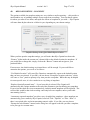
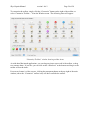
THE INTERFACE
iEye Captain has been designed to give more information than EyeTV provides, but with a
versatile interface reminiscent of Apple’s “iTunes,” letting you focus on the information you
need at the moment. The main window is broken into three sections, with a divider that can be
easily moved to give more space to schedules or recordings.
iEye Captain’s Main Window
3A.
Top Right – SCHEDULES PANE
On the top right are your EyeTV schedules (programs). You may change the size of the columns
by dragging the edges, re-order the columns by clicking the header and dragging, or sort by
clicking the column headings. If you don’t have enough space to see everything you want to see,
you can drag the scroll bars to pan across the information, or you can drag the divider between
the upper and lower panes to allot more space to the Schedules pane.
You can select more than one schedule at once by shift-clicking or command-clicking--- this is
very handy if you want to set up a text or iCal export of only a few items, or you can delete a
range of schedules by selecting them and hitting the Delete button (Option-click to bypass the
warning dialog).
iEye Captain Manual
3B.
version 1.0.6.3
Page 6 of 58
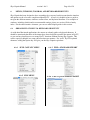
SCHEDULE INFO DRAWER
To create a new schedule: ensure you are in the “All Records” playlist and that the Saved Search
popup button is set to “All Records.” Then, you can click the “+” button on the bottom right of
the main window, the “+” button in the toolbar, or choose “New Schedule” in the File menu.
To view a schedule in more detail or make changes: click the schedule to select it, and click the
“Info” button on the bottom left of the window, the “Info” button in the toolbar, or choose
“Show Info” from the File Menu. This opens a drawer at the bottom, in which you may see the
schedule information in greater detail, and make whatever changes you need to make. If you
have not made any changes, you can click different items in the Schedules pane or Recordings
pane and see the info drawer update with the new item. Once you have made a change, you must
save the changes, reset, or cancel in order to continue.
“Schedules” Info Drawer
Clicking on the “Submit” button in the drawer both sends your changes to EyeTV, and saves
them in iEye Captain. Similarly, you can click on the “Add” button to create a new schedule,
and when you hit “Submit” your new schedule will be created in EyeTV. At any point you can
hit “Cancel” to close the drawer without saving changes, or “Reset” will reset all of the values
but leave the drawer open. Also, you can delete the schedule in both iEye Captain and EyeTV
by clicking the “Delete” button.
TIP: Holding down the Option key while pressing many buttons (like the Delete
button) bypasses warning dialogs that would otherwise appear.
3.B.1 “RECORDS TO” MAKES SHARING DISKS EASY
You can decide right when you create a schedule that you would like it to record to a different
hard drive or folder. If you have set up alternate storage locations already, simply choose your
desired location from the “Switch to” popup menu. If you need to set locations up, you do so
from the “Set Storage Locations” menu item of the Tools menu.
When you submit your changes, iEye Captain will add an item to the Batch, which is a queue of
items to be moved. For more information, please see the chapter on Multiple Archives.
iEye Captain Manual
version 1.0.6.3
Page 7 of 58
3.B.2 EXTERNAL CHANNELS METHOD
You will notice in the info drawer that if you set the input source to Composite or S-Video, you
have the option of setting an “external channel,” which can be automatically placed in iCal
reminders to help you remember to change an external digital cable box or satellite controller.
Or, more excitingly, if you own a StudioZee ZephIR or IRTrans infrared device, you can easily
set up iEye Captain to automatically change the channel for you on your external device. See the
chapter section on Infrared Exporting on page 37 for more information about this.
Top of Schedules Info Drawer (looks this way when Tuner is not selected)
IMPORTANT: iEye Captain uses a workaround to let this external channel information pass
between itself and EyeTV. If you wish to set an external channel while in EyeTV’s interface,
type the channel number between two asterisks at the beginning of the “Description” field (eg.
*323* with no spaces or any other characters before or within the asterisks). Or, if you prefer,
you may type the station name (must be typed exactly) between two “#” symbols – in other
words, you would type #BBC_One# for the station “BBC_One” (you must first set up the
External Channel Map – see next page). Then, when you open iEye Captain, you will see the
external channel appropriately displayed. It is very important that you do not delete or alter this
in any way, or iEye Captain will not be able to keep track of the channels. You can still place a
description after this number, and it will display properly in iEye Captain and any text exports
you make from it. Of course, if you enter the channels from within iEye Captain, you will not
need to use this method. However, once you go back to EyeTV, you should not delete the *xx*
numbers that iEye Captain places in the Description field, or iEye Captain will not know what
channel to set the external device to.
Entering an external channel in EyeTV’s “Info” window
iEye Captain Manual
version 1.0.6.3
Page 8 of 58
For station names that are also duplicates of tuner channels (for instance, if your digital cable
offers the same stations that your analog cable offers in the sub-100 range), or for channels that
you have indicated station names for in EyeTV, iEye Captain will automatically display the
correct station name for you.
If you use a digital cable or satellite set-top box in conjunction with EyeTV’s analog inputs,
there may be many channels that you wish to indicate station names for, and EyeTV does not
give you a means to do this. Luckily, iEye Captain has an “External Channel Map” feature, that
not only keeps track of station names, but may fix certain situations where program guides
record incorrect settings.
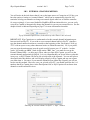
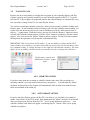
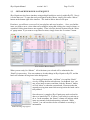
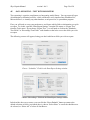
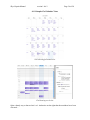
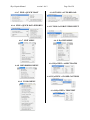
3.B.3 “EXTERNAL CHANNEL MAP” FOR STATION NAMES
You access the External Channel Map from the Tools menu. The window looks like the one on
the left.
First, indicate which input you record from at the top.
To add a new channel / station name pair, enter them in
the fields at the bottom, and then click the “+” button.
To edit a pair, click the row of the pair you wish to edit,
and the station name and channel will appear in the fields
at the bottom. Make your changes, and be sure to hit the
“Update” button.
To delete a channel pair, first select them in the table, and
then click the “–” key.
When you are finished, click the “Save” button to save
your changes, or if you would like to leave without
saving, click “Cancel.”
External Channel Map
As pictured above, once these channels are entered, iEye Captain will be able to fill in missing
information. If you enter “305” as a channel, iEye Captain will display “MFest” as the station
name. If you enter “MFest” as the channel, iEye Captain will know you mean channel 305.
Some program guides incorrectly assign the channel, input, or station name (currently TVTV is
known to do this in the UK). iEye Captain provides a handy way to work around this issue, and
a necessary means to record the proper information for iCal reminders or infrared triggers.
iEye Captain Manual
version 1.0.6.3
Page 9 of 58
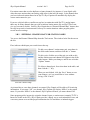
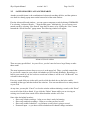
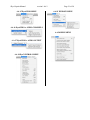
3.B.4 “FORCE VIDEO INPUT” MENU ITEM (1.0.6.2 and later)
If you have digital cable, and you never use your EyeTV’s internal tuner, you may find it helpful
to “force” the input to S-Video or Composite. This takes schedules that are set up for your
internal tuner (like the ones automatically generated by EyeTV’s program guide), changes them
to the correct input for your cable box, and records the channel in the description field for you.
IMPORTANT: this will only be helpful if your digital cable or satellite channels are exactly the
same as the internal tuner channels. In other words, if PBS is on channel 65 on analog cable, but
channel 32 in digital cable, then you should NOT use this option.
“Force Video Input” sub-menu of Tools menu
Under the “Tools” menu, there is now an option to “Force Video Input” — select “S-Video” or
“Composite,” depending on what you use for your digital cable set-top box. Then, you can use
EyeTV’s integrated program guide to set up a schedule, and no longer worry about the “*123*”
method. EyeTV will first set up a schedule using the internal tuner as the input. As long as you
have auto-reloading and auto-infrared enabled in iEye Captain, iEye Captain will automatically
change the input to “S-Video” or “Composite,” and will change the channel to external and set
the “*123*” in the description field for you.
For channels that are outside of the internal tuner’s range, it may be possible to manually map
your EyeTV’s EPG to pretend that these channels exist. First make sure that you enable the
desired channels on your Titan/Zap2it/TVTV lineup (through the appropriate web interface).
Then, open the “Channels” view in EyeTV, choose an empty channel, control click it, and select
“Assign EPG Channel.” Select the desired channel from the window that appears. For instance,
I have mapped channels 301-307 to tuner channels that I was not using:
Unused analog channels remapped to digital-only channels
iEye Captain Manual
version 1.0.6.3
Page 10 of 58
In the screen shot above, you see that I could do the same to channels 70 and 71, as I am not
using them. PLEASE NOTE: I can not provide support for doing this on your system.
Once you do this, you can see these channels in the program guide, select them for scheduling,
and iEye Captain will change the input for you and export the appropriate trigger calendar.
3.B.5 “DUPLICATE SCHEDULE(S)” MENU ITEM
There may be times you wish to duplicate a schedule – for instance, there may be a syndicated
show that airs more than once per day on the same channel. You can set up a schedule for the
first one, duplicate it, and then just change the time.
To do so, select the schedule you wish to duplicate in the Schedules pane, and choose “Duplicate
Schedule(s)” from the Edit menu. An identical copy of the schedule will be made, except that it
will be disabled (if it were enabled, it would cause a schedule conflict). Now, simply open the
disabled copy in the Info drawer, change the start time, enable it, and then hit “Submit.”
iEye Captain Manual
3.C
version 1.0.6.3
Page 11 of 58
Bottom Right – RECORDINGS PANE
Recordings pane of main window
Very similar to the schedules pane, on the bottom right of the main window are your EyeTV
recordings. You may again change the size of the columns by dragging the edges, re-order the
columns by clicking the header and dragging, or sort by clicking the column headings. If you
don’t have enough space to see everything you want to see, you can drag the scroll bars to pan
across the information, or drag the dividers between the panes to allot more space to the
recordings pane.
3.C.1 QUICK ADDING OF SIZES
Recordings Pane showing quick adding of sizes (in summary at bottom)
If you select more than one recording in the recordings pane (by shift-clicking or commandclicking), iEye Captain adds the sizes for you and displays them at the bottom of the window--a very quick and handy way to see what will fit on a DVD! Once you have them selected, you
can export them all using the same settings by using the QuickExport feature (on page 23) or
delete a range of recordings at once by selecting them and hitting the Delete button (Option-click
to bypass the warning dialog).
iEye Captain Manual
version 1.0.6.3
Page 12 of 58
3.C.2 “CREATE SCHEDULE FROM RECORDING” MENU ITEM
What happens if you are watching live TV, and come across a show you like? You hit “Record”
just in time. Once you have recorded the show, you decide you would like to record it next
week. No problem: just select the recording in the Recordings pane of the main window, and
choose “Create Schedule from Recording” from the “Recordings” menu. You will see a new
weekly schedule created with the information from this recording. At this point, you should
check to verify that the start time and duration are what you need them to be.
3.C.3 “ENABLE REPEAT DATE FIXING” MENU ITEM
As mentioned in the section “The Relationship Between EyeTV and iEye Captain,” there is an
issue with EyeTV 1.8’s date sorting that iEye Captain fixes by default. Before running iEye
Captain, sorting by date in EyeTV’s Programs window may show repeating schedules out of
order, because it sorts based on when the schedule was initially made, not when it will be
recording next. iEye Captain changes the dates of the schedules so that they sort properly based
on when they will record NEXT, which is much more helpful information. You can disable or
enable this by toggling the “Enable Repeat Date Fixing” item in the “Tools” menu.
3.C.4 “ALLOW MULTIPLE EYETVs” MENU ITEM
As brave users have discovered, EyeTV has an undocumented (and unsupported) feature: you
can actually connect more than one EyeTV hardware device to your Mac, and the EyeTV
software will let you record to more than one at once.
DISCLAIMER: It is outside the scope of this manual to explain how this is done and
what the limitations are. Also, VidCan Media Solutions does not condone this
practise, and can not accept responsibility for anyone who attempts to do this and
causes damage to their hardware or software.
That said, users with multiple EyeTVs have reported that they connect them safely and reliably,
and they have requested that I include an option to disable checking for schedule conflicts. As
you can understand, if you try to schedule two shows to tape at the same time, that would
ordinarily cause a warning to appear.
To disable iEye Captain’s checking for schedule conflicts, enable the “Allow Multiple EyeTVs”
menu item in the “Tools” menu.
iEye Captain Manual
3.D
version 1.0.6.3
Page 13 of 58
RECORDINGS INFO DRAWER
When you click on a recording to select it and hit the “Info” button (same shortcuts as for the
Schedules drawer), you’ll see something really exciting… a huge preview window! If you click
from recording to recording in the Recordings Pane, you will see the preview update for each
one. Hitting the “Play” button below the preview begins playing the recording in EyeTV…
when you return, the preview automatically updates to the last frame you were at. If you want,
you can also hit the “Snapshot” button to take a full sized (640x480) snapshot of the current
frame and iEye Captain will open it in Preview, or save it to the location you have indicated in
the Snapshot Settings (in the “Recordings” menu-- more info on page 27). Also, hitting the
Export button below the preview immediately exports the recording using the export settings you
have selected in QuickMedia Settings (“File” menu)… a very quick way of initiating an export.
Recordings Info Drawer
As in the Schedules drawer, any changes you make to the title, episode, or description can be
saved to iEye Captain and EyeTV by hitting the “Submit” button. You can exit without saving
and close the drawer by hitting “Cancel,” or “Reset” will reset the information but leave the
drawer open. Lastly, you can delete the recording with the “Delete” button (hold down Option if
you would like to bypass the warning dialog).
iEye Captain Manual
3.E
version 1.0.6.3
Page 14 of 58
PLAYLISTS PANE
Playlists are an exciting feature to simplify the navigation of your expanding library, and iEye
Captain’s playlists are especially useful if you can’t afford the upgrade to EyeTV 2. If you do
have EyeTV 2, iEye Captain can import the playlist data either manually, or automatically every
time you make a change in EyeTV (see Auto-Playlist, below).
You can have an unlimited number of playlists, which you can rename by double-clicking in the
Playlists pane. To add schedules and/or recordings, just select the schedules and recordings you
wish to add, and choose the playlist you want to add them to from the “Add selected items to
playlist…” popup button. From this section, you can also click the “Remove” button to remove
selected items from the current playlist, click the “Clear” button to completely clear the current
playlist, Also, you can use the “Delete” button to delete a playlist. For these last three options,
holding down the option key will prevent the confirmation dialog.
IMPORTANT: ALL selected items will be added – if you are adding recordings and do NOT
want schedules to be added too, you must ensure that you deselect any selected schedules, either
by Command-clicking, or clicking anywhere in the empty area beneath the schedules. The same
applies if you are adding schedules and do not want the selected recordings to be added too.
Playlist pane, controls and
“Add Items to Playlist” popup
menu
3.E.1 SMART PLAYLISTS
If you have more than one recording or schedule with the same name (like recordings of a
repeating schedule), you only need to add one into your playlist… If you then hit the “Smart”
checkbox for that playlist, iEye Captain will automatically find all other items with the same
name and add them to the found set.
3.E.2 “AUTO-SMART” OPTION
If you use the Auto-Playlist option with EyeTV 2 (see below), you will find it very handy to
enable “Auto-Smart” in the Tools menu. Auto-Smart turns the “Smart” checkbox on by default
when you import your playlists from EyeTV 2. You’ll see the difference right away--- your
schedules with the same name will appear, even though EyeTV 2 doesn’t allow you to group
schedules in playlists.
iEye Captain Manual
version 1.0.6.3
Page 15 of 58
3.E.3 SMART PLAYLIST TUTORIAL (EyeTV 1.8.x only)
Say you record daily syndicated reruns of Stargate on one schedule, and you have another
schedule set up for a weekly time slot that features new episodes. You also tape Battlestar
Galactica and Star Trek every week. You want to create a Sci-Fi playlist.
1. First, click the “New” button to add a new playlist.
2. Double-click to highlight the playlist’s name, and change the name to “Sci-Fi.”
3. Select “All Records” both in the Playlists pane and the Saved Searches popup menu, to
display all data (or select “All Records” in the Playlists pane but use the Advanced
Search or Simple Search to help you find what you want to add to the playlist).
4. If the Info drawer is open, save your changes or cancel to close the window. This allows
you to make multiple selections.
5. In the Schedules pane, if the two Stargate schedules have the exact same name, select just
one of them. If one has a different name (like Stargate Season 8) then command-click to
select both of them. Now command-click to select the Galactica and Star Trek schedules.
6. If you don’t rename your recording titles after they have recorded, go on to step 7. If you
do rename recording titles, select each unique title by command clicking in the
Recordings pane.
7. Click the Add Items to Playlist popup button, and choose the “Sci-Fi” playlist you just
created, to add these items to your playlist.
8. Click the “Smart” checkbox beside your Sci-Fi playlist, and voila! All schedules and
recordings that match these names are shown. When you click this playlist to activate it,
future recordings that have the same name will also appear.
IMPORTANT: To remove items from a Smart Playlist, you must first
deselect the “Smart” checkbox, select the items you wish to remove, and click
the “Remove” button. Holding down the option key will prevent the confirmation
dialog.
3.E.4 IMPORTING EYETV 2 PLAYLISTS AND AUTO-PLAYLIST
If you have EyeTV 2, the ideal way to work is NOT to use iEye Captain for playlist changes, but
rather to use the very handy “Add to Playlist” popup menu in EyeTV’s Info window for the
schedules you set up. This automatically adds recordings to a certain playlist after they have
recorded, and saves adding them later.
Knowing this, I have set up iEye Captain’s playlists to be a “slave” to EyeTV’s playlists. You
can choose at any time to import EyeTV’s playlists (Tools menu), and they will completely overwrite any changes you have made in iEye Captain.
The best way to work with EyeTV 2 is with the “Auto-Playlist” feature (Tools menu).
When this is enabled, iEye Captain will automatically sense if any changes have been made
to EyeTV’s playlists (even re-ordering them), and will seamlessly import them. I suggest
you enable both this and “Auto-Smart,” and make all your playlist changes in EyeTV.
iEye Captain Manual
3.F
version 1.0.6.3
Page 16 of 58
SAVED SEARCHES / ADVANCED SEARCH
Another powerful feature is the combination of advanced searching abilities, and the option to
save them in a handy popup menu on the bottom left of the main window.
First the Advanced Search window: you can create a temporary search by hitting COMMANDF or selecting “Advanced Search…” from the Edit menu. Alternatively, you can create a new
named search by selecting “New Search” from the File menu, or by clicking the “New” button
beneath the “Saved Searches” popup menu. The following window will appear:
Advanced Search window
There are many possibilities! As you will see, you don’t need to have a large library to make
them useful.
The most important section to keep an eye on is at the upper left. There, you find controls that
let you decide a name for your search, and whether you will include Schedules, Recordings, or
both in your search (if you don’t select to search one of them, it will be as if “All Records” was
selected for that category).
For every search field you wish to add, you first click the check-box to the left to enable
searching of that type, and then indicate the criterion. You can search based on as many criteria
as you wish.
At any time, you may hit “Cancel” to close the window without initiating a search, or hit “Reset”
to reset all of the fields to blank. If you click the “Delete” button while you are viewing an
existing saved search, that search will be deleted and the window will close.
Some ideas for helpful searches:
• Show only edited recordings – helps to see what is ready for burning.
• Show only unedited recordings – helps to see what you need to edit.
• Show only enabled schedules – so you know exactly what is going to record.
• Non-tuner input – so you know which schedules need channel-change reminders.
iEye Captain Manual
version 1.0.6.3
Page 17 of 58
If you have another search you have set up that you would
like to duplicate and slightly modify, you may find it handy
to click to “Load…” button on bottom of the Advanced
Search window, and select from your existing searches.
<-- “Load Search” window
After hitting the “Load” button in the Advanced Search
window, a window like this will appear, allowing you to copy
criteria from another search.
When you are finished setting up your search, press the “Perform” button to close the window
and initiate the search.
If you named your search, it will appear in the “Saved Searches” popup button, ready to initiate
at any time. If you would like to change the name or any of the settings, click the “Edit” button
to call up the Advanced Search window again.
Saved Searches controls and
popup menu
If you did not select to name your search, it will appear in the
Saved Searches popup menu as “Temporary Search.” If you
decide you would like to keep this search, simply click the
“Edit” button, click the “Save Search As…” button, and enter
the name you wish to assign to the search. Otherwise, the temporary search will be deleted when
you initiate a new search or choose “All Records.”
iEye Captain Manual
3.G
version 1.0.6.3
Page 18 of 58
SIMPLE SEARCH
Lower part of Main Window, showing “Simple Search” field on left
At the bottom left of the main window, you will notice a “Simple Search” field. This field
applies an additional filter to whatever playlist and saved search you have active. For most
cases, you will probably find this the most convenient way to quickly access your data.
The Simple Search does a “Contains” search of the title & episode information of both the
schedules and recordings. For instance, typing “BSG” calls up both the “BSG” and “BSG Orig”
shows in the above example – this happens whether these are show titles or episode titles.
To initiate a Simple Search, simply type your search term in the search field and hit “Return” on
your keyboard.
IMPORTANT: To clear a search, you must not only delete the search term, but also hit “Return”
on your keyboard to clear the filter.
3.H
UNDERSTANDING SEARCH ORDER
iEye Captain conducts searches in the following order, which is also how they appear in the main
window:
PLAYLISTS -> SAVED SEARCHES -> SIMPLE SEARCH
It makes sense if you think of it this way… Playlists are your starting point. For instance, you
may want to have one playlist for yourself, and one for your spouse. Your spouse may want to
do an Advanced Search based on a certain date range, but she is not interested in seeing your
recordings from that date range, only hers.
Once you have limited the criteria somewhat with an Advanced Search, the Simple Search will
help you get closer to what you need. For instance, say you want to burn a DVD. You have
your playlist selected, and you click a Saved Search you set up to show only recordings that have
already been edited. 30 shows appear… Hmm, maybe you have enough Stargates edited to
make a full DVD? Enter “star” in the Simple Search field and you have the shows you need.
For smaller libraries or simpler purposes you may find it is enough to have Playlists and Saved
Searches set to “All Records,” and primarily use the Simple Search field. But you will find as
your library grows the other search functions become more and more indispensable!
iEye Captain Manual
3.I
version 1.0.6.3
Page 19 of 58
CUSTOMIZING COLORS
iEye Captain has been designed with similar colors to the EyeTV interface, to make it an easier
transition to go from one to the other. However, you may prefer alternating row colors to make
it easier to differentiate between different rows of information, or you may wish to choose
alternate background colors for the Schedules Pane or Recordings Pane of the main window.
Colors sub-menu under Windows menu
ALTERNATING ROW COLORS: To toggle alternating row colors on or off, simply choose
“Toggle Alternating Row Colors” from the “Colors…” sub-menu of the Windows menu.
Alternating row colors example
iEye Captain Manual
version 1.0.6.3
Page 20 of 58
CUSTOM BACKGROUND COLORS: In order to customize the background colors, you must
first open up the Color Picker, by choosing “Show Color Picker” from the “Colors…” sub-menu
of the Windows menu. You will be greeted with a standard Macintosh color picker, with which
to choose a preferred color. To set either the Schedules Pane or the Recordings Pane to this
color, simply choose “Set Schedules BG…” or “Set Recordings BG…” from the same
Customize Colors sub-menu.
Color Picker and custom colors example
TO RESET EYETV COLORS: In order to reset to the standard EyeTV colors, simply choose
“Toggle Custom Colors” from the “Colors…” sub-menu of the Windows menu.
iEye Captain Manual
3.J
version 1.0.6.3
Page 21 of 58
NEW ARCHIVE MOVER / BATCH QUEUE
iEye Captain was the first to introduce using multiple hard drives actively within EyeTV. Now it
is easier than ever! To open the newly redesigned Archive Mover, simply click on the “Mover”
button on the bottom right of the interface. The Archive Mover drawer will open.
From here, you still have access to all of your playlists and saved searches… Once you find the
items you wish to move, select either one or multiple (using shift-clicking for a range of items, or
command clicking items that are not together). Then, select the desired location from the “Move
to” popup menu. If you want to set up other locations, simply choose the “Locations” button.
New Archive Mover drawer
When you are ready, hit “Submit.” All of the items you selected will be submitted to the
“Batch” for processing. You can continue to do other things in iEye Captain or EyeTV, and the
batch will continue moving items in the background.
You can toggle between the “Add Item” view and the “Batch”
view by clicking the blue tab indicators. In the Batch view, you
may select items to remove and then click the “Remove” button,
or click “Abort” to abort the current batch. Please note that the
currently moving item must finish moving before the batch can be
fully aborted.
Once the move is complete, iEye Captain may need to reload its
data or re-launch EyeTV. If it does, it will wait for a safe time to
do so. In the meantime, the “Status” column will indicate which
items are currently locked and awaiting a relaunch. While
“locked,” you can not edit or delete a schedule or recording’s
information.
Batch moving in progress
iEye Captain Manual
4.
version 1.0.6.3
Page 22 of 58
EXPORTING
The toolbar stacked with export functions
iEye Captain has very versatile export features to meet a wide range of needs. Here are some of
the handy things you can do:
-
4A.
Select a number of recordings and export them all at once (EyeTV 1.8 only lets you
initiate one export at a time) – even start Toast with all exported recordings set up on a
DVD, VCD, or SVCD, and movie thumbnails set to the last viewed frame.
Pre-select a folder you always want your exports to go to, and QuickExport lets you
avoid dialogs. You could export 10 shows with a single click.
Click one button, and all your schedules show up in iCal – complete with reminders,
helping you remember when to watch a show or when to change the satellite channel.
Export all your schedule and recording data as a tab-delimited text file, which you can
easily import into spreadsheets like Excel or databases like Filemaker Pro for managing
large libraries or just printing DVD labels.
Created named aliases of all of your mpeg recording files, if you need a handy way of
accessing the actual files on disk for use with viewers like Virtual DVHS or VLC, or with
utilities like MPEG2Works.
Control your satellite channel changer or digital cable set-top box via infrared, including
setting up automatic schedules so the channel is always changed on time! Please note
that this requires a compatible infrared device such as the ZephIR USB or IRTrans.
MEDIA EXPORTING - STANDARD
Even standard media exporting is a little
handier with iEye Captain…
Firstly, you can select a number of recordings
and initiate them all at once (improvement over
EyeTV 1.8).
Secondly, you can choose the export type right
from the File menu, and when the EyeTV
export dialog comes up, the export type is
already selected for you.
<-- Standard Export Settings (File Menu)
iEye Captain Manual
4B.
version 1.0.6.3
Page 23 of 58
MEDIA EXPORTING – QUICK EXPORT
Where iEye Captain starts to make your life easier is where “Quick” is part of the name…
Whether it is QuickExport (media), Quick iCal, or QuickAlias, the Quick means that one button
or menu selection initiates the action with no further intervention required, or the level of
intervention that you specify.
To open the Quick Media Export settings, either click on the “Export” toolbar icon, or
choose “QuickMedia Settings…” from the File menu. The following window will appear:
Quick Media Export Settings window
The Quick Media Export settings default to settings that can be used right away, but you may
want to customize them.
Initially, the default location is set to the Movies folder inside the Home folder of the current
user. You can change this default export location by clicking the “Browse…” button and using
the browser to choose a folder.
The ideal way to use QuickExport is to let it always select the location for you--- if so, leave the
“Use default location” button checked. If you have space constraints, you may find it helpful to
select “Prompt for location each time.” Because this defeats the purpose of a Quick Export in
some ways, it may be preferable to use one default folder for a while, and then change it to
another default folder when the first location is running short on space. Or, you can leave one
location selected, and use the “Standard Export” feature (above) when you need an alternate
location. It’s up to you.
Another default setting, as indicated in the snapshot above, is for iEye Captain to create a new
subfolder for each export. Together with the “Quick Adding of Sizes” in the Recordings pane of
the main window, this makes it very easy to see what will fit on a DVD, make your selections,
and then export just those selections into a folder that is immediately identifiable. You can do
several exports this way, and when you are ready to burn, all of the files are neatly grouped
together.
iEye Captain Manual
version 1.0.6.3
Page 24 of 58
The default is set up for iEye Captain to name these subfolders for you – after all, it is a Quick
Export! You have the option to auto-create based on the title of the first exported schedule and
an abbreviated date & time, or just the date & time. Or, if you choose the third option, “Prompt
for name,” you will be prompted for the name of the subfolder each time.
On the left, there is a popup menu where you can select your favorite export type. This is the
export type that will be used when you hit the QuickMedia toolbar button, if you select the
“QuickMedia Favorite” menu item in the File menu, or if you hit the “Export” button from
within the Quick Media Export Settings window.
You can bypass this export type easily later on, keeping all of the other Quick Export settings, by
selecting the desired alternate export type from the “QuickMedia Export as…” submenu of the
File menu.
Below the export type you have an option to replace files of the same name. By default, this is
NOT selected. iEye Captain will not prompt you if there is a duplicate, but will rather use –1, -2,
-3, etc. after the file name to guarantee that a file will not be replaced. If you do select this
checkbox, files that have the same name will be automatically replaced.
Lastly, on the bottom left, you can choose to let iEye Captain automatically name the individual
export files, or to prompt you for each file name. Auto-naming is based on Title + Episode if
there is an episode name, or Title + Abbreviated Date if there is no episode name.
To perform a QuickMedia Favorite Export, do one of the following:
• click the QuickMedia toolbar button,
• click the "QuickMedia" button in the Recording Info Drawer,
• click the Export button from within the QuickMedia Settings window, or
• choose QuickMedia Favorite from the File menu.
iEye Captain Manual
4C.
version 1.0.6.3
Page 25 of 58
MEDIA EXPORTING – QuickToast
EyeTV automates the process of burning to VCD or DVD, but there are several limitations to the
method that is used.
4.C.1 LIMITATIONS OF EYETV TOAST BURNING:
-
EyeTV 1.8: Only for a single recording
First frame of recording is set as thumbnail – rarely the one you want.
Toast’s rudimentary scrubber for thumbnail images makes it very difficult to fine-tune
exactly which frame you want.
Only works for DVD, not VCD or SVCD (can be changed later, but is an extra step)
Continuing in the fashion of making your life easier… iEye Captain expands on these
capabilities by offering “QuickToast,” which provides some important advantages.
4.C.2 ADVANTAGES OF iEYE CAPTAIN QuickToast BURNING:
-
-
Over EyeTV 1.8: Select multiple recordings, and iEye Captain will export all of them in
one step, importing every one of them into Toast for you
The thumbnail image is set to the MOST RECENT frame viewed, rather than the first
one. This allows you to play each clip in EyeTV (or using iEye Captain’s play controls)
to fine-tune exactly which frame you wish to appear in the DVD menu. (Please note that
due to an Mpeg encoder issue, the frame may be off by as much as a second or two, but it
is still a finer control than the Toast scrubber).
Available for VCD, SVCD, and DVD.
QuickToast sub-menu of File menu
To perform a QuickToast, simply select one or more recordings in the Recordings Pane of the
main window, using the handy size calculator at the bottom of the window to see if how close
you are getting to the capacity of the CD or DVD. Once you have the selection you wish, select
DVD, SVCD, or VCD from the QuickToast submenu of the File menu.
Please see the next section, “Why you should upgrade to Toast 7 or 8” if you have Toast 7.
If you have Toast 6, QuickToast will create a sub-folder inside the default export folder that you
have indicated in the QuickExport settings. Each recording will be exported into this subfolder,
and a little script is also placed into the subfolder to manage the burning process. When the
export is complete, this script will wait until Toast is free (if it has been occupied burning
something), and then open Toast, import the items, and set up the menu for you. When you are
iEye Captain Manual
version 1.0.6.3
Page 26 of 58
ready to burn the disc, simply click on the red “burn” button, and follow the instructions in Toast
to burn your disc.
Once the burn has finished and you have tested your disc, you may safely delete the entire
subfolder of the export, including the script file. If for any reason Toast was not able to burn the
disc, you may double-click this script and it will set up the disc for you just as if the process was
initiated from iEye Captain.
It is important to note that you can continue working in iEye Captain and/or EyeTV after
QuickToast has been initiated. Even though you may see a spinning black & white indicator
ball, just click anywhere in the main window to continue working.
4.C.3 WHY YOU SHOULD UPGRADE TO TOAST 7 or 8
Aside from the myriad of advertised improvements and new features, such as DIVX exporting,
and a choice of greatly improved DVD menus, Toast 7 offers a HUGE enhancement over Toast
6 when it comes to EyeTV: you don’t have to do a time-consuming media export before burning
a disc. All you have to do is drag recordings from your EyeTV Programs window over to Toast,
or choose them from Toast 7’s new media library.
iEye Captain takes these improvements to heart – when you do a QuickToast, if iEye Captain
senses Toast 7 is installed, it will immediately set up a disc for you, rather than performing
media exports as described in the previous section.
It’s even easier to fine tune movie thumbnails this way – because you don’t have to go through a
time-consuming media exporting step, if you don’t like the frame that iEye Captain provides, and
you can’t get to the one you want with Toast’s scrubber, just clear the disc, hop back to EyeTV
to play the video and fine-tune the frame you wish. Once you have paused on that frame or
closed the window, hop over to iEye Captain and do a fresh QuickToast.
iEye Captain Manual
4D.
version 1.0.6.3
Page 27 of 58
MEDIA EXPORTING – SNAPSHOTS
The options available for snapshot settings are very similar to media exporting… this provides a
much handier way of grabbing multiple screen snaps from recordings. You can choose options
for where you want to save them, and rapid-fire dozens of snapshots if you wish--- iEye Captain
will name them & place them in a folder for you, depending on your chosen settings.
Snapshot Settings in the Quick Media Export window
When you first open the snapshot settings, you will notice that iEye Captain has chosen the
“Pictures” folder inside the current user’s home folder as the default location for snapshots. If
you would like to change this, simply click on the “Browse” button and navigate to your
preferred folder.
For most uses, the default settings as pictured above will be enough. If you would like to
customize the options, you can do so as follows:
“Use Default Location” will cause iEye Captain to automatically export to the default location
that you have pre-selected. If you like, you can choose “Prompt for location each time,” which
will cause a “save” panel to open up every time you take a snapshot. While this may be helpful
for some specific uses, it is less conducive to easy firing of snapshots.
“Replace identically named items” – if you leave this de-selected, iEye Captain will
automatically add a unique number to the end of the filename to prevent deleting any snapshots.
If you select the check-box (not recommended), similarly named snapshots will be replaced. The
result of this would be that each recording could only have one snapshot, unless you disable
auto-naming (below).
“Auto-name exported snapshots” provides a way of rapid-firing snapshots – these snapshots are
automatically given a name by iEye Captain, based on “Title – Episode” or “Title – Date” if
there is no episode title, and an incrementing numeric suffix. If you like, you may choose
“Prompt for each filename” instead, and a dialog box will appear each time you take a snapshot,
to let you type in a custom name.
iEye Captain Manual
version 1.0.6.3
Page 28 of 58
“Create subfolders” is a handy way to group your snapshots… If selected, a subfolder will be
created within the snapshots export folder, into which the snapshots will be placed. You have
two options for this: If you choose “Based on unique recordings,” iEye Captain will use the
naming system mentioned above to name the subfolder, and only snapshots from that unique
recording will be placed inside. If you choose “Based on title,” iEye Captain will name the
subfolder based on the title only, which will cause snapshots from multiple episodes of the same
TV show to be placed in the same folder. Snapshots from Live TV will be placed in a folder
named “Live TV”.
Lastly, “Open File Afterwards” will cause iEye Captain to immediately open the snapshot in the
Preview application once it is taken.
When you have finished with the snapshot settings, you may click “Save & Close” to save your
settings and close the window, “Cancel” to close the window without saving, or you may click
the “QuickMedia” radio button on the left to adjust the QuickMedia export settings.
Before you initiate a snapshot, you must indicate what you want to take a picture of. If you wish
to take a snapshot of an existing recording, you must make sure to either select the recording in
iEye Captain and play it, or make sure no recordings are selected if you wish to take snapshots of
a live TV window.
IMPORTANT: If you have a recording selected in the Recordings pane, it will take
precedence over a live TV window or other recordings that are playing in EyeTV, even if
the recording that is selected is not actually playing.
TO INITIATE A SNAPSHOT:
-
Click the “Snapshot” toolbar button (camera)
Press the Command-T keyboard shortcut
Choose “Snapshot” from the Recordings menu
Click the “Snapshot” button below the preview
picture in the Recordings info drawer.
EyeTV Snapshots folder after a few snaps
iEye Captain Manual
4E.
version 1.0.6.3
Page 29 of 58
DATA EXPORTING – TEXT WITH DELIMITERS
Text exporting is a perfect compliment to a burgeoning media library. You can export all types
of information as delimited text files, which can then be easily imported into Filemaker Pro,
Microsoft Excel, or virtually any other database, word processor, or spreadsheet program.
First, you will need to set up your preferences, and choose which fields or information you wish
to export. To do this, open the “Data Export Settings” from the File menu, or “Export Text”
from the Tools menu. If you choose “Export Text,” you will need to click on the “Schedules
Text Fields” or “Recordings Text Fields” radio buttons on the left to access the fields you wish
to export.
The following screens will appear, letting you check whichever fields you wish to export:
Choose “Schedules” Fields in the Data Export Settings window
Choose “Recordings” Fields in the Data Export Settings window
In both of the above two screens, you can click the “Reset Defaults” button to return to the
default selection of fields (as pictured above), choose “Select None” to set all the checkboxes to
de-selected, or “Select All” to select all checkboxes.
iEye Captain Manual
version 1.0.6.3
Page 30 of 58
Once you have selected the fields you wish to export, you can click “Save All” to save your
settings and return to iEye Captain’s main menu, or you can click either of the “Text Options”
radio buttons in the Export Options on the left to set up the rest of the text export settings.
Schedules Text Options settings in the Data Export Settings window
Recordings Text Options settings in the Data Export Settings window
The options for text exporting are very straightforward. For most of us, the default values as
pictured above will be pretty close to what we need.
LOCATION: The location defaults to the Documents folder inside the Home folder of the
current user. If you wish to change this, simply click on the “Browse” button and browse to
select an alternate location.
FILE NAME: A default name is provided for you; you may choose to change this name by
typing in this field (do not add the extension here). Clicking the “Replace” check-box will
replace any previous export with the same name. If you leave it un-checked, you will be
prompted to abort an export rather than over-write an existing file.
iEye Captain Manual
version 1.0.6.3
Page 31 of 58
DELIMITERS: A “tab-delimited” text file is the most standard way of exporting fields of data.
For some specific needs, you may wish to change this to “comma-delimited.” An example of
this might be if you wish to preserve “tab” characters in the exported output. Again, for most
applications just leave this radio button set to “Tab-Delimited.”
EXTENSION: The second radio button pair lets you choose a “.txt” extension, which will
indicate to other applications (and the Finder) that this is a text file. You may wish to change
this extension to one that will be better received by your database program, or to prompt a
different application to open the file when it is double-clicked in the Finder. To do this, simply
select “Other extension” and a field will appear to let you type in any extension you wish.
WHICH RECORDS: The last set of radio buttons in the lower right corner let you indicate
whether you wish to export text information for every record, or whether you just wish to export
text for what is currently selected in the main window.
Once you have set up these settings, you have several choices of what you can do next:
1.
You can click on the other data export settings, and continue to set your preferences for
various data export types.
2.
Click the "Save All" button, which will save all of your export preferences without
performing an export. When you are ready to export, simply choose "QuickText Sched" (for
schedules) or "QuickText Rec" (for recordings) from the toolbar or from the File menu -->
QuickData Exports submenu --> Schedules Text with Delimiters or File menu --> QuickData
Exports submenu --> Recordings Text with Delimiters.
3. Or, if you would like to perform an export immediately, choose the "Export Text" button.
This will save all your export preferences, and then perform a text export.
iEye Captain Manual
4F.
version 1.0.6.3
Page 32 of 58
DATA EXPORTING – ALIASES & UNIX SOFT LINKS
Aliases & Unix Soft Links in the Data Export Settings window
Aliases and Unix soft links (or "symbolic links") are mainly for advanced users, who wish an
easier way to access the actual mpeg recording files made by EyeTV. With the very cryptic
numeric naming scheme used by EyeTV 1.8 in the EyeTV Archive folder, and inside EyeTV 2’s
packages, having aliases named after the recording titles can be a lifesaver when you wish to
play or manipulate the files with any of a number of third party utilities or media players.
There are various options to set – for EyeTV 2, the default settings pictured above will be the
most useful.
NAMING SCHEME: iEye Captain uses a standard pre-set naming scheme to help prevent
multiple files having the same name. If a recording has an episode title, the alias will be named
according to "title - episode.mpg" and if there is no episode title, the file will be named according
to the date it was recorded, according to the format "title - Mar 27". You may wish to use the
“episode” field for custom notes if you wish this information to appear in the file names.
Location: Click the "Browse" button if you wish to change where you would like the aliases
saved to.
Erase Contents of Folder will delete the entire folder first (if it exists), and create a new folder
before exporting. If you choose to leave this unchecked, the following option becomes available:
Replace Identical Names: If selected, iEye Captain will erase over any files with the same name.
This is usually the best, because iEye's naming scheme should prevent duplicates. If you leave
this option de-selected, iEye Captain will add a numeric suffix ("-1" or "-2") to the end of the file
name to prevent over-writing an existing file. Be careful with this option, because multiple
exports can fill your folder very quickly!
Export as Alias: Again, this is the standard format. If you don't know what Unix soft links are
or why you would need them, just leave the “Export as alias” box selected.
iEye Captain Manual
version 1.0.6.3
Page 33 of 58
Export as Unix soft link: While soft links are very similar to aliases, there are specific purposes
where they are more desirable than aliases. Explaining why is not within the scope of this
manual. If you need them, make sure this radio button is selected.
REGARDING EXTENSIONS: Because EyeTV records in different formats (such as AVI or
Mpeg), it is highly recommended that you specify "same extension" here. If you do this, iEye
Captain will ensure that the same extension that is on the original recording file is also applied to
the alias. If you select "Other extension..." a text field will appear allowing you to specify an
alternate extension. This may be helpful to ensure the alias will be opened by a desired alternate
application to the default, or that it is understood correctly by the alternate application. Just be
aware that the extension is applied to every alias, regardless of the type of original recording.
(Note: this feature will be implemented before release—currently in build 0922 you can choose
between “.mpg” and a custom extension. However, if you choose “Alias of folder/package,”
iEye Captain will create the correct double-clickable “.eyetv” package format for the aliases)
"Alias of mpeg file only" is a popular option for streaming devices. This allows you aliases of
the actual Mpeg files but with descriptive names.
"Alias of folder/package" creates an alias to the parent folder or package that contains the
recording in question. THIS IS THE ONE YOU WANT FOR EYETV 2, as it will properly
create a double-clickable alias the new “.eyetv” package format. It does NOT rename the mpeg
files, so with EyeTV 1.8 it may be of limited use to you.
Lastly, as with the other export options, you can choose whether to export aliases for "All
Records," which makes aliases for every recording in your archive, or if you choose "Selected
records only" iEye will only export aliases for recordings that are currently selected (highlighted)
in the Recordings pane of the main window.
Once you have set up these settings, you have several choices of what you can do next:
1.
You can click on the other data export settings, and continue to set your preferences for
various data export types.
2.
Click the "Save All" button, which will save all of your export preferences without
performing an export. When you are ready to export, simply choose "QuickAlias" from the
toolbar or from the File menu --> QuickData submenu --> QuickAlias.
3. Or, if you would like to perform an export immediately, choose the "Export Alias" button.
This will save all your export preferences, and then perform an Alias export.
iEye Captain Manual
4G.
version 1.0.6.3
Page 34 of 58
DATA EXPORTING – iCAL EXPORT
iCal Export settings in the Data Export Settings window
For those of us with busy lives – which probably means most of us – it can be hard to keep tabs
on every thing that is supposed to happen in our day. iCal reminders can become a very essential
part of your EyeTV experience, whether it's just letting you know when your show is on so you
don't miss it, letting you know when it's time to change the channel on the digital cable or
satellite controller, or simply being able to view "what's on" in a handy printable daily, weekly,
or monthly view. Even using the default settings, you may wish to perform an export (Click the
"Export iCal" button) and then go to iCal to see how handy it can be!
It is very simple to customize the options:
- First choose a name for your calendar. You may wish to have one calendar set up for one type
of reminder, and another set up for a different type of reminder.
- Check the "Replacing" check box if you would like iEye Captain to over-write this calendar
each time. This is usually the easiest, but leave this unchecked if you wish to be prompted
before replacing an existing calendar.
- At the bottom, choose "All schedules" if you wish for every schedule to be represented in your
iCal calendar, or choose "Selected schedules only" if you wish to only include schedules that are
currently selected (highlighted) in the Schedules pane of the main window.
- "Schedule recurrences up to 'x' days" lets you indicate how for ahead to schedule recurring
schedules. For instance, if you have a weekly show scheduled, and set this to 30 days, there will
be 4 occurrences in the calendar, ending one month from now.
At this point you could already perform an export, and it would plot your schedules into iCal, for
handy Daily, Weekly, or Monthly printable views of what's on. Or, you can get even greater
functionality by setting up reminders:
iEye Captain Manual
version 1.0.6.3
Page 35 of 58
To set up reminders, simple pull the "reminders" popup menu to any of the following:
- Message - will simply display an iCal popup reminder with no sound.
- Message with Sound - displays a popup reminder with a chosen alert sound.
- Email - sends an email to the default email address on your system (indicated by the "me"
VCard in your Address Book application) every time a show is about to record.
- Open File - Lets you indicate a movie, sound, script, or application to be opened when the show
is about to record. You may wish to target the EyeTV application (this is the default) -- this is a
handy way to get EyeTV to jump to the foreground when a show is about to begin.
If you choose a reminder, various fields will become enabled, letting you choose the time frame
for the reminder -- from 0 minutes before to as many days as you wish. The "Message with
Sound" reminders will let you choose which sound to use, and the "Open File" reminders show
you which file will be opened, and a "browse" button which lets you choose an alternate file or
application.
PLEASE NOTE: It is not suggested that you make changes to these reminders from within iCal,
as they will be erased the next time you perform an export.
Once you have set up these settings, you have several choices of what you can do next:
1.
You can click on the other data export settings, and continue to set your preferences for
various data export types.
2.
Click the "Save All" button, which will save all of your export preferences without
performing an export. When you are ready to export, simply choose "Quick iCal" from the
toolbar or from the File menu --> QuickData submenu --> Quick iCal.
3. Or, if you would like to perform an export immediately, choose the "Export iCal" button.
This will save all your export preferences, and then perform an iCal export.
Check out the following page for an idea of how handy the iCal calendar views can be!
iEye Captain Manual
version 1.0.6.3
Page 36 of 58
4.G.1 Sample iCal Calendar Views
iCal showing full month view
iCal showing week view
Quite a handy way to know what’s on! And notice on the right that the reminders have been
activated…
iEye Captain Manual
4H.
version 1.0.6.3
Page 37 of 58
DATA EXPORTING – INFRARED EXPORT
EyeTV works perfectly when used with its internal tuner, changing the channel for you at the
appropriate time. But what if you have a digital cable or satellite TV set-top box, and you wish a
greater range of channels and a higher quality image? Analog EyeTV units allow you to hook up
these devices via the S-Video or Composite inputs. However, there is no way to automate
changing the channel, to schedule the shows you wish to record… that is, unless you have iEye
Captain and either the ZephIR or IRTrans USB infrared transceivers.
With the ZephIR or IRTrans, you can control your digital cable or satellite set-top box just as if it
were the internal tuner. You can time automated channel changes to the second, with perfect
reliability. The amazing thing is how easy it is!
4.H.1 PHYSICAL CONNECTIONS TO SET TOP BOX:
-
If you haven’t already, follow the directions to connect your EyeTV to your Mac. If you
have analog cable, use a 75-ohm coaxial cable (screw-on) to connect this to your EyeTV.
You will NOT use this cable to connect your digital cable or satellite set top box.
Hook up your digital cable or satellite set-top box to your EyeTV. You will need a stereo
RCA male-male audio cable (red/white) for the audio. If possible, use a 4-pin (S-Video)
connection for the video. This will give you the highest quality, and iEye Captain is
optimized for this input. If you do not have a 4-pin connection on your set-top box, I
suggest you use the yellow (Composite) connection for the video and red & white audio
connections for the audio. Using the 75-ohm coaxial (screw-on) connection gives you
the lowest quality, and is not supported for infrared control.
Samples of audio and video cables
-
Now, turn on the set top box, open EyeTV, and under the “Controls” menu select
“Composite” or “S-Video” depending on your setup. Use your set top box’s remote to
change channels, and verify that your EyeTV is receiving the audio and video.
iEye Captain Manual
version 1.0.6.3
Page 38 of 58
4.H.2 SETTING UP YOUR INFRARED DEVICE:
-
-
First, you must make sure you have the latest software and drivers installed for your
infrared device. ZephIR Station 2b12, iRed 1.4 or higher are recommended.
Secondly, follow the directions that came with your infrared device, to connect the
infrared device to your Mac. Usually it will be via a USB cable, though some IRTrans
models are connected via Ethernet.
Next, create a new “Component” in the infrared software, and you must ensure that the
numbers 0-9 and the “Enter” or “Select” button from your set-top box’s remote control
are programmed into the infrared software (you may need to consult the directions that
came with your device). Please make sure that the numbers 0-9 are named with just a
single numeric digit, and test them all to make sure they fire properly from the infrared
software. If there is no “Enter” button, it is advisable to create a button named
“enter” with no code attached.
IMPORTANT NOTE FOR IRTRANS/iRED: You must also set identical
Applescript names for these buttons… For example, the digit “1” should have an
Applescript name of “1” (no quotes).
Quit the infrared software (and iEye Captain if it was open) to ensure the preferences are
saved.
After any infrared software updates, it is important that you launch the infrared software
at least once to initialize your settings, before launching iEye Captain.
iRed Inspector showing Applescript Name
iEye Captain Manual
version 1.0.6.3
Page 39 of 58
4.H.3 INFRARED SETTINGS IN iEYE CAPTAIN:
Once you have set up your infrared software and tested the hardware, launch iEye Captain. If
Auto-reloading is not enabled, go to the Tools>Auto-Reload submenu and choose “Auto-Reload
when EyeTV changes.” This will synchronize iEye Captain with EyeTV but allow manual
control of the infrared scheduling.
Now go to the Tools menu to select “Infrared Settings.” The following window should appear:
Infrared Trigger settings in the Data Export Settings window
OPEN SETTINGS: IEye Captain should automatically detect your infrared software, and the
ZephIR / IRTrans selector at the top should automatically be set to the appropriate device. If you
only have one such device, this option will be grayed out. If you have both an IRTrans and a
ZephIR (as above), this selector allows you to choose between them.
TRIGGER CALENDAR: Firstly, ensure that you are happy with the name of the Trigger
Calendar. This is a calendar in iCal (separate from any reminder calendar you may have already
set up) that keeps track of the scripts that trigger the channel changes. It is very important that
you do not make changes to this calendar within iCal – if you need to make any changes, please
do this within iEye Captain. The scripts that control the channel changes are located in the
Preferences folder within the Library folder in the root directory of your startup drive.
SELECT A COMPONENT: The next step is to select a component. All of the components that
you have set up in your infrared software should appear in the “Component Name” popup menu.
If for any reason your component does not appear, you may need to quit out of iEye Captain,
open your infrared software, and verify that everything is set up properly there. Be sure to quit
the infrared software before re-opening iEye Captain so your preferences are saved.
SELECT “ENTER” BUTTON: Once you select a component, the “Enter” button popup menu
should be populated with all of the codes available on the component you have set. If you
already have a code set up with the name “enter” or “select,” iEye Captain will set it for you.
Otherwise, click on the “enter button” popup menu and drag to select the proper “enter” button.
iEye Captain Manual
version 1.0.6.3
Page 40 of 58
IMPORTANT: If your set top box does not need to have an “enter” button pressed, and you do
not have one programmed, it is important that you still have a button on the component that you
can designate as the “enter” button. In this case, you may create this empty button with no code.
TEST FIRE: Once you have set the component and “enter” button, it is important for you to test
the setup. Please ensure that your hardware device is connected, and click the “Test Fire” button
to send the digits from the Test Fire field to your device. It will only work with numeric digits,
but it is suggested that you test 123, 456, 789, and 890 to ensure all the buttons are working
properly.
“BETWEEN FIRINGS” may need to be adjusted if you find your device is missing one of the
digits in the sequence. For instance, “123” is set, but when you hit “test fire,” your set top box
turns the channel to “13.” This is similar to the “ticks” setting on some infrared software. It
instructs the trigger script to delay between individual codes sent to the remote – the number
indicated will be the number of tenths of a second delayed in between firings. It is recommended
that you use a value of 7 or higher – experiment to make sure the test fire is successful every
time, and then add at least 2 to the value, to compensate for times that your computer may be
busy, or something is preventing a clear transmitted signal. If you make the number 15 or higher
and digits are still being missed, try moving the infrared device closer to the set top box, or reprogramming the remote control codes.
The last three settings relate to the calendar and trigger scripts that are created.
“CHANGE CHANNEL X SECONDS BEFORE” lets you indicate how many seconds before a
schedule that the script will trigger the channel change. Because it may take a 5 or 6 seconds for
the script to change the channel, you may want to indicate a value of 6-10 seconds. You
probably want to experiment with a test schedule to ensure the settings will not cause the
previous show to be cut off, and yet will change the channel in time.
CHOOSE WHICH SCHEDULES: You can select either “All non-tuner schedules” or “Selected
schedules only.” The first option will create a trigger event for every enabled schedule with an
input source of “Composite” or “S-Video” that has a channel other than zero. This is the most
reliable option, as hitting “QuickIR” at any time will create a fresh calendar with all your
infrared triggers. If you wish, the second option will let you select one or more recordings in the
Schedules Pane and just make triggers for those schedules only. Please keep in mind that unless
you choose a different calendar name each time, this option will cause all previous triggers to be
deleted.
Once you have set up these settings, you have several choices of what you can do next:
1.
You can click on the other data export settings, and continue to set your preferences for
various data export types.
2.
Click the "Save All" button, which will save all of your export preferences without
performing an export. When you are ready to export, simply choose "QuickIR" from the toolbar
or from the File menu --> QuickData submenu --> Infrared Triggers.
iEye Captain Manual
version 1.0.6.3
Page 41 of 58
3. Or, if you would like to perform an export immediately, choose the "Export Triggers" button.
This will save all your export preferences, and then perform an iCal export.
The first time you do this, you should set up a short 1 minute test schedule, at least 6-7 minutes
from the current time. The iCal infrared scripts need at least 2 minutes leeway to execute, and
this will give you enough time to get through the instructions.
- if setting up a schedule in EyeTV, you must choose "S-Video" as the input (or “Composite” if
you are using the yellow video input), and enter the channel number between two asterisks in the
"Description" field. For instance, for channel 123 you would enter *123* in the description
field.
- if setting up a schedule in iEye Captain, choose "S-Video" as the input (or “Composite” if you
are using the yellow video input), and enter the channel number in the "external channel" field.
Check in EyeTV to ensure it appears correctly: double click the schedule and you should see the
channel between two asterisks in the description field. For example, the following show is
scheduled to record on channel 20:
EyeTV info window showing external channel
Now that you have done this, you must go to iEye Captain and export the infrared trigger
calendar. Do this by choosing the File>Quick Data Exports>Infrared Triggers menu item.
You should see iCal open up, and it will create a new calendar, with any shows you have
scheduled with external channels. For instance, the schedule from above appears in my iCal as
follows:
In iCal, click on the test schedule you have created. If the
“Info” drawer is not open, click on the “i” button on the
bottom left of the iCal window. Ensure the info drawer looks
similar to the one that appears here.
Now that this iCal trigger event is set up, the channel should
change at the proper time.
iCal info drawer showing infrared trigger
iEye Captain Manual
version 1.0.6.3
Page 42 of 58
Here is a bigger view of the trigger calendar in iCal:
Sample infrared trigger calendar in iCal
4.H.4 AUTO-INFRARED:
Once you export a trigger calendar to test it, and you know that it works, you can enable the
"Auto-reload and export infrared" option in the "Auto-Reload" sub menu of the "Tools" menu.
This will synchronize iEye Captain with EyeTV and also export a fresh trigger calendar to iCal
whenever any external channel schedule changes or is created.
IMPORTANT: If you make your schedule changes in EyeTV while iEye Captain is not running,
you must launch iEye Captain for the trigger calendar to be exported. If you do not have AutoInfrared enabled, you must manually export the trigger calendar after any schedule change.
For more information about infrared, please check out the online help, and also the iEye Captain
web site.
iEye Captain Manual
5.
version 1.0.6.3
Page 43 of 58
MULTIPLE ARCHIVES
One of the biggest limitations to EyeTV is its inability to access from or record to multiple hard
disks. Especially if you tape repeating syndicated shows or high definition material, you will
find that even the biggest hard drives on the market fill quickly.
iEye Captain provides many powerful (and safe) solutions to this problem, allowing you to not
only record to and play from an unlimited number of hard drives, but to be able to see them all in
the EyeTV application as well, just as if all schedules and recordings resided on the same hard
drive.
IMPORTANT: While these methods are safe when performed properly, and have been
established with the cooperation of Elgato Systems, it is strongly suggested that you fully
read and understand this section of the manual before attempting to join your archives
together. There are different ways to accomplish the same goals, and not all of them may
fit your particular workflow or needs. In any case, VidCan Media Solutions and Elgato
Systems are not responsible for any schedules or recordings that are lost as a result of
misusing the tools provided.
5.A
SIMPLE METHOD FOR MULTIPLE ARCHIVES:
The easiest method to using multiple hard drives in EyeTV is to actually record to the drive you
wish the recording to end up on, rather than recording to one drive and then moving the
recording later. If your main archive is filling up, select a repeating schedule in iEye Captain,
and click the “Info” button to open up the Info Drawer. “Records to” will tell you the current
location of this schedule. To begin recording to another hard drive, select a storage location
from the popup menu, and hit “Submit.” If you don’t see the drive you wish to record to in the
popup menu, you may need to select “Archive Locations” from the “Tools” menu to set up a new
location.
Info Drawer showing “Switch to” on bottom right
For details on what happens next, please see section 3.J on the new Archive Mover and Batch
Queue.
iEye Captain Manual
5.B
version 1.0.6.3
Page 44 of 58
LINKING IN OF PREVIOUSLY MOVED ITEMS
Without iEye Captain, many users juggle archives on other disks by selecting them in EyeTV’s
preferences, quitting, and re-launching to make them active. This way you can use a second
disk, but can not see, record to, or access the first disk’s archive while you are connected to the
second disk’s archive. As these archives expand, they can become very difficult to manage,
because EyeTV can not switch archives while it is busy recording or showing live TV.
These archives may be easily and safely integrated together, using iEye Captain’s unique “Link
Items to EyeTV Archive” feature. In seconds, you will have permanent access to all of these
secondary archives… Once finished, EyeTV will think that they are all on the same disk.
You will have no problems managing all your hard drives from one location with iEye Captain
after using this feature, and the best news is that you will have full functionality in EyeTV as
well! It is suggested that once you use this feature that you do not go back to switching archives
manually.
LINKING OTHER ARCHIVE FOLDERS:
These are the steps to follow to link archives together. It is suggested that you do this procedure
when your EyeTV is not currently recording.
1. Pick which archive will be your main archive. This will usually be the disk with the most
usable space. After you have linked the archives, this main archive will be the one that
you always leave selected in EyeTV’s preferences.
2. One by one, select each secondary archive in EyeTV’s preferences, quit, re-launch, and
disable or delete any scheduled programs that will conflict with schedules in your main
archive. If you have duplicate recordings for any reason, it would be a good idea to
delete these as well.
3. Once you have completed step 2 for every archive other than the main archive, select the
main archive in EyeTV’s preferences, quit, and re-launch.
4. Launch iEye Captain. If you haven’t registered the program, you will need to do so
before accessing this feature.
5. Choose Tools -> Link Items to EyeTV Archive. You will be prompted to browse to
select an EyeTV Archive Folder (it must be named this way, and be a valid archive).
Linking only takes a few seconds – iEye Captain will inform you how many schedule
folders were moved, and if there were any problems, how many were not moved. This is
usually because of a folder that has been copied from one archive to another, and was not
deleted in the original location. In this case, you will need to manually locate the folders
with the same names and consolidate their contents.
6. Repeat step #5 once for each secondary archive.
7. You will need to “Re-launch” EyeTV using the “Re-launch EyeTV” item in the Tools
menu, or activate EyeTV, quit, and re-launch, for the linking to be complete. If EyeTV is
active recording, you will need to wait until the recording is complete before quitting and
re-launching.
iEye Captain Manual
version 1.0.6.3
Page 45 of 58
Voila! EyeTV will now be able to see all of your schedules and recordings on every disk… You
can record, play, edit, compact, and export within EyeTV as if everything were sitting on the
same disk. Inside iEye Captain, you also will have other information and controls, letting you
manage your content even further. One of the first things that you will notice is that the location
of a recording or schedule is indicated in panes of the main window, and in the info drawer.
Inside the Schedule Info drawer, you also have controls for switching where a schedule records
to — a very handy feature when one hard drive is getting full.
THE FOLLOWING SECTION DEALS WITH EYETV 2 & ABOVE
5.E
BIG IMPROVEMENTS IN HOW EYETV 2 SAVES ITS FILES:
EyeTV 2 has a lot of changes over the hood, but also a lot under the hood, making it an upgrade
worth seriously looking at. Its new clickable named package format is a HUGE improvement
over the cryptic folder names of EyeTV 1.8.
SOME OTHER IMPROVEMENTS YOU MAY NOT BE AWARE OF:
•
•
•
•
•
Repeating schedules no longer record together inside the parent schedule folder. Each
new recording is placed in the root of the EyeTV Archive, or in the same folder that the
parent schedule is located. This makes moving single recordings around much safer and
simpler.
Schedules and recordings can be manually moved in and out of the EyeTV Archive, and
EyeTV will recognize and adapt to whatever is currently in the archive.
BIG NEWS: if you move a schedule package to another location, and simply create
a Finder alias back into the main archive, EyeTV will recognize it and record to the
new location-- even across a network!
BIG NEWS: if you move a recording to another location, and simply create a Finder
alias back into the main archive, EyeTV will recognize it and you will have full
functionality.
EyeTV 2 is smart about missing recordings… if one is missing (for instance, if it was on
a networked volume that is no longer available), it will not cause problems or crashes.
iEye Captain Manual
5.F
version 1.0.6.3
Page 46 of 58
HOW DOES iEYE CAPTAIN HELP MULTIPLE ARCHIVES IN EYETV 2?
LINK ITEMS TO EYETV ARCHIVE (EyeTV 2)
If you have manually moved recordings away from your EyeTV Archive, iEye Captain’s unique
“Link Items to EyeTV Archive” feature can link them back in. Just choose it from the Tools
menu, and it will ask you to locate the “secondary” location – i.e. the folder to which you have
moved the recordings or schedules. It will then link them back into your main archive, and relaunch EyeTV for you. This can be done any number of times… if iEye Captain sees items that
have already been linked, it will ignore them.
“RECORDS TO” POPUP IN INFO DRAWER
It is still a great habit to actually set up a schedule in the location you wish the recordings to be
made to, rather than recording them to the main archive and then moving them. All you have to
do is choose a different location in the “Records to” popup in the Info Drawer.
SEE LOCATIONS EASILY IN THE MAIN WINDOW
With EyeTV 2, it is great that you can drag aliases around manually to achieve multiple archives.
However, once you have linked a few it can be very hard to track which schedules and
recordings are where. The only way within the EyeTV 2 interface to find out where an item is
located is by choosing “Reveal in Finder” individually for each one.
With iEye Captain, the location for every schedule or recording is displayed clearly in the main
window.
IMPROVED ARCHIVE MOVER AND BATCH QUEUE
Please see section 3.J for more details about the easy new Archive Mover drawer and Batch
Queue.
iEye Captain Manual
5.G
version 1.0.6.3
Page 47 of 58
SETTING STORAGE LOCATIONS
To access and/or add to your chosen archive locations (you can have an unlimited number,
including networked volumes, but it is suggested you keep to volumes that can always be
mounted), click the “Storage Locations” menu item in the Tools menu, or click “Set locations” in
the Archive Mover window. The following window will appear:
Storage Locations window
You may notice some locations have been automatically entered for you. If you have used the
“Link Items to EyeTV Archive” feature to join multiple archives, you should see all of those
secondary locations already added for you. You may change a label for one of these, but you
may not delete a location if you see “Locked (in use)” in the “Status” column.
To add a new location, simply click the “Set…” button and use the browser to select a folder. It
is suggested that you have only one folder per disk, as you can access a maximum of six extra
folders in addition to your main EyeTV Archive. If you have more than one folder on a disk,
you will limit your expansion options later. Then, type in a custom label or leave the one that
was pre-entered, and hit the “+” button to add it.
To edit an existing location, select it in the table, and then either hit the “Set” button to change
the location, or type a new label. When you are finished editing, you must hit the “Update”
button to update the item in the table.
To remove a location (you can only do this if it is not in use), select the location in the table, and
hit the “–“ button.
Finally, to save your changes, click the “Save” button, or if you would like to close without
saving, hit the “Cancel” button.
iEye Captain Manual
version 1.0.6.3
Page 48 of 58
5.G.1 IMPORTANT NOTES ON USING EXTERNAL HARD DRIVES:
While these methods work perfectly and grant full functionality, it must be acknowledged that
they are temporary workarounds until Elgato adds multiple drive support to EyeTV. As
workarounds, there are limitations that must be recognized. The most significant is that it is
HIGHLY RECOMMENDED that you always mount volumes that contain EyeTV storage
locations before using either program. If you link schedules and/or recordings from external
drives or network volumes and then try to use EyeTV or iEye Captain when they are not
mounted, it may cause errors.
This only applies to the “master” archive, and to schedules and recordings you wish to remain
visible in EyeTV – For instance, you could have an iMac in your home office that does all the
recording and archiving. If you choose to record to or keep recordings on a firewire drive, that
drive should remain connected to the iMac and turned on. You may export compacted
recordings to a third drive--- this you could disconnect when needed. Then, you could have a
Mac Mini in your living room (with no EyeTV) connected to the iMac over the network, and set
the EyeTV preferences on the Mini to pretend that the iMac’s main archive is also the Mini’s
archive. The Mini could access all the recordings in the archives, and yet you could disconnect it
and turn it off, without affecting anything on the master iMac.
Particularly with EyeTV 1.x, if you must maintain archives on external drives that you
disconnect, you may wish to develop a naming scheme that will make it apparent in the EyeTV
Programs window which schedules and recordings belong to dismounted volumes. It is possible
that you may be able to operate by making sure you never try to play or access these schedules or
recordings while the volume is disconnected, but this method is unsupported and not
recommended. EyeTV 2 is a lot smarter about handling missing files -- if you choose this
workflow, I suggest you consider upgrading.
Hard drives for larger archive space, and fast DVD burners and media have never been cheaper;
there is no substitute for frequent editing, archiving & unloading of media.
iEye Captain Manual
6.
version 1.0.6.3
Page 49 of 58
MENUS, WINDOWS, TOOLBAR, AND KEYBOARD SHORTCUTS
iEye Captain has been designed to have something for everyone, but this means that the interface
and options can be a lot more complicated than EyeTV. As such, it is helpful to have a guide to
navigate the different menus, windows, toolbar items, and keyboard shortcuts. For examples of
windows, including default and/or recommended settings, please see section 6.B for a handy
index. For the other interface elements, you can see other helpful guides in this section.
6.A
BREAKDOWN OF MENUS & KEYBOARD SHORTCUTS
As with other Macintosh applications, the menus are a handy guide to keyboard shortcuts. It
should be mentioned that three of the menus have been designed to parallel the menus in EyeTV,
so you can have familiar access to many EyeTV functions without leaving iEye Captain. This
can be especially helpful in a setup with more than one monitor. For “most” EyeTV keyboard
shortcuts, adding the Option key will give you the iEye Captain equivalent.
6.A.1 “iEYE CAPTAIN” MENU
6.A.2 FILE MENU
6.A.3 FILE > STANDARD EXPORT
6.A.4 FILE > QUICK MEDIA EXPORT
iEye Captain Manual
version 1.0.6.3
6.A.5 FILE > QUICK TOAST
6.A.6 FILE > QUICK DATA EXPORTS
6.A.7 EDIT MENU
Page 50 of 58
6.A.10 TOOLS > AUTO-RELOAD
6.A.11 TOOLS > FORCE VIDEO INPUT
6.A.11 EyeVIEW MENU
6.A.12 EyeVIEW > ASPECT RATIO
6.A.8 RECORDINGS MENU
6.A.13 EyeVIEW > CLOSED CAPTIONS
6.A.9 TOOLS MENU
6.A.14 EyeVIEW > TELETEXT
iEye Captain Manual
version 1.0.6.3
6.A.15 EyeAUDIO MENU
Page 51 of 58
6.A.19 WINDOW MENU
6.A.16 EyeAUDIO > AUDIO CHANNELS
6.A.20 HELP MENU
6.A.17 EyeAUDIO > AUDIO OUTPUT
6.A.18 EyeCONTROLS MENU
iEye Captain Manual
6.B
version 1.0.6.3
Page 52 of 58
INDEX OF WINDOW SCREENSHOTS
Here is a list of the screenshots appearing in this manual:
iEye Captain’s Main Window ............................................................................................................................. 5
“Schedules” Info Drawer..................................................................................................................................... 6
Top of Schedules Info Drawer (looks this way when Tuner is not selected) .................................................... 7
Entering an external channel in EyeTV’s “Info” window.................................................................................. 7
External Channel Map ......................................................................................................................................... 8
“Force Video Input” sub-menu of Tools menu .................................................................................................. 9
Unused analog channels remapped to digital-only channels.............................................................................. 9
Recordings pane of main window..................................................................................................................... 11
Recordings Pane showing quick adding of sizes (in summary at bottom) ...................................................... 11
Recordings Info Drawer .................................................................................................................................... 13
Playlist pane, controls and “Add Items to Playlist” popup menu .................................................................... 14
Advanced Search window ................................................................................................................................. 16
<-- “Load Search” window............................................................................................................................... 17
Saved Searches controls and popup menu ........................................................................................................ 17
Lower part of Main Window, showing “Simple Search” field on left ............................................................ 18
Colors sub-menu under Windows menu........................................................................................................... 19
Alternating row colors example ........................................................................................................................ 19
Color Picker and custom colors example.......................................................................................................... 20
New Archive Mover drawer.............................................................................................................................. 21
Batch moving in progress.................................................................................................................................. 21
The toolbar stacked with export functions........................................................................................................ 22
<-- Standard Export Settings (File Menu) ....................................................................................................... 22
Quick Media Export Settings window .............................................................................................................. 23
QuickToast sub-menu of File menu.................................................................................................................. 25
Snapshot Settings in the Quick Media Export window.................................................................................... 27
EyeTV Snapshots folder after a few snaps ....................................................................................................... 28
Choose “Schedules” Fields in the Data Export Settings window .................................................................... 29
Choose “Recordings” Fields in the Data Export Settings window .................................................................. 29
Schedules Text Options settings in the Data Export Settings window............................................................ 30
Recordings Text Options settings in the Data Export Settings window.......................................................... 30
Aliases & Unix Soft Links in the Data Export Settings window..................................................................... 32
iCal Export settings in the Data Export Settings window ................................................................................ 34
iCal showing full month view ........................................................................................................................... 36
iCal showing week view.................................................................................................................................... 36
Samples of audio and video cables ................................................................................................................... 37
iRed Inspector showing Applescript Name ...................................................................................................... 38
Infrared Trigger settings in the Data Export Settings window......................................................................... 39
EyeTV info window showing external channel................................................................................................ 41
iCal info drawer showing infrared trigger ........................................................................................................ 41
Sample infrared trigger calendar in iCal ........................................................................................................... 42
Info Drawer showing “Switch to” on bottom right .......................................................................................... 43
Storage Locations window ................................................................................................................................ 47
Large view of most of the toolbar icons ........................................................................................................... 53
“Customize Toolbar” window showing toolbar items ..................................................................................... 54
“iEye Captain Help” title page .......................................................................................................................... 55
“iEye Captain Help” search results window..................................................................................................... 55
iEye Captain Manual
6.C
version 1.0.6.3
Page 53 of 58
CUSTOMIZABLE TOOLBAR
Unlike the EyeTV toolbar, iEye Captain features a customizable toolbar offering over 30
different functions, that you can tailor according to your needs. If you like, you can use small
icons with no text to free up space for more icons (tool tips will appear if you hover an icon, just
in case you forget its purpose), and another handy function is to set up a full range of EyeTV
play controls, that can act like a custom remote for your EyeTV.
Export Alias
Export Media
Export iCal
Export Infrared
Export Text
QuickAlias
QuickMedia
Quick iCal
QuickIR
QuickText Sched
Add
Remove/Delete
Info
Re-launch
EyeTV
Reload
Edit in EyeTV
Channel Down
Channel Up
Stop
Record
Skip Reverse
Fast Reverse
Play
Fast Forward
Skip Forward
Volume Down
Volume Mute
Volume Up
Pause
Large view of most of the toolbar icons
Snapshot
iEye Captain Manual
version 1.0.6.3
Page 54 of 58
To customize the toolbar, simply click the “Customize” button on the right of the toolbar, or
select “Customize Toolbar…” from the Window menu. The following sheet will appear:
“Customize Toolbar” window showing toolbar items
As with other Macintosh applications, you can drag any items onto or off of the toolbar, or drag
to re-arrange them. If you like, you can click on the “default set” at the bottom and drag it to the
toolbar to reset the items.
If screen real estate is of the essence, clicking the transparent button at the top right of the main
window (above the “Customize” toolbar icon) will show and hide the toolbar.
iEye Captain Manual
7.
version 1.0.6.3
Page 55 of 58
GETTING HELP
iEye Captain comes with a full searchable online help system. On most layouts, there is a Help
button in the corner, which you can click to activate the help system, or you can choose “iEye
Captain Help” from the Help menu.
The following title page will appear:
“iEye Captain Help” title page
From there, you can follow the links, or type a search term in the search field at the top. A
search window will appear with the results:
“iEye Captain Help” search results window
iEye Captain Manual
version 1.0.6.3
Page 56 of 58
HELPFUL WEB LINKS:
iEye Captain main web page:
iEye Captain FAQ:
iEye Captain Downloads:
http://www.vidcan.com/Software/iEyeCaptain.html
http://www.vidcan.com/Software/FAQ.html
http://www.vidcan.com/Software/Downloads.html
(you can get the latest version of this manual at the iEye Captain Downloads link, above)
iEye Captain RSS News:
iEye Captain Web Store:
Known Issues:
Helpful Web Links:
Recent Downloads:
feed://www.vidcan.com/iEye/news.xml
http://store.eSellerate.net/s.asp?s=STR7854316728
http://www.vidcan.com/iEye/known_issues.html
http://www.vidcan.com/Links.html
http://www.vidcan.com/iEye/download_history.html
SOFTWARE SUPPORT:
PURCHASE SUPPORT:
[email protected]
http://www.esellerate.net/
For sales info, tech support, and feature requests, please contact me by email. For anything
related to your purchase transaction, billing, registration numbers, etc. please contact eSellerate.
TIP: Many of these links, as well as a bug report email pre-formatter, can be
accessed in the “Help” menu right inside the iEye Captain application.
Please read this manual section appropriate to your question fully, and consult the FAQ before
asking questions. Registered users will be given support priority. In any event, I will attempt to
provide answers to emails within two business days, holidays excepted.
iEye Captain Manual
8.
1.
version 1.0.6.3
Page 57 of 58
TABLE OF CONTENTS
INTRODUCTION.............................................................................................................2
1A.
FOREWORD: The Story of iEye Captain... ................................................................2
2. GETTING STARTED ......................................................................................................3
2A.
SYSTEM REQUIREMENTS ......................................................................................3
2B.
REGISTRATION........................................................................................................3
2C.
RELATIONSHIP BETWEEN EYETV AND iEYE CAPTAIN ...................................4
3. THE INTERFACE............................................................................................................5
3A.
Top Right – SCHEDULES PANE ...............................................................................5
3B.
SCHEDULE INFO DRAWER ....................................................................................6
3.B.1
“RECORDS TO” MAKES SHARING DISKS EASY .........................................6
3.B.2
EXTERNAL CHANNELS METHOD .................................................................7
3.B.3
“EXTERNAL CHANNEL MAP” FOR STATION NAMES................................8
3.B.4
“FORCE VIDEO INPUT” MENU ITEM (1.0.6.2 and later) ................................9
3.B.5
“DUPLICATE SCHEDULE(S)” MENU ITEM .................................................10
3.C
Bottom Right – RECORDINGS PANE .....................................................................11
3.C.1
QUICK ADDING OF SIZES.............................................................................11
3.C.2
“CREATE SCHEDULE FROM RECORDING” MENU ITEM.........................12
3.C.3
“ENABLE REPEAT DATE FIXING” MENU ITEM ........................................12
3.C.4
“ALLOW MULTIPLE EYETVs” MENU ITEM ...............................................12
3.D
RECORDINGS INFO DRAWER..............................................................................13
3.E
PLAYLISTS PANE...................................................................................................14
3.E.1
SMART PLAYLISTS........................................................................................14
3.E.2
“AUTO-SMART” OPTION ..............................................................................14
3.E.3
SMART PLAYLIST TUTORIAL (EyeTV 1.8.x only).......................................15
3.E.4
IMPORTING EYETV 2 PLAYLISTS AND AUTO-PLAYLIST.......................15
3.G
SIMPLE SEARCH ....................................................................................................18
3.H
UNDERSTANDING SEARCH ORDER...................................................................18
3.I
CUSTOMIZING COLORS .......................................................................................19
3.J
NEW ARCHIVE MOVER / BATCH QUEUE ..........................................................21
4A.
MEDIA EXPORTING - STANDARD ......................................................................22
4B.
MEDIA EXPORTING – QUICK EXPORT...............................................................23
4C.
MEDIA EXPORTING – QuickToast.........................................................................25
4.C.1
LIMITATIONS OF EYETV TOAST BURNING: .............................................25
4.C.2
ADVANTAGES OF iEYE CAPTAIN QuickToast BURNING: ........................25
4.C.3
WHY YOU SHOULD UPGRADE TO TOAST 7 or 8.......................................26
4D.
MEDIA EXPORTING – SNAPSHOTS.....................................................................27
4E.
DATA EXPORTING – TEXT WITH DELIMITERS ................................................29
4F.
DATA EXPORTING – ALIASES & UNIX SOFT LINKS........................................32
4G.
DATA EXPORTING – iCAL EXPORT....................................................................34
4.G.1 Sample iCal Calendar Views ...................................................................................36
4H.
DATA EXPORTING – INFRARED EXPORT .........................................................37
4.H.1
PHYSICAL CONNECTIONS TO SET TOP BOX: ...........................................37
4.H.2
SETTING UP YOUR INFRARED DEVICE: ....................................................38
4.H.3
INFRARED SETTINGS IN iEYE CAPTAIN:...................................................39
iEye Captain Manual
version 1.0.6.3
Page 58 of 58
4.H.4
AUTO-INFRARED:..........................................................................................42
5.A
SIMPLE METHOD FOR MULTIPLE ARCHIVES: .................................................43
5.B
LINKING IN OF PREVIOUSLY MOVED ITEMS ..................................................44
5.E
BIG IMPROVEMENTS IN HOW EYETV 2 SAVES ITS FILES: ............................45
5.F
HOW DOES iEYE CAPTAIN HELP MULTIPLE ARCHIVES IN EYETV 2?.........46
5.G
SETTING STORAGE LOCATIONS ........................................................................47
5.G.1
IMPORTANT NOTES ON USING EXTERNAL HARD DRIVES: ......................48
6. MENUS, WINDOWS, TOOLBAR, AND KEYBOARD SHORTCUTS.......................49
6.A
BREAKDOWN OF MENUS & KEYBOARD SHORTCUTS...................................49
6.A.1
“iEYE CAPTAIN” MENU ................................................................................49
6.A.2
FILE MENU......................................................................................................49
6.A.3
FILE > STANDARD EXPORT .........................................................................49
6.A.4
FILE > QUICK MEDIA EXPORT ....................................................................49
6.A.5
FILE > QUICK TOAST ....................................................................................50
6.A.6
FILE > QUICK DATA EXPORTS ....................................................................50
6.A.7
EDIT MENU .....................................................................................................50
6.A.8
RECORDINGS MENU .....................................................................................50
6.A.9
TOOLS MENU .................................................................................................50
6.A.10 TOOLS > AUTO-RELOAD ..............................................................................50
6.A.11 TOOLS > FORCE VIDEO INPUT ....................................................................50
6.A.11 EyeVIEW MENU..............................................................................................50
6.A.12 EyeVIEW > ASPECT RATIO ...........................................................................50
6.A.13 EyeVIEW > CLOSED CAPTIONS ...................................................................50
6.A.14 EyeVIEW > TELETEXT...................................................................................50
6.A.15 EyeAUDIO MENU ...........................................................................................51
6.A.16 EyeAUDIO > AUDIO CHANNELS..................................................................51
6.A.17 EyeAUDIO > AUDIO OUTPUT .......................................................................51
6.A.18 EyeCONTROLS MENU....................................................................................51
6.A.19 WINDOW MENU .............................................................................................51
6.A.20 HELP MENU ....................................................................................................51
6.B
INDEX OF WINDOW SCREENSHOTS ..................................................................52
6.C
CUSTOMIZABLE TOOLBAR .................................................................................53
7. GETTING HELP ............................................................................................................55
8. TABLE OF CONTENTS ................................................................................................57