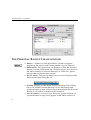
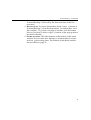
1
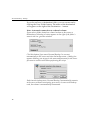
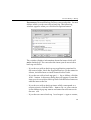
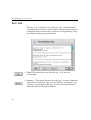
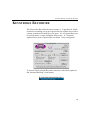
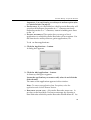
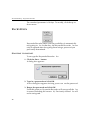
USER’S MANUAL
Personal Backup -
Personal Backup 2 for Macintosh
© 2001 - 2002 Intego, Inc. All Rights Reserved
Intego, Inc.
www.intego.com
This manual was written for use with Personal Backup 2 software for Macintosh. This manual
and the Personal Backup 2 software described in it are copyrighted, with all rights reserved. This
manual and the Personal Backup 2 software may not be copied, except as otherwise provided in
your software license or as expressly permitted in writing by Intego, Inc.
The Software is owned by Intego and its suppliers, and its structure, organization and code are
the valuable trade secrets of Intego and its suppliers. The Software is protected by United States
Copyright Law and International Treaty provisions.
2
Personal Backup - Introduction
INTRODUCTION
Welcome to Personal Backup 2. We hope this software will give
you complete satisfaction. Did you return your registration card
or register on-line? If not, please do so now. It is the only way for
us to inform you about product upgrades and other important
information. Thank you.
If you experience any difficulty or would like to offer some
suggestions, please feel free to contact us. You may also contact
the customer support department of our local distributor.
WHAT CAN PERSONAL BACKUP 2 DO FOR YOU?
Personal Backup 2 lets you back up and synchronize data
quickly to and from hard disks, AppleShare volumes, removable
media or any other mountable volume.
The backup function creates a copy of all designated items in
Finder format. The synchronization function checks the
differences between two folders or volumes and reconciles their
data: it copies the most recent file to the other volume. A built-in
schedule lets you automate unattended backups and
synchronizations at shutdown or at any chosen time.
The Keystroke Recorder function of Personal Backup 2
permanently records everything you type in a 24-hour period. It
prevents loss of data even when a nasty system error destroys
your active files. You can recover all typed data with a copy and
paste from a text file.
3
Personal Backup - Customer Support
CUSTOMER SUPPORT
If you experience any problems with this software, please
contact Intego at [email protected], or visit the Intego web
site: www.intego.com.
4
Personal Backup - Contents
CONTENTS
INTRODUCTION ....................................................................................................................3
CUSTOMER SUPPORT ............................................................................................................4
INSTALLATION ......................................................................................................................6
Installing Personal Backup 2 ...................................................................................6
How to access Personal Backup 2 ..........................................................................7
The Personal Backup 2 main window ...................................................................8
BACKUP ..............................................................................................................................10
Backup configuration .............................................................................................11
SYNCHRONIZATION ...........................................................................................................19
Synchronization configuration .............................................................................20
Synchronization dialogs ........................................................................................26
LIST OF SCRIPTS ..................................................................................................................30
Notifications from Personal Backup 2 .................................................................30
Managing scripts ....................................................................................................31
Log file .....................................................................................................................32
KEYSTROKE RECORDER ......................................................................................................33
Record ......................................................................................................................34
Encryption ...............................................................................................................36
Accessing files containing your data ...................................................................37
Recovering data ......................................................................................................40
5
Personal Backup - Installation
INSTALLATION
Personal Backup 2 requires a Macintosh equipped with System
8.1 or later, two megabytes of RAM, and a hard disk.
INSTALLING PERSONAL BACKUP 2
Please follow these steps to install Personal Backup 2:
1. Double-click the application “Personal Backup 2 Installer”.
2. A dialog box opens. Click Continue.
3. In the next dialog, click Install.
This installs the file “Personal Backup 2” in the Control Panels
folder and the file “Personal Backup 2 Helper” in the
Preferences folder inside the System Folder on your start-up
disk.
4. In the dialog box which appears, click Restart.
After restarting the Macintosh, a dialog box appears asking you
to personalize your copy of Personal Backup 2.
5. Type your name, the name of your company, if any, and the
serial number which you received with Personal Backup 2.
6. Click OK.
Note : IMPORTANT NOTE for users of Personal Backup 1.2.4.
• Automatic volume mounting during backup is not 100% reliable
with Personal Backup 1.2.4 under Mac OS 9.
• Backup scripts defined with Personal Backup 1.2.4 must be
updated for use with Personal Backup 2 because additional
server information must be saved under Mac OS 9 than what
6
Personal Backup - Installation
was necessary with earlier versions of Mac OS. After installing
Personal Backup 2, you should edit each script, verify the source
and destination, and close the configuration dialog box by
clicking the OK button even if you make no changes. Clicking
the OK button saves the extra information, while clicking on
Cancel would leave the script unchanged and not updated.
• Updated scripts for Personal Backup 2 are no longer compatible
with Personal Backup 1.2.4.
• If you want to save your Personal Backup 1.2.4 backup scripts,
you can make a copy of the preference file called "Backup Prefs"
located in the "Personal Backup Prefs" folder inside the
Preferences folder of your system.
HOW TO ACCESS PERSONAL BACKUP 2
The Personal Backup 2 control panel can be accessed through a
menu permanently displayed on the right-hand side of the
menu bar. This menu is represented by the Personal Backup 2
icon. You can even instantly launch a backup or synchronization
script by selecting it in the menu.
Note : The Personal Backup 2 menu is displayed by default. If you
prefer not to display it, uncheck the option Show menu in the control
panel. Should you do this, you will have to select the Control Panels
item in the Apple menu to access Personal Backup 2 which is located in
the Control Panels folder. To open it, double-click its icon in the
window.
7
Personal Backup - Installation
THE PERSONAL BACKUP 2 MAIN WINDOW
• ABOUT…: When you click this button, a window appears
displaying the version and license number of your software.
• SHOW MENU: This option lets you display or hide the Personal
Backup 2 menu in the menu bar. This menu gives you access to
the main window of Personal Backup 2 or to the configured
backup and synchronization scripts.
• POP-UP MENU: This pop-up menu lets you access the Keystroke
Recorder function (See page 33).
• ON/OFF: Activate or deactivate Personal Backup 2 by clicking
On or Off. When Personal Backup 2 is off, the backup and
synchronization scripts will not start automatically but Personal
Backup 2 will still be available in the menu bar.
• LIST OF SCRIPTS: As soon as you have configured a backup or
synchronization script, it will appear in the main window of
8
Personal Backup - Installation
Personal Backup 2 followed by the date and time of the last
execution.
• HELP BUTTON: For more information about a specific feature of
Personal Backup 2, click the Help button. To read further, click
the scroll bar. To go from one page to another, click the button
Next or Previous or select a specific feature in the pop-up menu
just below the title.
• OTHER BUTTONS: The other buttons at the bottom of the main
window let you create new backup or synchronization scripts
and configure existing ones. The features of the these buttons
are described on page 31.
9
Personal Backup - Backup
BACKUP
It is recommended that all Macintosh users regularly back up
their data. This is vital to recover data in case of accidental
deletion, hard disk failure, or other annoying situations.
Too many computer users still fail to back up their data
regularly because it is too cumbersome and interferes with their
activity on the Macintosh.
With Personal Backup 2, it is now possible to back up data
automatically without any interference in your work. You can
either back up at shutdown or at a specific moment during the
day, for example, each day at noon. You can also run the backup
procedure instantly by typing a keyboard shortcut or by clicking
a button in the main window.
Personal Backup 2 makes incremental backups of your data.
During the first backup, it will back up all your data onto the
folder or volume of your choice. Afterwards, Personal Backup 2
will only back up new files and files which have been modified
since the last backup.
All data is copied in Finder format: Whenever you need to
recover data, you just have to open the backup folder or volume
and you will find an exact copy of your data. There is no need to
restore data from a backup file.
Personal Backup 2 lets you back up data to hard disks, magnetooptical disks, Syquest cartridges, AppleShare volumes, etc.
With Personal Backup 2, you can generate several backup copies
of one particular file or folder which are then stored by date in
different subfolders. If for some reason the most recent backup
copy is damaged, you can immediately consult a former backup
copy. Moreover, this particular system enables you to access
different chronological versions of your files.
10
Personal Backup - Backup
BACKUP CONFIGURATION
In the main window, click the New… button to create a script.
(You can also edit an existing script by selecting it in the main
window and clicking Edit...) A configuration window appears:
The Backup function is selected by default.
SOURCE AND DESTINATION
• SOURCE indicates the item you wish to back up. Click the
Source… button. Locate a volume or folder you wish to back up
in the directory dialog box, select it and click the Select button.
The name of the source will appear on the right of the Source…
button.
• DESTINATION indicates the name of the volume or folder in
which the backup will be stored.
Click the Destination… button. Locate a volume or folder in
which you would like to store your backup, select it and click
the Select button.
11
Personal Backup - Backup
If you do not have a destination folder, you can create one by
clicking the New Folder button. The name of the destination
will appear on the right of the Destination… button.
Note : Automatic connection to a shared volume.
If you select a folder located on a shared volume as the source or
destination of a backup, a button appears to the right of the folder's
name in the configuration window.
Click this button if you want Personal Backup 2 to connect
automatically to the server each time the backup starts. A dialog box
appears allowing you to type in the name and password for the server
you want to connect with when performing the script:
Each time the backup starts, Personal Backup 2 automatically connects
to the server without interrupting your work. As soon as the backup
ends, the volume is automatically unmounted.
12
Personal Backup - Backup
EXCEPTIONS: Personal Backup 2 allows you to select the files and
folders which you do not wish to back up. The following
window appears when you click the Exceptions button:
The window displays information about the items which will
not be backed up. You can select the items you do not wish to
back up as follows:
- If you do not wish to back up any application contained in
the source folder, check the Applications box. Do the same for
aliases, invisible items or items located in the Trash.
- If you do not wish to back up specific files or folders, click the
Add… button. A directory dialog box will appear. Locate the
item you do not wish to back up and click the Select button to
add the item to the list.
- If you do not wish to back up items which correspond to a
certain criteria, click the Filter… button. Define your criteria
in the different pop-up menus and enter the relevant text in
the text field.
- If you do not want to back up files of a specific type or creator,
13
Personal Backup - Backup
you can click the Same As… button and select a file
corresponding with the type or creator.
EXECUTION
With the following options, you can set up an automatic backup:
• BACK UP AT SHUTDOWN: If you select this option, Personal
Backup 2 runs the script at each computer shutdown. The
backup starts as soon as you select the Shutdown command.
The Macintosh shuts down once the backup is finished.
• BACK UP AT: Choose this option to specify a day and time for
your data backup, for example, each workday at noon. Select the
time by clicking the up or down arrow, and the day(s) by
checking the square button(s). This kind of backup runs in the
background, and will not interfere with your work on the
computer. During the backup, an icon
flashes over the
Apple menu icon. If Personal Backup 2 encounters an
irregularity, it will inform you with a dialog box to allow you to
intervene immediately.
• Back up every: This function allows you to run backup scripts at
regular intervals, e.g. every 15 minutes, every hour or every 2
days. To activate this feature, check the Back up every … box.
Modify the interval value by clicking the up or down arrow,
then select the time unit in the pop-up menu (Minutes, Hours,
Days). The script will run for the first time after the defined
interval following its configuration.
• KEYBOARD SHORTCUT: Define a keyboard shortcut to
immediately run the script in the background.
OPTIONS
• Do not display messages on screen: If an irregularity occurs,
Personal Backup 2 displays a dialog box informing you of the
nature of the problem (missing file, problems to connect to the
server …). Select this option if you do not want to be interrupted
by Personal Backup 2 during your work. If Personal Backup 2
notices an irregularity, it will notify you with a beep and a
14
Personal Backup - Backup
flashing icon
over the Apple menu icon. This notification
indicates you must consult the log file (See page 32) and run the
script manually.
• Warn before starting: Select this option if you want to be
notified by a confirmation window before the backup script
starts running:
- If Personal Backup 2 is running a backup at shutdown, it will
display a dialog box. Click OK to start the backup or Cancel if
you do not wish the script to be run. The Macintosh will shut
down as soon as the backup is finished or cancelled. If you do
not answer the dialog, the message will disappear after five
minutes and the script will not be executed. The Macintosh
will shut down afterwards.
- If Personal Backup 2 is running a backup at a specific time, a
flashing icon
appears on top of the Application menu
icon. Open the menu and select Personal Backup 2. In the
dialog box that appears, click:
- OK to start the backup
- Cancel if you do not wish the backup script to be run
- Delay to delay the script until a later time.
15
Personal Backup - Backup
• BACK UP DESKTOP: If you want to back up an entire volume and
some of the files or folders are currently on the desktop, select
this option to include these items in the backup.
Personal Backup 2 will store the backup desktop items in one of
two locations, depending on the nature of the destination.
1. If the destination is a folder, Personal Backup 2 will automatically create a Desktop Folder within a destination folder. It
will store a backup of the desktop items in this Desktop
Folder.
2. If the destination is a volume, Personal Backup 2 will copy the items
from the source desktop onto the desktop of the destination. After the
backup, the original icons and the backup icons will be superimposed
on the desktop. The backup icon is placed on top. When both volumes
remain connected, take care not to use the backup items instead of the
original ones. If you want to know which volume an icon represents,
select the icon and choose the Get Info command.
Note : If you do not intend to disconnect the destination volume from
your Macintosh, we recommend you back up an entire volume to a
folder within the destination volume and not to the volume as is. This
will prevent you from using the backup copy of your file or folder
instead of the original.
• GENERATE … COPIES: With Personal Backup 2, you can generate
several
backup copies of one particular file or folder which are then
stored by date in different folders. If for some reason the most
recent backup copy is damaged, you can immediately consult a
former backup copy. Moreover, this particular system enables
you to access different chronological versions of your files.
The different backup folders are identified by the name of the
source, date and time of the last backup.
Check this option and define a number of backup folders. Each
time Personal Backup 2 runs a backup, it will store its backup
alternately in one of the subfolders. The oldest backup folder
16
Personal Backup - Backup
will be automatically replaced by the most recent backup folder.
If you check this option after having run backups of this
particular script, Personal Backup 2 will automatically create the
different backup folders and delete the existing data in the
backup folder.
If you increase or decrease the number of backup folders,
Personal Backup 2 will automatically create or delete the
necessary folders.
• DEFAULT BACKUP OPTIONS: Before running a backup, Personal
Backup 2 checks the source and destination folders. If, since the
last backup, an item was deleted from the source folder or
added to the destination folder, Personal Backup 2 will keep this
item in the destination folder by default.
- If you prefer to delete any such item, or if you want to
intervene manually, click the Configure… button. A dialog
box appears displaying several options. As mentioned above,
the default option is to keep items in the destination folder.
If you prefer not to keep these items in the destination folder,
select the first option “Delete these items in the destination
folder”.
- If you prefer to be notified each time an item is deleted from
the source or added to the destination folder, select the last
option “Ask the user to choose keep or delete”.
Should this situation arise, a dialog box appears displaying
the names of all items which are in the destination and not in
the source folder. Personal Backup 2 will invite you to keep or
delete each item.
17
Personal Backup - Backup
Personal Backup 2 displays the name of the backup script on
top of the window and lists the names of the items and their
specifications.
- The validation sign indicates that Personal Backup 2 proposes
by default to keep the item listed.
- If you want to delete the item, click the validation icon. It will
be replaced by a Trash icon. If you want to delete all items in
the destination folder, click the validation sign on the first
line, press the mouse button and select the whole line
downwards.
After having validated each line, click OK to start the backup.
If you are not sure of your decision, click the Cancel button.
18
Personal Backup - Synchronization
SYNCHRONIZATION
If you are frequently working on two different computers, for
example, a PowerBook and a desktop Macintosh, a lot of the
data will be identical. The synchronization function of Personal
Backup 2 was designed to update those items which are on both
disks. It will copy the most recent item to the other volume.
During a synchronization, Personal Backup 2 compares the
contents of two folders or volumes and detects new items and
items with the same path name (name of the item and its
hierarchical location).
If a new item was created on one side of the synchronization,
Personal Backup 2 will automatically copy this item to the other
side. In the same way, if since the last synchronization an item
has been modified on one side only, its corresponding item on
the other side will be automatically updated.
Personal Backup 2 synchronizes to and from hard disks,
magneto-optical disks, Syquest cartridges, AppleShare volumes
…
You can automate the synchronization script to run either at
shutdown or at a specific moment during the day, for example
each day at noon. You can also run the synchronization script
instantly by typing a keyboard shortcut or by clicking a button
in the main window.
All the actions taken by Personal Backup 2 are described in a log
file that you can consult at any time.
19
Personal Backup - Synchronization
SYNCHRONIZATION CONFIGURATION
To configure a synchronization script, click the New… button in
the main window. The configuration window of Personal
Backup 2 appears:
• Synchronization script: Select the synchronization button.
You will notice that the backup options have been replaced by
synchronization options.
SYNCHRONIZATION ITEMS
• Between…: Click this button to designate an item to be
synchronized. A directory dialog box appears. Locate a folder or
volume, select it and click the Select… button.
• And…: Click this button to designate the second item of your
synchronization. A directory dialog box appears. Locate a folder
or volume which you want to synchronize with the item you
selected first, select it and click the Select… button.
20
Personal Backup - Synchronization
The names of the items to be synchronized appear in the
window, as well as the names of the volumes and folders in
which they are located.
Note : Automatic connection to a shared volume.
If you select a folder located on a shared volume as the source or
destination of a synchronization, a button appears to the right of the
folder's name in the configuration window.
Click this button if you want Personal Backup 2 to connect
automatically to the server each time the synchronization starts. A
dialog box appears allowing you to type in the name and password for
the server you want to connect with when performing the script:
Each time the synchronization starts, Personal Backup 2 automatically
connects to the server without interrupting your work. As soon as the
synchronization ends, the volume is automatically unmounted.
21
Personal Backup - Synchronization
• EXCEPTIONS: Personal Backup 2 allows you to select the files and
folders which you do not wish to synchronize. The following
window appears when you click the Exceptions button:
The window displays information about the items which will
not be synchronized. You can select the items you do not wish to
synchronize as follows:
- If you do not wish to synchronize the applications, check the
Applications box. Do the same for aliases, invisible items or
items located in the Trash.
- If you do not wish to synchronize specific files or folders,
click the Add… button. A directory dialog box will appear.
Locate the item you do not wish to synchronize and click the
Select button to add the item to the list.
- If you do not wish to synchronize items which correspond to
a certain criteria, click the Filter… button. Define your criteria
in the different pop-up menus and enter the relevant text in
the text field.
- If you do not want to synchronize files of a specific type or
creator, you can click the Same As… button and select a file
corresponding with the type or creator.
22
Personal Backup - Synchronization
EXECUTION
With the following options, you can set up an automatic
synchronization:
• Synchronize at shutdown: If you select this option, Personal
Backup 2 runs the script at each computer shutdown. The
synchronization starts as soon as you select the Shutdown
command.
The Macintosh shuts down once the synchronization is finished.
• Synchronize at: Choose this option to specify a day and time for
your synchronization, for example, each workday at noon.
Select the time by clicking the up or down arrow, and the day(s)
by checking the square button(s). This kind of synchronization
runs in the background and will not interfere with your work
on the computer. During the synchronization, an icon
flashes over the Apple menu icon. If Personal Backup 2
encounters an irregularity, it will inform you with a dialog box
to allow you to intervene immediately.
• Sync every: this option allows you to run a backup script at a
regular interval, such as every 15 minutes, ever hour or every
two days. Check this check box, than change the interval value
by clicking the arrow buttons, and select a time unit in the
popup menu (Minutes, Hours, Days). The script will be run a
first time after the interval defined, then will reoccur according
to this interval.
• Keyboard shortcut: Define a keyboard shortcut to immediately
run the script in the background.
OPTIONS
• Do not display messages on screen: If an irregularity occurs,
Personal Backup 2 displays a dialog box informing you of the
nature of the problem (missing file, problems to connect to the
server …). Select this option if you do not want to be interrupted
23
Personal Backup - Synchronization
by Personal Backup 2 during your work.
If Personal Backup 2 notices an irregularity, it will notify you
with a beep and a flashing icon
over the Apple menu icon.
This notification indicates you must consult the log file (See
page 32) and run the script manually.
• Warn before starting: Select this option if you want to be
notified by a confirmation window before the synchronization
script starts running:
- If Personal Backup 2 is running a synchronization at
shutdown, it will display a dialog box. Click OK to start the
synchronization or Cancel if you do not wish the script to be
run. The Macintosh will shut down as soon as the
synchronization is finished or cancelled. If you do not answer
the dialog, the message will disappear after five minutes and
the script will not be executed. The Macintosh will shut down
afterwards.
- If Personal Backup 2 is running a synchronization at a specific
time, a flashing icon
appears on top of the Application
menu icon. Open the menu and select Personal Backup 2. In
the dialog box that appears, click:
24
Personal Backup - Synchronization
- OK to start the synchronization
- Cancel if you do not wish the synchronization script to be
run
- Delay to delay the script until a later time.
• Synchronize desktops: If you want to synchronize an entire
volume and some of the files or folders are currently on the
desktop, select this option to synchronize these items.
- If you wish to synchronize between a volume and a folder,
Personal Backup 2 will automatically create a Desktop Folder
within this folder. The items on the desktop will be stored in
this Desktop Folder.
- If you wish to synchronize between two volumes, Personal
Backup 2 will immediately synchronize the items on both
desktops. After the synchronization, the icons of the items on
each desktop will be superimposed as long as both disks are
mounted. If you want to know which volume an icon
represents, select the icon and choose the Get Info command
in the File menu of the Finder.
25
Personal Backup - Synchronization
SYNCHRONIZATION DIALOGS
Before synchronizing, Personal Backup 2 compares each folder
or volume to be synchronized. If Personal Backup 2 sees that a
file has been modified since the last synchronization, it will
automatically copy the most recent version of the file to the
other side.
If, however, a file has been modified on both sides or a file has
been deleted on one side only since the last synchronization,
Personal Backup 2 will not make any decision: To avoid
accidental loss of data, Personal Backup 2 will display a dialog
box which will allow you to solve this kind of irregularity.
Each line shows the name of a file or folder for which Personal
Backup 2 requires a decision. They also indicate the date and
time of the last modification and the size of the file.
To know the hierarchical location of a file, select the line in
which the file is listed.
On the middle of each line, you will notice a button. Each time
you click this button, it will display a different icon. Each icon
represents a function that Personal Backup 2 will execute when
you click OK.
26
Personal Backup - Synchronization
To know the meaning of each icon, click the lever in the upper
right corner of the window. All different options will appear at
the bottom of the window.
To select the option of your choice, you can either choose the
corresponding icon or click its radio button.
After having validated each line, click the OK button to start the
synchronization script. If you are not sure of your decision, you
can click the Cancel button at any time.
• File modified on both sides: If, since the last synchronization, a
file has been modified on both sides, Personal Backup 2 displays
both versions of the file.
- Personal Backup 2 proposes by default to keep the most
recent file and to copy it to the other side, thus deleting the
older version.
- Keep the file on “Hard Disk”: If you identify a file more
easily by the name of the hard disk or if you want to keep the
27
Personal Backup - Synchronization
older version, click the option corresponding to the hard disk
or select the icon indicating the direction of the
synchronization.
- Do not synchronize these files: If you prefer to keep both
versions of the file, select the icon or choose its corresponding
option.
- Copy and rename files: If you wish to synchronize both files
and wish to keep the original versions on both sides, choose
the option Copy and rename the files or select its
corresponding icon.
Personal Backup 2 will first copy each file to the other side
without synchronizing them. A new file will appear on both
sides named after the original file but with a suffix. Then the
two files will be synchronized.
- Add the file to the exceptions list: The last option proposes
not to synchronize the files and to add them to the exceptions
list. This implies they will never by synchronized.
• Item deleted on one side: If, since the last synchronization, an
item has been deleted on one side only, Personal Backup 2 will
display a dialog box with the name and location of the
remaining item and will propose to delete the item by default.
Important: If you add an item on one side of the synchronization and
this item has been backed up previously, Personal Backup 2 will not
consider this item as new but as an item whose corresponding item has
been deleted.
Hence, Personal Backup 2 proposes to delete the item by
default. Be sure to use the synchronization option instead.
- Remove the item: Personal Backup 2 proposes by default to
delete this type of item so that both sides of the
synchronization remain identical.
28
Personal Backup - Synchronization
- Keep the item, do not synchronize: If you prefer not to
synchronize and to keep the item where it is located, select
this option or its corresponding icon.
- Synchronize the item: If you prefer to synchronize the item,
select this option or its corresponding icon.
29
Personal Backup - List of scripts
LIST OF SCRIPTS
As soon as you have configured a script, it appears in the main
window of Personal Backup 2.
Personal Backup 2 displays a symbol on the right side of the
window indicating whether or not the script was executed
properly. Next to the symbol are indicated the date and time of
the last execution.
NOTIFICATIONS FROM PERSONAL BACKUP 2
Personal Backup 2 informs you of the execution of each script by
displaying an icon on the right of each script:
- A checkmark icon means that the script was run properly.
- An exclamation mark icon indicates that Personal Backup 2
encountered a problem during the last backup or
synchronization and that the script did not run properly. In
this case, we recommend you consult the log file, solve the
irregularity and run the script manually.
30
Personal Backup - List of scripts
Important: If the script did not execute properly, the date and time for
the script will show the date and time of the last successful execution,
not the date and time of the failed execution
MANAGING SCRIPTS
Several command buttons at the bottom of the window let you
manage the scripts:
• New: Click this button to create a new backup or
synchronization script.
• Edit: To modify a script, select it in the list and click on Edit… or
double-click the script.
• Duplicate: To duplicate a script, select it and click on Duplicate.
You can make changes such as destination or frequency of
execution. If a keyboard shortcut was attributed to run a script
instantly, the keyboard shortcut will be duplicated and will
apply to both scripts.
• Remove: To remove a script, select it from the list and click on
Remove.
• Backup: To perform a script immediately, select it and click the
button.
Note : The button displays Back up or Synchronize, depending on the
type of script you select. If you select several scripts of different types,
the button changes to a Perform button.
31
Personal Backup - List of scripts
LOG FILE
The log file is a dialog box in which you can find information
concerning the execution of the scripts. It displays the start and
completion time of each script, and a list of irregularities, if any,
encountered during script execution.
• Clear: This button lets you clear the log file to prevent
overstorage.
• Save as…: This option lets you save the log file under a different
name before clearing it. The file is created in a text format. You
can also access and print the log file in the Personal Backup 2
folder (located in the System Folder).
32
Personal Backup - Keystroke Recorder
KEYSTROKE RECORDER
The Keystroke Recorder function creates a file per day in which
it stores everything you type. It prevents loss of data even when
a nasty system error destroys your open files. All typed data can
be recovered by a copy and paste from a text file. A special
option allows you to protect the recorded file by encryption.
To access the Keystroke Recorder function, select this option in
the Personal Backup 2 local menu.
33
Personal Backup - Keystroke Recorder
RECORD
Keystroke Recorder comes with standard parameters and is
immediately operational when Personal Backup 2 is activated
and the ON/OFF switch is set to ON. Keystroke Recorder
creates a file per day in which it stores several data:
Keystroke Recorder shows the names of the
applications used during the work session.
A carriage return in the Keystroke
file stands for a backspace typed
in the original document.
The default name of a Keystroke
file is its creation date.
Keystroke Recorder shows the
names of the windows opened
during the work session.
You can change the standard parameters as follows:
• RECORD: By default, Keystroke Recorder stores every 40
keystrokes you type, and/or following 10 seconds of keyboard
inactivity. The recording is very fast and completely transparent
to the user (it will not interrupt or interfere with another activity
in the file). Click the up or down arrow to change the settings.
• APPLICATION NAMES: It may be easier for you to retrieve your
data if you record the names of the applications in which you
work.
• WINDOW NAMES: This option shows you the names of the
windows you opened during your working session (name of
opened documents, commands used, etc.).
• IN DIALOG BOXES: If you check this box, Keystroke Recorder will
register whatever you type in dialog boxes. However, dialog
boxes often contain information such as passwords, personal
access keys, etc.
34
Personal Backup - Keystroke Recorder
Important: If you use this option, we advise you to use the encryption option
in Keystroke Recorder (See page 36).
• DELETE KEYS: If you check this box, the Keystroke Recorder will
record each Backspace keystroke as a "‹" character and each
Delete keystroke as a "›" character, instead of adding new lines
to the file.
• DO NOT RECORD IN: This option lets you set up a list of
applications in which Keystroke Recorder will not register. Use
this function for utility software, paint applications, etc.
To define these applications:
1. Click the Applications… button.
A dialog box appears:
2. Click the Add application… button.
A directory dialog box appears.
Locate the application you want to add, select it and click the
Select button.
The name of the application appears in the window.
Note : To remove an application from Exceptions, select the
application and click the Remove button.
• KEEP FILES OF THE LAST…: Keystroke Recorder stores one file
per day on the hard disk. Prevent overstorage by choosing a
time limit after which Keystroke Recorder should delete its files.
35
Personal Backup - Keystroke Recorder
The standard parameter is 10 days. To modify, click the up or
down arrow.
ENCRYPTION
Keystroke Recorder offers you the possibility of automatically
encrypting its files. In that way, the Keystroke Recorder files can
only be opened after decrypting them using a password you
previously determined.
STARTING TO ENCRYPT
To encrypt the Keystroke Recorder files:
1. Click the Start… button.
A dialog box appears.:
2. Type in a password and click OK.
A new dialog box appears inviting you to confirm the password.
3. Retype the password and click OK.
From this point on, Keystroke Recorder will encrypt all the files
it creates (including the current file). Previously created files will
not be encrypted.
36
Personal Backup - Keystroke Recorder
Note : The Start… button will immediately change into a Stop…
button. If you want to disable the encrypt function, click the
Stop…button and enter your password.
MODIFYING A PASSWORD
To modify the password, proceed as follows:
1.
2.
3.
4.
Click the Password… button.
Type the current password and click OK.
Enter a new password and click OK.
Retype the new password and click OK.
Important: Use the old password to decrypt all files created before the
password was changed.
ACCESSING FILES CONTAINING YOUR DATA
• To access a file which has not been encrypted by Keystroke
Recorder:
1. Open the Keystroke Recorder ƒ folder located in the System
Folder.
2. Double-click the file you wish to open.
• To access a file which has been encrypted by Keystroke
Recorder:
1. Click the Decrypt…button.
A list with all encrypted Keystroke Recorder files appears:
37
Personal Backup - Keystroke Recorder
2. Select a file and click Decrypt…
Keystroke Recorder lets you save a copy of the encrypted file in
text format; the original encrypted file will not be modified.
As soon as you click the Decrypt button, a dialog box appears.
3. You can choose the name proposed by Keystroke Recorder or
type in another name. Choose a destination for the text file
and click the Save button.
A dialog box appears.
38
Personal Backup - Keystroke Recorder
4. Type the password and click OK
5. To open the file, close the Personal Backup 2 window, then go
to the file and double-click its icon. Once you have doubleclicked the icon, a SimpleText file appears.
39
Personal Backup - Keystroke Recorder
RECOVERING DATA
To recover data:
1. Select the data you wish to recover and choose the Copy
command in the Edit menu.
2. Quit SimpleText.
3. Open the application or file in which you want to paste the
data.
4. Select the Paste command in the Edit menu.
40