1
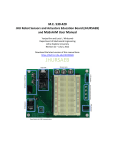
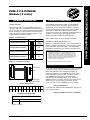
IHardware Installation
Software Installation
Jumper Setting
There are two slots on a single PCMCIA card drive.
You may install one to four PCMCIA card drives in your
PC. If more than one card is installed, jumpers need to
be set accordingly. These jumpers (JP1 and JP2) are
shown on the Host Interface Adapter in figure 1. The
Jumper settings are shown in table 1.
Table 1: Jumper Setting
The PCMCIA Card Drive includes a DOS PCMCIA
services software library CardSoft, manufactured by
SystemSoft. It also comes with CardView, a PCMCIA
control and maintenance utility for Microsoft Windows. It
works side-by-side with CardSoft, allowing you to
configure and control your PCMCIA cards easily while in
Windows. These functions are supported under
Windows '95 without CardSoft and CardView.
Note: Install card drive before installing software.
PCMCIA Card Drive
JP1&2
Slot No.
The 1st PCMCIA Card Drive
0,1
(Default)
The 2nd PCMCIA Card Drive
2,3
The 3rd PCMCIA Card Drive
4,5
The 4th PCMCIA Card Drive
6,7
Installation for DOS and Windows 3.1x
During the installation procedure, if one of the following
memory managers is detected, a warning screen similar
to the one shown below will appear. The appropriate
DEVICE line changes for your memory manager will be
displayed on the screen.
The CardSoft 3.1 Install Utility has detected the presence of the
EMM386 memory manager. In order for CardSoft 3.1 to function
properly, certain ranges of memory need to be excluded from this
memory manager. If you wish to ensure proper functionality of the
CardSoft 3.1 drivers we suggest you add the switch X=D000-DFFF.
After this installation is complete, please edit the line in your
CONFIG.SYS file to appear as below:
PCM-3115 PCMCIA Module (2 slots)
PCM-3115 PCMCIA
Module (2 slots)
Device=C:\DOS\EMM386.EXE NOEMS X=D000-DFFF
Figure 1: Location of Jumpers
(Press [ESC] to quit, any other key to continue
JP1 & JP2
If you see a screen similar to the one on the lower right
of page one, write down the displayed DEVICE line.
When the installation has completed remember to
change the setting in your CONFIG.SYS file to match
the line displayed on the screen. To edit or display
your CONFIG.SYS file type the command Edit
CONFIG.SYS at the DOS prompt. If you are using
EMM386 memory manager, look for a line similar to the
following (if you do not see any line similar to that
below, you are not using EMM386 on your system):
JP3
Active LED
Battery Low LED
JP3 Pin Assignment
device=emm386.exe
2
4
6
8
10
12
14
16
18
20
22
24
1
3
5
7
9
11
13
15
17
19
21
23
To exclude the address range D000-DFFF, change this
line as shown below:
device=emm386.exe noems x=d000-dfff
Enable/Disable Boot ROM
15-16 (JP3)
S
Enable
O
Disable (Default)
S=Short, O=Open
PCM-3115 User's Manual
PC/104 and the PC/104 logo are trademarks of the PC/104 Consortium
1
Part no. 2006115002 3rd Edition Printed in Taiwan April 1997
If you are using a memory manager other than those listed,
refer to the manual the you received with the memory
manager for instructions on how to exclude an address
range. The installation procedures are as follows:
1. Start your computer. Insert the CardSoft diskette into
drive A: or drive B:.
2. If you are a Windows user, start the Windows program.
Select File and the Run. Type A:\Install or B:\Install when
asked for a file name and press <Enter>. If you are a dos
user type Install at the appropriate DOS prompt (A:\ or B:\).
3. Follow the instructions that appear on the screen. If you
have questions regarding the installation procedure, refer to
the CardSoft User's Guide in the supplied diskette for
assistance.
4. If you are a Window's user you will likely want to install
CardView after the CardSoft installation. To install
CardView select File and Run from the main menu of the
program manager. Type A:\Setup or B:\Setup when
prompted to enter a filename. When the CardView program
appears, follow the on-screen instructions.
Additional software documentation is provided in three files
located in the \DOC directory.
CSUG-DOC.EXE----CardSoft User's Guide
CVUG-DOC.EXE----CardView User's Guide
CSTR-DOC.EXE----CardSoft Technical Reference
The above files will be decompressed to Windows Wordformat files when executed from within the DOS
environment. While may not need the additional information
provided in these files, they are provided for easy reference
should the need arise.
Installation for Window's '95
Window's '95 contains built-in support for this PCMCIA
Card Drive and does not require the supplied driver
diskette. The hardware still needs to be properly configured
following installation. Follow the steps below once you
have entered the Windows '95 environment.
1. At START/SETTINGS/CONTROL PANEL double click
on ADD NEW HARDWARE. An Add New Hardware
window will be displayed.
2. Double click on the PCMCIA socket. A Manufacturer's & Model window will be displayed. Double click on
PCIC or Compatible PCMCIA controller. A Resource
type and Setting window will be displayed.
3. Click on Next and then click Finish. A System
Settings Change window will appear.
4. Click Yes to reboot Windows '95. Installation is
finished.
Using PC cards
This section describes how to use your PC cards for
DOS and Windows 3.1x. For Windows '95, please refer to
the Windows '95 User's manual.
Before Using PC Cards
Before using your PC Card you should verify the
installation. Follow these steps to verify card setup:
Verify your CONFIG.SYS file:
After software installation your
CONFIG.SYS file will include
command lines shown at right.
Lines 5 to 9 and 12 to 13 are
included only when the supplied
software disk contains optional
Flash File System II (FFS2) or FTL.
To use a Flash card, FFS2
or FTL is required.
DEVICE=C:\Cardsoft\SSVADEM.EXE
DEVICE=C:\Cardsoft\CS.EXE
DEVICE=C:\Cardsoft\CSALLOC
DEVICE=C:\Cardsoft\ATADRV.EXE
DEVICE=C:\Cardsoft\MTAA.EXE
DEVICE=C:\Cardsoft\MTAB.EXE
DEVICE=C:\Cardsoft\MTI1.EXE
DEVICE=C:\Cardsoft\MTI2P.EXE
DEVICE=C:\Cardsoft\MTATM.EXE
DEVICE=C:\Cardsoft\MTSRAM.EXE
DEVICE=C:\Cardsoft\MTDDRV.EXE
DEVICE=C:\Cardsoft\SSMSFLSH.SYS
DEVICE=C:\Cardsoft\FTL.EXE
DEVICE=C:\Cardsoft\CARDID.EXE
Make Certain CardSoft has been loaded successfully:
After verifying the CONFIG.SYS file, reboot the system.
Verify that there are no errors due to loading the drivers.
Check System Resources: A CSALLOC Utility scans the
system for available memory (MEM), I/O ports (IOP), and
Interrupt Request Lines (IRQ). To check for available
resources type CSALLOC /d at the DOS prompt and press
<Enter>. A list similar to the following will be displayed.
MEM=D000-DFFF
IO=108-1EF, 1F8-377, 380-3EF, 970-977, B70-B77
IRQ=3, 5, A-C, E, F
None of the 3 lines above can be absent!
Card Insertion and System Beeps
When you insert a card your system emits a beep code to
let you know whether or not the CardSoft software was
successful in recognizing and configuring the card. The
beep codes are as follows:
Medium tone followed by high tone beep: The PC card was
recognized and properly configured when inserted.
Single low tone beep: The PC card was recognized but not
successfully configured when inserted. When you hear a single
low tone it indicates that the card will not work. Please refer to
Trouble Shooting for further assistance.
When you remove a card you should hear a high tone followed by a
medium tone. This indicates that CardSoft has recognized the
removal of the card.
2
PCM-3115 User's Manual
Using ATA cards
Using LAN cards
letters are reserved to specify ATA cards. You can find out
which letters have been reserved for your ATA cards by
using CARDINFO. To do so, insert the ATA card into a
PCMCIA slot. Then, from the C:\cardsoft directory type
CARDINFO /V and press <Enter>. A list similar to the
following will be displayed:
If your LAN card was recognized but not properly
configured (single low tone beep), you may use a client
driver to configure your LAN card. Consult the vendor's
driver guide for instructions on how to configure. When
your LAN card has been configured (two beeps), from the
CardSoft directory type CARDINFO /V and press
<Enter>. A list similar to the following will be displayed:
Slot 0:
[Card Information]
Card Type="ATA Disk" (Drive D:) çDrive letter is listed here
Manufacturer=<Vendor Name>
Product Name=<Vendor Product Name>
If necessary, you can use the DOS FORMAT command to
format your ATA cards. All standard DOS commands will
work with your ATA cards.
Using SRAM cards
At system startup, a series of messages scroll across the
screen as different software and hardware drivers are
automatically installed. One of these messages tells you
which drive letter is the first that will be assigned to your
SRAM cards. You can press the PAUSE key to stop the
messages from scrolling. To continue the system startup
press the PRINT SCREEN key. Press the PAUSE and
PRINT SCREEN keys alternately until you see the following
message:
Microsoft CardDRV for CardSoft Card Services Version 0.01.08 (26 April 1994)
Copyright (C) Microsoft Corporation 1989-1993. All rights reserved.
Card Services Interface Copyright 1993-1994 SystemSoft Corp. All rights reserved.
The Device Driver system installed 02 drive(s): D: - E:
In the above example, drives D and E are already installed
in the system. Drive letter F is reserved for slot 0 and drive
letter G is reserved for slot 1. If necessary you can use
these drive letters and the DOS FORMAT command to
format your SRAM cards.
For Windows95 environment please add
DDEVICE=C:\WINDOWS\SYSTEM\CSMAPPER.SYS
DEVICE=C:\WINDOWS\SYSTEM\CARDDRV.EXE
to CONFIG.SYS (Windows95)
Using FLASH cards
For using Flash cards, an optional Flash File System II or
FTL is required. Refer to the section Before Using PC
cards/ Verify your CONFIG.SYS file in this user's guide.
The drive letters assigned to Flash cards are the same as
those reserved for SRAM cards. To format your Flash
cards run the utility MCFORMAT. A function manual will be
displayed. The Erase and Create and Format functions
should be the only functions required. First erase and then
format. For Intel compatible Flash cards formatted as FTL,
all DOS commands will work with the PCM-3115.
For Windows95 environment please formatted as FFS2,
and add
DEVICE=C:\WINDOWS\SYSTEM\CSMAPPER.SYS
DEVICE=C:\WINDOWS\SYSTEM\CARDDRV.EXE
DEVICE=C:\WINDOWS\SYSTEM\SSMSFLSH.SYS
to CONFIG.SYS (Windows95)
copy SSMSFLSH.SYS (PCMCIA Software Drive)
to C:\WINDOWS\SYSTEM
PCM-3115 User's Manual
Slot 0:
[Card Information]
Card Type="Ethernet"
Manufacturer=<Vendor Name>
Product Name=<Vendor Product Name>
[Configuration Info]
necessary for running Network software
Configuring client handle is A65C
Memory +I/O interface, Vcc 50, Vpp1 50, Vpp2 50
Config base 0100, Config value:
Option value: 60
Status value: 00
Copy value: 00
First I/O range 300-30F, 8-bit ç
Second I/O range 310-31F, 16-bit ç
Assigned IRQ is 5 (enabled) ç
After being configured your LAN card functions like an ISA
Bus LAN adapter with a specified I/O range and IRQ set by
jumper. In the above example, your Ethernet card is
configured with two I/O ranges (300-30F & 310-31F) and an
IRQ setting of 5. The I/O range and IRQ assignment of your
network software must agree with these configurations or it
will not function properly.
Using FAX/MODEM cards
Confirm that your FAX/MODEM card was recognized and
properly configured (two beeps). From the CardSoft
directory type CARDINFO /V and press <Enter>. A list
similar to the following will be displayed:
Slot 0:
[Card Information]
Card Type="Modem" (COM3) ç
Manufacturer=<Vendor Name>
Product Name=<Vendor Product Name>
[Configuration Info]
Configuring client handle is A5B7
Memory +I/O interface, Vcc 50, Vpp1 50, Vpp2 50
Config base 0100, Config value:
Option value: 62
Status value: 08
I/O range 3E8-3EF, 8-bit
Assigned IRQ is 5 (enabled) ç
In the example above your Fax/Modem card is configured
to COM 3 and IRQ 5. The COM port and IRQ assignment
of your communication software, such as Bit/COM, etc.,
must agree with this configuration in order for the device to
function properly. Normally your PC has resident COM
ports and IRQ for devices such as a mouse. The
standard configurations are COM1/IRQ4 and COM2/
IRQ3. CardSoft avoids configuring your Fax/Modem to
these settings so as to avoid conflicts with other devices.
3
Trouble Shooting
Installation
If you see a window like that below during
installation, the installation has failed. This
screen will appear if the Host Interface adapter is
not correctly installed, the jumper setting is not a
default value, the default value (I/O address) is
used by another adapter card, or your Host
Interface adapter is defective.
Intel 82365SL Socket Services
Databook Socket Services
Cirrus Socket Services
Vadem Socket Services
VLSI Socket Services
Intel 82365LP Socket Services
IBM 720 Socket Services
VIA VT83C465/469 Socket Services
Not Install Socket Services
During system bootup if you see the following
message there is a conflict with software other
than CardSoft or the Host Interface adapter is
defective.
***Installation failed: VT83C469 PCMCIA adapter not
found
ATA card
2 beeps, DIR error:
Your ATA card may not have been formatted.
Please format now.
2 beeps, can't format:
Your ATA card may not have been partitioned.
Use the ATAINIT command from the CardSoft
DIR. For more information refer to Ch. 3 of the
CardSoft user's guide.
2 beeps, can't partition:
Your ATA card may be defective.
1 beep:
CardSoft does not support your ATA card or your
ATA card is defective.
FAX/MODEM card
2 beeps, no configured COM port:
There may be four resident COM ports in your PC. Consult
your PC's user manual for instructions on disabling a COM
port.
2 beeps, no configured IRQ:
Please refer to the section Using CSALLOC in chapter 2 of
the CardSoft user's guide.
2 beeps, configuration settings don't suit software:
Please refer to the sections Using CSALLOC and Using the
Configuration Utility in chapter 2 of the CardSoft user's
guide.
2 beeps, configuration settings suit software, but
software does not function properly:
The current configuration may conflict with other devices
being used by your PC. Please refer to the sections Using
CSALLOC (Ch. 2) and Customizing Your System (Ch. 5) in
the CardSoft user's guide.
1 beep:
Your Fax/Modem card is defective or CardSoft is not
correctly installed. Refer to the section Before Using PC
cards in this user's guide.
LAN card
2 beeps, no configured I/O range or IRQ setting:
Please refer to Using CSALLOC in chapter 2 of the
CardSoft user's guide.
2 beeps, configuration settings don't suit software:
Please refer to Using CSALLOC (Ch. 2) and Customizing
Your System (Ch. 5) of the CardSoft user's guide.
2 beeps, configuration settings suit software, but
software does not function properly:
The current configuration may conflict with other devices
being used by your PC. Please refer to the sections Using
CSALLOC (Ch. 2) and Customizing Your System (Ch. 5) in
the CardSoft user's guide.
Configuration of the LAN card's client driver fails:
Please refer to the sections Using CSALLOC (Ch. 2) and
Customizing Your System (Ch. 5) in the CardSoft user's
guide. Check to see if there is a system resource for the
client driver to configure your LAN card.
Other cards
SRAM card
2 beeps, DIR error:
Your SRAM card may not have been formatted or the
CardSoft installation is incorrect.
2 beeps, can't format:
Your SRAM card is defective or the CardSoft installation is
incorrect.
1 beep:
Your SRAM card is defective or the CardSoft installation is
incorrect.
Refer to the instructions provided for trouble shooting of
LAN cards.
NOTE: For those who need special utilities for Reading/
Writing memory cards (SRAM or FLASH) or more
information about booting from memory cards, please
refer to the README.TXT file located in the \Utility
subdirectory on the supplied diskette.
FLASH card
2 beeps, DIR error:
Your FLASH card may not have been formatted or the
CardSoft installation is incorrect.
2 beeps, can't format:
Your FLASH card is defective or the CardSoft installation is
incorrect.
1 beep:
FLASH memory chip on your FLASH card is not supported
by CardSoft, your FLASH card is defective or CardSoft is
not correctly installed. CardSoft supports FLASH cards
which are built with INTEL series 1 (or compatible), INTEL
series 2, AMD type A, AMD type B or AMTEL Flash
memory.
4
PCM-3115 User's Manual